If you like sharing your photographs online, whether on Facebook or on your own blog, you should learn how to properly resize your images in Photoshop. While your camera can take very high resolution photographs, it is always a good idea to down-size or “down-sample” those images, not only because most websites won’t accept large images, but also because making those images smaller will actually make them look better, if done correctly. In this quick tutorial, I will show you the proper way to resize images in Photoshop. I have seen people employ all kinds of different techniques when it comes to resizing images in Photoshop. The below method is how I personally do it and it has been working great for me, at least based on your feedback. You can employ this technique to any photograph – whether it is a portrait or a sweeping landscape.
When I wrote about the benefits of a high-resolution sensor, I used the word “down-sampling” when talking about reducing noise and increasing sharpness in high-resolution images. Right after I posted the article, I got plenty of questions from our readers, asking about what the down-sampling process is like and how it can be done. I then realized that many photographers are used to the term “resizing” and have never heard of the term “down-sampling” before. I often use the word “down-sampling”, because “resizing” applies to both increasing and decreasing image resolution (and hence its size), while “down-sampling” only applies to reducing an image.
1) Why Resize / Down-Sample Images?
Why would you want to resize an image? Your camera is a very advanced tool and it contains millions of pixels. This is good if you want to print your images, but what if you want to share those photographs online? Many websites won’t even let you upload high resolution images, while others like Facebook will down-size them for you, automatically lowering the resolution and quality of those photographs. Because this automated photo reduction process is often not optimized for best quality, it can make your resized photo appear soft and might even result in loss of colors. To prevent that, it is always a good idea to properly resize your images before you use them online. This way, you are in full control of how your photo should look.
2) The image resizing workflow
Once again, there are many different ways to down-sample images. Here is the workflow I personally use for my Photographs:
- Import images into Lightroom
- Make necessary adjustments to the image I want to resize
- Open the image in Photoshop
- Clean up the image (sensor dust specks, unwanted objects, etc) using spot healing and other tools
- Do additional image adjustments like contrast boost, dodge and burn, levels and curves, etc
- Run a single pass of noise reduction (only applies if there is visible noise at 100%)
- Run a single pass of sharpening at 50-75% (Unsharp Mask) – this step is only needed if you will be using the high resolution image for print
- Down-sample the image to target resolution (target resolution is typically 1024 pixels wide for horizontals and 500 pixels wide for verticals)
- Run another pass of sharpening at 25-50% (Unsharp Mask)
- Export the image in sRGB color profile
The process might seem complex, but it is actually not. I do not do this with every image – only the images I want to showcase (like when publishing wallpapers, etc). Everything else gets processed very simply, by just exporting directly from Lightroom.
3) The image resizing process
- First, let’s open our photograph in Photoshop by going to File->Open and selecting the photograph we want to edit:
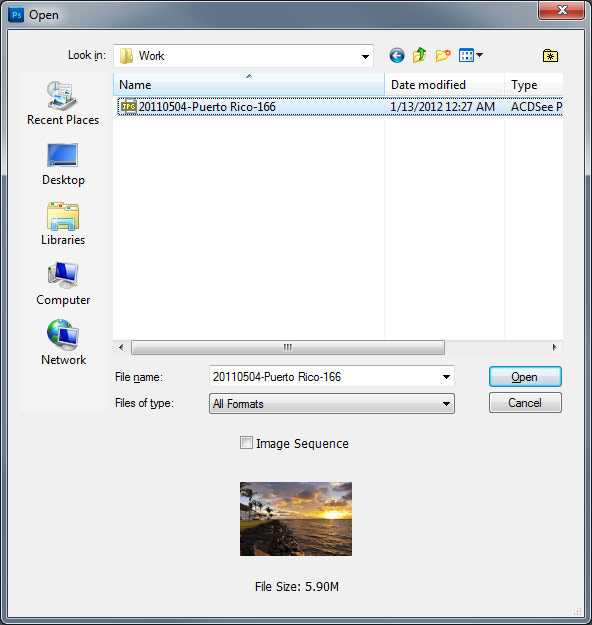
Make sure to pick the full resolution file, not a previously resized version. If you use Lightroom, simply right click on the target image and then select Edit->Open in Photoshop. I am assuming that you have already worked on your photograph and adjusted its exposure, levels, saturation, etc. (Camera RAW or Lightroom). Always make sure to edit problem areas in full resolution, so either do it using Lightroom’s built-in tools or in Photoshop. I prefer the latter when I know that I will be working in Photoshop.
- Once the full resolution image is edited, run a single pass of noise reduction. I prefer a selective noise reduction process that only cleans up noise in problem areas. If you do not know how to properly reduce noise, see my Noise Reduction Tutorial. I prefer to use commercial tools like Nik Software Dfine for selective noise reduction, because they do it much cleaner and give the best results. If you do not have a commercial tool for this, use Lightroom’s built-in noise reduction tool, I find it to work better than Photoshop’s “Reduce Noise” filter. Here is a screenshot of Nik Software Dfine reducing noise:
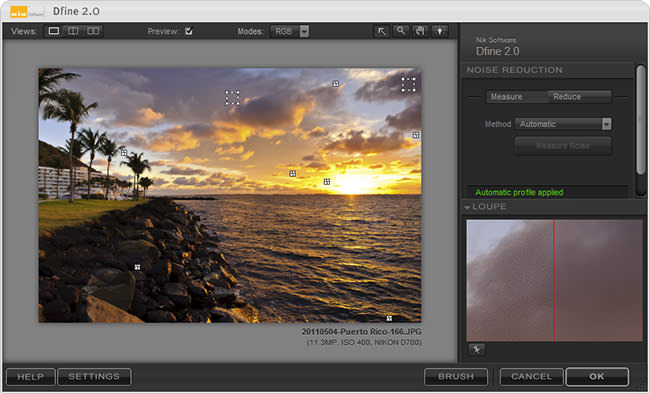
The purpose is to reduce noise in the sky and other affected areas of the image.
- This step is only needed if you plan to keep the original image in full resolution for print. There is no practical reason to sharpen an image before you down-scale it (big thanks to Mark for correcting me). If your purpose is only to publish an image to the web, then skip this step completely.
Make sure to apply a good sharpening technique to your high-resolution image. While commercial tools are great for this step, Photoshop’s built-in filters like “Unsharp Mask” and “Smart Sharpen” work great too. Here I am using 75% sharpening with 1 pixel radius:
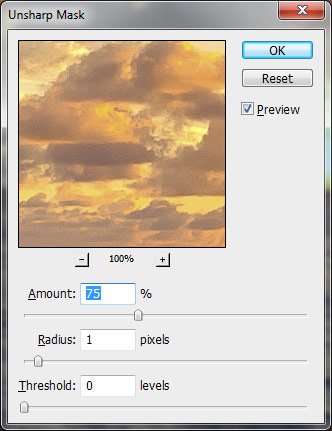
Again, there are many different ways to sharpen images. If you prefer to sharpen in Lightroom, see my “how to sharpen images in Lightroom” article.
- Now we are at a very important step – we will be down-sampling the image to lower the image resolution. To accomplish this, go to Image->Image Size and you will be presented with the following dialog:
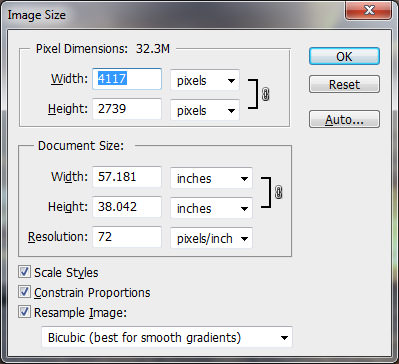
At this point, you have to select the target resolution. I personally export 1024 pixels wide, but you might need to export in smaller or larger sizes (depending on what you want to do with it). Make sure to check “Constrain Proportions” on the bottom. Now type the target pixel size in the “Width” input with “pixels” selected next to it. As you type the width, you will see that the height will automatically adjust to a smaller number. For me, Photoshop automatically picked “681”, as seen below:
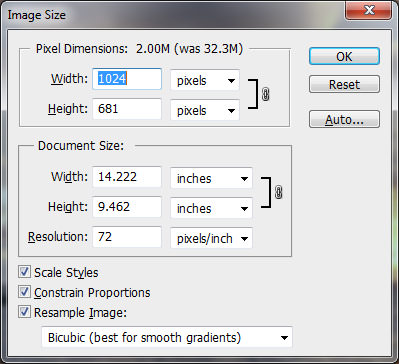
The next big task is to select a resampling method. On the very bottom of the screen you should see a dropbox with the following choices: Nearest Neighbor, Bilinear, Bicubic, Bicubic Smoother and Bicubic Sharper. I personally favor the “Bicubic (best for smooth gradients)” one, because it does a great job in reducing noise without sharpening the image (which we have already done). Occasionally I use “Bicubic Sharper” for some images, but “Bicubic” is my preference. Click OK after you are done making your choice.
- Now the image is much smaller in size. Noise should be completely gone as well (assuming it was not too noisy to start with), thanks to the Bicubic down-sampling method that we have used in the previous step. Now it is time to sharpen the image a little more, which will be the final step of the process before we extract it. Once again, either use a good selective sharpening process, or Photoshop’s “Unsharp Mask” as I have:
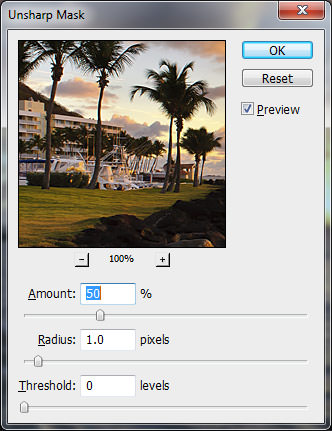
Remember, this is your final step to make your image look good, so be very careful in sharpening it. Pick an are of the image with the most detail and play with the sharpening “Amount”. I set mine on “50%” and it was plenty to bring out the detail I want. I could do “75%” with a 1 pixel radius and still get a good result though, so the range of 50%-75% seems to work great for this particular image. Every photo is different though, so you might find yourself using between 25-75%. Make sure not to over-sharpen the image!
- The final step is to extract the image for the web. Do not simply use the “Save” function – it will create a huge file that is not appropriate for the web. Instead, go to File->Save for Web & Devices. A screen will come up, as shown below:
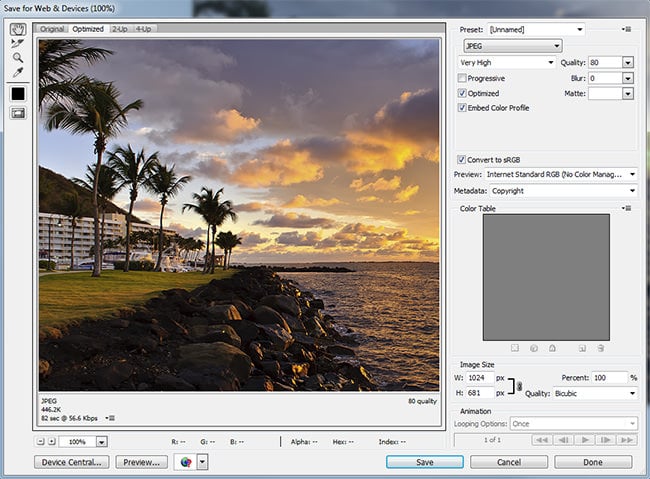
This screen is very important, because it controls the format, resolution and other important things that will be embedded to your image. First, select JPEG as the format. I typically set my Quality to “80%”, which is a good target for photographs. I find that anything lower than 70% visibly degrades image quality and anything above 80% is an overkill for the web. Make sure that both “Optimized” and “Embed Color Profile” are checked. Blur should be at 0 and Matte does not matter (white by default). Next, make sure to check “Convert to sRGB” – you need this so that the colors in your photos are displayed correctly. I also often leave my “Copyright” metadata. Click Save, pick a location where you want to save the final image, give it a name, then click Save again.
I have been asked a lot about the PPI (pixels per inch) setting that I use on my web photos. Whether you use Lightroom, Photoshop or any other image processing software, the value you use for PPI does not matter. You can leave it at whatever value (I believe 72 is default) and you don’t need to change anything. The PPI value is only important for print – changing it while exporting images for the web will only add metadata to the file and will have no impact on how it is actually displayed on a monitor.
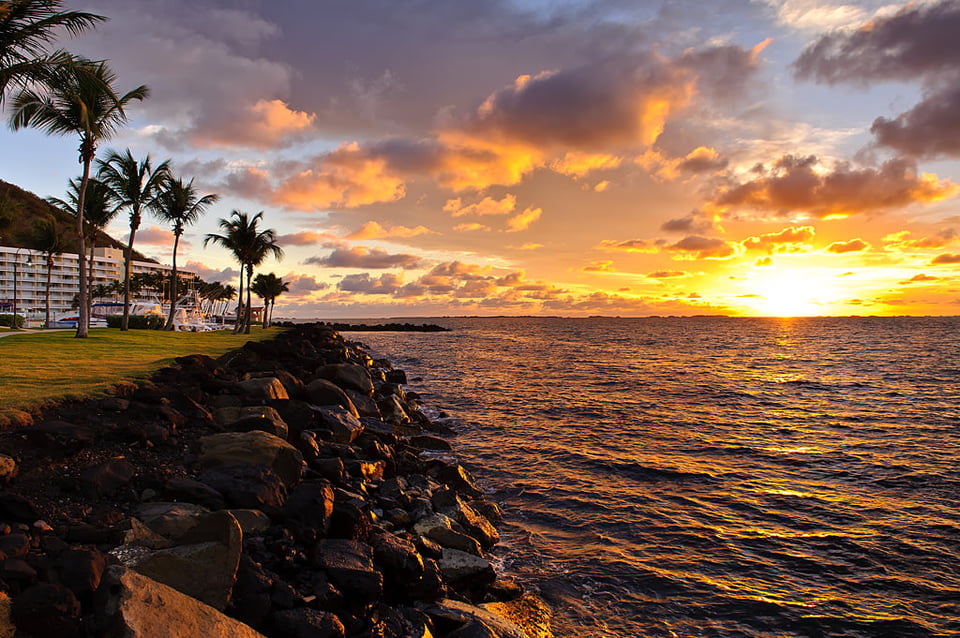
That’s it! Here is my final image processed with the above steps:
And here is another image that was processed the same way:
My next tutorial will be on resizing and optimizing images for Facebook. For those who use Lightroom, I will post a separate article on the best way to resize images in Lightroom.
I enjoyed reading the article, but I have to say this is more confusing than enlightening.
In my opinion, the difference between ppi and dpi is just a semantic one. Let me explain:
I think many people, including the author, confuse resolution with pixel count. My camera, a Nikon D750, has a sensor of 35.9 x 24 mm, with a pixel count of 6,016 x 4,016 pixels. So, the resolution of this camera is a whopping 4,256 ppi horizontally and 4,250 ppi vertically. This tiny discrepancy, I believe, comes from the inaccuracies associated with the conversion from mm to inches.
Obviously, nobody wants to print anything at 36 x 24 mm, and nobody wants to view pictures on their monitors at that size either. So, in order to end up with reasonable print sizes, the photo has to be enlarged, while the resolution necessarily has to come down. The key parameter here is viewing distance. For ordinary photos viewed from up to 2 ft, 300 dpi is considered to be sufficient, while huge billboards viewed from 33 ft away, you get away with much less, for instance 20 dpi.
Coming back to the photos generated by my camera, at a print resolution of 300 dpi, this results in an image of 20.05 x 13.39 in. When I zoom in to 100% view in Photoshop CS5, one inch on my 27″ iMac gets blown up to ~2.75 inches, when measured with a real ruler. This is because I have set the screen of my iMac to 2,560 x 1,440 pixels, which translates to a screen resolution of 110 ppi (300 divided by 110 equals 2.73). Obviously, that makes no sense really, because digital noise and other artefacts become much more obvious. And if I decrease the resolution of my photo to 110 ppi while checking the option “Resample Image”, the pixel count decreases from the original 6,016 x 4,016 to 2,206 x 1,473 pixels, while the print size remains unchanged. However, now in the ruler above the photo on my display, one inch equals exactly one inch on my physical ruler. And as far as I can tell, the picture in 100% view looks much better than it was with the 300 ppi.
So when it comes to saving photos for the web, it makes sense to pay attention to the resolution of the display. Granted, many people may still be using monitors at 72 ppi or 96 ppi, and if I wanted to, I could set my iMac display to 5,120 x 2,880 pixels = 220 ppi, but then everything else looks tiny. And lastly, no two photosharing websites are the same. Some, as many here have pointed out, limit the size, while others do not. For instance, I’m very active on www.deviantArt.com, and they allow to display images in their original size. So it is even more complicated.
To summarize:
Stick to 300 dpi for printing regular photos up to 19 x 13 inches.
If you want to print posters or billboards you can increase the image size while reducing the resolution.
For posting pictures on the web, use your monitor resolution as a guideline and pay attention to the rules of the website.
I am a novice. I want to self publish a book using my own photo on the cover. I have no idea what number of ppi I need but I want the printed photo to be 3 inches tall and 2 inches wide. Do I use your above instruction except change inches for width and height and let the photoshop soft ware take over?
Thanks
Frank
Thank you for this information – i didn’t know so much was involved in the process! My question is this – will this process enable me to enlarge a digital and print a high quality digital photo as follows? If so, how would you suggest i manipulate original file?
Original resolution of 736 x 890, 96 DPI, 24 bit depth
Enlarging for print to approximate size of: 12600 x 17400 (42″ x 58″)?
Thanks so much!
I think the picture is over-sharpened. My eyes are always drawn to examining the quality of edges, and I notice halos and chromatic aberations. Perhaps the picture can be seen as safeguarded against a second downsampling if displayed in a smaller window by the web browser. The water and the rocks look satisfactory. I would go over the horizon and trees with a history brush to remove the excess sharpness from there.
The trees and the building look better if I flip the picture horizontally. I have a conventional screen with primary colors ordered R-G-B. It almost looks like the picture was prepared with sub-pixel aware resizing (discussed on Image Magick forums). Aberations or shifted colors from a flatbed scanner should not be so visible in a downscaled image, but maybe they were brought out by the sharpening.
Basic Bicubic (neither sharper, nor smoother) is best for avoiding overshooting halos around contrasting edges. I’m not sure why smoother is worse, as it should be the opposite.
It is also possible to resize image online using
Thanks for your site! Makes me want to go out on a photo shoot.
I’m trying to publish a wallpaper app. I’ve been using 800 x 1070 images but they don’t fill the screen on some phones. I tried using Photoshop Image Processor to resize them to double the size, 1600 x 2140, which is incredibly fast and easy, but the images increase in memory size dramatically. (From 140 kb to 1500 kb, for example). Do you know why the memory size would increase so dramatically and what would you suggest for acceptable resolution/size to use a little memory as possible? This would also be helpful to photographers who publish their work online. Larger images mean longer download time. Longer download time means more site abandonments and lower conversions. The best sites are the fastest sites.
What “Quality” setting would you recommend in the Photoshop resizing process and would you still recommend converting to sRGB if the image was created in Illustrator CMYK?
Anything you can share would be helpful! Thank you!
Thank you for your tutorial.
Alow me to ask you for some tips “how To Resize An Image ( label disk) In Photoshop And Keep It Sharp and quality ” .Exactly how to resize an image to an expanded, larger image. The final goal is to resize (expand a smaller label image ) to create the right label for printing it on bluray disk.
Thank you in advance for your help and understanding. If this topic is already explayned please post a link for it.
Thank you!! This is fantastic – just what I was looking for! I was doing many of the steps, but not enough. Can’t wait to try it.
Hi ..i take images using a microscope i want to be able to enlarge those images to wall size canvas’s..at least 1900×1500..i am not very ‘literate’ when it comes to resolution and pixels and all that..I am trying to learn and read as much as i can online to try and understand it..!..are you able to tell me if its possible to resize or do something to my images in photoshop to then enable me to enlarge them to big scale wall art?..any help or suggestions greatly appreciated..
Nice, but it doesn’t explain how i, essentially, need to create a whole new image by taking a “landscape” shot and turn it into a “portrait” shot and still keep the integrity of the original shot. Example: I’ve a shot by our bass player’s wife on a cheap Kodak digital that by default gave us a 10.xx by 8 image from which I want to make a standard letter size poster. (10×8 landscape to 8.5×11 portrait.) resizing makes it all “pixelly” and I can’t have that.
Hi, I don’t think sharpening works that way. There is no magical method to replace details that your cheap kodak failed to capture. You can try reducing the PPI value when you crop to 8.5×11, but that will probably lead to a blurry print too.