As the number of photos taken each year continues to increase at a nearly exponential rate, infrared photography remains a relatively small niche in the photography world, one that allows us to see and capture the world in a unique manner. Because of my infrared articles and photos, I often receive emails from others struggling to achieve good IR processing results, sometimes even from our illustrious leader. ;) Recently, I received a spate of questions regarding my technique and seeking assistance. I thought that sharing a detailed example of my workflow might be helpful for those of you who have an interest in this style of photography and are looking for some tips and pointers.

Table of Contents
1) Factors Impacting Infrared Images
Two of the main questions I receive are, “What is wrong with my IR image?” and “Why don’t my IR photos look anything like your photos?” Occasionally, people will email their photos and ask me to help determine why their results didn’t turn out as they had hoped they would. Providing an accurate answer can be often be tricky, since a variety of factors can impact the results:
- The amount of IR light
- The camera’s sensor
- The specific lens
- The wavelength of the IR filter
- The manufacturer of the IR filter
- Whether you shoot RAW or JPEG
- How the camera processes RAW or JPEG files
- The white balance used at the outset of the IR workflow
- The steps taken in the IR workflow
- Updated: For those of you using an IR filter on your lens, the type and strength of the IR cut filter, which blocks most IR light from reaching the sensor, will influence the overall exposure time
- The steps taken in the IR workflow
Changing any variable will likely change the results. Changing lenses can often require a modification to your white balance and other exposure settings. There are no rigid standards for IR filters, so a 720nm filter from one manufacturer may produce slightly different results than one from another manufacturer, even with the other factors remaining the same. Traditional camera sensors are sensitive to IR light, but not by design. I think of it as an added benefit of digital cameras, and hope that as camera sensors evolve, they continue to be capable of capturing IR light. Unfortunately, camera manufacturers do not share any IR-related lens data with IR enthusiasts. I have called some of the lens manufacturers in the past to inquire about the IR performance of their lenses, but never found anyone who could answer my questions. I wish camera manufacturers would publish such data. IR photography, however, does not seem to be a priority for them.
Thus, if you want to understand whether a specific camera lens will work well for IR, you need to check the websites of the IR conversion companies or general photography websites that also maintain such information. A while back, Nasim began to list the suitability of each lens for IR purposes, so you can always check our site if you want to know if a given lens will perform well. You can also reach out to other IR photographers who post their work on flickr or 500px and inquire about their experience with a particular lens. Some lenses may work wonderfully in visible light, but be terrible for IR use, the main reason being hot spots (a not-so-subtle bright spot in the center of the image).
2) Shooting
As I have explained in other articles, I use a Nikon D7100, which as been converted by Kolari Vision, a 720nm IR filter, and a Nikon 16-85mm lens. I occasionally use other lenses, but the 16-85mm provides a perfect focal length range for just about any IR opportunity and handles IR light exceptionally well. I shoot RAW, using a custom white balance. For most scenes, I rely on Matrix metering. But because I pull my images into Lightroom, the custom white balance does not really serve a function apart from providing a more pleasing cocoa/beige and white IR image on the back of my D7100’s LCD, rather than the usual red/pink IR colors.
As with my D810, I primarily shoot in Manual Mode, let the ISO float, and keep the LCD display on RGB Highlights mode. F/5.6 and F/8 are my most used apertures. Since most of the IR photography takes place on sunny days, I can usually shoot at shutter speeds more than sufficient for crisp images and use low ISO values. My D7100 does an excellent job of metering IR scenes. Occasionally, a specific scene can confuse the camera’s metering system. Under such circumstances, I will make minor adjustments via the Exposure Compensation control – normally a +/-3 or 7. I almost always carry a gray card with me so I can get a white balance reference.
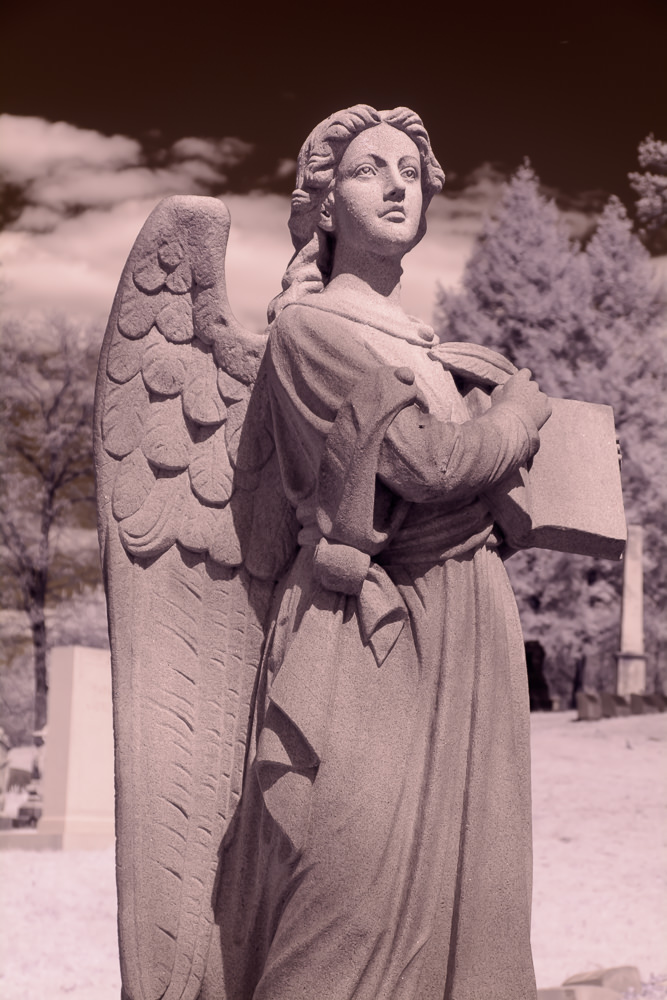
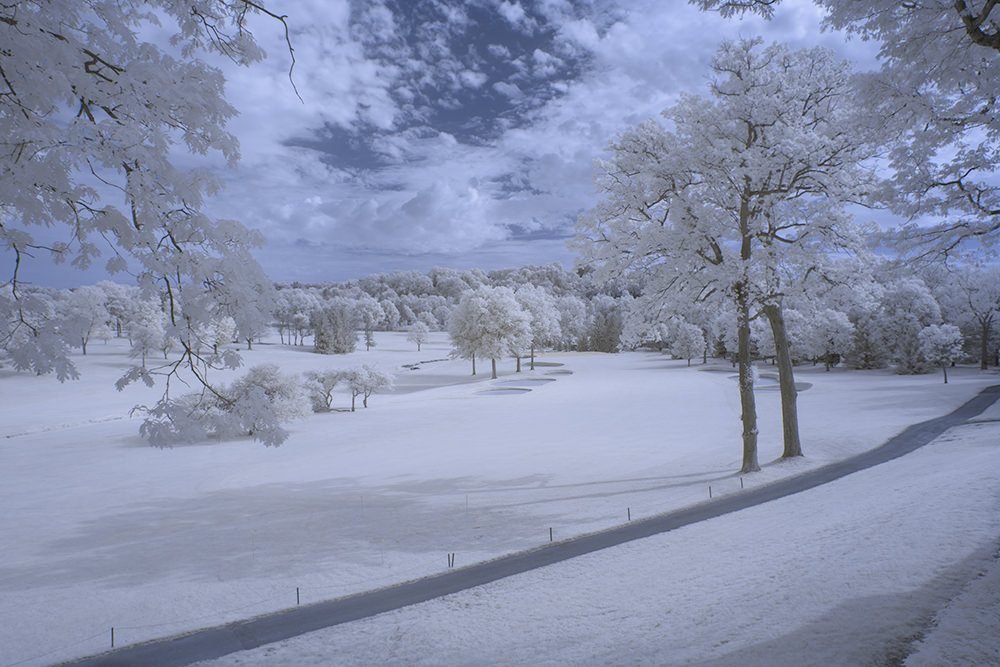
Once you have experimented with IR photography for a while, you will find that you can easily spot conditions conducive to good IR photography. You also become adept at imagining how well what you see on the back of your camera’s LCD will translate into a finished IR photo. I wish I could explain in words how to acquire such skills, but alas, it is simply something that you learn from experience. The presence of clouds is an important component for IR landscapes, since they add drama and character to the skies. And normal vegetation, which may look rather bland and boring in the middle of a hot summer day, when the sun is directly overhead and visible light photography is nearly impossible, lights up using an infrared-enabled camera, appearing bright white or slightly yellow. Depending on the subject, colors will often appear very different than their visible counterparts. Certain types of dark clothing can appear to be white or light blue based on the material.
2) Software Used
I use the software products below in my IR workflow. Photoshop’s Channel Mixer makes it a must-have for IR processing. I understand that Gimp also features a Channel Mixer functionality so this may be an option for those of you who don’t wish to purchase or subscribe to Photoshop. I have never tried it, but I understand it is useful. Many IR aficionados would love to see Adobe add a Channel Mixer capability to Lightroom. But for the lack of the Channel Mixer, all IR processing could potentially be done within Lightroom (Adobe?). Some people also claim that they have had some success making Hue Adjustments in CaptureNX, Photoshops Elements, or Nik Viveza can achieve similar results, but note that these other techniques don’t offer as much flexibility as Photoshop’s Channel Mixer.
- Lightroom
- Photoshop CS6
- Silver EFEX Plugin for Photoshop (structure or clarity)
- Topaz DeNoise
- Topaz InFocus (sharpening)
I have used a Adobe Custom DNG Profile Tool. I processed two photos, one using the custom DNG profile for my infrared D7100 and the other using the technique below. I did not notice any appreciable differences between the final photos. Then again, I only tried it on a few different IR photos. Now that I have created it, I can easily check its results against my current technique. If you wish to experiment with custom DNG profiles, you can check out some videos and articles online on how to do it. The custom DNG profile does have one main advantage – it allows you to move the white balance sliders of Temperature and Tint past the current limitations of 2000 and 150 respectively, and thus provide additional latitude in processing IR photos. I have to experiment more with this feature to determine how and under what conditions it may be useful.
3) IR Workflow
3.1) Import Into Lightroom
I import my DNG or NEF files into Lightroom 6 using a custom preset. This gets me within the “ballpark” relative to the proper white balance and exposure settings. Don’t be disappointed if the settings I list do not work as well for your specific IR camera configuration. You need to experiment and discover what works best for your images based on your specific equipment. Under the Camera Calibration section of Lightroom, I use “Camera Portrait,” since I don’t want Lightroom making any significant changes to the photo, as I would rather these be made in Photoshop, after I have performed the color swapping operation, and seen the resultant image.
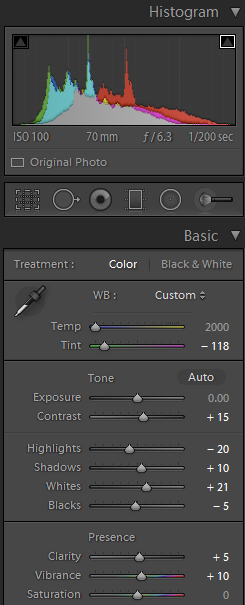
The photo now looks like the one below. I will then check the white balance of a picture that I took with my gray card, and determine what, if any, adjustments I wish to make. They are often minimal. Getting the white balance correct is critical, and is usually where people go wrong. It can be tricky without some form of standard or guide. Changes in white balance settings don’t appear to be very different when you view the pinkish/red image in Lightroom or Camera Raw. But such differences can significantly alter the results once you perform the Channel Mixer swapping routine described below. If you get the white balance wrong, you will likely see it in the white/yellow portions of your photos, as they may look rather dull.
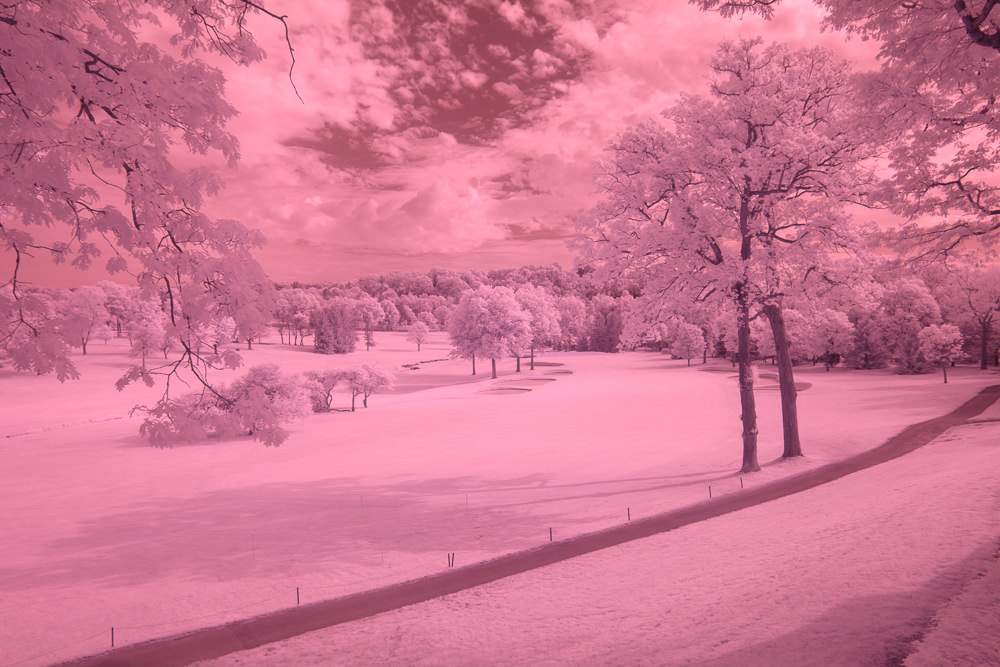
The photo looks pretty pink and bland, which is characteristic of most IR photos prior to processing.
3.2) Photoshop Processing
I then bring the image into Photoshop, where I use an Action to accomplish the next set of tasks. I highly recommend that you create actions for IR processing. This will save you work and enable you to obtain consistent results.
3.2.1) Adjust The Channel Mixer
Many tutorials suggest changing the Channel Mixer settings to the following:
Red Channel: Red=0, Green=0, Blue=100
Blue Channel: Red=100, Green=0, Blue=0
Green Channel: Red=0, Green=100, Blue=0
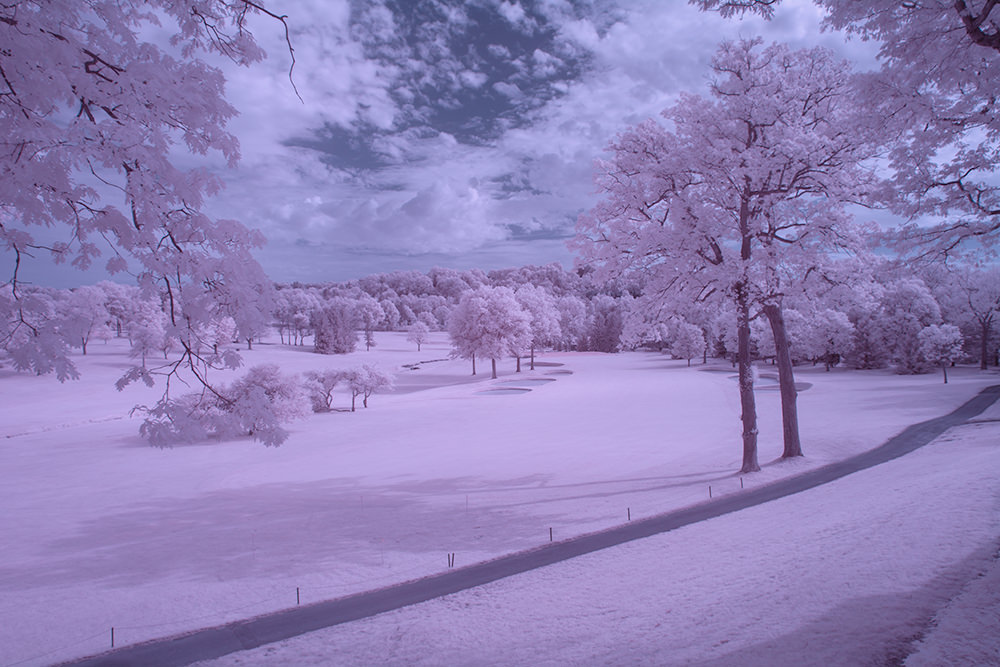
These settings will create a photo that looks something like the one below. Our bland pink image now shows what is referred to as “false color.”
I experimented with the Channel Mixer settings and found the settings below to be better, at least to my eye. Channel Mixer Settings can be tricky to experiment with. Slight changes can have huge impacts. And each Channel has three settings, all of which interact with the settings from the other Channels. As you experiment, it is helpful to make minor adjustments and save those you like as Channel Mixer Presets. This will help you compare settings and allow you to reference them when creating an IR Action.
Red Channel: Red=0, Green=0, Blue=100
Blue Channel: Red=100, Green=100, Blue=-100
Green Channel: Red=0, Green=0, Blue=100
These settings will result in a photo that looks something like the one below:
3.2.2) Add HUE/SATURATION Layer
I like a slightly different blue hue, so I make an adjustment in the Hue/Saturation Slider. This is purely a matter of taste. I encourage you to play with the Hue/Adjustment settings to determine if you find one or more settings that are aesthetically pleasing to you.
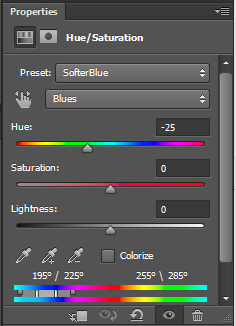
This results in the photo below. Looking better, but still pretty bland.
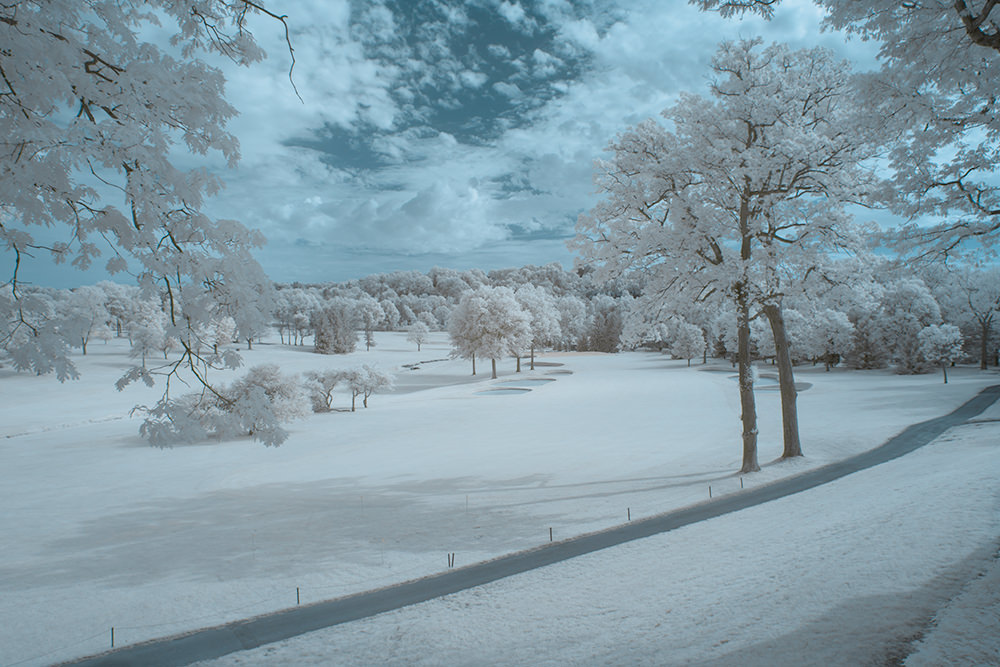
3.2.3) Add Curves Layer
The AUTO function in the Curves dialog generally works very well with IR photos. After applying an Auto Curves layer, our image is starting to look half-decent:
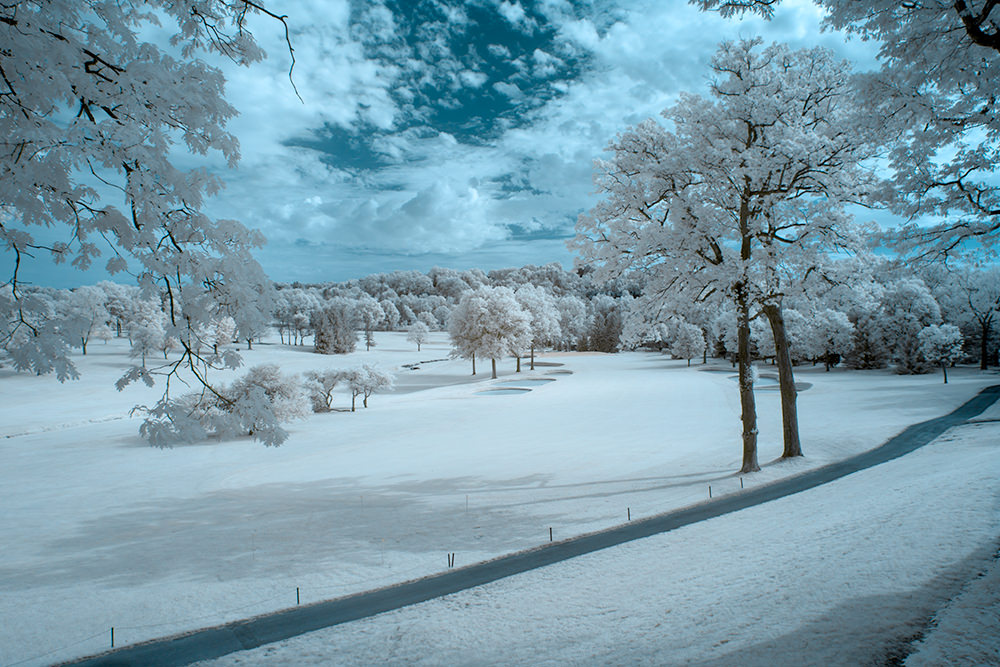
3.2.4) Silver EFEX
Silver EFEX, from Nik (now owned by Google), is a handy plugin for processing and fine tuning black and white images. For IR, I use it primarily to add structure (or clarity in the Photoshop world) and make some minor modifications to the false colors. I created an Action that enables me to get consistent results with little effort.

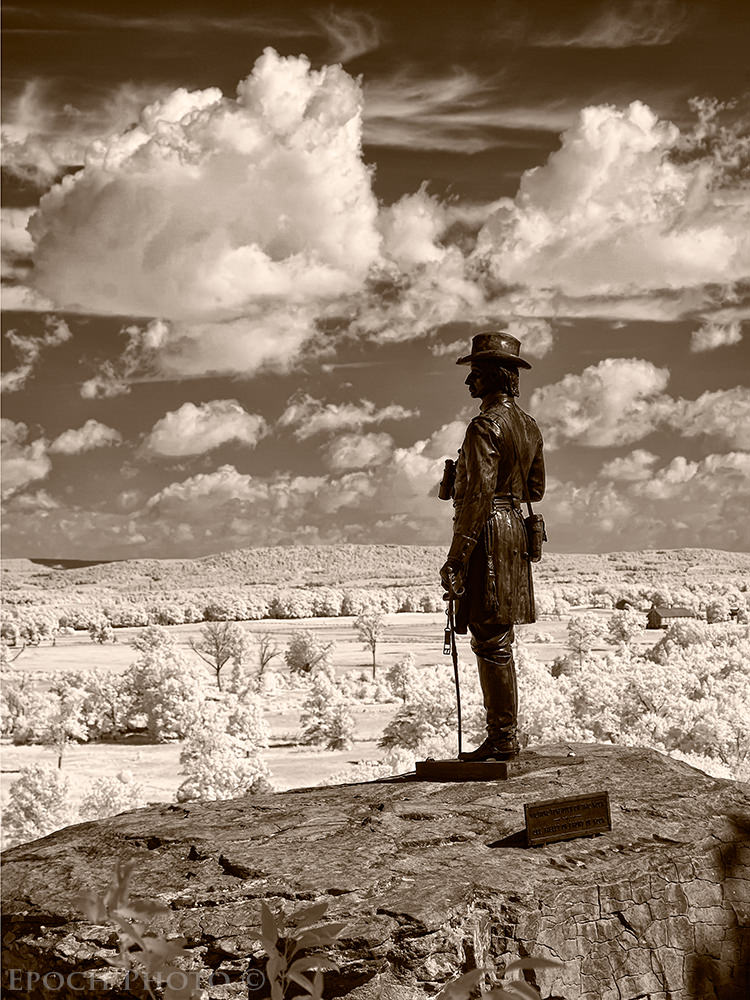
I then change the Blend Mode of Silver EFEX layer to Luminosity. This particular technique works better for some photos than others. Sometimes I will adjust the opacity of the layer depending on the specific photo and how well I believe the additional structure adds or detracts from the image. Not every IR photo looks good using false colors. In those cases, I may simply stop at this juncture and use the black and white version of the photo. I may add a touch of sepia tone for character, as shown in this photo of General Gouverneur Warren standing on Little Round Top, at the Gettysburg Battlefield.
After changing the Silver EFEX layer Blend Mode to Luminosity, we get this:

3.2.5) Topaz DeNoise and InFocus Sharpening
Last, but not least, I have an action to apply a denoise layer and then sharpen the final picture. Despite their low price, I find that Topaz’s utilities to do an excellent job. And here again, is the final result:

Here’s a 1/9th center crop:
4) Summary
In a world inundated by photos, IR photography still offers photographers the opportunity to capture something that stands out from the crowd. Achieving consistent IR results can be tricky at times, however, as demonstrated by some of the emails I receive. With some patience and persistence, you may find that you are able to process IR photos in the same amount of time as their visible light counterparts.
Update:
Since I wrote this article and others related to infrared photography, many people have emailed me with questions related to IR and advice regarding IR conversion services. Over the last few years, I have recommended Kolari Vision. Kolari Vision has converted four DSLRs for me. I have been very impressed with the quality of the service, turnaround time, value, and performance of the IR converted DSLRs. Ilija Melentijevic, Kolari Vision’s founder, has been especially patient and helpful in explaining the technical and nuanced aspects of converting and using digital cameras for infrared photography. Kolari Vision offers a full range of infrared, ultraviolet, and other specialized digital camera solutions and related filters.
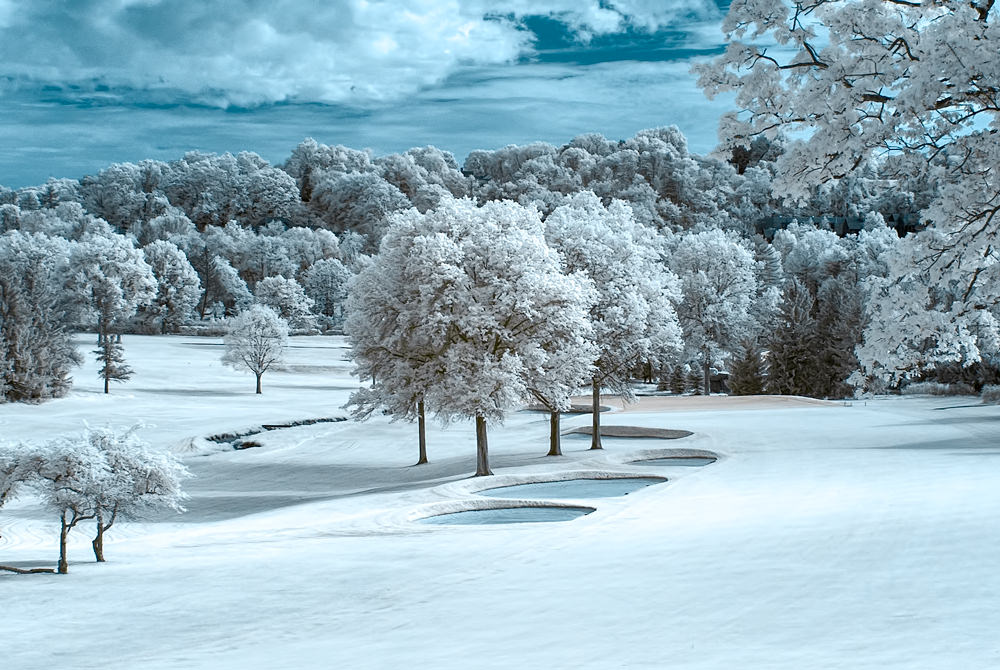
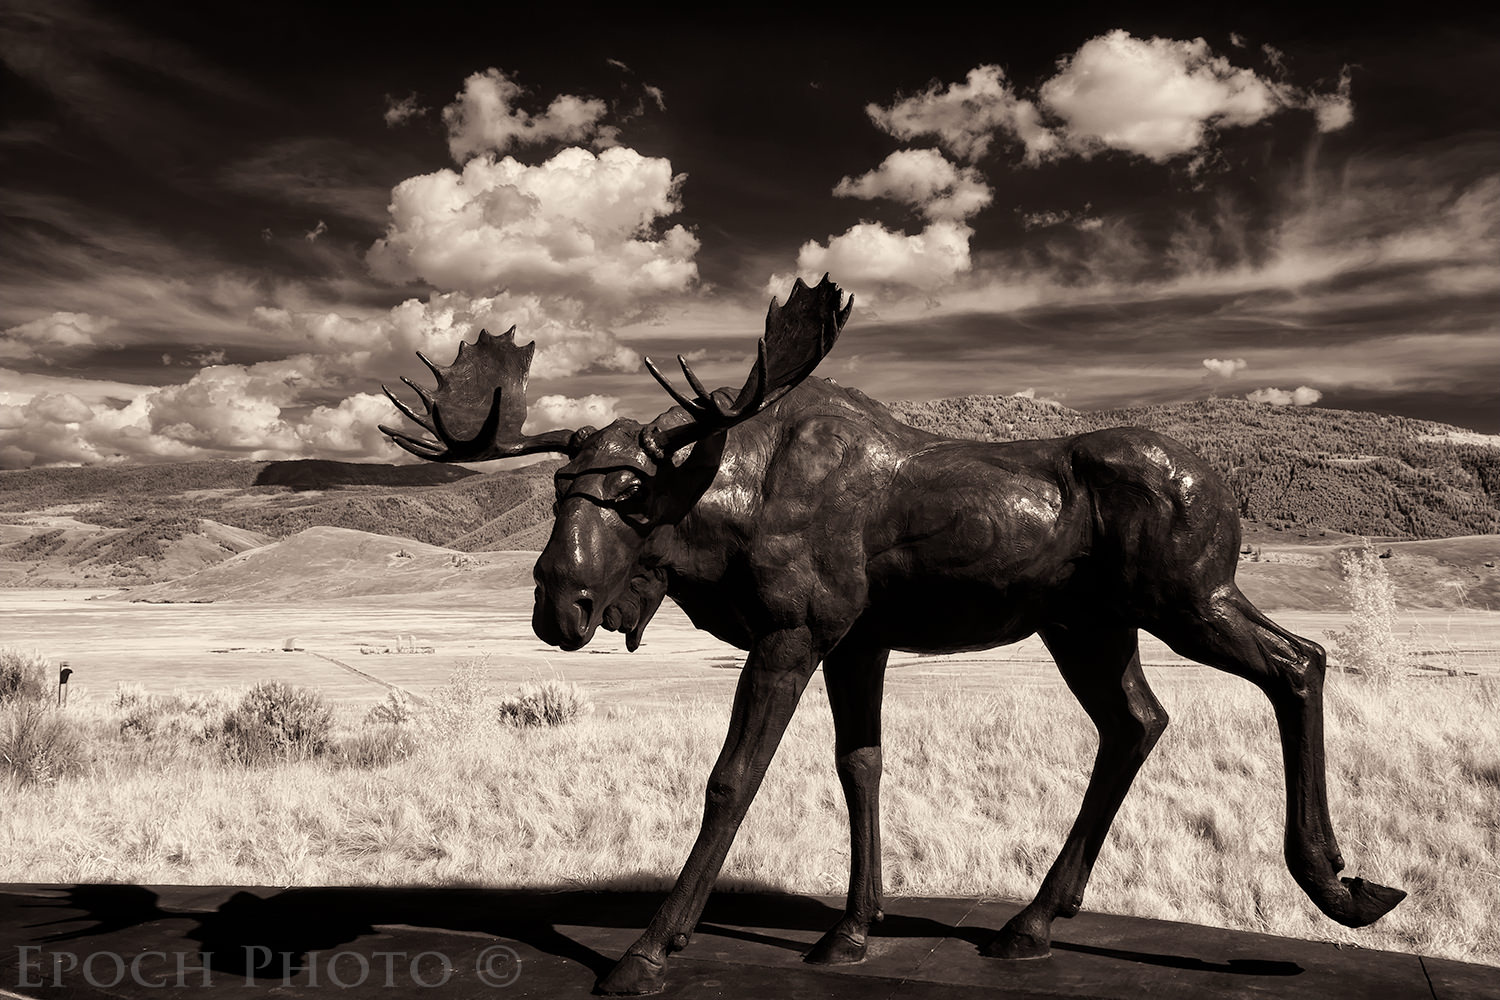
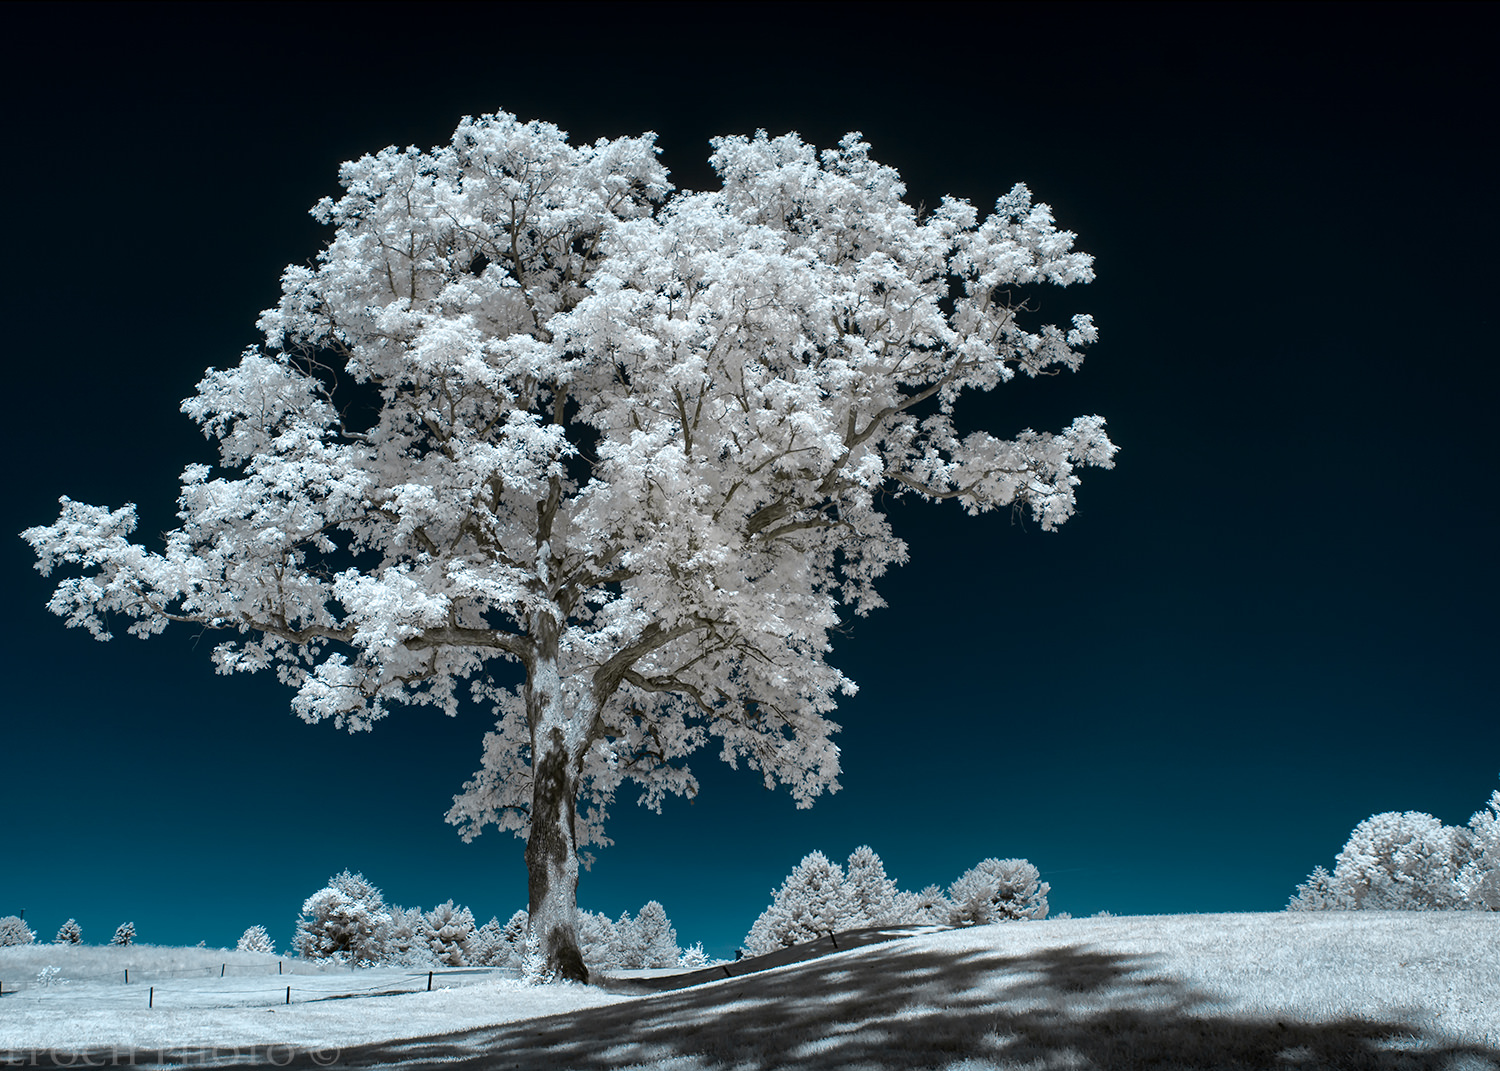
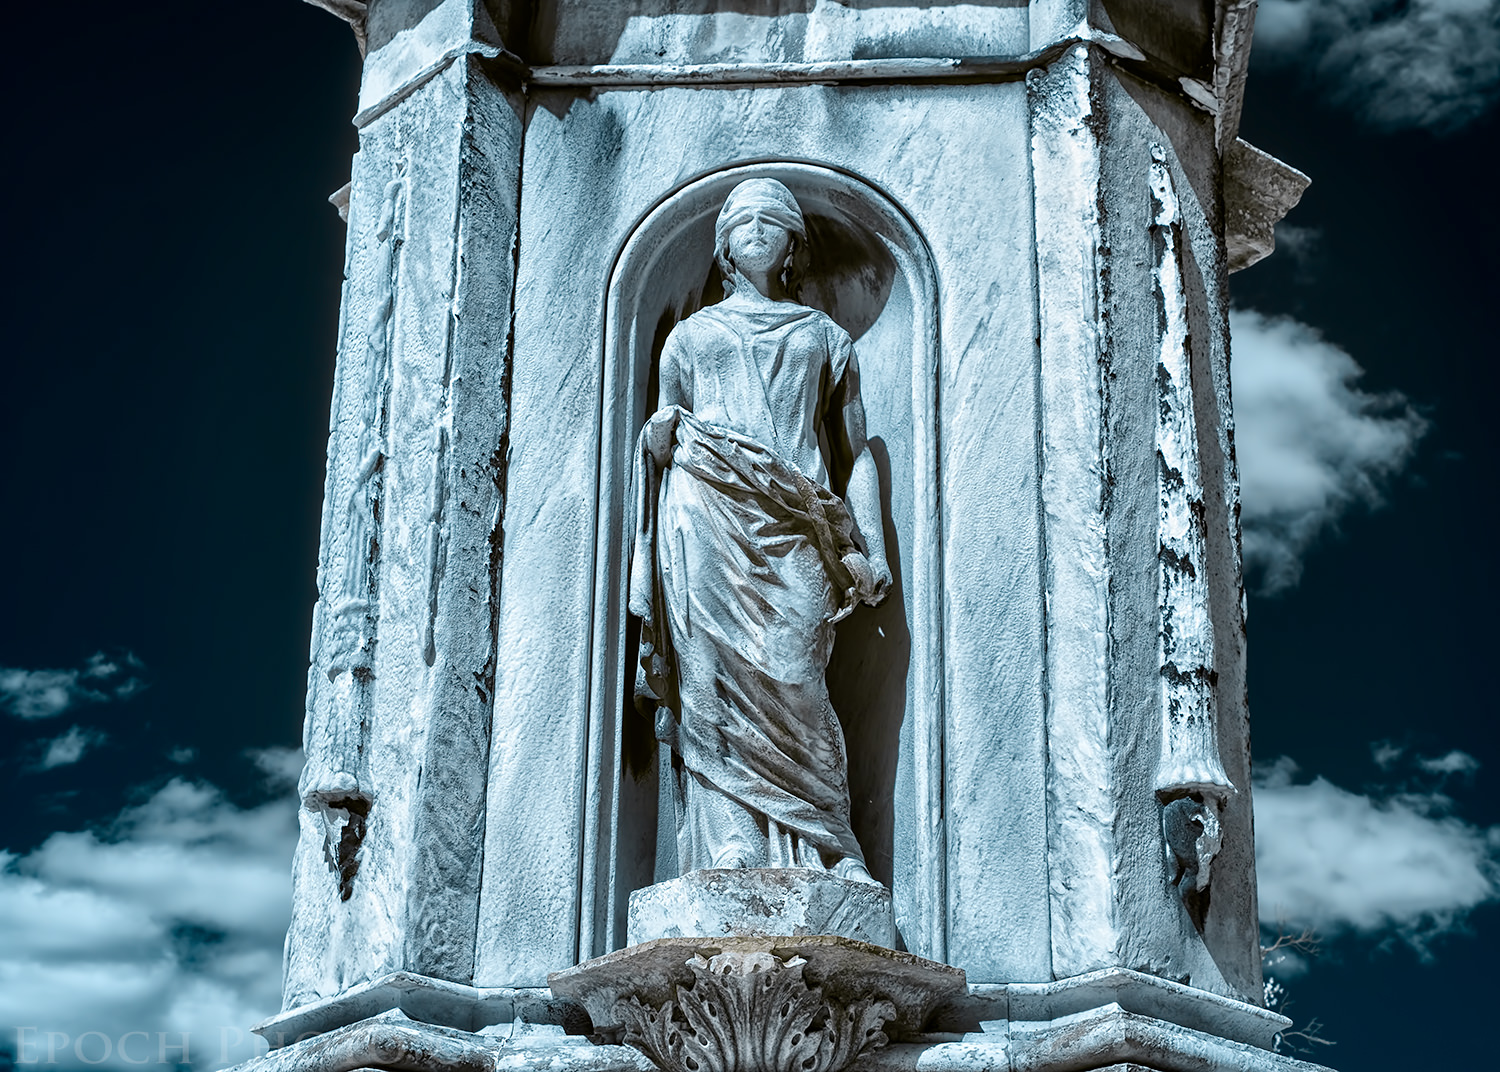
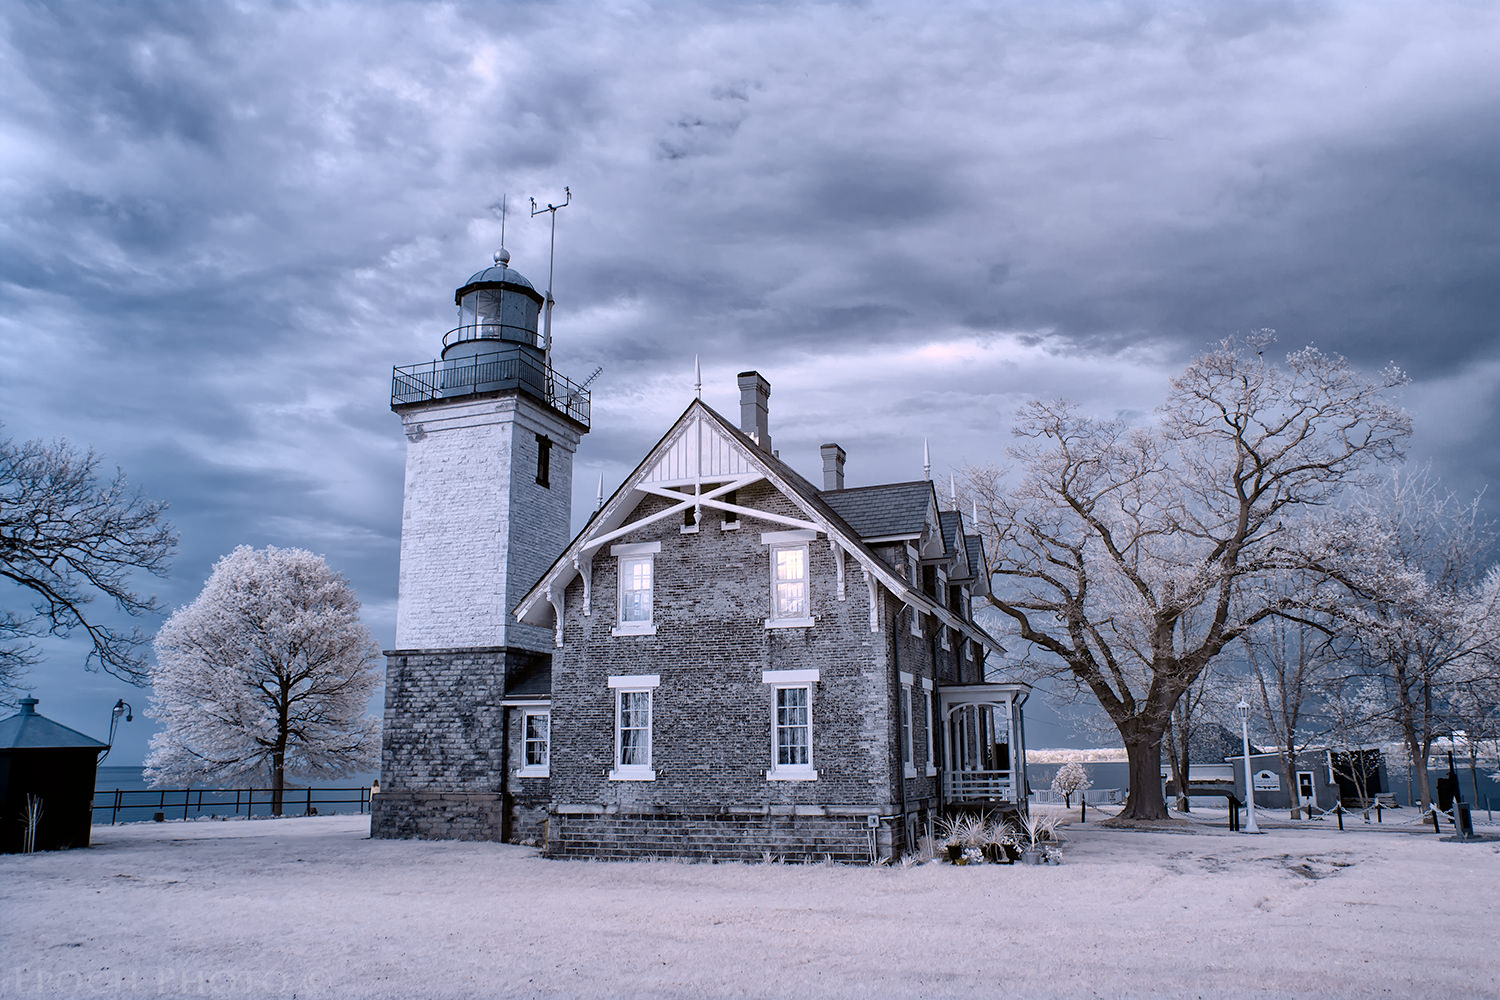
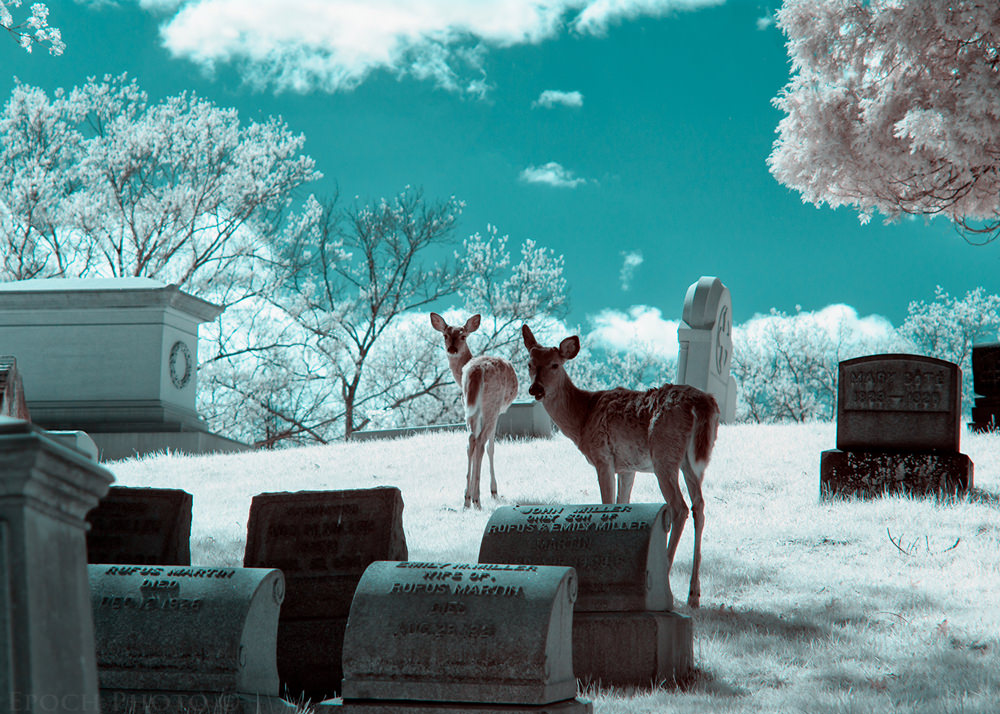
Following are some examples of the types of effects you can achieve with IR processing:

This is great, having just gotten my first IR filter.
I love the looks of many of these, if I get close, I’ll be happy.
Not getting close. I suck at this.
Anyone interested in a Haida M-100 IR filter?
I have a Canon 5G Mark IV that I purchased converted to full spectrum via Lifepixel. I use a variety of different filters for IR (850, 720, 650, 560 nm plus a rotating version that goes from 540-720 nm) and use the canon 17-40L 1:4 lens. I have a continuing issue with photos being fuzzy and out of focus particularly along the periphery of the image. They look crisp in the viewfinder prior to taking the photo. Any ideas why this maybe happening?
I use a Nikon D7000 I converted with a Kolari Vision 850nm internal filter and do B+W infrared photography . My photos always have allot of noise in them and have noticed this in others IR photos . Taken at the same ISO and other settings being equal , why do the IR photos have way more noise than normal visible light photography ? I’ve looked all over the internet and have found no scientific explanation for this .
Manx,
The short answer is that digital camera sensors are optimized to capture visible light, not infrared light. I always considered it a fluke (and blessing!) that digital sensors capture infrared (technically near-infrared) light at all.
The digital camera sensors likely struggle with pure IR light as they don’t capture it with the same fidelity as they do visible light. As a result, you see more noise with the 850nm filter. I have no doubt the camera companies could use sensors designed specifically for capturing IR light, but they likely would carry a much higher price tag.
Bob
Yes, my D800, 830nm shows some noise but my Z7ii 580nm has some but a lot less.
Thank for this great introductory article. I am just beginning to venture into IR photography. Just doing my homework to get a camera converted. I am familiar with Lightroom but totally petrified of using photoshop. While I own a membership, I have never used it. I am dreading the learning curb.
Hi Bob
Would it be possible to purchase a picture with its full resolution/pixels from you?
Thank you, Cecilia
Help! I am just starting with an Olympus OM-D E-M10 converted to 720 IR. When I bring the images into Lightroom the Temperature slider gives me + and -, and does not allow me to accurately set the Kelvin temperature as you suggested (i.e., 2000). I tried saving the image as a TIF and that did not solve the problem. Am I doing something wrong?
You need to use the DNG Profile Editor to create a profile for your camera, as mentioned above and in the video “Setting White Balance on Infrared Images with Lightroom (DNG Profile Editor)” on this page: www.lifepixel.com/photo…hop-videos
You would have an easier time by doing the following:
1) Shoot custom white balance with filter installed, and this may be green patch or white card depending on wavelength
2) Use Nikon software to import and decipher the white balance (which Adobe products cannot interpret correctly, which is why they are pink in your article)
3) Save a TIFF from the Nikon software
4) Process the TIFF by your workflow
That is the way to take advantage of your converted camera.
Cheers
Greg,
Not necessarily. I’m familiar with that technique, but not a fan of it. I’m in LR or PS most of the time. The Nik software adds another dimension to my normal workflow, which is why I don’t choose to process photos that way. I’m also not interested in working with TIFF files, which are not as easy to work with as RAW files.
As I mention in other articles, there are many ways to achieve the same results in IR. The important issue is finding a method that works for you, and, with a few presets, actions or reference photos, be able to replicate the results without wasting a lot of time.
Bob
Hi Bob,
I am an amateur photographer owning a Canon DSLR and some older Hasselblads. Have you ever worked in film? I would love to see the effects on film especially using Hassy. Where could I find information regarding tutorials? It appears you are solely digital based?
Regards,
Karen
Karen,
I haven’t but did write an article referencing someone who did use Kodak Aerochrome. There’s not as much to write about if you use film. The specific IR film will process the image according to the sensitivity of the film to IR – no post-processing necessary. Richard Mosse used infrared film to create some very moving images as shown in the article.
photographylife.com/revie…red-filter
Here’s another article showing the work of someone who used IR film with their Hasselblad.
www.hasselblad.com/stori…ersailles/
Bob
I did used to shoot infrared colour film which was quite complex in a way because different filters gave quite different effects and different combinations of filters gave surprisingly different effects again. There was never any information available about that; you just had to work it out by yourself. The effect of IR film was also quite different to digital because the film had three layers whereas IR digital effectively has only two channels. I don’t have anything onlne from what I shot and most of it I never scanned.
However, the IR film I used to use, which used E4 processing, is discontinued and I’m not sure that anyone is still manufacturing an equivalent.
Hello Bob. I have 4 camera’s and one of them is going to be converted. Which one would you go with? Fuji XE-2, Fuji XT-1, Nikon D7000 or a Canon T5i?
Anthony,
I would suggest converting the one which you will also shoot visible light with. This will allow you to swap lenses and reduce the need for different lenses.
Bob
Thank you for a great article, ive been shooting with a converted Nikon and 10-24 lens and love the images and your workflow was very useful, thank you or sharing. Do you ever turn the foliage pink? Ive done a few of those and in the right context they look good.
Matt,
Glad you found it helpful. I’ve written a few articles regarding post-processing routines with the 720nm and 550nm. You always need to watch the fringes of leaves when making sweeping color changes. If you push these techniques too far, you will find halos or fringes of color where the leaves meet the sky, which can be difficult, if not impossible, to resolve.
See the links below.
Bob
photographylife.com/infra…0nm-filter
photographylife.com/revie…red-filter