This article is intended to be a general starter guide to photographing the Northern lights. The title is perhaps misleading as the “Northern Lights” are not just a phenomenon of the Northern hemisphere but also occur in the Southern Hemisphere. In the North, it’s generally referred to as the Aurora Borealis whereas in the south, it goes by Aurora Australis. However, my experience has generally been shooting the Northern Lights in Norway and Iceland, and this is what I will now expand upon.
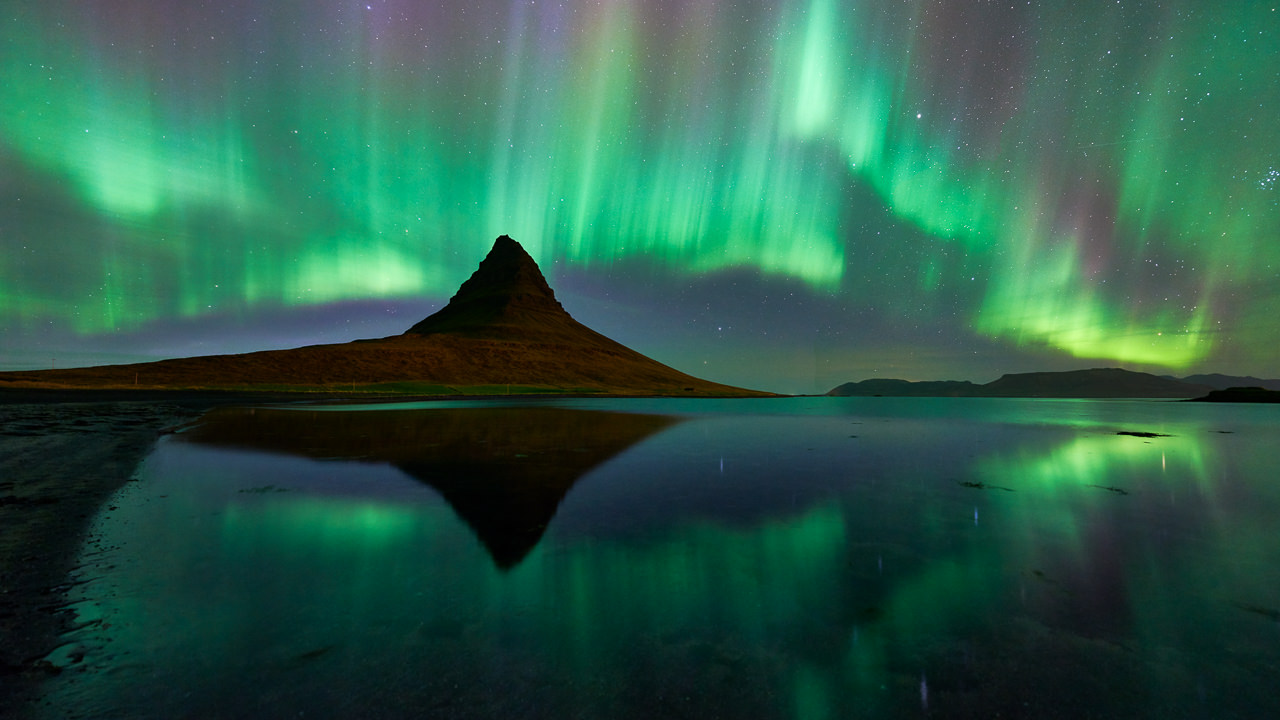
Table of Contents
1) Where to photograph the Northern Lights
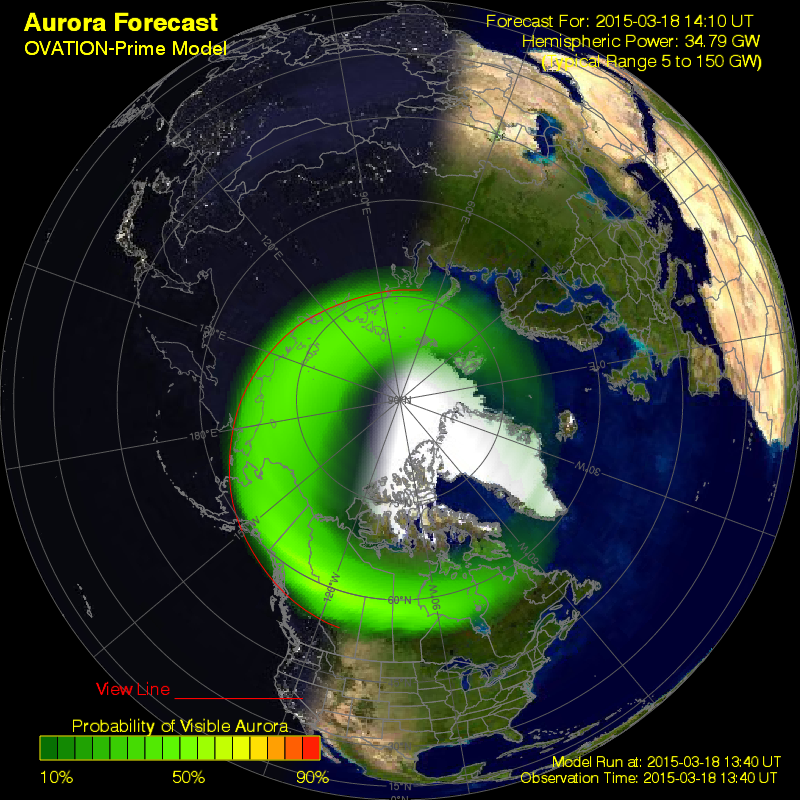
The Northern Lights are best visible in the high latitude regions of the Earth, generally north of the Arctic Circle. Of late, the most popular places to photograph this phenomenon have been in Iceland, Scandinavian countries like Norway, Finland and Sweden and Greenland. As you can see in the above image which is downloaded from www.spaceweather.com, you can see the aurora oval (as of March 18, 2015) in the Northern Hemisphere – in this image, parts of northern Canada and the northernmost fringes of Scandinavia and Russia seem to have the best display.
My own experiences have been photographing these in Iceland as well as in the Lofoten Islands of northern Norway although Greenland has also become popular in recent years and there are lots of photo tours geared toward Northern Lights photography to all these destinations.
2) When to photograph the Northern Lights
The Northern Lights are typically visible year-round; however, as is obvious, they can only be seen or photographed when the sky is relatively dark. Because of the incredible fluctuation of day-night lengths in the Arctic latitudes, the period entering fall (around mid-September) when you begin to once-again have 10-12 hour nights and longer until early spring (early March) are the best periods to photograph this phenomenon.
Obviously, these periods can be quite cold so high up North so the entire process can be quite challenging occasionally. The weather can also run amok but this is the fun of it – the challenge and the wait can be quite rewarding.
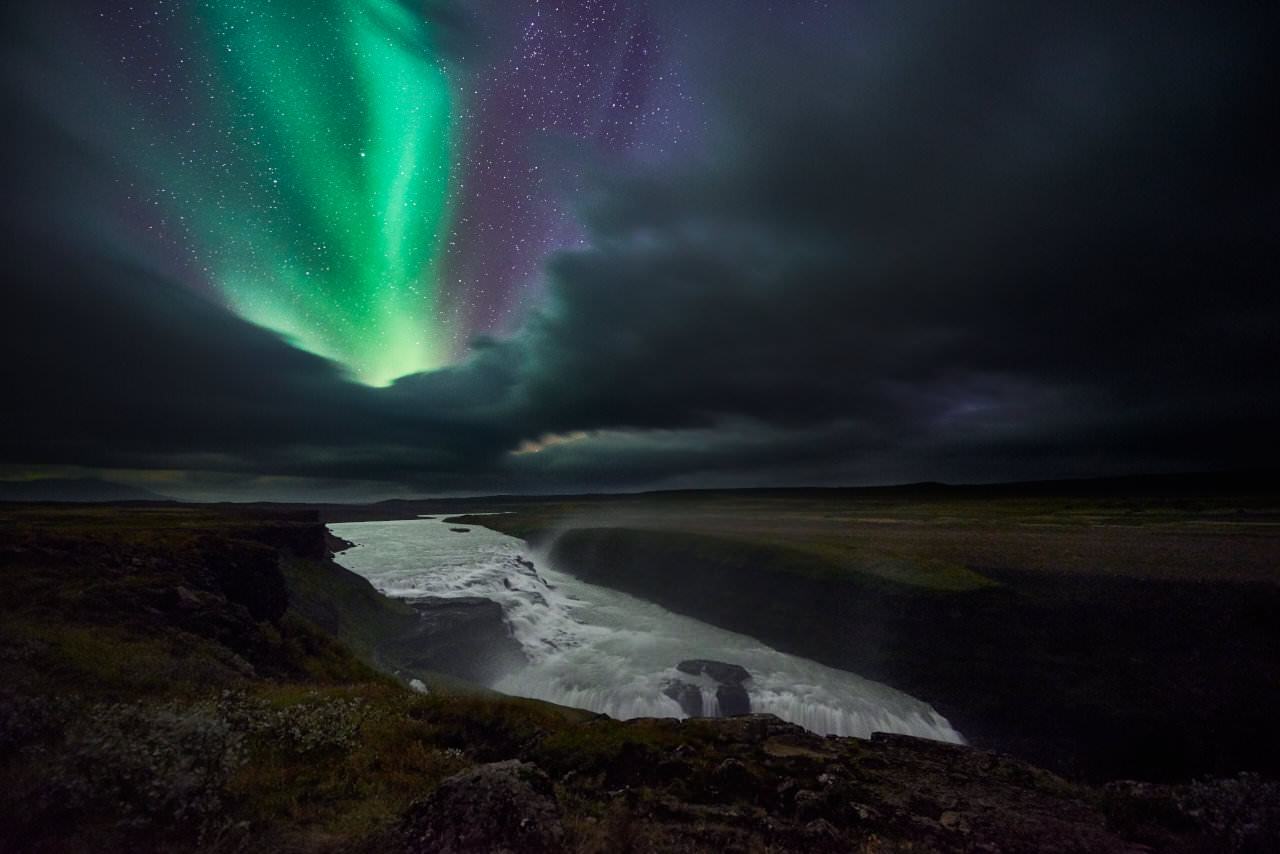
But speaking of the weather, it is very necessary to always keep an out for it. Oftentimes, the aurora predictions are high but cloud cover can spoil the fun and prevent you from seeing any of it. The picture below is of the well-known Gulfoss waterfall in Iceland. As you can see, I caught a glimpse of the aurora through the thick cloud cover. The cloud movement was quite swift and within the next 10-15 minutes or so, there wasn’t much shooting left to do. However I was quite pleased with this photo and I feel the cloud cover helps create a dramatic visual opening and complements the form of the waterfall quite nicely. A clear sky may have resulted in a very typical image and the aurora activity wasn’t really that strong that evening. This just goes to show how even the negatives can sometimes be quite beneficial if you are in the right place at the right time.
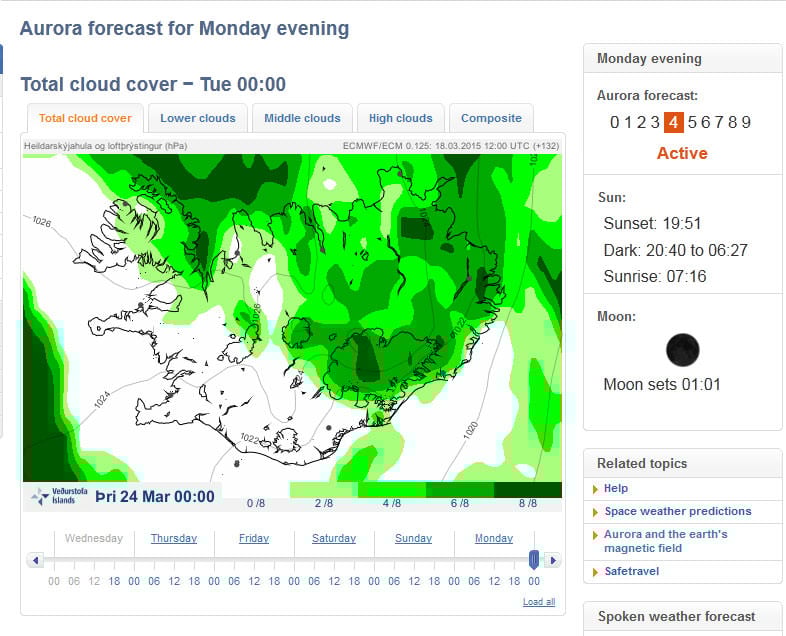
But the above image is the exception to the rule. Cloud cover can invariably threaten a good night’s photography and even with high aurora activity, sometimes you need just a bit of luck to be able to view it at all. It’s helpful to note a few online websites can be used to give you a rough forecast for Aurora activity and regular weather. In Iceland for example, the national meteorological office http://en.vedur.is/weather/forecasts/aurora/ is a good source. The website not only shows you the cloud cover across Iceland (green is heavy cloud cover, white is clear), it also shows you the scale of Aurora activity on any given day. A scale of 1-2 is quite mild and you may see some hazy movement across the sky. 3 is moderate but 4 onwards represents quite a lot of activity and you can see it quite clearly with the naked eye. Incredibly, this past St Patrick’s day solar storm created auroral activity of the magnitude of almost 9. The activity was so off the charts that it was supposedly visible even down here in New York, albeit quite faint. I was quite jealous of a few photographers I follow on facebook who were posting the most insane aurora photos I had ever seen in Iceland.
The above is a screengrab from vedur.is showing the aurora forecast.
Other than the Icelandic met office, a few other good sources to check aurora forecasts are:
– http://www.yr.no (Norwegian met office)
– http://kho.unis.no
– http://www.spaceweather.com
3) How to photograph the Northern lights
And now we come to the meat of the matter. How do we photograph this? The essentials are quite simple – a good fast wide-angle lens, a DSLR/mirrorless camera capable of good high-ISO quality and a good sturdy tripod.
3.1) Camera
Most modern digital cameras are becoming quite capable of shooting relatively clean pictures at ISOs of 1600 and above. Generally, cameras with full-frame sensors will give you the best quality at high ISOs, though the latest breed of smaller sensor cameras are no slouches either. I’ve shot a lot of auroras with my older Nikon D800 at ISO 3200, and if exposed correctly, the images are quite clean to my taste. Newer generations like the D850 and Z8 only improve upon that performance.
Lens choice is also greatly impacted by type of camera used since the same lens on a crop-factor sensor will not be as wide as on a full frame camera.
3.2) Lens
Speaking of lenses, any fast lens is usable, but generally, the wider angle lenses are best as they give you enough “reach” into the sky to capture as much of the activity as possible. In the two images below, the photo on the left was shot with the Zeiss 21mm f/2.8 lens whereas the one on the right was shot with my Nikon 14-24mm f/2.8 at 14mm. What the 14mm focal length allowed me to do that night was to be able to frame the entire mountain and it’s reflection with enough of the sky to follow the aurora.
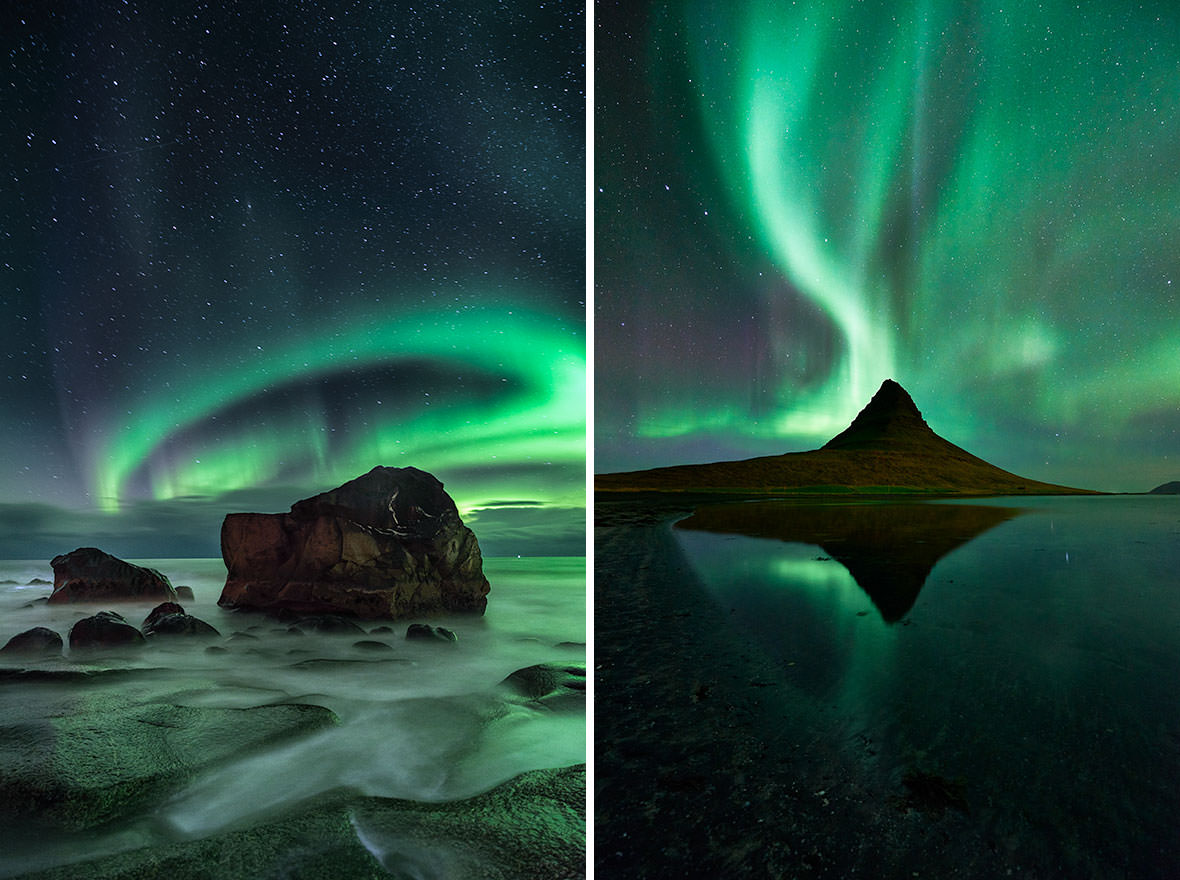
Having the 14mm to 24mm range also allows some flexibility in framing which the prime does not. That said, there are other fast primes around, such as the Nikon 20mm f/1.8. These offer the advantage of 1-2 stops of extra light, meaning you can either reduce your ISO (for greater dynamic range) or reduce your shutter to get more detail in your exposure.
Some of you may worry that the fast lenses might result in shallow depth of field. But in general, to photograph something so distant in the sky, you would be focusing at infinity anyway. Unless you are also including a foreground object in your composition, you should generally have no worries other than the noise from the higher ISOs.
One tricky aspect of an autofocus lens is that it can be quite difficult to focus in a near pitch black environment. My manual focus Zeiss prime is fantastic since all I need to do is to turn the focus ring all the way to the end, and it’s at infinity. With an autofocus lens, the trick here is to pre-focus on something far in the distance, then switch your lens to manual focus and don’t touch it again. Some photographers even fix their lens focus ring to infinity using duct tape. The other option is to ask a companion to stand far away, then use their phone as a bright source to focus on. With a very wide angle lens such as the 14-24mm, a distance of about 20-30 feet should give you pretty close to infinity focus.
Aurora movement can vary – sometimes it dances slowly across the sky; sometimes it is quite fast and energetic and breathtakingly beautiful. A very long exposure will result in “smearing” of auroral activity so the shorter the exposure time, the better.
3.3) Tripod
A tripod is a must, but any semi-serious photographer probably has one already. In this case though, there are probably a few details to be conscious of as a precaution.
Most of us travel great distances to witness and photograph the Northern Lights. So it is imperative to pack your gear in a way that is easy to be carried around. Regarding tripods, it’s generally a given that a solid carbon fiber tripod will be a good investment in the long run. The weather in such locations can be quite finicky so if your tripod is too light, you may get blurry photos due to strong winds. Induro and Sirui have some nice affordable tripods while on the higher end, Gitzo and RRS have sturdy tripods that be extended quite tall if necessary.
Tripod care is a must too. In extremely cold temperatures, some carbon fiber materials might get stiff and brittle; so good care is necessary so you don’t snap a leg while folding it back together. Also if one or more of your tripod legs is submerged under (sea) water while shooting, it’s generally a good idea to clean the legs as soon as possible to prevent accumulation of saline matter.
3.4) Technique
The basics are quite simple. As a starter rule, open your lens to its widest aperture, set your ISO to about 1600, and shoot an exposure of 10-15 seconds. Aurora activity – even bright activity – is still quite dark to the camera sensor; so even at high ISO, you need a relatively long exposure of about 10-15 seconds. Most of my aurora shots have been with lenses with a maximum aperture of f/2.8. With a lens such as the 24mm 1.4, you could get a 2-stop advantage and either shoot at a lower ISO to get cleaner files with greater dynamic range; or shoot a shorter exposure so you can get a lot more detail and prevent long-exposure “smearing”.
The general idea is to shoot so that you have a well exposed histogram. Once you shoot your first test exposure, you should get a good idea if it’s too bright or too dark and compensate accordingly. Generally the light from the aurora comes through quite nicely but any foreground landscape will be much darker. If not exposed properly, the shadow detail will be very hard to recover. Some photographers sometimes shoot the aurora at their optimal settings, then later capture a much longer exposure to get the maximum detail in the foreground. On occasion when you have a foreground object such as a rock very close to camera, some photographers even shoot multiple photographs at varying focal distances and then focus stack the result in photoshop.
Of course, it’s quite difficult to compose a picture in the dark. My personal trick is to boost the ISO to the max so I can take a brief 2-3 second shot and understand what I am framing. Once I am happy, I can bring down the settings to their optimal values. If you can level your tripod as well as your camera, you should then be able to swing the camera around as necessary and photograph to your heart’s content.
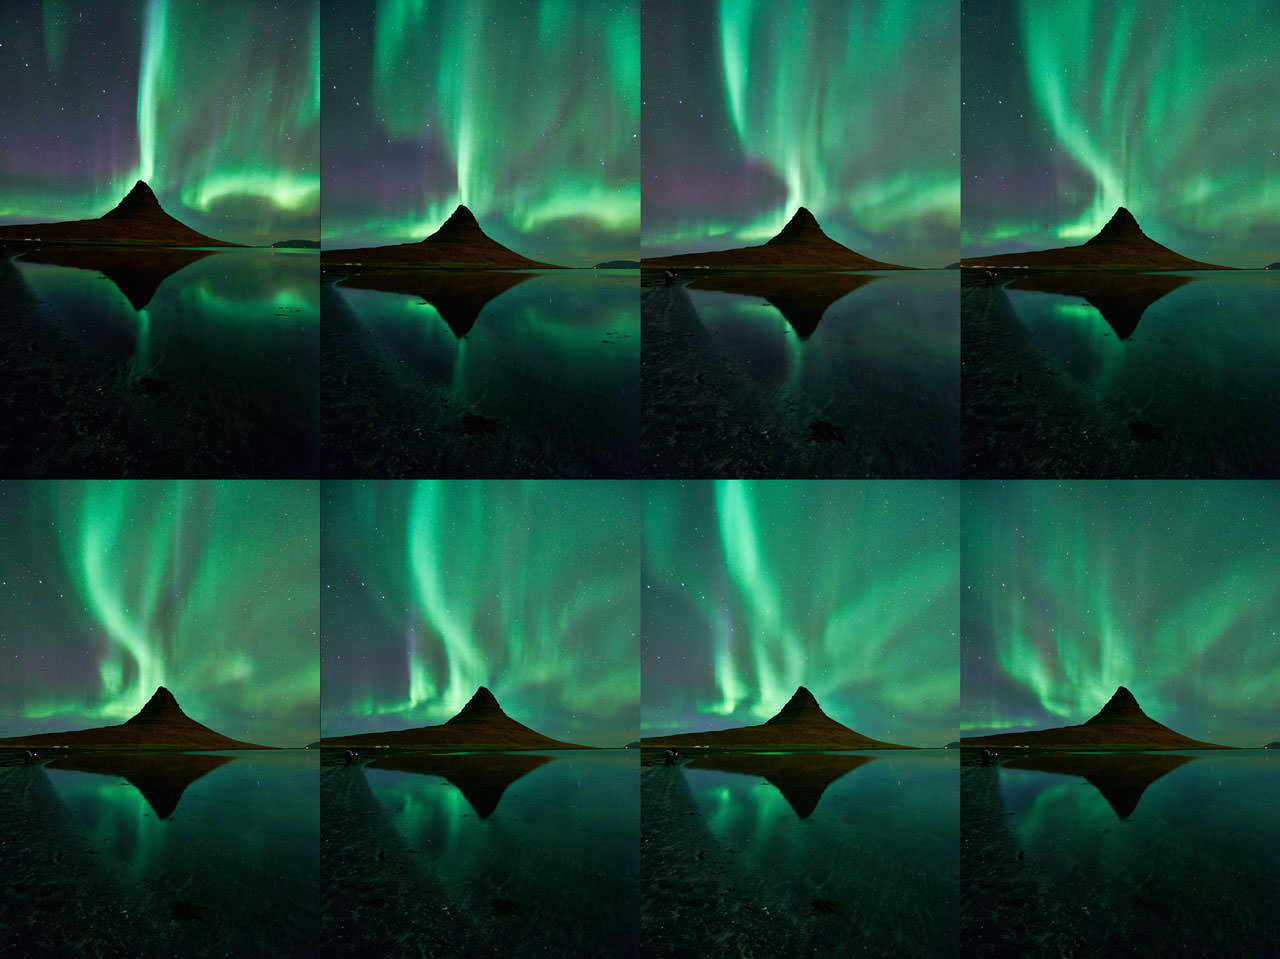
The images above shows a series of images I shot in the Snæfellsnes peninsula of Iceland, looking at the lovely Kirkjufell. This aurora display was perhaps the most amazing display I had ever seen. It was very clear and beautiful and incredibly active and went for a good tow hours. This transition of the Aurora waves happened in a 4 minute period and each frame was shot for 13 seconds at ISO 2500 at 14mm.
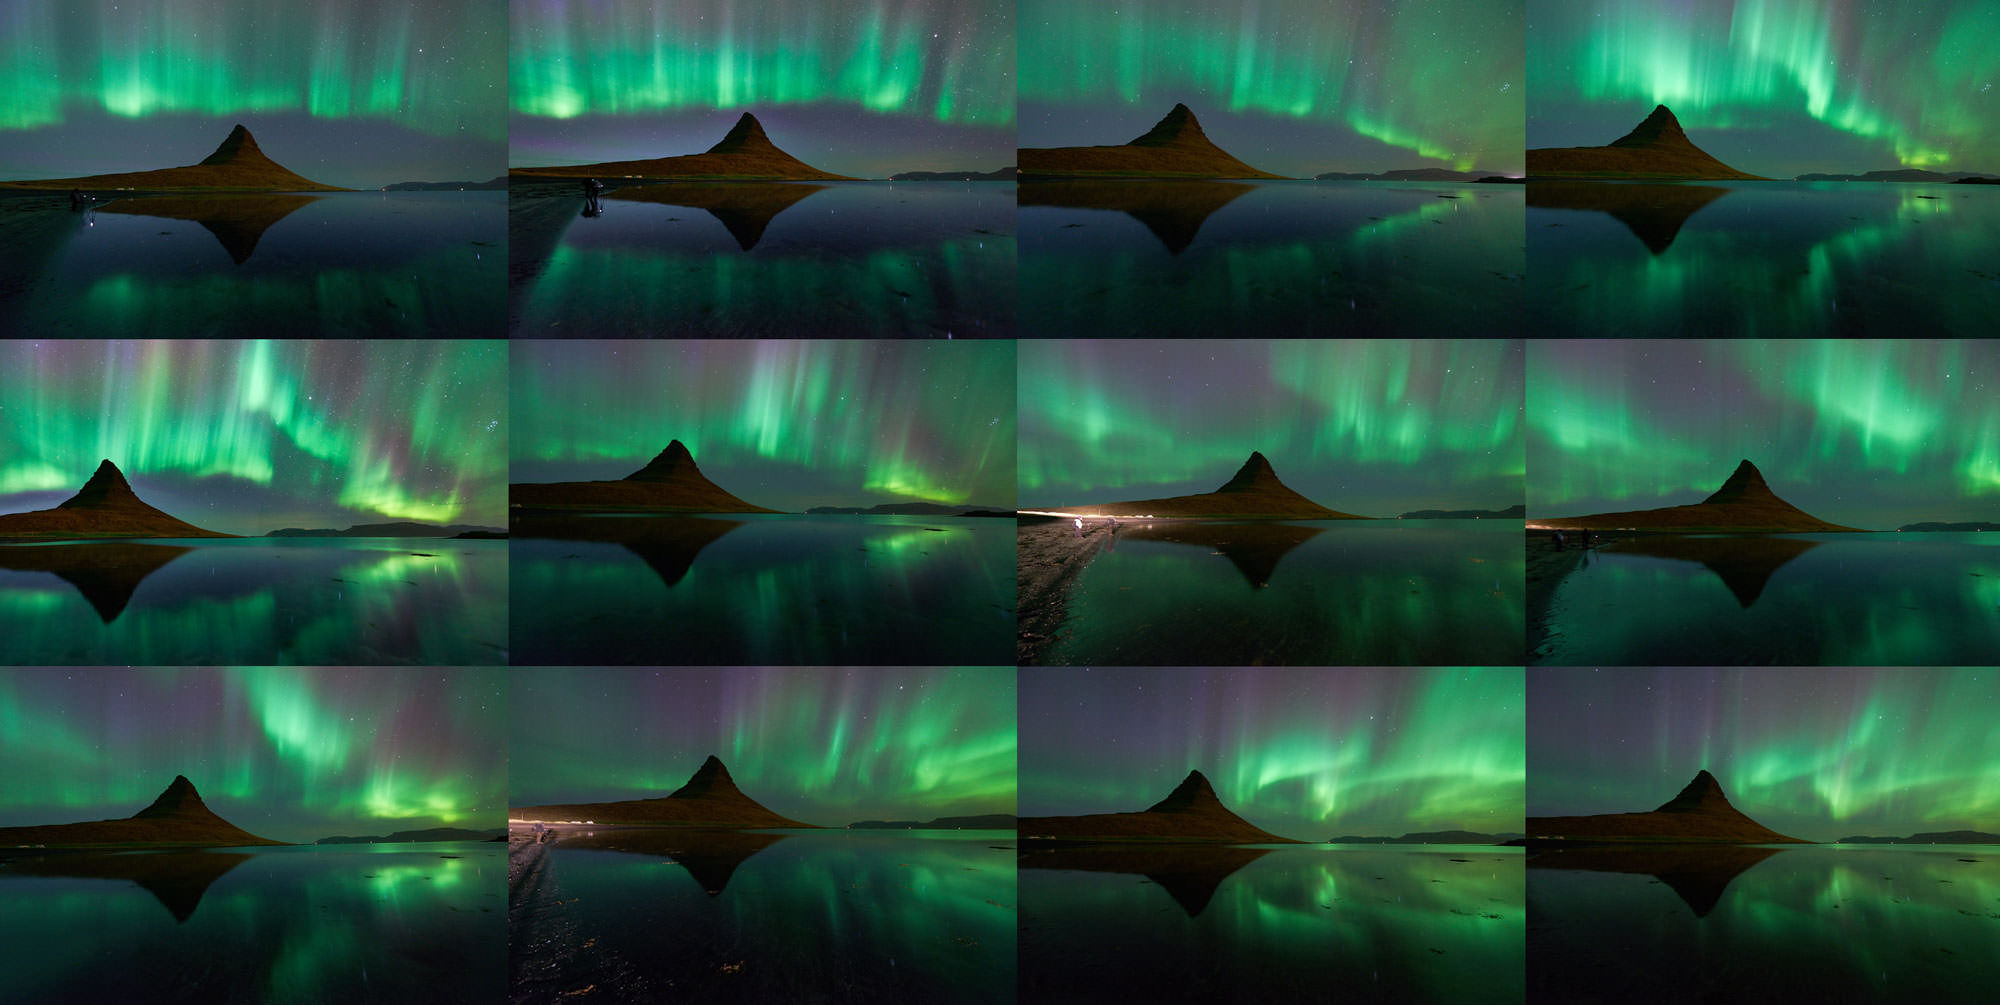
This set shows you another sequence I shot at the same location during that very same aurora display. Once again, you can see how the aurora dances across the sky weaving elegant light streaks across the sky. Since I shot this right across from the highway, you can see the light spill from vehicles in a couple of shots. I also cloned out the couple of lone photographers on the beach in the final image I posted.
3.5) Post-processing
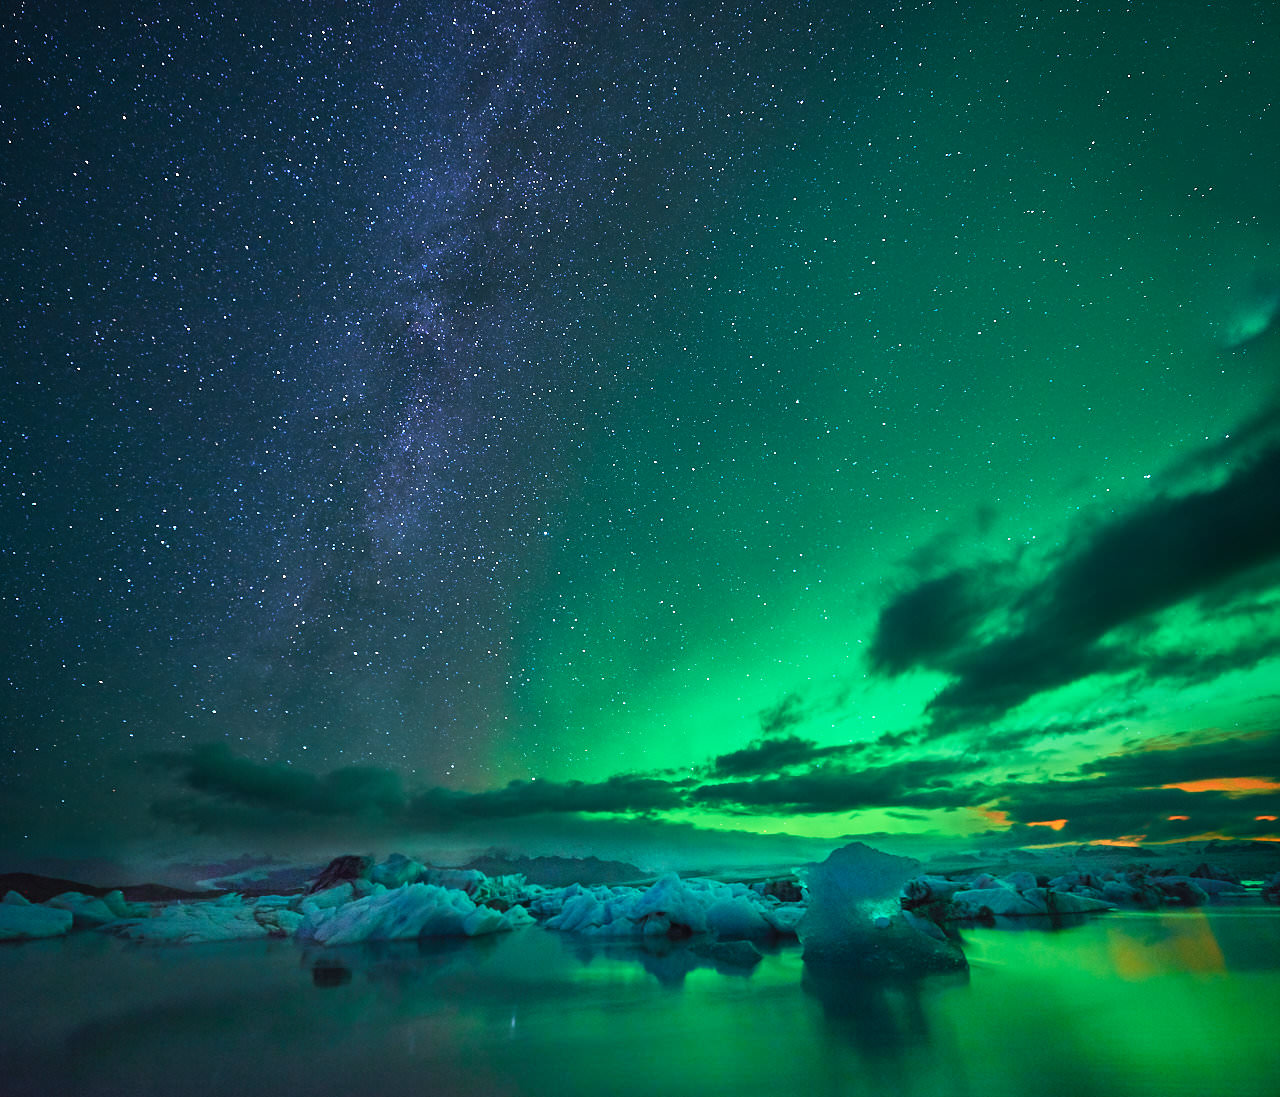
Well the difficult part is shooting the aurora. Generally any form of processing will yield a presentable result given that the composition is an appealing one. The below image, which I will use as a first example is an image I shot at Jökulsárlón, the famous glacier lagoon in Iceland during that same trip and I was lucky to see a display of the Northern Lights here. What did come as an unexpected surprise is the orange haze on the far right. At the time of shooting, I could see a faint glow and supposed it to be light pollution from a neighbouring town. It was only after I had returned and shared my image, that several commentators mentioned that this glow was most likely pollution from the Holuhraun volcanic eruption in the Bardarbunga caldera. This makes this image quite unique to me, and the aurora was a bonus. That said, this wasn’t the most brilliant display I had seen and the brief but more interesting displays were in a direction across from me, but without any form of foreground I could accentuate it against.

Coming back to the processing part, below is a series showing three stages of the process.
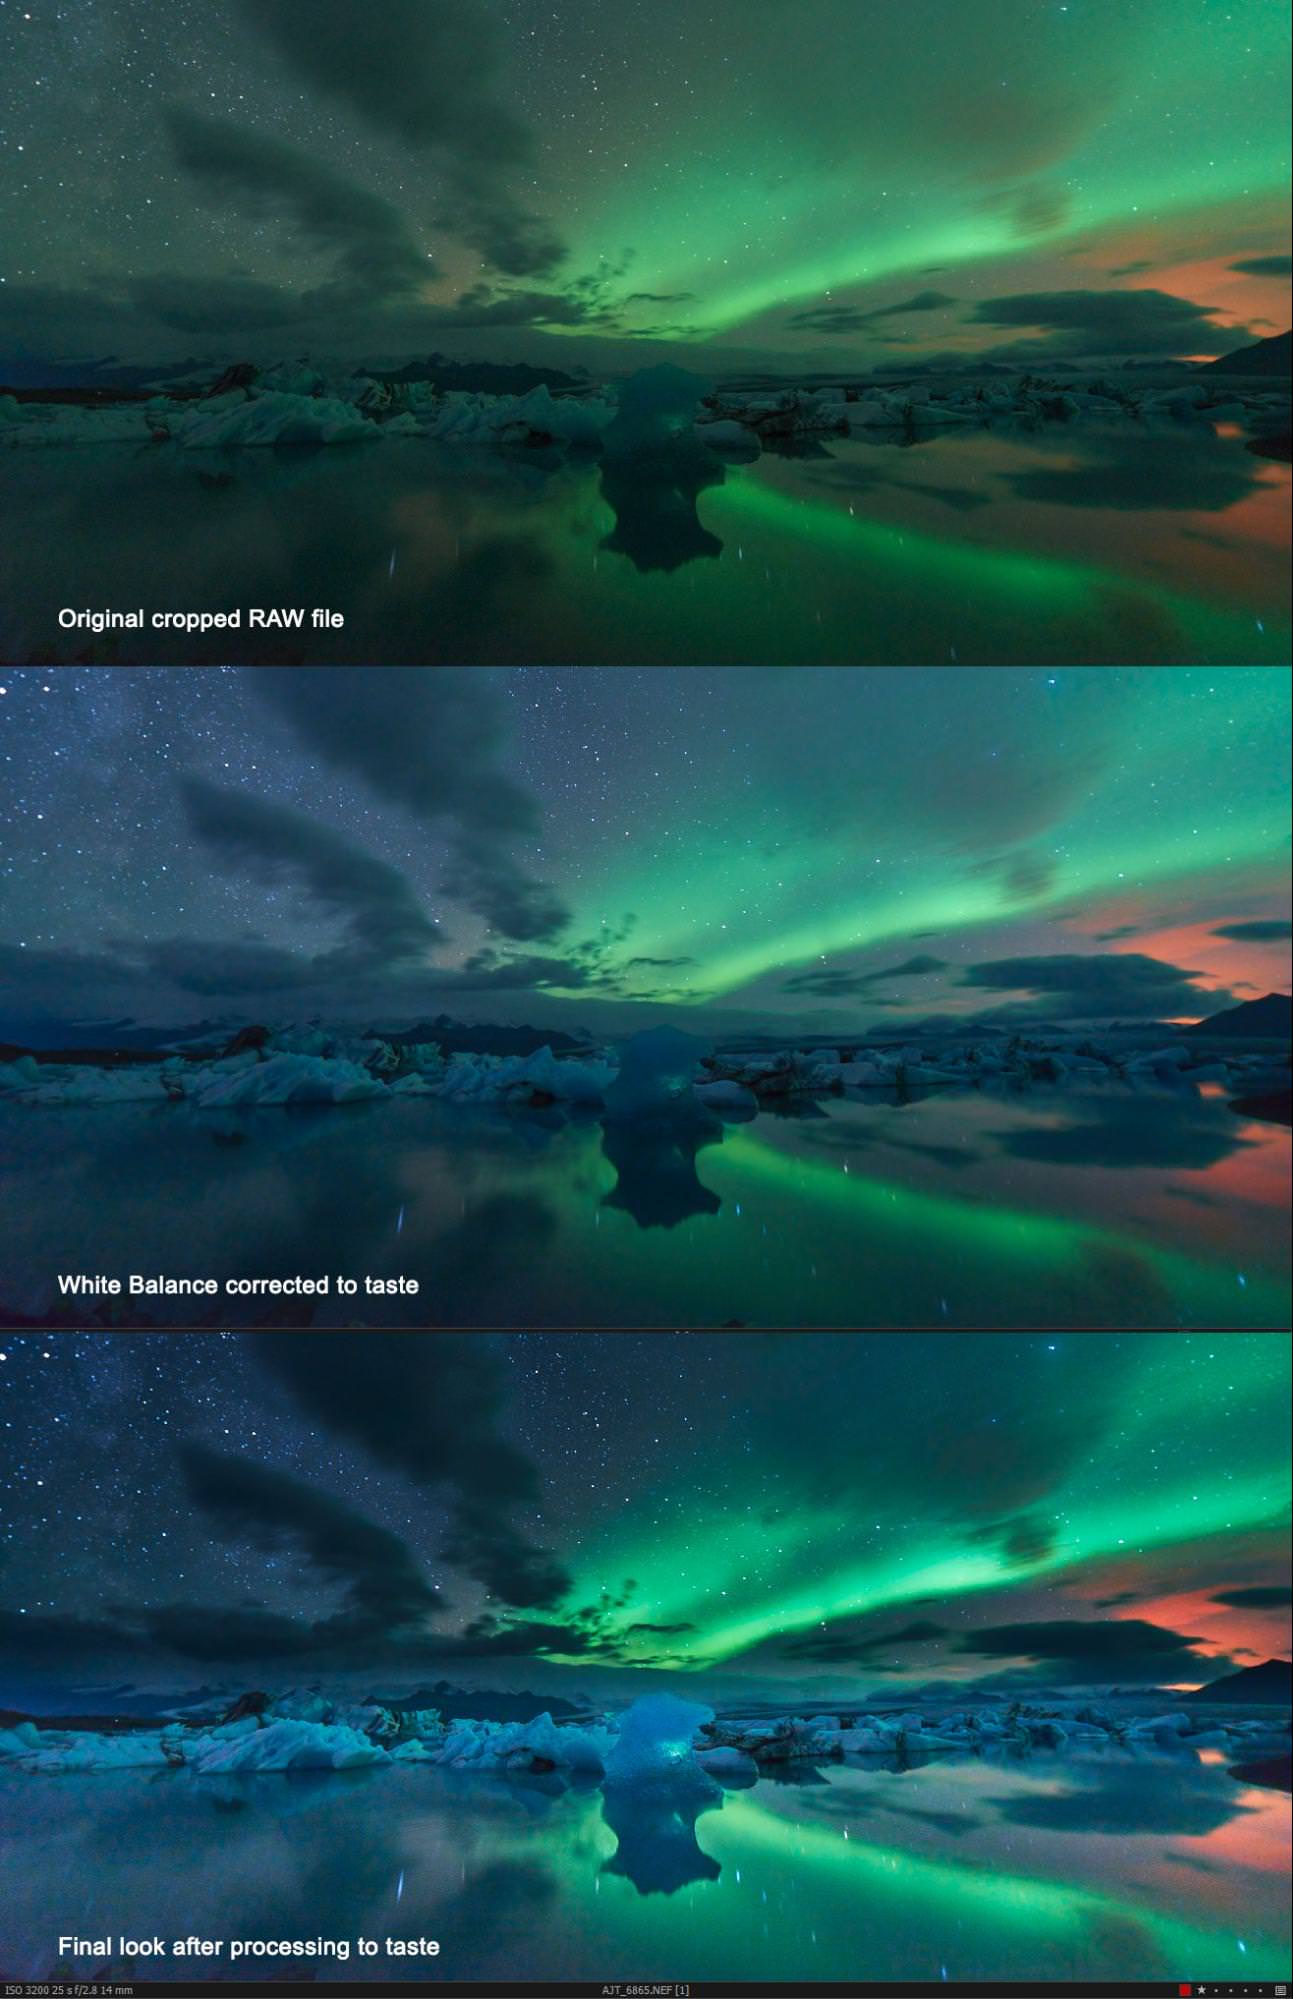
The original RAW file had a heavy green cast which is what you will normally see when you shoot the auroras. However, it does look rather dull and presently, I enjoy shifting the white balance to a cooler tone; just enough to reveal the dark blue tones of the sky. Now you can argue that the green cast is obviously the true colour of the scene and I would agree, but given the artistic license I wanted to exercise, I felt the rich blue tones of the iceberg accentuated the colour of the image quite brilliantly; contrasting the greens and the blues with the orange-red haze of the volcanic pollution makes it even more amazing to me.
The final image has some further creative license; I balanced the tones of the iceberg by lifting them with a grad and contrasting the sky a tad. However these are personal preferences and are in no way the only way it should be done; this is just a guide of the process that I used on this image.
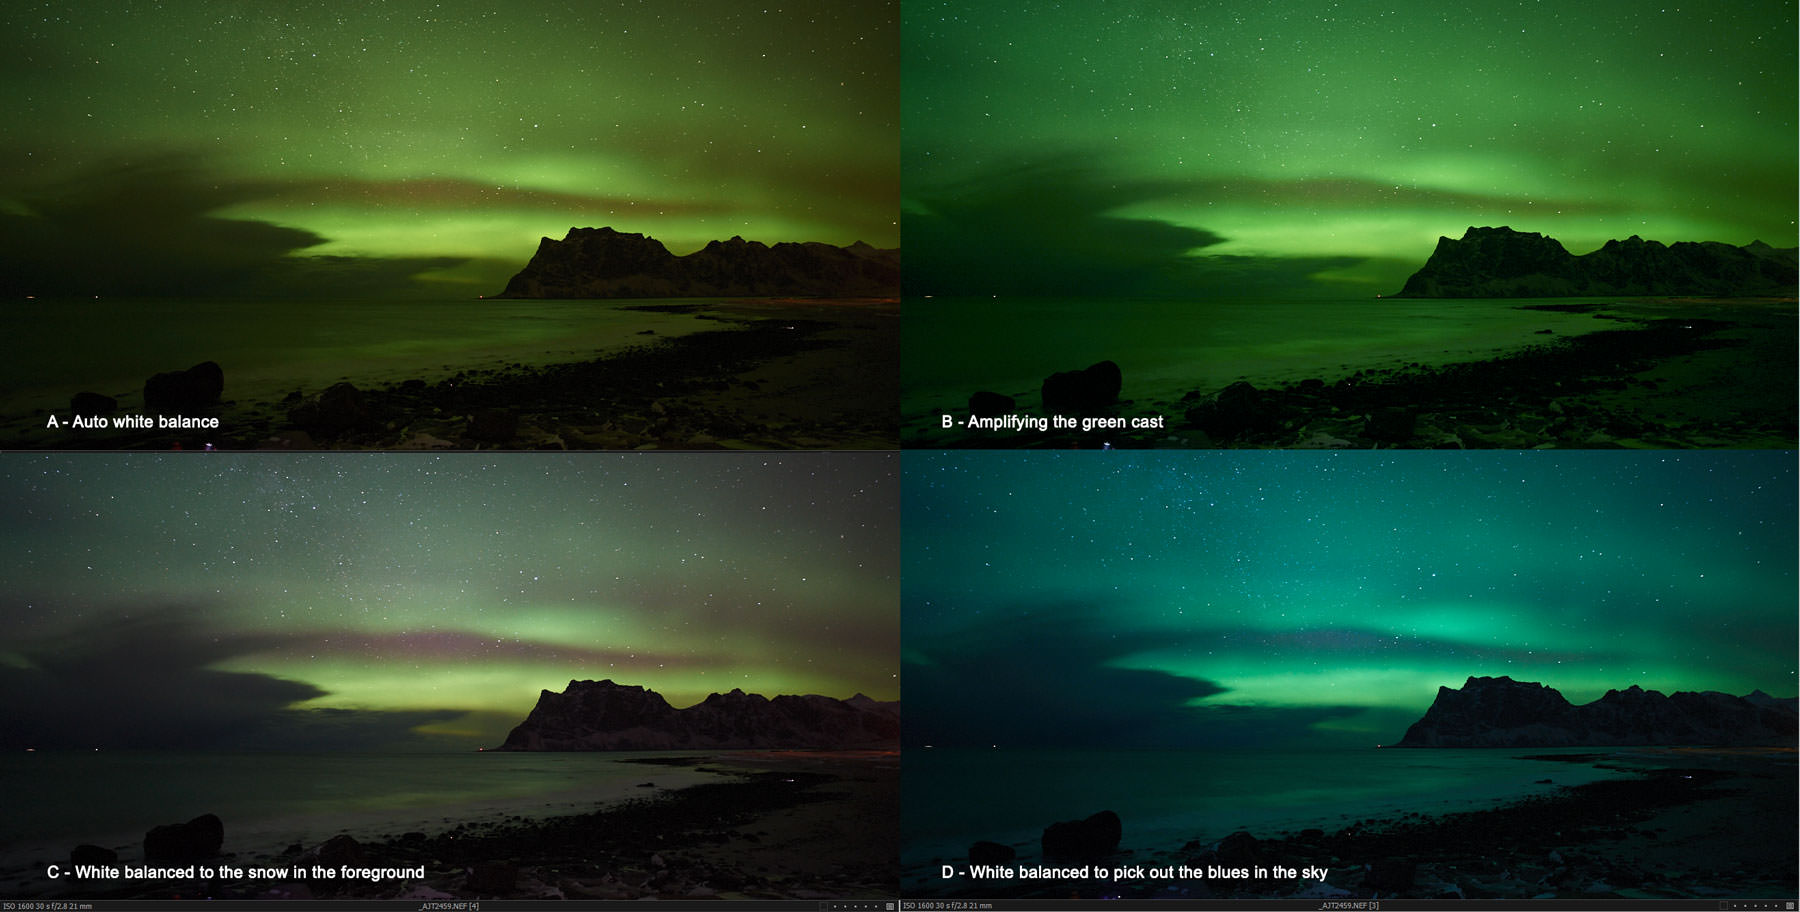
Below is another example of white balance. In this case, the choice of white balance is not as clear-cut. Balancing to match the blue sky (D) gives a very cool, yet alien rendition and the most appealing ones would be either (B) which just amplifies the scene as I saw it or even C which balances the tones to the white of the snow.
Below is yet another image from that same evening at Jökulsárlón. The aurora had waned quite a bit and all that was visible was just the leftover green haze on the right, but once again, bisecting the Milky Way almost precisely and giving me yet another three-part composition.
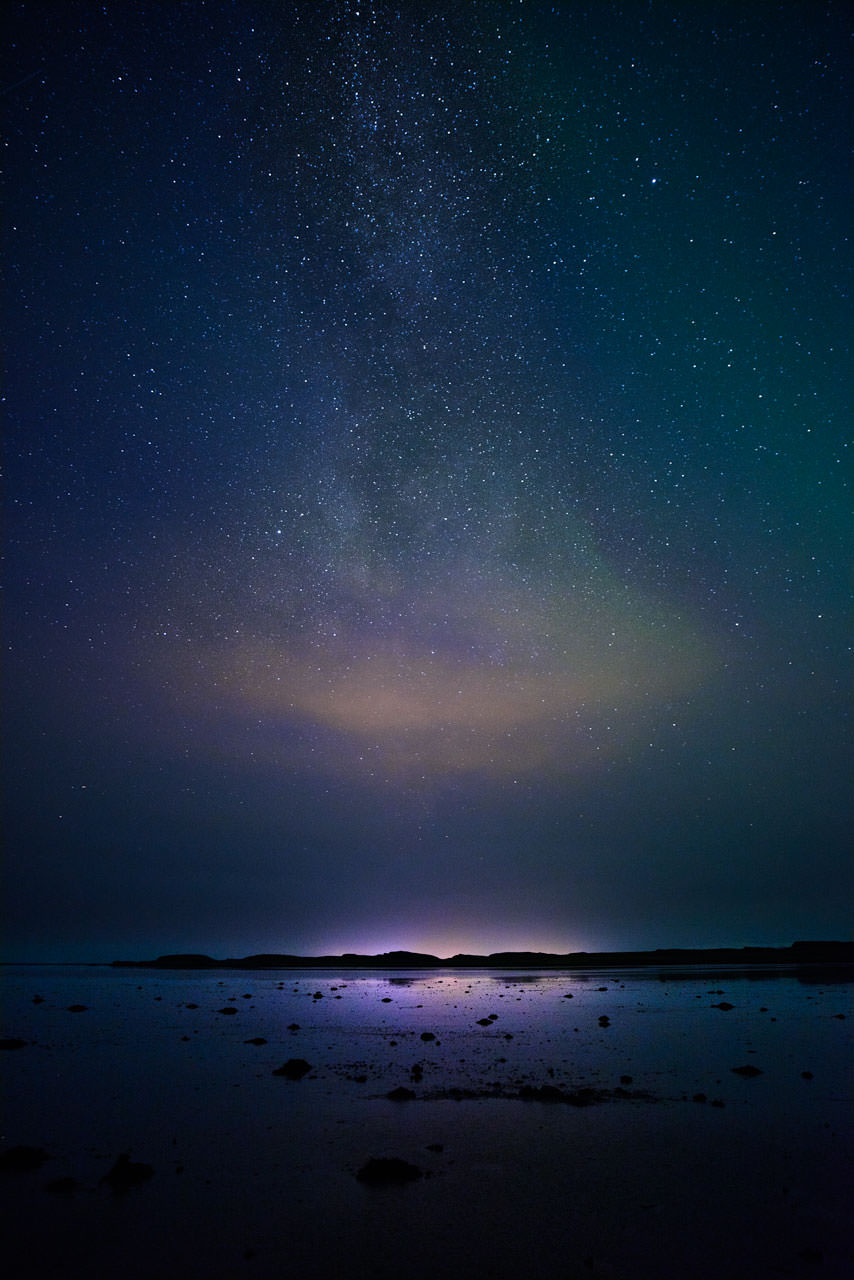
As you can see from all these images, there is a lot of variety in the shape and movement of this bizarrely beautiful phenomenon. These images were perhaps the most presentable of my personal collection and were shot during just two trips. I was immensely lucky to witness some beautiful moments and I hope to see it a few more times in my lifetime. Until then, here is one last image – quite a weak aurora but still a pleasantly beautiful footnote to a beautiful phenomenon.
Ajit Menon is an amateur hobbyist photographer based in New York City. In his day-to-day life, he is a visual effects artist, having plied his trade for over 10 years in New York city (and around) and currently working at The Mill, an industry heavyweight in this field. Photography has become quite a passion for Ajit over the last several years during which he has traveled to different parts of the world to capture the spellbinding natural beauty of the world. You can visit Ajit’s website to see more of his work.
Hi everyone,
I have Nikon D3300 and Im going to Tromso next February to shoot the northern lights, can this work with a wide angle lens to get good quality pics ( I plan to buy Tokina 11-16mm f/2.8 ) ?
Thanks,
Mido
Hi Ajit beautiful pics of Aurora. I have Nikon D5100 . I dnt have 14mm-24 mm lenses but do have 70mm-300mm. How do I use this lense to capture the Northern lights?
I am not a professional photographer but have been using DSLR for many years. I can’t afford 14mm-24mm lense. Pls give suggestions
Hi Anju, you might want to take a look at this list. Some options are very cheap, such as samyang 14mm f/2.8. I have bought my 14-24 f/2.8G used in good condition from KEH at $500.
photographylife.com/the-b…on-cameras
The most beautiful pictures of the northern lights and write-ups of any similar sites or articles I have seen. Thanks. I am going there next week.
A.S.
Ajit,
Your photos are nothing short of amazing! I just bought my first camera (beginner’s camera) after my trip to Iceland to see the Northern Lights. I have a Canon EOS T6, is there any lens I could purchase or special equipment in order to be able to capture the Northern Lights on my next trip?
Thanks for the advice in advance.
Hey Letty
As I mentioned in the article, I would go for a lens that has a wide aperture – like f/2.8 at the minimum. There seem to be a LOT of new lenses on the market with such wide apertures that seem to have been specifically designed for astro-photography/ northern lights etc – I haven’t used these but the Tokin 11-16 f/2.8 or 14-20 f/2 may be good starter choices or even the new Irix 15mm 2.4. I would look up reviews on these to make a decision (besides price). Obviously the better lenses get expensive.
I was told that when doing Northern Lights, ALL filters/attachments on the lens should be OFF, otherwise you’ll get wavy imprints on the photograph. Your article didn’t seem to mention that, and your pictures look good.
Hi Sam
I’m not sure what you mean by wavy imprints.
However, the main reason to not use filters is to not reduce light reaching the sensor any more than necessary. It is already quite dark at night and you don’t want to increase your ISO and exposure more than necessary.
I haven’t used protective filters like UV filters on my lenses in many years now but I doubt they would scramble the image in any way even if they were on though.
Hi Ajit,
I’ve seen pictures with circular, wavy circles on them. I was told it’s because the way filters work under the circumstances. I was to go to Iceland, and was prepared to experiment, but had to last minute cancel, so I can’t prove it to myself. Thanks.
Very detailed information.. Thank you Ajit!
Really great photos! Took a few this past week in Iceland for the first time. Not so easy as it looks, but I got a few. Will be going back ASAP and hopefully get some better ones. Thanks for the tips.
Will be in Iceland early next year, so Aurora Borealis will be on the agenda. I read somewhere that you should remove the lens filter when shooting the Aurora, is it a must? Thanks.
Sorry. Just saw this.
In general, it’s so dark when shooting the Northern Lights that any extra glass in front of the lens may cause you to under-expose the image. I imagine (protective) UV filters might not hurt much but a circular polarizer will definitely take away 1-1.5 stops of light. As long as you are careful, you should be fine shooting without filters.
Also a circular polarizer can result in circular imprints on your images due to the long time exposures.
What white balance setting on the camera do you recommend? Would auto be best, and then adjust in post processing? Or is there a specific setting that would work best? My camera is Nikon D7100 with a 10-20 Sigma 3.5 lens.
Thanks!
Generally around 3600 K – 4000 k or so.
But yeah, you can just shoot auto and change in post unless you are recording in JPG.
Awsome. Thank you for sharing knowledge.