One of the most amazing landscapes in the world is Iceland’s Jokulsarlon lagoon — famous for its massive and beautiful icebergs. And if the lagoon isn’t enough, these glass-like icebergs routinely wash ashore on a nearby black-sand beach. This crazy combination is enough to attract photographers from across the globe. In this article, I will share some tips for photographing Jokulsarlon that will help you make the most of your trip to Iceland.
Table of Contents
1) Layout
Jokulsarlon (Jökulsárlón in Icelandic) is split into two parts: the lagoon and the beach. Each of these parts is split by a river running from the lagoon to the beach, and a road running across the river. The illustration below makes this clearer:
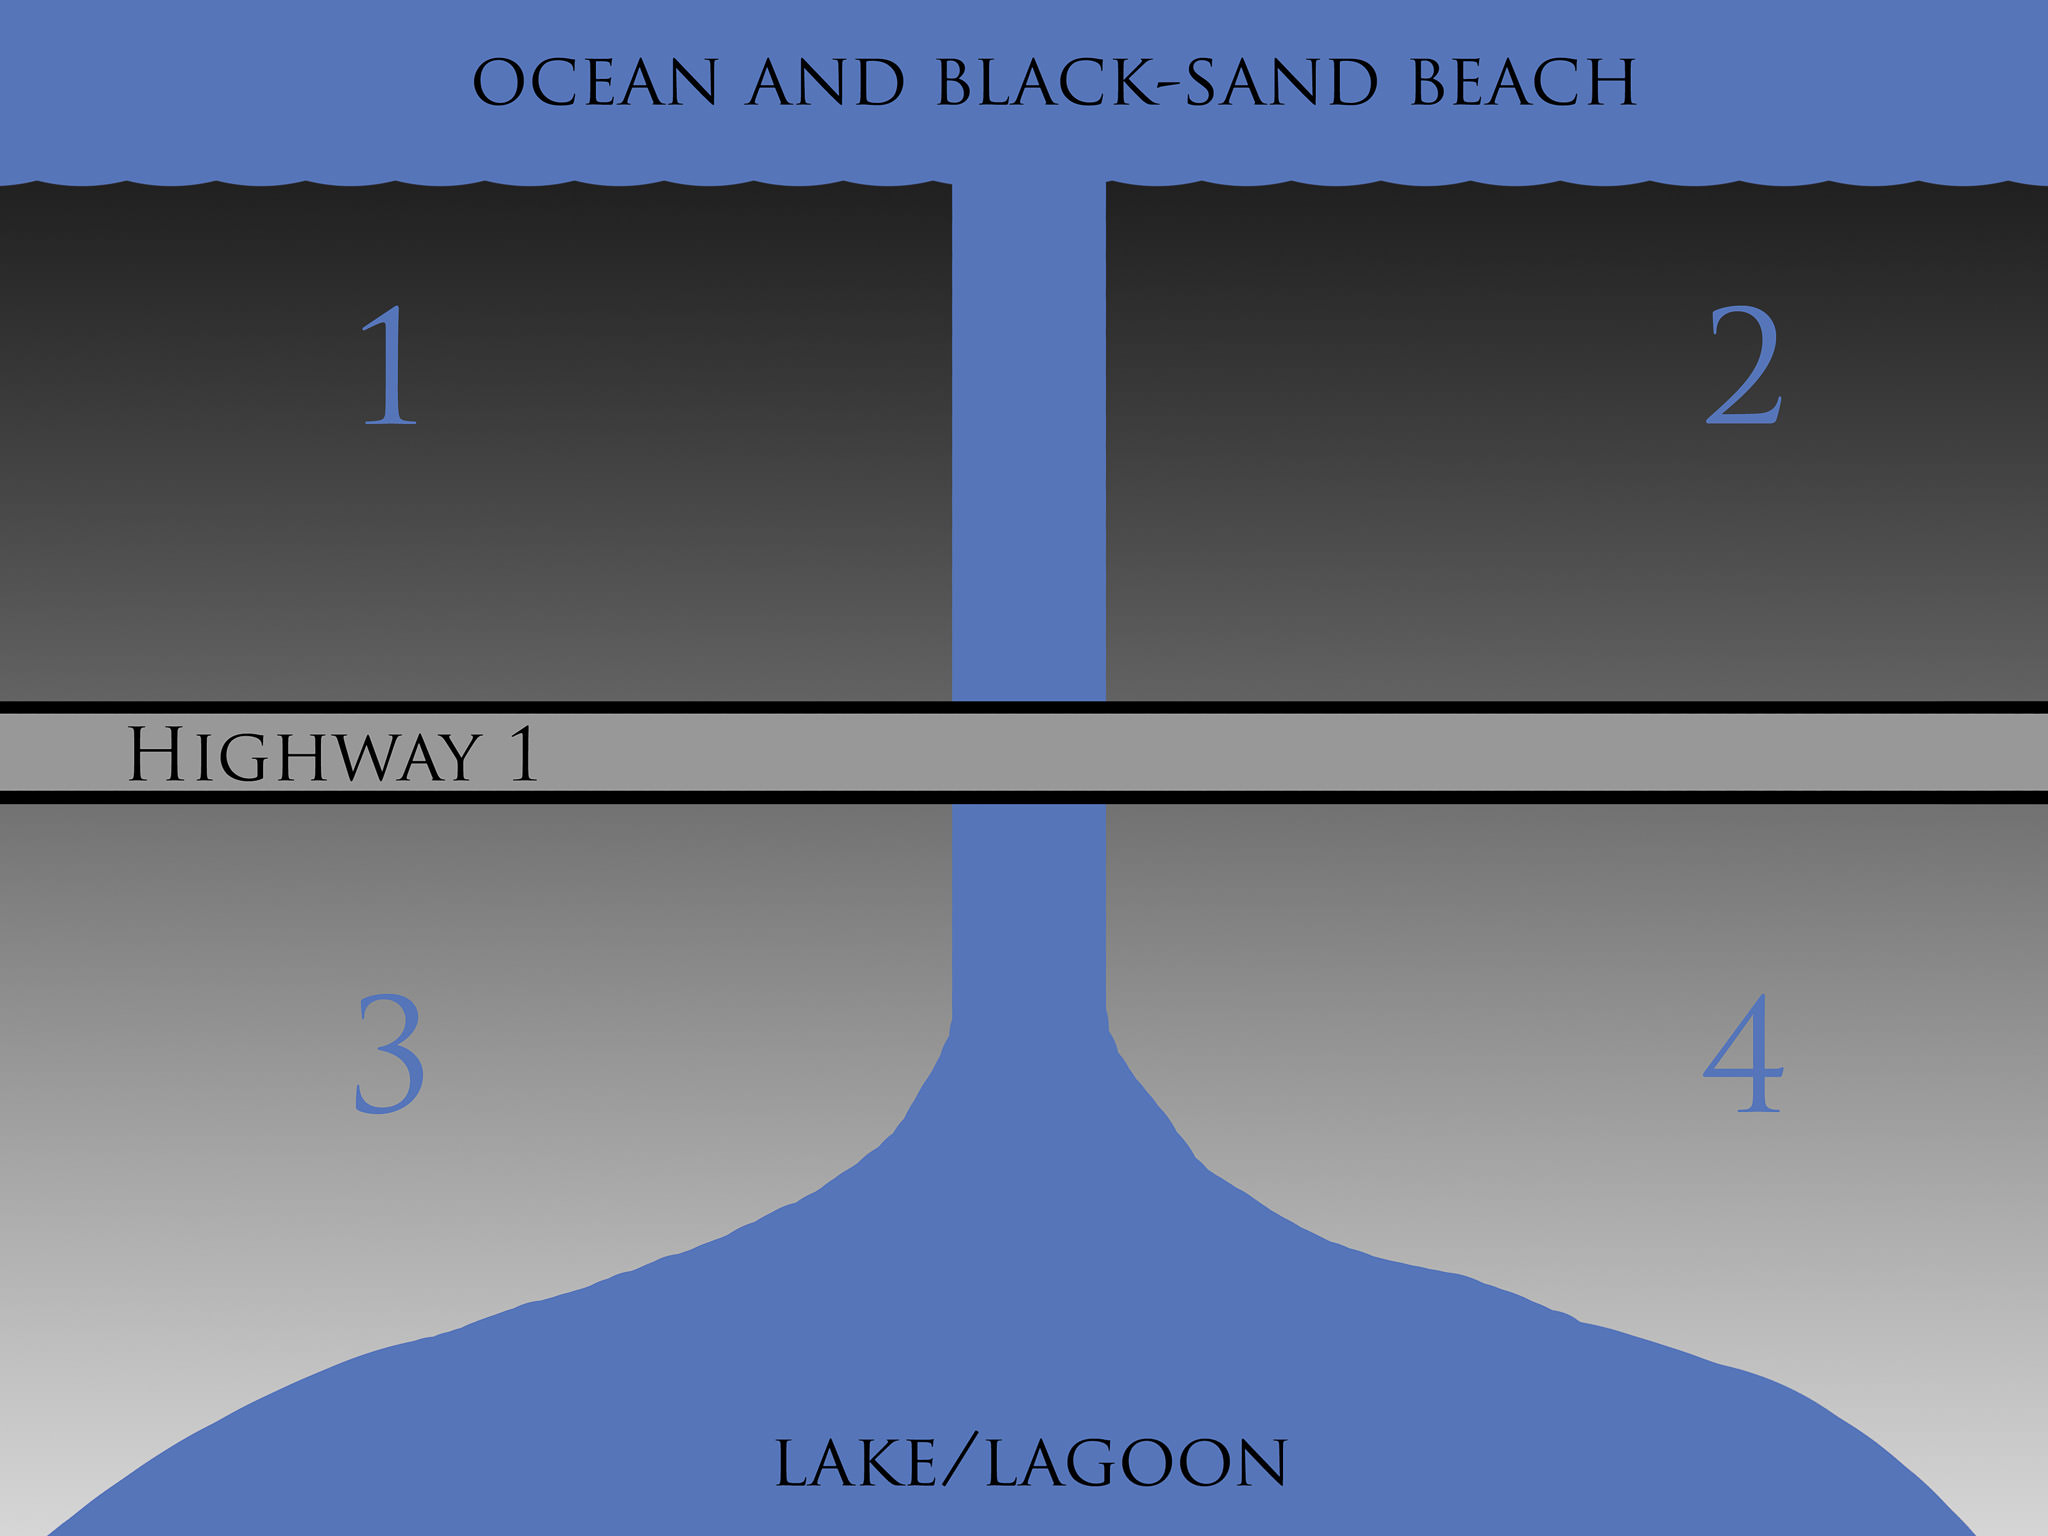
The most popular part of Jokulsarlon is quadrant 3 — this is where you will find the main parking lot and gift shop. It is easy to walk along the edge of the lake/lagoon in quadrant 3, which can lead to large crowds (especially during July and August).
Quadrant 4 is nice if you want a less-crowded view of the lagoon. It is still possible to walk to the edge of the water, although you must climb down a moderately-steep hill to do so. However, at least during the four days I visited Jokulsarlon, there were not quite as many icebergs on this side of the lagoon. Of course, quadrant 4 is beautiful, but there is a reason that quadrant 3 is more popular.
Quadrants 1 and 2 are nearly identical. The only real difference depends upon the tides — one of these beaches generally has more ice than the other. The amount of ice on each beach will change day-to-day, and it is impossible to predict which side will have more icebergs on a given day. If you want to avoid crowds, you may consider visiting the beach with less ice.
2) Times of Day
Jokulsarlon is most crowded at mid-day, as would be expected. Throughout most of Iceland, it is rare to see other people — Jokulsarlon, on the other hand, attracts thousands of tourists each day.
A common theme at Jokulsarlon, and in famous locations worldwide, is that few people explore beyond the surface of the site. Tourists may spend thousands of dollars and dozens of hours to visit a place like this, yet nearly everyone stays within 200 feet (60 meters) of the parking lot.
So, even during mid-day, it is easy to escape crowds by walking a few minutes farther up the lagoon. It is quite easy to do so, too — Iceland is so barren that nearly every landscape is easy to hike. Of course, the icebergs may be more plentiful near the parking lot, but that is impossible to predict beforehand.
If you have a more flexible schedule, though, the best time to visit Jokulsarlon is sunrise. Doing so is especially helpful if you want to photograph the black-sand beach without other photographers nearby — and at the best light of the day. Sunset is equally good for lighting, but it tends to be far more crowded than sunrise.
3) Camera Equipment
Since Jokulsarlon is divided into two parts (the lagoon and the beach), it is reasonable to use different sets of camera equipment for each.
Personally, I stuck with a wide-angle lens on the beach, and a telephoto at the lagoon. It is easy to walk up to icebergs on the beach, and a wide-angle lens helps exaggerate the beautiful lines of the waves. In the lagoon, though, most icebergs are in the distance — I would recommend a 70-200mm equivalent for most photographers who want a good shot of the ice in the lagoon.
More important than the lens, though, is a good tripod. I used my RRS TVC-24 tripod with the BH-40 ballhead — a fairly heavy-duty setup — throughout my trip to Iceland. Although I missed the lighter weight of my old tripod, the heavy waves on Jokulsarlon’s beach validated my decision.
However, no matter how sturdy your tripod, it is utterly useless if it sinks in the sand during the exposure. Your best option is to get tripod spikes, which let you push the tripod into the sand. The tripod manufacturer Feisol makes some good and inexpensive tripod spikes, which work with most tripods (although be sure to check your specific model before buying them).
With a strong tripod and a good set of spikes, it is possible to take sharp photos even when you are standing in the middle of rough waves.
4) Camera Settings
A difficult part of photographing Jokulsarlon is that the icebergs move somewhat quickly. Even in the calm waters of the lagoon, ice moves with the current at moderate speeds. To guarantee a sharp image, your shutter speed at the lagoon should be no longer than a second.
On the beach, the iceberg’s movement depends upon its size. The largest, heaviest icebergs generally remain still once they land on the beach, despite powerful waves crashing over them. However, lighter icebergs move quite quickly when hit by a wave, and you may still get motion blur with a 1/10 second shutter or faster. It is crucial to experiment on-location, since different wave and ice conditions make it hard to predict a shutter speed that works for a given scene.
If necessary, do not be afraid to raise your ISO. The worst possible result from a day at Jokulsarlon is to review your images and see that your photos all have some blur because of the iceberg’s movement — it is far better to shoot at ISO 400 or more, if you must.
That said, if you shoot during the day, you are unlikely to struggle with shutter speeds. It is only at sunset that you may find it tough to create a technically-perfect image.
5) Additional Equipment
Jokulsarlon is often wet and windy; and, even during the summer, painfully cold. A pair of windproof and water-resistant pants is a necessity, as is a rain-proof jacket. You may spend hours taking pictures in truly miserable conditions, and it is crucial to be dressed comfortably — Jokulsarlon is worth it.
Alongside all the cold-weather gear, one of the most important pieces of equipment I brought to Jokulsarlon was my pair of fishing waders. It is tough to get good photos on the black-sand beach without standing in the water — and, since this is the Arctic Ocean, you don’t want to stand in the water.
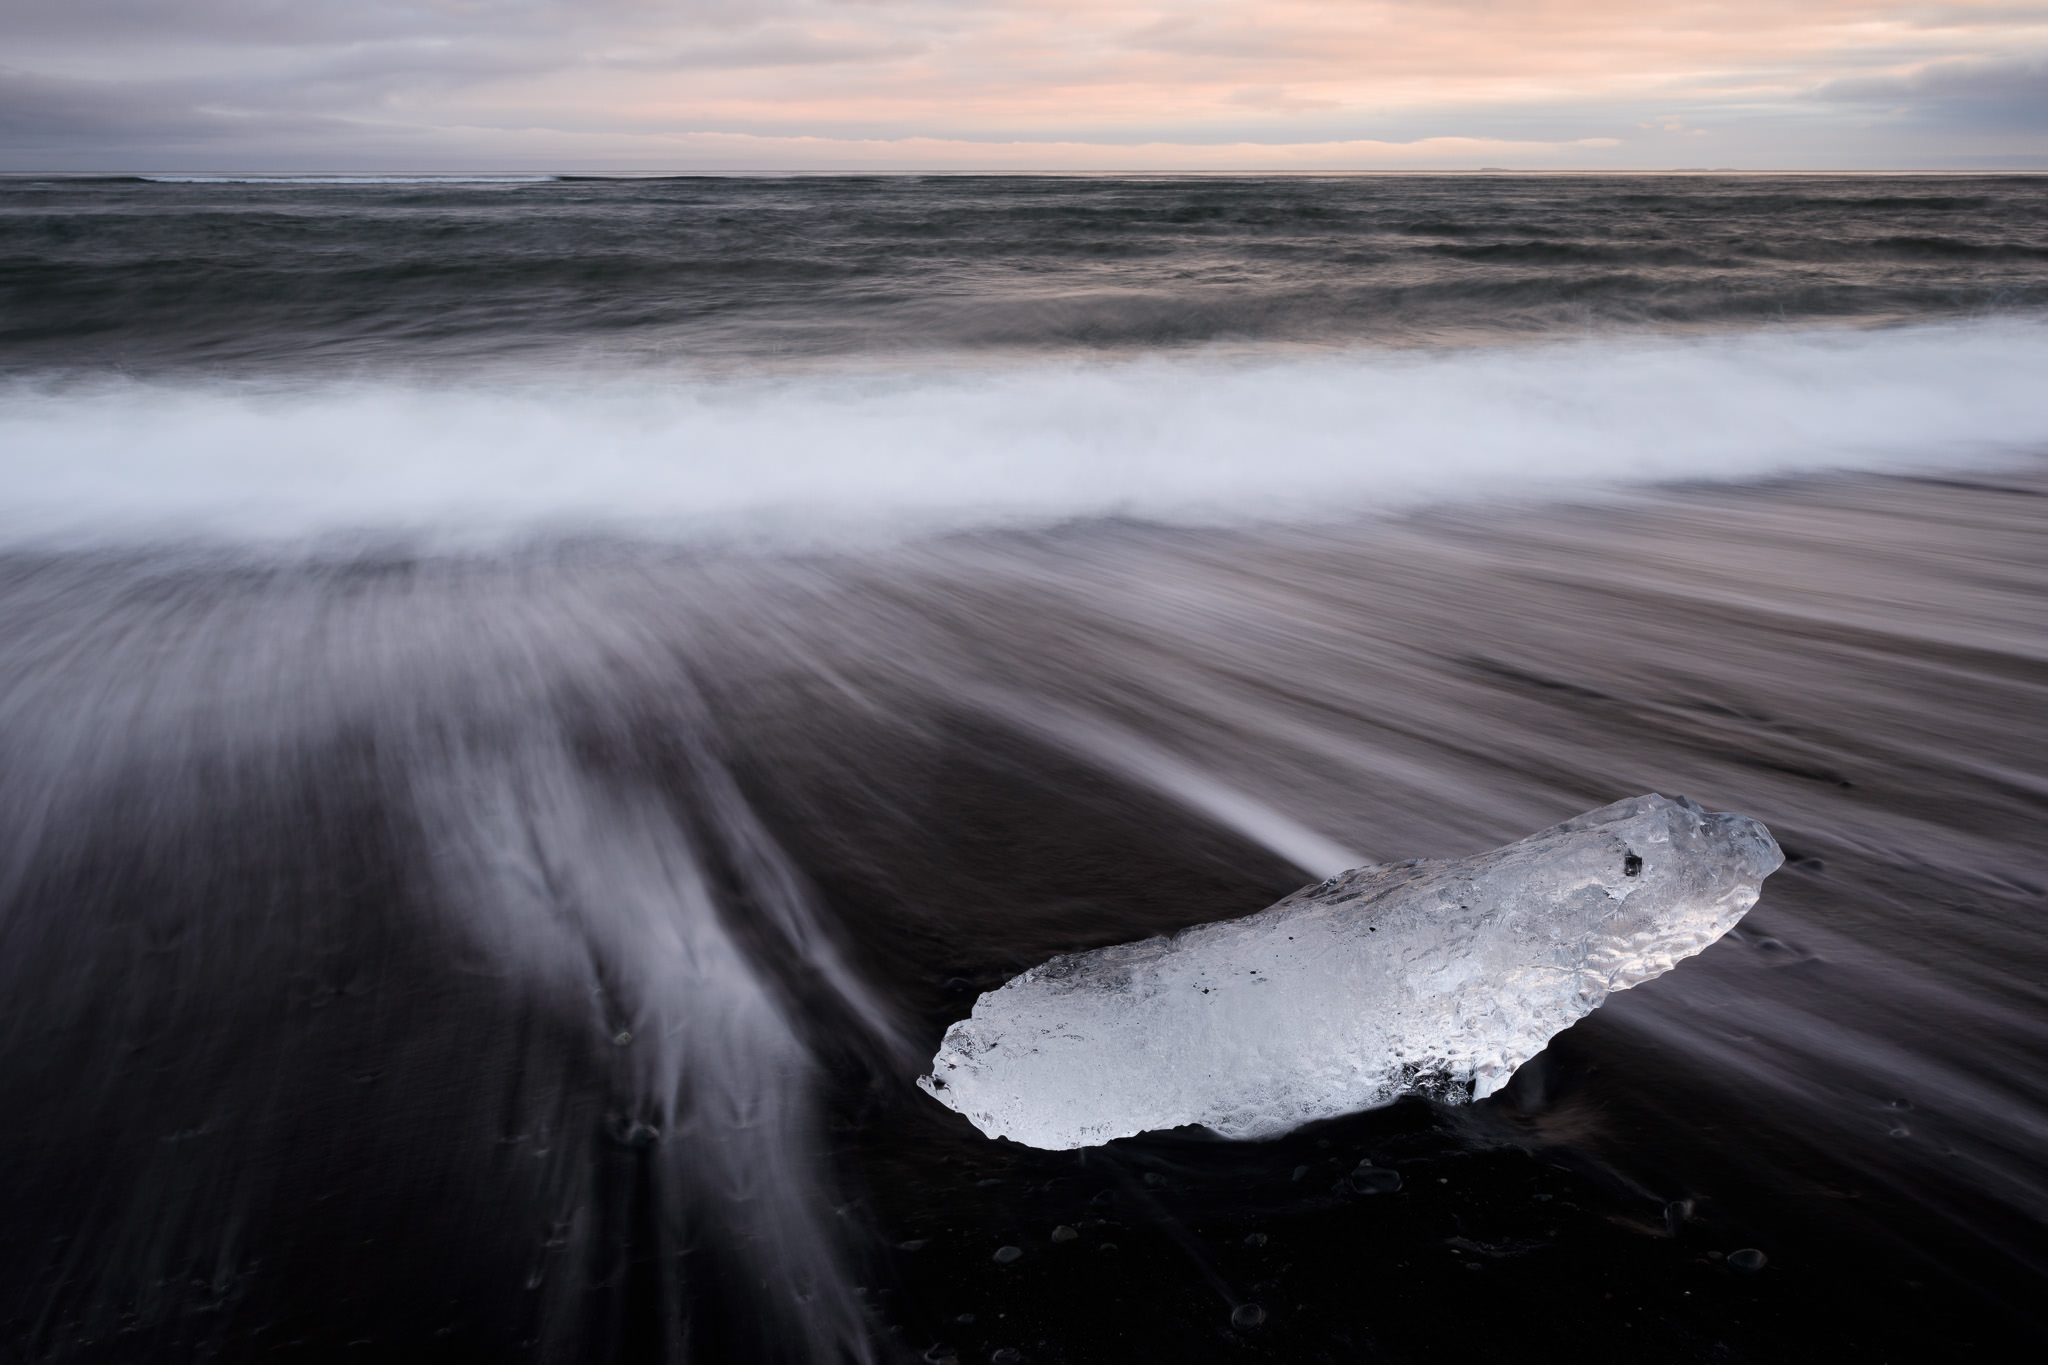
In terms of protective gear, I saw some photographers wearing tall, waterproof boots. These seemed to work well, although I’d imagine they are more prone to filling with water over time. I strongly discourage you from going too far out into the ocean, as it is very easy to be swept away by a rogue wave. But if you stand on the beach where the waves are a no more than ankle-high, and you pay careful attention to the ocean, you should be good. It is safe to say that many of my Jokulsarlon beach photos — including the one below — would have been impossible without waders or waterproof boots.
6) Overall
Jokulsarlon is one of the most wonderful landscapes on the planet, but it takes some preparation to photograph it well. If you want to avoid crowds and capture the best light, sunrise is the best time of day to visit — although good photos can be made here at any hour.
To photograph the lagoon as well as possible, consider using a telephoto lens. Although some icebergs will float near the edge of the water, most of the large pieces will remain in the distance. On the other hand, if your goal is to get a good photo at the black-sand beach, you need to use the proper equipment: a sturdy tripod and spikes, as well as fishing waders or waterproof boots.
If you prepare beforehand and pre-visualize the shots you want, you may find Jokulsarlon to be one of the best places in the world for photography.

Thanks, Tony. Excellent article and details – both for the photography equipment and settings, and also for the site management. Your photos are stunning. Exactly what I was search for to help plan my trip.
Thanks for this, very helpful.
I am visiting in September, but will only be at the lagoon for part of a day. I hadn’t thought about waders, but I think I will try and keep away from the water as I can’t swim and don’t really like waves either so might get a bit stressed. This has definitely given me a few pointers though, need to start preparing. I visited the lagoon before in 2007 but much less photography focused and I want to spend more time trying to get something this time. Although aurora are less common in September, I know they are possible so if they happen that day too, that would be awesome, but not basing my trip on it. A bit concerned about getting lost in the dark though (and needing the toilet if i am there a long time after the cafe shuts!!) I need to start thinking about light as I hadn’t really factored this into my decisions. I won’t be able to get here for sunrise, so I’m hoping I will be able to make use of sunrise at Vik where I am staying two nights. I am hoping to get out to the plane wreck also, but again have concerns about getting lost (I will be by myself) but determined to find a way (weather permitting)
I would suggest getting lost is not a problem. The road you will travel on is the main road that circuits the island and the beach is on one side and the lagoon on the other. Just drive off the road on to either car park and you are there. The waves can be large, or small, depending on the tide. If large, the waves can drive icebergs the size of a car up the beach. These can be dangerous, as running away from them up the beach on wet sand is not the most pleasant of pastimes! Just stand and watch, observe what is happening and you WILL be safe. The best shots are from the water’s edge, as a wave recedes and leaves small icebergs (up to the size of a coffee table, and smaller, a football) stranded with water patterns as the sea recedes. So you will need to get close, but walking boots will suffice. They will get wet. Your guides will be other photographers – watch what they are doing! And stay alert!
The cafe will be open whenever there are people to serve, so toilets are not a problem during daylight hours.
The plane wreck is another issue. You drive off the same main road along a rough track that soon becomes a well-worn trail across very open ground. It is a desert and you will wonder where the plane is. It will take about 10 minutes of careful driving – just follow the very obvious wheel tracks of the thousands of cars that have preceded you. The plane is isolated and you can climb into it and photograph from any angle. (Use the plane as a toilet screen if necessary – I didn’t say that!) Allow an hour for the plane visit.
You shouldn’t have any problems. I hope you enjoy the trip and come back with some amazing images.
Hello,
Not concerned about finding the lagoon, I should have clarified I meant getting lost if I am there at night looking for northern lights and am by myself navigating the beach etc. I have a terrible sense of direction :-) my toilet concern also in night time if I stay for NL if forecast is favourable, daytime fine.
As for the plane wreck, the path is closed for cars now (as of last I heard) due to damage by irresponsible people not sticking to track. I hadn’t planned on driving anyway, as I am not renting a 4×4 and am not comfortable attempting it in a smaller car. I was planning on walking, and my concern was getting lost with my poor sense of direction and/or if I went for northern lights, walking back in dark would be hard too.
I’ve not decided what im going to do about the plane yet. I really wish I had known about it when I travelled in 2007 as I had suitable car, a friend with me and it would have been less crowded!
I don’t be weeing near the plane! it’s a bit harder for us ladies :-)
Hello and thank you for the great advise.
I will be travelling Iceland and would like to know if the ice is plentiful all year, or are there better months like winter than summer to shoot the ice?
Thank you.
Now I need to purchase a pair of waders
Lenora. :)
Happy to help! The ice is generally more plentiful during the winter. However, your beach photos could suffer from too much ice, where you can’t isolate individual blocks (as I did in my photos above). The lagoon itself will generally be more photogenic during the winter.
I stayed around the Jokulsarlon area for about four days in the middle of June, and occasionally there was no ice at all on the beach — that just depended upon the tides. Any time of year should work, though, if you are willing to wait a day or two.
Let me know if you have any more questions. I hope you enjoy your trip!
I been wondering how can I take photos like that not with Ice just rocks, now I have an idea so thanks Spencer.
it must be the Aussie in me but I had. I problems whatsoever going along the beach in my thongs/flip-flops!
The water was a little cold but you get used to it after the first few waves. Probably helps to explain the funny looks I got too!
Please take the shore and waves seriously! Espacially close to Dyrhólaey and Reynisdrangar
(www.google.is/maps/…1f8b035451)
We just got yet another incident:
icelandmonitor.mbl.is/news/…dyrholaey/
Baldur
Love to take a swim in that sea
There are seals that manage it. I didn’t get any photos of them, though. If you do take a swim, remember to bring an underwater camera : )
You take a swim, you die. Humans are not seals!
Hi, did you use any filters?
I used a polarizing filter for every one of these shots, if I remember correctly. For the beach photos, I also used a graduated ND filter (2.5 stops, soft).
Indeed one of the most wonder of this planet!You can see a great collection from Jökulsárlón right here : www.flickr.com/photo…6610673269 and don´t forget about the best event at ice lagoon every year in August Fireworks show .This year will be Saturday 15th!
I hadn’t heard about the fireworks show. Thanks for the info!
Many thanks. An excellent article.
I will be there with a friend in the middle of September, so your comments are most timely and helpful.
One point for further consideration; we have heard from someone who used waders at that very location as you suggest, who was caught unawares by a large wave. Fortunately, she was able to stay on her feet, but she emphasised the danger of wading into the sea whilst being preoccupied with photography. If any other readers have a comment to add, for or against waders, I would welcome your help. They are quite heavy and there is a limit on airline luggage weight, so we don’t want to take them without a clear expectation of using them.
Any other helpful comments on any aspect of photography in Iceland also most welcome.
I agree that Jokulsarlon is a very special place, but I would reiterate the risks of photographing close to the water edge. The waves can be quite unpredictable and occasionally a wave can come much further up the beach than expected (particularly near the entrance to the lagoon, I believe). This happened to me in February, when one wave (which did not look particularly big) came right up the beach. Whilst the incoming wave was not strong enough to knock me over, the ebb completely washed the sand away from under my feet, causing me to go for a swim in the icy water (fortunately with D800 in a rain cover held well above the water line). Boots or waders are of no help in such a situation. All of my subsequent photographs were taken with a longer focal length from a safer distance.
As is often the case, the light is best early and late in the day, and the beach is much less crowded at these times. Having said this, the beach is quite long and I never found overcrowding to be a problem.
Good points. Thank you, Tony.
I would like to add that it is important to watch for icebergs behind you as well, if you choose to wade into the ocean. A few times, I saw powerful waves move massive icebergs much farther on shore than you would expect. Many of these icebergs are large enough to knock over a semi-oblivious photographer when the wave recedes.
~Spencer
Thanks, Tony!
I have heard several stories of people taking an unexpected swim at Jokulsarlon when they were busy photographing. It’s always important to be careful with this type of photography.
The waders I used were a $35 pair from Academy Sports. They weigh just a few pounds and fold quite flat (they are made of thin canvas and neoprene/rubber). I had no particular difficulties fitting them in my luggage.
And yes, more tips for photographing Iceland are soon to come!
~Spencer