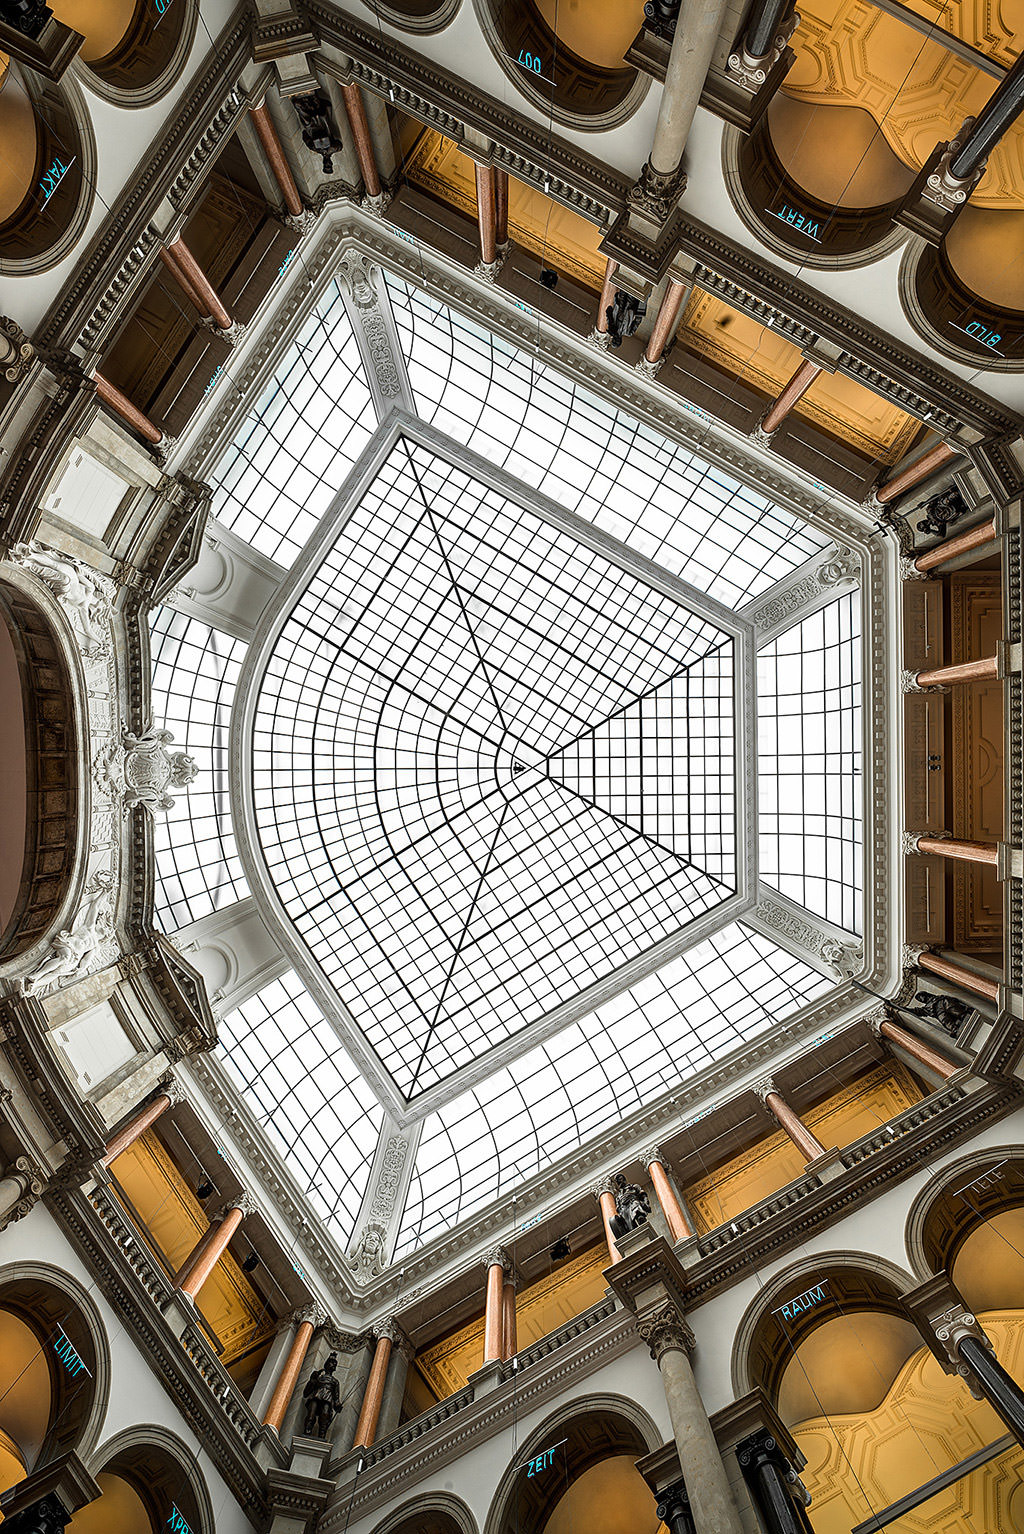
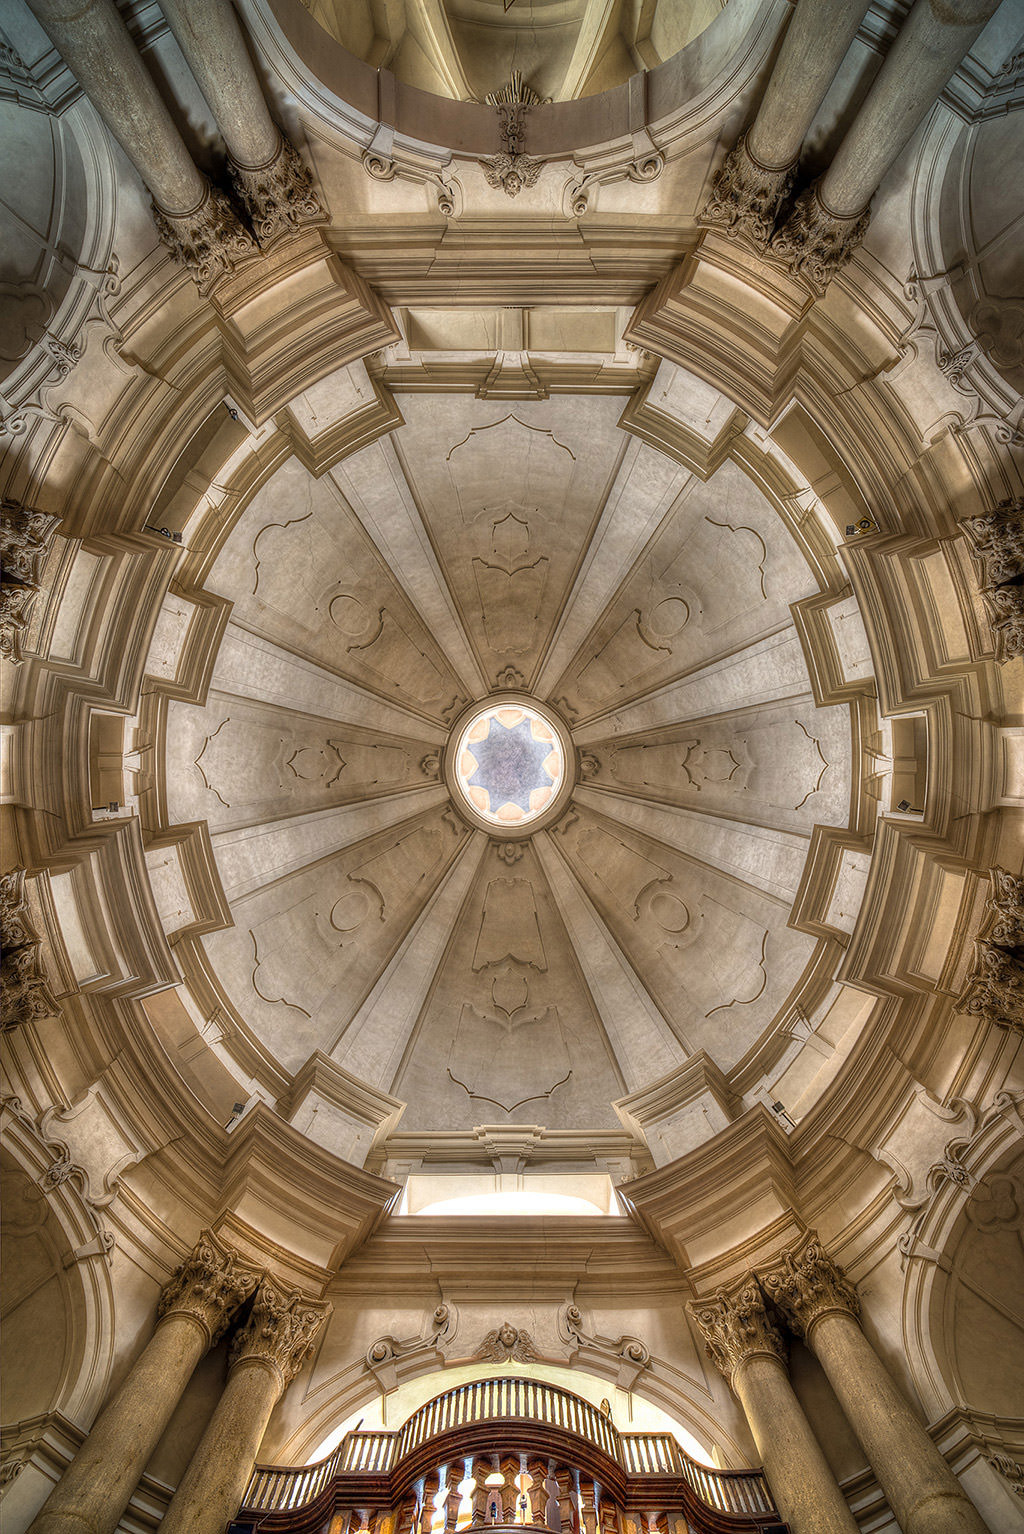
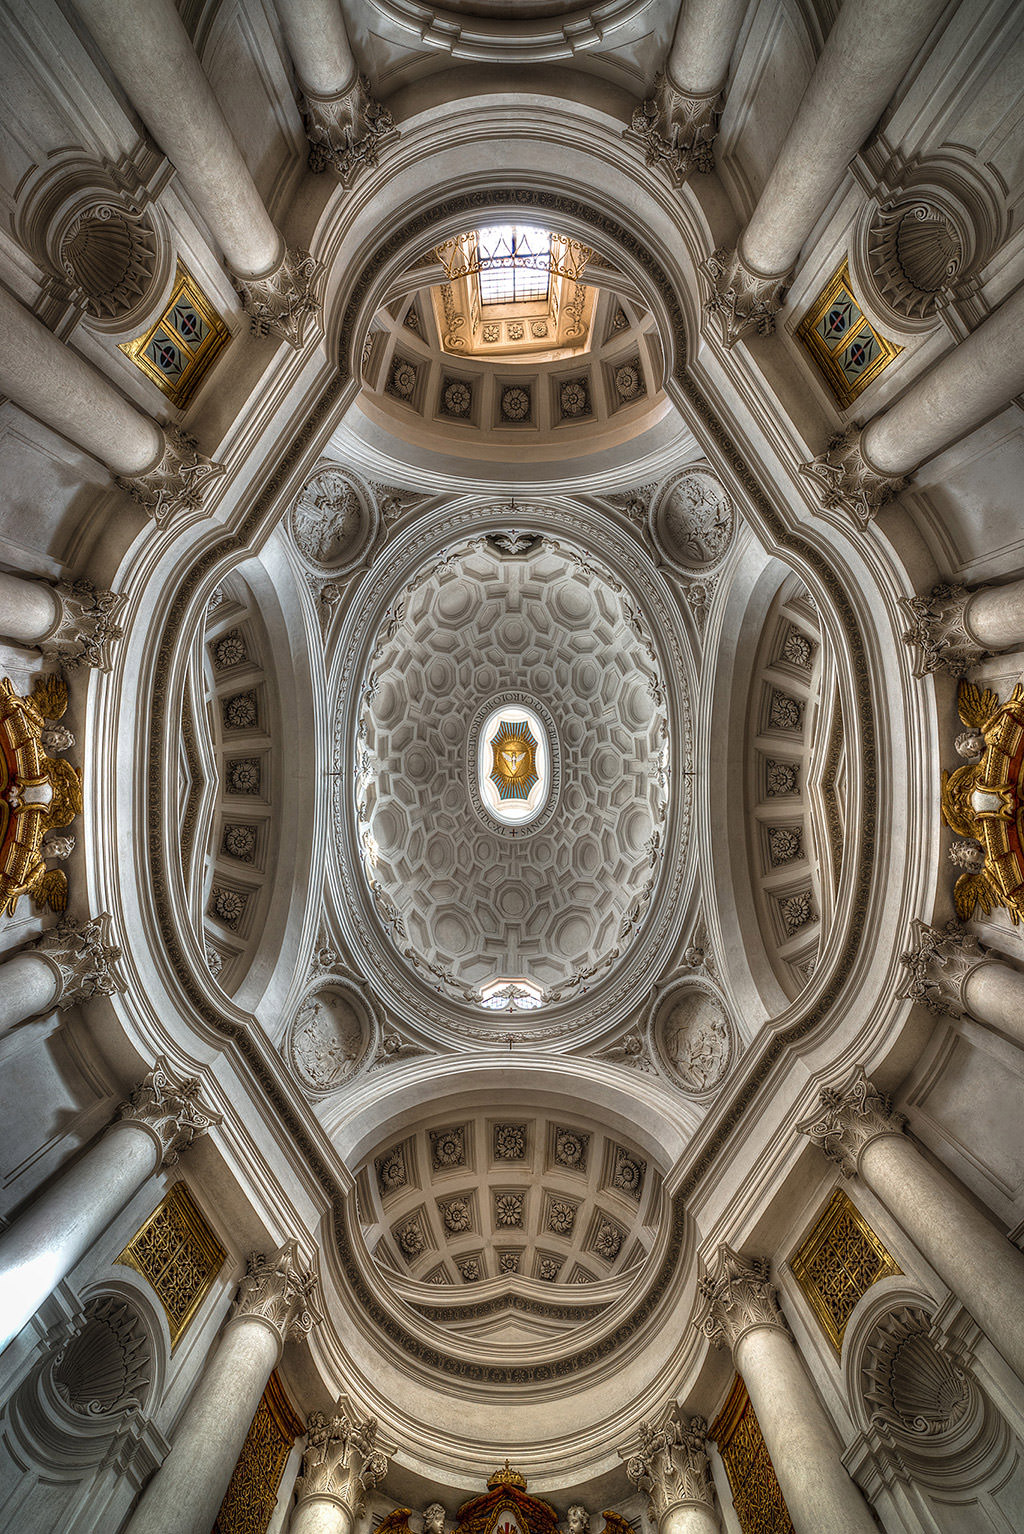
Incredibly, the first domes date back to people living in the Mediterranean region 4,000 years BC. Since then, artists have created a fascinating variety of them all over the world. Still today, they are an essential part of modern architecture, as shown for example by Calatrava’s spectacular glass dome of the library of the Institute of Law in Zurich, Switzerland.
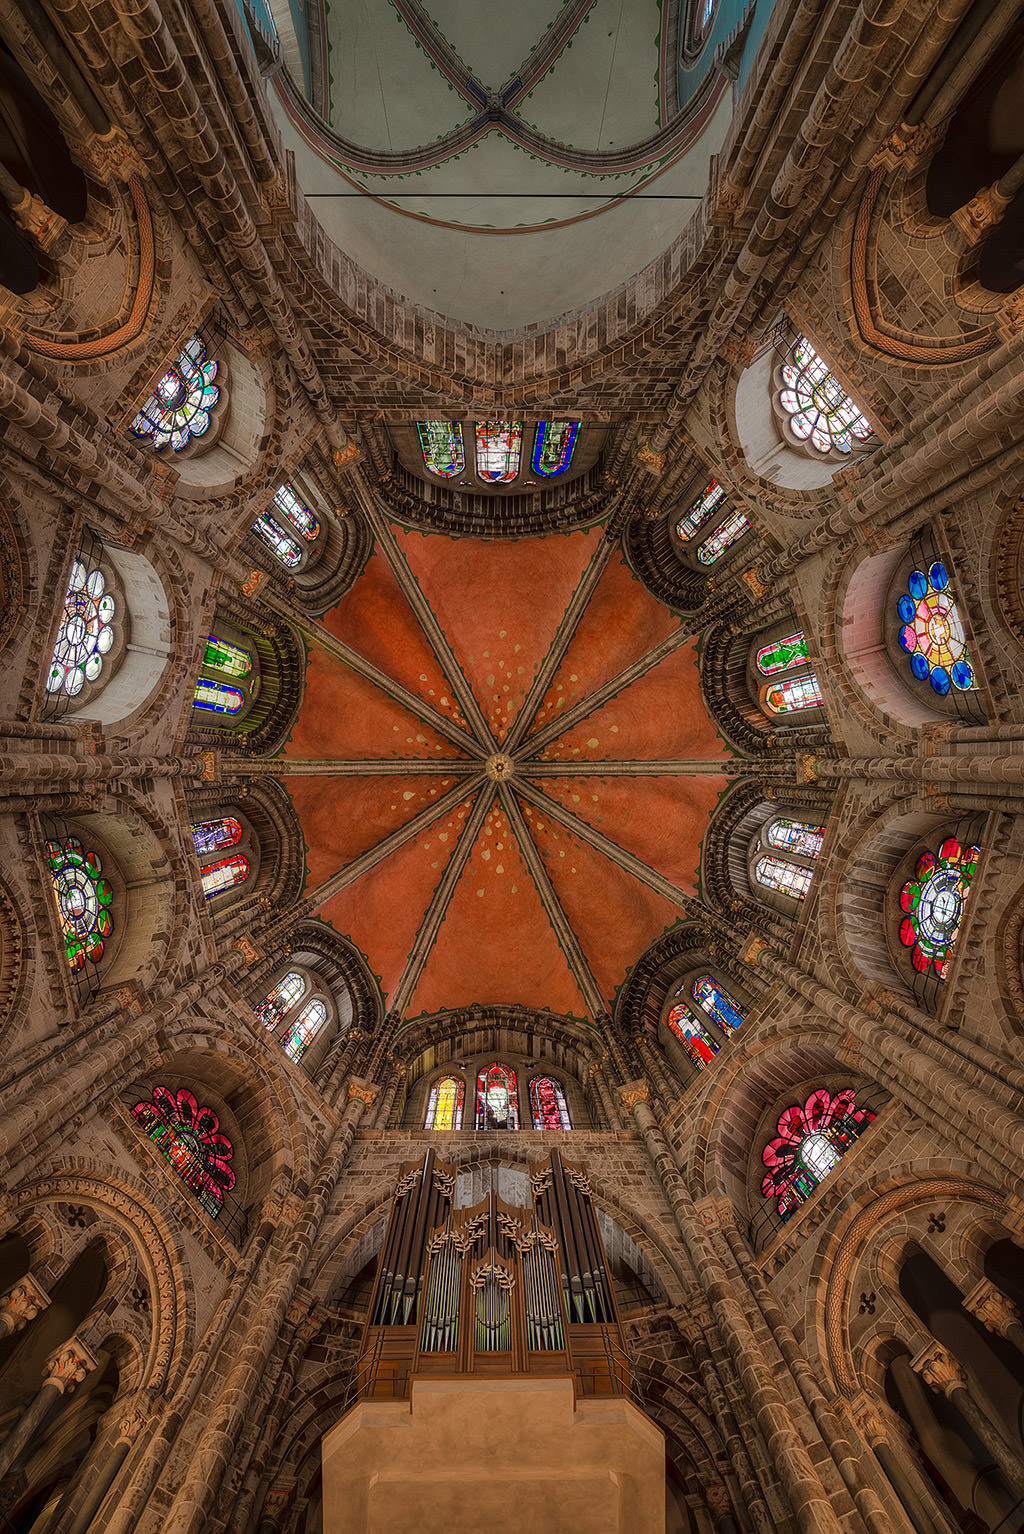
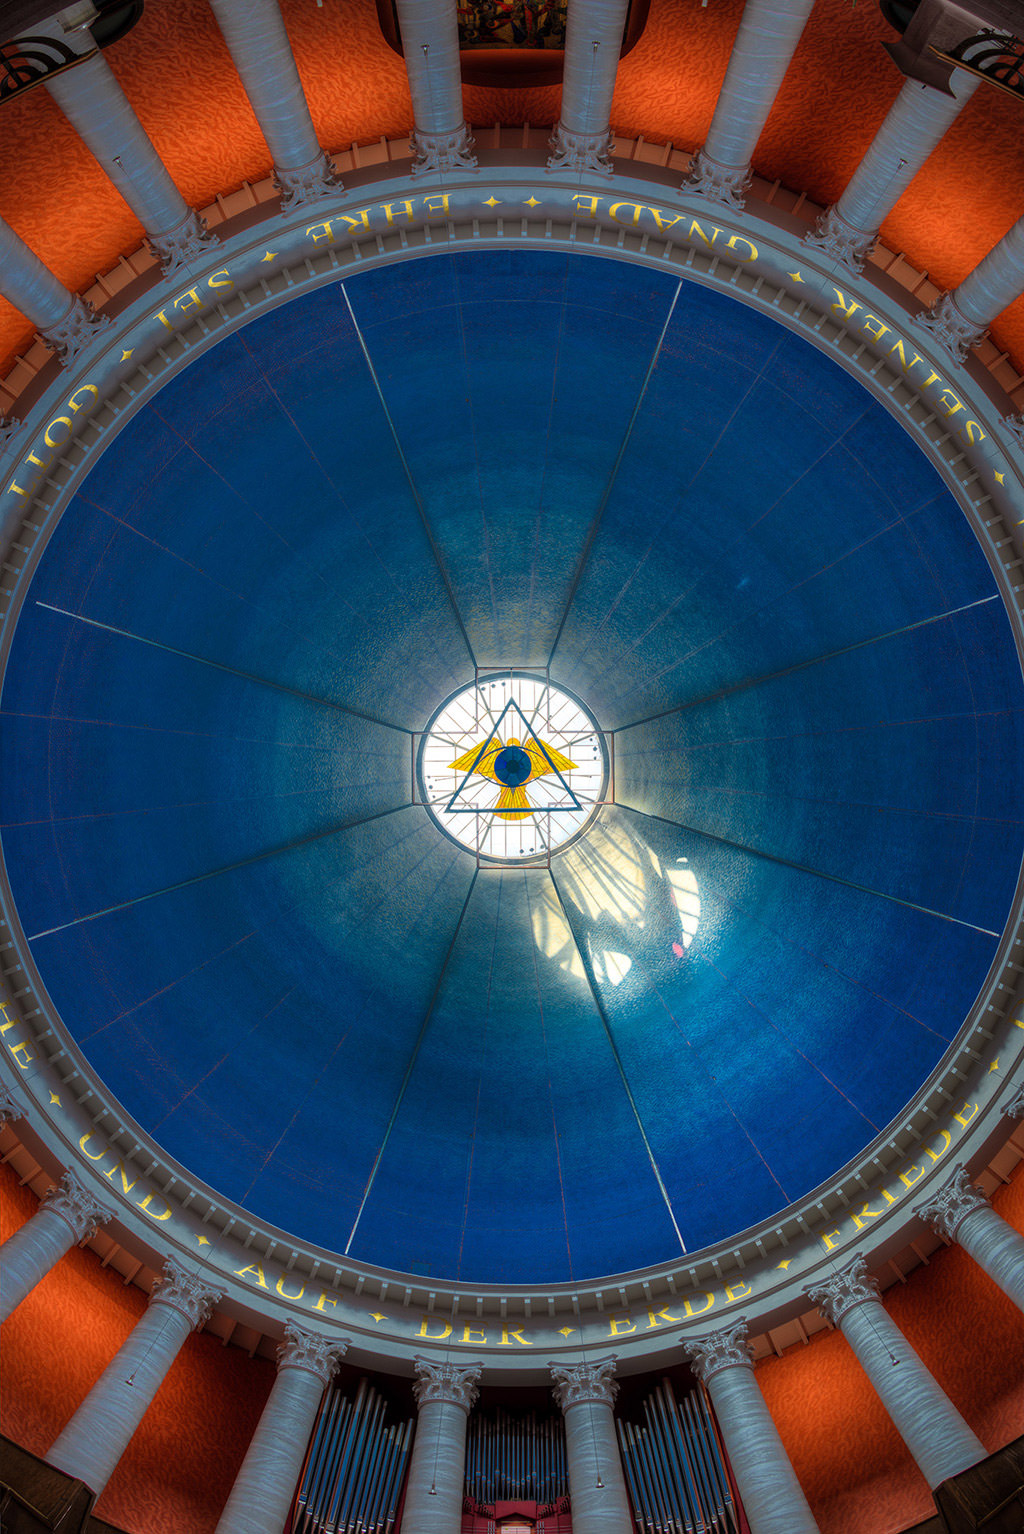
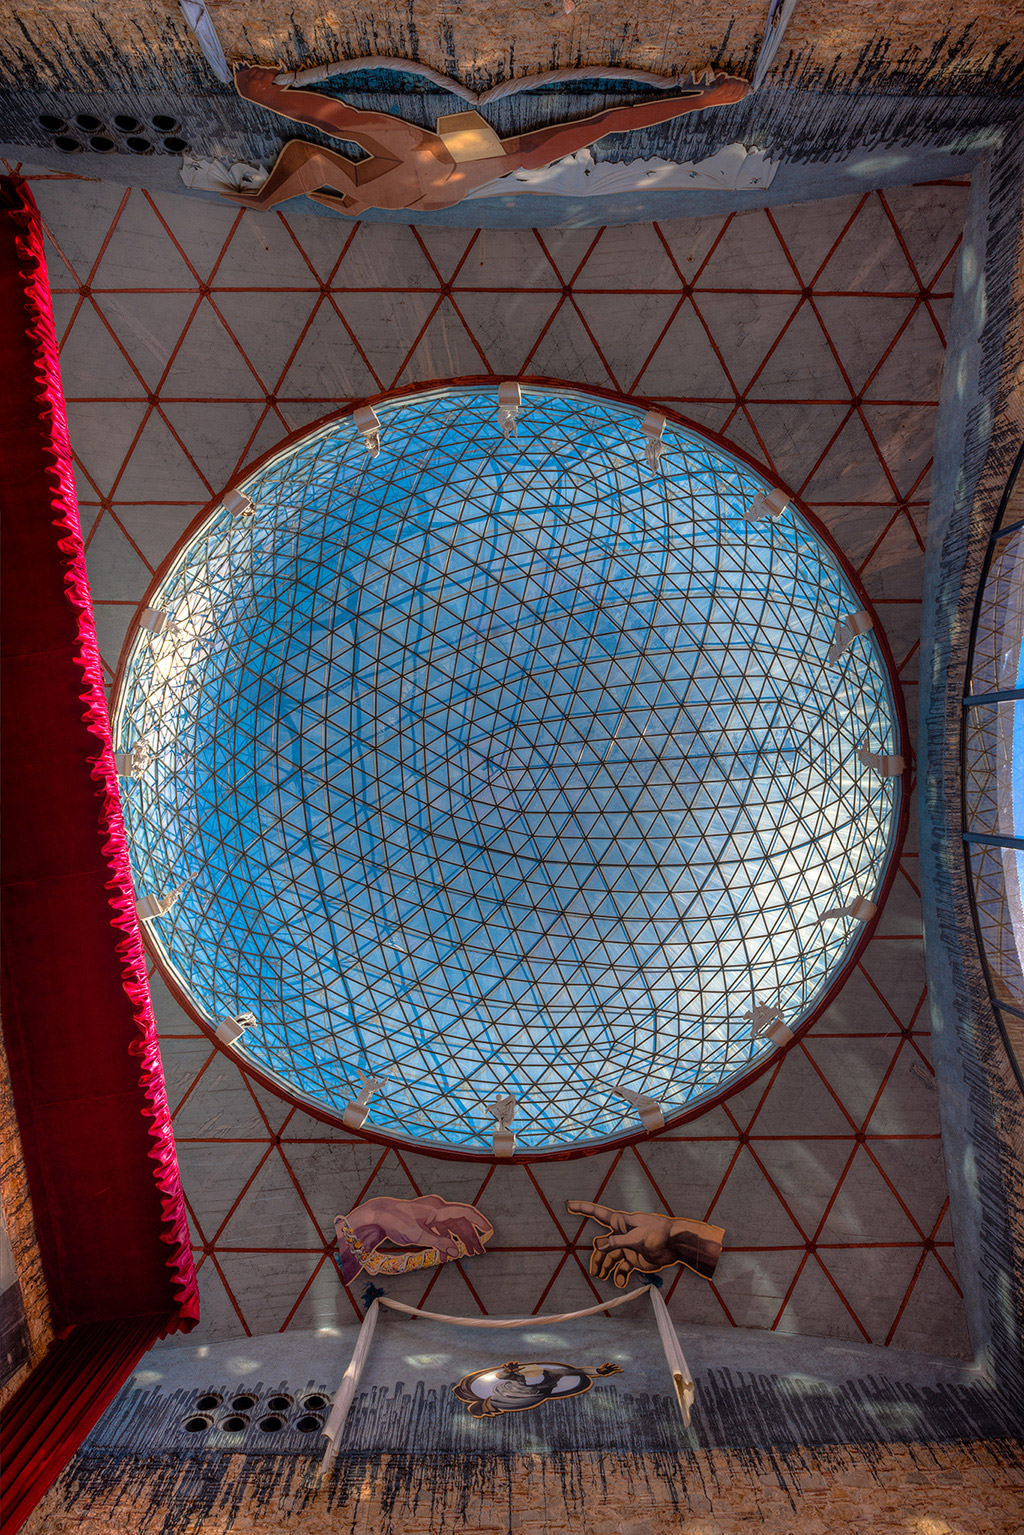
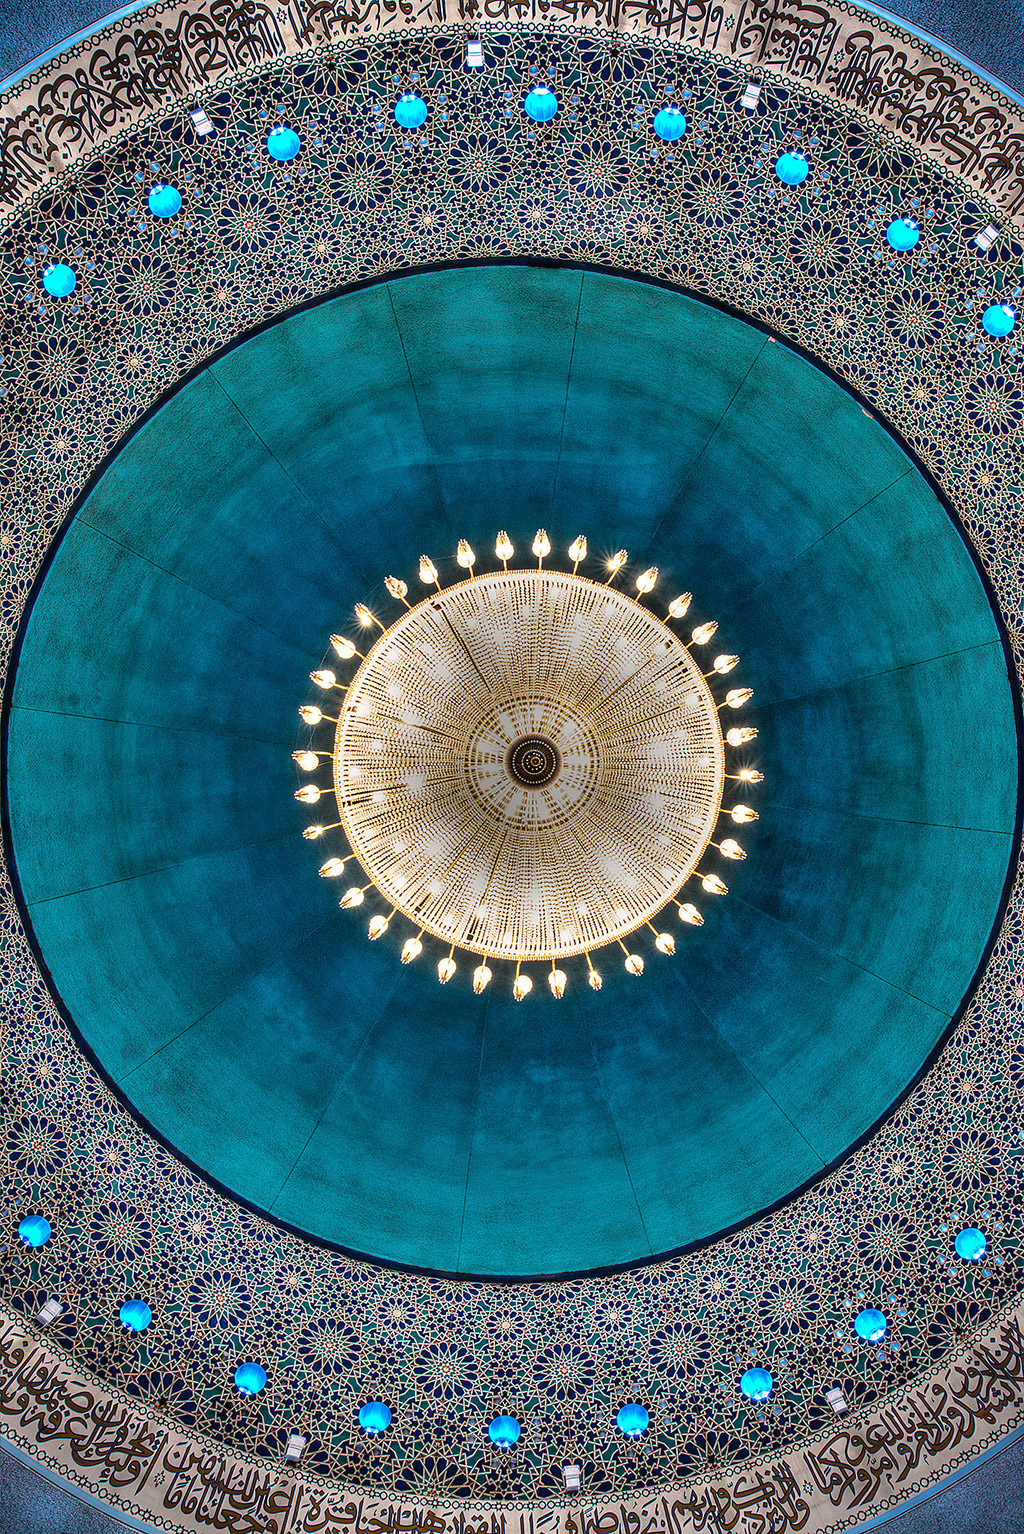
Unfortunately, most domes do not get the attention they really deserve. One reason is that many buildings, especially churches, are not well illuminated and the works of art can hardly be seen in the semidarkness. Another reason is that some domes, particularly those from the Renaissance and Baroque periods, are crowned by a lantern with separate windows which cause sharp contrasts. Furthermore, in bigger domes the details are far away from the observer on the ground, making it virtually impossible to study the subtle details of paintings. Finally – no surprise! – domes are located above you and looking upwards becomes strenuous for the cervical spine soon. The photographic technique described below helps to overcome some of these difficulties.

I switched to full format photography a few years ago when the Nikon D800 came out. At the same time, Carl Zeiss started to sell their super wide angle lens with a focal distance of 15mm, the Zeiss Distagon T* 15mm f/2.8. With a focus on architecture, this combination is really a dream for me. It gives you razor sharp details I have never seen before.
First, I took pictures of domes as I did of other parts of buildings. They were not really in the center of my interest. This changed when I had a close look at some photos I took more or less accidentally, especially when changing the exposure in Lightroom. I became fascinated by the geometry of domes, their colors and their decoration. So I decided to focus on this subject a little bit closer. I added a notebook to my equipment on which ControlMyNikon serves as remote control software.
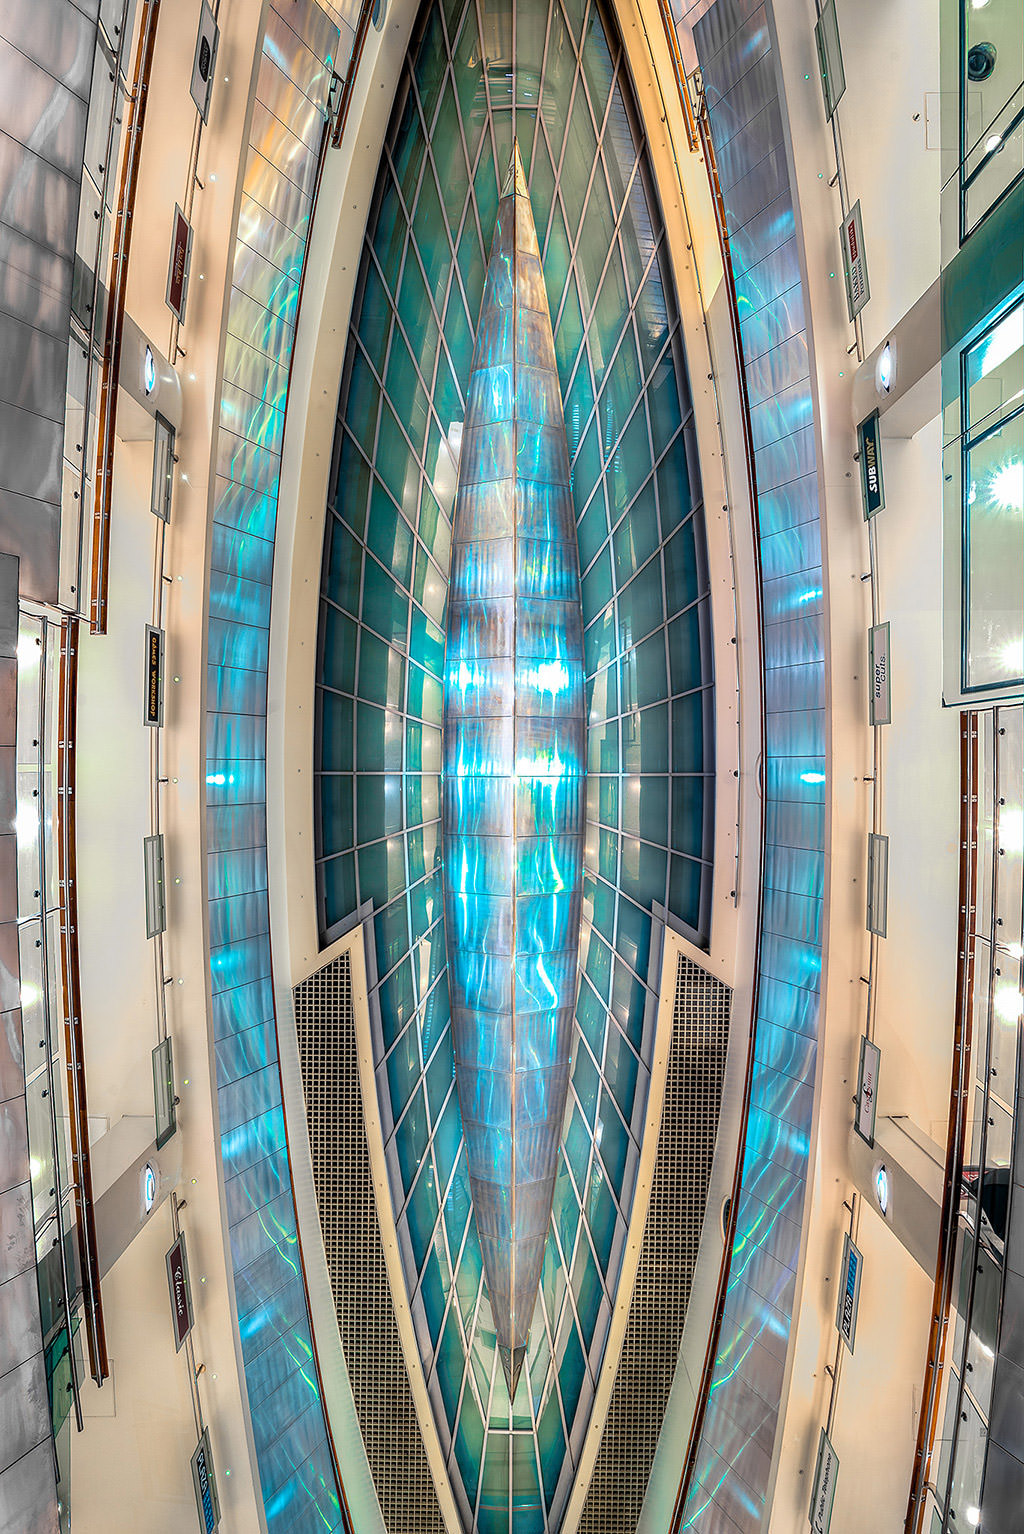
The setup is simple: Without a tripod, I put the camera directly on the floor. The display is protected by a thin rubber mat. The lens is positioned directly under the middle of the dome and points directly to its center. As I cannot use the viewfinder or the LCD anymore with this setup, the camera is linked to the computer with a standard USB cable. The 15-inch monitor gives me a reasonably sized image. LiveView allows me to find the exact center of the dome, which can be a challenging task. The zoom function is extremely helpful in this context. Most of the images are taken with an aperture of f/8 or f/10. ISO is always set to 50. I take 16 pictures with shutter speeds ranging from 1/800 to 30 seconds. These settings are saved in a profile. I start the program with a click of a button and then the computer and the camera do their work. The photos are developed in Lightroom, then transferred to Photomatix as HDR software and finally prepared for web presentation in Photoshop by exactly following the workflow Nasim describes on this website.

Some situations do not allow taking photos in the way described above, mainly for two reasons: you must be really fast (e.g. in a church which is open to the public only for the mass, so you don’t have enough time to install your computer after the priest has finished his service and before the building is locked again a few minutes later), or your setup is classified as professional equipment (e.g. by staff members of a museum who think that you take photos for commercial purposes). In these cases, I use the Haehnel Giga T Pro II (B&H) wireless remote control and the built-in bracketing function of the D800 with 9 images. This requires some experience, because you have no visual control and especially in larger buildings finding the exact center of the dome might be even more difficult than with Live View on the notebook.

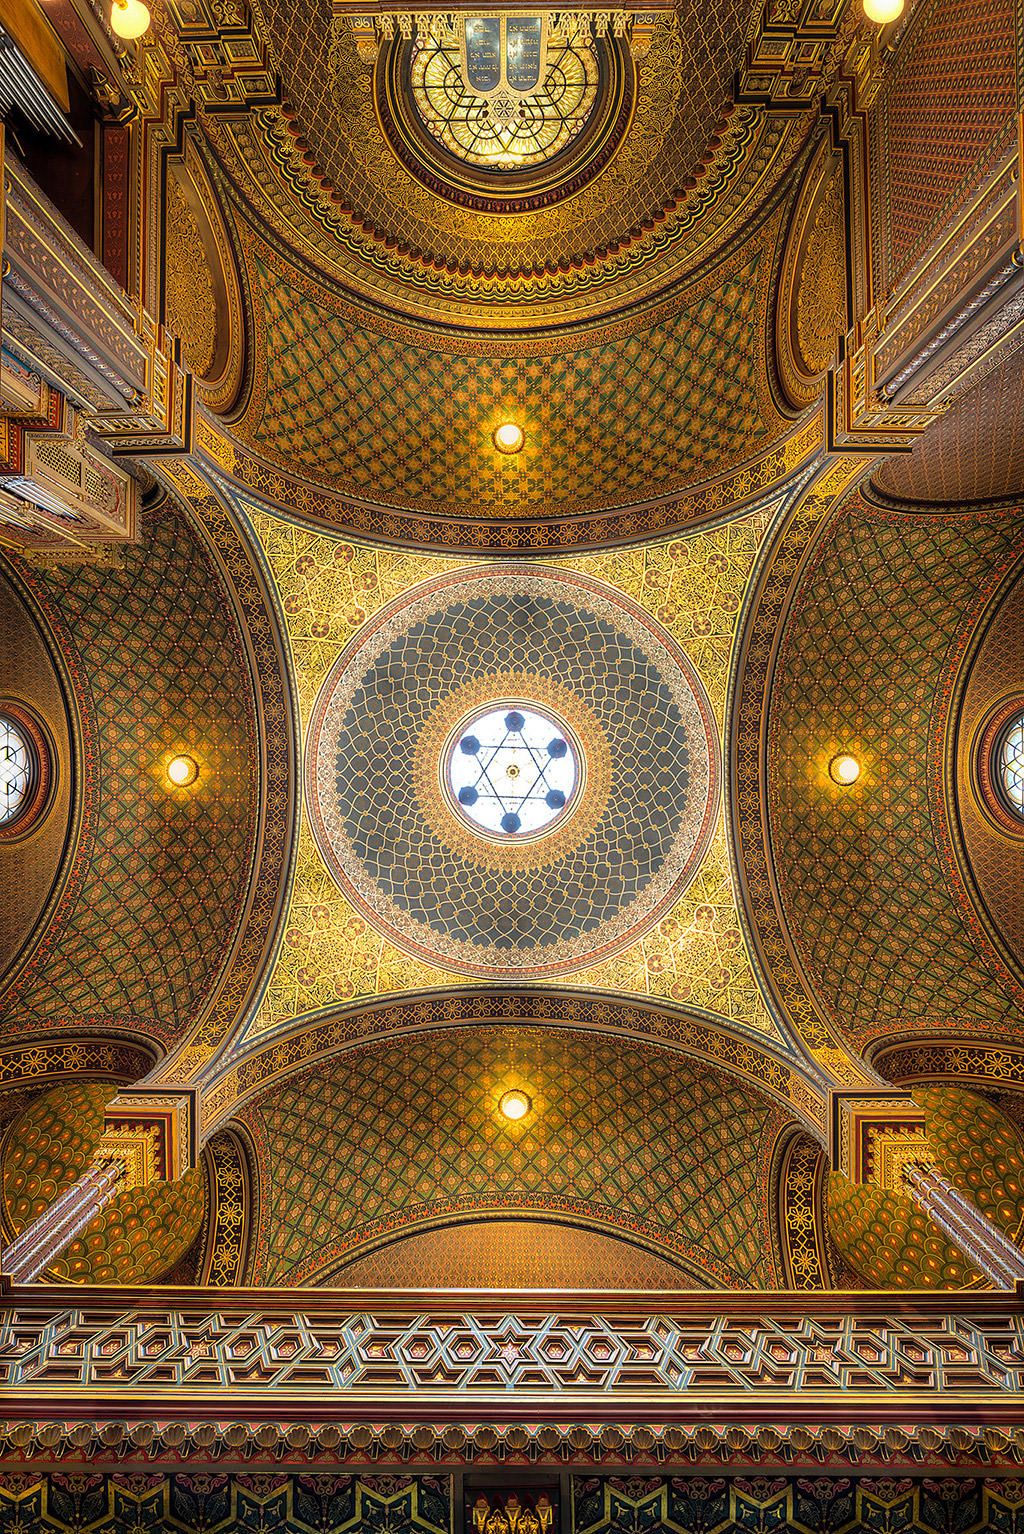
I am a professional radiation oncologist, not a photographer. But medical science means travelling from time to time. Furthermore, my wife and my three kids really like being on tour, so I see a lot of places. Before I start, I have a close look at good guidebooks, do some web search and scan sites like 500px.com. A perfect preparation is essential! Quite often you can identify problematic locations in advance. St. Peter’s Basilica in Rome has definitely a perfect dome, but unfortunately, the Pope’s throne is situated where the camera should be positioned… Taking photos is usually not a problem in Roman Catholic churches which are generally open to the public. With Jewish synagogues the situation is completely different: without hardly any exception, taking photos is strictly forbidden, mainly for security reasons. In other locations, like courts, written requests and formal permissions are mandatory. However, despite good research in advance, you don’t get every shot you long for: some churches are open only once a week for two hours, some domes are covered because they are getting restored etc. Nevertheless, I am able to realize about 80% of the planned projects (a good rate compared to wildlife photography, isn’t it?).
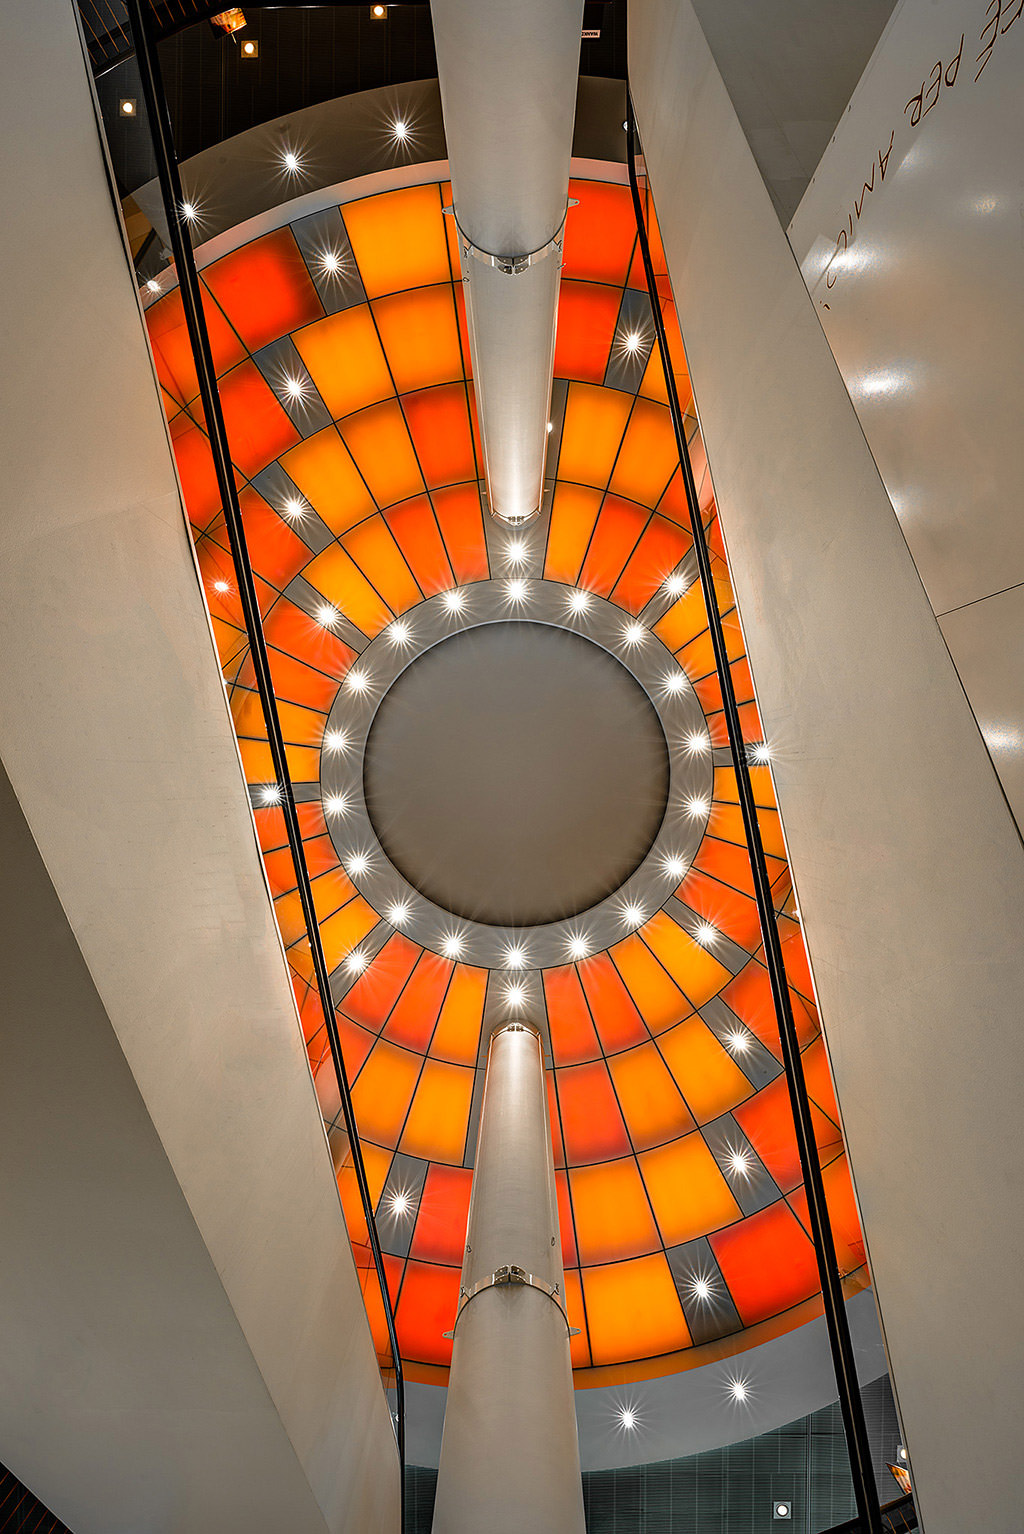
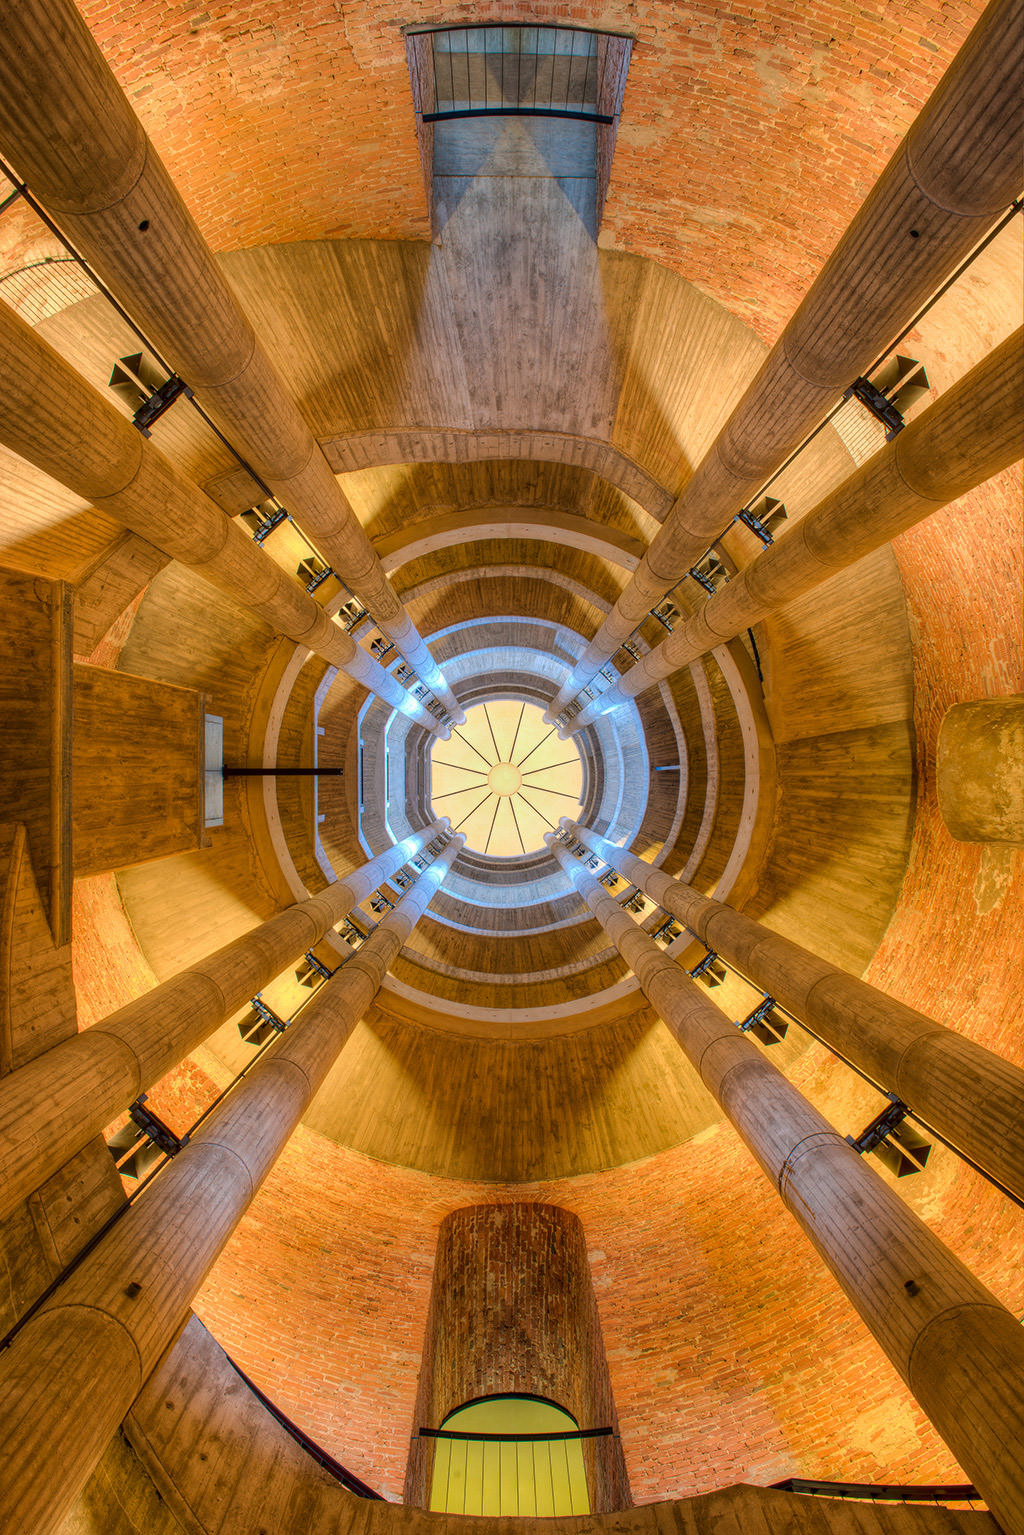
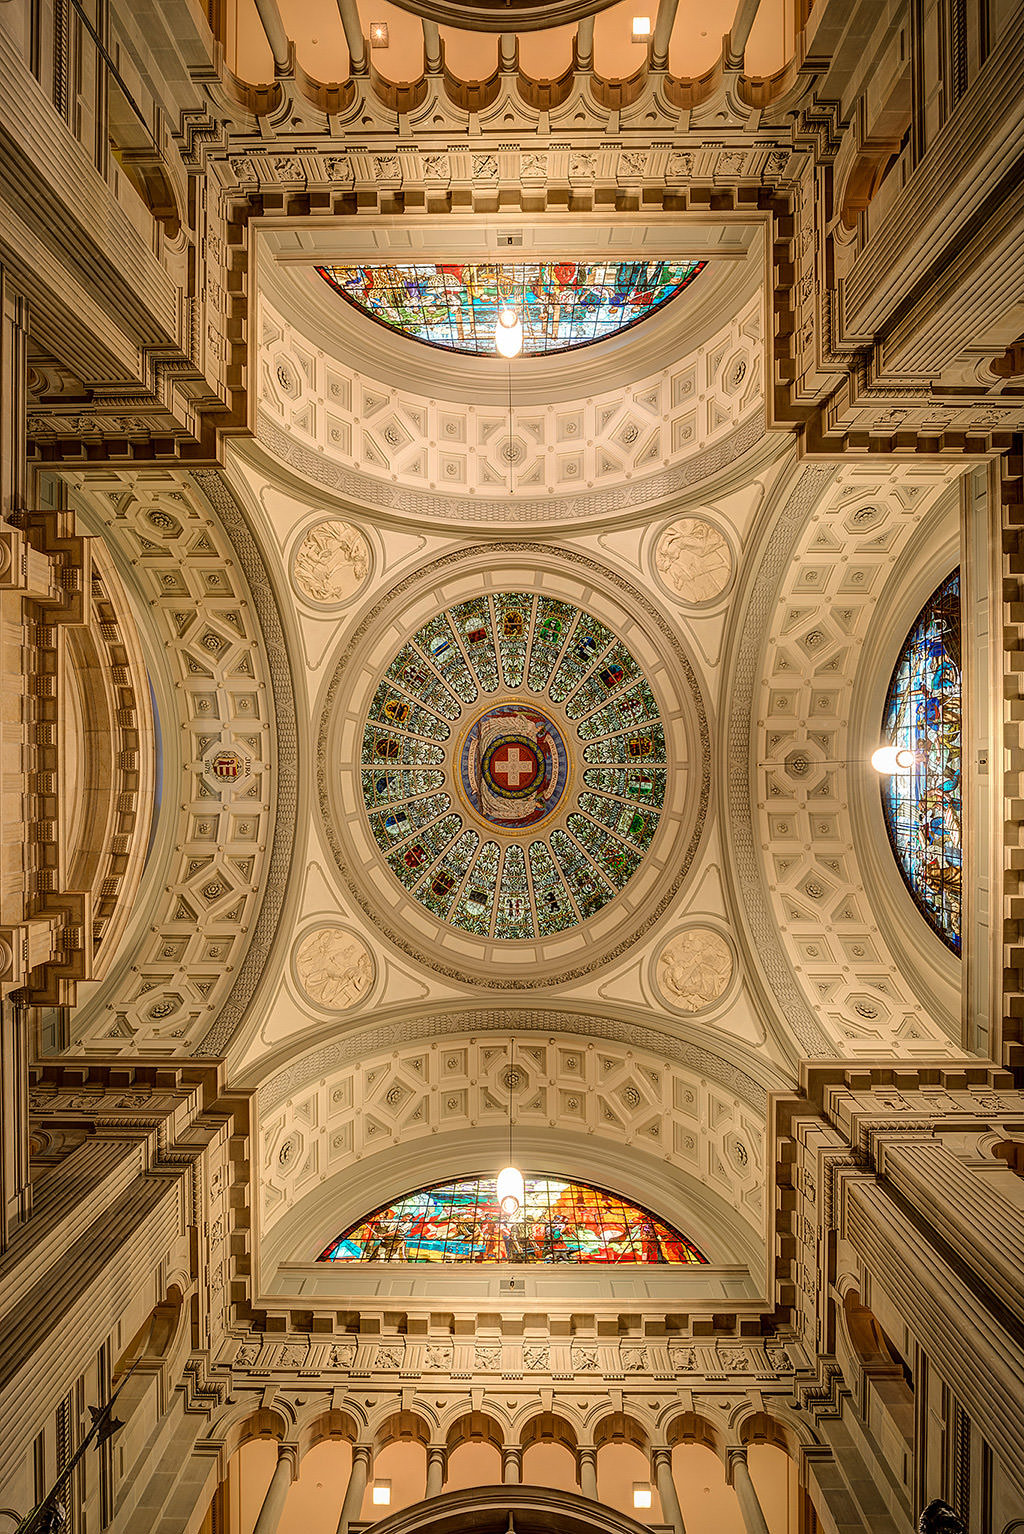
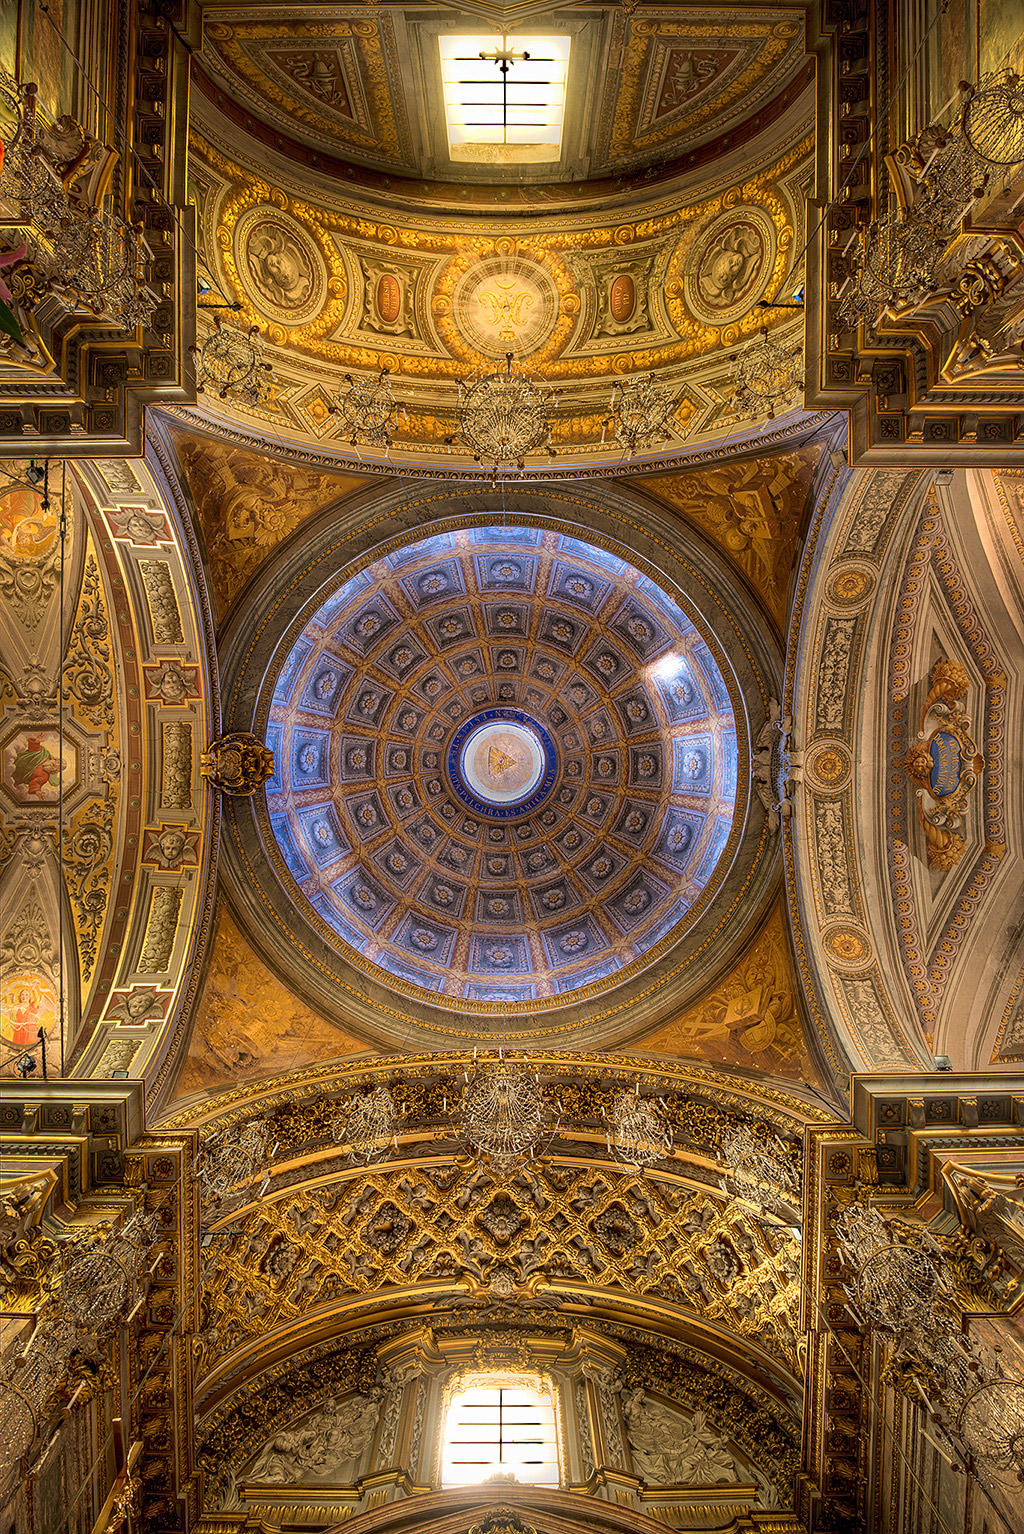
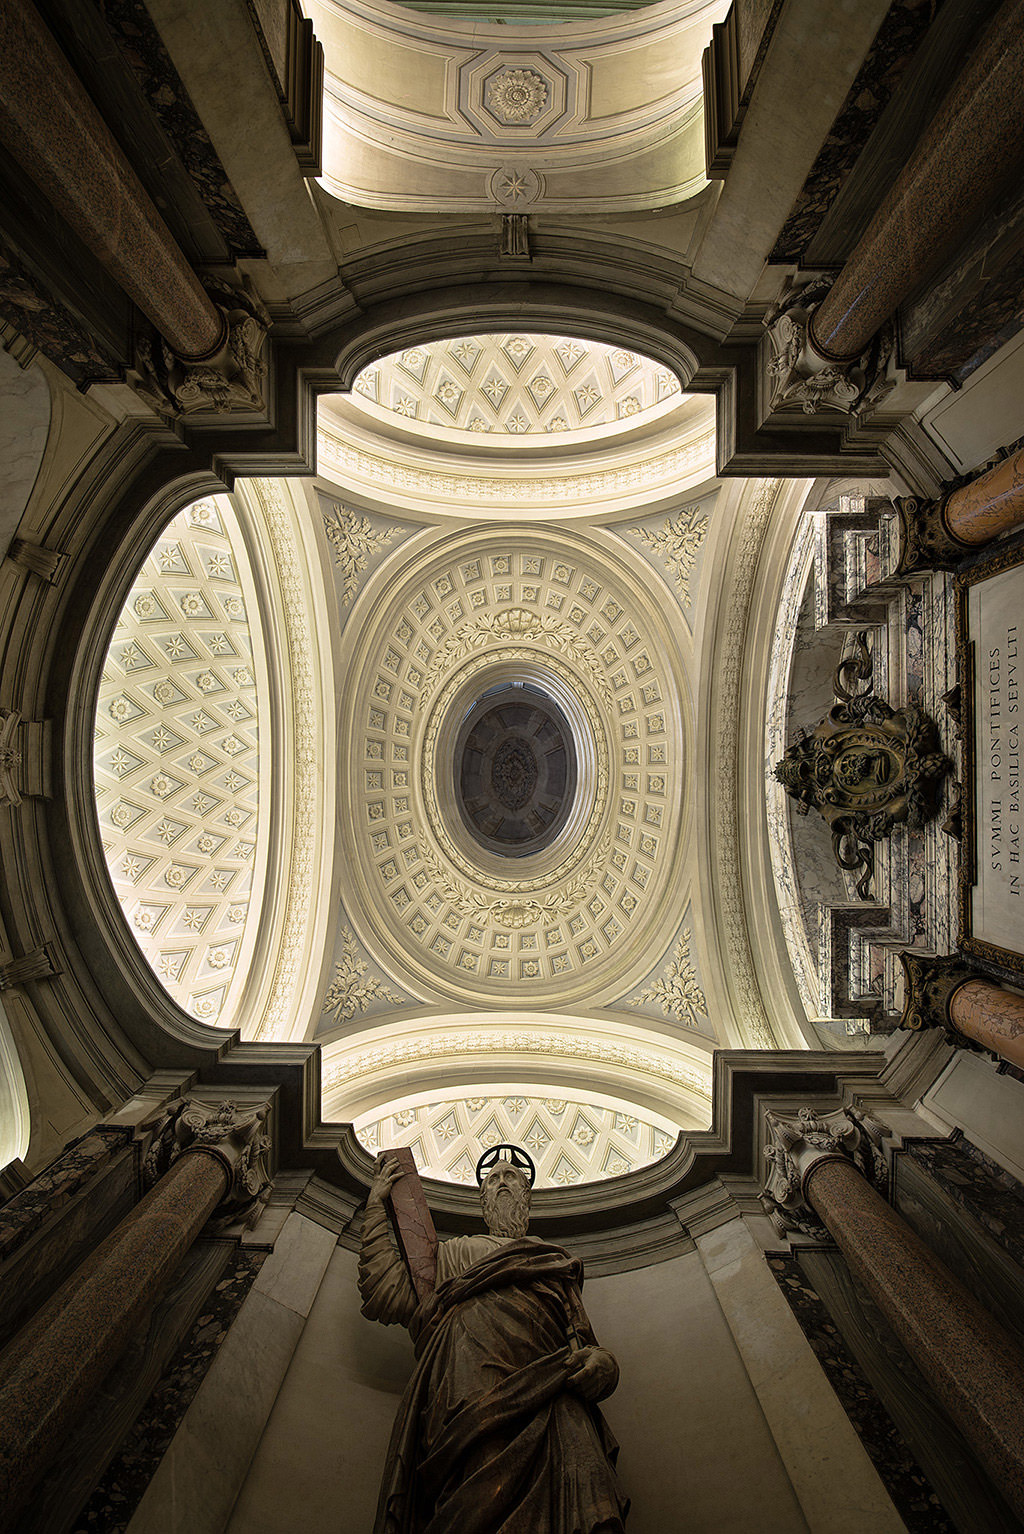
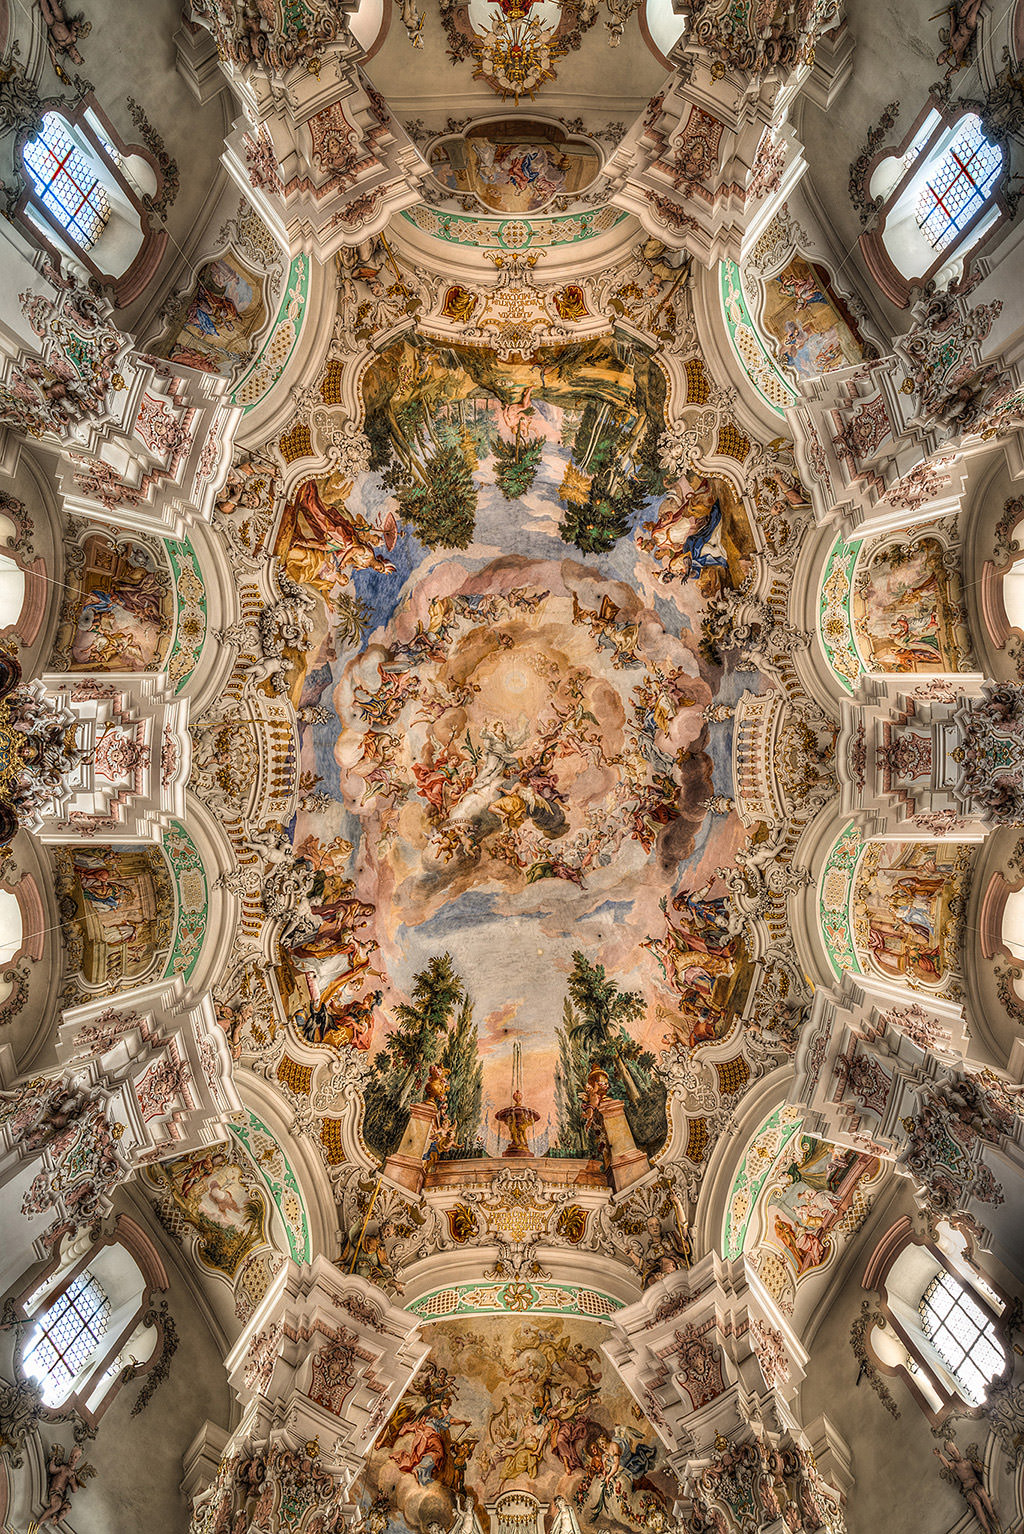
The above technique for photographing interior domes has been quite effective for capturing the beauty of popular architectural landmarks. Setting the camera on the floor allows for the widest perspective without having to worry about setting up and aligning a tripod. Long exposure times enlighten the darkness. HDR image fusion is effective in avoiding overexposure and/or underexposure of relevant parts of the final image. The combination of a full format sensor with 36 MP and a tack sharp lens reveal the finest of details – when scrolling through images on a monitor at 100% or at even higher magnifications, I am always fascinated by a perspective comparable with an artist’s or a restorer’s point of view. And, last but not least, the presentation on a monitor or as a print offers an ergonomic way of looking at the photo. It’s much more comfortable to admire works of art without a stiff neck.
A selection of photos from this series will be shown at the Photokina show in Cologne, Germany, September 16th-21st, 2014. For this purpose, the images are face-mounted to coated, highly transparent museum glass which gives them a crisp and vibrant look with an almost three-dimensional depth effect, as shown in this PDF document.
More Dome Images of Popular Landmarks:


This guest post was written by Prof. Dr. Johannes Lutterbach, a professional radiation oncologist based out of Singen, Germany. Please visit his 500px page for more examples of stunning photographs of interior domes.
The photograph indicated as « Dome of St Peter — Rome », may be of one of the lateral chapels, but certainly not of the Michelangelo dome.
Beautiful images, perfect technique — but a dome always makes a more moving (spatially and emotionnaly) photograph when the photographer is not under the absolute center. Asymetry touches always more (at least, since the two last centuries).
Breathtaking. It’s a crime against humanity not to publish them in an A3 album. Please tell me that’s the plan :)
Thank you so much for your comment, Judit. A publication in print is a project for next year or 2017. Until then, you can see on lutterbach.500px.com/ how the collection is rising.
That is fantastic news, I can’t wait! Fingers crossed that it’s sooner than later :) I can look at these pics for hours – it would be wonderful to have them in print and be able to enjoy every detail. This has got to be the most impressive thing I’ve seen in photography so far. I live in Europe, too, and some of these churches are familiar. Now I’m inspired to visit them again and take a closer look at the domes! If you ever travel around Hungary, the St Stephen basilica in Budapest or the St Adalbert basilica in Esztergom might inspire you.
Thank you again for sharing these wonderful images, and for the very interesting article.
Lovely dome shots. Thanks for posting.
I too shoot with a D800(E). I’ve shot domes in Bavaria with the Samyang 14mm f/2.8 MF lens. It is wicked sharp, and much of the distortion can be taken out in post. Great results from a lens that cost me about $400.
Thank you very much for your advice and your beautiful photos. Best wishes.
Great work Mr lutterbach:
But HDR is not always take the fine details. I was in the Spanish Synagogue and I took this pic of the centre of the dome, and i remember there were small red cristals in the lantern above that i didnt get to capture. I have to try your formula focusing in small part of the dome because i have no a 36 mp sensor …by the moment.
Greatins from Spain
Beautiful pictures. I am myself a hobbyist and looking at your pictures have just encouraged me to do more. Thank You for the tips and for sharing your beautiful creative pictures.
Thank you so much for the positive comments which encourage me to keep on with my dome project!
Beautiful pictures! I really need a full frame camera but just got into photography and bought a Nikon D3300, any recommendations for us cropped picture taking people? I will invest eventually in a full frame but at the moment need to work with what I got :)
These images are absolutely stunning! I went to Europe with my family last year and was blown away by the beauty of these domes everywhere. I found that capturing images of these domes was no easy. I didn’t have a professional dSLR with me but I can relate the preparation it demands. Thank you for sharing your creative work.
You have captured some very beautiful images. I like the detail you were able to show in each.