Rainbows are rare in nature, because a number of events have to happen at the same time. First, there has to be moisture in the sky, so a rainy day or a quick rainstorm is the first pre-requisite. Second, the sun must be positioned on the horizon at a low angle, around 42 degrees relative to the viewer. Third, the part of the sky where the sun is must be clear from clouds and obstructions, while the part of the sky where the rainbow will appear must have continuous rain / moisture. When all of these conditions are met, the sun rays will refract and reflect off the water droplets in the sky, creating the optical illusion that we refer to as “rainbow”. When you see a rainbow, it is only natural to want to capture it on your camera. Who wouldn’t want to capture such beauty that contains the full color spectrum visible to our eyes? And if you happen to be at the right place, rainbows could make an ordinary subject appear truly extraordinary. Even a boring scene could be turned into something completely different with a full arc of a rainbow.

Photographing a rainbow can get frustrating, especially if you do not have the right tools for the job. In this article, I will go over the process of taking pictures of rainbows and provide some tips on how to incorporate them in your photographs.
Table of Contents
1) Types of Rainbows
Although all rainbows are formed similarly and should not be classified into different types, they can be formed in various conditions and can appear partially or fully. For example, rainbows can appear with direct sun rays, or rays reflecting off the surface of the moon. Known as a “Moonbow“, such phenomenon can be truly amazing to capture on your camera. The Lower Yosemite Falls at the Yosemite National Park, for example, is a popular spot in the US for photographing moonbows. If the conditions are right and the sky is fully moist on the opposite site from the light source, you could see a full arc that goes from one side of the horizon to the other. Often times such full rainbows will be accompanied by a secondary rainbow, creating a “double rainbow”, as seen in the below photograph:
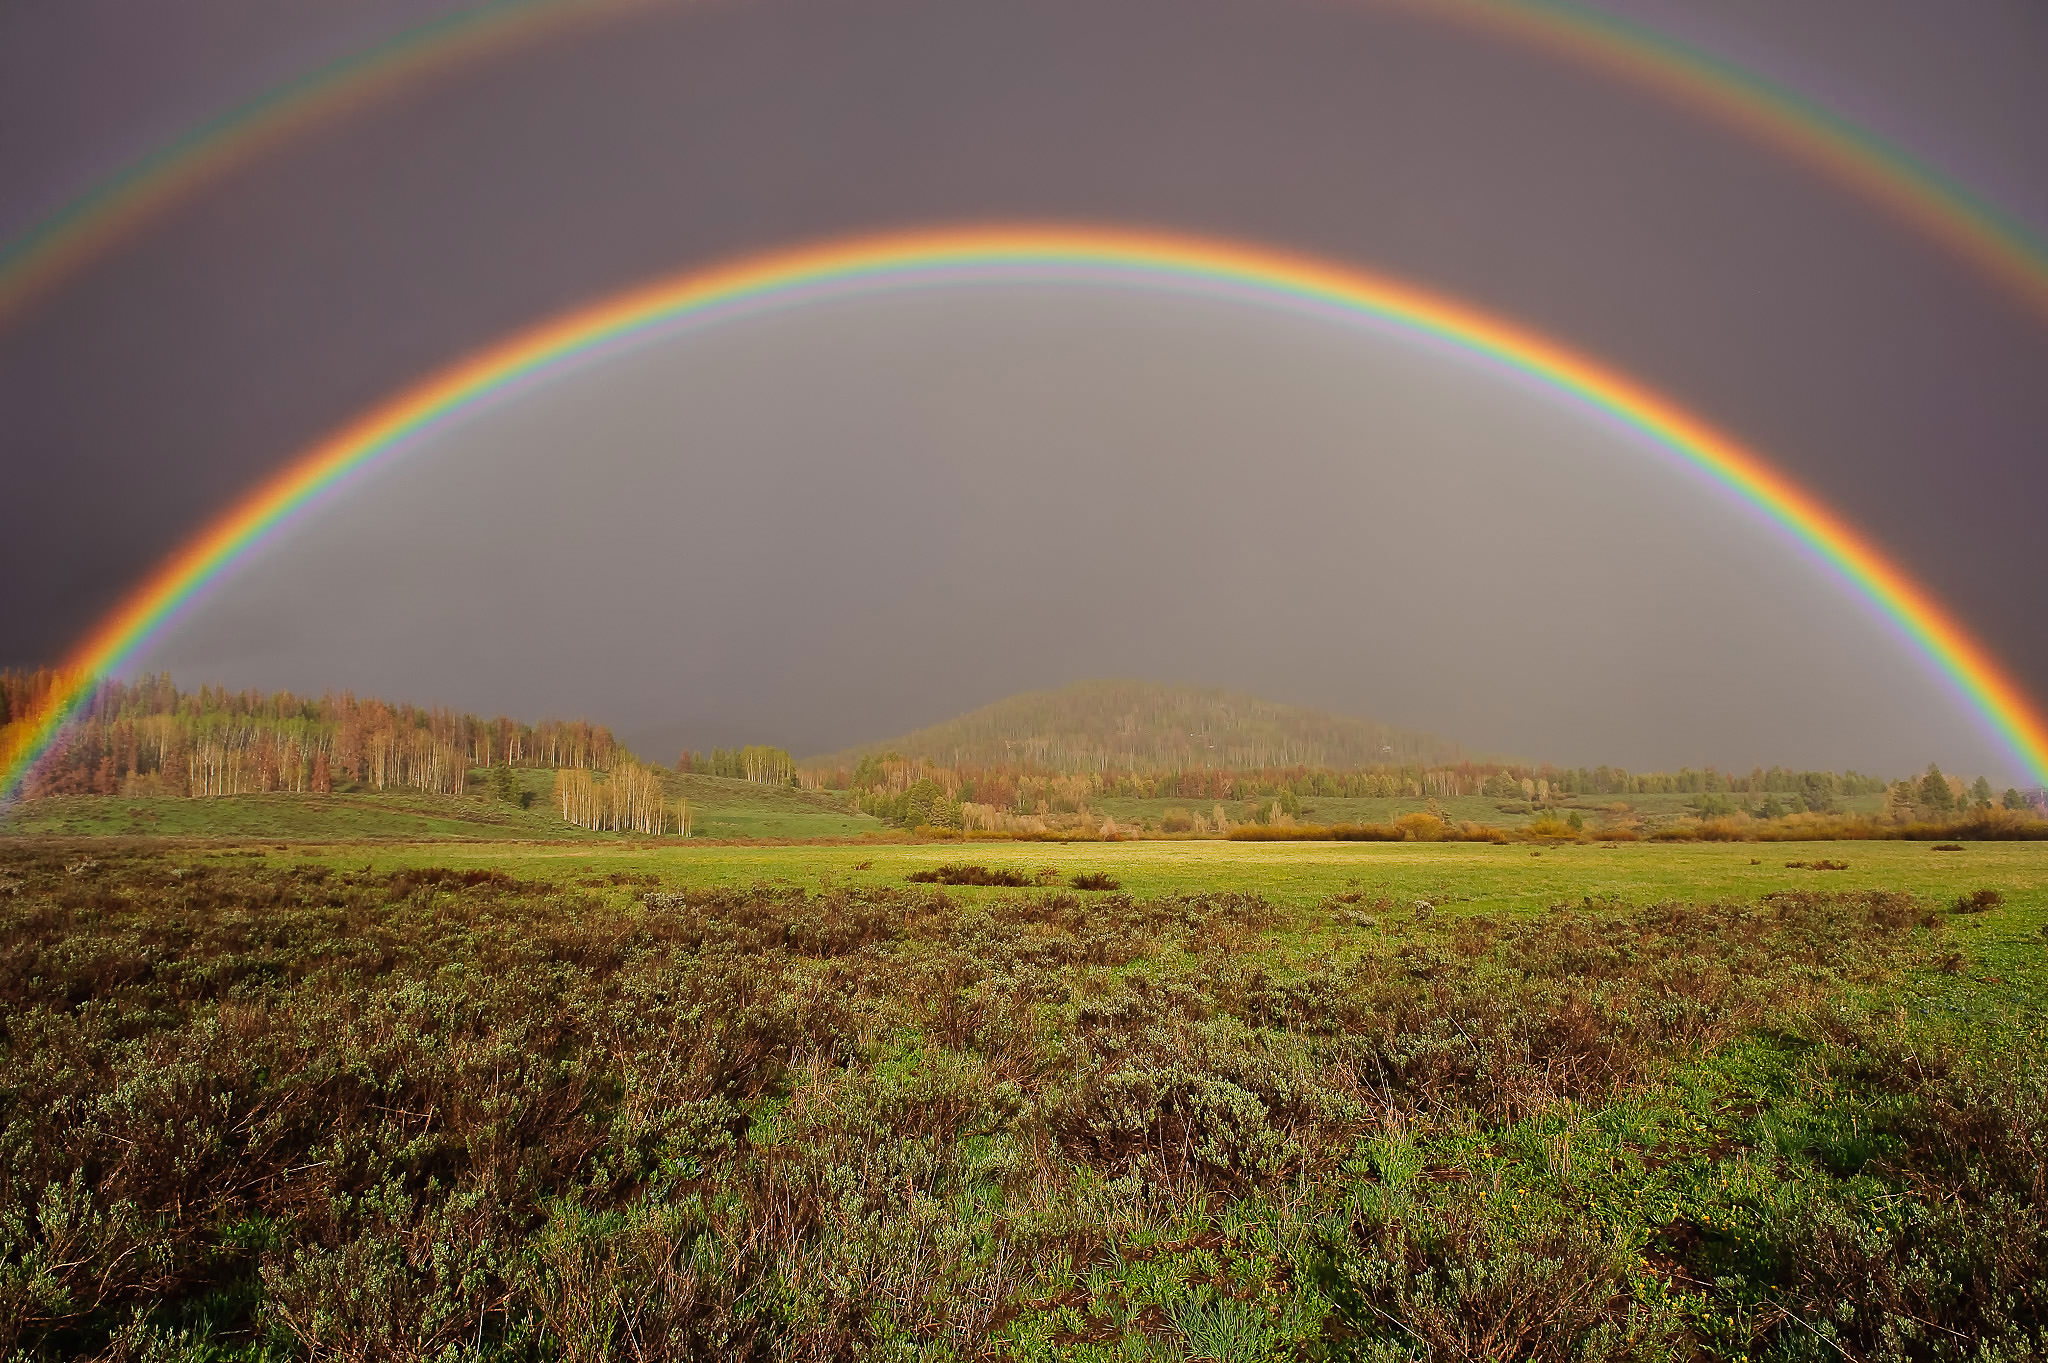
Double rainbows are very rare and there is some evidence of triple and even quadruple rainbows!
2) Weather Conditions
As I have pointed out above, natural rainbows only occur when there is moisture in the atmosphere and the sun or the moon are at a 42 degree angle relative to the viewer / camera. This means that when there is a potential for a mostly cloudy day with thunderstorms, you should be heading out to find some rain! Look out for those days when part of the sky is clear and part of the sky is covered with dark clouds. Look at the position of the sun, determine where it will set and see if that part of the sky is relatively clear. If it is, then head towards the rainy area and wait for the sun to break through the clouds. In all honesty though, planning for a rainbow can get quickly frustrating, as you might never see it from a single spot, so it will probably be best to drive around on a stormy day to see if you can find a rainbow. When looking for a rainbow, make sure that you are looking at the opposite direction of where the sun is!

Photographing in rain is not something you should be doing without understanding the potential risks to your camera gear. If your camera and lens are not weather sealed, I would recommend to use good protection to prevent water from getting into the gear. A simple umbrella would do, but if you need to use both hands then a good protective cover might be a better choice. There are lots of different rain covers available on the market. Op/Tech’s rainsleeve is a great solution for rainy days and it fits most DSLR cameras out there.
3) Finding a Rainbow
Once you find a rainbow, even if it is very faint in color, it is time to wait and move around. Some rainbows start out very faint and can get very intense in color and shape in a matter of minutes! So take your camera out and start shooting, even if you only see a partial rainbow.
4) Lenses
Full, double rainbows can span a large area of the scene, so I would recommend to bring a wide-angle lens that can capture the whole rainbow. A 24mm lens on a full-frame camera can capture a full rainbow, but it won’t be wide enough for a double rainbow. If you want to capture a double rainbow, I would recommend something like a 16-35mm lens. I would not bother with a telephoto lens, unless you want to concentrate on photographing just part of the rainbow.
As for the ideal aperture, you obviously want to maximize your depth of field, so that all foreground and background elements appear sharp in your photo. Because of that, the ideal f-stop range would be between f/8 and f/11. You can stop down to smaller apertures like f/22, but keep in mind that diffraction will impact the overall sharpness.
5) Polarizing Filter
If you want to really bring out the rainbow, use a polarizing filter! Yes, a polarizing filter can make a huge difference in enhancing colors of the sky, the rainbow and other foreground / background elements. But be careful when using a polarizing filter – normal polarized position could make a rainbow completely disappear by blocking those reflections! So do not just use the viewfinder or the rear LCD screen of your camera when photographing a rainbow. Occasionally look at the sky with your eyes and if the rainbow appears more vivid, you probably need to rotate the filter more.
6) Tripod
Rainbows often occur in low-light situations, requiring you to use small apertures for maximum depth of field, when working with foreground subjects / objects. Thus, a tripod would be an essential tool for effectively capturing rainbows, with the minimum amount of noise. I would suggest to buy a good, reliable tripod that will reduce chances of getting camera shake. If you need a recommendation on what tripod to get, see my tripod buying guide.
7) Composition
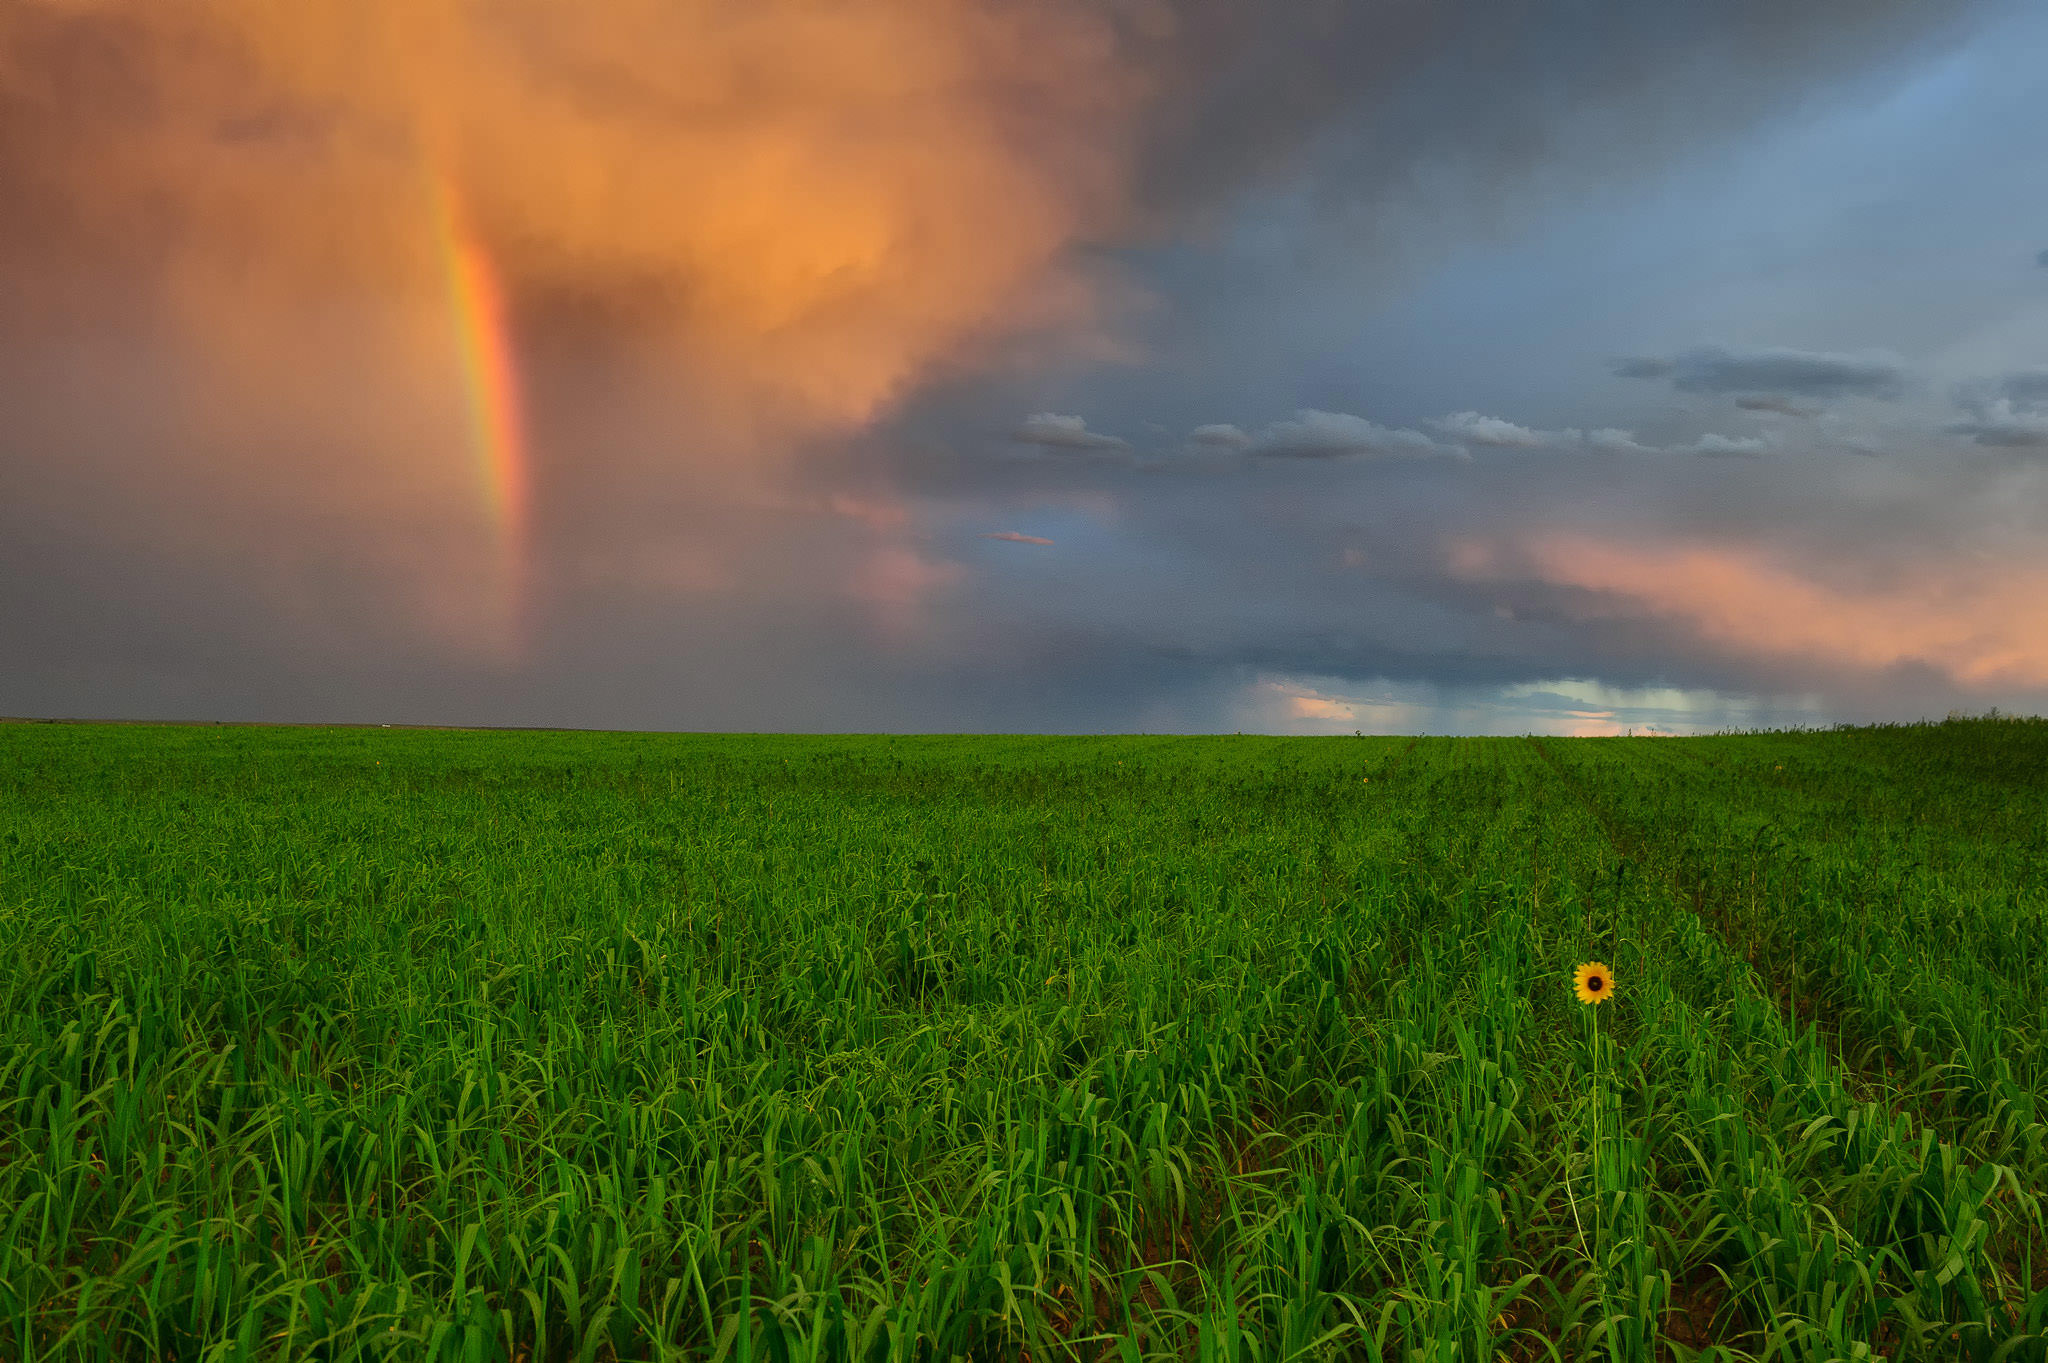
Composition is obviously important when capturing rainbows. If you get to see a full rainbow, see if you can quickly locate an interesting subject that you can place in the center of the rainbow. A lone tree, a small building or a beautiful peak of a mountain could all be excellent candidates for composition. Sometimes getting down low and photographing flowers or wildflowers could also work. Don’t forget about typical composition rules either – using rule of thirds, leading lines, etc can make the scene appear more balanced and interesting. In the below photo, I placed the rainbow to the left of the scene, about 1/3 from the left edge of the frame, then found a single sunflower in the field and placed it on the opposite side, giving a good balance and an interesting foreground element to the photo:
one of the best photo
The sunflower in the field shot is breath-taking. Simply exquisite.
Hi Nasim,
Very very informative article.
I dont want to sound rude, but dont know how to put this politely. Rainbows are optical phenomena, not illusions.
Thanks,
Raghav
Hi Nasim,
thanks for sharing. I was able to shoot a full arch of double rainbow once, using my D90 +18-200 lens, but had to take few shots and asseble in a single panorama later in PS.
www.flickr.com/photo…298940974/
Nasim, thanks for the tip about the Op/Tech Rainsleeve. It is now in my wish list waiting for my next order. It’s funny the things we do in the rain such as this morning I was washing my truck and trailer while it was raining. It gave the rig a nice soft water rinse. :)
We have been fortunate enough to get a few rainbow shots on the covers of magazines. Here is a link to it if you would like to see them.

roadslesstraveled.us/publi…ily-fagan/
We have learned so much from you and team mate Bob Vishneski. I check your website every morning over tea. Thanks for having the best site on the internet.
Nice post Nassim, I’ve recently came back from yosemite and I was gifted with lots of rainbows!
Do you have the inttention of creating anything about printing techniches? I think this is the only subject that is not present in photographylife.
Fantastic shots.
Norway is a great place for photographing rainbows. Rain combines with sunshine almost every day. I shot so many rainbows when I was there, including a complete one which began and ended in the sea. And a polarising filter definitely helps! :)
…and of course being at a relatively high latitude the sun traces a continual low arc cross the sky during the more rainy months!!
Ideal indeed.
Cool beans! Thanks.
A valuable information indeed with regards to rainbow catching. Thanks a lot Nasim.
Lots of great info, Nasim … beautiful images!!!