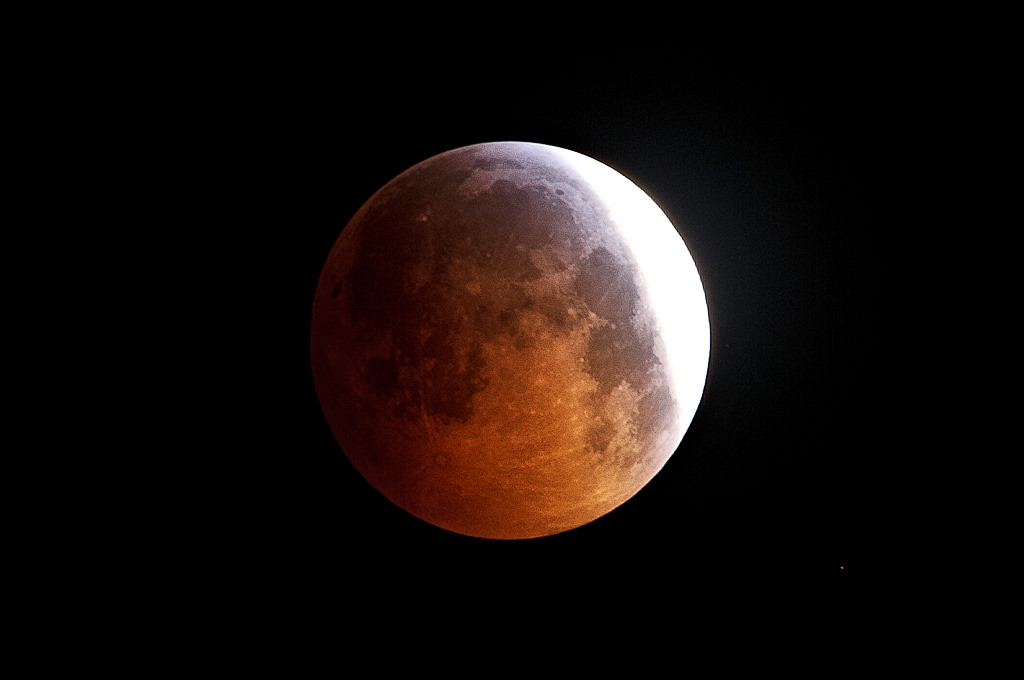
Every so often the Moon falls into the shadows of the Earth, resulting in a lunar eclipse. Although lunar eclipses take place more often than solar eclipses, you’ll still want to experience watching and potentially photographing this somewhat rare and stunningly beautiful phenomenon. I have been taking pictures of both partial and total lunar eclipses for a number of years now, and I decided to document my experiences and the challenges I encountered for the benefit of our readers. In this article, I will do my best to explain how to photograph a lunar eclipse in detail.
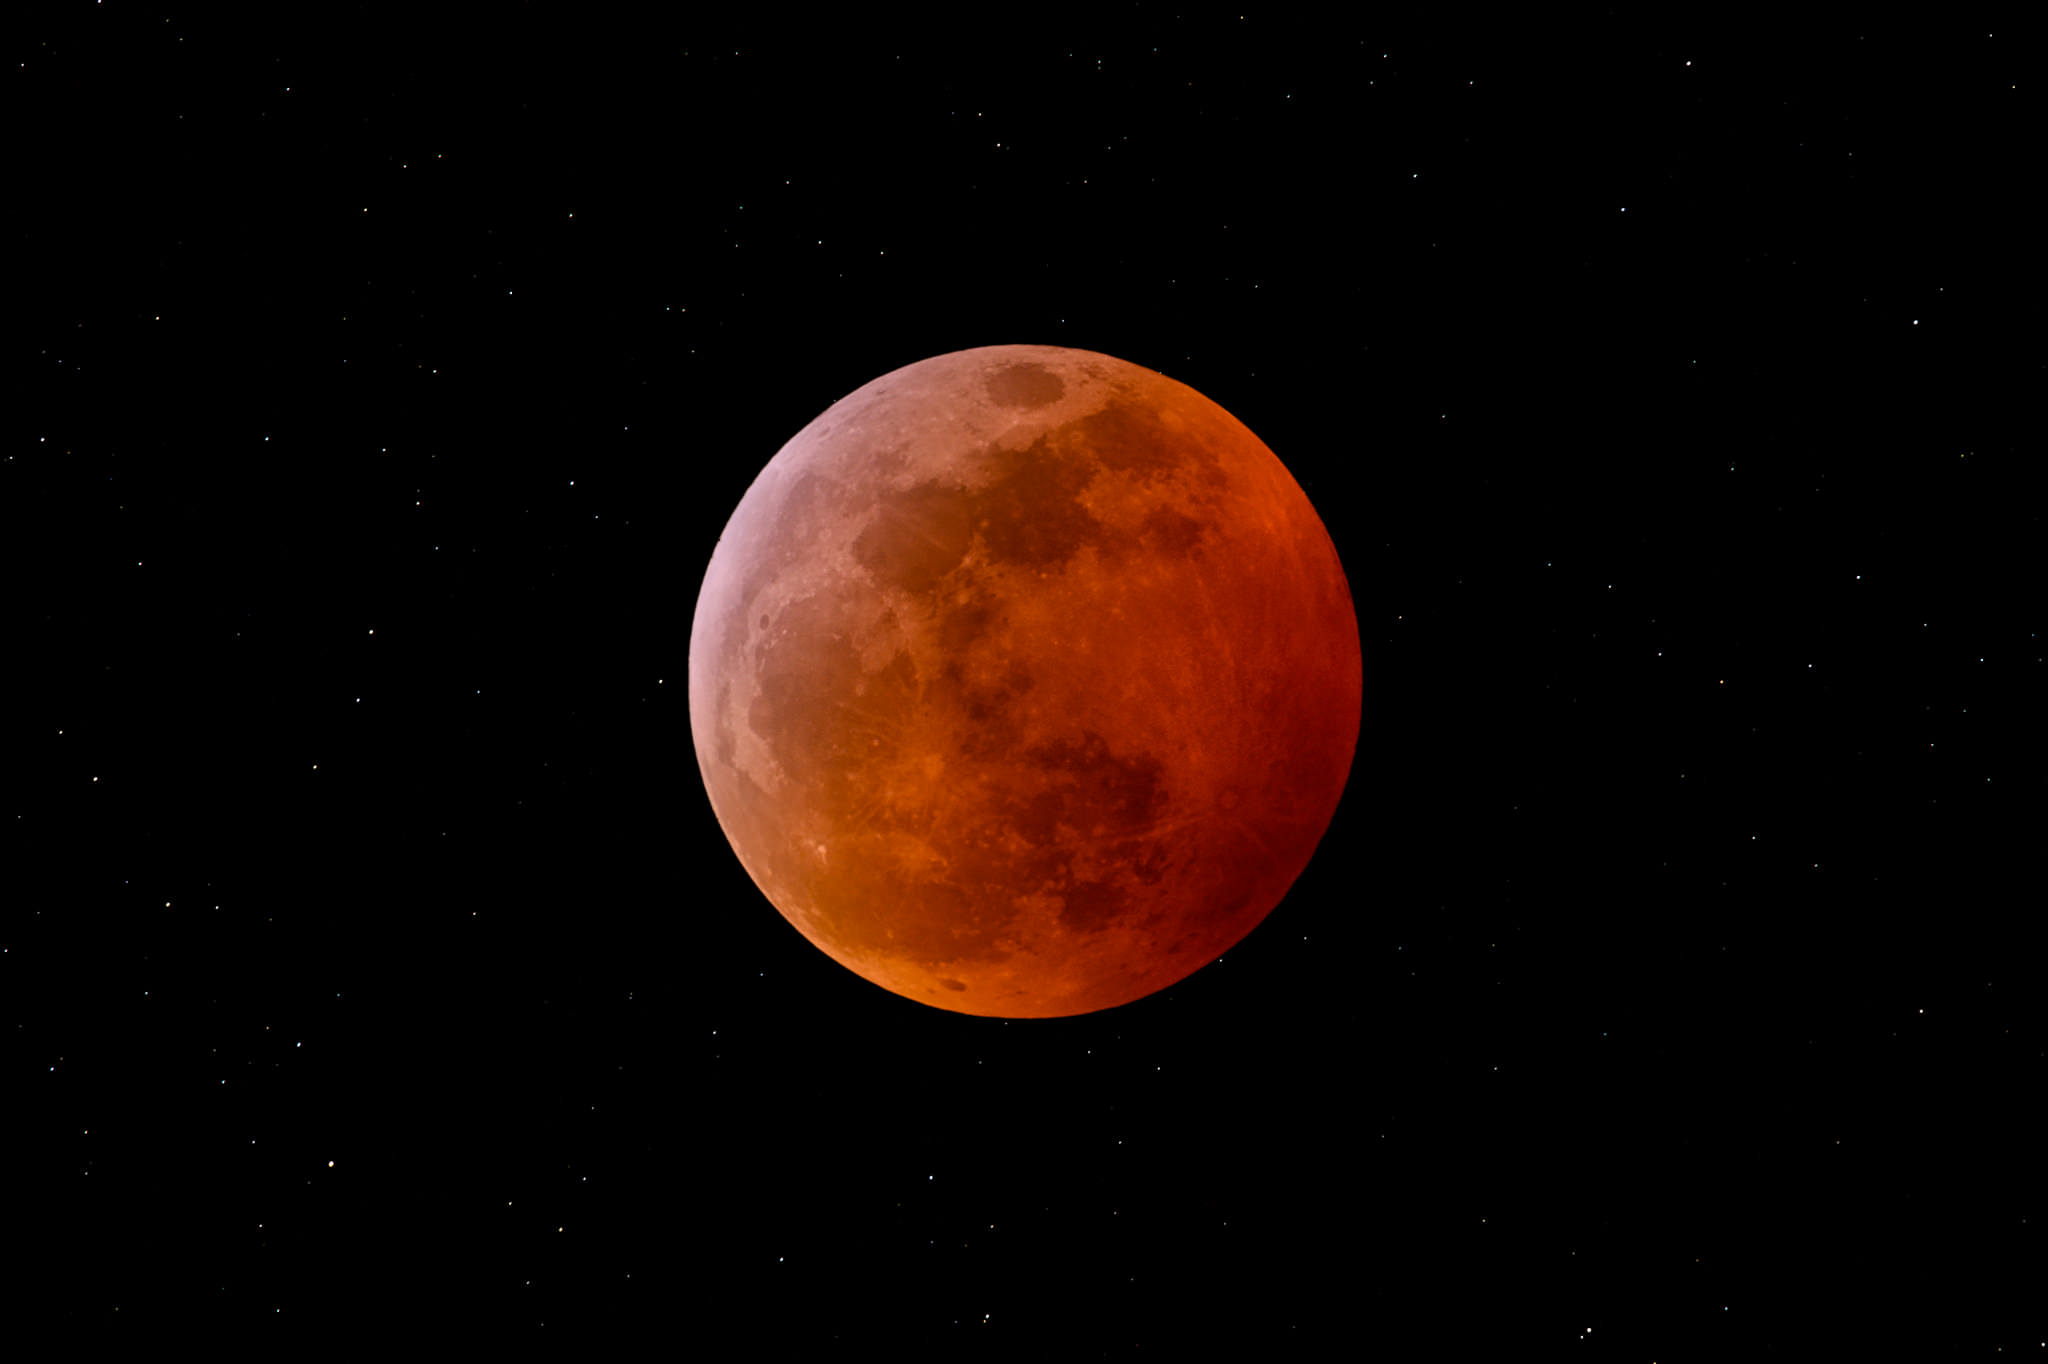
NIKON Z 7 + 300mm f/4 + 1.4x @ 420mm, ISO 200, 10 sec, f/8.0
Photographing a Lunar Eclipse
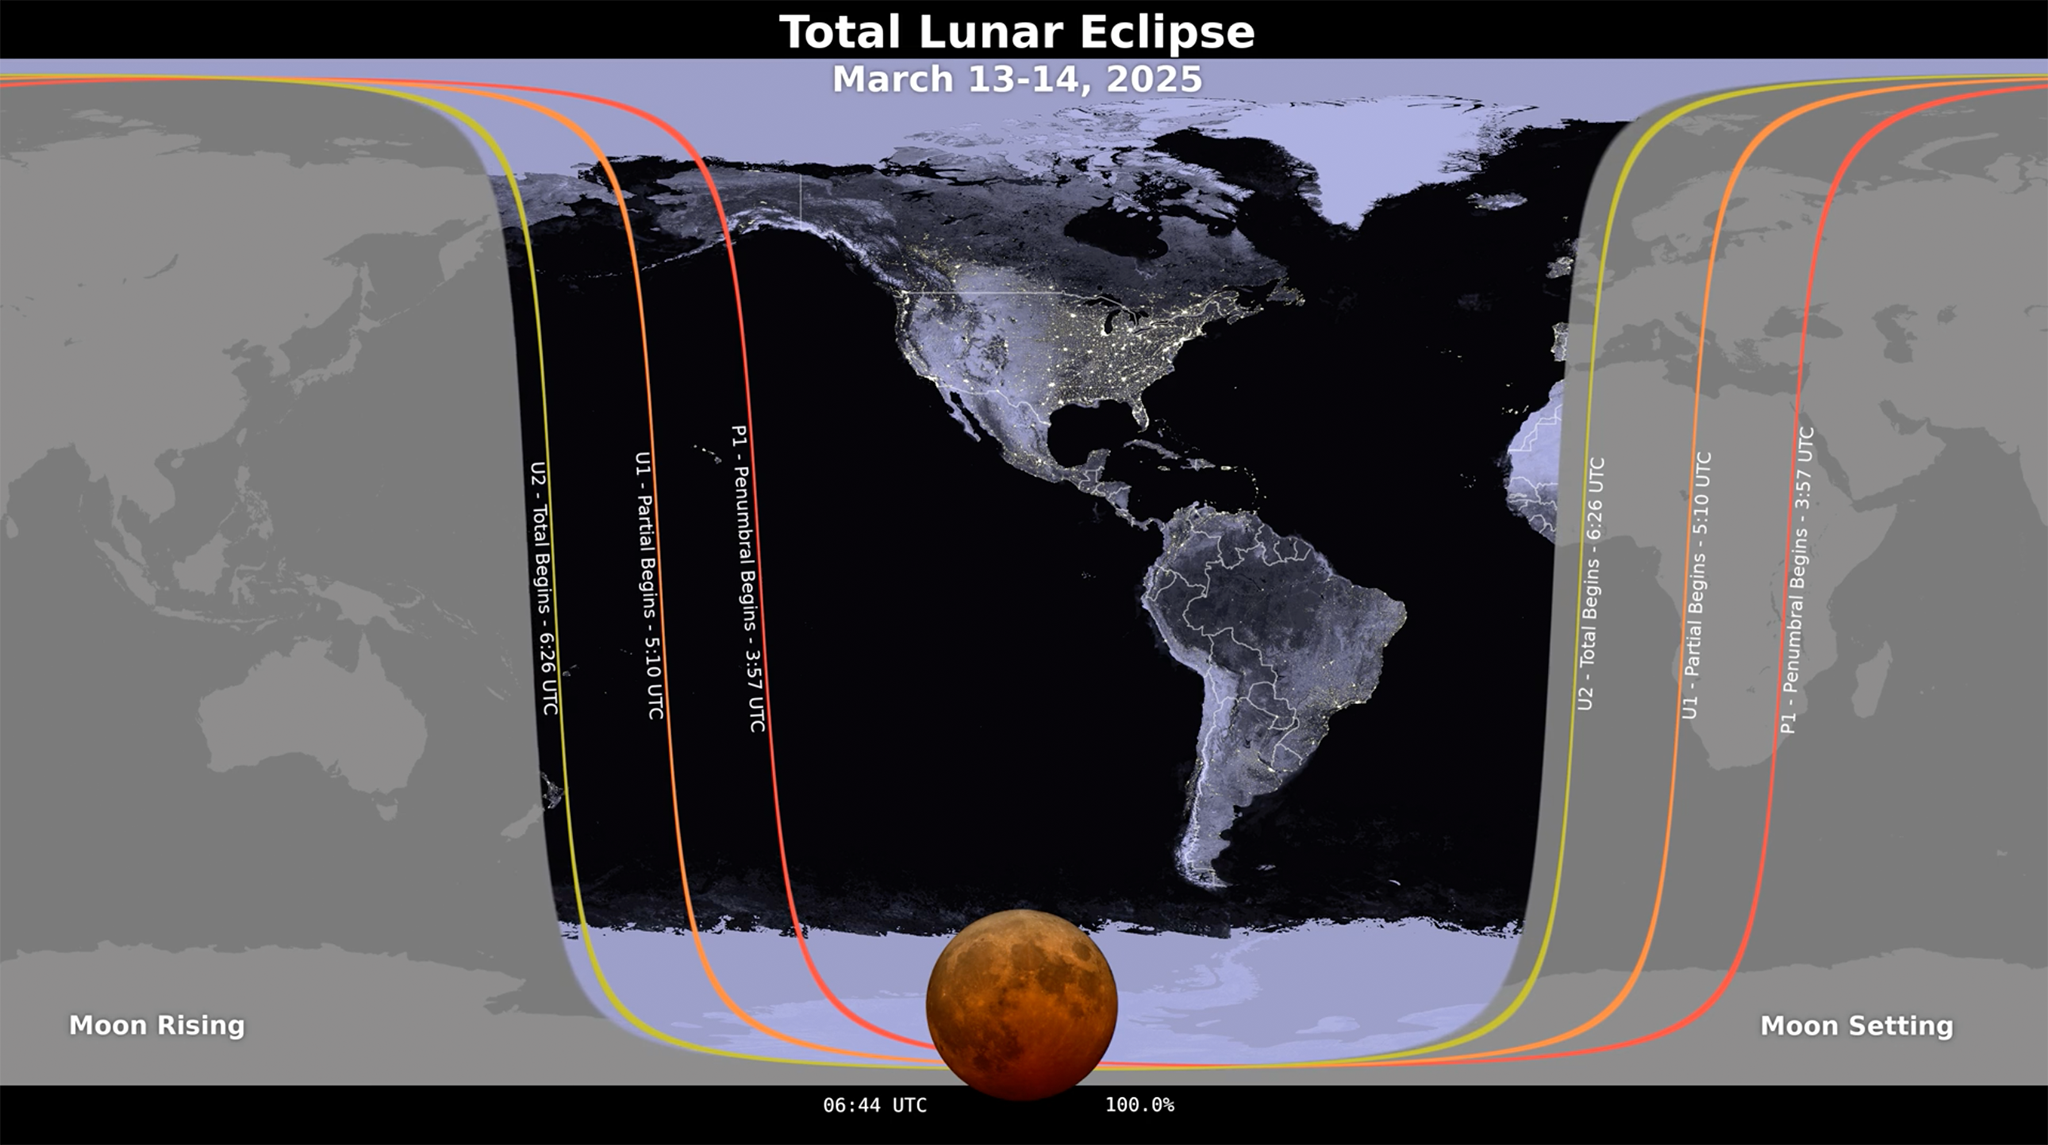
What Time And Place Is the Lunar Eclipse?
Lunar eclipses are never visible across the entire world, only part of it. But they happen often enough that you’ll definitely be able to see a lunar eclipse from where you live if you’re patient! I recommend visiting this website and typing in your city name to see if the upcoming eclipse is visible where you live, as well as the time and duration of the eclipse.
The Basics of Moon Photography
Before reading the information below, I recommend reading my “How to Photograph the Moon” article, where you can find plenty of information (including camera settings) on the subject. You will need that while capturing the beginning and the end of a lunar eclipse, when the Moon is partially lit by the Sun.
Photographing the Sequence
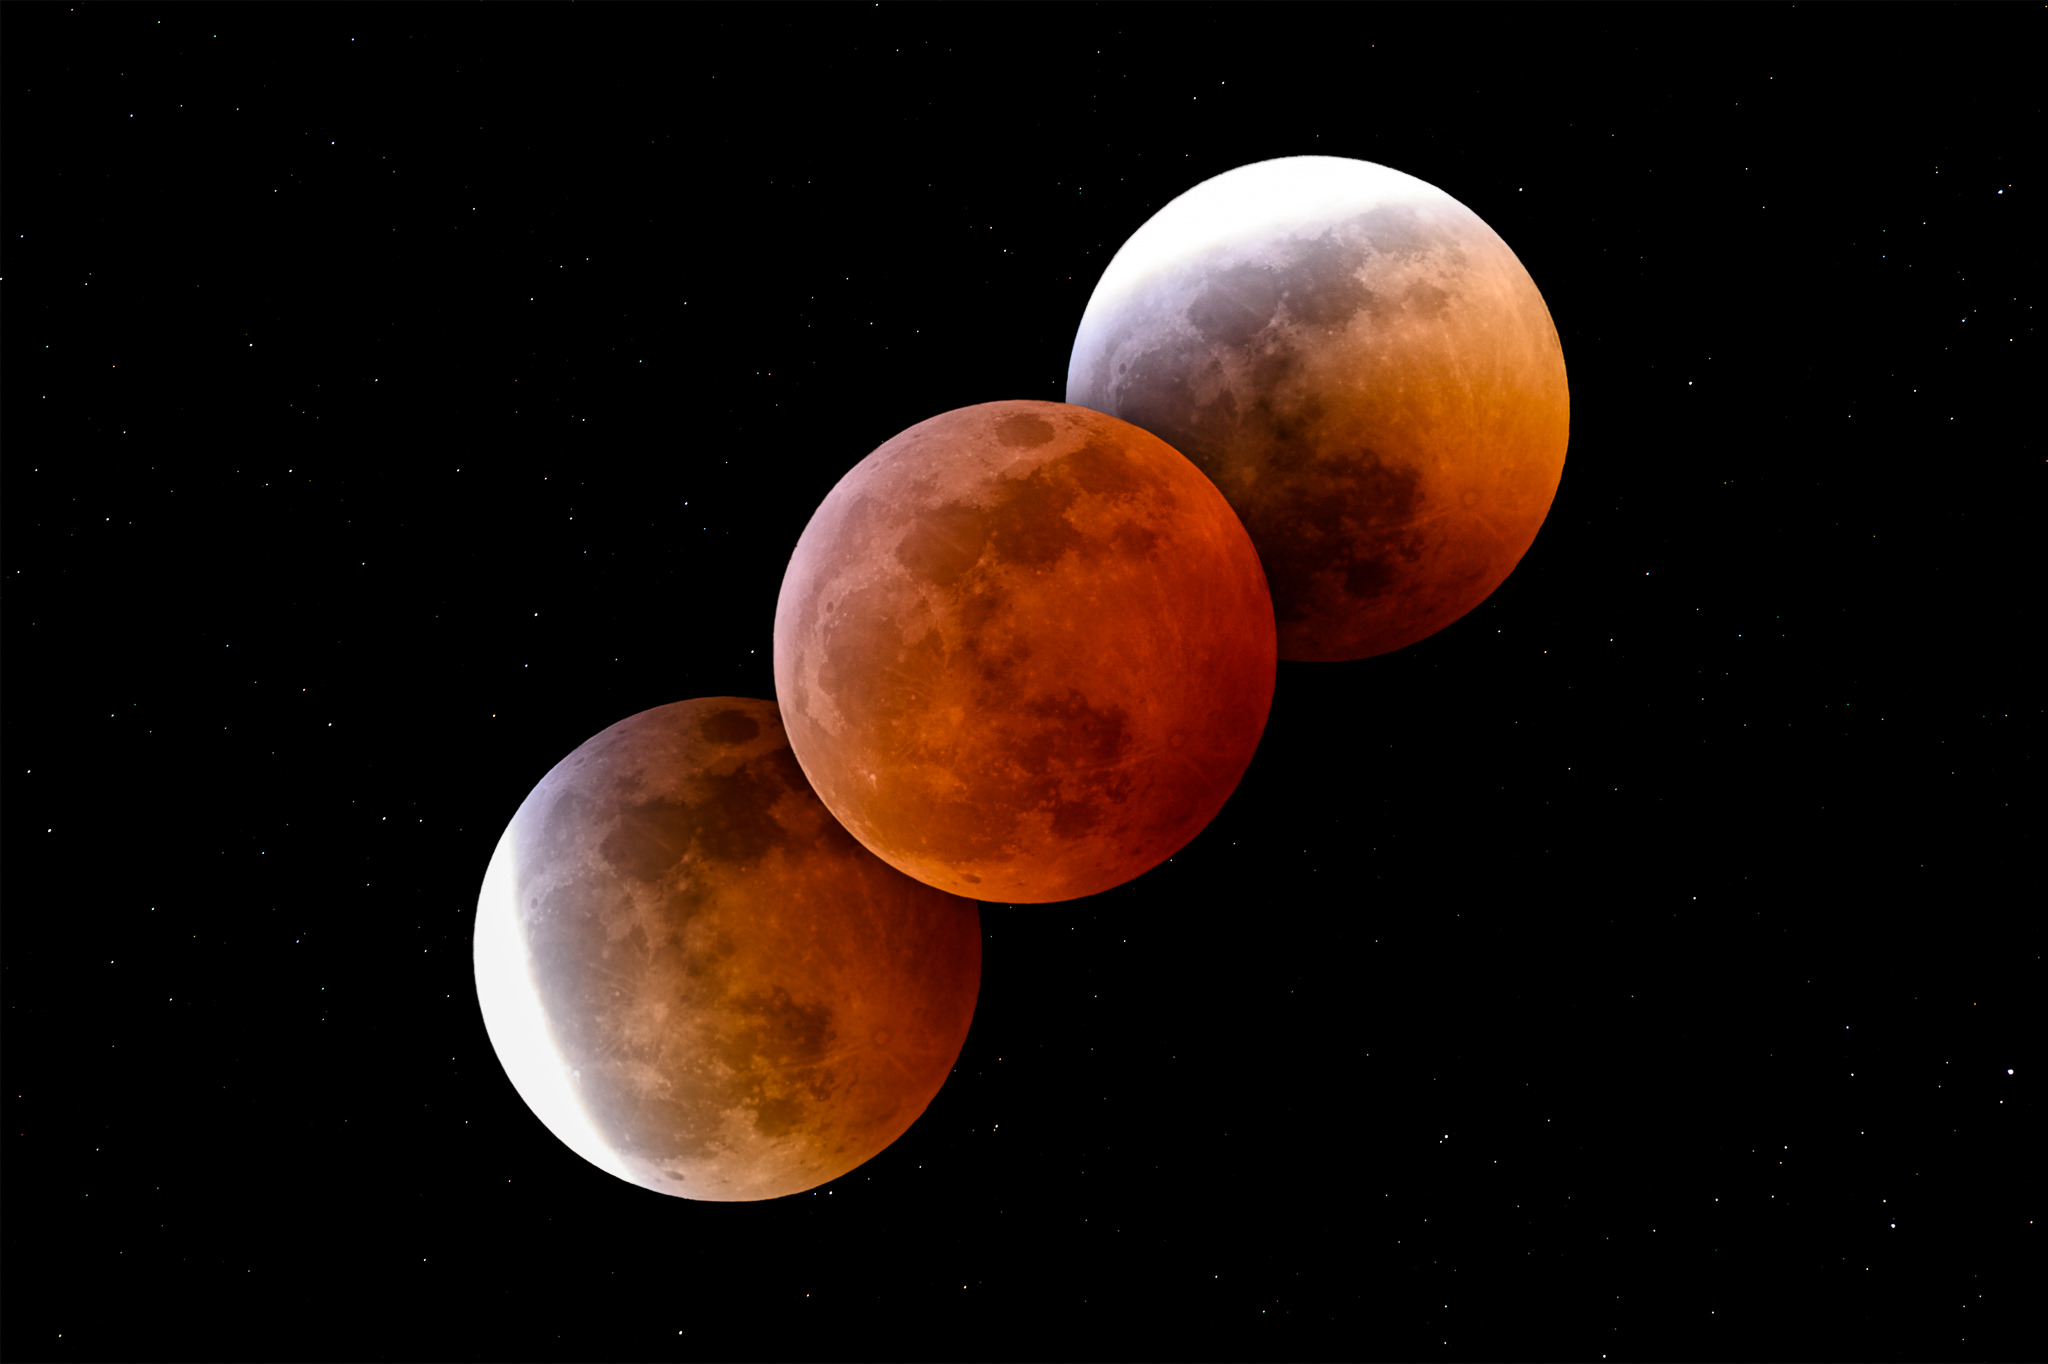
One thing you need to decide on, is whether you want to shoot the entire sequence of the lunar eclipse, or just the period of totality when the Moon is orange / red in color. I would personally recommend to document the whole process from the beginning to the end, so that you have pictures of the full Moon, then a partial eclipse, then a total eclipse, then a partial eclipse again, returning back to full Moon when the eclipse ends. The nice thing about having the entire sequence in pictures, is that you can later combine images together like this:
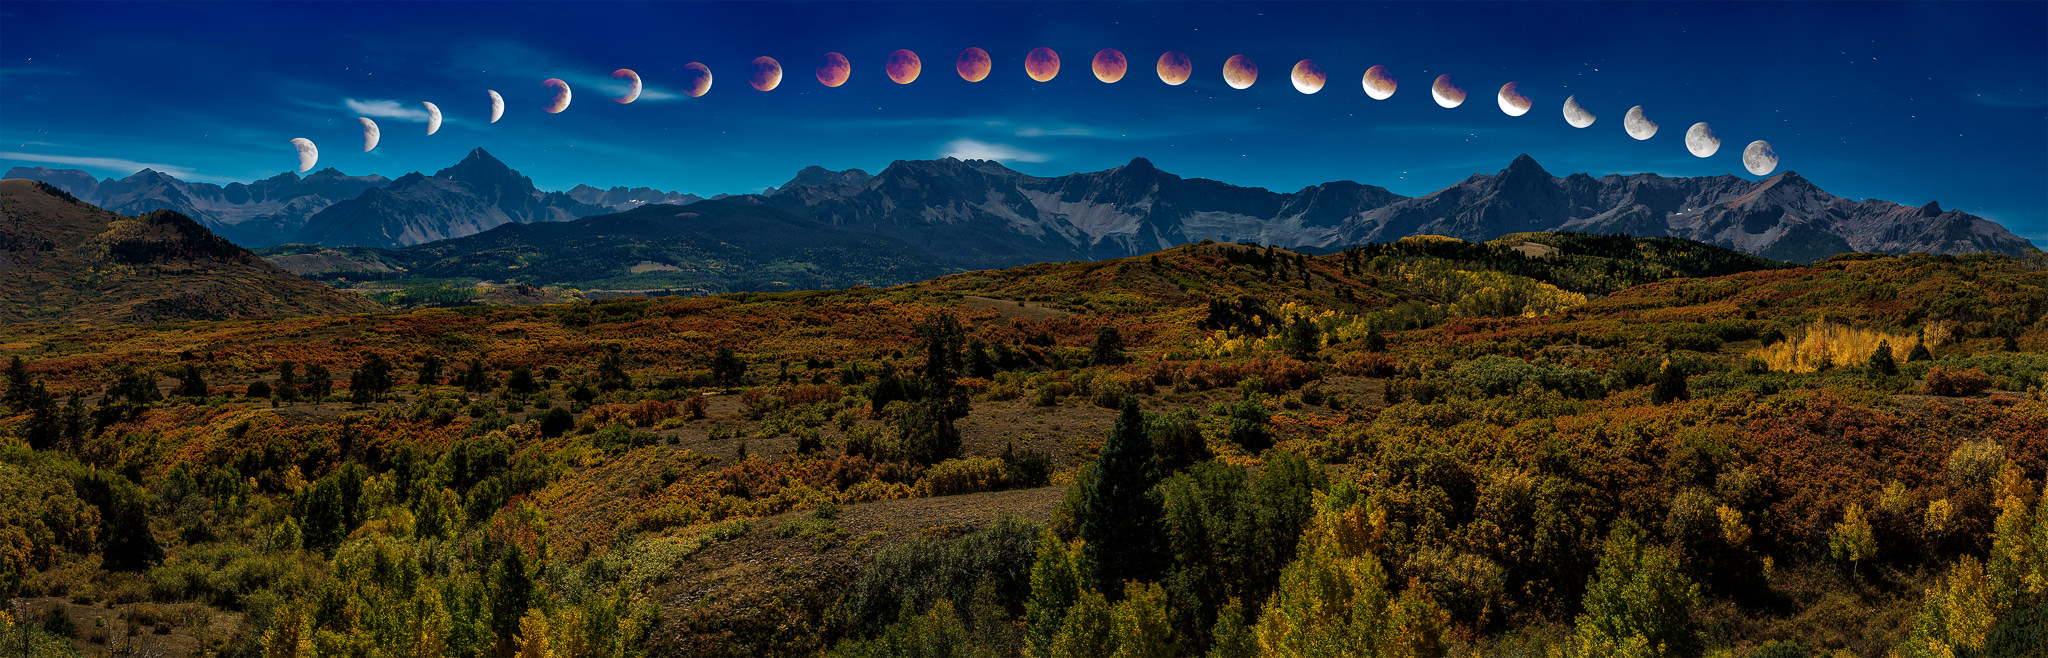
You will have to be very patient though – it took me about four hours in total to capture the Moon from the beginning to the end of the eclipse. The night was quite cold, but I was out with a group of photographers and we decided to document all phases of the eclipse with our cameras. After we were done, we decided to drive to an overlook where we photographed the above scene separately as a panorama, in order to create a single composite you see above. It is important to note that the image has a much larger Moon compared to the reality. If I kept the Moon at its real size relative to the landscape, it would have looked minuscule. Some photographers choose to photograph real scenes with super telephoto lenses, without resizing the landscape or the Moon. Such photographs require a lot of planning and effort (often requiring a lunar eclipse to take place near the horizon for matching a landscape), but offer a much more rewarding experience. Proper planning is extremely important in such cases. Reliable tools and apps that allow one to preview the location of the lunar eclipse should be used for best results, as explained below.
Planning
Whether your goal is to simply photograph the Moon during an eclipse, or to photograph a scene with the Moon at the time of the eclipse, proper planning is important and should not be overlooked. There are plenty of great software and smartphone apps out there that you can use for planning purposes, but the two apps I use the most are PhotoPills and The Photographer’s Ephemeris. When doing night photography, I sometimes fire up Star Walk as well, but that’s only if I need to find a particular object in the sky. Being able to see exactly where the Moon is going to rise is very important – it will make the job of scouting for a location much easier.
While leading a group of photographers in Death Valley National Park, I really hoped that the sky would clear up during the total lunar eclipse on January 20, 2019. The weather was quite stormy for a few days at the beginning of my workshop, but the day of the eclipse looked promising, with the sky opening up in the evening. While checking for weather reports every few hours, I also used the PhotoPills app on my smartphone to find out exactly where the Moon would be located in the sky during the lunar eclipse. Using the Night Augmented Reality (Night AR) feature of the app allowed me to pinpoint the exact location of the Moon.
After realizing that I would not be able to find a subject tall enough in the vicinity to be able to use it as my foreground, I made the decision to skip the scouting process and only focus on photographing the lunar eclipse with my super-telephoto lens. However, if I found a very tall foreground subject, it could have worked to photograph the eclipse over it. Instead, I looked up where the Moon was going to rise from and decided to photograph a landscape scene facing the Moon as it rose up:
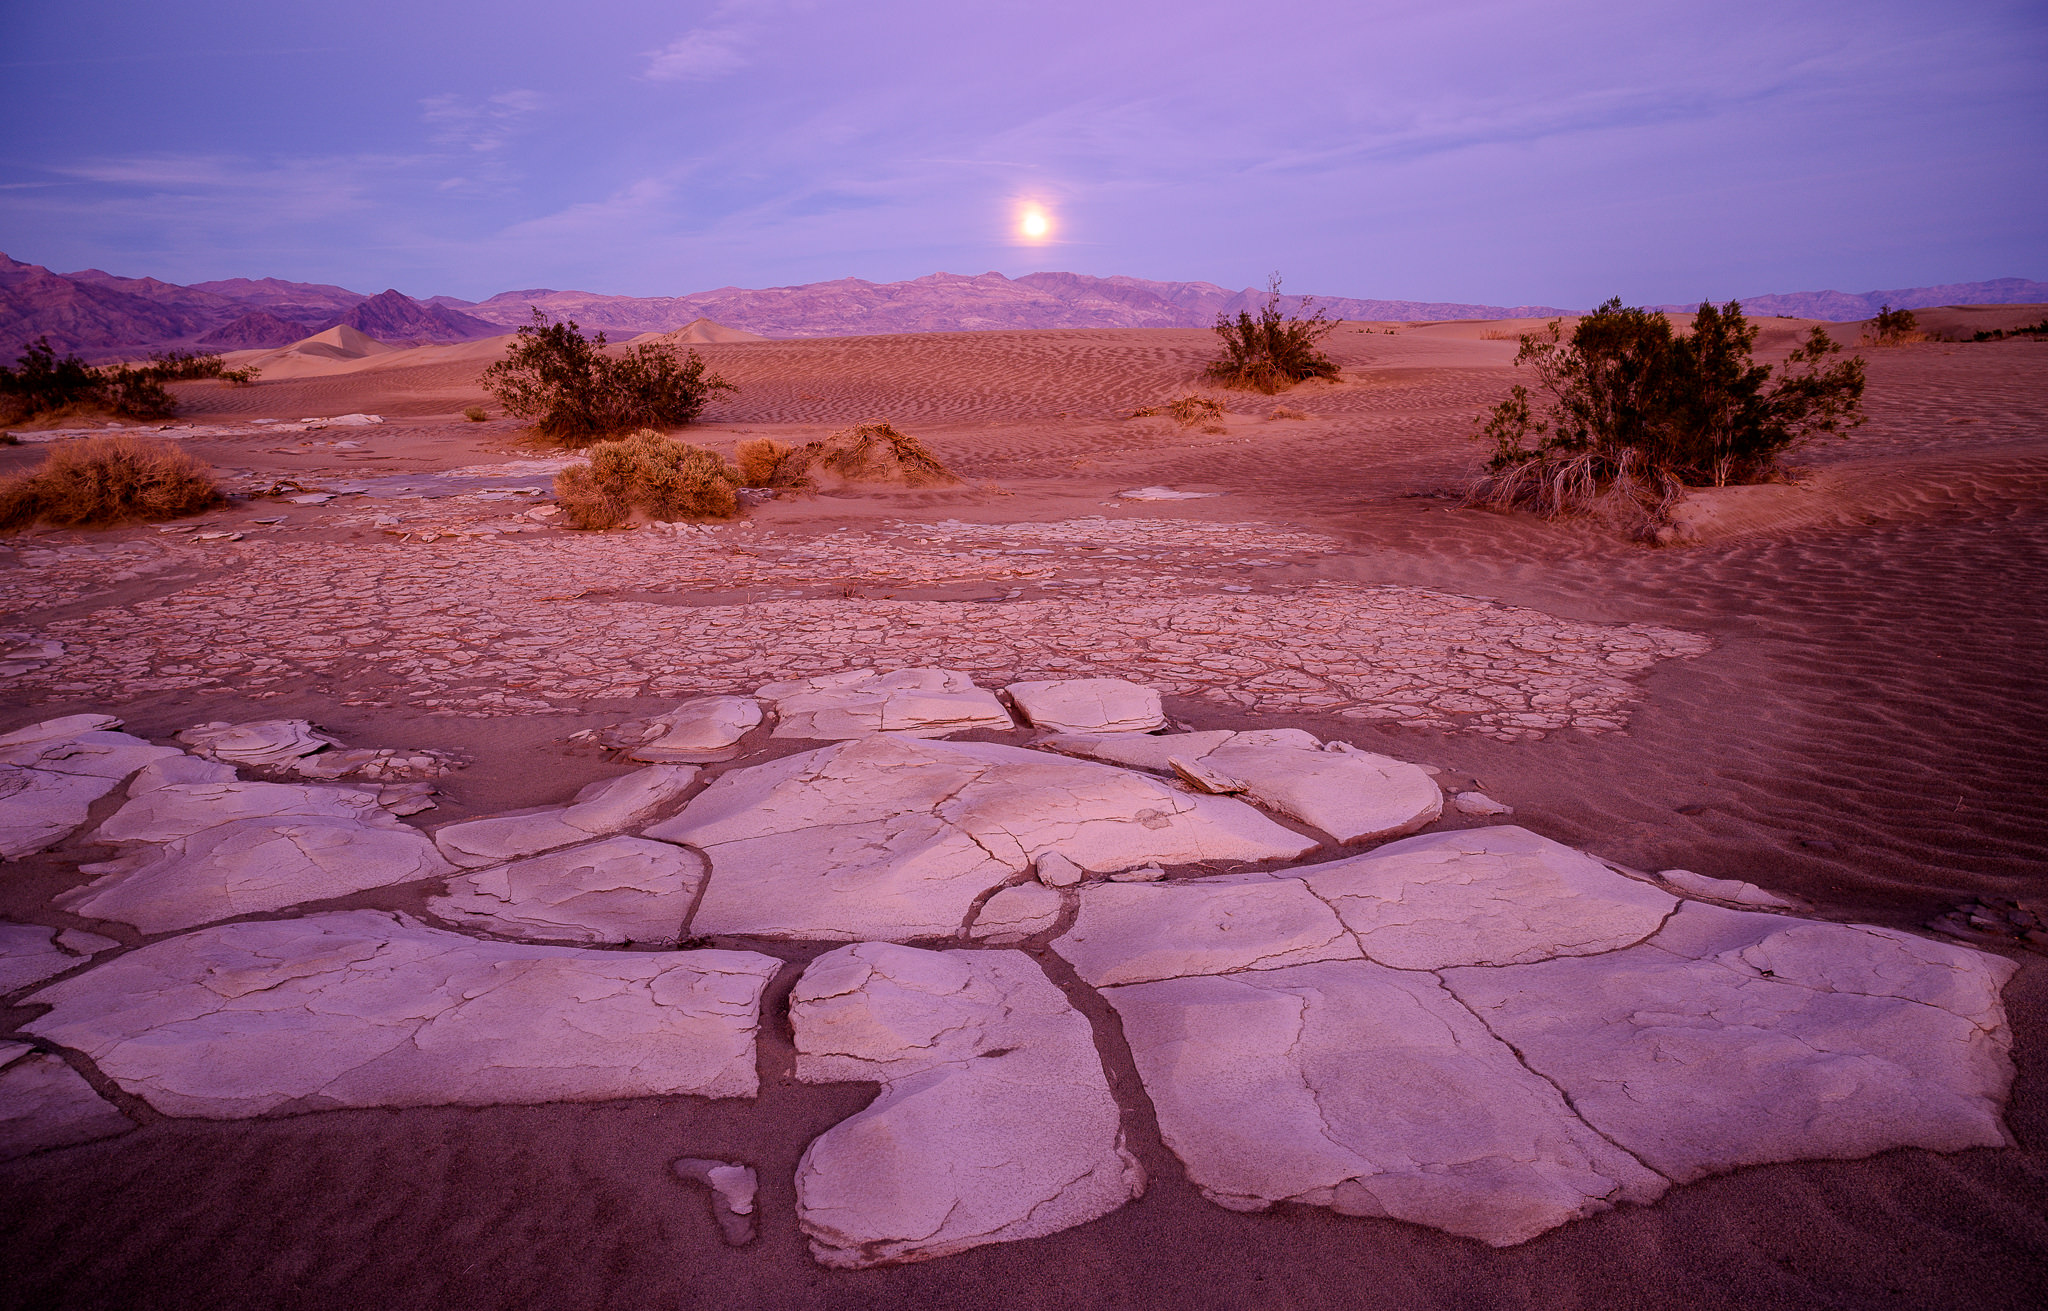
NIKON Z 6 + NIKKOR Z 24-70mm f/4 S @ 24mm, ISO 100, 4 sec, f/8.0
As you can see, it was a pretty foggy evening – not particularly great for photographing a lunar eclipse! As the Moon rose over the distant mountains, the clouds in the sky were too thick, making it a problem to get a clear shot of the Moon. The weather forecast still insisted on a clear night though. I looked at the horizon and the sky indeed looked quite clear there. After about an hour the sky indeed cleared up for the most part – just in time for the beginning of the lunar eclipse!
So keep all this in mind. When planning for a lunar eclipse, always pay close attention to weather forecast – you might need to move to a different location with less cloud coverage.
Camera Equipment and Lenses
When it comes to photographing a lunar eclipse, the type of equipment you are using plays a huge role. Photographing a lunar eclipse is not the same as photographing the Moon for one major reason – lack of light. When you photograph the Moon lit by the Sun, it is typically so bright, that you can easily use fast shutter speeds and low ISO, without having to worry about noise and motion blur. Photographing a lunar eclipse is much more challenging, because the Moon gets very dim when it is in the Earth’s shadow. Not only will you have to drastically decrease your shutter speed, but you will also have to increase camera ISO to a much higher value, especially if you are shooting with long lenses above 300mm. Having a good DSLR or a mirrorless camera that can handle noise at high ISO levels will certainly help.
When it comes to lenses, longer lenses will magnify the Moon more and provide some good details for your shots. So, unless you are planning to capture the Moon with a foreground element, I would recommend to use the longest lens in your arsenal. But a longer lens presents another problem for Moon photography – you will have to use a fast shutter speed to get blur-free images of the Moon, since it moves so fast.
Without a doubt, the best thing you can do for lunar eclipse photography is get an equatorial tracker, such as the iOptron SkyGuider Pro:
I have previously attempted to photograph the Moon without a tracker and I always found myself struggling with camera settings at the time of the total lunar eclipse. Even with a very slow shutter speed of 1 second (which was barely enough to keep motion blur under control), I had to increase my camera ISO to 3200, at which point the amount of noise in the images was too much to deal with. With an equatorial tracker, once you set it up to track the Moon, you can take very long exposures without having to worry about shutter speed, since the setup automatically adjusts for the Moon movements. In addition, you do not have to constantly deal with readjusting your composition every few minutes. The biggest task is going to be proper and accurate alignment with the North Star – once you do that, the rest of it is going to be a breeze. With the tracker, I was easily able to take 10-20 second exposures at ISO 64 – ISO 200, which allowed me to take images with no noise issues to deal with in post-processing.
A good equatorial tracker is not just useful for photographing lunar eclipses. I used the same setup before for photographing a solar eclipse, as well as photographing the Milky Way and it worked amazingly well. If you are into photographing the night sky, you should seriously consider investing in such a device. In fact, instead of spending a lot of money buying expensive lenses designed for astrophotography, I would recommend to start out with a tracker!
If you have no plans for getting an equatorial tracker, you can still successfully photograph the lunar eclipse. See the instructions below for more details.
Camera Settings
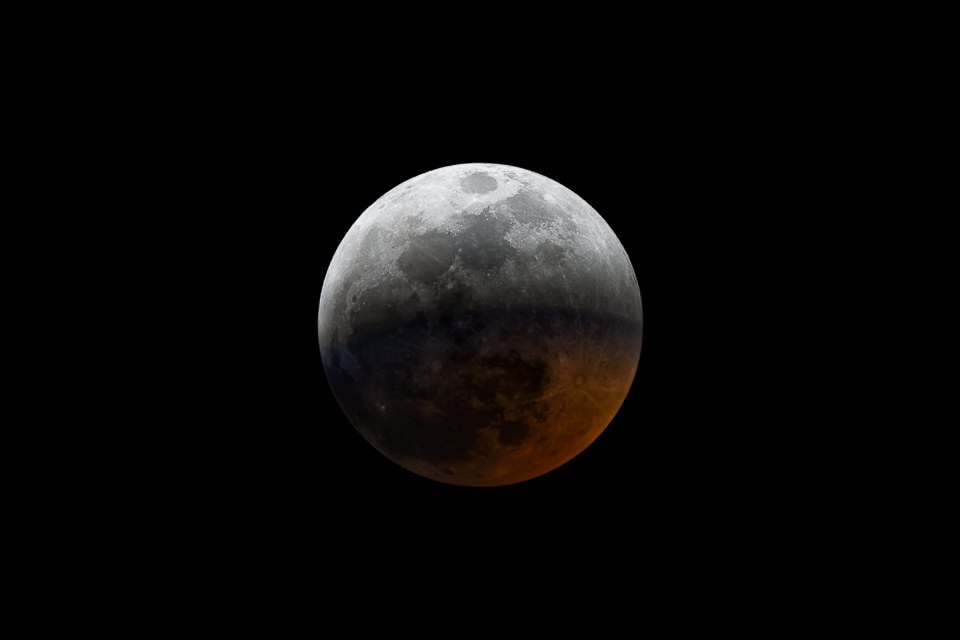
When you shoot a bright Moon, a good starting exposure is typically around 1/125-1/250th of a second @ f/8, ISO 100. When an eclipse starts, this exposure should work great to expose the bright part of the Moon, while the dark side of the Moon is not going to be visible at all. At some point, you will have to change your shutter speed to expose for the dark side, while overexposing the bright side of the Moon, similar to this image:
I found out that the exposure difference between the bright and the dark sides of the Moon was a whopping 8 full stops! What does this mean? It means that if you were getting a great exposure of the Sun-lit Moon at 1/250th of a second at ISO 200, in order to capture the part of the Moon that is in the Earth’s shadow, you will have to shoot at 1 second @ ISO 200 (1/125 -> 1/60 -> 1/30 -> 1/15 -> 1/8 -> 1/4 -> 1/2 -> 1)!
This is the part where the focal length of your lens becomes your enemy. The longer the lens, the more you need to worry about two major problems – shutter speed and camera shake. A long lens (above 300mm) will make the Moon larger in your picture, which at the same time means that the Moon will move very quickly through your frame. Using a slow shutter speed is obviously unacceptable, because the Moon features will appear blurry due to motion blur. Therefore, your only choice (aside from getting a motorized equatorial tracker) is to shoot at maximum aperture and increase camera ISO to a large number. In the above example, to increase my shutter speed to just 1/15th of a second, I would have to shoot at ISO 3200, which would result in a lot of noise, especially if I were shooting on a small sensor camera.
So, what should your shutter speed be? It depends on the focal length of your lens. If you are shooting at 300mm on a 1.5x crop-factor camera body using a 70-300mm lens, shoot at shutter speeds faster than 2 seconds. If you are using a longer lens, you will have to use even faster shutter speeds to get a blur-free image of the Moon. I was shooting at 560mm (a 400mm lens with a 1.4x teleconverter) on a 12 MP full-frame camera and I found that my limit was about a half a second (1/2) before the Moon started to get blurry. If you have a high resolution camera with a 30+ MP sensor, you might need to use even longer shutter speeds to avoid blurring the Moon.
Take a look at the below crop shot at 2 seconds to see how blurry the Moon got:
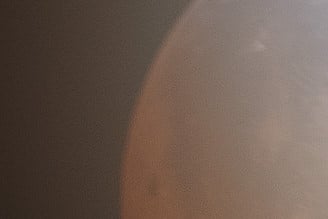
And that’s with me shooting on a tripod using a remote shutter release, plus Mirror Up with about 1-second interval after raising the mirror! So it is definitely not camera shake you are looking at in the above photo – that’s motion blur. Speaking of camera shake, you need to absolutely make sure that you are taking advantage of all the capabilities of your camera to minimize camera shake, especially when shooting with long super-telephoto lenses.
It goes without saying that your camera needs to be mounted securely on your tripod and you should not be releasing the shutter with your hand. Either use a remote shutter release in combination with “Mirror Up” mode to reduce camera shake, or if you have a more advanced camera that supports features such as Exposure Delay Mode and Electronic Front-Curtain Shutter, you can use those features to reduce, or potentially even eliminate camera shake. Lastly, don’t forget to turn off Image Stabilization / Vibration Reduction when your lens is mounted on a tripod.
Keep in mind that taking pictures of half-lit or quarter-lit Moon is relatively easy, since you still have quite a bit of light to work with. Once the Moon goes into Earth’s umbral shadow and totality starts, that’s when you will encounter the most issues. Depending on how bright the Moon appears during this phase, you will have to adjust your exposure accordingly. During the last total lunar eclipse event, those around me that did not have equatorial trackers had to open up their aperture fully and shoot between ISO 1600 and 3200, which added quite a bit of noise to their images. Always keep in mind that it is better to have noise than motion blur in images. While noise can be dealt with in post-processing, a blurry photograph cannot be saved.
Below are my recommendations for a proper setup and camera settings:
- Use the longest lens you can get your hands on. If it is compatible with a teleconverter, you might want to use it.
- When using a heavy lens, always mount the lens on a tripod instead of the camera.
- Use a stable tripod and a solid tripod head that can easily handle the weight of your camera + lens.
- If your camera has the EFCS feature, make sure to turn it on and use the particular camera mode that takes advantage of it in order to eliminate shutter shock.
- If your camera does not have the EFCS feature, use Mirror Up in combination with a remote shutter release or Exposure Delay Mode (if available).
- Make sure to properly focus your lens. Do it before the eclipse starts. Once focus is acquired, turn off autofocus (see #6 below for more details on focusing).
- Start at ISO 100 during the partial eclipse and increase ISO as needed during totality.
- Choose the sharpest aperture of the lens for partial lunar eclipse shots (typically between f/4-f/8). Open up the lens to the maximum aperture during totality.
- When it comes to shutter speed, start with the 500 rule (divide 500 by the full-frame equivalent focal length of the lens), review images at 100% zoom and adjust as needed.
Focus Accuracy and Sharpness
No matter what lens you are using, getting a very accurate focus on the Moon is extremely important. I know that some of you might suggest to shoot at infinity, but since many lenses now allow focusing beyond infinity, getting a true infinity focus is not that easy – a slight inaccuracy will make the Moon appear blurry. While using your center focus point to acquire focus might work fine when the Moon is lit by the Sun, your autofocus will most likely cease to function or might be grossly inaccurate when the Moon is in totality. Use your camera LCD screen to zoom into the Moon and acquire precise focus. If your LCD screen overexposes the Moon, making it impossible to see the details for focusing, see if you can turn off exposure simulation in your camera menu system. On some Nikon DSLRs, the solution is to press the “OK” button in Live View, which takes care of the problem.
Instead of dealing with refocusing every time you take a picture, I highly recommend to switch off autofocus once you get accurate focus on the Moon (ideally before the lunar eclipse starts). Take a picture and use the LCD screen of the camera to see how sharp the Moon is. Zoom in all the way and make sure that all the features of the Moon are visible. If the Moon appears blurry, go back and retry. If you cannot manage to get your camera to autofocus in Live View mode, try manually focusing with your hand while zoomed in all the way in the LCD. If you get precise focus before the Moon goes into the Earth’s shadow, you won’t have to touch your focus until the end of the eclipse.
One more thing I would like to point out: if you are using a lens with a teleconverter, or if you are using a consumer zoom lens, the optics are probably not very sharp when shooting at large apertures. Stopping down the lens aperture to f/8-f/11 should give you the sharpest results. Don’t use apertures smaller than f/11 (such as f/16 or f/22) – diffraction will kick in and make the Moon appear even softer.
Moon Movement Speed
So far I mentioned several times how fast the Moon moves when using long lenses. Take a look at this video and see for yourself where the Moon starts in the frame, and then ends up at the end of the 2 minute video. If you are impatient, simply look at the beginning of the video, then the end and compare the location of the Moon in the frame:
Now just think how many times I had to move my camera to photograph a 4 hour long eclipse!
Bracketing Partial Lunar Eclipse
Considering that the shadow and the bright side of the Moon are 8 stops apart, you might be wondering if there is value in bracketing the shots to capture detail in both. To be honest, after going through the process of bracketing during the last total lunar eclipse, I really struggle to see the benefits of doing it. First of all, you end up taking way too many images in the process and second, I don’t see how one can blend exposures 8 stops apart without making the resulting image look artificial. Take a look at the below photograph:
NIKON Z 7 + 300mm f/4 @ 420mm, ISO 64, 1/50, f/8.0
Personally, I find the image quite unnatural. During the partial lunar eclipse, our eyes cannot really see the shadow part of the Moon – we can only start seeing the details once the Moon nears totality. While it is cool to be able to see both with our digital cameras, I struggle to see the value of capturing all the shadow and highlight detail during the partial lunar eclipse. Plus, blending these images in post-processing software was rather painful. Lightroom was not able to do a good job, so I had to export multiple images into Photoshop and blend them manually, which took quite a bit of time and effort.
My recommendation would be to expose for the highlights during the partial eclipse. Once the Moon nears totality, you can switch your metering to the shadows.
Composition
Unless you are shooting at short focal lengths with a foreground object or some sort of a scene, don’t worry about composition – place the moon anywhere in your frame. The location does not matter, since you can easily crop the Moon out in post-processing, as long as it is exposed properly. When shooting without a motorized equatorial tracker, I often found myself re-centering the Moon in my frame, but as you saw from the above video, it was not an easy task. After I while, I started placing the Moon on my top left corner frame and let it move towards the right bottom corner. When it approached the bottom, I would move it back to the top left again.
If you want to have stars with the Moon in the final picture, the best way is to shoot stars separately, then combine both images together. If you want to have a composite image like the one I posted in this article, then your best bet is to photograph a night scene separately with a wide-angle lens, then use Photoshop to copy-paste the Moon into the image.
Post-Processing
The post-processing method I use for the Moon is described in detail in my “How to Photograph the Moon” article. If you did not use a tracker, the biggest problem is going to be dealing with all the noise in images due to high ISO levels. If noise bothers you, see my “Noise Reduction Tutorial” – there are plenty of tips in that article on how to clean up noise in Photoshop and Lightroom.
As for doing composite images (combining the various phases of the Moon with other images), the process is not that difficult:
- Pick a couple of photos with a dark sky, obviously shot at night.
- Open your Moon photos and using the “Quick Selection” tool, select just the Moon by itself. Make sure that you are grabbing the whole Moon, not just parts of it.
- Copy the Moon by pressing CTRL+C / Command+C
- Paste it into a corresponding image with a dark sky.
- If the Moon you copied has some black edges to it and your sky is not totally black, then try this trick: select the Moon once again with the Quick Selection tool, then right click the Moon, choose “Select Inverse”, then right click again, choose “Feather” and give it 2-3 pixels. Next, click on the “Add a Mask” button on the layers palette. Once this is done, click on the Mask itself in the layers window, then click “Apply Mask”. Repeat this process several times, if necessary, to make the edges of the Moon smooth.
- Experiment with copy-pasting several phases of the Moon and see how you like the final image.
- Don’t forget about sharpening the Moon. Do it before selecting the Moon with the Quick Selection tool, otherwise the sharpening tool will also sharpen the edges of the Moon.
Personally, I really like combining several phases of the lunar eclipse in a single composite. Take a look at the below image, which shows three total lunar eclipse phases:
NIKON Z 7 + 300mm f/4 @ 420mm, ISO 200, 10 sec, f/8.0
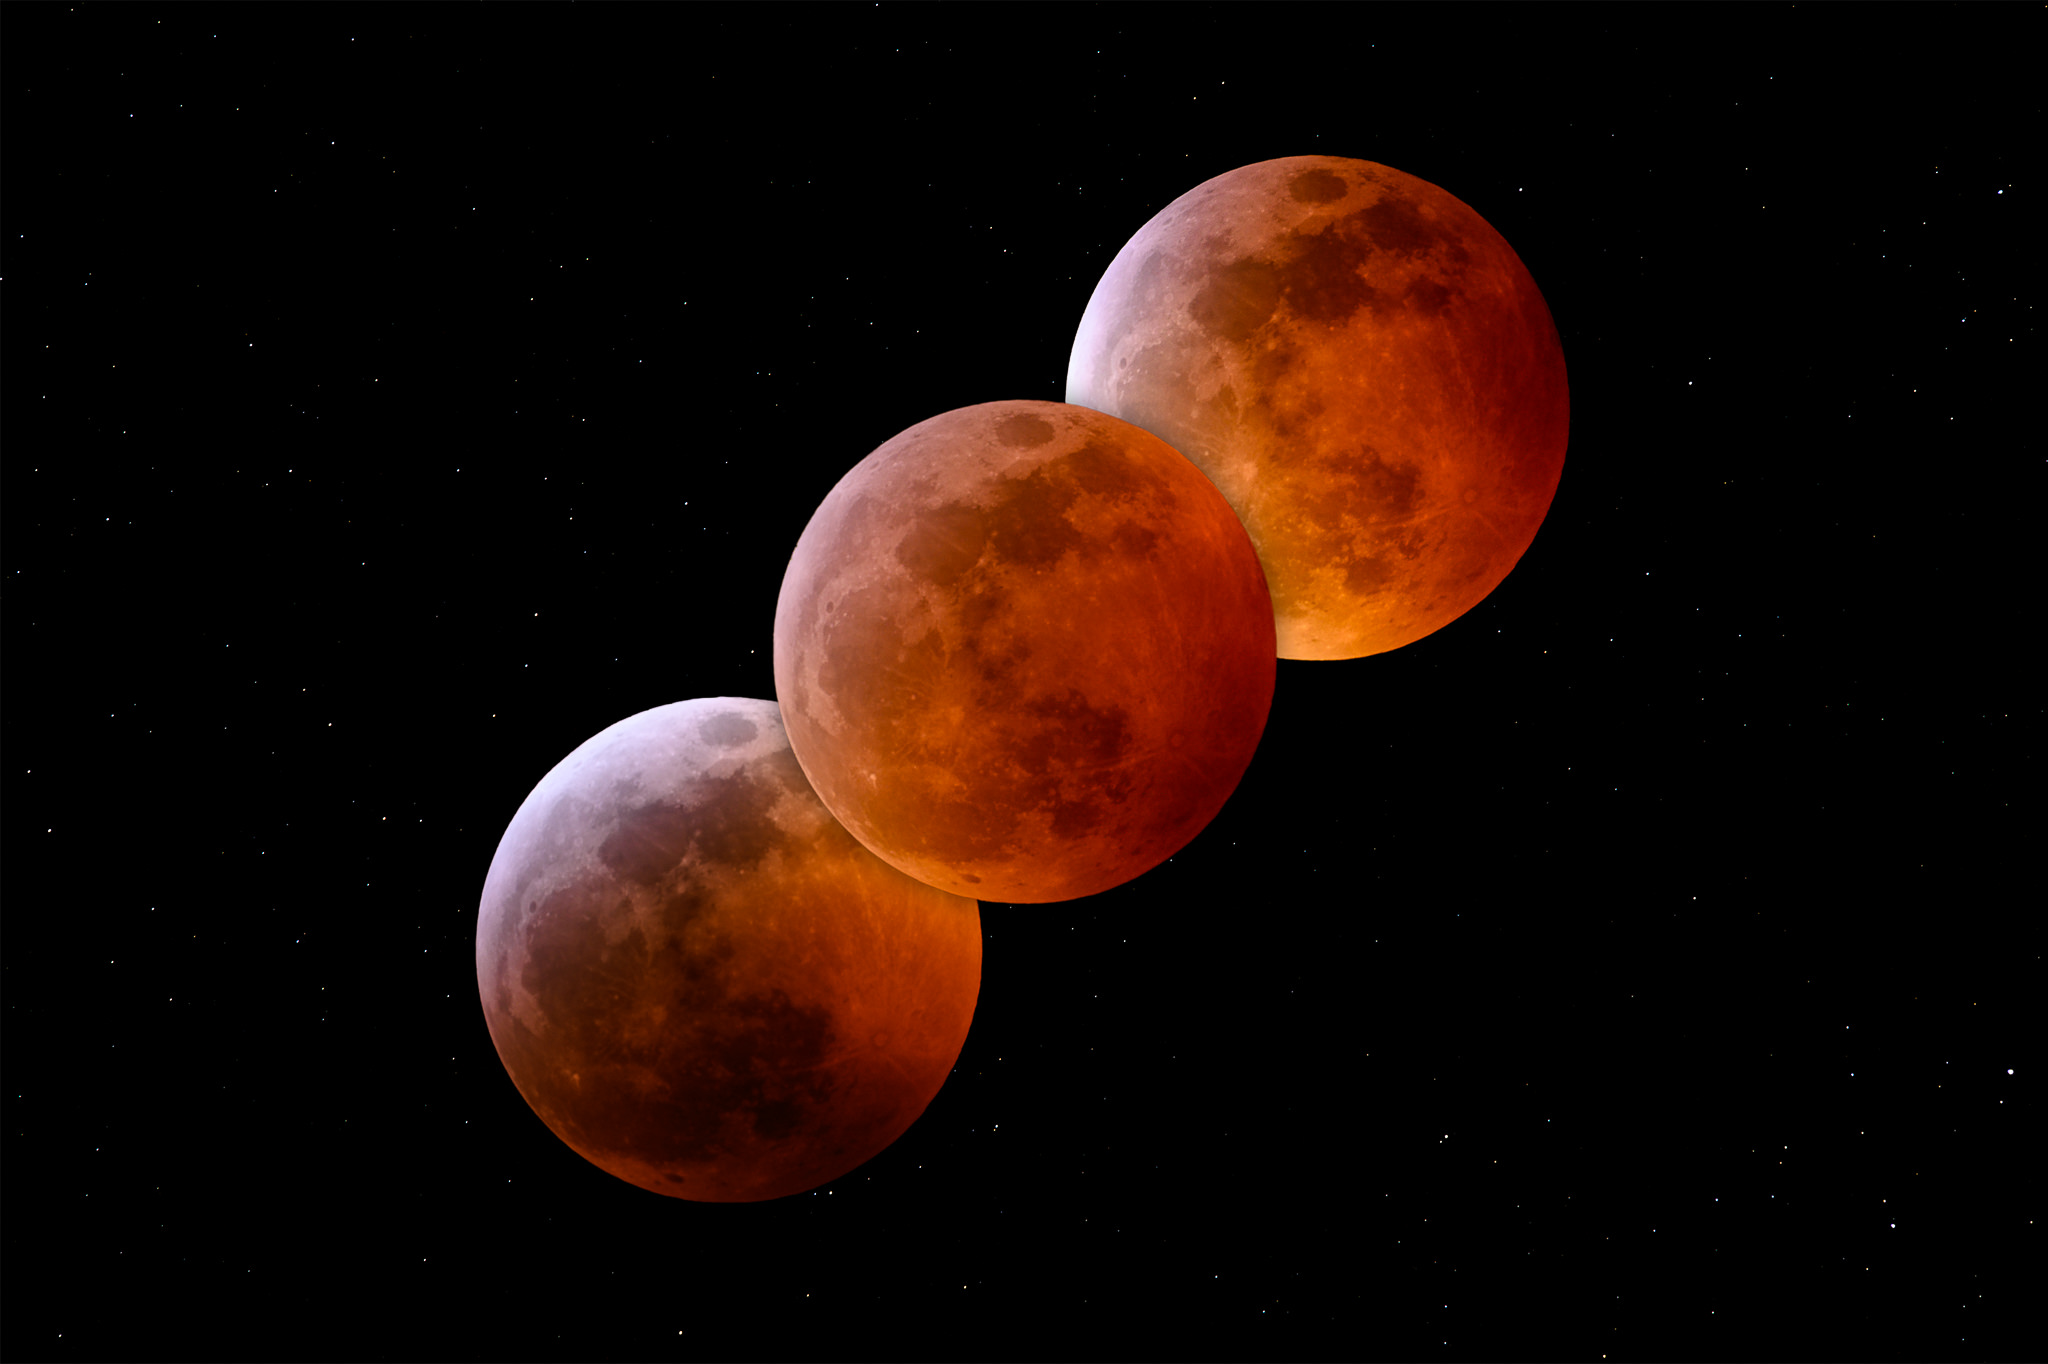
Here is another composite that shows two partial eclipse photos and a total eclipse photo in the middle:
NIKON Z 7 + 300mm f/4 @ 420mm, ISO 200, 10 sec, f/8.0
I personally like the first version, but others like the second one better. Doing this took some time in Photoshop to cut the Moon and place it like this, but I like the end result and that’s what really matters.
I hope you found this article useful. If you have any questions, please let me know in the comments section below!
Damn it, the clouds got in the way!! Well at least I had the opportunity to get a full night’s worth of sleep. Pity I wanted to try out the 180-600 to capture the lunar moon, but oh well at least I got the chance back in 2022.
Yeah same here! I actually went out and it was cloudy. But I didn’t even know about the eclipse, except that I always look for the moon. Shame. I don’t think I’ve ever seen one.
these images are simply stunning!
It was cloudy in Tucson but I’m pretty sure the Eclipse looked the same as the last one.
Thanks, Nasim…For a novice me, would you recommend clicking the moon with a P1000 or D800 with 200-500 mm f/5.6…
I have clicked earlier with P1000, the magnification is there but I am hoping to get better resolution with D800…
Regards,
Sarvesh from Gurgaon
(Earlier with F4)
Thank you Nasim. I photographed the eclipse last night, and read your instructions this morning to see what I’d done wrong! I usually read instructions last. It was a hazy evening in Auckland New Zealand but I managed to get pleasing though not technically perfect shots as the moon appeared and disappeared through the clouds. I might print it. It’s on Instagram if anyone is interested graham.orbell but I’m sure there will be many others far better
I have a question regarding the iOptron SkyGuider Pro that you mentioned in the article. When I click on the link, I find that there are *two* versions available (with and without iPolar). I’m new to astrophotography. Which one would you recommend for a newcomer, and why?
Dennis, if this is your first time doing it, I would say get it with iPolar – makes it easier to see, and you can align without clearly visible North Star.
Very good replay covering everything one can ever encounter during a night. I also did the Jan 2019 eclipse, I was in upstate Ms. and it was +/- 20 degrees out in a hayfield. Use a lens warmer, two for long telephoto like 200-600. I was in a hunting blind with a Buddy heater under the camera but the protective glass filter started icing up. I used a video tripod head on my old heavy Manfrotto. I used the Sigma 150-600 with a 2x teleconverter on a A7m3. Important lesson as the moon moves the whole night it goes like a high noon sun and your lens is pointed at about 80 deg. up, if your camera does not have a articulating screen you will be under it, the A7m3 does but you will be in a different viewing angle as well as tracking ever so little, so up on a table. If you are using a 2x and in APS-C mode (1800mm) you will be zooming in and out for tracking with cold fingers! Yes nice to get that full frame image but like the first image with stars around, like my image at just 562mm setting is I think the best because of the surrounding stars and best for blending like the other with 3 phases on top. Todays software makes transforming (enlarge/shrink) so easy a small image not affected my motion blur can be large or as you capture each 2 minute image can be resized on a pano image. Like ON1 Photo Raw has a AI cutout that you can do anything with the image.
I recommend the 400mm to 600mm image and this will allow easier tracking and bracketing shots (you have 3 images to play with). Also remember the moon wobbles some so an image to be real watchout for fake moon eclipse photos, compare first and last images of the night the bottom crater like its belly button will move left and right so a stock image is not wise to use.
This one will be SW to NW mainly aim to the west with a 24mm to 80mm for a landscape doing an image every 10 to 30 min. the moon will be a good size and if shot at ISO/SS 125 f/ 8 will be clear and sharp once focused and do bracketing to get detail of bright/dark. No tracking required just set your time lapse. Blend all in PS or ON1 layers and you will also have the correct wobble in each.
A note Sony mark 1 and 2 cameras have on camera apps from Playmemories the time lapse app is done on camera all hands free!!!!
I still play and no correct way.
One other preparation comment: the May 26 total lunar eclipse was quite low in the sky for those of us in Colorado, and the end coincided with sunrise. For those of us living close to the Front Range, that low angle raised some issues, as the moon set behind the mountains before the eclipse was even full. In such cases, using planning tools like The Photographer’s Ephemeris and/or PhotoPills becomes quite important. They’re useful for planning even absent such extreme conditions.
As always, an excellent article.
Last night I shot the eclipse with a 90mm refractor and 4x PowerMate and Nikon D850. This is an effective lens of 2400mm and f/26.
All the problems detailed above are true.
The most difficult for me was getting sharp focus in the view finder.
Sad to say, I didn’t think about using Live View and Zoom to dial in my exact focus.
To avoid motion problems with long exposures, I had to jack my ISO all the way to max… with the associated lack of image quality.
An equatorial mount really is the answer, especially with telescope mounted cameras. The mentioned mount has an 11 lb upper limit that is not beefy enough to scopes, diagonals, PowerMates and cameras.
A low-tech way to shoot the moon is simply take two different exposures, one to get the moon (which will make everything else dark) and one to shoot the foreground (which will turn the moon into a ball of white). Take shot number one, select the moon (blur the edge by 3 pixels), copy into a new shot and then increase the size by 30%. Copy this into the shot with the properly exposed foreground and it will look fine. A 30% difference is enough to make the moon stand out, but not enough to make it look fake. It looks like the moon which the eye sees, whereas, the moon as the camera captures it always looks too small.