Lightroom has become a very essential part of the workflow process for many photographers, including myself. While one could argue that Lightroom isn’t an ideal tool for image culling, it is certainly an excellent choice for efficient photo organization. Every image that’s imported into Lightroom gets its metadata extracted and organized into a database, which allows photographers to quickly identify duplicate images, sort and organize photos based on different criteria.
Over the past few years of using Lightroom extensively, I have come up with efficient ways to store, organize and access photos on my computer, so I wanted to share a few tips with our readers on how I do it for both personal and professional work. Although there are many ways to organize images, this particular method has been working great for myself and many of our readers. If you are looking for a generic guide on doing this without any third-party photo software like Lightroom, then please read my older article on “how to properly organize pictures“.
Table of Contents
1. Where and How to Store Photos
The first question you should be asking yourself is, where and how do you store your pictures? I used to store all of my photographs in various subfolders of my hard drive (commonly in “My Pictures” or “My Documents”), but after I got into photography, I decided that it was best to keep all of my photographs in the root folder of an external drive that I dedicate for my photography needs. Hard drive storage is relatively cheap, so creating a properly organized and redundant storage for your photography needs does not have to cost a lot of money.
For those on a budget, I highly recommend a two-drive RAID 1 (mirror) storage array that can be attached directly to your computer with a USB cable. If you have a large collection of RAW images, my favorite solution is a 5+ drive network-attached storage (NAS) array from Synology. With large-capacity hard drives on a NAS array, you could get terabytes of photo and video storage that will last for many years, and you can easily configure it for redundancy in case one or more drives fail.
2. Folder Structure and Organization
Once you figure out where you will be storing your photos, it is time to figure out what the folder structure is going to be. There are obviously many ways to organize folder structure. I will show you what works for me and will leave it up to you to decide whether you want to adopt it, or create your own.
I start by categorizing Photos and Video into separate root folders:
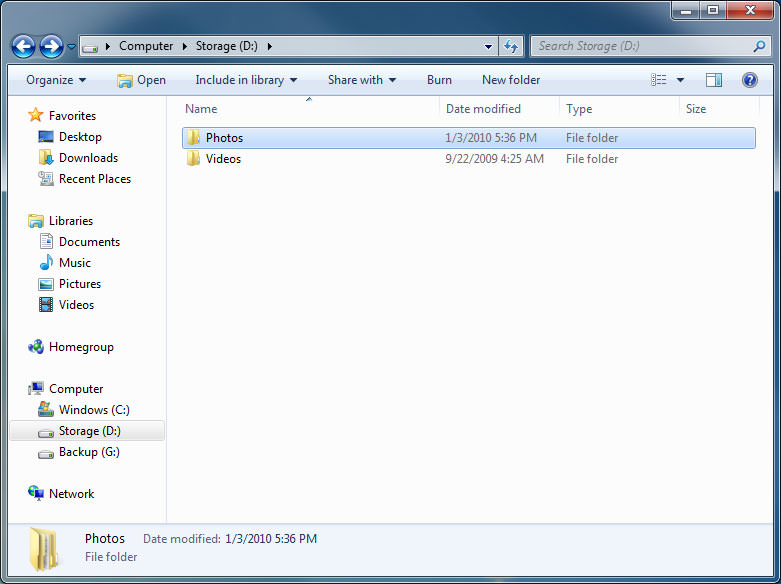
Within the “Photos” folder, I create sub-folders for each year:
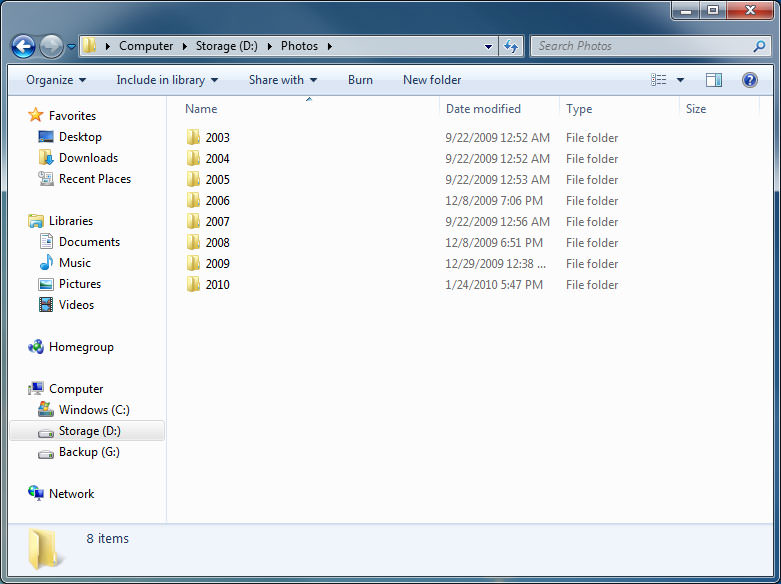
From there, I create one more folder structure for photo location, or event:

All photographs are stored within these folders, so the depth level typically stops here. In rare cases, I might have a large event or a trip where I want to break photos up to different sub-events or days.
For example, if I have photos from a trip to New York in 2024, the photos would reside in “Photos\2024\New York”. This is a simple method that works for me, and I can locate images very quickly in my filesystem.
3. Create a New Lightroom Catalog
Once you define and create your initial structure, it is now time to create a Lightroom catalog. Start off with a new Lightroom catalog by going to File -> New Catalog. For performance reasons, I prefer to store my catalog along with image previews on the fastest drive (typically the main drive of my computer), while pictures are stored on an external storage array. If you don’t have tens of thousands of photos, you can store them all in a single catalog without much impact on Lightroom performance. However, if you are a busy photographer, I recommend creating one Lightroom catalog per year.
Start off by creating one folder on your main drive called “Lightroom” and store all of your catalogs there.
4. Modify Lightroom Preferences
For every new catalog I create, I slightly modify the default settings to fit my needs. Although you can do this later, it is probably best to do it in the beginning, as you might forget to take care of it later. The first thing I do is to set up Lightroom Preferences. Go to Edit -> Preferences and under the “General” tab, set similar settings as shown below:
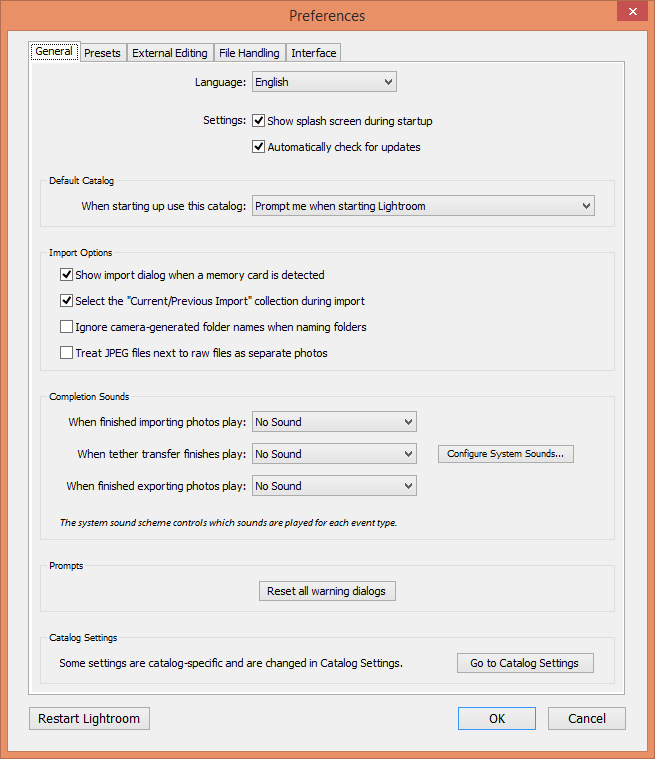
There are two settings that I changed here. I modified the “Default Catalog” option, where I set it to “Prompt me when starting Lightroom” – this basically makes Lightroom prompt which catalog I want to load when I start up Lightroom, which is convenient if you use multiple catalogs. If you only have a single catalog, there is no need to change the default setting. The second option is “Show import dialog when a memory card is detected”, which simply tells Lightroom to automatically fire up the import screen when you insert your memory card.
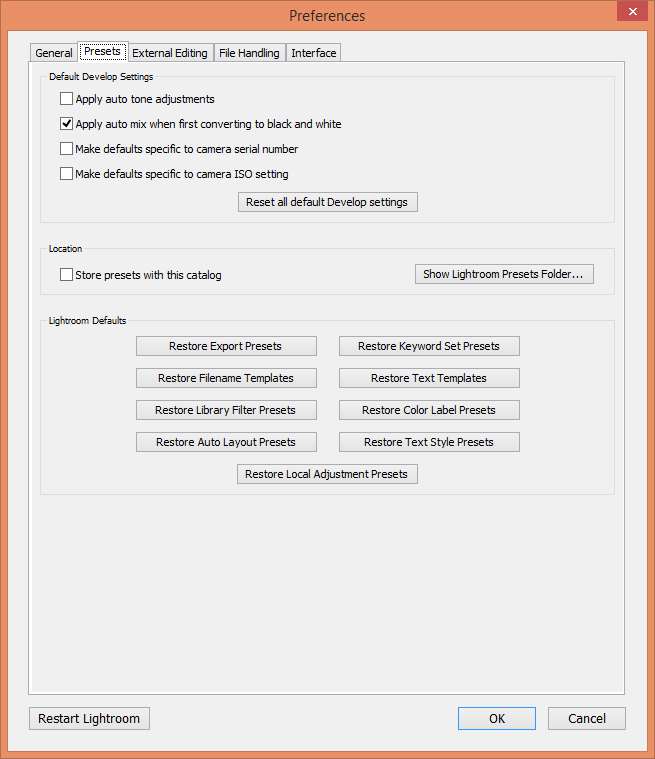
The next tab is “Presets”, where I typically leave everything by default. The only thing that is worth mentioning on this page is the “Location” where you can check or uncheck “Store Presets with Catalog”. Lightroom allows storing your user presets (such as default import settings, file naming convention, copyright information, etc.) either in a general folder that is used for all of your catalogs, or in each of your Lightroom catalogs where you can set different presets depending on the catalog. I personally use one preset for all of my Lightroom catalogs and recommend leaving this option unchecked.
The next tab called “External Editing” allows you to specify the default File Format and Color Space for use in external applications such as Adobe Photoshop. If you use RAW format for your images, you should always edit images in Photoshop with the best format that preserves all image details and the widest color space. I use TIFF format (default) for files and ProPhoto RGB (default) for color space for this reason. Bit Depth should obviously be 16 bits and I leave the resolution at 240 (default), with ZIP as the compression method:
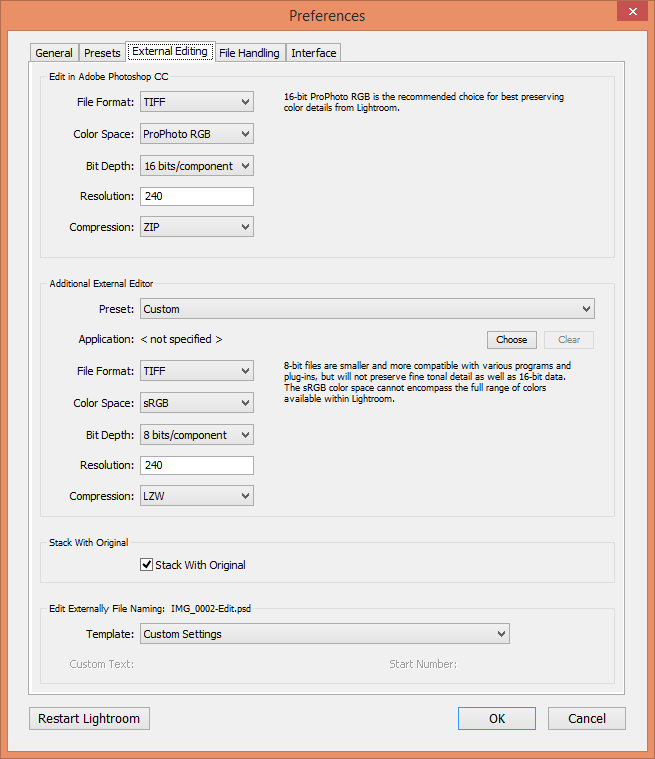
I also leave “Stack With Original” checked, so that an image that is edited externally stays attached to the original RAW file.
Let’s now move to the “File Handling” tab. This particular tab is very important, because it controls the way your pictures are imported into the catalog. Here is how I have my File Handling tab set:
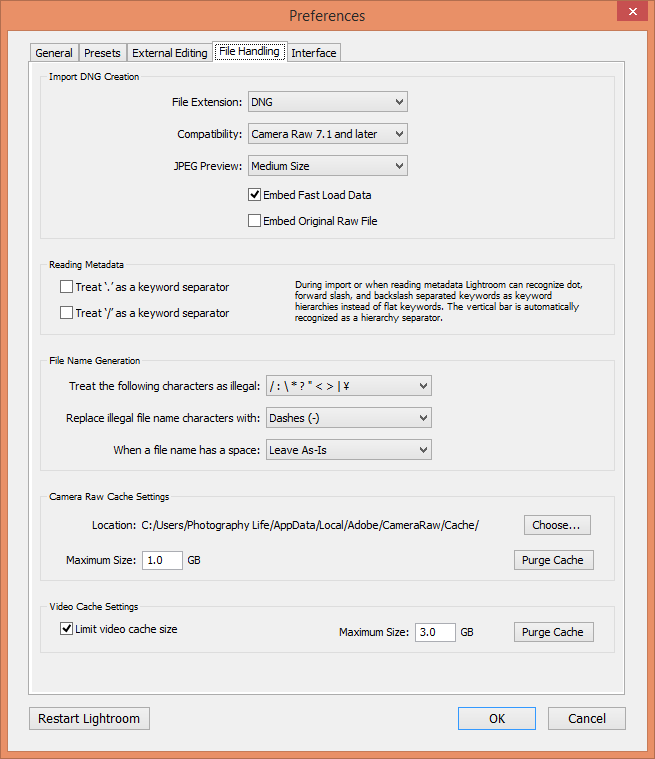
Pay attention to the “Import DNG Creation” settings on this page. I set “File Extension” to “DNG”, “Compatibility” to the latest Camera Raw version available, “JPEG Preview” to “Medium Size” and left “Embed Original Raw File” unchecked.
The important settings here are “JPEG Preview” and “Embed Original Raw File” that control the total size of your DNG files (read more about the DNG format). By default, every RAW image contains a full-size JPEG image (see RAW vs JPEG) inside that is stored as a “Preview” (the “Preview” image is what you see on the back of your camera when you take a picture).
By setting the “JPEG Preview” option to “Medium Size”, you are telling Lightroom to generate a smaller version of a preview inside DNG files, which will save you up to 15-20% of space per file (depending on the size of the RAW file). While you might think that it is not such a big deal, it does a make a huge difference when you have tens of thousands of pictures.
The only penalty is the fact that the image opens slightly slower when you try to open a full version of it in Lightroom later, simply because it has to generate a full-size version from the RAW image. If the speed is important, you could always generate full-size previews in Lightroom later. The checkbox “Embed Original Raw File” is something I recommend to leave unchecked, because if you leave it checked, your DNG files will actually be much larger than the original RAW file (DNG + RAW will be combined in a single file).
I leave the last “Interface” tab at its default settings.
5. Modify Lightroom Catalog Settings
The next thing we need to modify is your Lightroom Catalog Settings. You will have to do this once for each catalog that you create. Go to Edit -> Catalog Settings to bring up the “Catalog Settings” window. I usually leave everything to default values in “General” and “File Handling” tabs. However, if you want Lightroom to render bigger previews to match your monitor resolution, pick a different value under “Standard Preview Size”. Note that the larger the preview size, the more space Lightroom’s cache will take on your hard drive.
The most important tab for me here is the “Metadata” tab, where I can specify what data is written into my images by Lightroom:
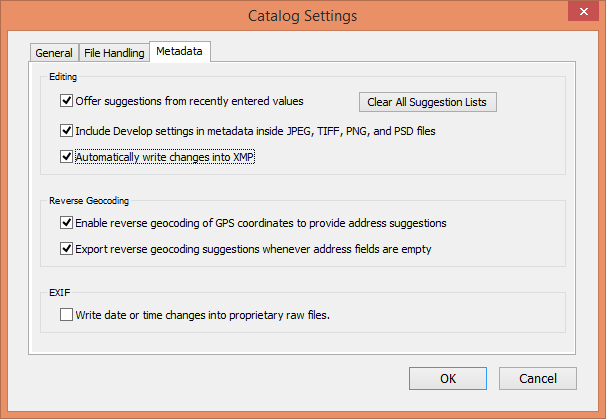
The first two options “Offer suggestions from recently entered values” and “Include Develop settings in metadata inside JPEG, TIFF, and PSD files” are checked by default and I do not touch them. The last option “Automatically write changes into XMP” is unchecked by default.
This is the one I usually recommend to turn on, because it makes Lightroom write your changes right into the DNG files (or XMP sidecar files that go with your RAW files) as you work on them. Why is it important? Because if your Lightroom catalog was to fail and you lost all of your catalog data, the image file would still keep all changes that you’ve made in Lightroom! It is also very useful if you happen to open that same file in Photoshop or other Adobe applications, because all changes will be immediately visible as you work on the file.
And if you were to lose your Lightroom catalog completely, you could just import all the images from your hard drive and all changes would migrate through (except for the history). The penalty of keeping this option checked is slower performance, since every change is immediately written to the DNG / Sidecar file. If performance becomes a problem, you can turn off this setting and occasionally force Lightroom to save changes to files by selecting all files (CTRL+A in the root folder) and saving changes (CTRL+S).
6. Import Your Photos into the Lightroom Catalog
Your preferences and catalogs settings have now been modified. Let’s start importing your pictures! Fire up the photo import catalog by going to File -> Import Photos… or press CTRL+SHIFT+I on your keyboard. Once the import screen comes up, it will look similar to the following:
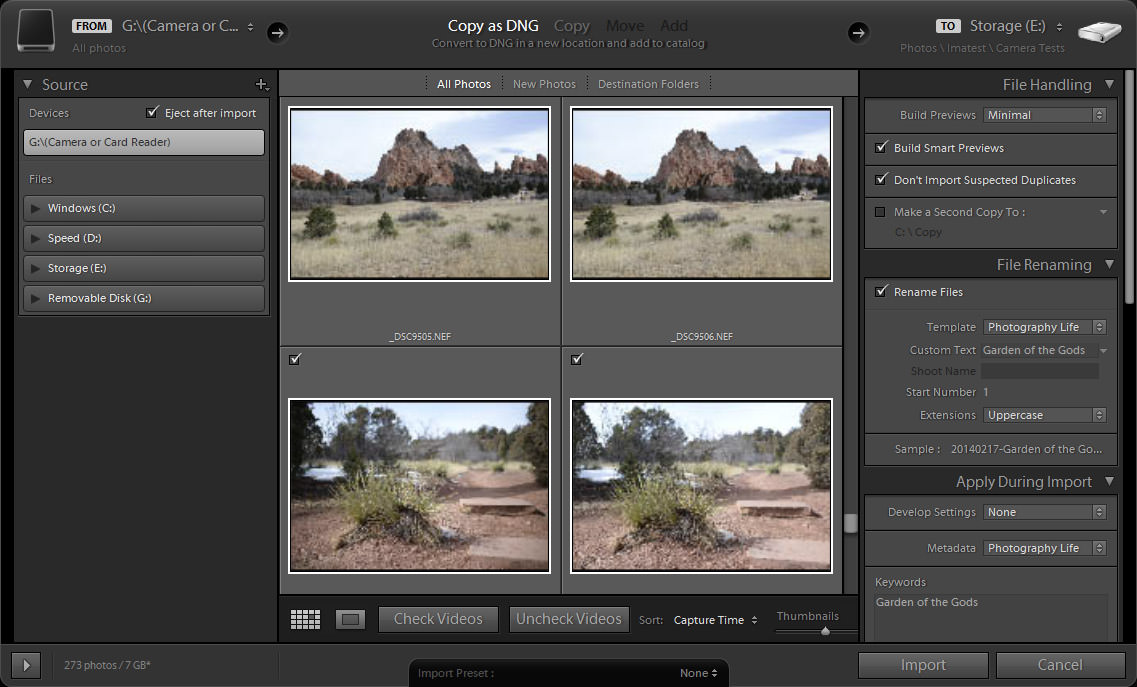
The entire import screen is organized very similarly as Lightroom itself, the left side being the location where you will be grabbing the files from, while the right side serves as the destination, along with import settings. The middle section shows all images to be imported. The “From” section has been designed in such a way that Lightroom is able to differentiate between permanent storage and your memory card reader.
The nice thing is, the import screen is dynamic, meaning whatever changes happen in the system, the screen gets updated in real time. For example, if you open the import screen and then disconnect your memory card, the device will simply disappear from the screen. Reconnecting the memory card will add the device back into the screen.
If you want to standardize on the DNG format, you can leave “Copy as DNG” selected in the top middle section. If you choose to keep the original RAW files, then pick “Copy” instead.
The right import menu consists of several sections: File Handling, File Renaming, Apply During Import and Destination. Let’s take a look at the first two sections – File Handling and File Renaming:

6.1. File Handling Section
The File Handling section typically consists of four choices – “Build Previews”, “Build Smart Previews”, “Don’t Import Suspected Duplicates” and “Make a Second Copy To”. I leave the “Build Previews” option on “Minimal” to save time during file import. However, if you have plenty of storage and you want to speed up the time it takes for your files to render when you zoom into them, you can set this option to “1:1”, which will generate full-size previews. Normally, I don’t recommend this, unless you want to speed up the process of editing high resolution files (see my article on efficient Lightroom workflow for high resolution images).
The “Build Smart Previews” option can be very useful for situations where you have a laptop that stores just the catalog and your actual images are stored on external storage. If you happen to travel and need to disconnect from your storage, keeping this option turned on will create image previews, so that you can see the photos and go through them for basic editing and image culling. If you are using a desktop PC and the storage is attached permanently, I would turn this option off.
I always keep “Don’t Import Suspected Duplicates” turned on and I do not use Lightroom’s way to back up imported images, so I keep the last option “Make a Second Copy To” turned off.
6.2. File Renaming Section
The File Renaming section consists of variables that are used for renaming your files. I always rename my files to the following format: “YYYYMMDD-Custom Text-Sequence Number”. The first part is obviously the file date stamp. Then a dash is followed with a custom text that I type during each import, which is then followed by a sequence number. I like renaming my photos, because I do not like to keep photo names like “DSC_1000.NEF” that mean nothing and get duplicated over time. By renaming the photos, I know that I can copy images from different folders without running into duplicate file names. I highly recommend taking a similar approach and uniquely identify every image you import.
If you have not already created a rename template, take a look at the following:

Create a similar template, then save it as a Preset and click “Done”. Then simply select your preset under the “Template” drop-down.
The next field on the Lightroom import screen under “File Renaming” is Custom Text – the text you can type to identify images. For this particular example, I used “Garden of the Gods” as custom text, which means that my first file will be named like “20140217-Garden of the Gods-001.DNG”. The “Start Number” field lets you type the first number that the system will use, so if you type “1”, your first file name will have a sequence number of “001” and consecutive photos will have this value incremented by one. I always leave the extension in uppercase for consistency.
6.3. Apply During Import Section
This section is also important, since it lets you choose an import preset with your Lightroom settings, write Metadata and Keywords into each image as it gets imported. I have already made some changes to the way I import files, and being able to choose what I want before the import process starts is a great idea, as it saves a ton of time during the image editing process. Once you save an image preset in Lightroom, it will immediately show up on this screen.
The next field is called “Metadata” and it is used for writing additional data into each imported file. For example, if I wanted to include my copyright text to every image (do not confuse this with a watermark), I will need to create a new Metadata preset and make some changes:
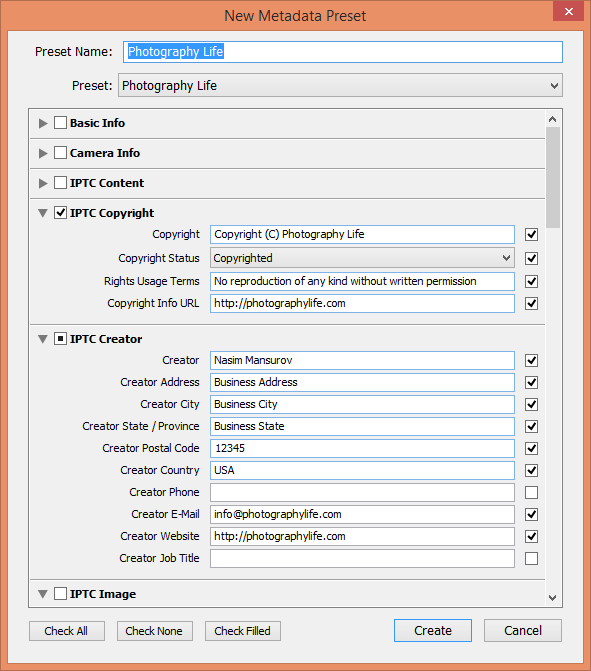
I wouldn’t waste too much time filling out every single field and only pay closer attention to “IPTC Copyright” and “IPTC Creator” fields, where you can provide your name and contact information.
The last field is “Keywords” and that’s where I type keywords related to what I am importing. Keywords can be great to be able to locate photos by event, location, theme, etc. For the above example, I used “Garden of the Gods” keyword, which saves it into the Lightroom database. Keywords are an easy way to quickly locate groups of images in Lightroom.
6.4. Destination Section
The last section identifies the location of where the import process will store files. The first field is called “Into Subfolder”, which I always leave checked, since I do want Lightroom to create subfolders for me. The next field is a drop-down with two options: Organize “By Date” and Organize “Into one folder”. If you select Organize “By Date”, you will get an additional field called “Date Format”, where you can specify the format of the subfolders that will be created by Lightroom.
Since I already have a folder for each year and my file names already contain the full date, I do not feel the need to create subfolders for year, month and day. Instead, I like to keep everything simple and organized, instead of having many different subfolders in the system. Therefore, I always choose “Organize Into one Folder” and then type the name of the subfolder:
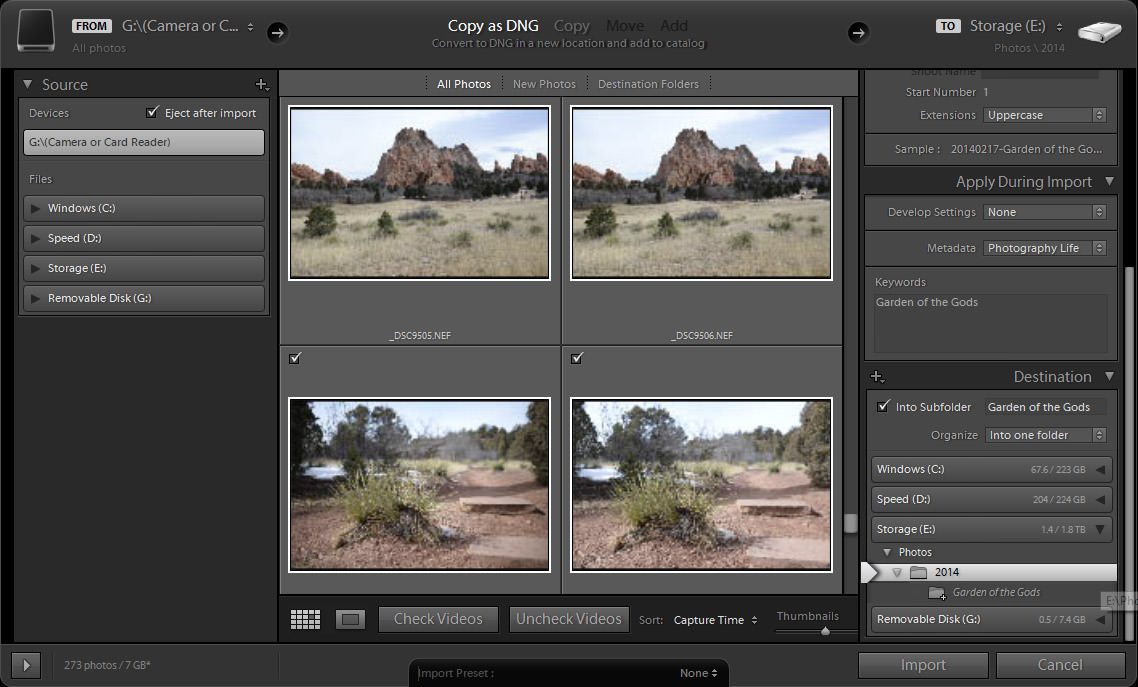
Because I store all of my images in a master folder called “Photos” and then subfolders by year, I simply select the year under “Photos”, as shown above. As you can see, the system is set to create a folder under “E:\Photos\2014” called “Gardens of the Gods”, where all the photos will be imported.
I always sort my import images by “Capture Time” under “Sort” drop-down. Once you choose the destination folder, simply click the “Import” button to start importing your images. The import window will go away and you will start seeing the images popping up in your Lightroom catalog.
7. Post-Import Check
Now that you know how to import your images with custom templates, go ahead and import all of your pictures into Lightroom and make sure that everything gets transitioned correctly. Do not forget to change the folder names along with “Custom Text” and “Keywords” fields upon each new import in the “Import Photos” screen going forward.
Otherwise, you will end up with a bunch of unwanted folders and incorrect file names and keywords. If you accidentally imported your pictures with wrong settings, it is not a problem. Just select the imported pictures, then change the keywords under “Keywording” section in the “Library” module, then rename the folder to the correct event name and press “F2” (or go to Library -> Rename Photos) to mass rename your pictures.
If your pictures go out of sequence for whatever reason (for example your sequence numbers are repeated, but with a different name), then simply select all pictures and batch-rename them all by pressing “F2” on your keyboard. Give it a new sequence number and it will start renaming them based on the age of the image or your selection criteria.
8. Perform Full Backup
By now, you have done a lot of work to re-organize your photographs and you have completed importing all of your pictures into Lightroom. It is definitely a good time to perform a full backup of both your Lightroom catalog and your pictures.
Many people assume that the backup functionality in Lightroom backs up their photographs too. That’s a very wrong assumption! Lightroom does NOT backup your photos – it only backs up your Lightroom catalog, which is useless without your images. You can afford losing a Lightroom database, but you cannot afford losing your pictures. Therefore, you should always backup your photographs first, then worry about Lightroom.
Here is a simple way to perform a full backup using your operating system:
- Close out of Lightroom.
- Get your backup drive ready, connect it to your computer and turn it on.
- Go to the root folder where you are keeping your photos. In my computer it is “E:\Photos”. Select this folder and drag and drop it into the backup drive’s “Photos Backup” folder or something similar, which will start the file copy process.
- Wait until all pictures are copied / backed up. Make sure that you do not have any errors and the copy process is completed 100% successfully.
- Now backup your Lightroom catalog(s). Locate Lightroom catalog file(s) on your hard drive with “lrcat” extension and perform the same copy process to your external drive. I usually store my Lightroom catalogs in a folder called “Lightroom Catalog Backup” on my backup media.
The above process could be easily automated by third-party backup programs or with some built-in backup tools within your operating system. I highly recommend to set up an automated job that backs up your computer as often as possible. I also recommend backing up your data to at least two different locations every time.
9. Image Management in Lightroom
If you would like to watch a video of how I organize images in Lightroom, take a look at the Chapter 3 of our free “Post-Processing” course on YouTube:
And the next chapter of our video course covers file management in detail:
I hope this guide helps you in keeping your photos organized in Lightroom. Please let us know if you have any questions in the comments section below!
Nasim, I do question your recommendation (admittedly I am replying neatly two years after your article was written) to store create multiple catalogs for libraries in excess of !0K images. In my library of over 400K images I use a single Lightroom catalog with no problem whatsoever.
In days gone by Lightroom did see performance issues with larger catalogs, but that is a thing of the past. Adobe has done a great job of improving single catalog performance on seemingly any size catalog!
There may be other reasons for creating multiple catalogs (personal. work. client, education, etc) to separate your images by their intended audience or purpose, but improved performance is no longer a reason!
Hi I am an amateur photographer my files are over the place.Can you have a quick look at capture files to advise on where I am going wrong and how it can be rectified Thanks
During the COVID 19 lockdown what better time to find the piles of hard drives with the muddle of my photos over the last 10 years and organise them, at last. Your youTube tutorial (linked to from the Guardian newspaper) is excellent – clear, futureproof and takes the fear out th scale of what’s involved. BUT – it sounds like you started with the same bunch of hard drives and muddle so I am trying to figure out the way to best organise with Lightroom to end up with one organised folder. It starts with several hard drives, can it be organised over several? I am guessing with duplicates I have 3tb and I bet after de duping that comes down to 1.5. Frankly, I can’t get my head around the process. Somewhere in the mix is – I think – the question of how Lightroom works across drives? But there again if I understand your approach where you create the folder structure by year etc actually on the drive itself then that problem falls away. You work with the hard with the muddle on it, plug in the target drive and label it for say 2010 then you work through each of the unsorted hard drives, organising, exporting all the 2010 photos to said drive. Then back up the 2010 drive. Label it. Sound right? If so, that is my long overdue photo housekeeping – I have had Lightroom, the piles of drives and your tutorial has given me just what I have needed to grapple with this. Warm thanks. arj
I have some questions about digital photo organization. As I understand your articles, one needs to establish some sort of file system regardless whether they use organizational software like Lightroom or DigiKam? The organizational software will store additional data about the photos in a database and leave the structure we have created without change or will I have two structures – one that I created and one created by the organization software?
Many photographers advocate for Year/Subject/Sub-subject organization. My question is how do you find the picture of (what ever) if you don’t know the year it was taken? Search all years?
Thank you for the articles on digital photo workflow – very helpful! I have one request. Would you cover open source software for digital photo workflow? As you know, Lightroom costs at least $10/mo. That can get to be a bit much for amateur photographers.
And the Sad part of Adobe’s way of doing business is: Just try to cancel LR (monthly, subscription) AFTER you have owned it for over a year. I was offered three month of LR for free and then still pay for the rmaining time that I had originally signed up for. Adobe ‘stuff’ is good ‘stuff’, no doubt, however you better already know photography jargon, and have a really good idea of what you wnat where you want it. I’ve tried PSE (Elements) also for organizing. If you want to organize your photos, you better load them from your camera for best results. I could write a book after ‘fooling around with adobe’ for ten years and it is NOT for amateurs.
I probably missed it but why do you not use “My Photos” in Windows?
Hi Nasim
I love your articles and always look forward to new ones. I am using the same Backup style as you do and it works very well. One other thing I use is a program called “Chrono Sync”. I am not sure if you had mentioned in a previous tutorial or where exactly I had read about it, but it works amazingly well and I use it for all my backups, not just Lightroom.
Thank you again for your informative tutorials.
Ken
I think much in this article is really good, however, since it was written 2014 I think AI and other technical improvements have changed how to best organize photos today. Lightroom is still a good option, and probably the best when it comes to the postproduction and editing. However, for the organization, I believe the new tool Picular might be a stronger option. Apart from face recognition that LR also has Picular also tags photos automatically (with help from AI) and has a much more organized focused interface that enables for quicker searching of photos.
Hi Nasim,
Great article and I would like to implement your yearly catalog idea.
Here is my problem.
Currently I have one insanely large catalog from day 1 when I started photography back in 2010. I shoot a lot now.
All my photos are stored on external drives. Many and different sizes daisy chained to my Mac. This has to END. So looking at your Synology suggestion.
The question is how can I go back and optimise LR catalog per year now? And when I edit photos now, I guess I open only 2018 catalog and work from there?
I need to reorganise everything and implement good back up solution. But first I need to speed up LR and organise catalog.
Hi Nasim,
Thankyou for the great article. This is one of the best ones I have read/found in a long time since I cannot find a good solution to organize photos (since picasa got dis-continued). Can you help me with a question I have. I want to use LR as a front end to the photos on my external drive. So seems like the protocol I would follow is:
1) Collect all the photos on my external hard drive (typically I have photos->year->month->trip)
2) Open LR, create a catalog for the entire Photos folder.
3) import all photos using the awesome instructions you have provided
4) Edit, delete as needed
5) Save and backup.
My question is, how do I make LR save all the edits from steps 3 and 4 on the original folders? I want to preserve the resolution of the originals to what they were, but use LRs import and manual edits to rename files and delete un-necessary files as well as preserve edits like cropping etc permanently. Is this possible to do in LR? Is there anything wrong in doing this that I am not understanding?
Appreciate your help so much!
Thanks
Mudita