Love it or hate it, Adobe Lightroom has become one of the most popular post-processing and image management tools on the market. With its simple and intuitive interface, it is easy to learn and our team at Photography Life has provided many in-depth articles on using specific Lightroom features over the years. However, one of the biggest frustrations with Lightroom can be its poor performance, which can be especially disappointing when using the software on an older computer. In this article, we will go over a number of different techniques and settings in order to optimize Lightroom’s overall performance.
Table of Contents
1) Upgrading Lightroom Might Not Be The Answer
When one experiences serious issues with any software, sometimes the answer is to upgrade to the latest and greatest release, hoping that the new version will address the problems. Unfortunately, that’s not the case with Lightroom. As we have previously demonstrated in our Lightroom Performance Comparison article, Lightroom is only getting slower with each new release, so the typical recommendation to upgrade to the latest version is not going to take care of its poor speed – it might actually make it worse. So if you are running an older release of Lightroom and you are wondering if upgrading the software is going to alleviate all the performance issues, it probably won’t. With the exception of some specific releases, it might get worse before it gets any better. For this reason, I recommend that you go through all the performance tips below and potentially even consider changing some parts of your post-processing workflow to get the best out of Lightroom.
That said, while jumping to the latest major release might not take care of the performance issues, you typically want to stay current either way. Adobe often delivers fixes and stability improvements to Lightroom and the most current minor releases will also provide support for the latest cameras and lenses available on the market. If you would like to find out more about this process, you can check out my article on how to upgrade Lightroom.
2) OS, Driver and Firmware Updates
While you might have your reasons for not wanting to upgrade Lightroom to the latest release, the same should not apply to your Operating System, Driver and Firmware updates – those you should update periodically, as they might contain important performance, stability and security patches. Personally, I avoid upgrading operating systems to the latest major release when it gets announced for at least three months (preferably six), so that all the potential bugs and incompatibility issues are addressed. There are plenty of beta testers out there willing to be on the cutting edge and if you want a stable workflow, you don’t have to be one of them. Just wait a few months and once all the major issues are addressed, you can safely upgrade. That’s not the case with driver and firmware updates though – I would recommend to update as soon as such updates are available. Pay close attention to graphics card driver updates, making sure that you have the most current driver.
3) Storage, CPU and GPU Performance
It goes without saying that Lightroom’s performance heavily depends on fast storage, CPU and GPU performance. For a start, have a look at the types of speeds you can expect to see when moving up from a spinning hard drive to an SSD or an NVMe drive in my HDD vs SSD vs NVMe Performance comparison. In short, it is a good idea to have at least one SSD or faster drive on your computer that you can utilize to store your Lightroom catalog and previews. I will provide more information on this type of setup further down in the article.
The same goes for your computer’s CPU – faster is generally better, although you don’t have to go with the latest architecture and an expensive Intel Core i7 CPU. I personally found Core i5 CPUs to be quite adequate for most Lightroom features. Since Lightroom is generally not well optimized for multi-threading, you don’t have to worry about getting a high-end Intel Xeon CPU either. Aside from the image export process and maybe 1:1 preview generation, Lightroom does not typically use more than a single CPU thread.
Having a fast and dedicated GPU card can provide some advantages to Lightroom’s performance. This is covered in more detail further down below.
4) Memory (RAM) Requirements
If you take a look at the system requirements page on Adobe.com, it states that 2 GB of RAM is required and 8 GB of RAM is recommended to use Lightroom. First of all, forget about the first number! I cannot even imagine trying to run Lightroom on a machine with anything less than 8 GB of RAM. In fact, even 8 GB of RAM can be insufficient for smoothly running Lightroom, especially if you open up Lightroom and other memory-hungry software at the same time. How smoothly Lightroom runs also very much depends on what you are planning to use it for. If you edit low-resolution images and don’t stitch panoramas or merge HDR images, 8 GB should be sufficient. However, if you are planning to perform such activities, I would strongly recommend to have at least 16 GB of RAM for Lightroom to use.
Unfortunately, Adobe’s Lightroom software development is rather poor, since the software has only become layered with more functionality over the years and some of the core issues and bugs have never been properly addressed. Lightroom is also known to be a memory hog and its memory leaks can occasionally result in enormous memory consumption. Because of this, I would recommend to occasionally close out of Lightroom and reopen it – this alone can take care of a number of performance-related issues. So if you see Lightroom slowing down, you would be surprised to see how much improvement you can get by just re-launching it.
5) Lightroom Catalog, Previews and Cache Folder Locations
Ideally, you should have your Lightroom catalog and the accompanying “Previews” folder (which contains all image previews and smart previews, Previews.lrdata file on Mac) sitting in the fastest storage you have available on your computer. For example, if you have an SSD drive and a large capacity hard drive on your computer, you should have your operating system, along with the Lightroom catalog + Previews folder on the SSD drive, whereas your photographs can reside on the slower hard drive. Lightroom’s cache should also reside on the fastest available storage. Below is an example of how I do this on my secondary computer:
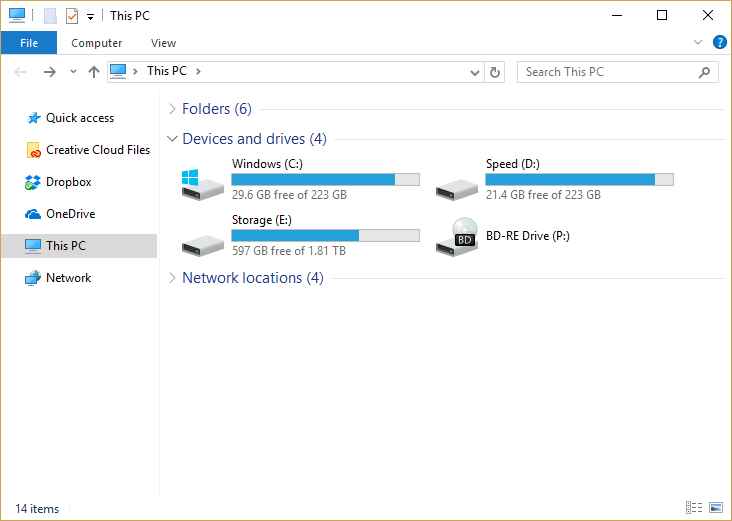
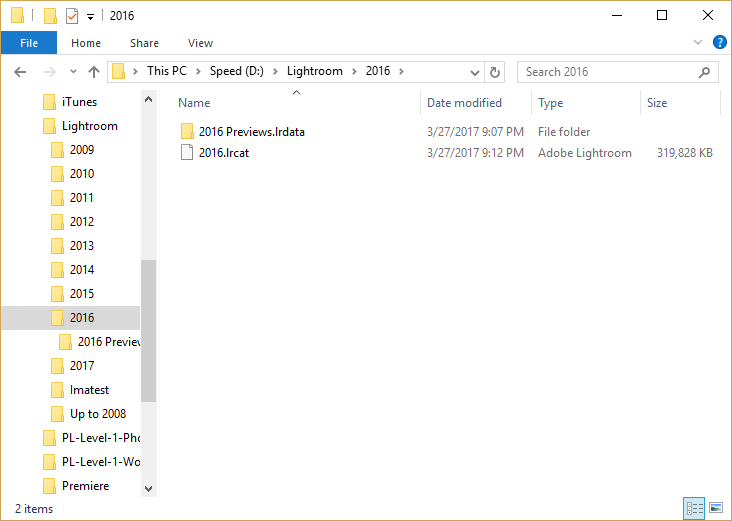
As you can see, I have three separate drivers on my computer. The first one C: (Windows, 256 GB SSD drive) is for the operating system and Lightroom Cache folder. The second D: drive (Speed, 256 GB SSD drive) is for storing Lightroom catalogs and Previews. The third E: drive (Storage, 2 TB Hard Drive) is for storing the actual RAW photographs. For Lightroom catalogs, I create a folder called “Lightroom” and I place all yearly catalogs there (more on file management below):
And all photos are stored in a relatively simple structure – Photos -> Year -> Event, as shown below:
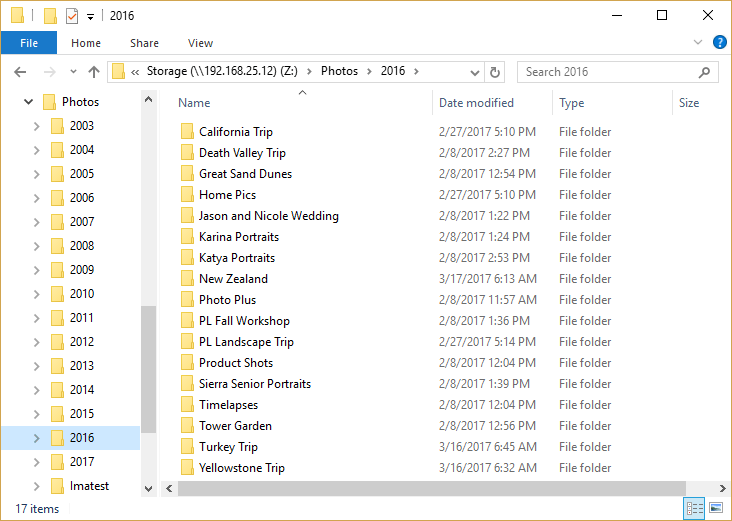
Here is the basic folder structure:
- “C:\Lightroom Cache” – only for Lightroom’s cache
- “D:\Lightroom” – for storing Lightroom catalogs, organized by year
- “E:\Photos” – for storing actual RAW images
You don’t have to have three drives as in the example above – on my primary machine, I only have a single large M.2 NVMe drive that I use for the operating system, Lightroom catalogs and cache, so the second drive is only used for storing RAW images. If you only have a single drive available to use (which is often the case when using a laptop), you can use that drive to store your Lightroom catalog and cache, whereas your photos can reside on external storage. My personal choice for external storage is the compact Samsung T3 SSD drive. It is an insanely fast drive that is both compact and lightweight, which makes it an ideal device to use when traveling (see my Samsung T1 review for more details).
Lastly, if you have a lot of photos like I do, you might want to consider putting all your photos on a large network storage device like the Synology DS1815+. In such configurations, your best bet is to still keep the Lightroom catalog and cache on a fast SSD drive, while the actual photos are fetched from a network resource. Make sure to use a gigabit switch and CAT-5e or faster network cables, or you might experience very painful speeds. You definitely do not want to be loading your images off a network storage device using wireless network, as it won’t give you the speed or the reliability of a direct cable connection.
6) Lightroom Cache and its Impact on Performance
When moving between RAW images in Lightroom, many of us are pretty familiar with the dreadful “Loading…” notification, which can show up for a few seconds when looking at a high-resolution RAW image. In order for Lightroom to properly read the information from a RAW image, it must access the file and extract all the relevant information. This information is temporarily stored in something called “Camera RAW Cache”. By default, Lightroom allocates 1 GB of your computer’s primary storage for this cache, which is capable of handling roughly 2,000-2,500 images. Once the folder goes over 1 GB, Lightroom’s cache management automatically purges older cache contents. While maintaining a cache of two thousand images might be sufficient for most people, if you are planning to work on more than a few thousand images (say after coming back from a full day wedding, or a long trip), you are better off increasing the size of this cache in order to accommodate more images and avoid constantly seeing the “Loading…” notification.
To make this change go to Lightroom’s Preferences (“Edit” -> “Preferences…”), then click on the “File Handling” tab and pay attention to the “Camera Raw Cache Settings” part of the window:
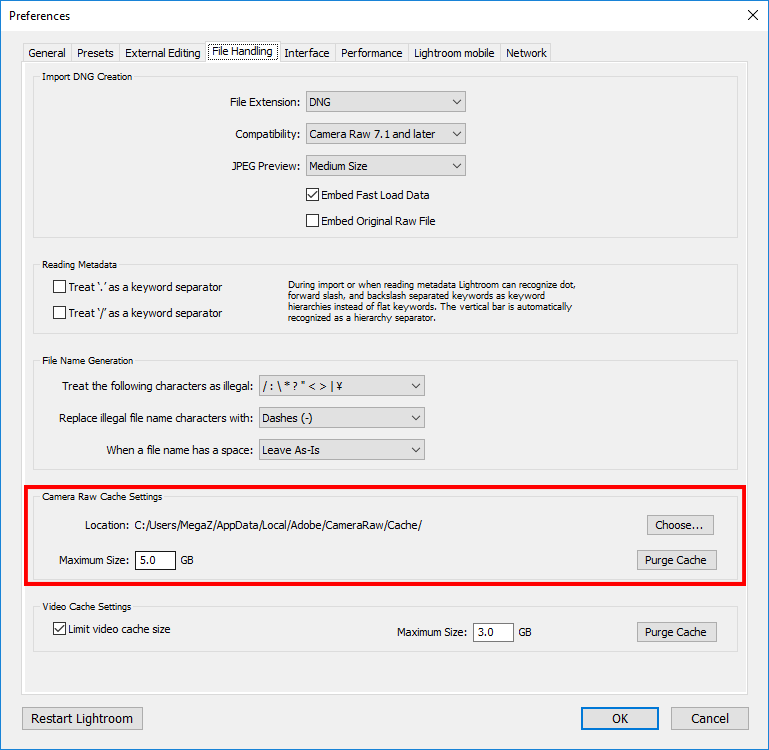
Simply bump up that number from 1 GB to something like 5 GB, which should be plenty for most situations. With 5 GB of storage space, Lightroom will be able to accommodate between 10,000 to 12,500 files in the cache, which is more than adequate for most photographers. If you know that you will be working with more than 10,000 images at a time (perhaps for timelapses or sequences of panoramas), then you can bump it up to 10 GB. There is no need to increase the cache to ridiculous numbers. Not only will you end up wasting space, but you will also significantly increase the number of files in a single folder, which might actually end up hurting the performance of Lightroom rather than improve it.
There is no need to move the cache location if it is already on a fast drive, but if you see that the cache folder is sitting on a slower hard drive, you might want to consider moving it to something faster. Keep in mind that the Lightroom cache is not something that is going to make Lightroom drastically faster. Having a cache that contains information about RAW files is going to make Lightroom marginally faster – perhaps 10-15% faster at most. Still, you do not want to lose this advantage when post-processing images, which is why it is a good idea to allocate enough space for the cache.
7) Allocate Enough Storage Space for Lightroom
Always make sure to allocate enough storage space for Lightroom to use. This one is very important, especially for the volume that keeps your Lightroom catalog and the accompanying Previews folder. If you run out of space while performing tasks in Lightroom (which can happen rather quickly when generating 1:1 previews), you might even end up corrupting the catalog. Adobe recommends at least 20% free space on your storage, but it all depends on what type of storage you are using and how big it is. To avoid potential corruption and performance issues with Lightroom, make sure to have plenty of storage available.
8) Organize Lightroom Catalogs
Lightroom catalog is essentially a database that contains all imported image metadata, along with current adjustments and editing history. If you take a good care of catalogs and properly organize your images in Lightroom, that in itself should take care of a few performance issues. For example, instead of putting everything into a single catalog, my personal preference is to keep Lightroom catalogs and photographs organized by year, as I have shown above. This way, things can be kept clean and I don’t have to worry about storage space issues, or my Previews folder getting massive. I have written quite a bit on image management and there is no need to repeat everything again – please see my article on how to organize images in Lightroom, where you will find a video that details how I keep Lightroom catalogs and photo folders on my computers.
Although you might be better off having a single catalog when you are starting out and you don’t have many images, I think it is a good idea to get in the habit of properly organizing your file and folder structure from the get-go to avoid potential changes and problems in the future. Lightroom can surely accommodate millions of images in a single catalog, but that’s not something I would recommend for a number of reasons. First, larger catalogs are going to be slower compared to smaller ones. I know database folks might disagree with me on this one, but it is not just the database that slows things down – the previews folder that contains image previews for every image and its accompanying database also grow significantly larger, becoming potential performance bottlenecks. Second, larger catalogs are harder to backup and manage, whereas smaller ones are much easier to deal with. Third, you are not putting all your eggs in one basket with a single Lightroom catalog. And lastly, if you run into space issues, it is very easy to move your older data by moving older catalogs, along with their accompanying image files to external archive storage – you won’t have to deal with anything missing from your catalog.
9) Optimize Lightroom Catalogs
When you delete a bunch of images from Lightroom, the database does not get automatically checked and compacted for you. This means that occasionally, you should run catalog optimization in order to make sure that the database is well-maintained. Optimizing a Lightroom catalog is very easy – all you have to do is fire up Lightroom, then select “File” -> “Optimize Catalog…”, which will bring up the following window:
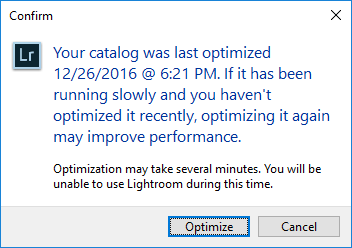
As you can see, it looks like I optimized by 2016 catalog at the end of the year, as part of my year-end workflow activities, but if I changed anything in my catalog, I would normally re-optimize it to make sure that it stays as compact as possible. Depending on how often you perform this task and the speed of your storage volume where the catalog resides, the process of optimizing a catalog can take as little as a few seconds and as long as a few minutes. Once you are done, you will receive a message that says “Your catalog has been optimized”.
Another reason for occasionally optimizing your catalogs is to make sure that they are error-free. If anything happens to the catalog that causes corruption, the process of catalog optimization might fail, which will be a good sign for reverting to an older backup.
10) Lightroom Previews (1:1, Standard and Thumbnails)
Lightroom can potentially store up to three types of previews for each image:
- Thumbnail – for showing image thumbnails in Lightroom’s Library module. Thumbnails are generated pretty quickly by Lightroom, since it often uses the embedded JPEG previews in images that are generated by your camera. If Lightroom detects any changes, it will re-render the thumbnails and make them appear closer to what they should actually look like after changes in the Develop module are applied.
- Standard – for looking at a larger version of an image in the Library module. Standard previews are nice to have built ahead of time, so that you don’t have to wait for the “Loading…” message each time you navigate between larger versions of images.
- 1:1 Preview – for zooming in on an image and seeing it at 100% / 1:1 or higher view. The 1:1 previews can be very useful when looking at images at 100% view in the Library module. Please note that 1:1 previews are not used by the Develop module, so if you zoom in to images at 100% in the develop module and navigate between images, they will need to be re-rendered each time.
One of the suggestions that we often hear from photographers is to create 1:1 Previews, claiming that it will make the process of image culling and editing faster. While 1:1 Previews can certainly help a great deal for culling images, they are of no use when utilizing the Develop module! Don’t believe me? Try the following yourself:
- Select a group of images and generate 1:1 previews
- Once the previews are built, jump to the Develop module, zoom in to the first image at 1:1 / 100% view. Now press the right arrow of your keyboard to navigate to the next image
- You will see “Loading…” each time you move on to the next image
Now repeat the same process, except this time, zoom in 100% to the first image in the Library module, without going to the Develop module. Press the right arrow of your keyboard to move to the next image – the 1:1 preview will be shown without the “Loading…” message.
This basically proves that the 1:1 previews are of limited use and they can only be relied on when going through image culling. If you think they can help you when making changes to images in the Develop module, you would be wrong. As a result, if you are planning to cull through images in Lightroom, you should never do it from the Develop module – always look at images in the Library module instead.
11) Retaining Lightroom Previews
If you choose to generate Lightroom previews, don’t forget to check your Preview retention settings in Lightroom, to make sure that they are not eating up your precious space forever. Personally, I keep my 1:1 Preview retention / garbage collection to be 30 days, but if you edit images frequently and generate a lot of 1:1 previews, you should probably shorten that window to a week. Go to “Edit” -> “Catalog Settings” and click the “File Handling” tab to reveal the “Preview Cache” settings:
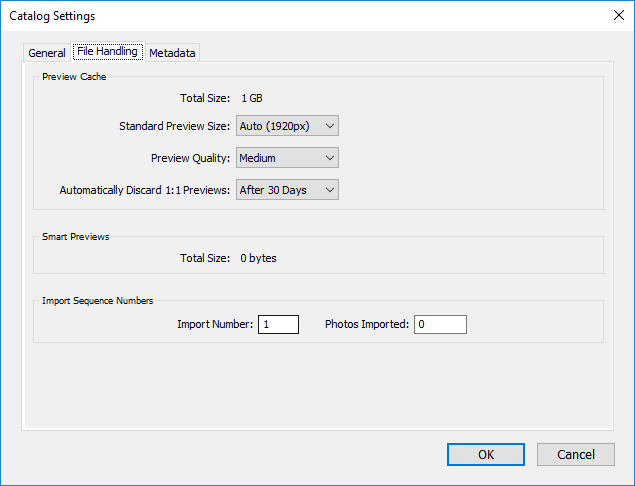
Take a look at the “Automatically Discard 1:1 Previews” setting and make sure you pick a time interval that works for you. Unless you really know what you are doing, you should not select “Never”. For most desktop computers, I would keep the default “Medium” setting for “Preview Quality”, but if you have a slow machine or a laptop, you are probably better of picking “Low” to make rendering a bit faster. Keep the “Standard Preview Size” at “Auto”, but if you have previously changed this setting and wondering which one to pick, choose resolution that closely matches your monitor resolution.
12) Automatically Writing Changes to XMP
In Lightroom’s Catalog Settings, you will find another tab called “Metadata”, which contains an important setting called “Automatically write changes to XMP”, as shown below:
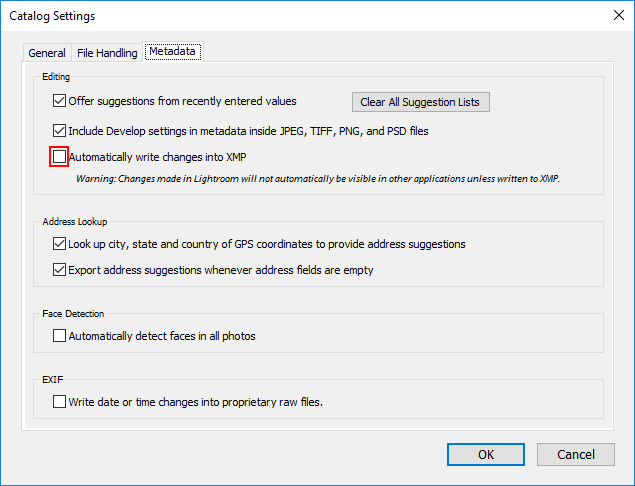
What this setting does, is whenever you make changes to a RAW file in Lightroom, it either embeds your edits into the same image (if its is in DNG format), or creates a sidecar file that contains the changes. While I certainly recommend to preserve your edits within sidecar files, I would not recommend to keep this setting turned on, because it will impact Lightroom’s overall performance. And it makes sense, because Lightroom will be constantly writing changes to the XMP / sidecar file as you edit your photographs.
Instead of this, my recommendation is to make the process of creating sidecar files with all your changes either at the end of your editing process, or as part of your year-end workflow activities (see section #5 “Save All Edits”). The process of saving your edits is very simple – all you do is select all images (CTRL / CMD + A), then press CTRL / CMD + S to start the process (you can also go to “Metadata” -> “Save Metadata to File”). This way, if anything happens to your Lightroom catalog, you will be able to create a new catalog and import your images without losing your edits. Please note that saving your edits does not preserve your editing history.
13) Lightroom is Poor at Image Culling
Now let’s go over the painful process of image culling in Lightroom. Why painful? Because Lightroom sucks at image culling, period. In order to even make the process of image culling tolerable, you must render 1:1 previews ahead of time, or you will be wasting your time, waiting for Lightroom to render each image at 100% zoom. So if you are going through hundreds of images at a time, selecting which one you are going to pick or delete, you will need to sit and wait through the process of generating 1:1 previews. Unfortunately, this process can take forever, which for many of us means that we should allocate sufficient time for Lightroom to do this for us. Many wedding photographers typically import images into their Lightroom catalogs, then start the 1:1 preview rendering process before they go to bed, so that by the time they wake up in the morning, the renderings are done and they can sit and cull through the images. Sadly, many don’t understand how the 1:1 previews actually work, so they end up wasting a lot more time by firing up the Develop module, where the 1:1 previews are completely useless!
Now picture this process in your head. You have 1,000 images to import into Lightroom, out of which you are planning to only edit 100 images or so, which means that plenty of images will be deleted, while others will not be marked for editing later on. During the import process, Lightroom will be copying all 1,000 images into a designed folder on your computer and simultaneously creating tens of thousands of rows of data in the Lightroom catalog / database, containing image metadata, file location and other relevant information. When you start rendering the 1:1 previews, it will take even more time, since Lightroom needs to apply any of the import settings to each image, then render images one at a time. It then needs to keep all the rendered images in a separate database that resides inside the “Previews” folder, so that Lightroom knows which images have those 1:1 previews available to use. Next, you start going through images, marking which images you want to keep or delete, which again results in more database operations. After you are done, you delete all the images that you marked for deletion. During this process, Lightroom empties all the rows containing image metadata and other relevant information that no longer needs to be in the database. However, the database still stays at the same size, since nothing is re-organized or compressed after this – you will need to repeat the process of optimizing the Lightroom catalog in order to be able to reclaim the space and keep the catalog at its proper size. This, in turn, adds up to more wasting of precious time that one could spend editing images.
Lightroom might be pretty solid for editing images, but I personally stay away from Lightroom for culling through images for the reasons stated above. Instead of going through this nightmare, I would recommend to modify your workflow, so that you cull through the images ahead of time, only importing images you are intending to keep and edit in Lightroom. My personal choice of image culling software is FastRawViewer (see my detailed FastRawViewer review) and I use it heavily to cull through the images while they are still sitting on my memory card. Once I mark the images I want to edit and delete the ones I don’t care about, only then do I go through the import process in Lightroom. This speeds everything up and I know exactly what needs to be done in Lightroom. I don’t waste my time generating 1:1 Previews or optimizing my Lightroom catalog each time I delete images from it.
If you modify your workflow and avoid Lightroom for culling images, you will save yourself a lot of time and frustration!
14) Import Settings
When importing images into Lightroom, you can save quite a bit of time by not rendering large previews upon import. You especially want to avoid rendering 1:1 previews on import, because those take forever to build and provide benefits only for image culling, as stated above. Personally, if I want to import images as quickly as possible, I choose “Minimal” for preview generation and if I want to be able to toggle through large images from a single card, I might sometimes choose “Standard” size previews (I typically do that after images are culled and imported though):
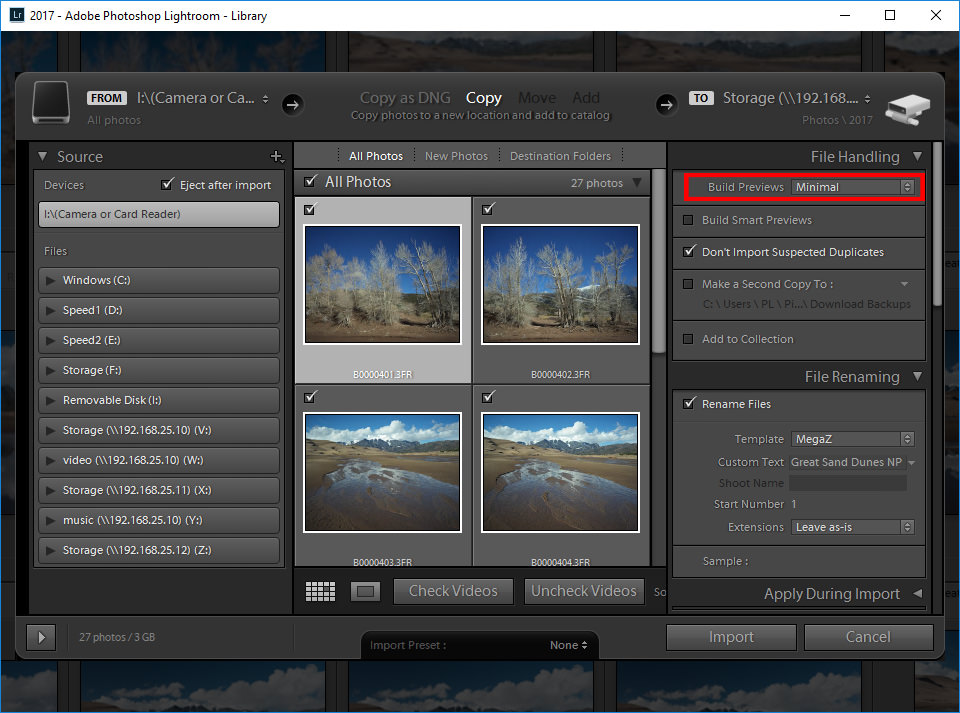
For the best image import performance, I would recommend to render Minimal previews, especially when importing from more than one card. If you want to generate image previews, you can always do that after the import process is complete.
15) Using Smart Previews
Basically, Smart Previews are highly compressed, low resolution DNG files that are generated from the original RAW images. If your machine is slow and you are working with a lot of high-resolution images, sometimes limiting yourself to edit using Smart Previews is the best way to speed up Lightroom. For this, you will need to generate Smart Previews ahead of time, which can be done in a similar way as rendering 1:1 previews. Simply go to “Library” -> “Previews” -> “Build Smart Previews” and let Lightroom generate those smart previews for you. Once the process is done, you will end up with a bunch of small DNG files in a new folder called “Smart Previews.lrdata” (it is a file on Macs). These files will be used for editing, instead of the original RAW file.
To make sure that your computer actually uses the Smart Previews instead of the original RAW files, you will need to change a setting within Lightroom. Fire up Lightroom Preferences by going to “Edit” -> “Preferences…”, then select the “Performance” tab. You will find a setting under “Develop” that says “Use Smart Previews instead of Originals for image editing”:
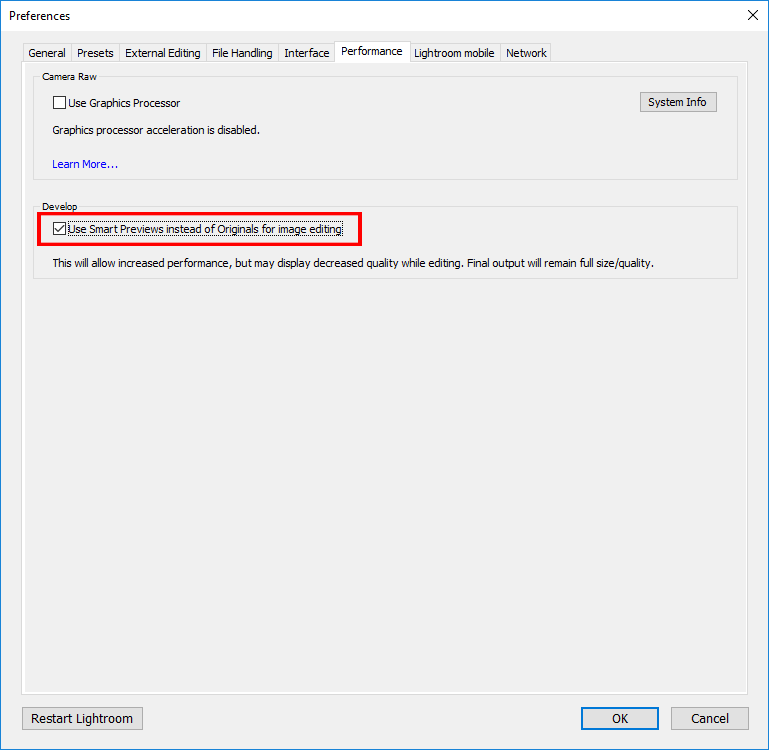
Once you check that setting and click “OK”, go back to the develop module and select an image that you previously created a Smart Preview for. As long as you don’t zoom in to the images at 100% view, the RAW file that you will be working on will use the data from the DNG file instead of the original RAW image, which should noticeably speed things up, especially when toggling through many images and applying edits to them. The great thing about performing edits on Smart Previews, is that your changes will be automatically replicated on the original RAW images, so you don’t have to sync anything.
Don’t forget to turn this setting off after you get back to your fast desktop, as you are better off working on original RAW images instead.
16) GPU Acceleration
Some software is able to take advantage of a dedicated Graphics Processing Unit (GPU) in order to speed things up through “GPU acceleration” – a process that replaces CPU usage with GPU. In many cases, GPU acceleration can bring a lot of benefits, since the GPU is used for drawing and outputting information on the screen, whereas the CPU is freed up to perform other tasks. Although Lightroom can now take advantage of GPU acceleration, its support is unfortunately very poor at the moment. GPU acceleration is only limited to the Develop module, so it is completely useless for Library, Export and other modules / screens. It can bring some performance benefits when using the Develop module tools such as Spot Removal and Adjustment Brush. You can find this setting in the same Preferences window as above, under the “Performance” tab:
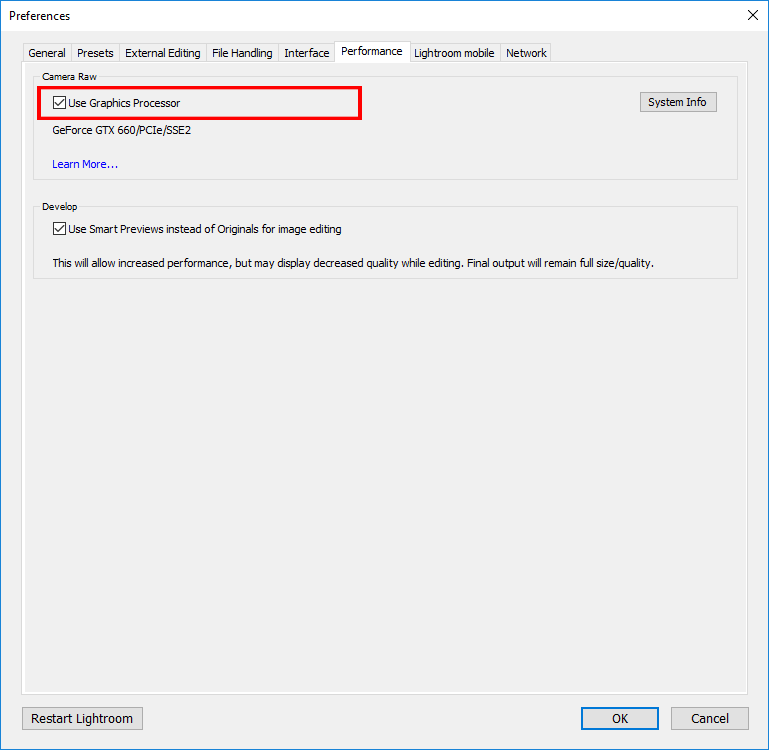
If you have a fast dedicated graphics card from NVIDIA or AMD, you can take advantage of GPU acceleration and speed things up. However, the effectiveness of enabling GPU acceleration has to be tested on a case-by-case basis. If you have a fast video card, you will most likely benefit from enabling GPU acceleration. But if you have a built-in GPU or an older-generation GPU, you are probably better off keeping this setting turned off.
Therefore, my recommendation is to test whether this setting is going to be effective for your editing. In many cases, I found GPU acceleration to be buggy and slow, but in some cases, it can noticeably improve the performance of tools within the Develop module.
17) Improving Editing Speed
It is always a good idea to apply an import preset to your images upon import, especially if it saves time during post-processing. However, you have to be careful what types of settings you should apply to images automatically. For example, you should avoid applying sharpening, noise reduction and lens corrections (especially distortion correction) to images during import, because such changes might significantly impact your editing speed. Such changes should be carried out at the end of the editing process.
The same goes for using tools like Spot Removal and Adjustment Brush – if you are planning to make extensive edits, better get all the basic edits first, then save these for last, so that they are not bogging down Lightroom too much. Remember, each time you remove a spot or apply a custom brush, Lightroom has to process that non-destructively, which consumes a lot of memory and CPU. Save the heavy loads at the end and you won’t regret it!
I hope you found this article on optimizing Lightroom performance useful. If you have any questions or comments, please use the comments section below.
Wow what a great article. Have read many such articles about Lightroom over the years but this one is an order of magnitude better than the next best.
Nassim, what an excellent article ! I am intrigued by your having a catalog for each year – this would be great as mine is huge. I rely heavily on keywords for clients and subjects, etc. How do you handle finding say, “cats” “John Doe” “studio” for the past 35 years (yes, I scanned in all my pre-digital work…) ?
Here’s another idea for this list. I had accidentally set the power plan on Windows 10 to Power Saver. As a result, a bunch of things became really slow:
1) Browsing and picking photos in Library module
2) Switching from Develop to Print module took several seconds.
Switching to the Balanced power plan resulted in a massive performance improvement.
Switching to High Performance gave another, small improvement.
I have some shortcuts to switch back and forth automatically, set up using this method: I’m currently using shortcuts for quickly switching between power plans as described here: www.howtogeek.com/howto…wer-plans/
What was happening to result in Power Saver given poor performance was that the CPUs were not running at their full speed. Intel CPUs and Windows work to decrease CPU speed when the CPU is not in used. My CPUs were running at 1.25GHz. Lightroom uses the CPU in a very bursty manner, for short periods of time, spending most of the time waiting for user input. In Power Saver, Windows just doesn’t spin up the CPUs to their full speed. In Balanced mode, that seems to work better. In High Performance mode, it runs all CPUs at the fastest speed. In my case, I overclocked my CPUs to 4.5GHz. 4.5GHz vs 1.25GHz is a gigantic difference.
Read your two below on Lightroom. Found both very informative, been using Lightroom for some time. These two articles provided a concise overview
of the performance features of the program. Have subscribed to your post via e-mail.
Looking forward to seeing more informative info on the performance of the Software.
How to Optimize Lightroom Speed and Performance
Lightroom 6 Bugs and Performance Issues
Awesome tips Nasim! I’ve long wondered why my workflow in Lightroom is soooo slow. I do have a fast cpu and gpu, and a ssd drive – which I’ve only used for Windows. I might have to tweak some settings now. It’s definitely frustrating that image importing is fast but creating the previews takes forever.
Would you recommend to upgrade my RAM to 16 gb if I constantly edit large Nikon NEF-files produced by D750?
Like your site, bookmarked!
Just use Photoshop and Bridge to instead of Lightroom
One of the things I did that impacted LR performance for the better was to disable Hyper threading in the BIOS.
When Hyper Threading was on my CPU was working way harder than it should. The fans were going nuts to cool it. After disabling Hyper Threading things were much calmer. LR seems to behave a bit better.
Importing and exporting is still long and so are many actions taken in LR develop module but it is a bit faster and the CPU does not work as hard.
Nasim, have you actually tested speed differences from the import presets you mention? I have not tested them with Lightroom, but when importing with Bridge and Camera Raw, I found no significant difference when adding noise reduction and sharpening on import, or even lens distortion and vignetting correction, which surprised me. Like you, I thought it would make a big difference, but it didn’t. The only thing I found that really mattered was the size I chose for the previews.
Nasim, thank you for a great post yet again. Not to put your post down, I love your blog and all it’s content, but when it comes to Lightroom, there is nothing that can be done. Adobe does not seem to care too much or they would have coded LR better. They did not.
My PC is two months old with Z170 mobo, i7 Intel, 32GB RAM and most importantly, two of the fastest 1TB M.2 Samsung SSD’s, they cost me a bloody fortune! :-(
Nothing…Lightroom is no better than it was on my 6 year old computer (with obviously much lesser specs). If I enable graphic processor it has hiccups when zooming in and out. When I disable it, cropping takes forever. Images take a second to render, moving from image to image stutters. Smart Preview, no Smart Preview, 1:1, standard…Nothing works. Lightroom behaves like an app from the 90’s.
I am not even talking about Local Adjustments.
I have all my Windows and all my apps on one SSD and the catalogs with the photos are on the same SSD. The cache is on the second SSD with 180GB allocated cache (so far it’s empty except the cache). My 2017 catalog has only 12,000 photos, not much for today’s standards and it is performing lousy. Importing a wedding (3-4k images) still takes (way) over an hour to render.
Tried my wife’s Mac Pro..oh well, this machine was a waste of money…I don’t tell her that though :-) It’s great for surfing the net.
I just purchased the ON1 program and I am going to look into it more seriously. I think it’s high time we tried something from a company that actually listens to its clients.
My two cents.
Cheers
Keep up the good work.
I wish I could take a video of my Lightroom while I am working with it. What a disgrace…Last night I backed up a job and transferred it into Lightroom. 1308 photos were backed up from my memory card to my hard drive, took 1 minute and 32 seconds to transfer all photos.
Bringing them to Lightoom took 1 hour and 48 minutes. OK, so maybe Lightroon does things we don’t know about…Not sure what but…
Now I am working with them and each time I press a preset it takes…wait…4 seconds to actually render. It takes 2-3 seconds to show crop marks after clicking the crop tool. This is Lightroom for you. Fully updated on a powerful machine.
Always interesting to read the Lightroom tech articles, Nasim. Thanks for posting them. Hearty food for thought, at the very least.