One of the biggest frustrations in photography is the fact that our cameras are not able to fully capture the light and the dark tones that we can normally see with our eyes, which is known as “dynamic range”. How many times have you seen situations when the sky is blue and beautiful, but it comes out very pale or gray in your photographs? There are other cases, when the sky is not blue at all, but you still want it to be blue in your picture. Gladly, the problem can be easily fixed in Lightroom, as long as the rest of the picture is fine.
In this tutorial, I will show you how you can transform the sky from light-blue/gray:
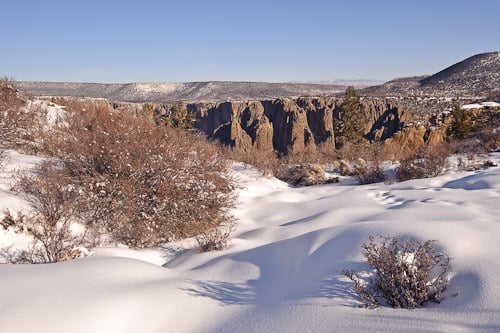
To darker blue:

1) Graduated Filter Tool
In the past, if you wanted to fix the sky in a photograph, you had to open it in Photoshop, then work with it through layers and masks. With the introduction of Lightroom 2, Adobe provided plenty of great functions within Lightroom without having to use Photoshop. These new functions truly save a lot of time, because you can copy-paste the same settings from one picture to another, especially when working with panoramas.
The best tool to fix the sky in Lightroom, without a doubt, is the “Graduated Filter” tool inside the “Develop” module. The only dilemma with the Graduated Filter is the fact that it works just like a regular Graduated Filter that is used in front of the lens while taking a picture, so if you have other objects such as trees and buildings mixed with the sky, those objects will also get affected.
While the picture is selected, click the “Develop” shortcut from the top right screen or simply press “D”. Once you are in the Develop module, expand the right menu and find the “Graduated Filter” icon inside a panel that is right underneath “Histogram”:
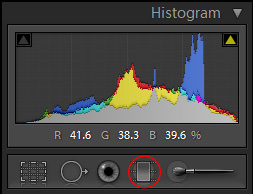
Click the icon or press “M” on your keyboard and your mouse cursor will transform into a large “+” sign. You will also see a new panel appear right under the icon with such settings as Exposure and Brightness. This means that you can now drag an area that needs to be fixed. Before we do this, we first need to identify what exactly needs to be done. In this case, we will first try to simply decrease the exposure of the sky to see if we can make it bluer. This will only work if the sky already has some blue in it. Go to “Exposure” and either drag the exposure to the left or type it on the right hand side where it shows “0”. I typically start with “-1” and see how it affects the sky:
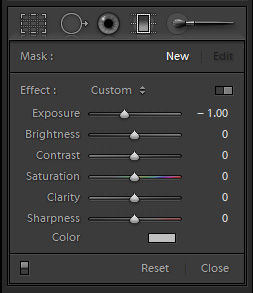
Nothing is supposed to happen yet, because you have not yet identified the area that you want to apply this to. Let’s go ahead and do it now. Start from the very top of the image (I start outside the top boundary of the image) and while holding the left mouse button, drag the graduated filter all the way until the sky ends. If you want the gradient tool to come down straight, simply hold the “Shift” button on your keyboard while dragging with your mouse and you will see that the graduated filter is coming down straight. If you have an angled sky with a building or some other object occupying a left/right side of the frame, you can also drag the graduated filter at an angle from the left/right corners.
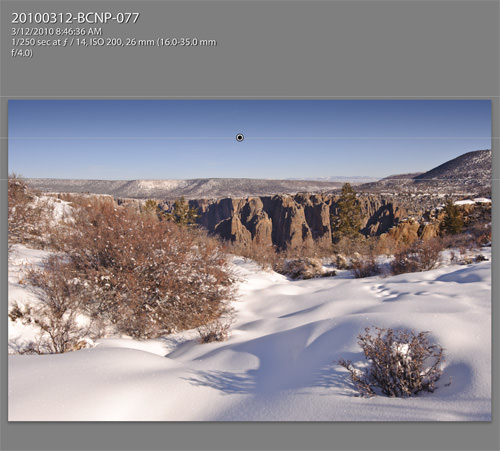
As you move down, you should see the effect of the filter immediately. The sky should automatically darken, but might not necessarily be what you are looking for just yet. Once you reach the end of the sky, release the mouse button to keep the graduated filter in place. If you are not getting enough blue, click on the try to decrease the exposure to “-1.5” or even “-2”. I do not recommend going past “-2”, because if you are not able to bring out the color at minus two stops, then your sky is either completely overexposed, or you have a gray sky. If you are seeing that the sky is getting more gray instead, then changing exposure will not help.
In the above image example, when I tried to decrease the exposure to “-1”, the sky got a little bluer, but not the true blue color I was looking for. In addition, as I pointed out above, if you do not have a straight horizon and have other objects in the frame, decreasing exposure will also darken those objects and might not necessarily yield a good overall effect. If you have a similar situation, try the next steps.
With the graduated filter selected (which shows up as a dot on the image), go to your “Exposure” setting and change it to “0” or something small like “-0.5”. Next, click the square right next to “Color”, which will bring up a new window like this:
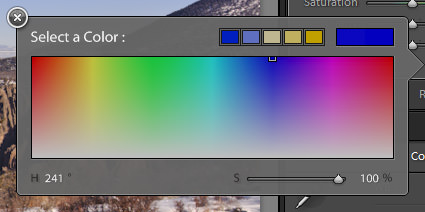
Start out with the darkest tone of blue at 100%, so click on the blue area and then move the pointer all the way to 100%, as shown in the above picture. Once you are done selecting the color, close out of this screen and see how your image has changed. To see the before and after comparison, click the little switch located to the left of “Reset” and “Close” text, which turn the graduated filter on and off. Click on it multiple times to see the effect and note the changes. If the sky appears too blue, go back to “Color” and move the pointer from 100% to 50% or less, depending on how blue you want the sky to be. Experiment between patterns of blue and exposure to get the best effect.
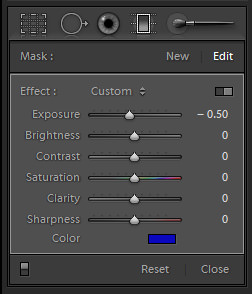
Here is how mine came out after the above changes:
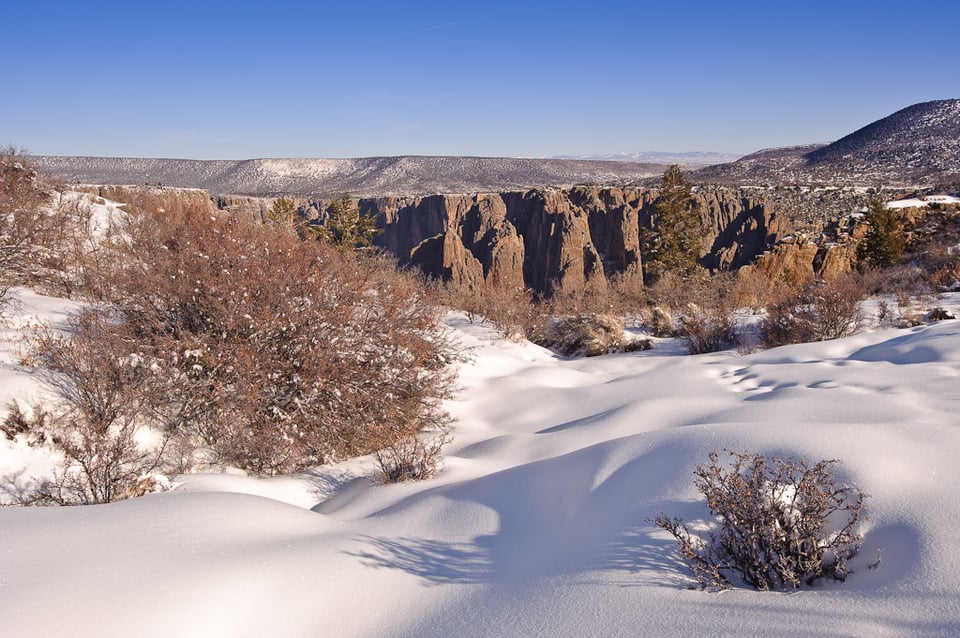
Definitely much better than what it was before!
2) Adjustment Brush
The second method is to use an “Adjustment Brush” tool within the Develop module of Lightroom. I recommend using this tool to fix the sky only when you have objects sticking out that you do not want touched. Take a look at this picture, for example:
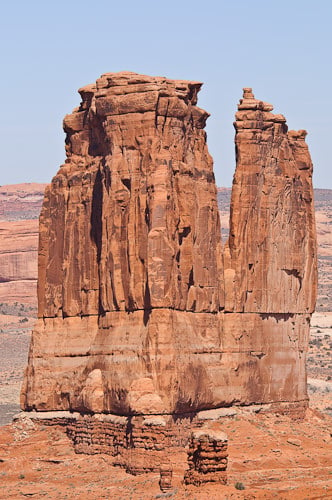
If I used the Graduated Filter to fix the sky in this image, I would end up with the top portion of the rock painted in blue – definitely not something I want to do. Another option would be to only apply graduated filter on the top of the image, but then the rest of the sky would still remain with the same color.
In situations like this, the Adjustment Brush (keyboard shortcut is “K”) works very well. It is located right next to the Graduated Filter in the Develop menu:
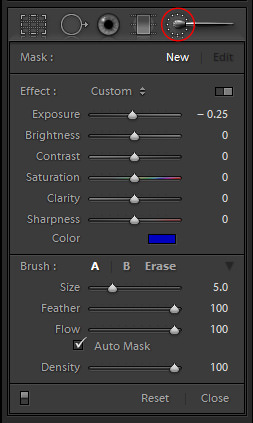
Many of the settings are the same, except there is one more “Brush” section that lets you pick a brush that you will be using to paint the sky. Choose the same exposure/color settings as I have shown in Graduated Filters, then go to Brush settings.
Here is what each of the settings does:
- Size – controls the size of the brush
- Feather – controls how far out the brush will start to fade for smoother transition. I typically leave this at 100 and lower it when working carefully around the edges.
- Flow – controls the rate of flow of the brush. I typically have it set to 100. If you changed the number to 50, the effect would be reduced in half with a single stroke. If you applied a second stroke on the same area, it would be the same as using 100 in the beginning.
- Auto Mask – will automatically avoid painting areas that do not match in color. Leave this checked.
- Density – this is just like “opacity” in Photoshop. Leave it at 100.
Once you click on the Adjustment Brush icon or press “K” on your keyboard, the mouse cursor will change to a circle with another circle inside and a dot with “+” sign in the center. The inner circle is the brush itself and the outer circle is the brush feather. Change the feather and you will see that the outer circle gets smaller or bigger, depending on the number.
Start with the image zoomed in at 100% view. Use the brush to draw from top to bottom and paint all of the sky that you see in the image. If you accidentally brush over other areas, do not worry, because it is very easy to remove them later. Once you paint the sky, inspect the outer edges of your objects and make sure that they did not get painted. If you see some paint around those edges, simply press the “Alt” button and paint over those areas. You will see that your brush will be converted to a circle with a minus sign in the middle, which works as an eraser.
Here is how the above image looks after using I used the Adjustment Brush on it:
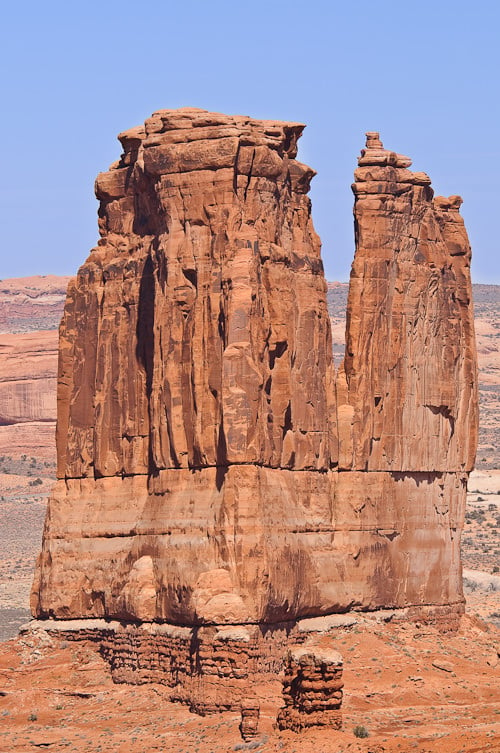
When using the Adjustment Brush tool, be careful with the edges. If you do not do it right, you might get a halo effect, where a visible outer boundary will show up around your objects.
Whether you use the Graduated Filter or the Adjustment Brush, just make sure that you do not overdo it. There might be cases where these tools will not work and make your sky even uglier, so use these carefully and see what looks the best to your eye.
Please let me know if you have any questions in the comments section below.
I use the adjustment brush often….but am not a professional lightroom user. The last few days when I try to use it it paints the part black where I move the circle brush. Not sure what I accidentally pushed to cause this. Any help to undo this would be appreciated. :)
i like this article very much it is very useful.
joseph premanandan
Thanks. I have just discovered your articles. They are informative and not ‘combative’ and flow logically. I shall read more and subscribe to your site. I am an amateur photographer and have been forever and will remain an amateur; I don’t ‘work’ to take away the pleasure and do not want the unending drive/pressure of being a Professional. That said I do have a good assortment of ‘good glass’. But it seems I can never remember to have all the many alternatives aligned that the DSLR offers. My wife has been a Professional Food Stylist for many years. I am around several Pro photographers and in professional situations. But I never ask them for advice. So I enjoy your reviews and opinions. Because I do not work with the camera nor Lightroom all the time it is a constant learning process. So we will just keep it between ‘us’. (hahah)
Thanks for a very usefull tutorial.
I’m new to Lightroom and I can make my sky blue – nothing happens when I use graduated filter and adjustment brush. My Sky is white (overexposed) and the colors doesn’t stick to the sky (but to other elements in the photo). Is it because I use jpg and not RAW?
Thanks
Great article! I work with a lot of commercial real estate photos, and this a huge time saver.
Hi Nasim,
I was thinking more along the lines of things that can be done in software (or I think can be….) like a polarizer bringing out more blue in the sky? Or a ND grad darkening an overexposed sky. Besides the time saving factor in using filters is there any other benefit quality wise?
I guess more specifically I am looking at a cokin holder system versus a screw on circular filter from Singhray like the ND Duo where the polarizer and ND are built into one.
If the cokin holder system is mainly useful for using ND grads so you can slide them up or down in the filter to position in your frame correctly, I am thinking why not use the ND filter in photoshop to change exposure in the parts of your picture where you need it,a nd instead go with the Singhray system on the camera lense?
Perhaps the Cokin system is still needed when using wide angle lenses?
If you have comments or suggestions on my thoughts here it would be really appreciated!
Just trying to piece together reasons for picking one system over another before I start any purchases.
Or perhaps I will find I need both filter systems eventually?
Thanks! :))
Thanks for the great article! I just purchased my first DSLR but have not lens filters…yet.
After reading articles like this and seeing the editing you can do that replicates certain functions of a polarizer and ND grads, I am questioning how much better a filter would do the same job on these type of techniques used in the software.
What is your opinion on this, is there really a noticeable difference when using lens filters versus software editing for the effects of polarizers and ND filters?
I ask more specifically about these types of filters as they are the ones most recognized as “necessary” outside of software editing….
Thanks!
Francis, software is not able to do the same thing filters do. For example, the effect of a polarizing filter to remove glare cannot be done in post-processing. In addition, certain filters like neutral density slow down the camera to be able to photograph waterfalls, etc – those types of things also cannot be replicated in post-processing software.
Hey Nasim,
I’ve been playing with Lightroom 3 Beta 2 the last few days and I really like it. The workflow is very intuitive. I still don’t know how to do many of the things I need to do, but that’s why articles like yours are so helpful.
I have to rethink how I process my photos. I want to use Lightroom to do all the minor tweaks and only use Photoshop for very specific edits on specific images. I like how you can hand an image off between the two programs seamlessly.
I think I’m going to have to spring for Lightroom 3 whenever it comes out. Sadly, I think that also means I’m going to have to get Photoshop CS5 when it comes out since CS3 doesn’t have the profile from the DS3 – which I also have to get.
Good thing I’m independently wealthy! :)
Matt,
Yes, Lightroom 3 is very sweet. I’m looking forward to upgrading to LR3 as soon as it is released.
As far as processing photos, that’s exactly how I do it – I use Lightroom for 95% of my photos and only edit images in Photoshop when I cannot do it in Lightroom. The integration works perfectly and I am very happy with the results.
As far as upgrading your Photoshop, you do not need CS5 to read RAW images from your D3s – all you need to do is upgrade your Camera RAW which can be downloaded from here. Once you download and install Camera RAW, your Adobe CS3 will be able to open the RAW files from most modern cameras, including D3s.
Awesome. Thanks! Upgrading Camera RAW would save me a bunch of money – it’d be nice to hold off on upgrading Photoshop.
Hey,
Just as a followup, it looks like the Camera Raw support for the D3s doesn’t include Photoshop CS3. Hmm, could it be that Adobe’s trying to make money? :)
Matt, o dang, I’m very sorry for giving you wrong information…looks like Adobe is stopping support on CS3 Camera RAW, which really sucks.
I wouldn’t upgrade until CS5 comes out later this year. This is such a rip-off!
Nasim, thanks for this interesting post-processing tips. Now I am using Lightroom 2 as well, will try when the needs come.
Just curious, does it mean even if a polarizer is used when shooting sky, the outcome of the shots will still look no good and required post-processing?
Dennis, you are most welcome! :)
As for using a polarizer – I almost never touch the sky when using a polarizer, because it already makes the sky blue enough. In some cases though, one part of the picture might be darker than the other when using a polarizer. In those cases, just use the Graduating Filter for one side of the picture to make the sky look even.
Sorry, I was using Lola’s laptop :)
Nasim, thanks for your sharing! Looks good to invest one.
Great photos before and after the retouch… you are definitely persuasive about lightroom… but I have photoshop and more programs>>>pricey! Do you really think it’s better?
Deana, thank you!
I’m not trying to say that Lightroom is better than Photoshop, because it is a program for a different purpose :) Lightroom is great for managing photo catalogs and for performing some simple editing without the need to edit pictures in Photoshop.
Photoshop, on the other hand, is a heavy-duty image editing program that is best for working on single images.
I recommend using both – Lightroom for organizing and managing pictures and Photoshop for editing images that cannot be edited in Lightroom…