In our previous Mastering Lightroom series articles we covered what Lightroom is and how it works. We also took a quick tour around Lightroom’s working environment. After highlighting the basic function and capability of each Module, it is now time to talk about them individually more in-depth, starting with Library Module. Before we can actually start using all Library tools, however, we need images to work with. That is why our first step is to learn how to import photographs in Lightroom. I will be using the latest (at the time of writing) version, Lightroom 5, to guide you through the process of Importing images. Virtually everything but Smart Previews is equally applicable to earlier releases.
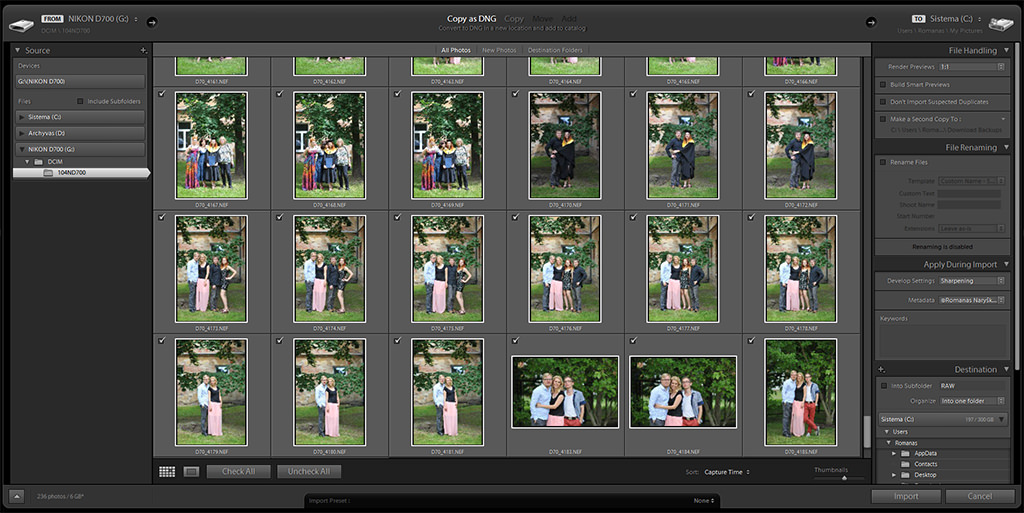
Table of Contents
Importing Photographs
Lightroom is a catalog-based photo manager and post-processing tool. That means in order to start working with photographs, you need to first Import them into your Catalog. Importing is a very simple, straightforward process done using the Import window. To start the process of Importing photographs, launch Lightroom and then click “Import…” at the bottom of the left-side panel in Library Module. Alternatively, you can Import photographs by selecting “Import Photos and Video…” from File menu (Ctrl+Shift+I for Windows users). This will open the Import window for you to choose source directory, image files, destination and other details.
A side note: by default, Lightroom should automatically launch and ready itself for immediate Import as soon as you connect an external storage device to your computer, such as a camera or memory card. If it does not or should you want to change this behavior, go to “Preferences…” in “Edit” menu and check or uncheck the “Show import dialog when a memory card is detected” box in the General tab. I find this a particularly useful option, yet nonetheless disabled it immediately after installing Lightroom on my computer due to a simple irritation. Lightroom would launch its Import dialogue even if I connect a simple USB flash drive which I use for general files and documents, not photographs I need in my Catalog.
1) Import Window Structure
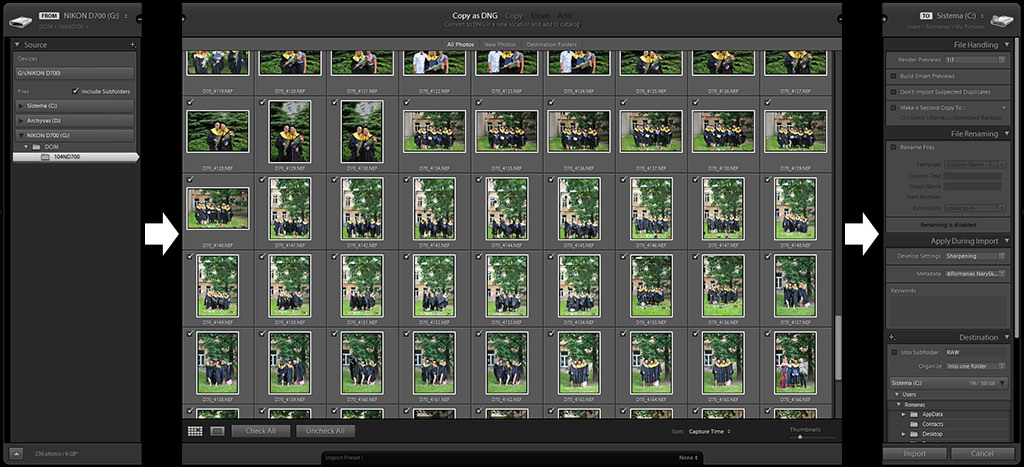
Lightroom’s Import window consists of three main sections, as shown in the screenshot below. These three sections clearly mark sequence of actions you need to take to successfully Import photographs into your Catalog.
First of all, you will need to select the source to Import image files from. Once you do that, choose which images to Import from the middle section of the window. Lightroom will generate thumbnail previews for both JPEG and RAW image files. Finally, specify additional information in the right-most section of the window. The tabs that will be available here depend on what settings you choose in the two previous steps. In all cases, you will have File Handling and Apply During Import tabs available.
A side note: at times, Lightroom will allow you to virtually skip two previous Import window sections. For example, if you’ve just connected your camera for image transfer and want to Import them straight through Lightroom, it will automatically choose source destination (camera or memory card). Lightroom will then select all or new images (those that are not yet Imported into working Catalog) for Import process. Often, you will need to simply fine-tune those settings and add information in the last section. This makes the process of Importing pleasantly swift most of the time.
If you tend to Import photographs straight from memory card after a shoot and rarely, if ever, need to select specific images manually, you can have Lightroom show much simpler Import dialogue. To do that, either hit the arrow button at the bottom-left of the screen or Tab key on your keyboard.
2) Choose Source to Import From
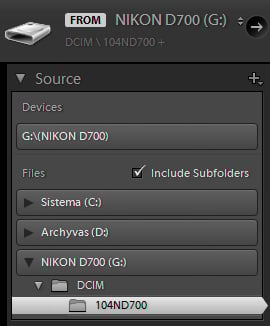
This is what the first section of the Import window is for. If you have a memory card, USB drive or camera connected to your computer, Lightroom will automatically choose it as source directory for you. All external devices will be shown in a separate list at the top of the Source tab. Also, there will be an option to have Lightroom eject external storage device as soon as Import process is over if one of the devices from the list is selected as source. To do that, mark the relative “Eject after import” check box.
If there are no external devices to Import from, navigate to the source directory manually. In this case, you will have a “Include Subfolders” check box ready. Enabling this setting will display all images in selected folder and those in folders inside it if any are present.
3) Choose Image Files to Import
The second step is as simple as the first one – now that you have shown Lightroom where your images reside, choose which ones you want in your Catalog. Lightroom will automatically grey-out photographs that are already imported provided they are named identically. In such a case you don’t need to worry about duplicates sneaking in. At the bottom of the central section you will find the usual and straightforward controls, such as “Check All” or “Uncheck All”. Hold down Alt key to toggle “Check Videos” and “Uncheck Videos” options instead. There are also sorting options. Adjust thumbnail size if you’d like bigger previews as you select specific images to Import. Do note Lightroom will not render these in high quality. You can preview images in Loupe view (magnified view when only one image is shown) by double-clicking on them or hitting “E” key. Hit “G” to get back to Grid view or double-click again.
4) Choose to Copy as DNG, Copy, Move or Add Image Files
Located at the top of central section, these options allow you to specify the method of Import. Some adjustments in the last section depend on which setting you choose here.
- Copy as DNG – image files will be copied from source directory to a specified location in Adobe’s universal DNG format. Read our “DNG vs RAW” article to learn more about DNG file format.
- Copy – image files will be copied from source directory to a specified location in original file format.
- Move – image files will be moved from source directory to a specified location in original file format. This option is unavailable when Importing from a memory card, for example.
- Add – files will not be copied or moved to a new location. Instead, Lightroom will simply add them to your working Catalog. This option is also unavailable when Importing from a memory card or USB flash drive.
5) Choose Destination to Copy Files to, File Handling Options and Metadata Settings
This last section of the Import dialogue is the last step you need to take to Import files and also one you’ll spend most time in. Let’s break it down and briefly discuss each tab.
5.1) File Handling
- Render Previews – specify quality in which Lightroom should render previews for images you are Importing. Choosing Minimal will use smallest previews that are already embedded into the files by your camera. This is the quickest option and will take up the least disk space. Lightroom will render Standard previews when needed (when in Loupe view mode). This will slow down operational speed somewhat at first when working with images.
Choose Embedded&Sidecar option to have Lightroom use highest quality embedded previews. A slightly slower process, it will also take a little bit more space on your hard drive. Again, Lightroom will render Standard previews when needed. This process will have an impact on operational speed at first.
Render Standard previews to avoid slow-downs in Loupe view Fit zoom level. Instead of using embedded previews, Lightroom will render Standard size on its own. This process takes longer than the two previous options, but makes working with images swifter. You can fine-tune Standard preview quality by selecting “Catalog Settings…” from the “Edit” menu (hit Ctrl+Alt+,). Standard preview settings are found in the “File Handling” tab.
1:1 previews are full-size images. They are used when zoomed in to larger magnifications, such as 100%. Rendering 1:1 previews takes the most time after the Import process is over and most disk space. However, it makes working with images even faster when done (you won’t have to wait for Lightroom to render 1:1 previews when zooming in individual images as you would with any of the other options selected). I would recommend you use this setting if you plan to post-process your images.
- Build Smart Previews – this check box is only available starting Lightroom version 5. Smart Previews are especially useful if you prefer to keep your weighty RAW files on an external drive. If you check the “Build Smart Previews” check box as you import your images, Lightroom will allow you to post-process the photographs in any way you like even if they are not directly accessible at the time. More than that, you will even be able to export them up to about 2540px (long edge), which is great for web sharing. Understandably, Smart Previews take up some disk space. They are stored along with your Catalog files.
- Don’t Import Suspected Duplicates – if you select this option, Lightroom will attempt to avoid duplicates on Import should they be present among selected files.
- Make a Second Copy To – very useful if you tend back up your image files to another location. Lightroom will copy all image files you selected for Import to a specified location. This option is only available if you chose Copy as DNG, Copy or Move Import methods and doesn’t work with Add.
5.2) File Renaming
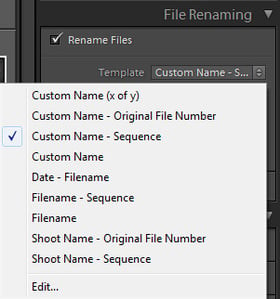
A set of important options only available if you chose to Copy/Copy as DNG or Move files on Import, it allows you to specify how you want to rename the images. Several naming templates are available and you can choose to create your own. File naming is best used in accordance to your image organizing model. For example, you can have your image name consist of date, event title and sequence number.
Creating your own template is very simple. Lightroom offers a huge amount of options for you to include. To create your own template, click on the drop-down list of available templates and choose “Edit…”. Filename Template Editor will pop-up – an extremely flexible tool you will use to create your own naming template. As soon as you’re done customizing your preset, use the Preset drop-down menu at the top of the Filename Template Editor dialogue and select “Save Current Settings as New Preset” to save and use the template.
To learn more about filename presets, read our “Using Filename Template Editor in Lightroom” article.
5.3) Apply During Import
Yet another set of important options you will definitely want to fill in.
- Develop Settings – allows you to apply a Develop Preset on images as soon as they become available in your Library. It’s great at giving you an approximate look of your final result rather than the flat RAW image rendering. Because you can only apply a single Develop Preset on Import, this setting works best with B&W conversion, color adjustment and tone adjustment Presets. Naturally, you can set it to a Sharpening or Noise Reduction Preset if you have those. The latter will give you a pretty good idea on which images came out too grainy for your taste.
Read more about Develop Presets in our “How to Manage Presets” article.
- Metadata – specify metadata preset to apply. You can easily edit or create new presets by choosing corresponding options from the drop-down menu. Managing metadata presets will be covered in a separate article.
- Keywords – specify keywords that suit all the images you are about to Import, such as event name. They are very useful when searching for specific photographs in Lightroom or sorting them. Do not apply keywords that are only appropriate for some of the photographs. For example, if you have both portraits and landscapes selected, it is better to add “Portrait” and “Landscape” keywords to these images separately in the Library Module after the Import. All of the keywords can be edited at any time after the Import.
5.4) Destination
Setting destination is only available if you chose to Copy/Copy as DNG or Move files on Import. You can specify a subfolder name and have Lightroom Import images into separate folders for you rather than a single one (based on date, for example).
6) Create an Import Preset
There you go! You can now go ahead and click “Import” – all selected images will appear in your Library Module and have the keywords and metadata entries attached to them. However, in case you find yourself setting up Import dialogue the same way on a regular basis, you can also save these settings as an Import Preset. To do that, use the Import Preset tool located at the very bottom of the Import window.

Either way you are now set to start managing and post-processing your photographs. If you have any questions, you are welcome to ask in the comments section below.
Hi all… I have my LR catalogue and digital files all on my computer Hard drive. My naming system is pretty standard: Year / Month / Date / Event. Currently I am keeping RAW and JPEG files in separate folders in the event folder, but this may change as I learn more about what my specific needs are. After editing if I have JPEG edits I want to send or post I export them into a separate folder in that same area named JPEG Edits. I was wondering if there is a way to have LR catalogue mirror this organization system? And will I still be able to access all my photos once I move them off the computer HD to an external.
Secondly, In the article here it says upon import you can click “standard” in the smart preview area so that you can view RAW images that aren’t on your hard drive. My other question is, is there a way to generate smart previews for files already on your catalogue? I’d like to do that before backing up all these to external so I have access to them even when I don’t have my external on me. Thanks for writing these. Super helpful and informative!!
This post and discussion is great hub of useful information.
Hi I have installed light room 5 free trail but i could not import raw files. in the the thumb nail it was showing no preview available. can you suggest what to do?
You have some Duplicate Files on your computer which hampers your memory space.
Just use “DuplicateFilesDeleter” software.
If you use this software you will be get comfortable.
Hi, Quiet often when importing I want to import from to the exact same location on a drive as my previous import. Is there a way to avouid the need to work through my file tree and get LR to remember my previous import location?
Have been using LR5 for a year. I create new folders as needed in my external drive #1. I then import pictures from the SD card directly to external drive #1. I then go through the same process to copy those images to external drive #2. Next I open LR5 on my laptop and import only the images I need to edit from external drive #1 to the listed folders. I’m not sure if this is the most efficient workflow. Is there a better way to copy from external drive #1 to external drive #2?
I imported images from my memory card successfully into Lightroom but once I eject the memory card from my computer Lightroom says that the source file is missing. I tried putting the memory card back in it worked fine again but as soon as I remove it the missing source file notification appears again. Any ideas on what to do?
Ava, when you’re adding images to your LR library, you need to specify where you want the imported files to reside. By the sounds of it, if you are truly importing, you are importing the files right back onto your memory card. You’ll need to specify that you want your imported files to go to your computers hard drive or another storage device.
While in the import window of LR, you will see the selected location of where your files will go should you choose to import. If the location is not correct, you’ll have to change the location by selecting the correct drive and file in the boxes also on the right side.
Now, if you have done editing on those files already, the adjustment files (xmp files) will also be stored wherever you imported to. If this is the case, I would locate the imported files folder and copy the entire folder to your correct storage location, click on the exclamation mark that indicates the file can not be found and follow the steps to point that file to its new storage location.
Turns out Lightroom and Photos (Mac’s newest version of iphoto) aren’t compatible/don’t communicate? The only way I can download photos to Lightroom from Photos is by dragging them into a new folder on my desktop. Kind of annoying, but I suppose not the end of the world.
When I try to import from a card in LR 6, it says it can’t read my files and stops the import. First time for this.
I have installed LR 6 (previously used LR 5) on my Windows 10 PC. In getting things in order, I find that I have a folder on my C:\ drive called 2015 under which are folders with the date the pictures were snapped containing DNG files (which must’ve been created when I ran LR 5). Although I can use the navigator thing to select the folder and its subfolders the import button is inactive (grayed out). What assumptions am I making. I would have to believe that this is not the method to use to get the 2015 folder’s pictures into the LR 6 catalog.