When taking pictures, one of the biggest frustrations one can experience is camera shake, which often happens as a result of the way the camera is held at lower shutter speeds. Properly hand-holding a camera can drastically reduce human-induced camera shake and result in many more sharp images and keepers. In this article, we will discuss a few different ways to hold a camera, which will hopefully reduce and potentially even eliminate unwanted blurry images when you are shooting in the field.
As you may already know, many cameras today come with specific features to help avoid the dreaded camera shake. Some cameras have image stabilization built directly into the camera sensor, while others might have image stabilization available on the lens, and some even combine camera and lens stabilization to get the best of the two worlds. In addition, many modern cameras today come with the ability to automatically control the camera ISO (often referred to as “Auto ISO“) in order to keep the shutter speed fast enough for the focal length one is using (for more details see reciprocal rule). While using such features can certainly help in reducing camera shake, it does not hurt to take additional measures to learn how to properly hand-hold a camera and that’s exactly what we are going to do next!
Table of Contents
1) What is Camera Shake?
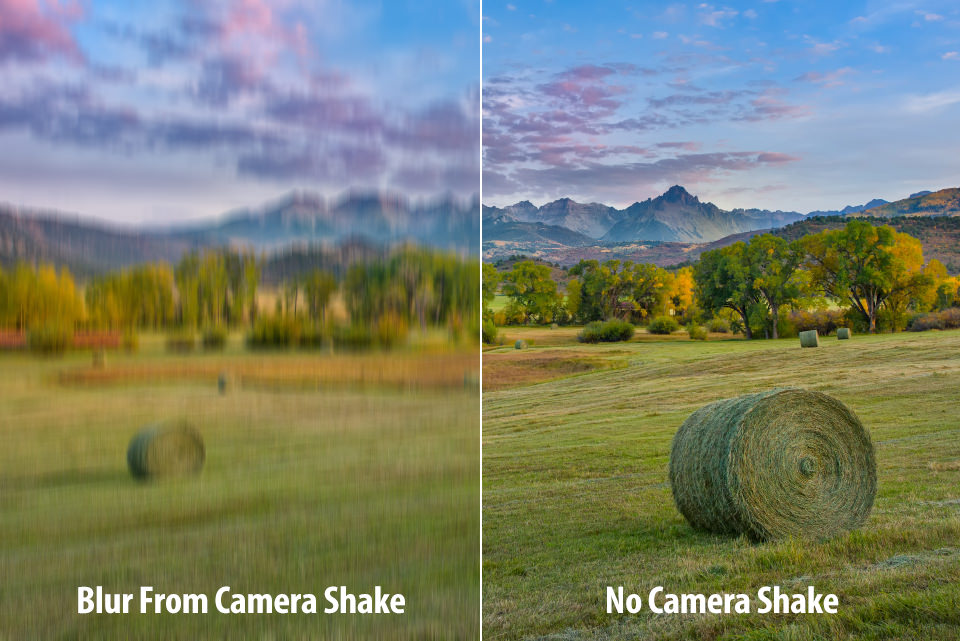
Camera shake occurs when the camera is unintentionally moved while the shutter speed of the camera is too low to capture a perfectly still image. The resulting image either looks blurry, or shows traces of “dragging” of the subjects, where multiple outlines could be visible around the subjects. Camera shake due to slow shutter speed typically takes place in low-light conditions when there is not enough light for the camera to yield a sufficiently bright image, or when exposure settings are set up incorrectly. For example, it is often needed to open up lens aperture as much as possible and increase camera ISO when shooting in indoor environments, because the amount of ambient light is too low. And when there is not enough light, the camera’s shutter speed must be slowed down to yield a properly exposed image (to understand the relationship between the three exposure variables, please see our article on Exposure Triangle).
2) The Relationship Between Shutter Speed and Focal Length: The Reciprocal Rule
If the shutter speed is too low for a given focal length of the lens, even slight movements to the camera can result in camera shake. It is important to understand the relationship between shutter speed and focal length in photography – as focal length increases, one has to simultaneously increase the shutter speed in order to avoid blur caused by from camera shake. Take a look at the below illustration:
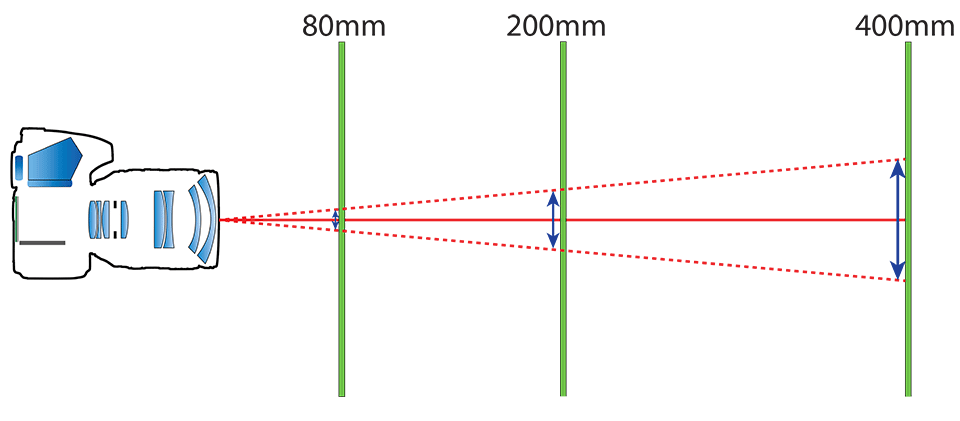
As you can see, the longer the focal length of a lens, the bigger the likelihood of seeing camera shake, since every movement is so much more amplified. If one understands this relationship well in practice, it is possible to avoid camera shake by keeping the shutter speed equal to the focal length of a lens, which is known as the Reciprocal Rule (I highly recommend that you give this article a read, since everything is explained in detail there).
Please keep in mind that the reciprocal rule is only a guideline to avoid camera shake – if one does a poor job at hand-holding a camera, much faster shutter speeds might be required in order to keep blur out of images. Therefore, it is important to know how to properly hand-hold a camera!
3) Hand-Holding Techniques
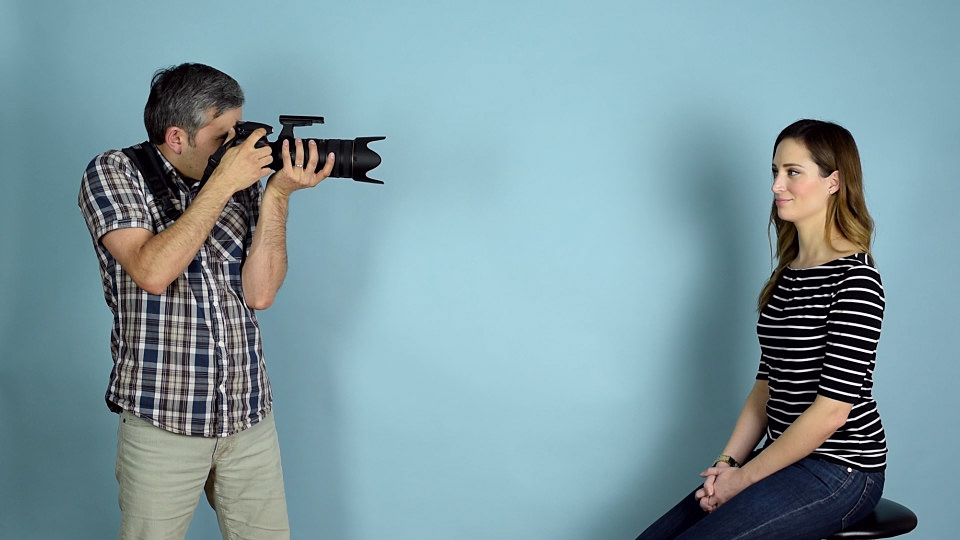
Let’s talk about a few hand-holding techniques that will help you eliminating camera shake and yielding sharp images. Here is a video clip excerpt from one of our free courses, where John and I cover a few different hand-holding techniques that help avoid camera shake:
As you can see, you can take a few simple steps to make sure that your camera is steady on your hands.
3.1) How to Hold a Camera in Standing Position
When you are in a regular standing position, use the below tips to avoid camera shake:
- Place your feet perpendicular to your subject: when hand-holding a camera, you typically have more balance when standing perpendicular to your subject, since there is less back and forth movement of your body compared to when standing parallel to your subject. If you have ever shot with an automatic rifle, you know that this standing position works very well, since there is quite a bit of recoil caused by the gun and standing sideways makes it easier to absorb each shot. So if you apply the same principle to shooting with a camera, it will surely work!
- Push your elbows into your sides: you want to avoid being in a “flapping” position with your elbows, because they will constantly move, causing your hands to move as well. Instead, tuck your elbows in and rest them against your body. Your body will serve as a resting spot for your elbows, which will not only help stabilize your hands, but also let them rest better when holding heavy gear.
- Hold camera at balance point: with every camera and lens combination, there is always going to be a point at which the camera setup won’t be neither front nor back-heavy. If you put your hand right at this point and let the camera rest on it, you will achieve good balance, which will make it easier to hand-hold the camera for extended periods of time, since you don’t have to fight the weight on either side of the hand.
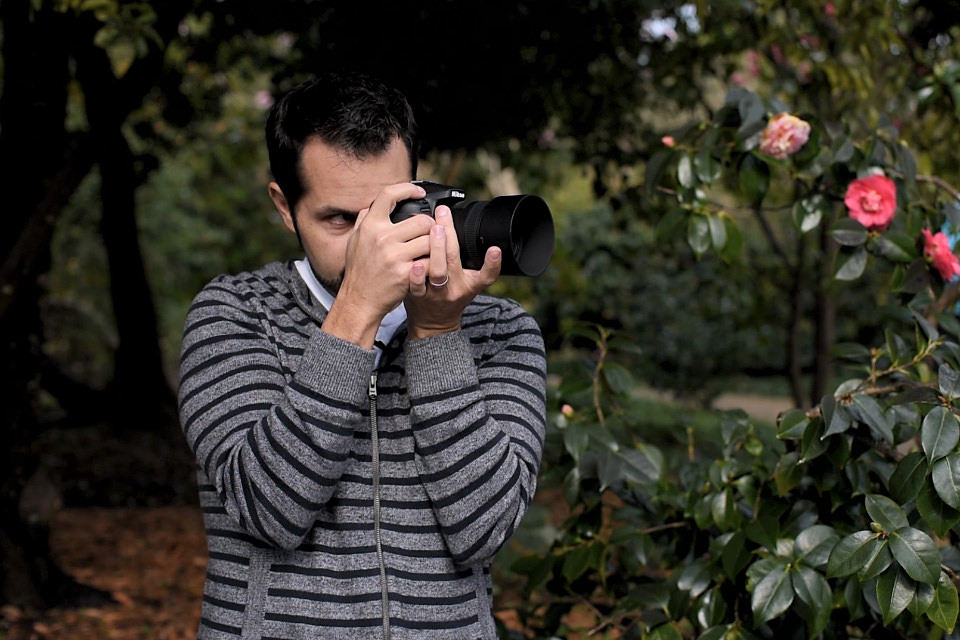
- Hold camera to your face: while some of us might prefer to use the back of the camera screen to frame images, shooting with your arms extended is always going to introduce more camera shake. If your camera has a viewfinder, you will find that holding the camera to your face will make it easier to stabilize the setup.
- Push the camera to your head: once your arms are close to your body and fully tucked in, you can help stabilize the camera even more by slightly pushing the camera against your head.
- Bonus tip – breathe out right before squeezing the shutter release: Again, this trick is known to those who have served in the military or have experience shooting long-range rifles. If you slowly breathe out right before squeezing the shutter release, you have a higher chance of avoiding camera shake, because your body is not moving as much as it does when you heavily breathe.
Here is John showing how to take the above into practice:
3.2) How to Hold a Camera With a Grip
If your camera is equipped with a grip, you can take advantage of a very good technique that is known as the “Joe McNally Grip”. This technique was revealed by one of my most favorite portrait photographers Joe McNally many years ago, where he demonstrated the technique of hand-holding the camera with a grip on his shoulder. This technique works really well, because your shoulders are typically more stable than your hands, so if you rest your camera on one of your shoulders, you can achieve really show shutter speeds without introducing camera shake. Here is what you need to do:
- You need a camera with a grip: this one is a must, because a regular camera is too short for you to be able to rest it on your shoulder while you are trying to look through the viewfinder. The grip solves this problem.
- Rest the left corner of the grip on your left shoulder: put the corner of the grip to a comfortable area of your shoulder. I personally prefer putting the corner of the grip on the softer front side of my left shoulder, but you should experiment and see where the camera rests comfortably for you.
- Look through the viewfinder with your left eye: if you are used to look through the viewfinder with your right eye this one might take some time to get used to.
- Wrap your left hand over your right hand: you don’t want your left hand just dangling off your body – you want to wrap it over your right hand, which helps push the camera further into your shoulder for extra stability.
- Push the camera to your head and breathe out: same tips as the previous technique.
Here is how it should look from the side:
I personally found this technique to be very useful in situations where I have to use very slow shutter speeds without having to increase ISO or open up my aperture. If you do everything right, you should be able to achieve ridiculously slow shutter speeds – I have once managed to take a full second exposure without camera shake with the Joe McNally grip!
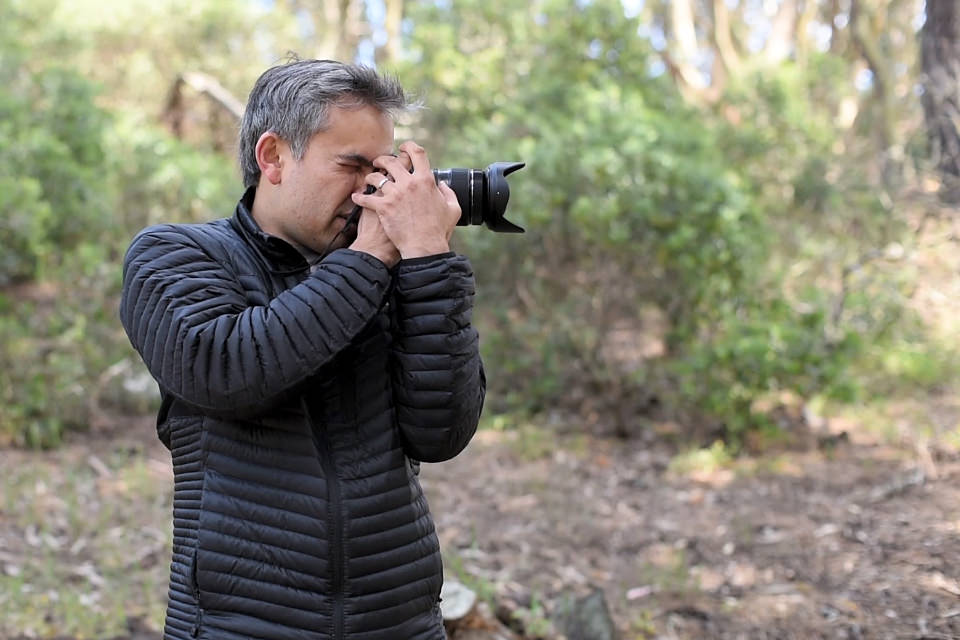
3.3) How to Hold Telephoto Lenses
The technique for hand-holding telephoto lenses can be slightly different, because there is much more weight on the front of the camera. For the most part though, you will be doing similar things as when holding a regular setup:
- Detach or reverse lens foot: heavy telephoto lenses typically come with the own tripod feet, because they are too heavy to be dangling off the camera mount. I personally never found it comfortable to hand-hold lenses by holding them by the tripod feet, especially when shooting for extended periods of time (try doing that on a full day wedding!). Not only will it cause the camera to move left and right, but it will also bruise up your hands. Instead, either remove the tripod foot completely (if you don’t use it), or reverse the lens foot so that it faces up.
- Find the best balance point: with the lens foot reversed, you can comfortably find the area where the lens and camera perfectly balance on your hand.
- Place your feet perpendicular to your subject: same as above, but becomes even more important with longer telephoto lenses, since the setup is heavier.
- Push your elbows into your sides: again, you want your hands tucked in tight to your body to avoid camera shake.
- Push the camera to your head and breathe out: same tips as the previous technique.
I have been using this technique for many years when shooting with 70-200mm and longer telephoto lenses and it has worked really well for me. Here is yours truly demonstrating the technique in the video:
3.4) Stabilization by Leaning
Another great way to significantly reduce camera shake when hand-holding a lens is to find a stable object that you can lean against, such as a tree, a wall or a car. This completely eliminates the potential to rock back and forth when taking a picture, thus allowing one to shoot at very low shutter speeds. Not much to add to this technique – make sure that you still have your hands tucked in, with the camera pushing against your head for extra stability. Stabilizing your breathing will also help in getting a sharper image, so give it a try!
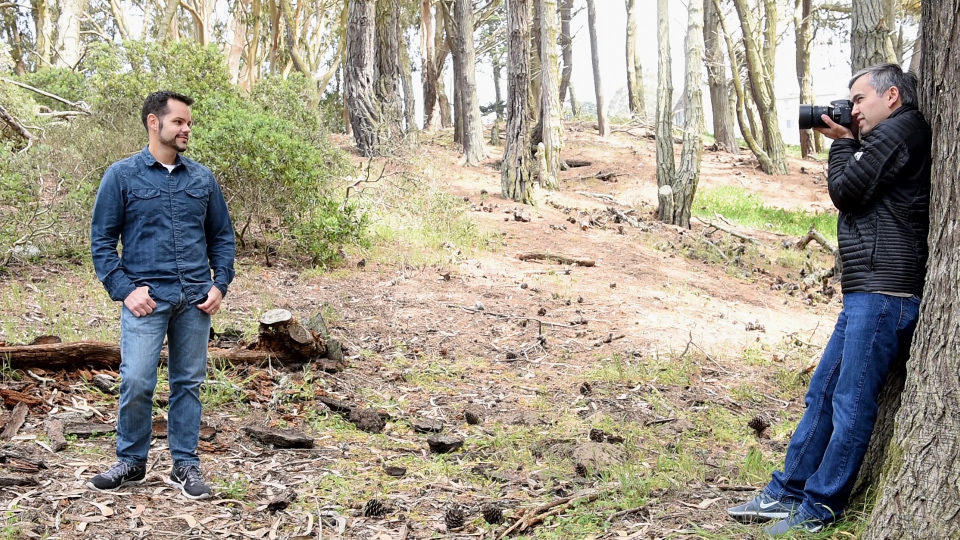
In the above image, I am leaning against a tree while photographing John with an 85mm lens at around 1/50th of a second, which worked out great to get a very sharp image.
3.5) How to Hand-Hold Camera While Sitting
One technique that we did not cover in the video is how to hand-hold a camera while sitting on the ground. While many of us rarely use this technique, it can be very useful in practice when photographing subjects from a lower angle, such as when photographing children. Once again, if you have weapon experience, you already know the best postures for proper hand-holding – either pushing your elbows against your knees while sitting while holding the camera in the center, or using the kneeling position, with the left elbow resting on your left knee, while your right knee is on the ground. Both techniques work really well, although many would probably prefer the kneeling position more to the sitting position to keep clothes clean.
4) Image Stabilization Considerations
Keep in mind that when shooting with cameras and lenses that have built-in image stabilization, the reciprocal rule and the techniques discussed above might apply slightly differently. First of all, image stabilization can do a tremendous job in reducing camera shake by compensating for different unwanted movements and motions, sometimes by up to 3-4 stops, which is a lot! So if you find yourself struggling to take sharp images at low shutter speeds and you have an image stabilization feature, make sure to turn it on. By default, you should always have image stabilization turned on when shooting hand-held, unless your shutter speeds are so fast that you don’t need it (in some cases when using shutter speeds faster than the focal length of the lens, image stabilization might actually work against you). Also, when shooting hand-held with telephoto lenses that have image stabilization, you should make sure to stabilize the setup first by half-pressing the shutter and letting image stabilization kick in for a second or two before taking a picture, as described in this article.
5) Dealing with Camera Shake on a Tripod
Although camera shake is commonly experienced when shooting hand-held, it can also happen when shooting from a tripod, where such factors as wind, tripod stability and shutter release by hand can cause unwanted movements. We have already written a detailed guide on how to reduce camera shake on a tripod, so please give that article a read – there is plenty of information there!
Since we as photographers always strive to capture sharp photographs with plenty of detail, camera shake can be very frustrating to deal with, so I hope you found the above article useful. If you have any other tips to avoid camera shake when hand-holding lenses, please let us know in the comments section below!
Thank you Nasim. I own a heavy camera/lens without image stabilization, and I really like the performance of this combination. The lens is a Sigma 50-100 f/1.8 which is a quite large and heavy lens, but produce excellent photos, so I am not letting go. Your techniques have helped me get many sharp photos at 100mm f/1.8 and shutter speed of 1/30s, and most photos were sharp at 1/60s, which is astounding. I don’t have naturally steady hands but finding the balance point of the camera/lens combo and standing perpendicular to my subject made a huge improvement. Thank you for sharing your experience and advice.
A technique I’ve used that really helped me is sometimes referred to as a “machine gun grip” or “elbow tripod”. There are a number of variants, but this technique used with a 300mm AF-S F/4 and 1.4tc has given me more than 1.5 stops of improvement vs. the traditional approach. If there is a way to post a photo of the grip on this forum, and someone would like me to do so, let me know. But I will try to describe it verbally below.
A couple caveats: This technique does not work for my friend who has very thick, muscled arms. It also does not let you zoom or switch to manual focus while shooting, so it’s usefulness depends on the situation.
– Turn your head to the left as far as is comfortable (don’t strain at all).
– Put your left arm in front of you, parallel to the ground. Bend your elbow, which should be in front of your face around chin level.
– Put your right arm, which is holding the camera, under the left arm. Rest the lens on your left arm between your shoulder and your elbow, wherever is comfortable.
– Depending on what’s most comfortable, stabilize the left arm either by placing your hand on the right shoulder (best for a short lens), or by resting it on your right forearm (for a longer lens).
– Leg position is the same as what you would typically use for hand-holding – left leg forward, right back, etc.
– Sight through the viewfinder using your left eye (this was the hardest thing for me to get used to!)
– If you are using a shorter “D” lens, make sure the focus ring is not resting on your arm (not that I ever did that…..)
It sounds complicated, but it takes me perhaps a second longer to get in this position vs. the traditional technique. And repositioning or panning the camera is very smooth and stable since you are using your torso to shift position.
Hope this proves helpful to folks!
I use this stance also with 300mm, feels pretty comfy to me.
l like it
So just curious, when you hold the camera to your eye (using viewfinder), do you all lean the camera on your face, forehead or nose or do you hold the camera an inch or so from your face? I hope that makes sense.
I generally do have a camera contact point somewhere on my face to help add stability and reduce camera shake. Exactly where that contact point is depends on the camera and what type of grip I’m using. For those like me who don’t have incredibly steady hands, I find it does make a difference.
Well waddya know. I tried your method and it’s not bad.
I noticed that in every picture above the left elbow is tucked in to the left side of the body for stability, a technique recommended since the dawn of the SLR and I certainly agree with; then Nikon moves the zoom ring to the front of the 70-200/2.8. Quelle horreur!
Welcome article! I see so many, sooooo many people holding their DSLRs with the left hand ABOVE the lens, instead of underneath it, supporting it… It always makes me laugh. Sometimes I walk up to them and suggest them to try the right way… at which point they look thunderstruck by some sudden illumination: “How didn’t I think of this myself before?” Yeah, well, indeed…
Mind you, those people also are those who religiously keep their lens hoods on all the time… in the storing (reversed) position, thereby defeating the very purpose and making it more difficult to re-touch focus manually if need be —but no, you’re right, they wouldn’t need to do that anyway. ;o)))
Yes! One of my first lessons from a great mentor, Russell Lee (en.wikipedia.org/wiki/…tographer)), was how to hold a camera. And you added some new to me ideas! Well done! and Thanks. Also, thanks for the sticky stick for cleaning my sensor.
As always great article.
If I may quibble on a minor point: Standing exactly perpendicular to your subject will help with movement toward and away from your subject but will introduce more sideways sway. What you really want is a diagonal stance: feet apart with one foot back. This stabilizes you in both directions. (You probably don’t stand exactly perpendicular yourself, but it doesn’t hurt to be clear about this when describing it.)
Also, something important when shooting in portrait mode: With no hand to hold and support the camera opposite to the shutter button, pressing that button in portrait mode unavoidably gives you rotary camera movement. The solution is to put on a battery grip and press the grip’s shutter button instead. Then you’re again pushing downward, against the support of your other hand.
For canon photographers setting the drive mode to silent or silent continuous significantly reduces the mirror induced vibration. I can often achieve tack sharp images at 1-2 stop slower shutter speeds.