Practically every day, one can see threads on photographic forums where members discuss the various different modes of automatic exposure, trying to find the right one. As a rule, these discussions result in the same question – what compensation to automatic metering ought one set to get consistently good exposure? It turns out that no autoexposure mode universally guarantees good out-of-box results.
What is Good Exposure?
Let’s start by defining “good exposure.” Good exposure is that exposure which allows you to get high-quality source data – that is to say, with a low noise level and without clipping in the shadows and highlights in all of the elements of the scene that are important to its composition; where you intend not to clip but to keep details and texture (of course, if the dynamic range of the scene is wider than the available dynamic range of the camera, it is a purely subjective decision, based on pre-visualization; and if the dynamic range of the camera is wide enough, maximizing the exposure, often called “Exposing to the Right” or simply “ETTR”, is the way to go). A shot taken at such exposure can be rendered (with the use of a raw converter and a graphic editor) so that the rendering of the scene will match the intention of the photographer and can be presented in the desired size.
Note
To quickly assess what can be extracted from a shot via a raw converter, we created FastRawViewer. Not only can it quickly render and display the results of simulating exposure correction, applying white balance, contrast curve, etc., but it will also record these adjustments (as well as any ratings, labels, titles, or descriptions) in an XMP file so as to not have to repeat the aforementioned adjustments in Lr/ACR raw converter.
However, when enacting an automatic exposure metering, a camera has no way of knowing the intentions of the photographer and therefore correctly understanding which elements of the scene are important to the composition and which aren’t. For example, in a contre-jour shot, ought one preserve the background? The photographer knows the answer to this question, the camera doesn’t. Undoubtedly, we could start demanding that camera manufacturers add settings to menus, additional buttons and various other controls. But all these additional options can only be used if shooting in a very relaxed (shall we say?) manner and with light in the scene not changing at all. (Let us note that for a relaxed shoot, one could dispense with such settings and simply use bracketing and rapid result analysis in, for example, FastRawViewer – that is to say, a trial-and-error approach.)
A photographer, unlike a camera, knows what is important to him in a scene, and therefore when setting exposure, he has the option of using a spotmeter. By default, a camera’s spotmeter is calibrated such that between the exposure recommended by the spotmeter and the maximum exposure in RAW there is approximately 3 EV (2.5 EV for JPEG). The exact value for your camera can be found using the method described in the article Establishing the in-camera exposure meter calibration point is the way to extract more dynamic range from your camera.
One of the ways of getting good exposure is metering while using the in-camera spotmeter on the lightest part of the scene that needs to maintain full detail (white clouds, snow, etc.) and applying the appropriate compensation to the exposure recommended by the spotmeter.
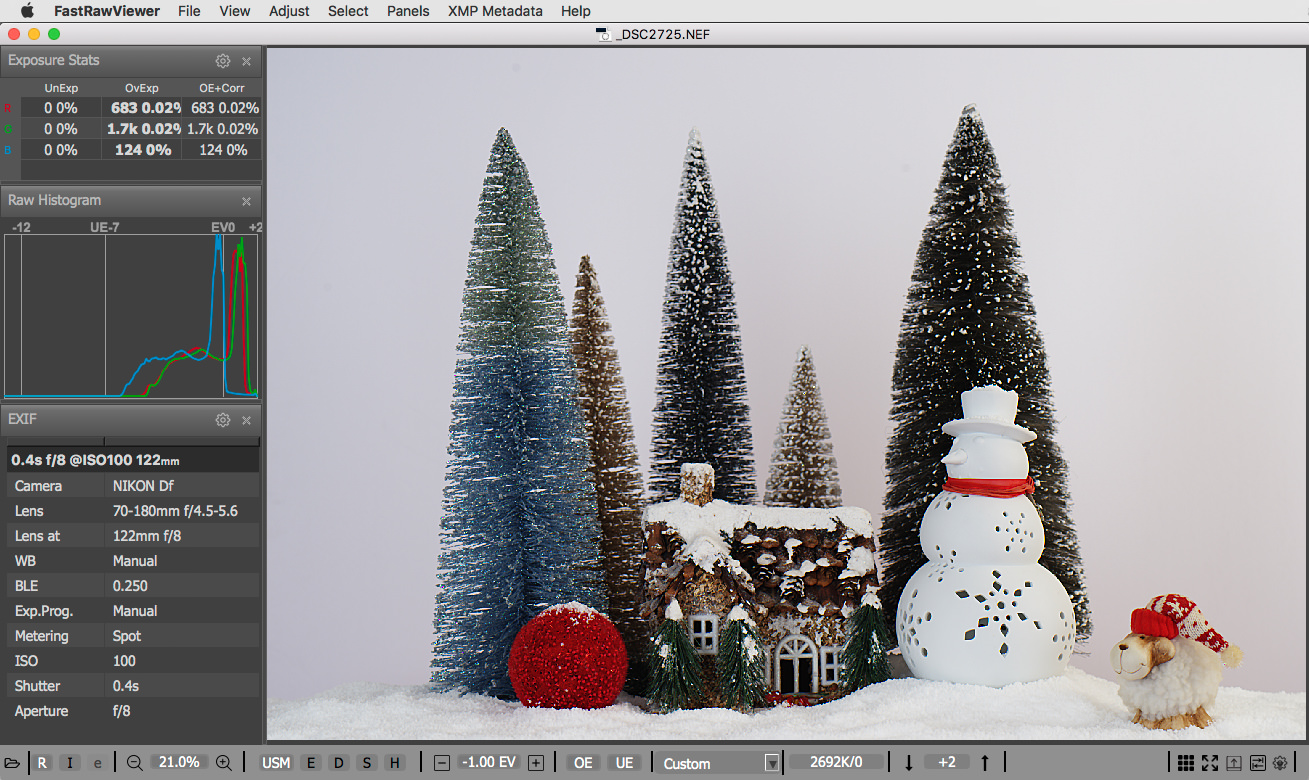
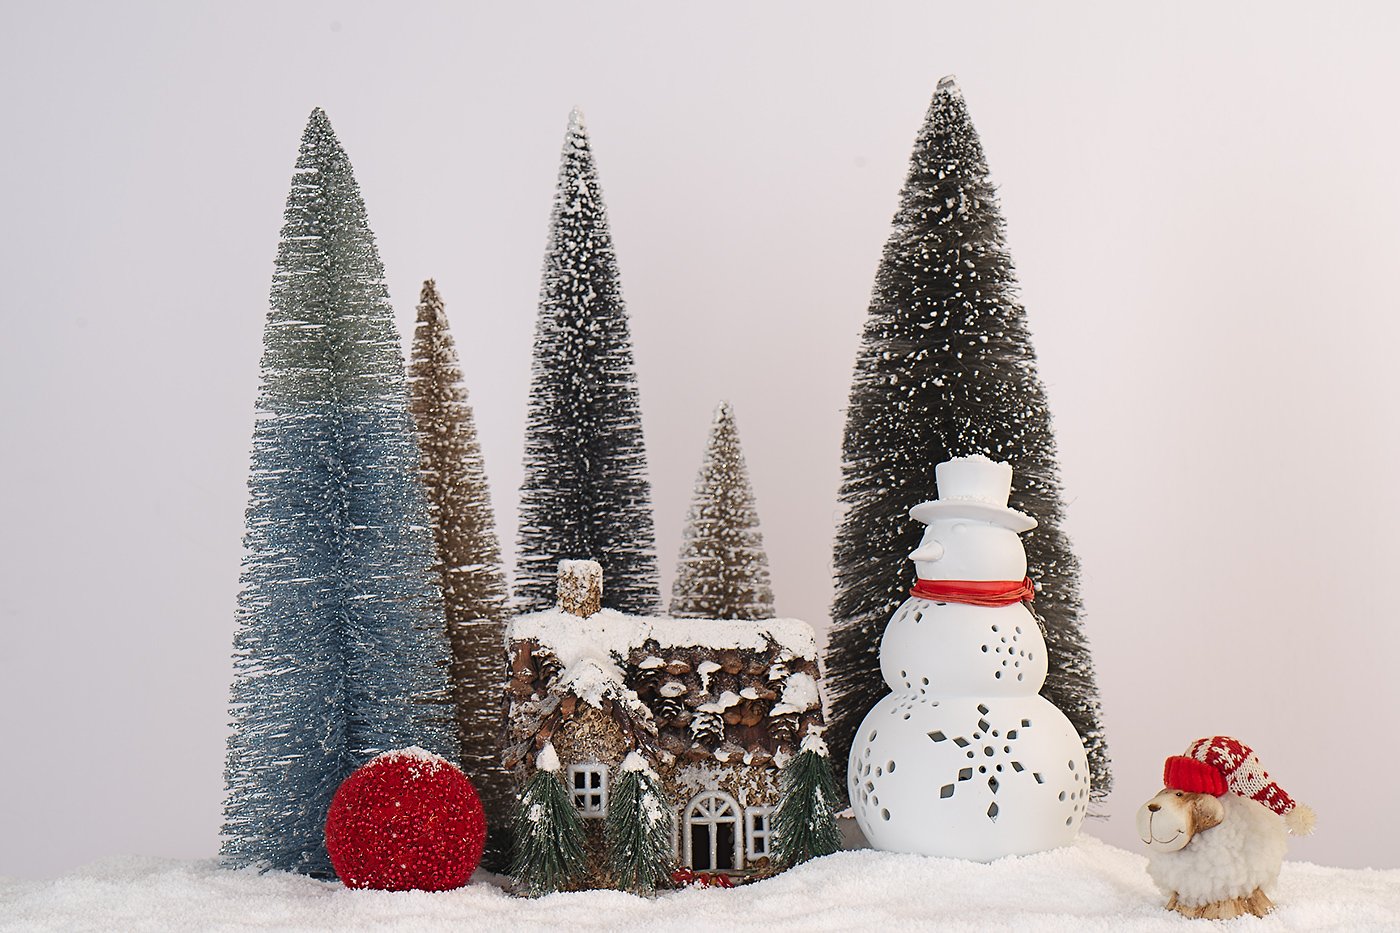
We built a scene similar to a natural winter landscape: the scene has sufficient contrast, has enough white, however, many of the elements of the scene that are compositionally important are darker than the background. One wonders – how will the multi-segment (matrix, evaluative) metering handle this?
To display and study the resulting RAW we will, as stated above, use FastRawViewer.
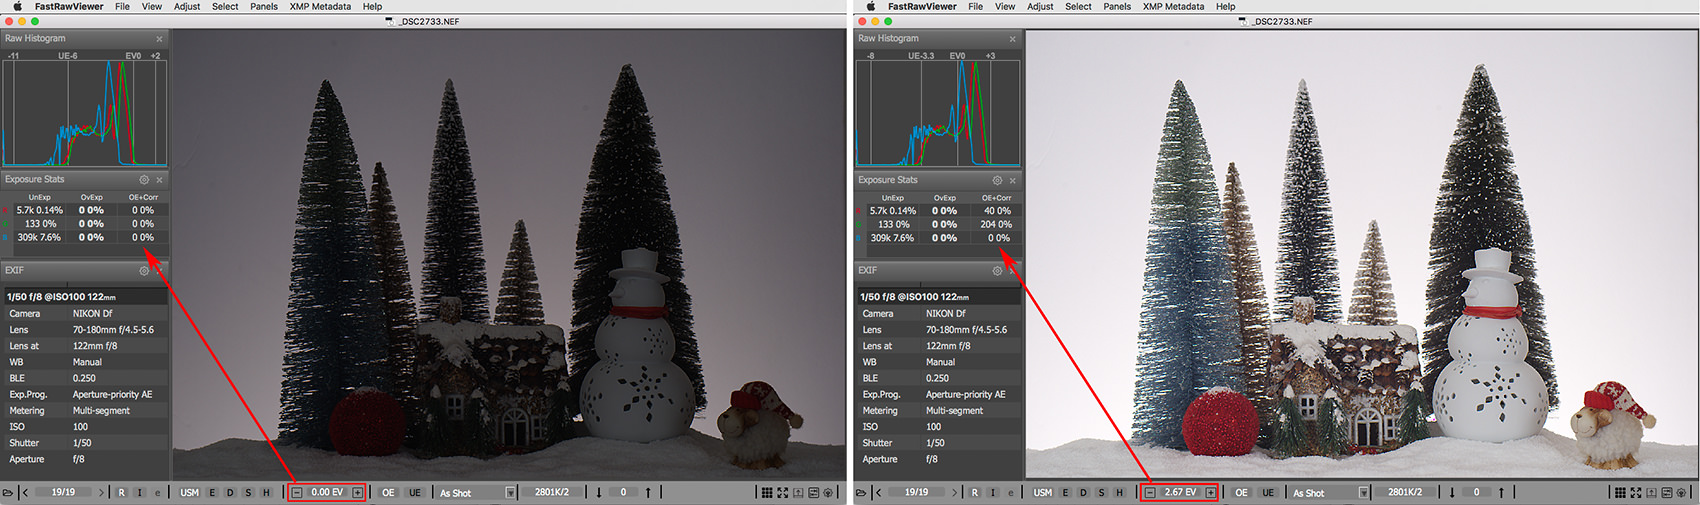
The image below was taken in auto multi-segment mode (left part of Fig. 2 is the shot “as is”). As can be easily ascertained, the underexposure comprises about 3 EV (right part of Fig. 2, the brightness has been increased in FastRawViewer by 3 stops).
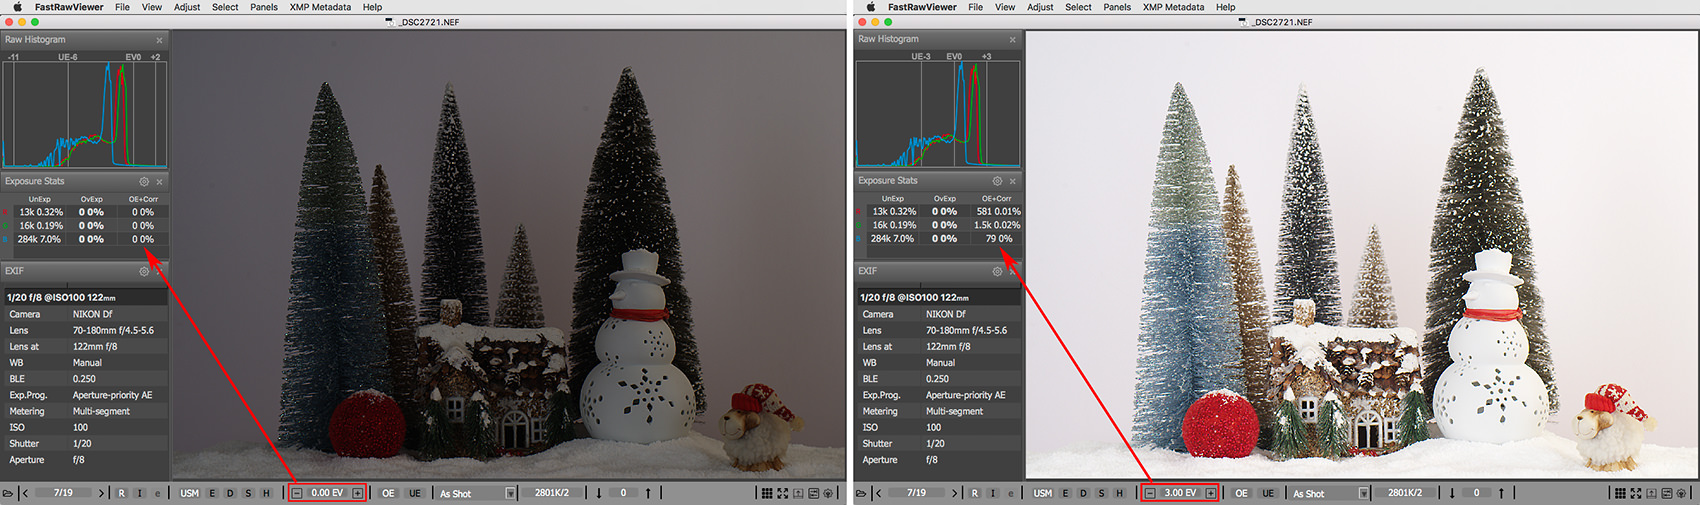
To evaluate underexposure, we raise the brightness in FastRawViewer, simulating positive exposure compensation in the camera (control, usually named “exposure” in RAW converters is marked with the red rectangle), up to the point where the amount of Ov.Exp + Corr reaches a fraction of a percent, making certain that the OE indication doesn’t show up in areas of important highlights; in our case, the snow and the snowman. “Clipping” in the specular highlights can be tolerated almost always.
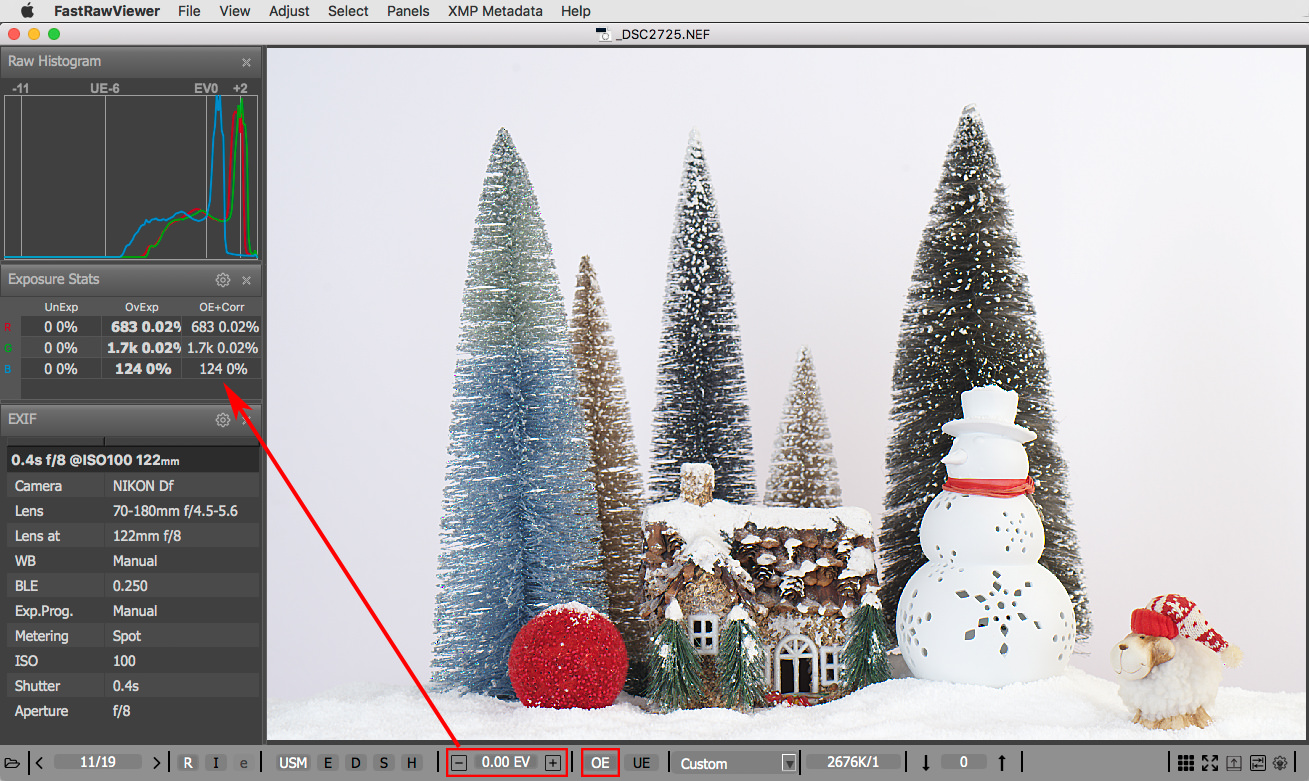
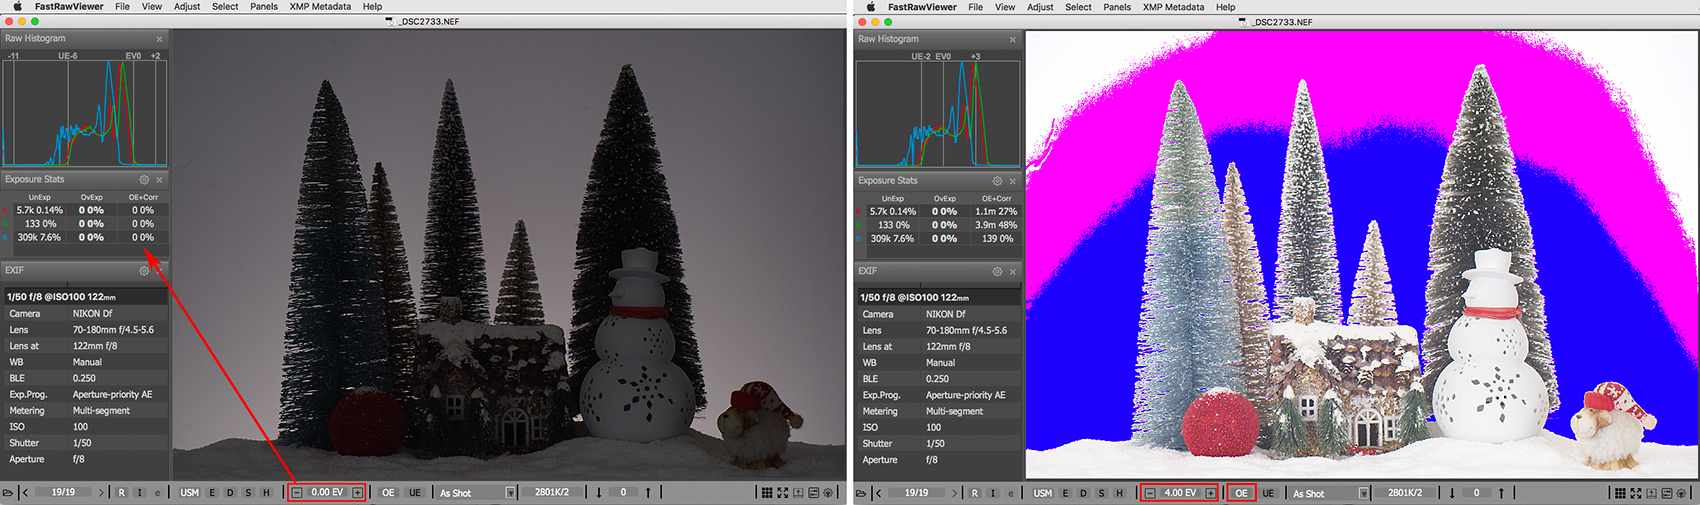
We can see in the shot that the auto-exposure scrupulously saved all of the specular highlights on the ends of the tree branches (left part of Fig.3, the Exposure Stats panel in the OvExp column displays 0% in every channel), transposing the main bulk of the composition into deep shadows.

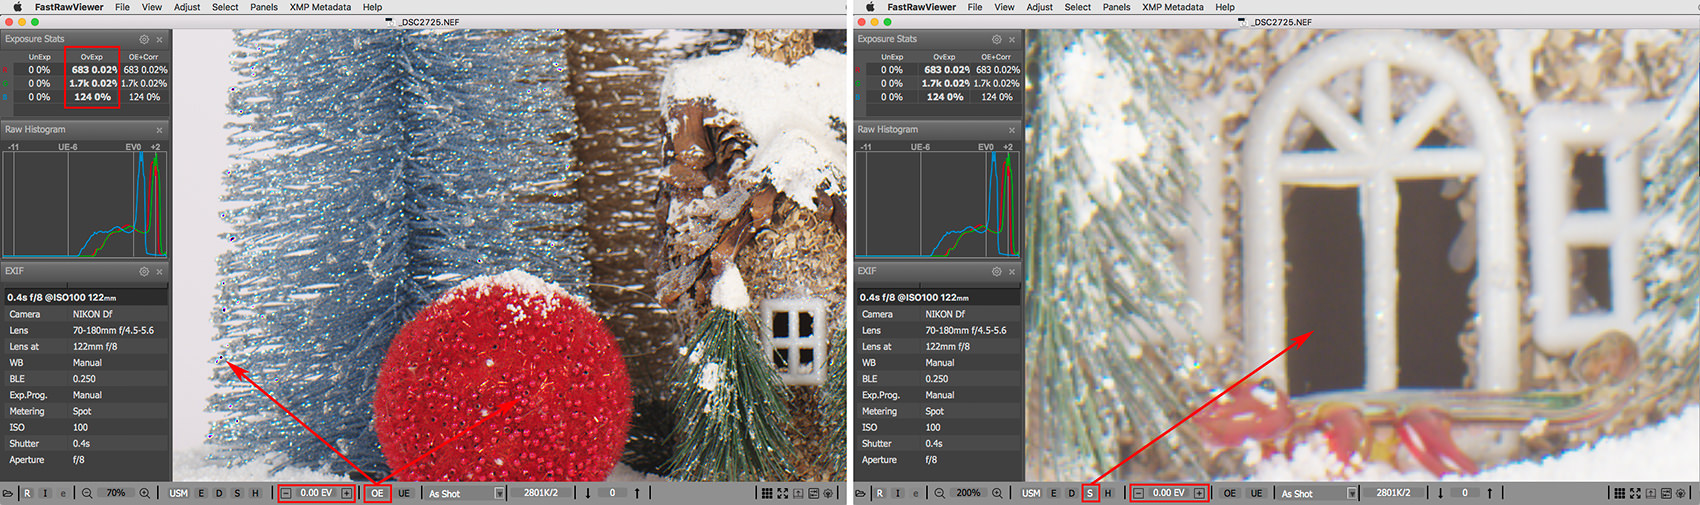
Of course, one could hope for and count on the high dynamic range of the camera and on being able to boost the shadows in software with sufficient detail. However, in the vast majority of cases, such correction leads to the details in the specular highlights not being discernable anyway due to rather extreme increase in brightness, while the noise and the artifacts in the shadows will be higher (and, correspondingly, the resolution and aesthetics of the shot will be lower) than would be with good exposure from the very start, without increasing brightness within some software (Fig. 3, right part – the application of Shadow Boost allows us to see the color artifacts and the noise in the shadows).
In actuality, for this scene we want the brightest elements that keep their texture to be the snow and the snowman, not the specular highlights on the spruces. Therefore, as we noted above, having used the in-camera spotmeter to meter the exposure off the brightest compositionally-important part of the scene and having added the correction (+3 EV) to the spotmeter results, we should get near-optimal exposure. Some cameras may not allow setting exposure compensation (EC) to +3 EV, as they go only up to +2.5 EV. You have two options in this case: set the camera to +2.5 EV, or, as I do, switch to manual mode and dial in a slower shutter speed and / or a faster aperture manually, to get to +3 EV.
During the shoot of the scene displayed below, the metering was performed off the white top hat on the snowman’s head with a correction of +3 EV in the camera.
Yes, we did get a certain amount of blown-out pixels in the areas of the specular highlights on the tips of the spruce trees (In the Exposure Stats panel, OvExp, we can see 0.02% in the R and G channels, 683 and 1.7k pixels correspondingly, and 124 pixels in the blue channel), but these are specular highlights which, in any case, lack any details. However, all of the shadows have been preserved (which can be tested easily, again, using Shadow Boost), as well as the texture of the snow.
Later, we can render this RAW according to our desires.
Could one calculate the constant compensation to autoexposure for multi-segment metering the way we do for the spotmeter?
Unfortunately, this trick doesn’t work well with autoexposure in multi-segment metering mode. Let’s see what happens if we expose according to automatic metering while changing the brightness of the background in the scene by +/-1 EV.
When increasing the brightness of the background by a modest +1 EV, a shot with autoexposure in multi-segment metering mode turned out to be underexposed by 3 1/3 EV, that is to say a third of a stop more than in the previous case.

When changing the brightness of the background in the scene by approximately -1 EV instead of +1, the shot will be underexposed by about 2 2/3 EV, so by 1/3 of a stop less than the first shot, and should we have the camera set to + 3 EV exposure compensation, some important highlights will be blown out.
Furthermore, if the idea is to shoot in contre-jour light, and preserving the background isn’t necessary, then the underexposure comprises >4 EV.
Accordingly, we don’t have the option of consistently calculating the standard compensation to autoexposure in multi-segment metering mode. The use of the spotmeter (as described above) eliminates said problem.
We preformed similar experiments with cameras from different manufacturers (Canon / SONY / Olympus / Panasonic), and the results are as follows:
- When changing the brightness of the background, the amount of the necessary compensation to the value suggested by multi-segment metering mode, changes;
- When contrast or absolute brightness of the light in the scene changes, so does the necessary compensation to the exposure suggested by multi-segment metering;
- The amount of the compensation to the value suggested by multi-segment metering is different not only for different manufacturers, but also for different camera models for the same manufacturer;
- When metering using the spotmeter on highlights with a compensation for the exposure meter’s calibration, the exposure is stable and doesn’t depend on the luminance of the background, scene contrast, or levels of light in the scene.
PS. In some cases, there are no areas with obvious compositionally-important highlights in the scene that are big enough to meter off. In such cases, one can spot-meter from the shadows and use a negative compensation, corresponding to the useful dynamic range of the camera at the given ISO. Metering off the shadows guarantees that the shadows are placed where you want them to be, thus you can prevent the shadows from drowning in noise, which is important if you plan to edit them further and want them to have good precision (“enough bits”) to stay sufficiently detailed, artifact-free, and smooth.
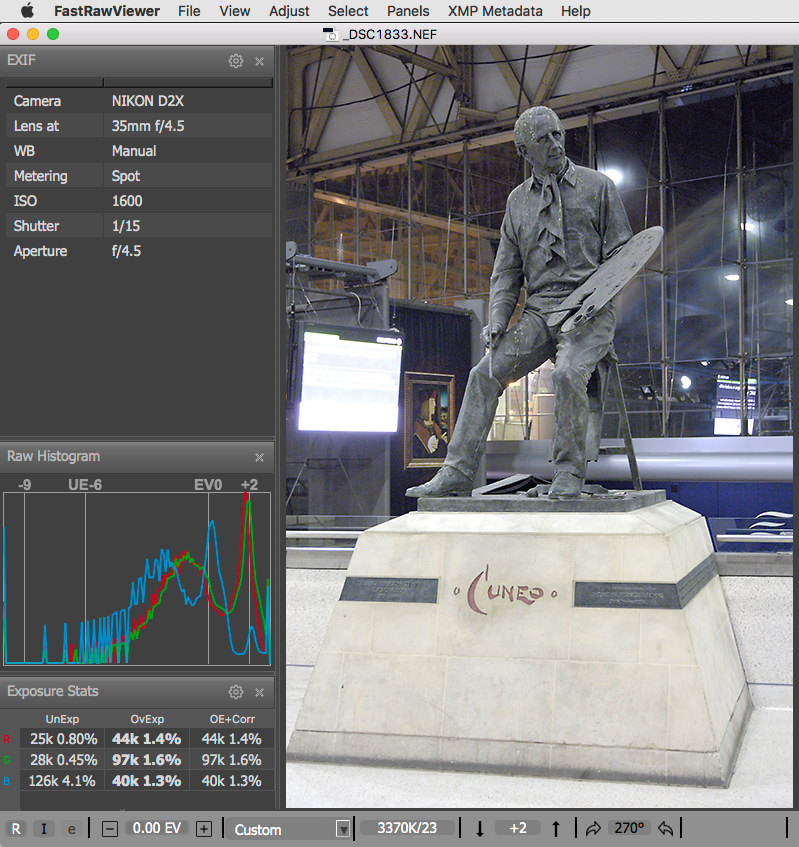
In this case, the spotmeter is used on the shadows of the sculpture, with a compensation of -3 EV…
Automatic exposure, even under much more favorable lighting conditions, in this case leads to less successful results.
Undoubtedly, shooting using spot-metering off the shadows, unlike it is with metering off the highlights, requires doing a bit more homework. To calculate correctly the negative compensation needed, one would have to complete an analysis of the dynamic range of the camera for a given ISO, as described in the article How to Use the Full Dynamic Range of Your Camera (unfortunately, using dynamic range values obtained via the internet can leave one disappointed).
I also think that shooting raw, opens up to various possibility and doors to me. My father has always taught me to click pictures with a very steady hand and in natural light. I refrain from using various Photoshop tools but i started using them out of curiosity. And now i am hooked
But great article though
www.travelwithshama.com/how-n…el-photos/
Giving a shot +3 EV from the spotmmeter highlight reading would place highlights at Zone System 8 if we were Ansel Adams. Don’t modern digital sensors have more “zones” than film cameras were using decades ago? If they do have more “zones”, can +4 EV give ETTR results that are even better at retaining shadow detail?
Dear Paul,
Exposure meters are not calibrated for 18% in raw, so, no Zone V. They are usually calibrated in such a way that there are 3 to 4 stops between the reading and the clipping. You can check yours by following the steps suggested at www.rawdigger.com/howto…amic-range
And a follow-up on this … The same thing did NOT occur just now when I posted the “FYI”.
FYI: Posting my comment (above) resulted in a new window opening in my browser (IE11), asking me to repeat the eCaptcha check – – from which I was not able to return to the article on which I was commenting. At this point, I was not sure if my comment had posted correctly – – but, by reopening the page, I found that it had.
Hope this helps …
Hello Iliah,
I’m using the ETTR (2nd) method that you outlined in your related article (photographylife.com/expos…-explained).
That is;
1) I have determined the amount of exposure “headroom” that I have on my Sony RX10 ii (+2EV, comfortably) and I have this permanently dialled-in on the exposure-compensation dial.
2) I expose for the highlights in the scene … using Zebra=100+ to assist in this process.
3) I adjust “brightening” in post-processing, as required.
For some high-contrast scenes, tho, this results in a “dark” review image (I’m aware this is just the in-camera JPG – which is what we see in review, even when shooting RAW). To address this, I’ve been experimenting with using S-Log2 (Picture Profile = #7, on Sony cameras that have this feature).
This works quite well – enabling one to see details in the EVF & review image that would otherwise be too dark to see.
My question is related to the ISO settings that are imposed when using S-Log2 … such that the lowest available ISO changes to 800 (whereas, base-ISO for my RX10 ii = 100). I found a not-quite-clear-to-me(!) explanation for this in a review of the Sony A7Rii – as follows;
[Because ISO ratings are based on mid tones in JPEGs and the flat tone curve pulls its mid tones from a long way down the Raw file, the S-Log2 mode is considered to be a higher ISO than the normal tone curve. As a result, the lowest available ISO in S-Log2 mode is 800: not because the lower settings are being locked off but because an ISO 800 exposure is enough for a middle-grey object to be represented as a middle grey in the S-Log 2 JPEGs.
Looked at from a Raw perspective, what’s happening is the camera is trying to use ISO 800 exposures but with much lower amplification than in standard mode, meaning highlights aren’t being amplified out of the file. (If shot with the same exposure values, the ISO 800 Raw files from S-Log2 shooting appear to be somewhere between the ISO 125 and ISO 160 results in standard mode).]
OK – I understand *some* of that! However, I’m conscious of the warning you gave at the end of the aforementioned article: “If you aren’t shooting at your camera’s base ISO, ETTR is all but useless”
So, question #1: Am I *effectively* using base-ISO (or close to it) when using S-Log2 with lowest ISO=800 (as the quote above implies) ?
And, question #2: The quote in the Sony A7Rii review goes on to say; [As a result, shooting in SLog-2 mode not only provides a more usable preview and output JPEG, it also essentially causes the camera to reduce exposure by 2.5EV to protect highlights.]
So, does this mean that I don’t need to dial-in +2EV exp.comp – ‘cos, by uing S-Log2, this is already being done for me?
Note: Yes, I will do some experimenting to assertain this for myself (that’s on my to-do list for tomo) – but, I’d appreciate having some expert info to confirm what I find.
Regards. John M
Dear John,
I don’t remember writing the article you’ve mentioned. The sentence you quoted, “If you aren’t shooting at your camera’s base ISO, ETTR is all but useless”, doesn’t represent my view on the subject, especially when it comes to Canon cameras, Nikon D3-D5 cameras, and DRpix cameras. SONY A7R II is a DRpix camera, see the 1 stop decrease of noise between base ISO and ISO 800 www.photonstophotos.net/Chart…0ILCE-7RM2
Your first question is this, as I understand it: when using S-Log curve at ISO 800 does the camera apply the lower analogue ISO? To answer this question, I need to see a pair of raw files – one taken at ISO 800 with S-Log curve, and the same scene taken at ISO 100 with a “Normal” setting. Preferably, the subject is some more or less evenly lit neutral surface (like a wall or a ceiling), metered in centre-weighted mode. Please upload the files to some free service, like Google Drive or Dropbox, and send me the links to [email protected]
Apologies for misquoting you, Iliah – – You are correct; it was from another article by a different author on this site (I had both articles open at the same time, and I got myself confused!)
Note: My camera is the Sony RX10 ii – which shows different performance on the photonstophotos chart to the A7 ii. For my RX10 ii it’s pretty much a flat-line (effectively, ISO-Invariant).
Re my question#1: Yes, you have interpreted it precisely – Thank you for the offer to check-out some sample files. I’m happy for others to see them too (to help in general understanding of this fascinating concept); to be found here: !AppgOm5fyuGXnQZAzx30Hi02YYMr
See image notes below.
============================
Note: Here’s my current (semi-technical layperson) theory as formed in attempt to understand what’s going on when using S-Log2;
a) Using S-Log2 does affect the resulting JPG file (including the JPG that’s embedded in the RAW file) – but (other than for the exposure adjustment that results from using S-Log2 .. [see c) below]), S-Log2 does not affect the RAW file. TBC!
b) Using S-Log2 on my RX10 ii results in lowest available ISO being ISO-800 (whereas, base-ISO for my RX10 ii = ISO-100) … I’m not sure how the camera actually handles this, in terms of signal-amplification … that’s the nub of my Question#1 (again, thanks for your offer of help in answering this).
c) The result on exposure, of making the camera’s logic “think” that ISO-800 is being applied (regardless of whether or not it actually is (- see b.), is to *reduce* exposure requirements by 3-stops (to counteract the increase in “brightening” by 3-stops of ISO adjustment = 100 to 800).
d) So, by using S-Lo2 for a high-contrast scene, one can expose for the highlights (using spot-metering) and still see the scene in the EFV and in the resulting review image (both of which are coming from the JPG) … whereas, withOUT the S-Log curve being applied *to the JPG*, the EVF & review would be “dark”.
============================
Which comes back to my original question#2 (assuming my understanding, outlined above, is at least roughly on-track);
ie.
Does using S-Log2 mean that I do NOT need to dial-in positive exp.comp (equivalent to the DR “headroom” determined for my RX10 ii) – ‘cos, by using S-Log2, this comp.adjustment is already being done for me?
Or, is it the other way around? … In that I DO need to dial-in my headroom exp.comp … ‘cos the “brightening” resulting from the increase to ISO-800 is being counteracted by the reduced exposure (?!?!)
Note: I’d prefer the answer to this be the 2nd of my conjectures, ‘cos that would allow for more refinement in headroom adjustment.
This is doing my head in! – – and so, I much appreciate your help.
Image notes:
————–
I have uploaded 2 raw files (Sony ARW format): one with PictureProfile=S-Log2 and the other with PictureProfile=OFF.
Both were taken using Centre-weighted metering in Manual-mode with matching exposure (ap & ss) … only the ISO settings are different, as per their PP setting.
Looking at them with FastRawViewer at 100% zoom; I cannot see much difference – and Exposure Stats show very little difference … which, perhaps, answers my own question#1(?) … but which still leaves Q#2.
Mmm, a thought; I’ve added 2 more images, with +2Ev exposure comp. dialled-in, to allow for RX10ii’s “DR headroom”. To achieve this I switched to Ap.priority – and allowed camera to adjust shutter-speed for the exp.comp.
FWIW: Looking at them with FastRawViewer; Exposure Stats are now quite different. I can “brighten” the S-Log2 version by +2.67 Ev to get almost the exact same *visual* result as obtained with the standard-PP version. I’m not sure what this means, tho (?) Also, I notice that histogram moves to the right with +2Ev comp on the standard-PP version – BUT, it moves to the left with +2Ev comp on the S-Log2-PP version … I reckon I’m now just confusing myself !
I’m happy to upload more/different files – Just ask.
Dear John,
Something wrong with the link, it doesn’t open.
Hi Iliah – Was it a “404” error that was returned to you?
I got a few of those too(!) – – Retrying got me thru after about 3 attempts.
I’ll send a fresh link to you on the email-address you offered.
To anyone who may be reading this with interest in the answer to my question – related to my Sony RX10 ii (other models may differ).
Q. When using S-Log curve at ISO 800 – what ISO is the camera actually applying ?
A. The EXIF:Makernotes indicate that it’s actually using ISO-100.
Note: This is excellent news; it means that high-contrast scenes can be captured at low ISO (where dynamic range capture is optimal) while using S-Log2 to assist in seeing (what would otherwise be a very dark) image in the EVF and in capture review.
Thank you, Iliah
Thanks Iliah!
I never thought to use the spot meter on a part of the scene & recompose . This is a duh moment for me. Been playing around the last hour & this will be VERY useful in the future.
Dear Jason,
Happy to help!
As usual a tremendously interesting article. However I feel that while ETTR is a precious way to optimize exposure for Raw shooting, it could be very interesting to understand how to make sure that what you are shooting will be exactly as it was in the real scene. Let’s call this optimized exposure for JPEG. Lcd’s are not very useful in this regard. This is mostly important in case of low light situations where the exposure meter would be tempted to give a longer-than-necessary shooting time.
Dear RiMara,
Camera can’t record a scene in any exact way. A camera is very close to what is called an observer in colour science, it it hasn’t 1-to-1 correspondence to human observer.
In terms of exposure, if a scene has a dynamic range wider than the camera at given ISO, centre-weighted and spot metering from the most important subject in the scene and correct placement it on the scale of brightness using exposure compensation is my preferred method (following Ansel Adams and Zone System).
Much depends on whether you are going to use out of camera JPEGs, or you will be using latitude and applying tone correction in an image editing application (Photoshop, Photoline,…).
There’s no such thing as ensuring what you shoot is exactly the same as it was in the real scene.
Shooting RAW you are just maximising the data capture – what you do with the data is personal choice using your editing software of choice.
Shooting JPEG you are at the mercy of whatever settings you input to the camera.
The human eye is an analogue recording device with a ‘gamma response curve’ connected to a human brain and as every brain (and its notoriously fallible memory) is different, so also is every person’s interpretation of ‘reality’.
The camera is a digital recording device with a linear response connected to nothing at all. It just dispassionately records everything you put in front of it within the limitations of current technology and what instructions it is given.
The closest you might get to exactly recording a scene is using a carefully calibrated camera in carefully controlled (artificial) lighting conditions to make say, an archival record of a piece of art in a museum or some scientific/medical subject with everything referenced to the same parameters. Even then, manual correction in software (at the same time referencing the original) might be necessary. Not very practical for real world shooting!
None of the images in this article load. (At least for Safari – both iPad and macOS.)
Dear David,
Do you have any plugins like AdBlock in your Safari installation? It is also sometimes that you need to give the scripts on the page some more time to run before images show.
I do have adblock and ghost installed but the site is whitelisted in both products. I tried in Chrome (for Mac) and have the same problem (and these blockers are not installed for Chrome).
David
If I try to download the image, I get the following:
Please enable cookies.
One more step
Please complete the security check to access photographylife.com
Why do I have to complete a CAPTCHA?
Completing the CAPTCHA proves you are a human and gives you temporary access to the web property.
What can I do to prevent this in the future?
If you are on a personal connection, like at home, you can run an anti-virus scan on your device to make sure it is not infected with malware.
If you are at an office or shared network, you can ask the network administrator to run a scan across the network looking for misconfigured or infected devices.
Cloudflare Ray ID: 3d2d9fb5e9432246 • Your IP: • Performance & security by Cloudflare
I get Captcha dialogs, complete them, and then it just loops back and asks again.
And what is the deal about doing a virus scan? My systems are clean and anyway, how can asking to read a file provide any information about whether my system is infected? This is all very strange. It should be possible to just set the images in your image database to read only to protect your systems,
This makes using your articles very hard! I (The next article about switching from LR to Capture One has the same problem. Other articles are OK.
David, that’s very strange – I haven’t seen complaints from others for image loading. Can you see if images are displayed in other articles, or is it just this one that is being a problem?
Iliah and Nasim
The pictures did not load on either of my computes either.
Patrick Kelley
I suggest you try Adguard.
It’s more sophisticated and costs some money (surprise,surprise)- but I get no problems.
Please try reloading – everything should be working now. Thank you!
I can’t get your images either, even though I have all script blocking and ad blocking services turned off. I did count that you are now serving up scripts from 34 different websites, some buried four deep.
Nasim and Iliah,
Same here. All extensions/adBlockers turned off but there are no images. This only happens with this article — all other articles are fine. Problem exists with both Firefox and Safari.
David, please try reloading – the issue should be fixed now.
Correction to my previous comment…
It also occurs on the previous article (about Capture One). A
I’m having the same problem as David. Tried earlier tonight and then again just now after shutting down Safari and reopening.
Images don’t load for me either on my Samsung phone using Google Chrome. This is the first time I’ve had this issue on your site.
The images do not load for me either for this article. Safari on Mac. I do not have problems with images loading in other articles on this site. Have tried disabling AdBlock plugin and that does not have any affect.
I can’t even go to the URL for the photos directly. for example.
Yup. I get a Captcha which, when successfully completed, gives me another Captcha. Extremely irritating.
Please try reloading – everything should be working now. Thank you!
Works! Thanks.
Please try reloading – everything should be working now. Thank you!
You guys want to get REALLY precise and accurate exposure? Then stop measuring reflected light, and start measuring incident light with a handheld meter! That is the only surefire way. More cumbersome, one more thing to carry, but the only truly professional way.
I have two handheld Sekonic meters, one top-of-the-line, super-sophisticated L858-D, and one super-small, no-battery, all mechanical, super-cheap Studio Deluxe III. Look them up, both work indescribably great, and although they may lose you some time in the field, they will overall probably save you time when factoring in how much less time you will spend in front of the computer trying to bring back lost highlights or shadows.
Dear Dominique,
Metering incident light is a good and very useful way of determining exposure.
There are several caveats to that method:
– first, it is not always possible – to meter incident light most of the cases one needs to come close to the subject and light needs to be fixed, not like it is, say, on stage (theatre etc);
– second, it doesn’t work when the incident light is not the only major factor (stained-glass windows in churches, and, more generally, luminescent objects);
– third, it doesn’t work well when the dynamic range of the scene is wider than the photographically useful dynamic range of the camera – one needs a spotmeter here to measure the contrast in the scene;
forth, contre-jour and silhouette scenes are not the type of shots where incident light metering is extremely useful.