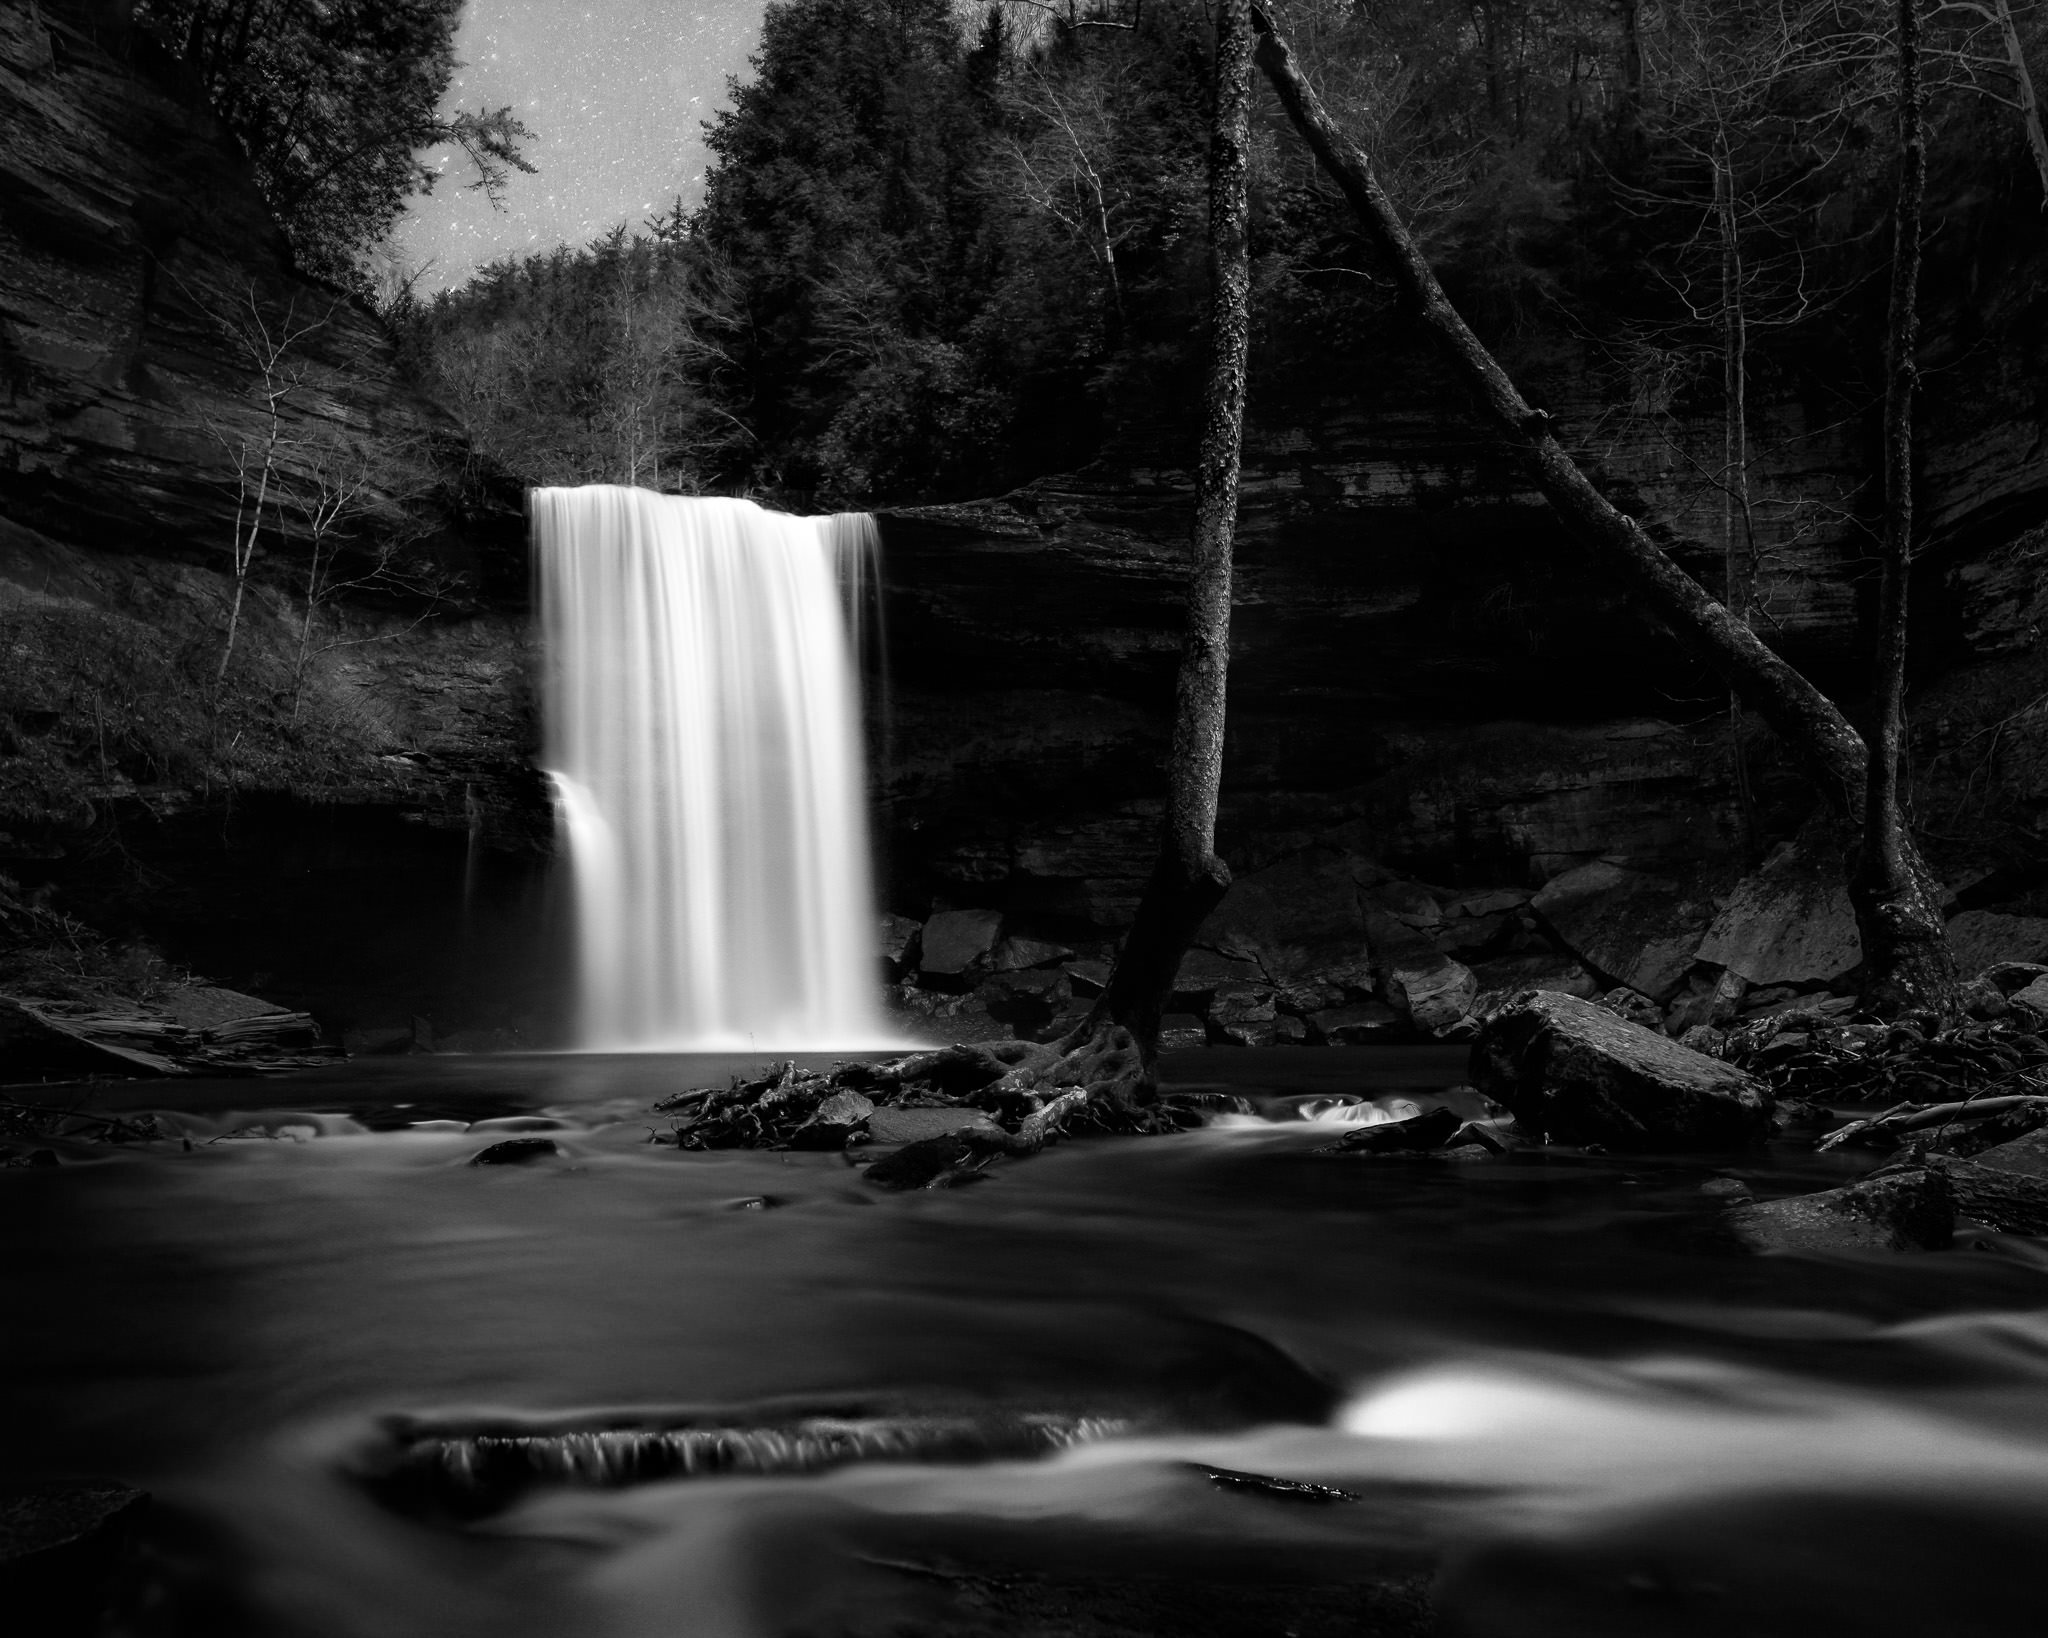
One of the challenges of nighttime photography — particularly Milky Way and star photography — is to get enough depth of field. If you’re focused at the horizon, and you’re using the widest possible aperture on your lens, how could your foreground possibly be sharp? Yet, if you look at galleries online, you’ll see countless photographers capturing perfectly sharp photos of a landscape underneath the night sky. What techniques are they using? In this quick guide, I’ll lay out a few useful tips for capturing sharp landscape photos at night.
Table of Contents
1) Use the widest possible lens
Wide lenses have significantly more depth of field than telephoto lenses. Ultra-ultra wide lenses take this fact to the extreme.
It’s easy to think of, for example, a 24mm lens and a 12mm as falling into the same category of wide-angles. After all, both of them have fairly large depths of field. In reality, though, the differences are vast. When your focal length cuts in half, you can use two full stops wider of an aperture and get the same depth of field. That’s the difference between f/4 and f/8, or f/5.6 and f/11.
So, to get good depth of field at night, you’ll want to use the widest possible lens. With a 14mm lens set at f/2.8, for example, you can get quite a bit of the image in focus — from roughly five feet to the horizon, depending upon the amount of sharpness you’re trying to capture in your stars and foreground.
Ultimately, then, the main “secret” to capturing sharp photos at night isn’t a secret at all. If you use ultra-wide lenses, you can maintain wide apertures like f/2.8 or f/2 and still capture enough depth of field. At night, when you’re fighting for every photon, that’s a huge advantage.
Still, sometimes, it isn’t enough. The next techniques are intended for situations where even ultra-wide lenses still don’t give you the depth of field you need, and you’re forced to use more extreme methods.

2) Use a smaller aperture
If you’re capturing a landscape with a particularly large depth of field, you may want to use a smaller aperture.
Really? Since one of the most difficult parts about nighttime photography is capturing enough light, this one may seem counterintuitive. Why would you use a smaller aperture when you need more light, and you paid so much for your lens specifically because of its wide aperture?
Yet, for nighttime landscapes with a large depth of field, this may still be your best option.
Consider the Nikon 24mm f/1.4, for example. At night, focused on the stars, its depth of field is razor-thin at f/1.4. This is one situation where stopping down to f/2 or f/2.8 may be preferable, solely from the perspective of depth of field. Although you will need to raise your ISO accordingly (or brighten the photo in post-processing), this tradeoff will be a necessary evil.
The other benefit of smaller apertures at night is that you’ll improve your image quality, particularly for stars in the corners of your images. Even the best ultra-wide lenses tend to perform poorly at their largest apertures. When you stop down, even slightly, you could reduce aberrations in your photo and capture a noticeably sharper shot.

3) Consider focus stacking
Finally, one major tip for getting sharp photos at night is to use focus stacking to your advantage.
Focus stacking is a useful concept: You take several photos, each with a different part of the photograph in focus, then combine them in post-processing software like Photoshop or Zerene Stacker. The resulting photograph will be sharp from the foreground to the horizon.
At night, it’s no surprise that focus stacking is a useful technique. If you have to choose between a sharp foreground and a sharp night sky, choose both! Just take one photo where the foreground is sharp, and one where the stars are sharp, and combine them in post-production.
Unfortunately, it’s not always that easy. Focus stacking at night can be very difficult — though not impossible. There are two different types of focus stacking that photographers use for situations like this. I’ll describe both of them briefly below:
3.1) Focus stacking, method one
The most obvious way to stack focus at night is simple: You take a series of photos from the stars to the foreground (or the foreground to the stars), all using a wide aperture, and then combine them in post-processing.
This method, however, can be challenging to do successfully at night. If you’re using extremely wide apertures (something like f/1.4 or f/1.8), you may need more than a dozen photos in order to create a successful blend in post-processing, since your depth of field will be so thin.
In particular, you’ll need to watch that you don’t change your focus point too much from photo to photo. Otherwise, you may end up “skipping” a slice of the landscape — leaving part of the final image irreparably blurry.
Nighttime photos don’t always stack well in post-processing software, either. If everything is very dark, and there isn’t much detail, you may find it difficult to blend the photographs successfully. This problem is even worse if anything in your photograph is moving from shot to shot, such as tree branches or leaves rustling in the wind.
Nevertheless, this is still a common way to stack focus at night, and it certainly works for some scenes. However, there is another method of focus blending that many photographers employ, particularly for nighttime photography scenes, to get around some of these problems. It doesn’t always work well, but, for certain images, it can be very useful.
3.2) Focus stacking, method two
At first glance, the second type of focus stacking seems pretty unusual: You take one photo right after sunset, when the sky is still moderately bright, using smaller apertures like f/8 or f/11. Then, without moving your tripod, wait an hour or two until the stars are visible. Finally, take a photo focused on the horizon, using the widest aperture on your lens. In post-processing, blend these two photos together for a seamless composite.
Personally, I try to shy away from this method for a few reasons. On one hand, it takes a lot of time and dedication; realistically, you can take only one such photo per night. Plus, if your goal is to enter this photo in certain competitions or exhibitions (or just take realistic photos in the first place), this sort of composite may not be acceptable. Finally, — and, for me, most importantly — photos taken with this method are much less likely to look realistic. If you see the Milky Way over what is clearly a sunset scene, it can make the image look very strange.
Still, if you do choose this method, there are some benefits. Normally, it can be very difficult to capture good detail in your nighttime foreground unless the moon is bright; this method solves that problem. Done well, too, “blue hour” lighting actually can look quite natural under a Milky Way; it’s just hard to do well, and it takes quite a bit of practice. Finally, the image quality from this method is top notch, since you can capture both the foreground and the night sky at their ideal settings (though things may look odd if the foreground has far less noise than the sky, so you may want to use similar ISOs for the two shots). It’s certainly a viable technique, although you should take care when you use it in the field.
Ultimately, focus stacking — both methods — should be something you keep in the back of your mind, even if you don’t use them very often. I’ve only focus-stacked my nighttime landscapes a handful of times, but I was very glad to have this technique at my disposal when I did.
If Milky Way photography is your game, I’m sure that you’re already very familiar with the pros and cons of focus stacking at night. If you’ve never tested it out yourself, it’s certainly worth having in your toolbox — and, in fact, may be the only viable way to capture some scenes.
4) Conclusion
There is no easy way to capture enough depth of field at night, but there are — like always — some techniques that can help out along the way.
The easiest of all is just to use an ultra-wide lens. To get the greatest possible depth of field, anything wider than 20mm is ideal.
However, that method will only take you so far. In certain landscapes, you’ll need an even wider depth of field, and that doesn’t leave you with too many options.
On one hand, you could potentially use a smaller aperture, which obviously would help. At the same time, small aperture values restrict the already-miniscule amount of light that reaches your camera sensor. This will make noise more obvious in your photos, reducing their image quality.
So, if you have no other option, you may need to stack focus from multiple photos in order to capture something that works. There are two types of focus stacking at night, and both can work quite well: capturing several photos in succession at wide apertures, or capturing a single photo at “blue hour” for the foreground and a single Milky Way photo at night.
All this may seem like a lot of work just to get a small payoff — more depth of field — but, at night, enough depth of field is crucial, and not particularly easy to attain. It’s nice to have these techniques at your disposal when you’re photographing the night sky, since you never know when you’ll need to use them for your next shot.
Would a Sigma 15 mm f 2.8 fisheye work? I have a Sony a7r2 & a77 (crop sensor)? Thanks
Re: “Also, you’ll notice that ultra-long exposure photographs have more noise than you normally would expect at a given ISO”. Is this because of hot pixels or something else?
Thanks for the tips. Night landscapes are my favorite in the time of the years when sunset comes early and there are no leaves on the trees. Rainy day here so I just learned how to use my wireless remotes for the shutter.
Many of my night landscapes have to be long lens shots in order to get across a lake.
You covered the wide angle lenses very thoroughly.
Any tips for using lenses like Nikon 300/2.8, Nikon 200-500, with and without TCs?
Thanks.
If you use a long lens, the stars in your photo will create thin streaks as the earth rotates and they appear to move across the sky. Even exposures like 15 or 30 seconds can show extreme levels of star movement. The only way to avoid this is to buy an equatorial mount, which rotates to counter the movement of the earth. However, for this type of photo, you won’t be able to have any land in the image, or it will appear blurry. Unless you’re asking about deep-sky astrophotography, my recommendation is to experiment with the star trails in a long exposure and embrace them.
As for your aperture and ISO, the same goes — use whatever aperture you need in order to capture enough depth of field, and then whatever ISO is required to get a bright enough output.
Would not be better to use a tripod for a slow shutter speed in combination with a small aperture ?
Hi Jorge, sorry for the late response. For normal landscape photography, yes, a long shutter speed with a small aperture is the ideal way to get enough depth of field and still end up with a bright exposure. At night, though, it’s so dark that even a multi-minute shutter speed could result in dark photos if you were to use a “typical” landscape aperture like f/8, f/11, or f/16. Aside from the annoyance of taking such long exposures, you’ll end up with a couple added problems to your images: noise and motion blur. If you’re trying to capture sharp stars, they’ll look very blurry if you use anything longer than a 30 second exposure (and, depending upon your lens, potentially much sooner than that). Also, you’ll notice that ultra-long exposure photographs have more noise than you normally would expect at a given ISO. The best way around these problems is to use a large aperture in combination with a tripod and slow shutter speed.
Thank you very much for the information !
Just as an aside, you can buy cheaper Bahtinov masks from astronomy related stores like optcorp.com or you can make your own, google “bahtinov mask generator”. Personally I never bother with Bahtinov masks for focusing a camera providing that it has a good live view with magnification, which unfortunately not all cameras do. I just bring a bright star like Capella or Vega near the center of the field, switch to maximum magnification and focus carefully. Don’t forget to set your camera/lens to manual focus. Autofocus will not work, but it sure will ruin your careful manual focus if you accidently engage it!
Another approach is to use a portable tracking mount like the Polarie, SkyTracker or Astrotrac which allows you to take much longer exposures without star trailing and then take a foreground shot of whatever duration is required to have a well exposed foreground. You then merge the two in photoshop with appropriate masking. This is certainly more work since you must polar align the tracking mount which takes some practice, but it allows you to use longer focal lengths which would be problematic with your choice of the rule of 600, 500 or my favorite 400. With a 100mm lens you only get about 4 seconds on a static tripod without objectionable star trailing. With a modestly priced and portable tracking mount you can get 10x or more the exposure time.
One more technique worth mentioning. We astrophotographers of deep sky objects virtually always stack our images to collect enough photons and to reduce noise (which basically goes down which the square root of the number of images stacked). IIRC my last deep sky image was a stack of about 40 x 20 minute exposures. Well, this works just as well with a static tripod, you just have to stack more shorter exposures. A few years ago I bought a 400mm f/2.8 and my astronomy gear was 1800 miles away. No problem, I stuck it on a tripod, aimed it at the pleiades and took 32 x 1 second exposures and stacked them and got a fairly decent image that displayed a fair amount of the nebulosity in the areas. There are several free star stacking programs such as deep sky stacker.
“…Another approach is to use a portable tracking mount like the Polarie, SkyTracker or Astrotrac which allows you to take much longer exposures without star trailing and then take a foreground shot of whatever duration is required to have a well exposed foreground. You then merge the two in photoshop with appropriate masking….”
I have used this technique successfully. One of my images taken last summer used a long exposure of the foreground. This was naturally lit with a setting crescent moon which provided enough light to generate both bright and shadowed areas on the structure. I then waited for the moon to set and the Milky Way to rise. The camera was mounted on the iOptron SkyTracker so I was able to do long exposures of the Milky Way without star trails. I then blended the two images together.
See here for a look at several shots from that session. The first image is the one I describe above. The second and third images were single exposures of short duration and high ISO.
www.dblanchard.net/blog/…-monument/
Spencer your Nikon 800E sensor is a Sony Sensor if memory serves me and like the A7r or very much alike and you do great captures, like they say that Nikon 14-24 f/2.8 is the gold standard just WOW.
Just thought I would share my experience with super ultra wides. I have been doing Milky Way captures in dark sky areas even within a brightly lit parking lot to a very dark beach with the Voigtlander 12mm f/5.6 and the new Voigtlander 10mm f/5.6 and manly the Sony SEL1018 f/4 at Full Frame mode of 12mm or before it the Rokinon 14mm f/2.8 with the A7s 12.2MP. My main thing is doing shots in front of driftwood on Driftwood Beach Jekyll Island Ga. from Feb to Oct. At 10 or 12mm even 14mm. I can stand in front of a 15 to 40 ft. tree maybe 10 to 20 feet (even closer) and get the whole tree or trees WITH the Milky Way above it (them). I do not do panoramic (yet) so I like the small size of the Milky Way with a close object as foreground, 10mm is awesome even at f/5.6 (you can do a 50 second shot and get lots of light). The SEL1018 in full frame at 12mm is soft on the sides and some vignetting (when doing dark work) but you get a 42 sec shot, the 14mm a 35 sec. shot. At the 500 rule you get some star trailing in the upper right side above the Galactic Spiral due to star movement faster in that area (thought I had a real bad lens). The Voigtlander 10mm and 12mm are superb glass with barely any star trailing at 500 rule and the SEL1018 at 12mm some star trailing but not like the Rokinon 14mm. I have gone to the 300 rule at 12mm and up even for my SEL1635Z.
As far as focusing as asked by prepalaw all you do is do a magnify mode at 10x for Canon or almost max for Sony pick your brightest star (maybe Mars or Jupiter) and manual focus, anything that the camera captures in front of the lens close to infinity will be sharp as a tack at 10mm to 16mm and tape it in place if you plan to do a walkabout like I do.
When doing night landscapes below 24mm like 10mm to 16mm remember like daytime everything is very far away so have a close subject. I have captured Newly Weds under the driftwood with a crescent moon (looking full) and a Milky Way above it and the pink glow of a sunrise up close to a couple maybe 15ft and very clear near and far, just as a test one early morning waiting for a sunrise at 10mm f/5.6 in Aperture at 10 seconds, Oh and no Flash!!! With clear stars reflecting off the still and foamy surf and no PS layering of anything!
Yes, even when so dark you can barely see your magic box there is so much light that no one can see but it can!!!
Spencer,
your articles are great and so are you photos. Here is the situation from my perspective. It is almost pitch black outside. What do I have to achieve Perfect Focus.
What this article lacks is the “how to do that”. The mechanics. I am not worried about a long lens. A short lens. I am worried that my shots do not have perfect focus.
So Spencer, what do you do mechanically to achieve perfect focus in almost black conditions. That information is what I need and will archive. Every article you write needs the how-to-do info.
The layering of photos taken in sequence is a known concept. I belong to two photo clubs. There are members who have been taking and processing photos for more than 50 years. We are in awe their results. But, no one tells you how they “finished” the photos.
I have the best Nikon equipment. I subscribe to Lightroom 6 cc. I can take pretty good photos. But, I can not finish them like the experienced people can.
I would like to make a suggestion: Use a crummy photo, which is in focus. Tell us your goal – what you want to get out of that photo. Give us 10 screen shots and describe what you did at each interval. That is what I personally need. That will help me.
Thank you.
peter
Hi Peter,
If you have a nearby foreground, I would pay particular attention to focusing at the hyperfocal distance. So, measure (or estimate) how close the nearest item in your photograph is to your camera. Double that distance, and focus there. If you want everything from ten feet to infinity to appear as sharp as possible, focus at 20 feet (doesn’t need to be perfect, but close is ideal). If you end up with blurry stars in that situation, and you’re willing to sacrifice a bit of sharpness in your foreground, you may end up wanting to focus slightly farther than that.
So, how do you actually go about this? I have a full article that lists all the best ways to focus at night: photographylife.com/how-t…hotography
Focusing at night isn’t easy. Having a flashlight helps, though, and there are a few other techniques you can follow in a pinch. Hope this helps!
As for the “crummy photo” thing, are you referring to nighttime photography, or photography in general? I’d be happy to go through the post-processing steps I took for some of my photos if you and other readers think that would be helpful. However, the main trick is to not have a “crummy photo” out of camera in the first place, and to take a “great photo” a few steps farther by subtle edits in post.
Spencer
Peter,
One reliable method for achieving sharp focus of stars in the dark of night is to use a purpose-made filter, such as this: www.lonelyspeck.com/sharpstar/
Cheers,
Ben
If you are looking to save some money you can find cheaper Bahtinov masks on amazon.com or astronomy related websites such as optcorp.com in the $10+ range or you can google “Bahtinov mask generator” and find web sites that will take your lens parameters are generate a template you can print out and then cut into a suitable blank which can be as cheap as cardboard — of course, these will have a very limited life. Since I do a lot of astrophotography with equatorial mounts, telescopes and dedicated cooled ccd cameras, I do this very differently. I have a stepper motor driving my focus ring with a belt and let a program do all the work. It basically takes a series of images and computes the mean star size and searches for a minimum. When everything is well tuned it draws a nice V graph (well, more like a U) as it hunts for perfect focus. There are a number of commercial programs that will run such a feedback look for you. But to tell the truth, when I am out with just a camera and tripod, as happens often, I just point to a very bright star like Vega or Capella and use magnified live view and dial it in by hand. Frankly I find this works quite well. Many people swear by Bahtinov masks and I have no doubt they work well and confess to having used them a few times, but if your camera has a good magnified live view I bet you will do very well with just that. Remember with any of these methods you have to get a good approximate focus first.
I sometimes cannot work out why sometimes I get very good dof and a reasonabley bright foreground and other times I dont. I compare settings and am still at a loss. I have worked out that open foregrounds like lakes and the sea allow more light in. I was at a PhotoPills workshop a few weeks ago. A couple of people said they use the hyperfocal distance with their 14mm lense and this solves the problem of limited dof. The weather has not been good since then so I have not tried this.
The foreground in your photos will change in brightness vastly from photo to photo, entirely because of the conditions in which you are taking pictures. It depends, for one, upon the reflectivity of the foreground. The other major factor is the ambient light (typically moonlight, but, potentially, nearby towns and light painting as well). In the mountain photo in this article, I was able to use ISO 200 and get a bright foreground, since there was a full moon and the landscape was highly reflective. There is no set rule for this; it’s something you’ll need to test out when you arrive on location. However, your camera’s LCD screen at night is very bright, and it can fool you into thinking that a dark exposure is actually good, so be watchful.
The other side of things is the sky’s brightness, which also changes. The sky can get brighter or darker depending upon the amount of clouds and light pollution in the air, as well as moonlight reflecting off water droplets in the atmosphere. In those situations, you won’t see as many total stars. On a clear, moonless, low-humidity night, you’ll end up with much darker skies and much more visible stars.
As for hyperfocal distance, that is certainly the ideal place to focus, but it still isn’t always enough. The reason is that your hyperfocal distance — focusing at twice the distance from your camera to the closest item in your photo — will give you equal sharpness between the closest foreground and the farthest horizon, but it won’t ensure that either is actually totally sharp. If, for example, I want everything from one foot to infinity in focus with my 14mm f/2.8, and I focus at the two-foot mark, I’ll still end up with a relatively blurry background and foreground, even though they’ll both be “as good as possible” for my chosen settings. That’s when focus stacking or a smaller aperture would be necessary.
Thank you for your article and follow up comments. Next time I am out I am going to use the method of live view x10 and then focus on a bright star. I will also give the hyper focal method. I am happy to stay with one shot photography and just put up with any shortfalls.