Our readers often ask us if it is possible to get Lightroom to provide the same colors as one would see from camera-rendered JPEG files when shooting in RAW format. Many photographers often choose specific color profiles in their cameras and they get surprised when images are imported into Lightroom and all those changes are lost. You might have noticed when importing files that Lightroom changes the colors immediately after import, when the embedded JPEG files are re-rendered using Adobe’s standard color profiles and settings. As a result, images might appear dull, lack contrast and have completely different colors. I have heard plenty of complaints on this issue for a while now, so I decided to post series of articles for each major manufacturer on how to obtain more accurate colors in Lightroom that resemble the image preview seen on the camera LCD and in camera-rendered JPEG images. In this article, I will talk about getting accurate colors from Sony DSLRs, SLTs and mirrorless cameras in Lightroom. Please see our other articles on getting accurate colors for Nikon, Canon and Fuji cameras.
Due to the fact that Adobe’s RAW converters are unable to read proprietary RAW header data, some settings have to be either applied manually or applied upon import. My personal preference is to apply a preset while importing images, which saves me time later. Before we get into Lightroom, let me first go over camera settings and explain a few important things.
Table of Contents
1) RAW File Nuances and Metadata
When shooting in RAW format, most camera settings like White Balance, Sharpness, Saturation, Lens Corrections and Color Profiles do not matter. Unless you use Sony-provided software like Image Data Converter, those custom settings are mostly discarded by third party applications, including Lightroom and Photoshop. Unfortunately, camera manufacturers rarely ever publish full specifications for their RAW files and do not work closely with third party application development companies like Adobe in order to take a full advantage of their cameras. Because of this, color profiles, along with all other camera settings are lost upon import of images. Although Adobe has been working hard on providing manufacturer and camera-specific color profiles, only the most popular cameras are typically covered. In addition, those color profiles are generated in Adobe’s own lab environment, which can result in slightly different color rendering when compared to the manufacturer’s.
Let’s go over data that is actually read by Lightroom / Photoshop Camera RAW:
- White Balance, as set by the camera. Instead of your chosen value such as Auto, Incandescent, Fluorescent, etc, only the actual color temperature and tint are read from the RAW file.
- Common image metadata such as Capture Date/Time, Exposure, Focal Length, Flash, Camera Make and Model, Lens information and GPS coordinates.
- Copyright information such as Author’s Name, etc. (if it exists)
That’s basically it. Now here is the information that is completely discarded:
- Creative Style
- Color Space (only relevant for JPEG images and JPEG images embedded into RAW files)
- Dynamic Range Optimizer (DRO)
- High ISO NR
- Face Detection
- Focus Area and focus point location in the frame
- AF Micro Adjustment and Lens Compensation (Shading, Chromatic Aberrations, Distortion)
- All other settings in the camera menus
All of the above settings do not affect RAW files in any way. Whatever you choose in your camera simply gets written as header information to Sony’s ARW files. Please note that “Long exposure NR” (Noise Reduction) is the only setting that affects RAW files. However, Adobe will still not know if Long exposure noise reduction was turned on or off in your camera.
2) Camera Settings
Because the above settings do not affect your RAW files, they are essentially of no use, so I would recommend to keep them turned off by default. You might be wondering why JPEG images or the image on the back of the LCD change when you pick different Creative Styles or other settings while shooting in RAW. That’s because RAW files actually contain full size JPEG previews, which is what your camera shows on the back of the LCD. Hence, any change you make in your camera will simply be reflected in the embedded JPEG file only. When RAW files are imported into Lightroom / Camera RAW, the embedded JPEG file is discarded and a new one is generated, based on Adobe’s default settings, or a chosen import preset. That’s why when I talk about getting more accurate Sony colors in Lightroom, we are simply trying to match Sony’s default rendering of colors in JPEG images to those rendered by Lightroom or Camera RAW. Remember, a RAW file is just like unprocessed film – you can interpret and process colors any way you like.
However, changing camera settings can indirectly affect your RAW files. For example, if you have Dynamic Range Optimizer (DRO) turned on (which simply applies a tone curve to the embedded JPEG image), you might think that you have enough shadow details in your image and you might end up underexposing the image. High ISO Speed NR might make it seem like you do not have much noise in your images, so you might not notice that your ISO value is unnecessarily high. That’s why it is best to turn all custom settings off completely.
Sony has a set of color profiles known as “Creative Style” available in its cameras. By default, a camera profile called “Standard” gets applied to images. That’s the profile I typically use when shooting with Sony cameras. Whichever Creative Style you pick, I would suggest to stick to it if you want to see consistent colors in Lightroom (or it will be too much of a headache). And do not worry about modifying custom adjustments within picture controls, since those might indirectly affect your RAW images as well (for example, setting high values for Contrast, Saturation and Sharpness).
3) Lightroom and Camera RAW: Camera Calibration
Since photographers want to see colors as rendered by their cameras, Adobe ended up creating different camera profiles based on the colors they saw from the rendered JPEG images. The process of creating such camera profiles is fairly complex and it involves shooting different color charts in JPEG format, then trying to match those colors while rendering RAW files. Adobe did an OK job with Sony’s color profiles (although as demonstrated below, some colors do appear different) and re-created many of the most commonly used ones. For example, here is the full list of created profiles for the Sony A6000:
- Camera Clear
- Camera Deep
- Camera Landscape
- Camera Light
- Camera Neutral
- Camera Portrait
- Camera Standard
- Camera Vivid
The ones that are missing for the A6000 are: Sunset, Night Scene, Autumn Leaves, Black & White and Sepia. Since these profiles are rarely used and vary from camera to camera, I don’t blame Adobe for excluding them.
You can find the above-mentioned profiles under the “Camera Calibration” sub-module in Lightroom, or the “Camera Calibration” tab in Camera RAW, as seen below:
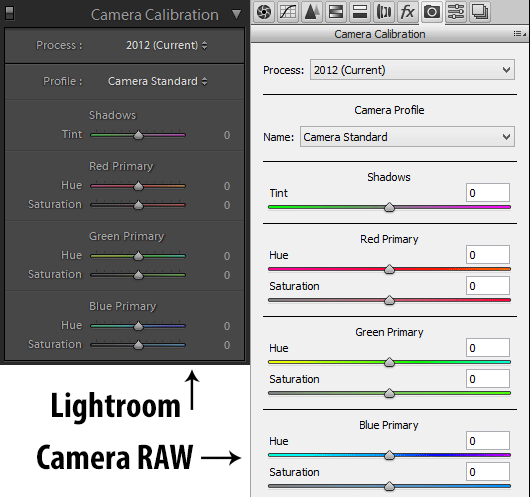
Basically, these try match the Creative Styles in your camera one to one. If you set your camera Creative Style to “Standard”, picking “Camera Standard” from the Camera Calibration sub-module of Lightroom / Camera RAW will imitate those colors (assuming that additional tweaking of Contrast and Saturation was not performed in the camera).
That’s why it is a good idea to stick to one Creative Style in your camera, because you can set that same Camera Calibration profile to all images every time you import them.
Adobe also provides the ability to tweak individual colors for hue and saturation after applying a profile, but if you choose to do that, it might deviate from Sony’s original colors.
4) Applying a Camera Profile During Import
If you want to always have Sony’s native colors in your images and not the default “Adobe Standard” camera profile (which is often pretty dull), you might want to set up an import preset that gets applied to your images when they are imported into Lightroom. This is a very simple and straightforward process, so let me show you the best way to do it.
- First, open any Sony RAW / ARW file in Lightroom’s Develop Module.
- Keep White Balance under the “Basic” sub-module “As Shot”, if you want Lightroom to read what your camera set WB and Tint to.
- Scroll down to the Camera Calibration sub-module.
- Pick the same color profile as what you have set in your camera (for example, Camera Standard).
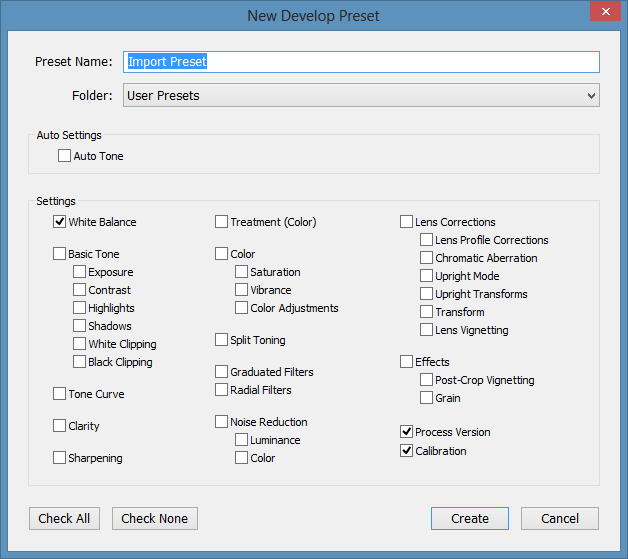
- On the left panel, scroll down to the “Presets” sub-module and press the “+” sign next to it, which is used for creating a new preset.
- A new window will pop-up. Give the preset a name, for example “Sony Import Preset”. The default folder “User Presets” is fine, but you can create a different folder if you want to.
- Only select “White Balance”, “Process Version” and “Calibration”, then click “Create”, as shown below:
Once you do this, a new preset will appear in the Preset menu, under the specified folder. Now all you need to do is specify this preset when importing images. Bring up the Import Window, then look at the right side of the window and expand “Apply During Import”. Click the “Develop Settings” drop-down and pick the newly created import preset, as shown below:
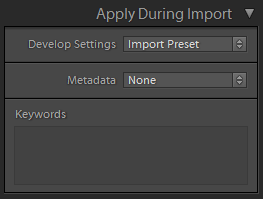
Once you import the photos, every one of them will be automatically changed to the previously selected camera profile, which will match whatever you picked in your camera.
5) Adobe Camera Profiles vs Sony Creative Style
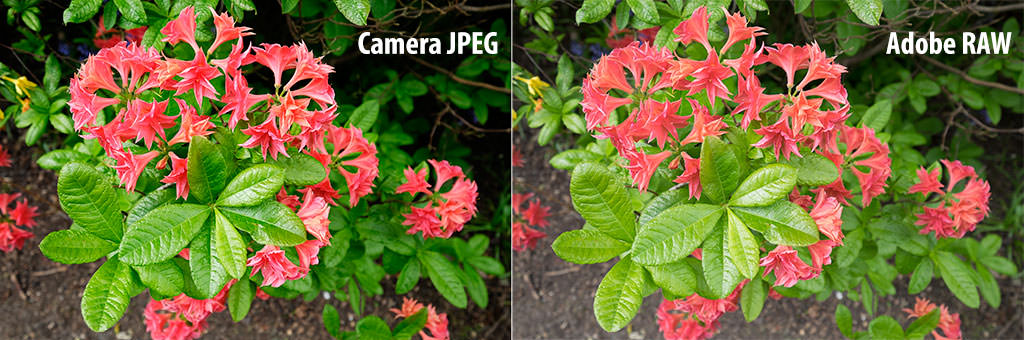
Now let’s take a look at a photo and see how closely Adobe’s Camera Profiles match Sony’s Creative Styles. I did a quick experiment, setting the Sony A6000 to “Vivid” Creative Style, then taking a picture of flowers. I set the camera’s file format to RAW + JPEG, so that I could use the JPEG file as a reference. Here is the JPEG file that the camera captured:
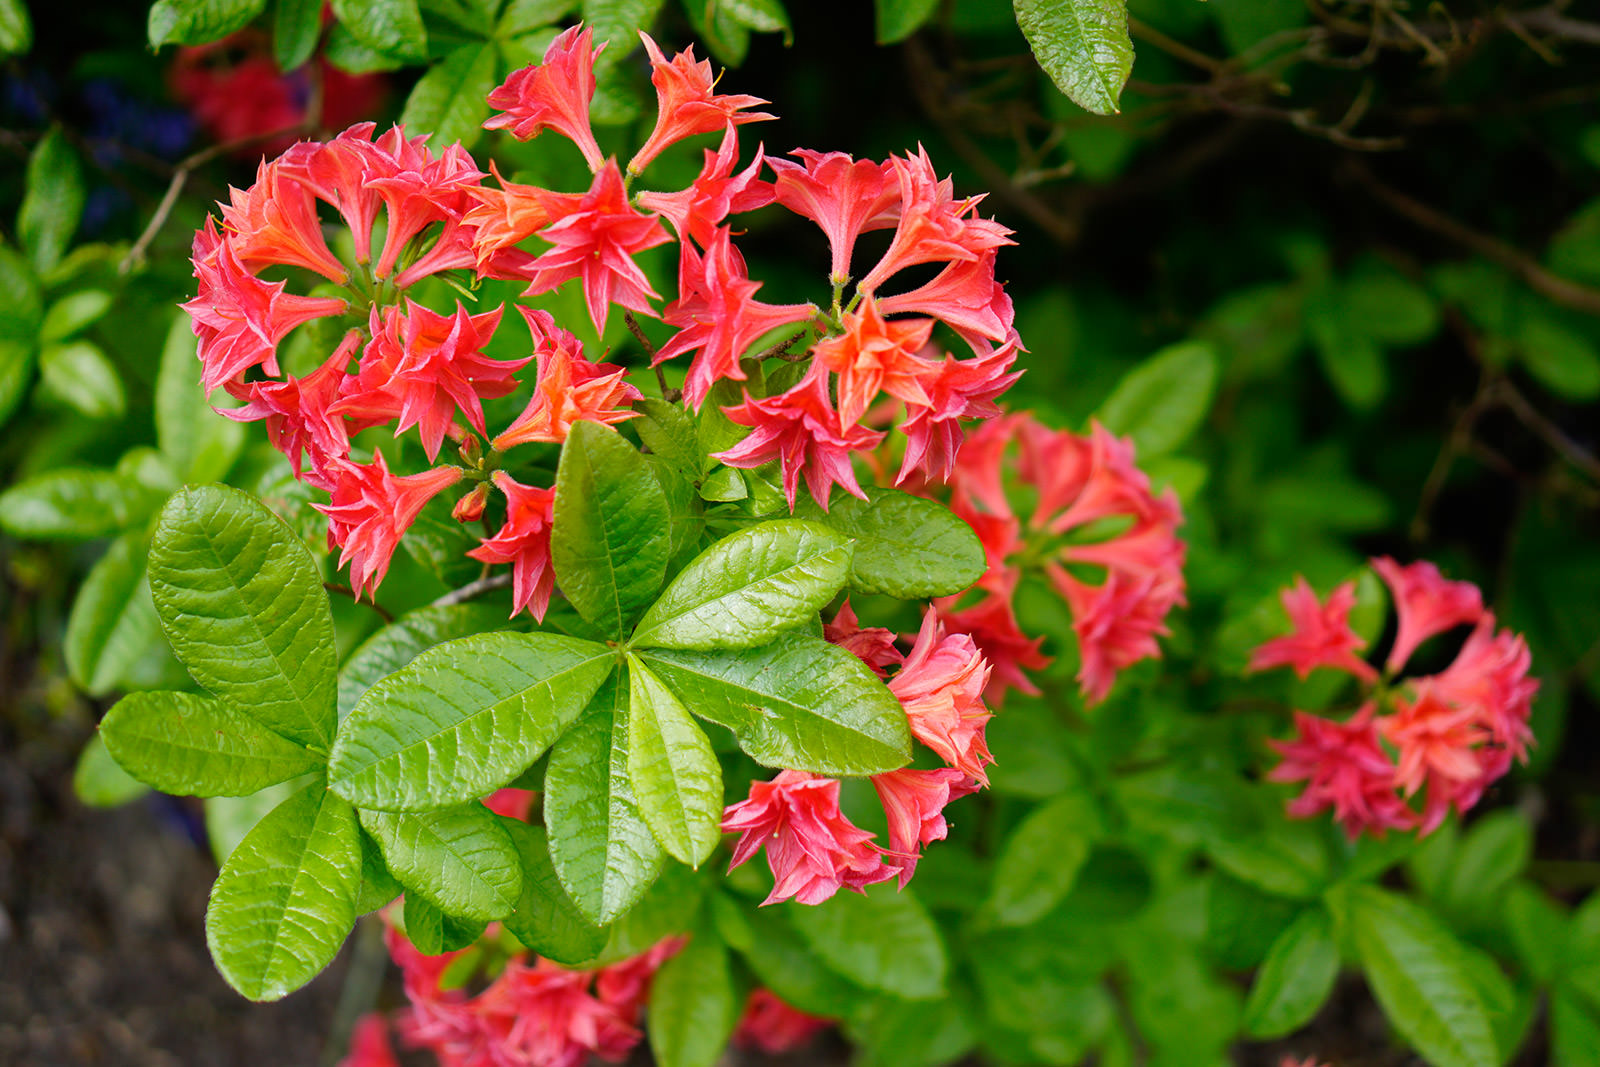
And here is what the image looked like after I applied the “Camera Vivid” profile in Lightroom:

As you can see, the images are quite different. While there are some noticeable differences in rendered colors, it is pretty clear that Adobe does not apply enough contrast to its Vivid camera profile. As a result, the two images appear rather different.
When I manually applied “Medium” contrast on the curve in Lightroom, the image started to look quite similar in the shadow area:

I cannot say that I was able to reproduce the colors exactly, but it is fairly close and is a good start.
Hence, if I were to use the “Vivid” creative style in the Sony A6000, I would include Medium Contrast along with the Camera Vivid camera profile in my import profile to be able to match the two. I guess the title of the article does not reflect the reality, as the colors and tones are still noticeably off. However, it is not as far off as the Adobe Standard profile either…
Do you know this or is this a copycat who translated your article to German? spc-international.com/store…troom.html
Here’s a good tutorial on how to get “Canon colors” from a Sony:
www.youtube.com/watch…#038;t=33s
When I first got my sony A7iii I was really bummed out by Adobe’s version of sony picture profiles. I mostly shoot landscapes, and choosing the camera landscape profile pumps a ton of purple into the shadows which I don’t like at all. It also really bumps the contrast, darkening the shadows a lot, making you lose dynamic range when moving on to basic editing. I really struggled with my edits at this point and ended up spending more time than I would have liked removing the purple, playing with curves along side basic edits to remove some of the contrast, tweak shadows, highlights and midtones, and never really achieving what I wanted.
It was shooting video in slog2 that made me realize that the last thing I wanted to do was start an edit with a high contrast, deeply saturated, purply photo. I then started my edits using the flattest profile available in adobe – adobe standard or camera standard.
If you think about it, the picture profiles in your camera are intended for shooting in jpg. The entire purpose of shooting in raw is to have the most dynamic range of information possible in order to get a better edit. Like log for video, a raw file isn’t supposed to look good out of the box. You have to look at it as a tool. It’s the most advantageous position to be starting an edit from. If you slap a picture profile onto it, you’re essentially automating the edit process. If this is what you’re doing you might as well be shooting in jpg to begin with.
Now I edit my photos starting from the flattest profile that fits the image. The edit process is simpler and much more predictable.
Hi,
I’m a beginner and would love to hear advice from you guys. In good lighting conditions where DR advantage of RAW files is not a big deal, should I shoot Extra Fine JPEGs (and then retouch them in Lightroom a little bit) to preserve the more pleasing colors?
PS. I came here from a link in your review of the Sony RX100 iv (which, in many ways, is a compact version of my RX10ii – they share the same sensor) … and I’ve gotta say; there are some impressive/amazing images included in that review (!!)
… including ones where I reckon you’ve leveraged the high Dynamic Range and ISO-Invariance of this sensor (eg. I’m guessing the one of the sunrise in the desert in section 6 was shot “under-exposed” and then brightened in post processing) … In which case, my DRO suggestion above may be useful (?)
Regards, John M
Hi Nasim – Thanks for the informative article.
Under the heading of 2) Camera Settings, you note that; “changing camera settings can indirectly affect your RAW files. For example, if you have Dynamic Range Optimizer (DRO) turned on (which simply applies a tone curve to the embedded JPEG image), you might think that you have enough shadow details in your image and you might end up underexposing the image.”
I understand your caution, but I actually use DRO (permanently assigned to Auto) even tho I always shoot RAW – knowing (as you confirm in this article) that it will not affect the RAW file. This is most useful when shooting a high-contrast scene, where I expose for the highlights (so that they won’t be blown-out), which often results in a dark image … that I can easily “brighten” in post-processing (in my case, with DxO Optics Pro) without noise-penalty … ‘cos my Sony RX10ii is ISO-Invariant (as are many/most Sony sensors). In this case (where the pre-brightened RAW is dark), the camera will kick-in with some tone-curve adjustment to the JPEG (but NOT the RAW) … so I can see the image in review on the camera, and I get some idea of how it will look when brightened in post-processing.
Just mentioning this here in case it’s useful to other Sony users …
Note: I bump-up the Sharpness (+3) in the Standard Creative Style for similar reasons – again, as you point out, knowing it will not impact the RAW (just the JPEG one sees on the back of the camera).
Regards, John M
Nice
Nice article! My question is: is it possible to apply other camera’s profiles (eg fuji) on Sony camera RAWs?
Thanks
Hi George.
The OpticsPro tools from DxOMark (see details here: www.dxo.com/us/ph…phy/styles ) will allow you to apply many different simulations of other manufacturers profiles (such as Fuji Velvia, Provia, etc)
I have no links with DxO – other that I’m a very happy user and “fanboy”.
Regards, John M
I had DxO Optics pro for 2 years and did not know that these even existed(free).
Thanks
I do not know if you still reply to this but I Forward this to all new to Sony users I meet. I use the A7s capturing the Milky Way in jpeg and raw (just to see the difference) for a year now. When you state in the beginning about WB selected settings not being carried to the RAW file and Adobe Lr’s ejection of embedded jpeg file, I have read this over and over and applied the many WB options. But I must ask you state ” White Balance, as set by the camera..” ! Is this just AWB?
My question is I guess how is the camera’s choice processed over a choice I select? I found the Adobe standard selection and Adobe camera selections to be the first place to do selections as a first step after Lens correction.
What about the camera lens presets in lightroom? When I shot with the kit 28-70mm Sony FE Lens, I could see that lens profile in lightroom when I was working with an image in develop. The same goes for the images shot when I changed my lens to the zeiss 50mm f/2. It shows the profile and allows for chromatic aberration correction along with a few other options to improve the development of the shot as it was taken.
Should I still be considering additional presets when I import or should I stick with my lens profile and then adjust my images based on my processing style?
Thanks
Craig Turpin
Capture one does that automatically when files imported, still you can manually override it, there several calibrated lens profiles, and as yours being a Carl Zeiss, I imagine that I’ve will certainly exist!