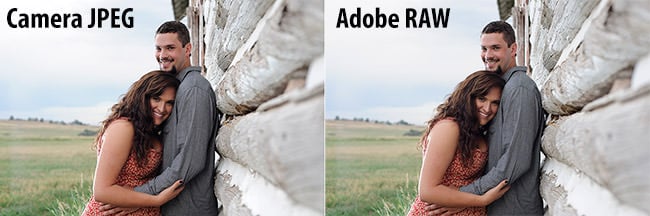
Our readers often ask us if it is possible to get Lightroom to provide the same colors as one would see from camera-rendered JPEG files when shooting in RAW format. Unfortunately, as you might have noticed when importing files, Lightroom changes the colors immediately after import, when the embedded JPEG files are re-rendered using Adobe’s standard color profiles. As a result, images might appear dull, lack contrast and have completely different colors. I have heard plenty of complaints on this issue for a while now, so I decided to post series of articles for each major manufacturer on how to obtain more accurate colors in Lightroom that resemble the image preview seen on the camera LCD when an image is captured. In this article, I will talk about getting accurate colors from a Canon DSLR in Lightroom.
Due to the fact that Adobe’s RAW converter is unable to read proprietary RAW header data, which often contains chosen camera profiles, some settings have to be either applied manually or applied upon import. My personal preference is to apply a preset while importing images, which saves me time later. Before we get into Lightroom, let me first go over camera settings and explain a few important things.
Table of Contents
1) RAW File Nuances and Metadata
When shooting in RAW format, most camera settings like White Balance, Sharpness, Saturation, Lens Corrections and Color Profiles do not matter. Unless you use Canon-provided software like Digital Photo Professional, all of those custom settings are mostly discarded by third party applications, including Lightroom and Photoshop. That’s because it is hard to process each piece of proprietary data, which is subject to change from one camera model to another. Now imagine trying to do this for a number of different camera manufacturers!
Let’s go over data that is actually read by Lightroom / Photoshop Camera RAW:
- White Balance, as set by the camera. Instead of your chosen value such as Auto, Incandescent, Fluorescent, etc, only the actual color temperature and tint are read from the RAW file.
- Common image metadata such as Capture Date/Time, Exposure, Focal Length, Flash, Camera Make and Model, Lens information and GPS coordinates.
- Copyright information (“Author’s Name” in Setup Tab 4)
That’s basically it. Now here is the information that is completely discarded:
- Picture Style
- Lens Aberration Correction (Peripheral illum. and Chromatic aberration)
- Color Space (only relevant for JPEG images and JPEG images embedded into RAW files)
- Auto Lighting Optimizer
- High ISO Speed NR
- Highlight Tone Priority
- Focus Point Location in the frame
- All other settings in Shooting, Setup, Custom Functions and other menus
All of the above settings do not affect RAW files in any way. Whatever you choose in your camera simply gets written as header information to Canon’s CR2 files. Please note that “Long exposure noise reduction” is the only setting that affects RAW files. However, Adobe will still not know if Long exposure noise reduction was turned on or off in your camera.
2) Camera Settings
Because the above settings do not affect your RAW files, they are essentially of no use, so I would recommend to keep them turned off by default. You might be wondering why the image on the back of the LCD changes when you pick different Picture Styles or other settings while shooting in RAW. That’s because RAW files actually contain full size JPEG previews, which is what your camera shows on the back of the LCD. Hence, any change you make in your camera will simply be reflected in the embedded JPEG file only. When RAW files are imported into Lightroom / Camera RAW, the embedded JPEG file is discarded and a new one is generated, based on Adobe’s default settings, or a chosen import preset. That’s why when I talk about getting more accurate Canon colors in Lightroom, we are simply trying to match Canon’s default rendering of colors in JPEG images to those rendered by Lightroom or Camera RAW. Remember, a RAW file is just like unprocessed film – you can interpret and process colors any way you like.
However, changing camera settings can indirectly affect your RAW files. For example, if you have Auto Lighting Optimizer turned on (which simply applies a tone curve to the embedded JPEG image), you might think that you have enough shadow details in your image and you might end up underexposing the image. High ISO Speed NR might make it seem like you do not have much noise in your images, so you might not notice that your ISO value is unnecessarily high. That’s why it is best to turn all custom settings off completely.
Canon has a set of Picture Styles available in its cameras. By default, a camera profile called “Standard” gets applied to images. That’s the Picture Control I typically use on all of my cameras. Whichever Picture Style you pick, I would suggest to stick to it if you want to see consistent colors in your images. And do not worry about modifying custom adjustments within picture controls, since those might also indirectly affect your RAW images as well (for example, setting high values for Contrast, Saturation and Color Tone).
3) Lightroom and Camera RAW: Camera Calibration
Since photographers want to see colors as rendered by their cameras, Adobe ended up creating different camera profiles based on the colors they saw from the rendered JPEG images. The process of creating such camera profiles is fairly complex and it involves shooting different color charts in JPEG format, then trying to match those colors while rendering RAW files. Adobe did a nice job with Canon’s color profiles and re-created all of them (excluding the “Monochrome” profile, since it is not in color and “Auto”). Here is the full list of created profiles:
- Camera Faithful
- Camera Landscape
- Camera Neutral
- Camera Portrait
- Camera Standard
You can find these profiles under the “Camera Calibration” sub-module in Lightroom, or the “Camera Calibration” tab in Camera RAW, as seen below:
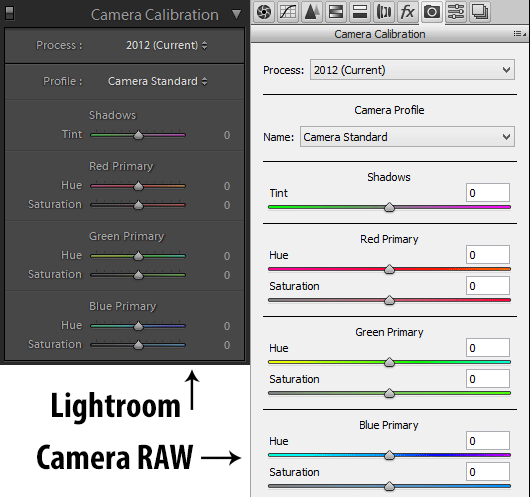
Basically, these match the Picture Styles in your camera one to one. If you set your camera Picture Style to “Standard”, picking “Camera Standard” from the Camera Calibration sub-module of Lightroom / Camera RAW will imitate those exact colors (assuming that additional tweaking of Contrast / Saturation / Color Tone was not performed in the camera).
That’s why it is a good idea to stick to one Picture Style in your camera, because you can set that same Camera Calibration profile to all images every time you import them.
Adobe also provides the ability to tweak individual colors for hue and saturation after applying a profile, but if you choose to do that, it will certainly deviate from Canon’s original colors.
4) Applying a Camera Profile During Import
If you want to always have Canon’s native colors in your images and not the default “Adobe Standard” camera profile, you might want to set up an import preset that gets applied to your images when they are imported into Lightroom. This is a very simple and straightforward process, so let me show you the best way to do it.
- First, open any Canon RAW / CR2 file in Lightroom’s Develop Module.
- Keep White Balance under the “Basic” sub-module “As Shot”, if you want Lightroom to read what your camera set WB and Tint to.
- Scroll down to the Camera Calibration sub-module.
- Pick the same color profile as what you have set in your camera (for example, Camera Standard).
- On the left panel, scroll down to the “Presets” sub-module and press the “+” sign next to it, which is used for creating a new preset.
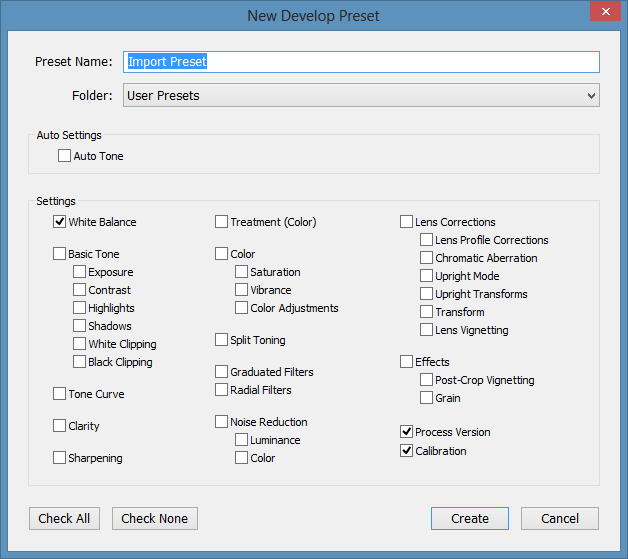
- A new window will pop-up. Give the preset a name, for example “Import Preset”. The default folder “User Presets” is fine, but you can create a different folder if you want to.
- Only select “White Balance”, “Process Version” and “Calibration”, then click “Create”, as shown below:
Once you do this, a new preset will appear in the Preset menu, under the specified folder. Now all you need to do is specify this preset when importing images. Bring up the Import Window, then look at the right side of the window and expand “Apply During Import”. Click the “Develop Settings” drop-down and pick the newly created import preset, as shown below:
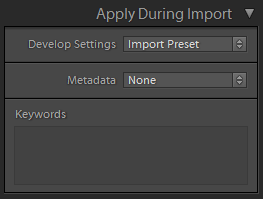
Once you import the photos, every one of them will be automatically changed to the previously selected camera profile, which will match whatever you picked in your camera.
I do not see those setting in my latest version of LightRoom Classic. Am I missing something? All I see are the adobe profiles.
same – only “versions 1-5”
i am also shooting with a custom user profile on my camera, so I’m not sure that would work anyway. sigh.
Thank you so much! I always tried to reconstruct the colors by all the possible settings and often failed with it. The way you described works so much better and easier!
Great article but you may have msissed something when you say this gives 100% accurate representation of the camera’s tone curve. I compared the colors of the Embedded preview of images shot in my canon’s standard style, with the colors in the Camera Standard LR preset. They are almost identical, but the Lr preset applies slighlty darker hue of Red than what you initially get in the Embedded preview. So not 100%. I’d say about 96% but good enough. :)
Excellent information about what happens to images upon import into Lightroom.
Question: I understand about picking one Canon “style” (I am going to use Standard), but I’m not clear what White Balance to use. Should it generally be automatic except for artificial light sources or do I choose what seems to be appropriate for the shot?
Nasim,
After buying an EOS 5d mk IV and switching from Aperture to Lightroom my raw’s appeared rather dull, they missed the color’s which where shown to me by the camera’s display. After I read this article I changed the Camera Calibration in Lightroom from “Adobe standard” to “Camera neutral” (which is my standard profile) and applied this setting on a random raw-file, WOW !
Thanks,
Jan
Totally clear. Excellent article! :)
It’s never too late to learn something – thanks!
Just found this article by accident. Excited to try it out. Am very new to Lightroom anyway so I can use all the help I can get. How can I get sharpness the I see in my JPEGS? I find that I go too far and make my subjects look cartoonish.
Man, if only I had found this article years ago. My solution became to always shoot in JPEG & RAW. If the photos needed little work, I’d just send those to the clients. If it was an important shoot, I’d painstakingly go through every RAW image and go through the three or four steps of additional edits to get them back to the much more attractive color profile and contrast that the JPEGS rendreed. Now, for my big question…..I started shooting in Kelvin recently which I find to be a great tool. Will Lightroom be able to read these color presets in RAW or is it as useless as the other WB presets?
Thanks!
Hi Nasim,
Thanks for the great article. I use a Canon 60D. I often photograph indoors with flash (hot shoe mounted) either in TTL mode or complete manual. Most of the rooms have mixed lighting of some kind (Fluorescent tubes, CFL bulbs, LED bulbs, Incandescent bulbs, etc.). Although other colors in the photograph come out to be perfect, the skin tones almost always have an a strong orange color cast to them. They look unnatural and unflattering, especially people’s faces. I shoot RAW and use lightroom to edit my pictures. I use HSL panel to color correct the photos along with the WB and Tint. In spite of all this, I sometimes end up with ugly yellowish-orange color cast on the skin. I haven’t found an easy and efficient way to get the skin tones right. Is this the problem with Canon DSLRs or is it common across the board? Or am I missing something in post processing? I hope you can suggest me a solution to this problem.
Thanks and Regards,
Anand Joshi