Blurring the background is one of the many ways to isolate or emphasize your subject. Do you need a special lens to do so? Absolutely not! In this article, we look at some of the ways you can get those creamy, beautiful backgrounds using almost any camera and lens.
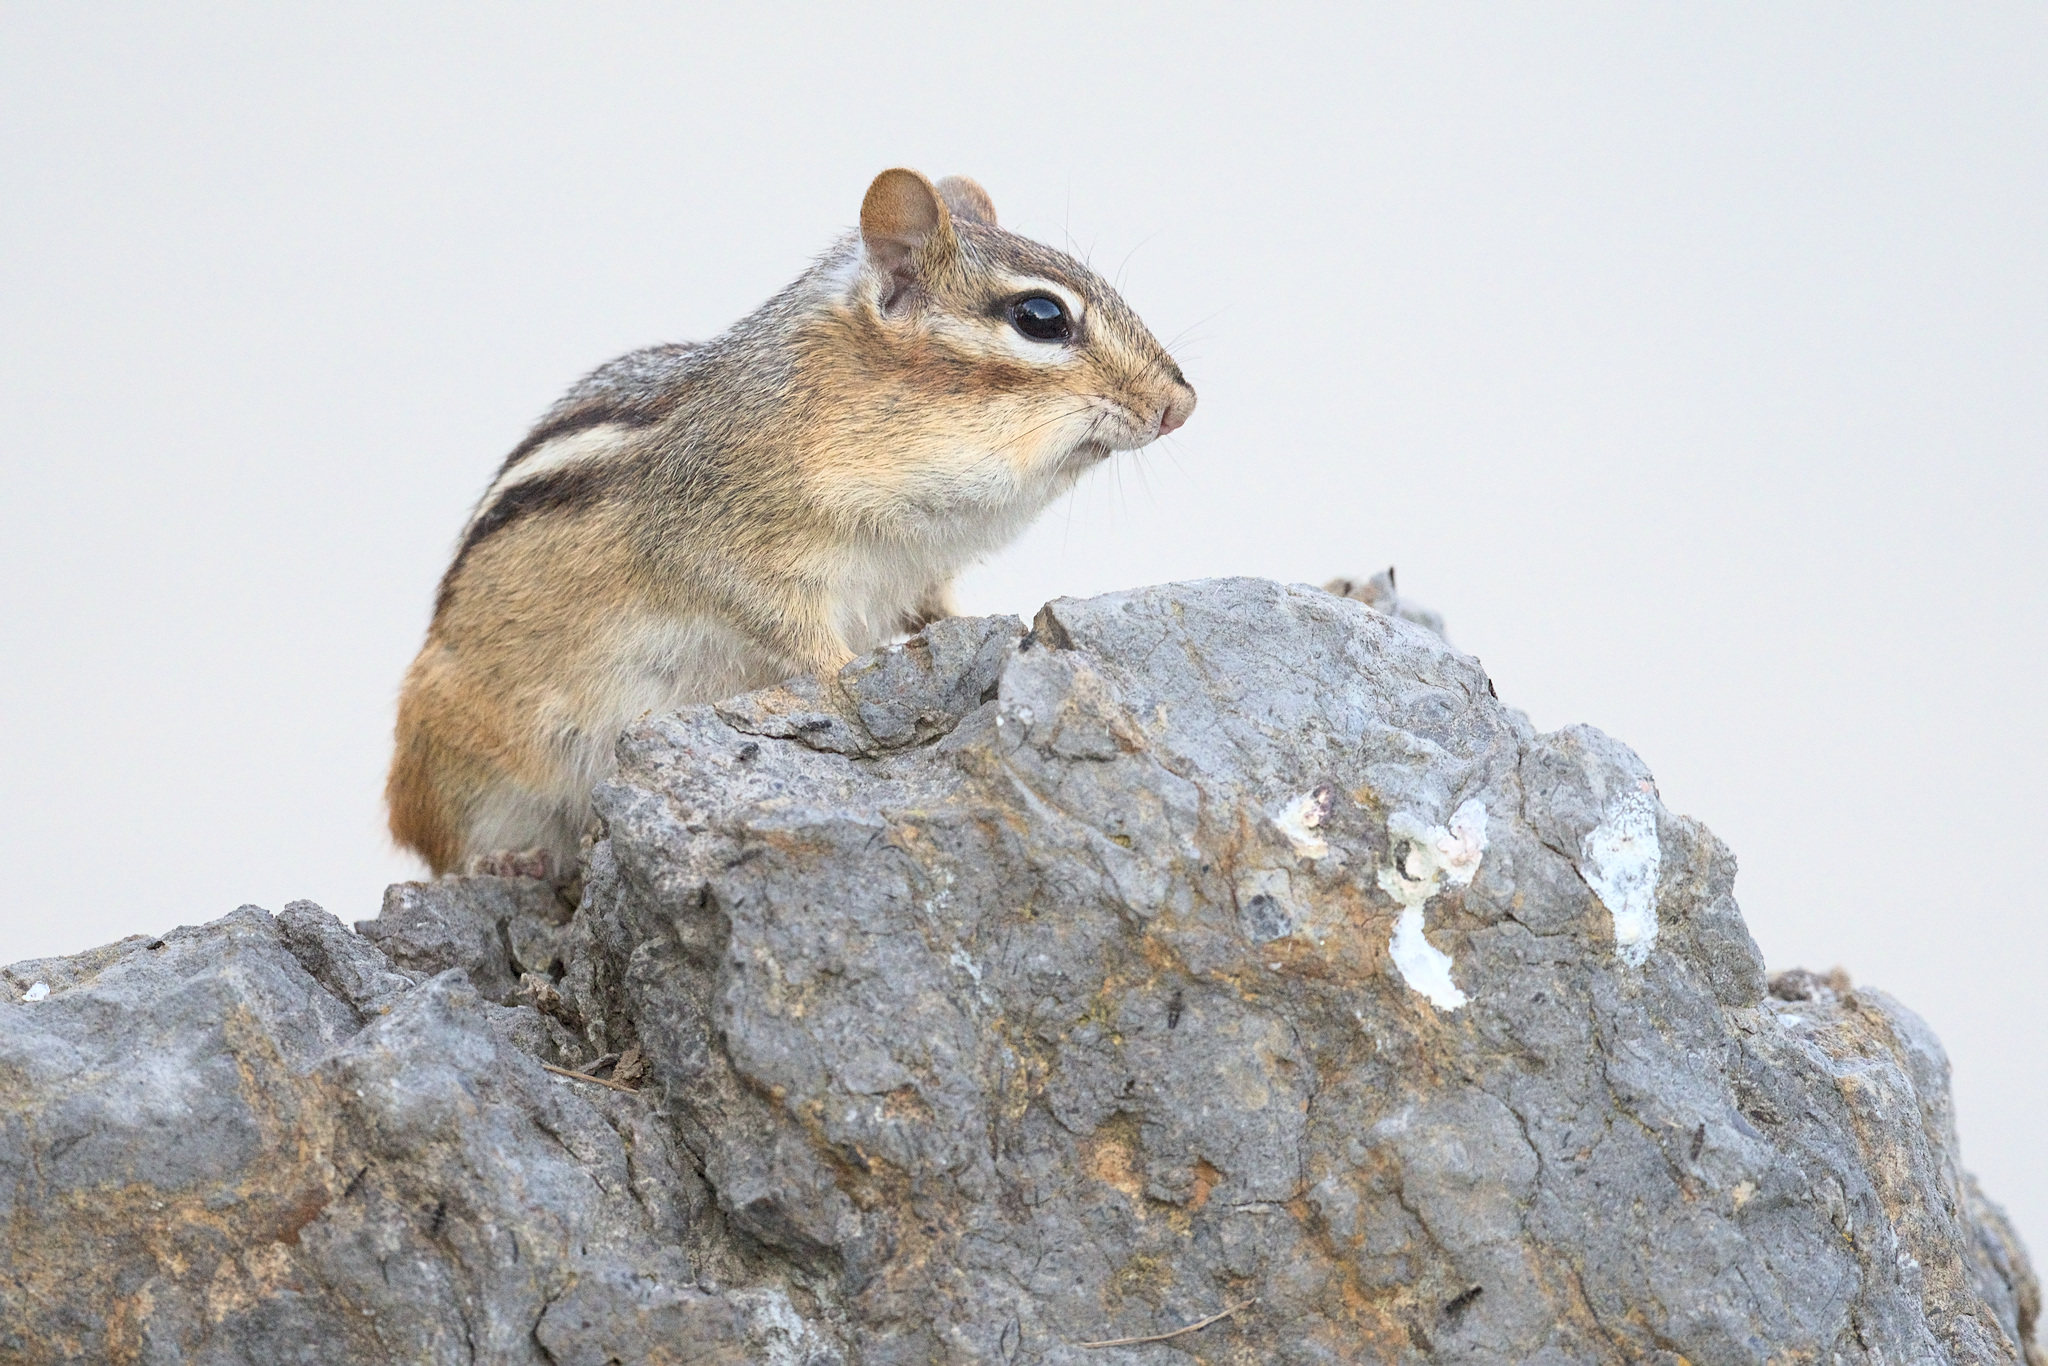
Table of Contents
Use a Wider Aperture
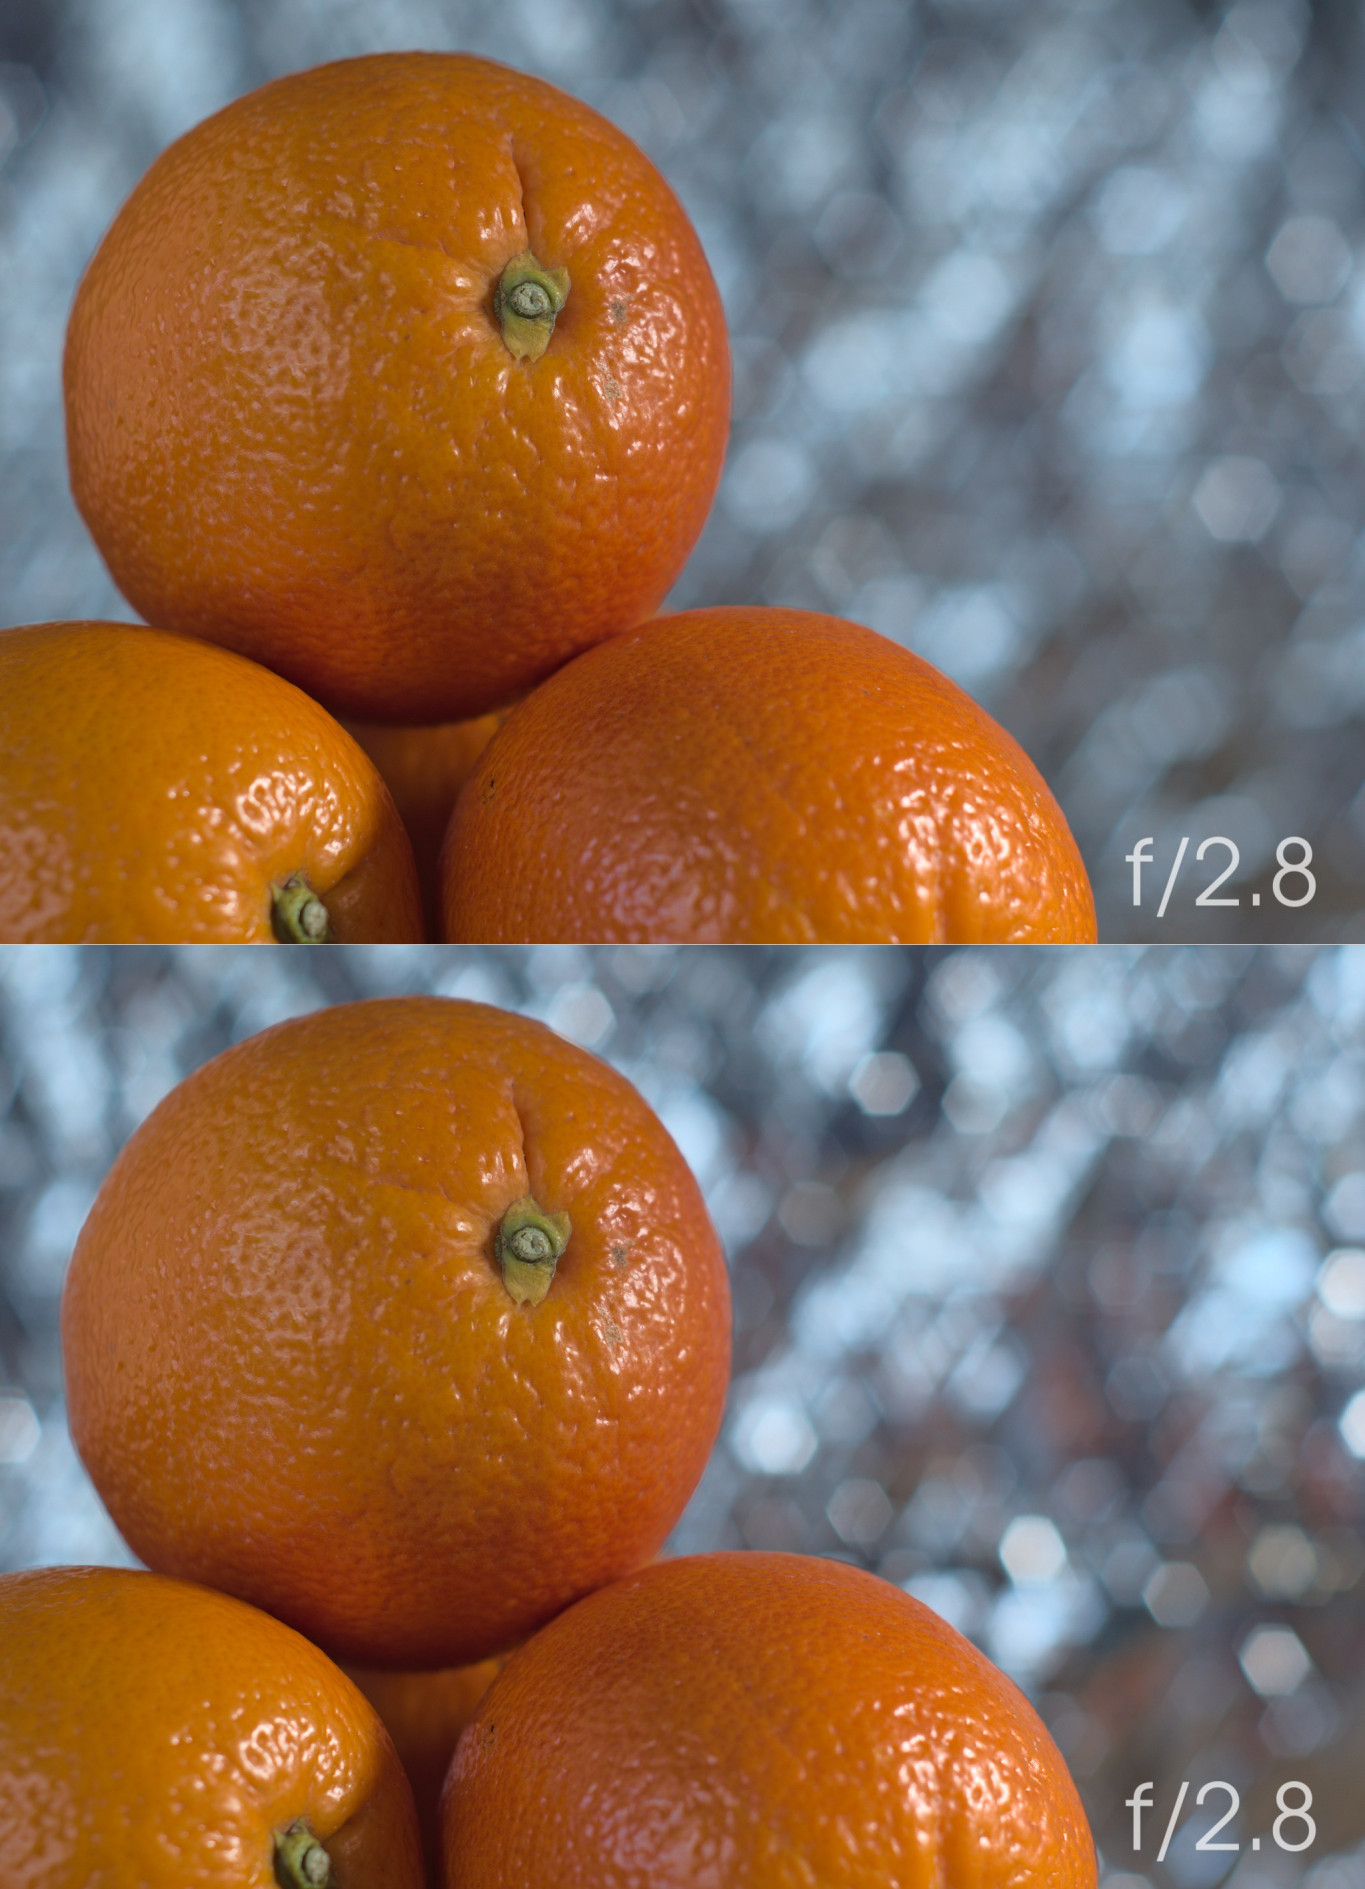
A lens’s aperture is the adjustable opening that controls how much light enters the lens. It is specified by the f-number, like f/2.8, which is the ratio of the lens’s focal length to the visible size of the adjustable opening. All else being equal, a wider aperture gives a more blurred background. Let us look at four photos at different apertures to see this effect:
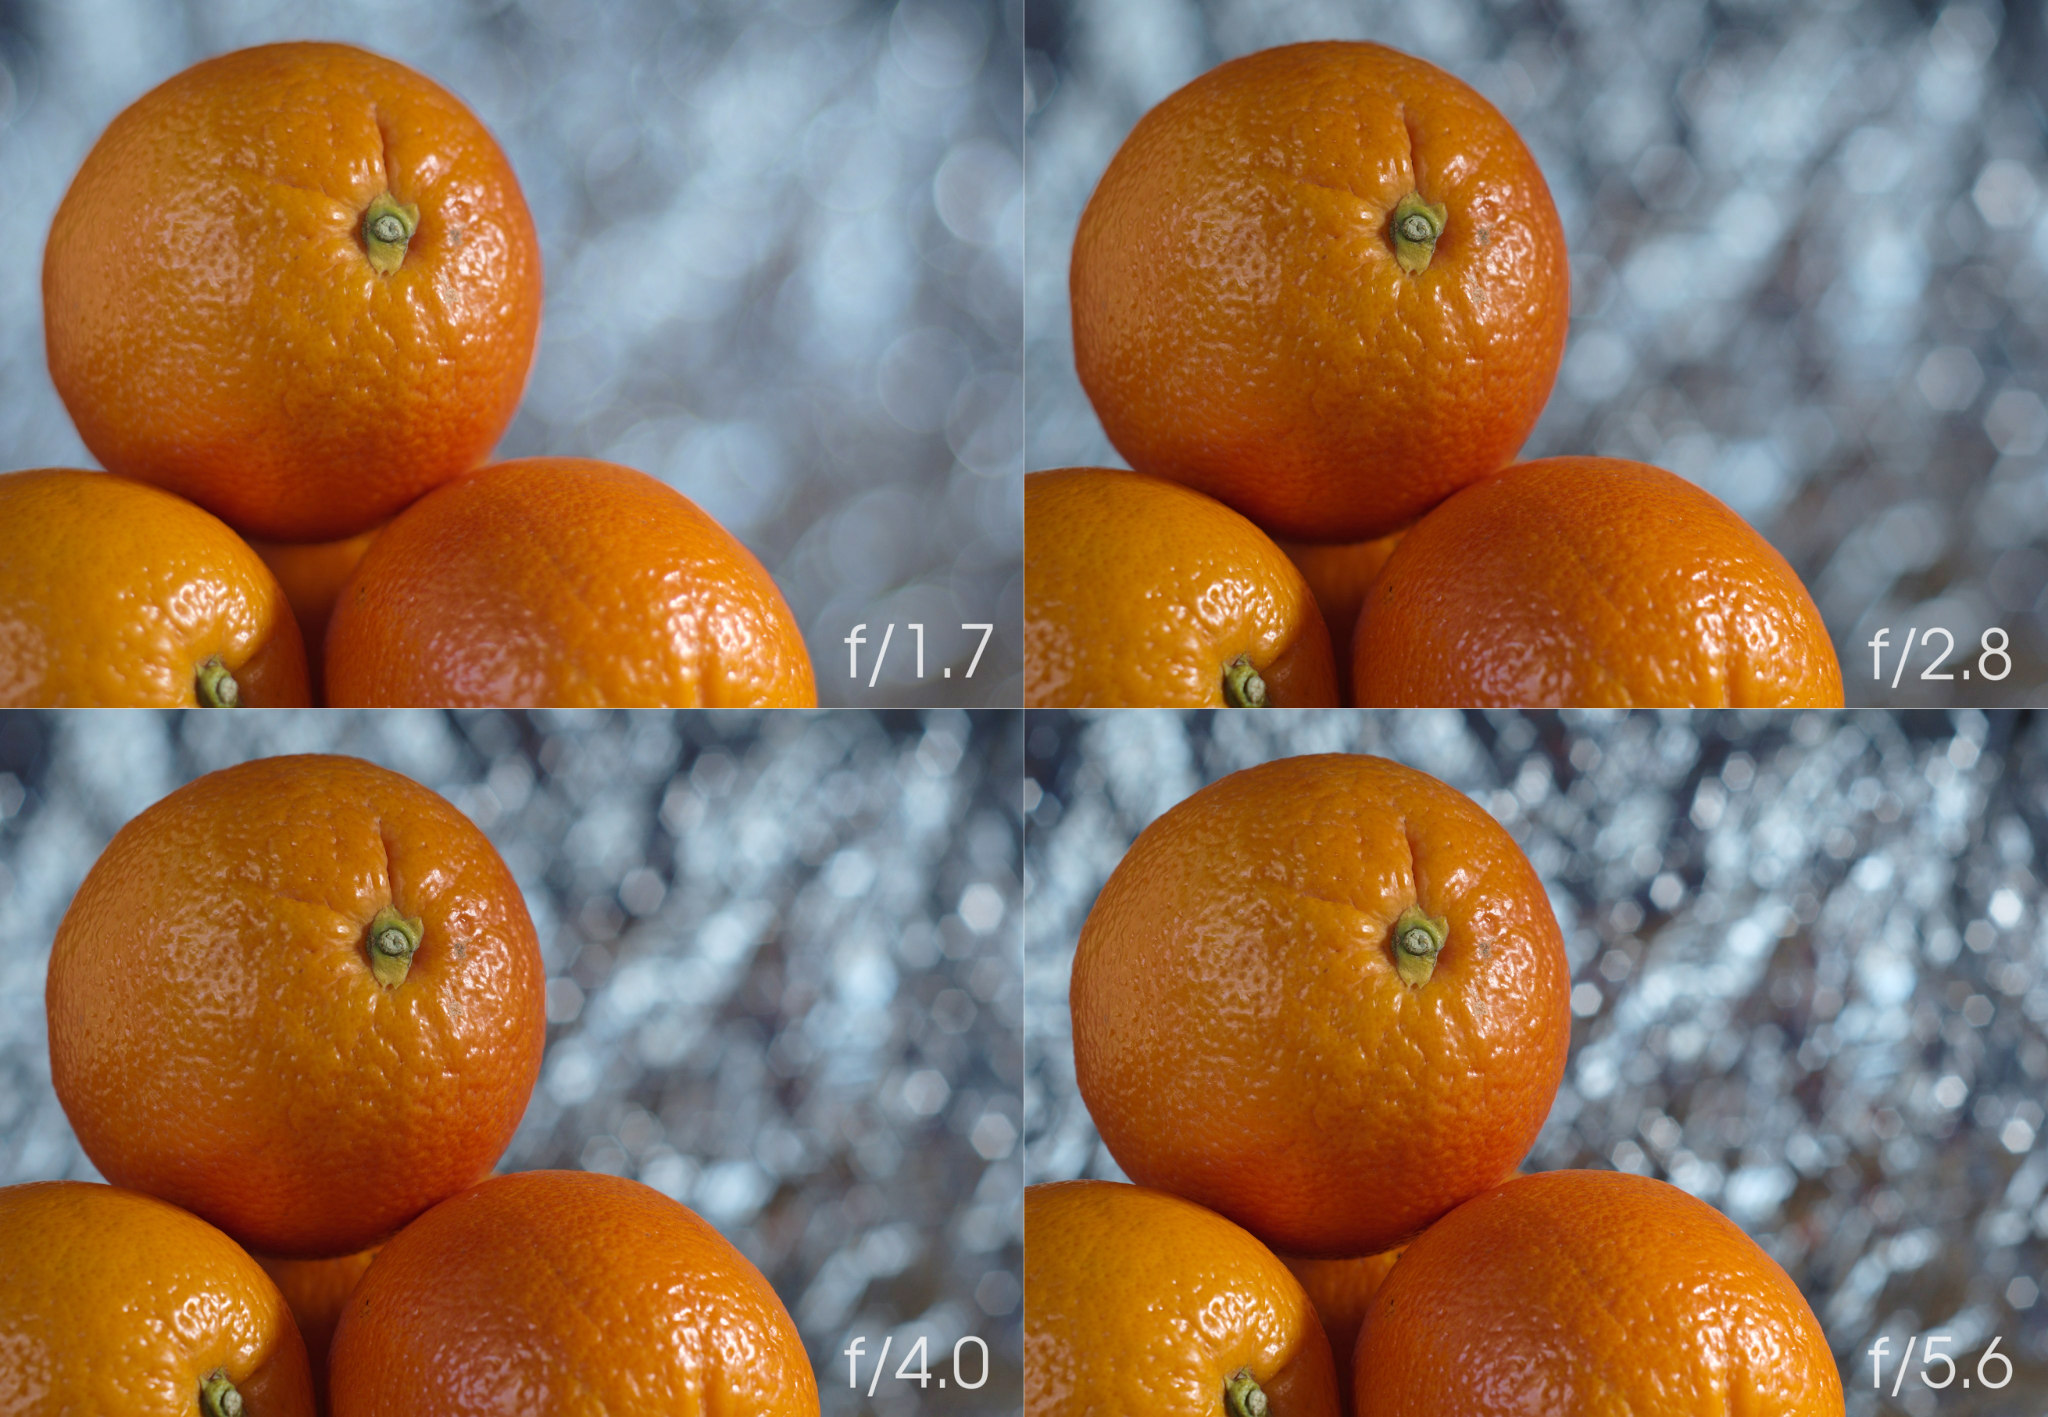
As you can see, wider apertures like f/1.8 and f/2.8 are preferable for creating smoother, blurrier backgrounds. This means that “fast” lenses like f/1.4 primes and f/2.8 zooms have an advantage if this is your goal. Such lenses can be more expensive than their counterparts, but you should be able to find some inexpensive f/1.8 or f/2 prime lenses for almost any camera out there.
However, opening up your aperture wider is not always desirable, even if you’re after a blurred background. Why is this? For one, the depth of field may be too shallow at wider apertures to cover your subject, even if you otherwise like how the blurry background looks. Furthermore, as shown many times on Photography Life, a lens near its maximum aperture often exhibits less sharpness and more aberrations.
A loss of sharpness at wide apertures is often the case with very fast portrait lenses, although recent designs are much better in this regard. For example, I was often hesitant to shoot the Nikon 50mm f/1.8G at f/1.8, whereas I would have no such hesitation with the Nikon 50mm f/1.8 S for Nikon Z cameras. Likewise for the newest 50mm f/1.8 primes from Canon, Sony, and others.

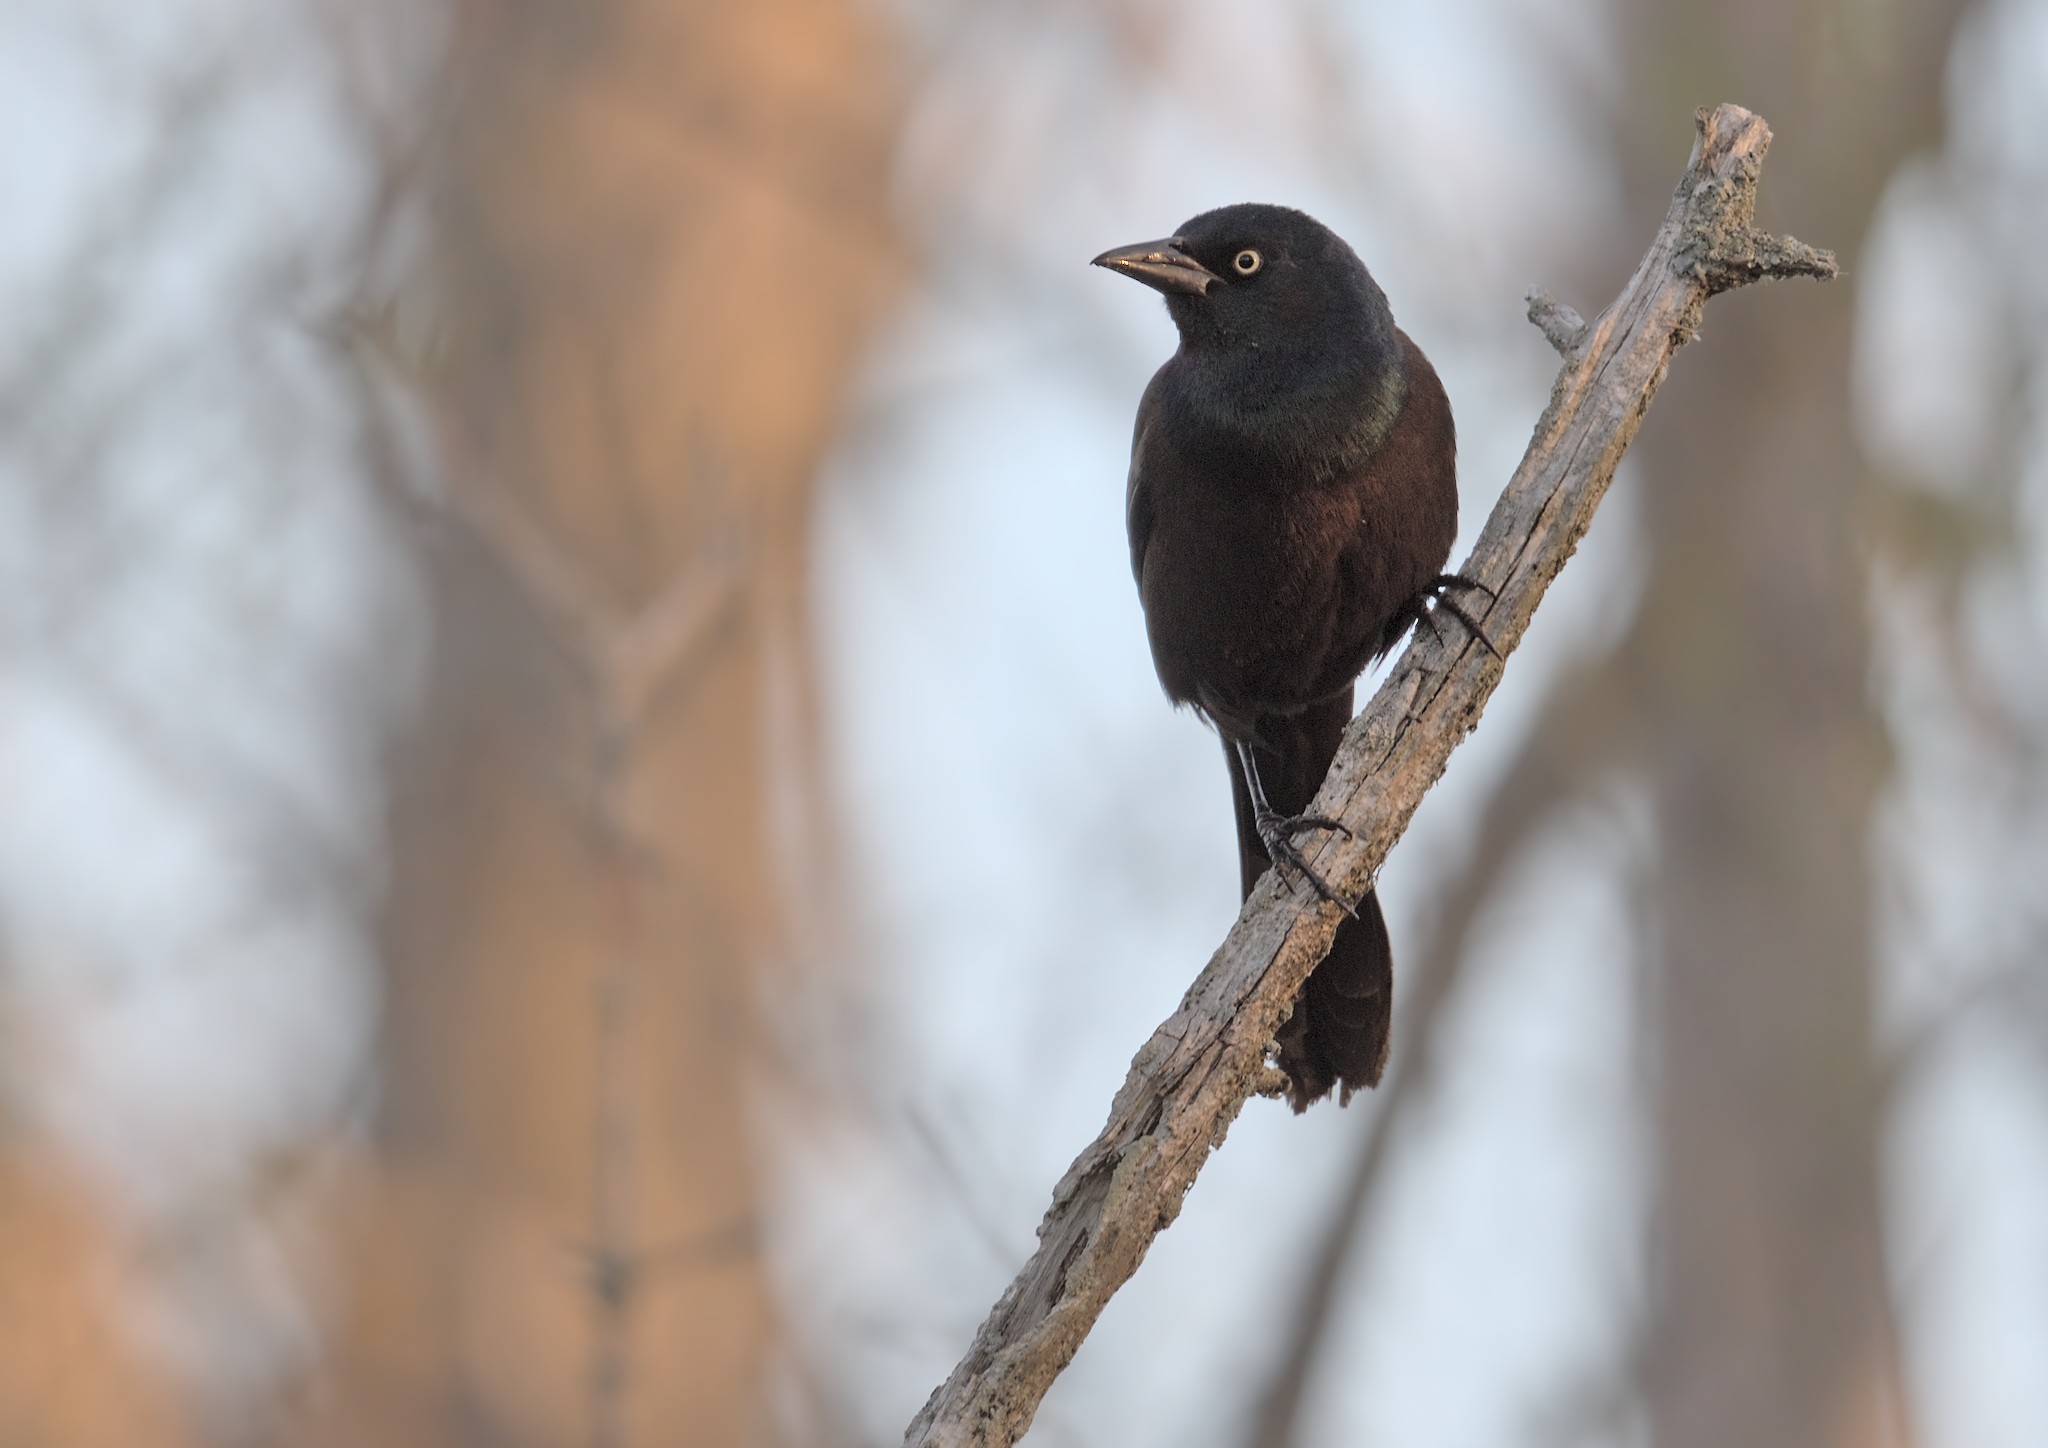
Get Closer
The famous war photographer Robert Capa once said, “If your photographs aren’t good enough, you’re not close enough.” As it so happens, aside from often making photographs better, getting closer to your subject also increases background blur. It is a good technique to use when you don’t have a fast lens. Let us see what happens if we move in closer, keeping other settings the same:
Of course, getting closer also brings its own disadvantages. It exaggerates issues like camera shake and missed focus, making it harder to take sharper photos. Besides that, getting closer completely changes composition and perspective. Portrait photographers have to be especially sensitive to perspective, since getting too close to a human face will accentuate closer features like the nose. Or, if you are a wildlife photographer and you are about to photograph a King Cobra, you may not want to get very close at all.
Keep the Background Far Away
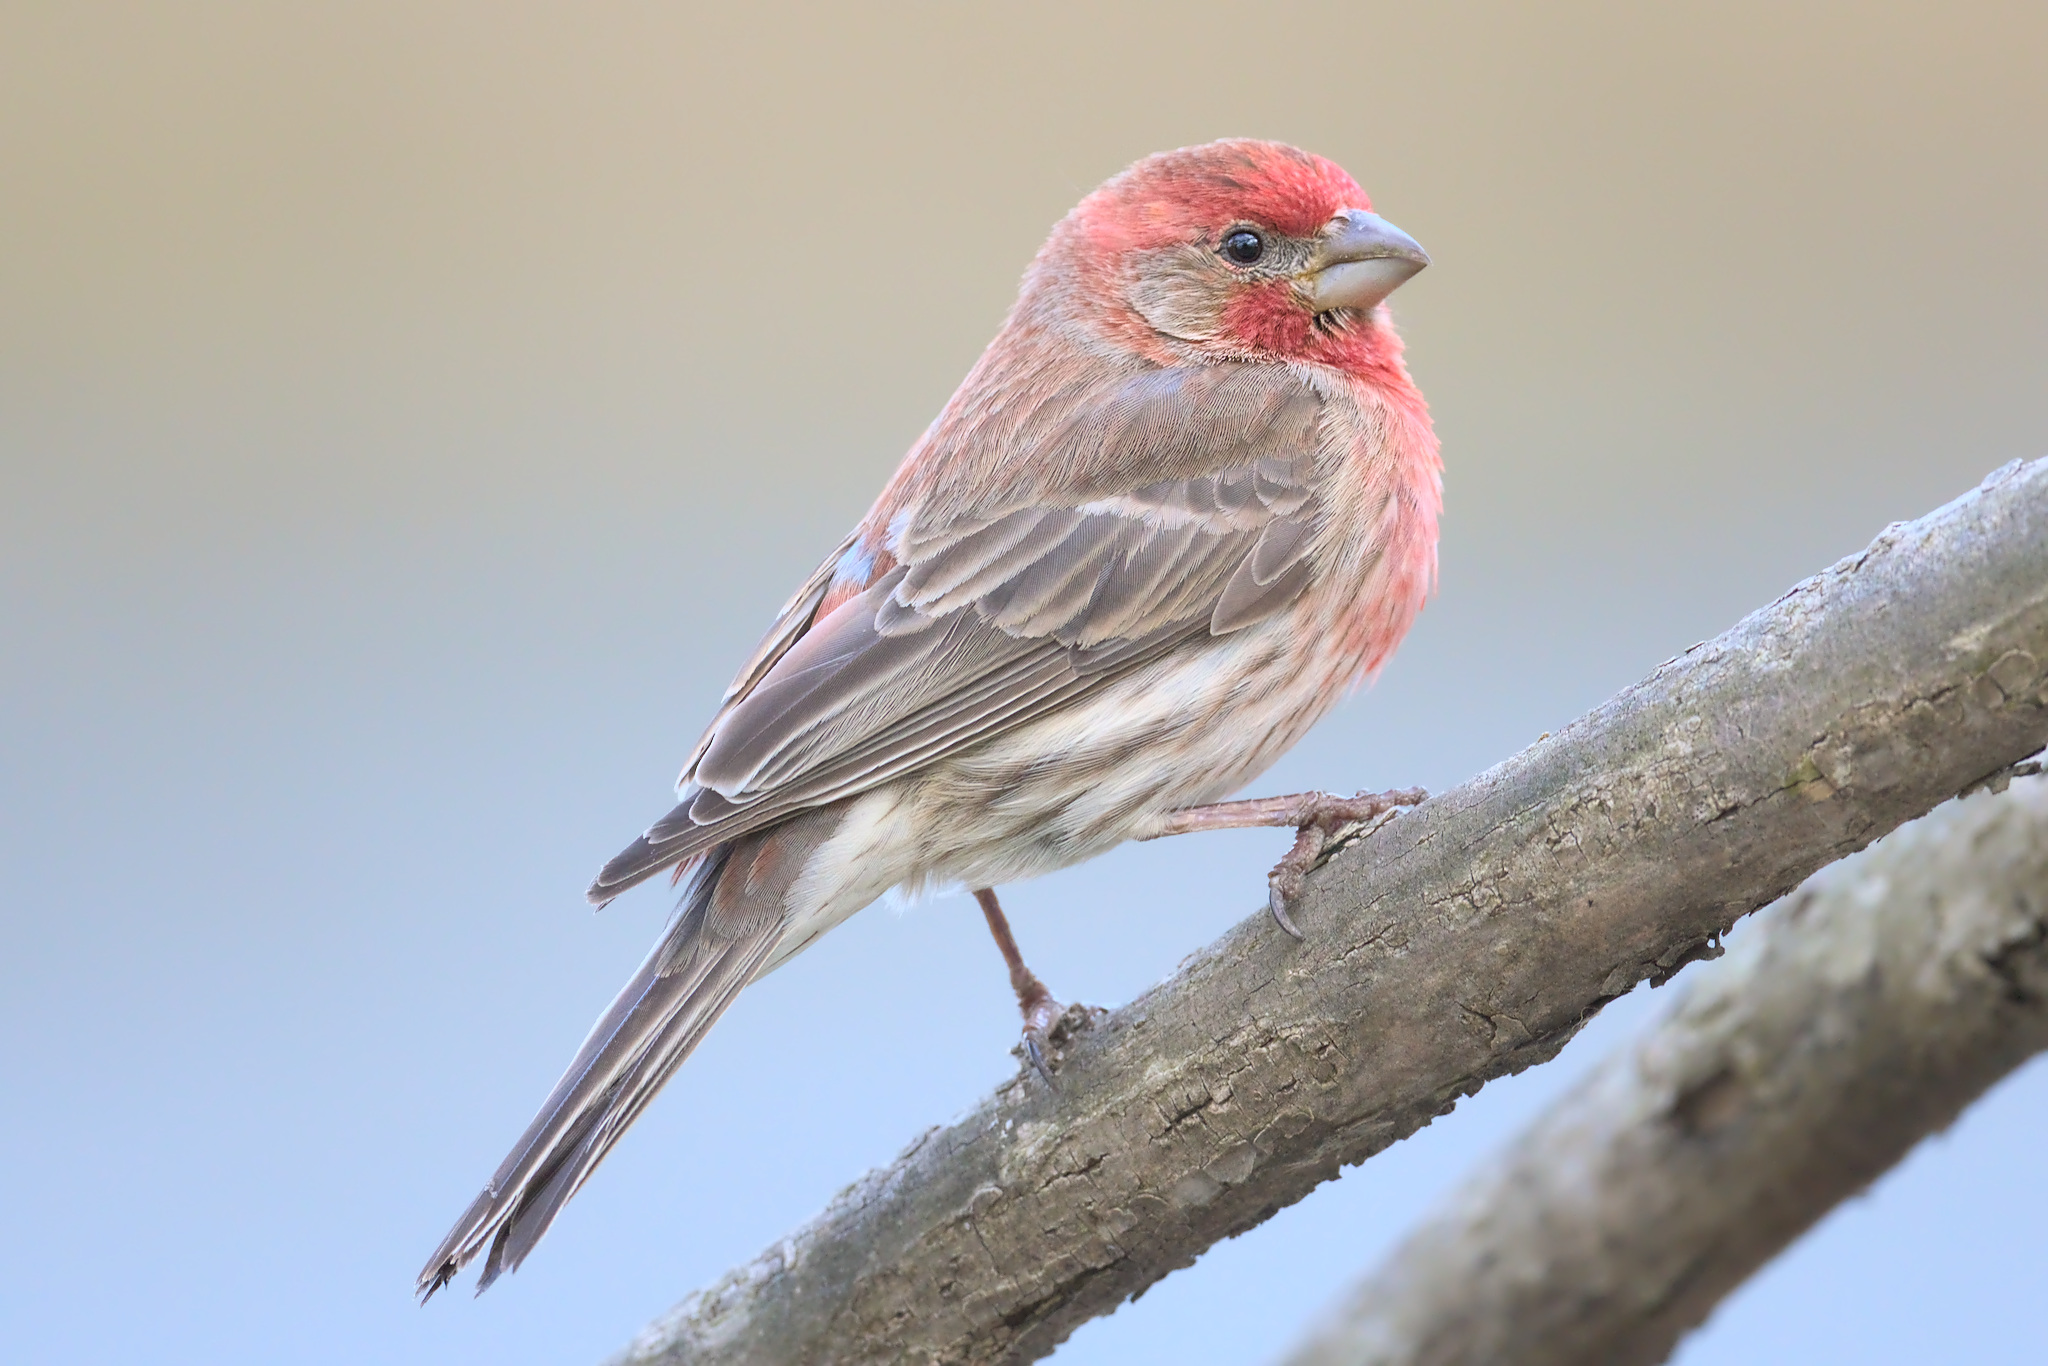
Keeping the background as far as possible is one of the best ways to create a blurred background. In the following shot, the House Finch was fairly close to me, while the background was a forest behind a river in the distance:
If you want blurred backgrounds with wildlife photography, you should pay attention to the background and shoot at different angles to avoid close background elements. In the following example, the only change to the second shot was moving the background half the distance to the subject:
It is also important to pay attention to the kind of background behind your subject. Thin grasses may melt away fairly quickly, whereas large structures like thick trees will remain recognizable even if they farther away.
Use a Bigger Sensor
Can choosing a larger sensor help you blur a background? In some cases, yes. With the same focal length and aperture and with a larger sensor, you can get the same framing by being closer to your subject compared to a smaller sensor. So, this is a variant of getting closer.
However, you do not need a large sensor camera to create beautiful blurred backgrounds. Using faster apertures, getting closer, and keeping the background far away work with all cameras.
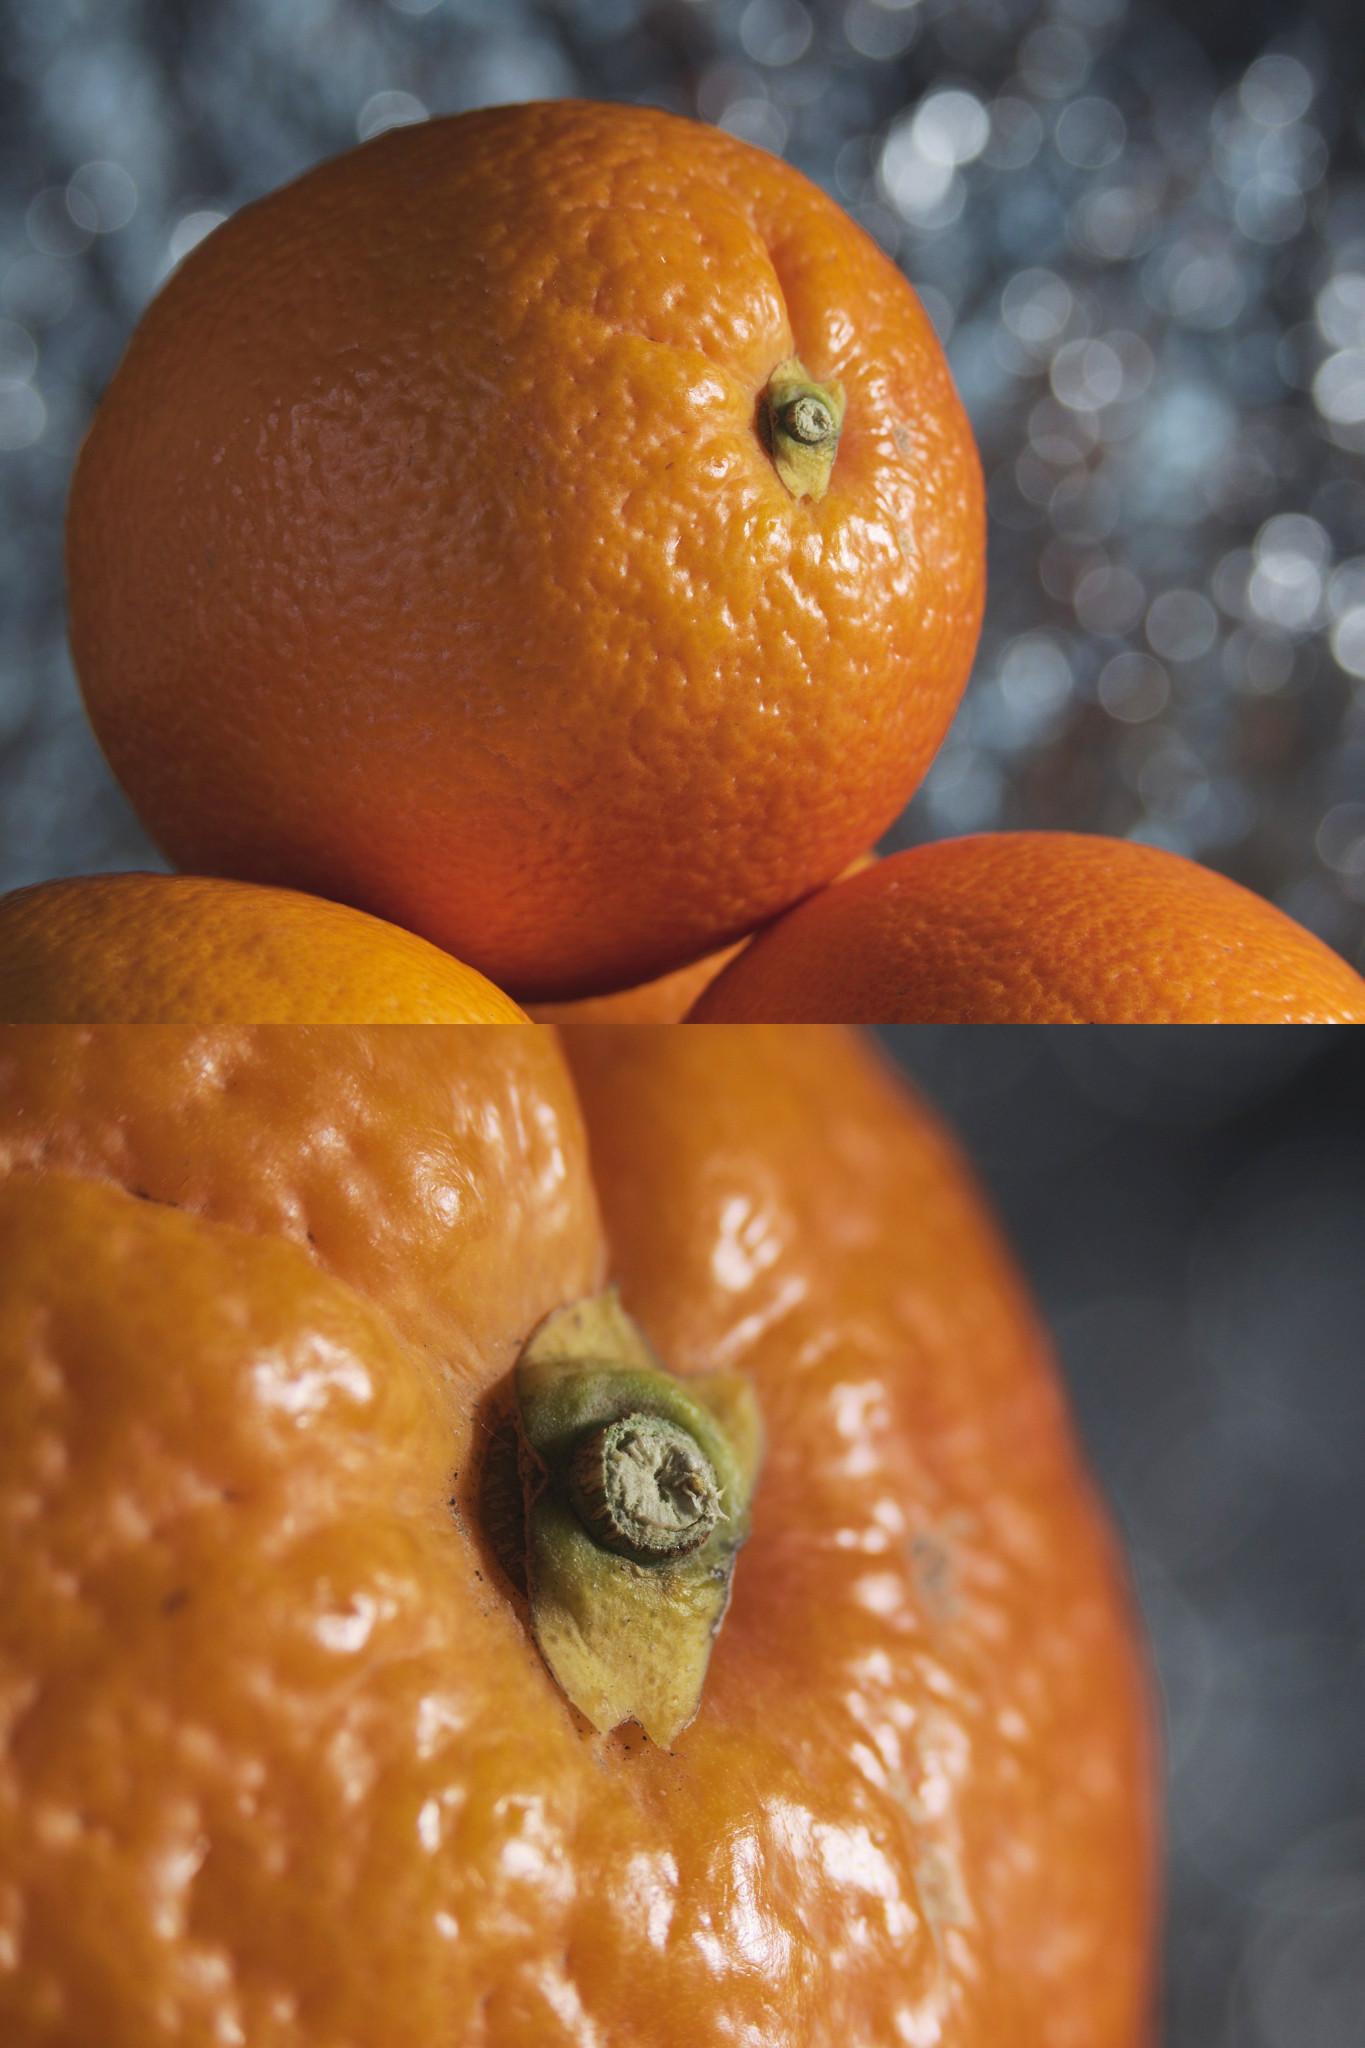
Use a Longer Focal Length
Can a longer focal length help you get a more blurred background? Absolutely. As you zoom in, background blur increases.
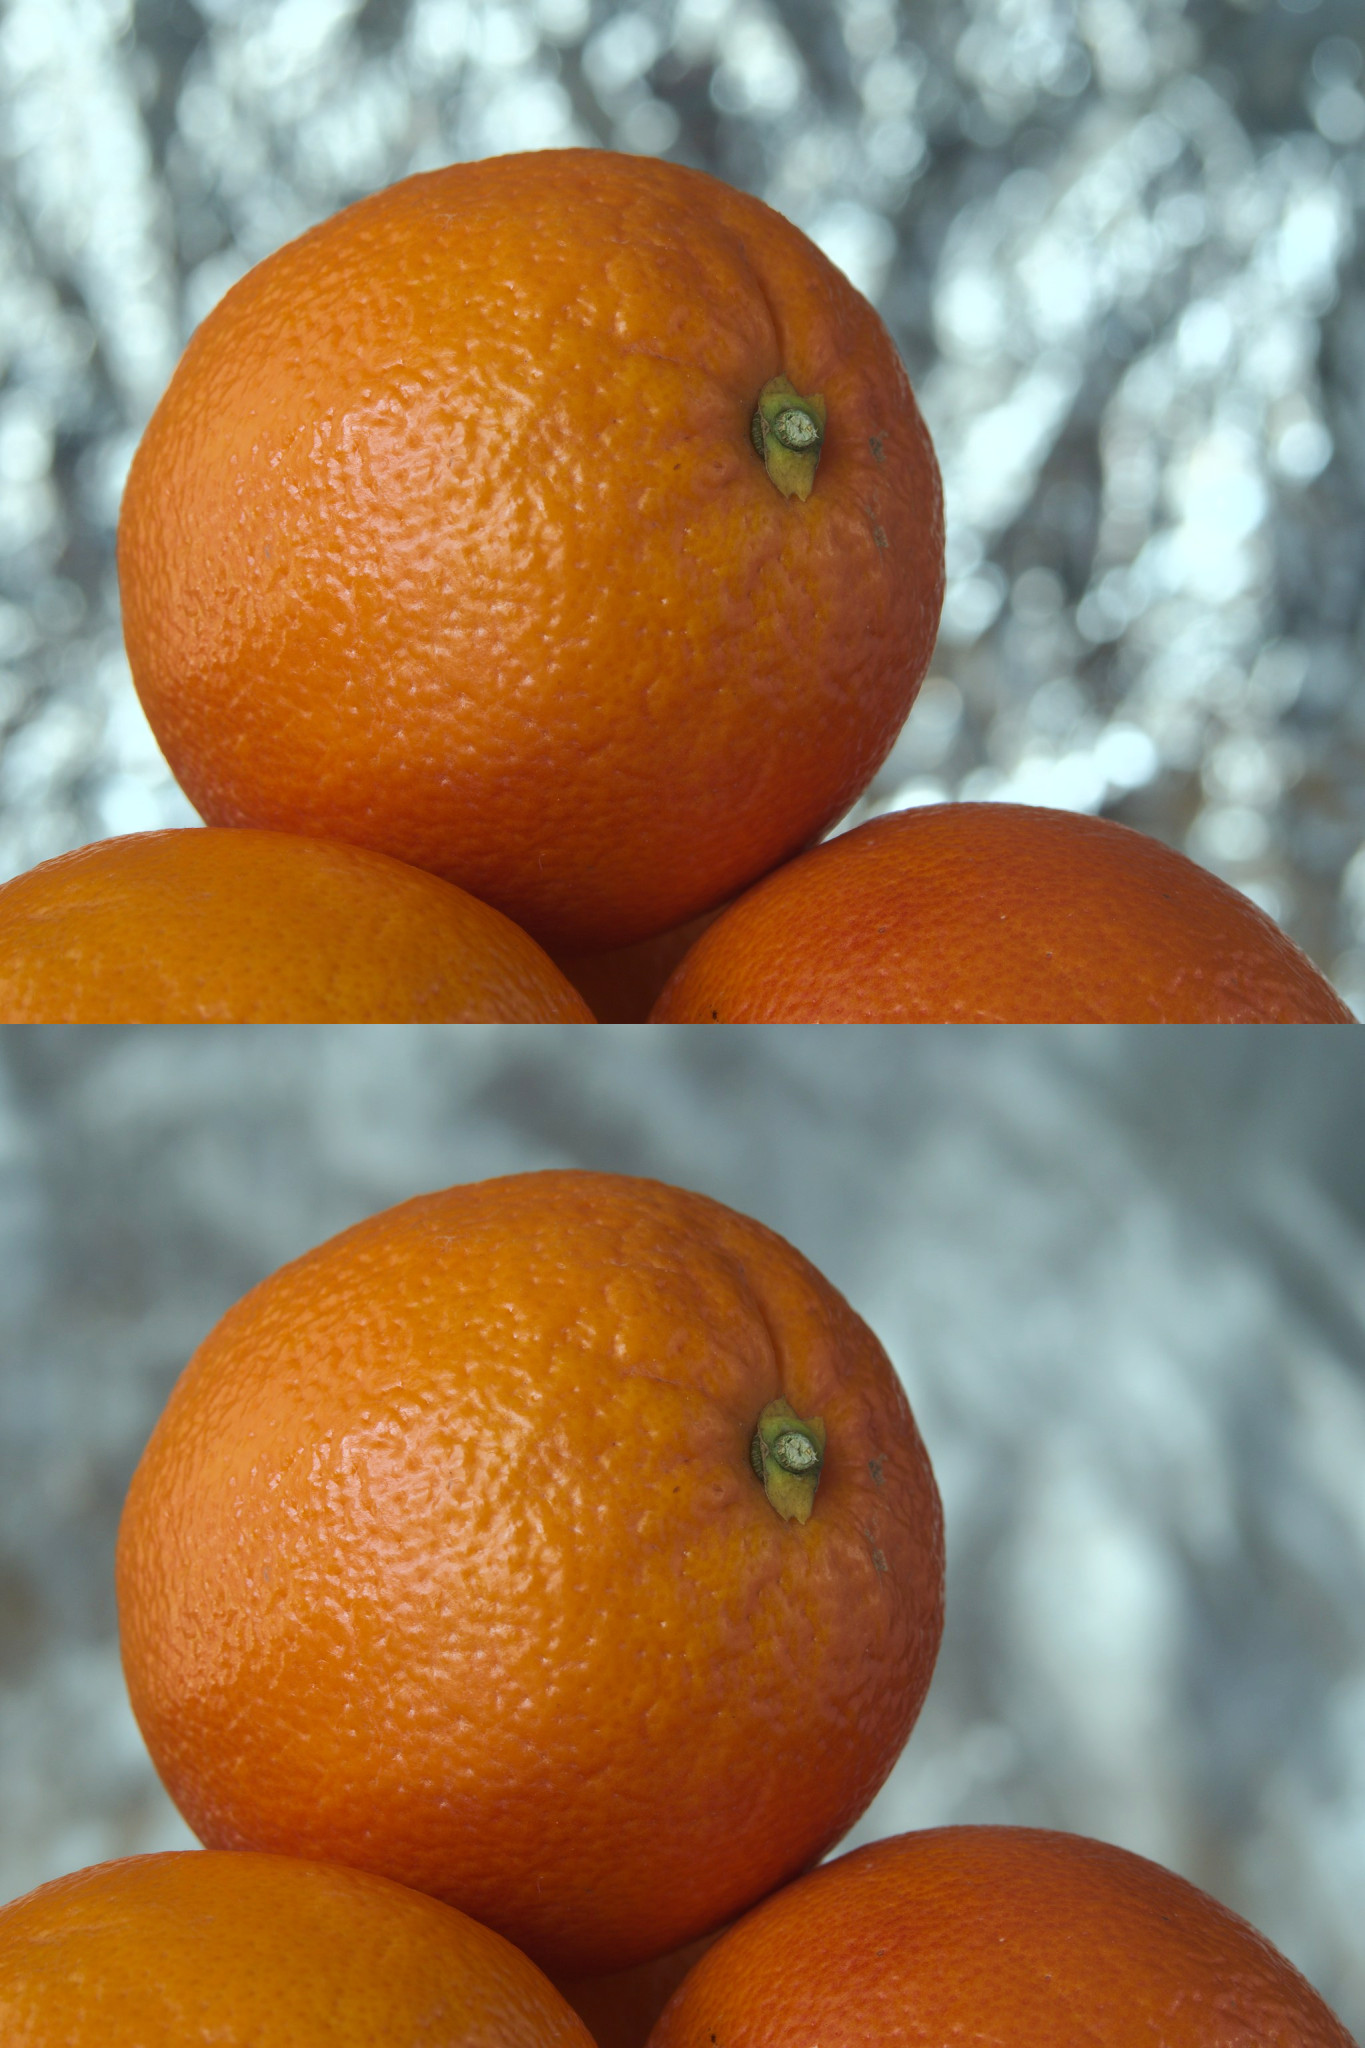
Despite what you may have heard, this even holds true if you then step back a bit in order to make your subject the same size. Due to the increased magnification provided by longer focal lengths, less of the background will be in the photo with long focal lengths compared to shorter ones. This provides the appearance of a more blurred background. Here is an example of zooming in and then stepping backward in order to keep the framing constant:
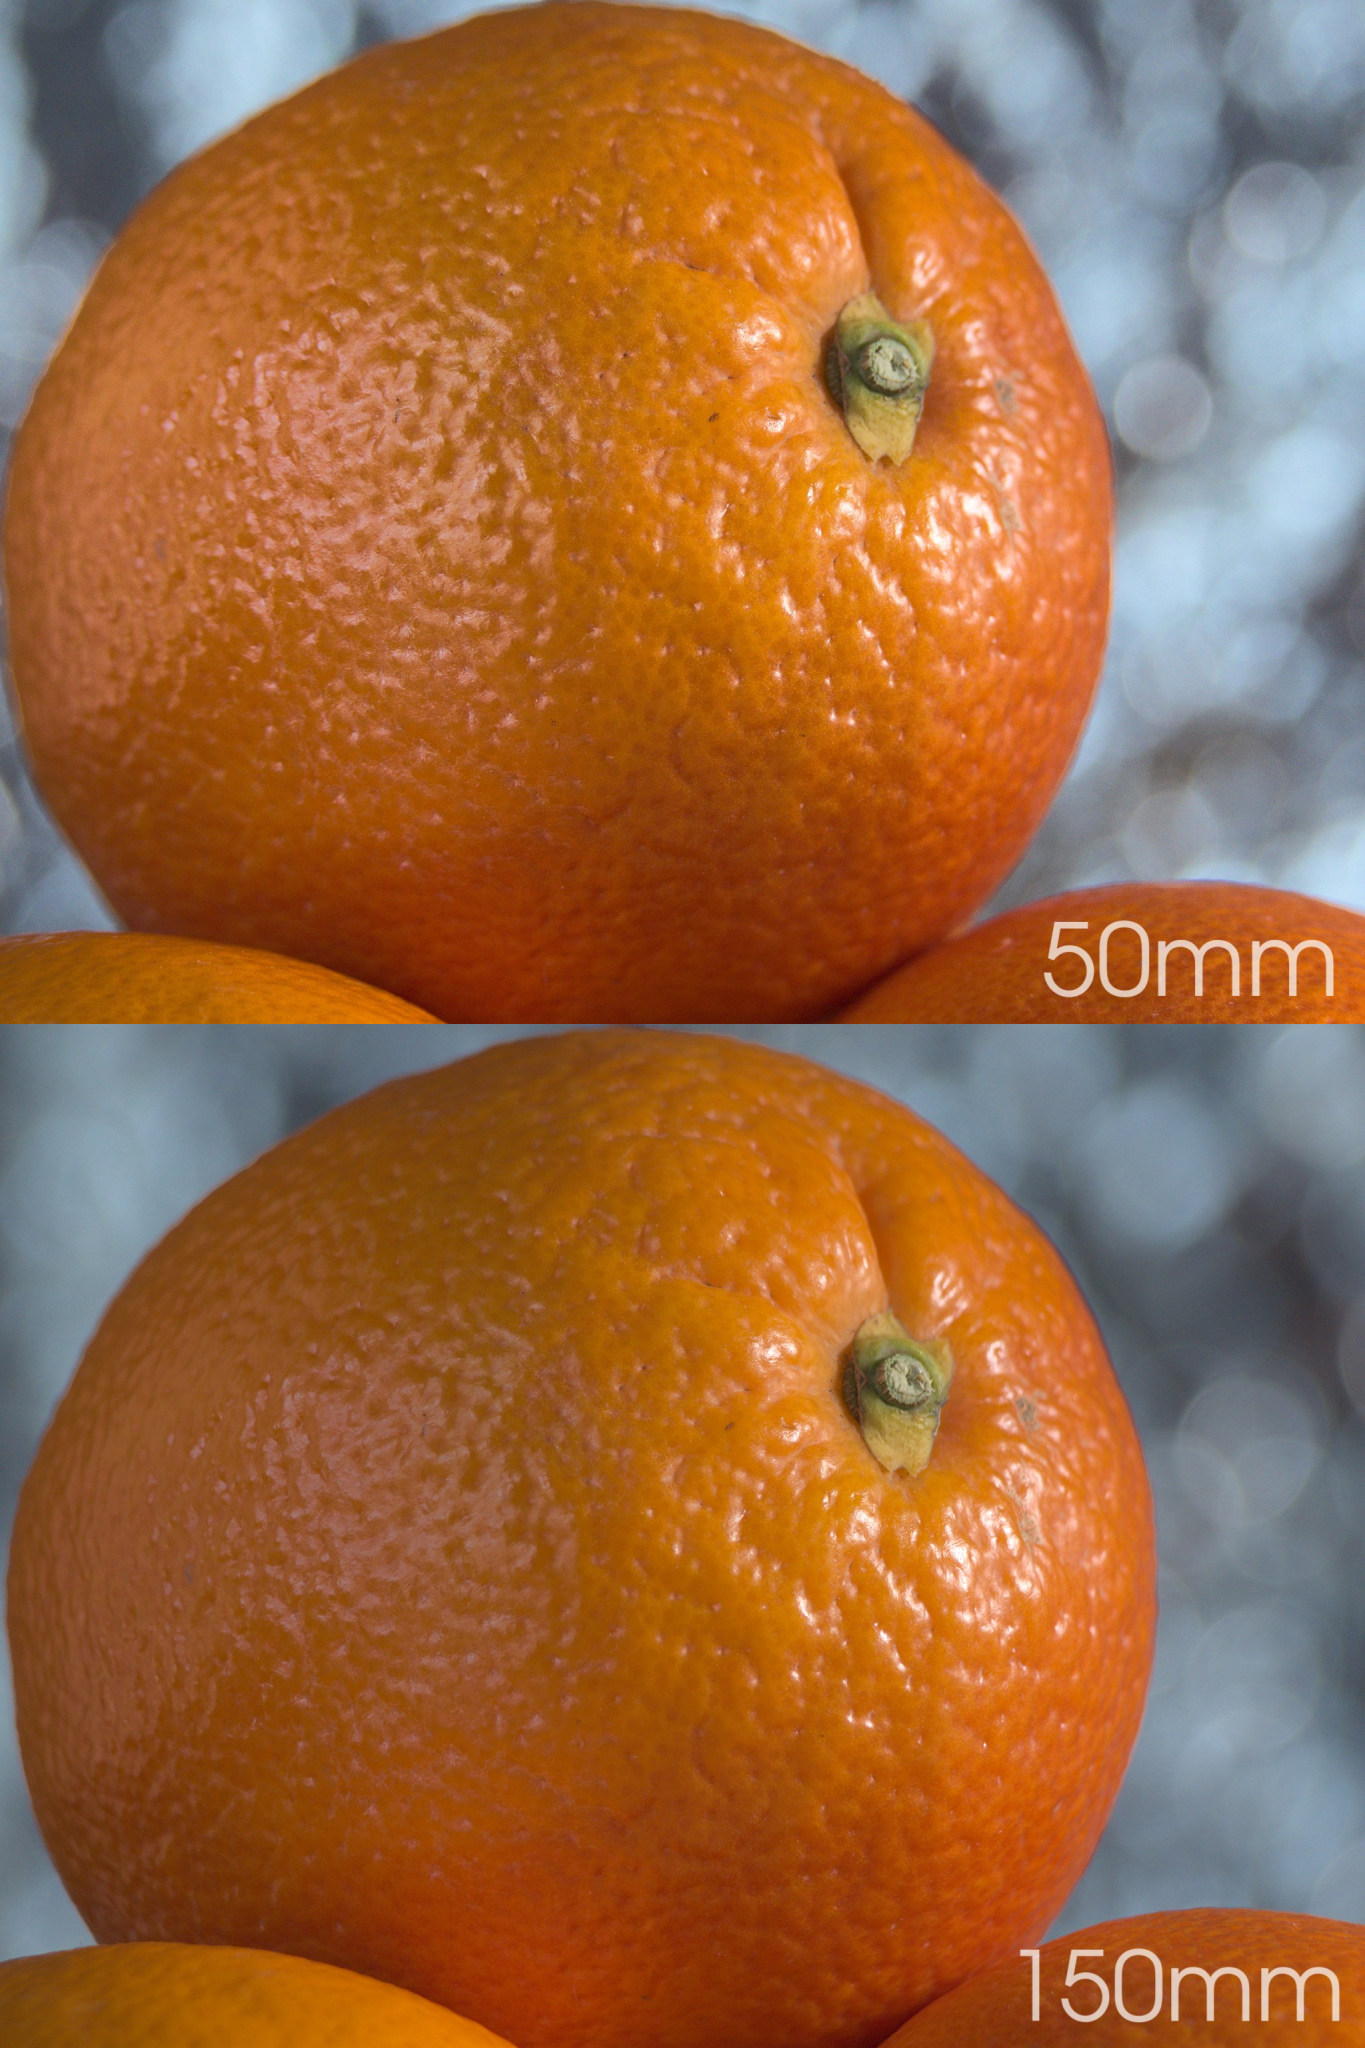
The background is equally detailed in both photos, which is why it’s fair to argue that you haven’t actually altered your depth of field. But from an artistic standpoint, it is larger in the 150mm photo. The appearance is of a smoother, more blurred background. This is the result of using a longer lens, even when I stepped back to hold the framing constant.
If I hadn’t stepped back when taking the second photo, you would see a more zoomed-in view of the orange, and the difference in background blur would be even more pronounced (similar to the example in the “get closer” section).
Changing focal lengths but keeping the same subject framing changes perspective, so there is only so much freedom in focal length choice. For example, for human portraits, many people enjoy the perspective and framing possibilities in the 85mm to 200mm full-frame equivalent range.
Motion Blur and Long Exposure
You can use motion blur to create a smoother background by blurring it out with a long shutter speed. In the following example, I used a long exposure of five seconds in both shots, but I physically shook the background during the second exposure:
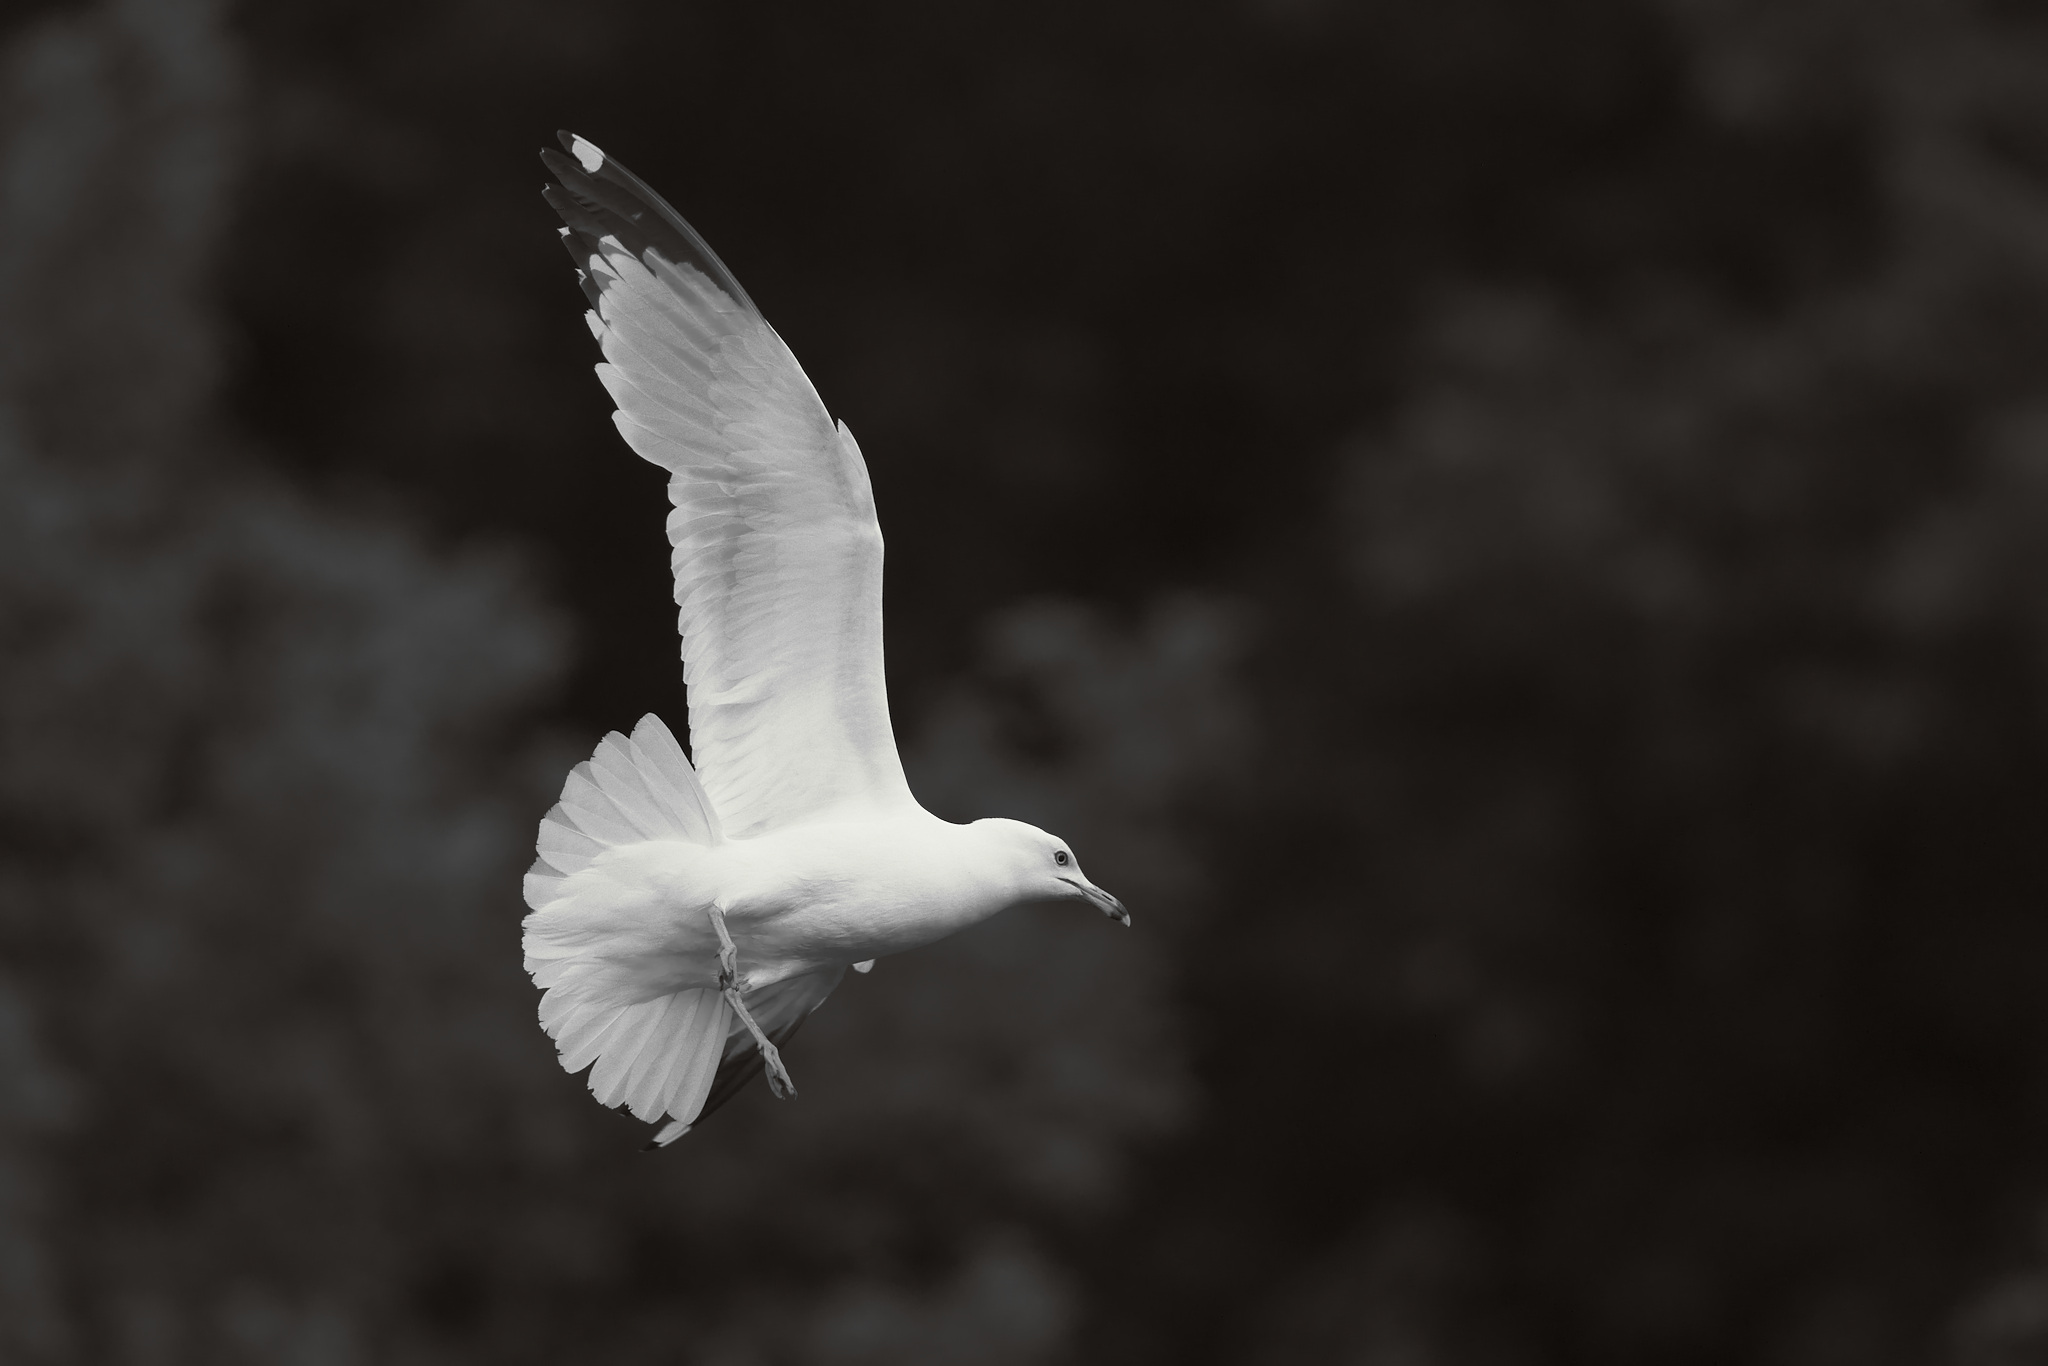
In wildlife photography, you can accomplish this effect by panning with a moving subject. Typically shutter speeds on the order of 1/2500 are used to freeze flying birds for example, but you can also pan with the bird at 1/40 to get an interesting blurring effect.
Provided you pan very well with the bird, you can still get a fair amount of detail around its eye, whereas the background will be strongly motion blurred. I encourage you to read Dvir Barkay’s Guide to Motion Blur and Panning for more details.
Even if you’re not after the full panning look, the principle still applies. If there’s a range of shutter speeds that will give you a totally sharp bird – say, anything from 1/500 to 1/8000 second – erring on the side of 1/500 second will make the background softer if you’re tracking the bird in flight.
Blurring in Software?
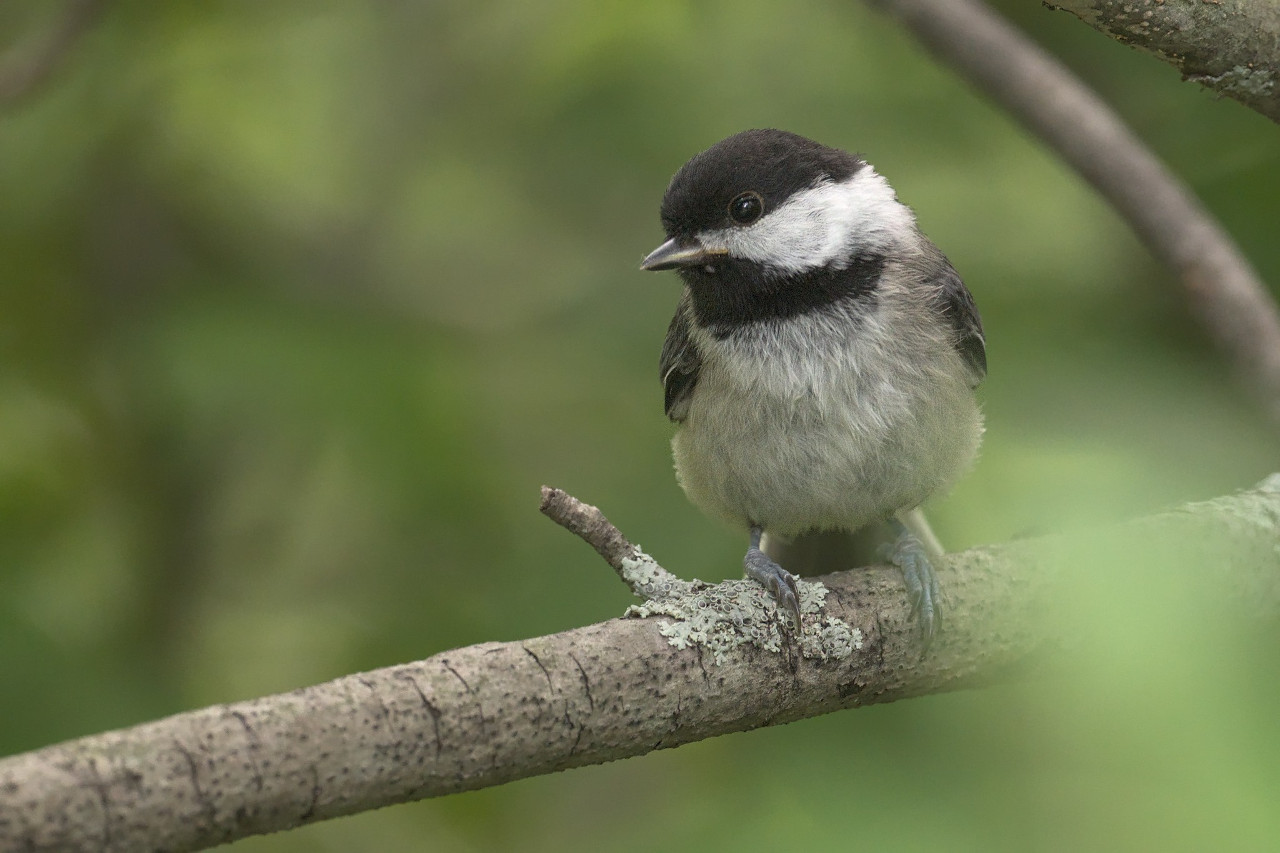
I hesitate to mention software, but software methods are getting pretty sophisticated these days and now can produce a more realistic blur than ever before. As an experiment, I found a shot of a Black-capped Chickadee, which had a somewhat busy background:
I then used a smartphone app that uses AI to create a depth map and attempts to replicate the out of focus effect created by a real lens:
The results are not perfect, and I did have to manually adjust the depth map on the chickadee’s bill, but it’s not bad for something almost completely automatic.
Even more sophisticated are phones that create depth maps as pictures are taken, which are used by algorithms to provide more realistic background blurring from fairly small sensors. In post-processing, you can also use something like Photoshop’s Lens Blur tool.
There is a bit danger in using such tools. For example, the chickadee image that I illustrated above had some artifacts. Also, parts of the image in the same plane of focus as the bird were blurred as if they were far away. Personally, aside from minor edits like noise reduction, tone curves, and colour correction, I never use such postprocessing because it goes beyond what I feel to be natural photography. However, such tools can produce interesting results when used judiciously and ultimately, one has to make an personal artistic decision about them. Regardless of your own decision, I do suggest trying to get what you want right in camera as much as possible.
To Blur or Not to Blur?
We have seen that we can control the level of background blur. However, the amount of blur should be a conscious choice. That is, you should choose a level of blur that will complement your subject, instead of just always aiming for blown
out backgrounds.
More blur emphasizes interesting textures and detail in your subject, but less blur provides more environmental context and a contrast with smooth subjects. And of course, some shots need not have any blur at all. Certainly if you’re photographing subjects like landscapes or architecture, photos without any background blur at all are common, and photographers sometimes go to great lengths to avoid it.
Make your decisions for background blur in a deliberate way to capture your subject at its best.
Conclusion
In this article, we have looked at various ways you can achieve a blurred background with camera settings, composition, and even software. With these techniques, you can choose the appropriate level of blur for your photos and have fun in the process as well. If you have any thoughts on blurring the background, I would love to read them in the comments!
I appreciate the tutorial on this. Thank you! It’s helpful to learn how to use inexpensive equipment (and even apps) to mimic some of the effects we see from expensive lenses. The bird photos are very nice.
Thank you, Matt!
Being reluctant to employ software or in your case even mention it in this day and age would be akin to driving a Model T Ford on an interstate highway.
Smartphones, what they can do or cannot do does not approach the software post processing platforms available today.
Your comments remind me of early exhibits I participated in wherein the judges wanted to have one category for “natural” photography and another for photography that employed processing via software. I hold to the view the majority of people cannot not tell the difference.
The buzzword was something like .. “Oh my, is that photo shopped?
Modern cameras including the Nikon d500 function in part via software. Some lenses are software driven via the camera body. Many camera bodies require periodic software updates to alter or improve performance.
“Out of focus” remains “Out of focus” whether it was created via software or a “real” lens. Both are subject to the operator.
Discounting what software is capable of today, and it’s impact on photography does not seem reasonable to me.
That being said your article was informative regarding bokeh and how it can be achieved. You covered lots of good information and examples. It will no doubt be quite helpful for beginners.
“You don’t take a photograph, you make it.” __Ansel Adams
You certainly make some good points. I do believe your model T analogy is a bit of an exaggeration though :)
I also agree with you completely that other software is certainly much more powerful than phones in many cases. I don’t know if you were referring to my example in the article, but the only reason I used a phone was because I don’t have any software that does background blurring, so I could not use a desktop-based solution as an example.
I do agree that software is capable of a lot, which is why I mentioned it is a personal choice. However, personally I have set the level of postprocessing that I am comfortable with. For me, photography is more than just the end result but also the process, even though you are correct in saying that the same result can be obtained with multiple means. I certainly acknowledge that pleasing and realistic effects can be simulated in software, even though I prefer not to use them.
For me, the result is mostly moot because I can achieve the results I want with the postprocessing I am comfortable with. I welcome everyone to make their own choice based on what is valuable to them :)
Michael wrote “That being said your article was informative regarding bokeh and how it can be achieved.”
The article does not mention bokeh. See What is Bokeh and How It Affects Your Images by Nasim Mansurov:
QUOTE
Basically, bokeh is the quality of out-of-focus or “blurry” parts of the image rendered by a camera lens – it is NOT the blur itself or the amount of blur in the foreground or the background of a subject.
END of QUOTE
Hello Pete,
Bokeh and blur are synonyms. See the dictionary for further help understanding the two terms.
By definition: “In photography, bokeh (/ˈboʊkə/ BOH-kə or /ˈboʊkeɪ/ BOH-kay;[1] Japanese: [boke]) is the aesthetic quality of the blur produced in out-of-focus parts of an image. Some lens designs blur the image in a way that is pleasing to the eye, while others produce distracting or unpleasant blurring (“good” and “bad” bokeh, respectively).[6] Photographers may deliberately use a shallow focus technique to create images with prominent out-of-focus regions, accentuating their lens’s bokeh.”
In every aspect the photographer’s perception determines how the finished image will appear. Bokeh is blur. How much “blur” is used, where and why it is used and whether or not the blur was via of a lens or software hardly matters. The image is subjective to begin with.
In the end the image matters. The process matters. Being nit picky about a definition that is easy to misconstrue is an exercise in futility.
If you say so.
So using something like this www.nvidia.com/en-us…io/canvas/ instead of a camera would still be ok with you? Cameras and lenses use software, but that doesn’t affect the image, which is created purely optically, if you shoot to RAW.