Over the years, focus stacking has gained wide popularity among digital photographers and is a handy technique you can use to get crisp images. However, how can a photographer use focus stacking when shooting panoramas? Digital panoramic photography often requires three, five, or more images to be stitched together in order to produce the desired end result. When combined with focus stacking, the challenges suddenly become bigger. This article explores those challenges and recommends tips for successfully creating a focus stacked panorama.
Table of Contents
Focus Stacking Digital Images
The purpose of this article is not to explain what focus stacking is and how it is done. It assumes that you already know how to do that with single-shot photographs.
However, to recap briefly, focus stacking is the process of photographing the exact same scene with the exact same camera settings with multiple shots. The only difference among those shots is the focus setting of the lens. The purpose is to capture multiple shots where some focus on the foreground, others on the middle ground, and yet others on the background of the scene. Those images are all blended together afterwards with software in order to contain only the sharpest parts of each image. Thus, the end result is a photograph which is in perfect focus from the closest to the furthest objects.
This article also assumes that you know how to do basic panoramic photography, both in field and photo stitching in post-processing.
Challenges with Panoramic Focus Stacking
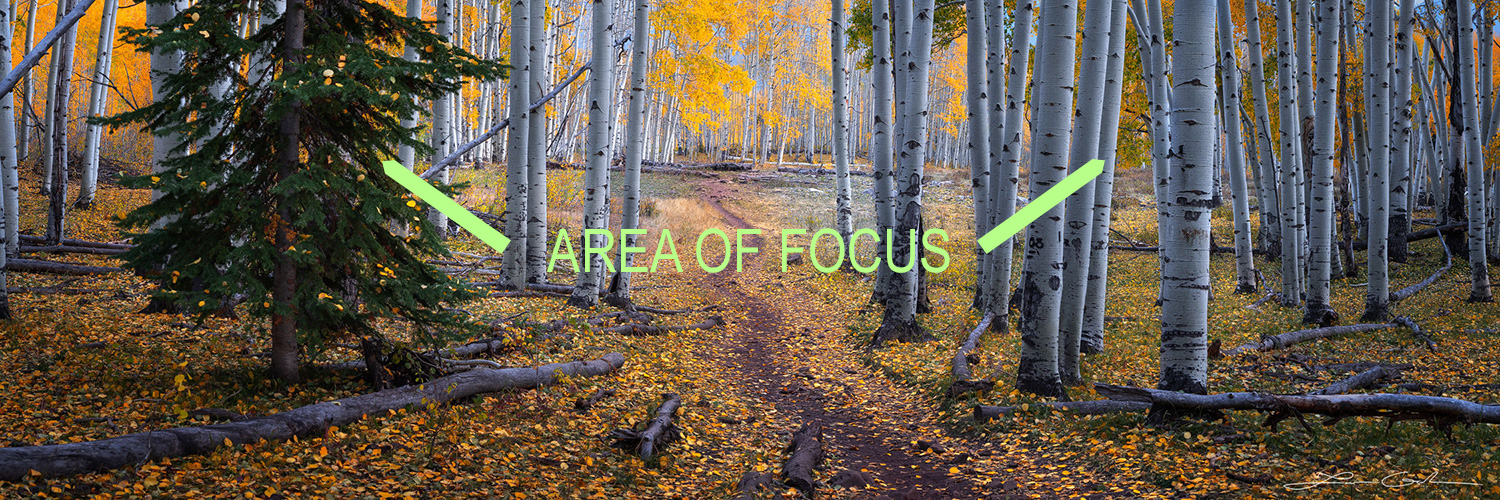
Although focus stacking is not easy, it is pretty straightforward when the desired final result will be a single 2×3 image. The reason is that the only blending necessary is that of identical shots, with the exception of their area of focus.
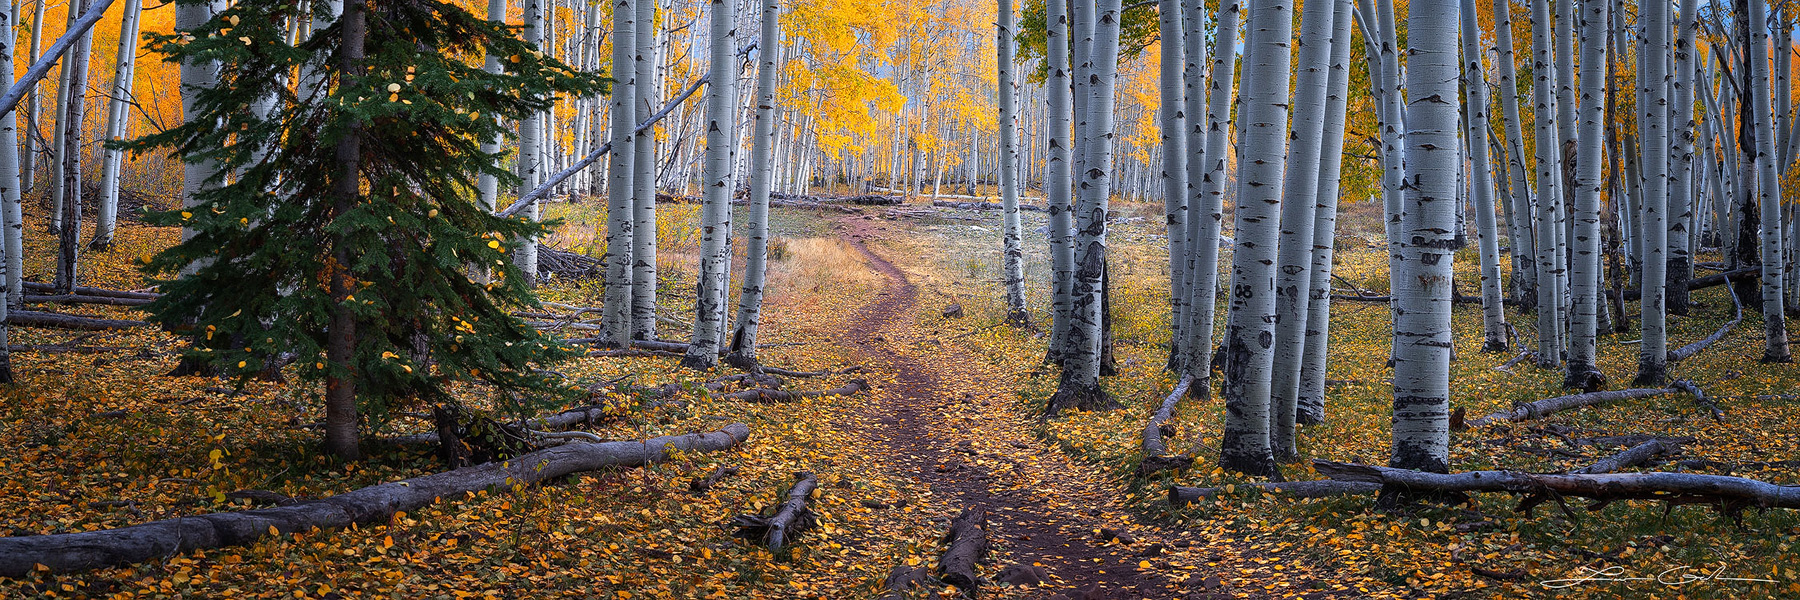
Let’s take a simple example. Suppose you shoot a landscape of a forest with some leaves in the foreground, trees in the middleground, and more trees in the background. To keep things simple, also suppose that you can get away with just three shots for a focus stack. Meaning, you focus one image on the closest ground leaves, the second on the middle of the forest, and the last on the trees in the back. Shooting and processing this image would not be too hard:
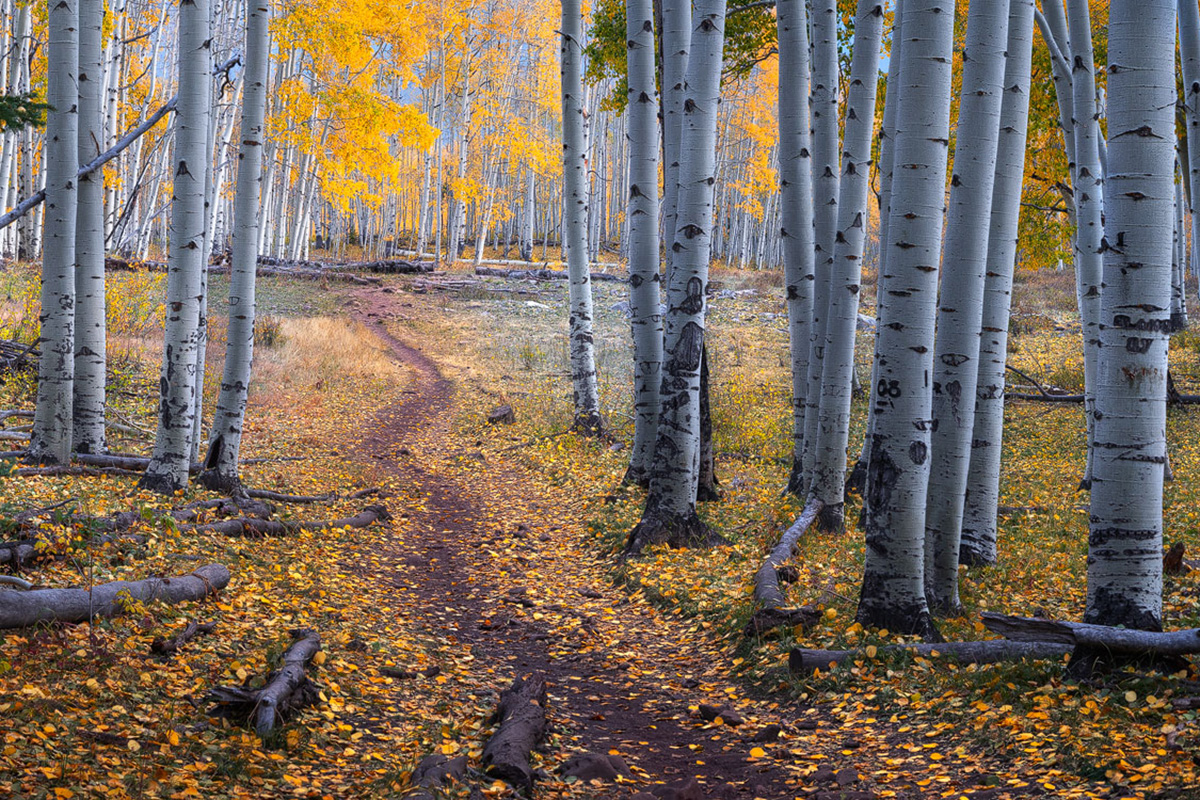
Now imagine a similar scenario, but this time you want to shoot the leaves and the trees in a 3×1 format panorama. You could use the technique above and then crop the image. However, if you want to be able to print it really big, having a high-resolution image is important. You’ll need to pan your camera to take multiple overlapping images in order to produce the panorama.
Let’s do some math. Suppose that you need a total of five overlapping images from a horizontal pan in order to produce the panoramic stitch. Now you want to add focus stacking on top of that in order to get a sharp image from front to back. Therefore, for each of the five overlapping images, you have to have three different shots, focused on different parts of the terrain. You will now end up with a total of 15 images. That means they have to be blended both horizontally and on top of each other. Are you starting to see the complexity? What can you do? Keep on reading.
Considerations in the Field
The background knowledge you need in order to take a focus stacked panoramic image is to understand:
- How to take ordinary focus stacked images
- How to take ordinary multi-image panoramas
If you already know how to do the above two, now it is time to blend both of these techniques together.
First, though, a quick note on weather conditions. It is very hard to do even ordinary panoramic photography with moving objects. Add focus stacking on top of that, and it becomes nearly impossible. For these reasons, you need to attempt this with static scenes.
However, even with static scenery, conditions in nature can change. Thus, it is important to be aware of the weather conditions in the field. Do you have fast changing light? Do you have moving clouds, wind, etc.? The less movement, the better.
Going by the example from earlier, let’s say that you need to take 15 shots. This may take a minute or two, depending on how experienced you are and/or how easy it is to use your camera and tripod setup. Being aware of the weather and working as quickly as possible are critical when trying to snap 15 different shots in a short amount of time. In other words, you need to ensure that the view will not look drastically different from the moment you started, till the time you pressed the shutter button for the 15th time.
Focus Sequencing
A technique I use to gain speed is what I call “variable focus sequencing”. This is how it works:
- Composition 1, shot 1: focus = foreground
- Composition 1, shot 2: focus = middleground
- Composition 1, shot 3: focus = background
[Pan the camera]
- Composition 2, shot 1: focus = background
- Composition 2, shot 2: focus = middleground
- Composition 2, shot 3: focus = foreground
[Pan the camera]
- Composition 3, shot 1: focus = foreground
- Composition 3, shot 2: focus = middleground
- Composition 3, shot 3: focus = background
[Pan the camera]
…and so on.
You’ll notice that I’m “snaking” the focus – starting in the foreground for one composition, and then in the background for the next, switching back and forth each time. Why do I do that? It’s all about speed. This method allows me to maintain the same focus when changing my composition to the next shot in the panorama. Ultimately, it minimizes the number of times I must refocus the lens.
The alternative method is to reset focus to the foreground for every shot of the panorama. Although this could be more convenient in post-processing, it also consumes precious seconds from the in-field process. Therefore, I prefer to work as efficiently as possible out in the field, so that I can capture the best image I can with the least chance of movement ruining the image.
If you follow this technique, you have to remember that you did it when it is time to post-process your masterpiece. That way you won’t be confused when focus stacking. This leads to the next section – how to process a focus stacked panoramic image.
Considerations in Post-Processing
There are two main methods of processing a focus stacked panorama. I call them “Stitch & Stack” and “Stack & Stitch.” Although this may seem like a play on words, it is not. Let’s examine both methods. Again, assume the scenario from above – five horizontally overlapping images, with three focus overlapping shots.
1. “Stitch & Stack”
The way you do this method is:
Step 1
- Stitch a panorama of all five foreground-focused images
- Stitch a panorama of all five middleground-focused images
- Stitch a panorama of all five background-focused images
Step 2
Now you have three panoramic images, which should be nearly identical to one another, except their areas of focus:


The only step left is to use your preferred focus stacking software to blend them together and get your final result.
Advantages
This method is a little faster than the other and is my preferred method. Another advantage, if you are using Adobe CC for your image processing, is that Photoshop’s Adobe Camera Raw now creates raw panoramic files. This means that you will have three panoramic files with different areas of focus, but they will all be raw files. Therefore, if you need to go back and make adjustments in raw later, you will not lose all your changes. Here are the steps:
- Stitch the 15 files into three separate raw panoramas with different areas of focus
- Rasterize them and do the focus stacking
- Perform any additional adjustments as part of your post processing
If you get to step 3 and you realize that you forgot to apply changes in the raw files, you only need to repeat steps 2 and 3. In the section below, you will see how the Stack & Stitch method is more limiting in that regard.
Disadvantages
Panoramic stitching software rarely is 100% consistent, even with almost identical starting images. In this case, the three stitched panoramas may not line up perfectly with one another, and the focus stacking process may end up doing a poor job. I have noticed this especially to be the case if you have straight, horizontal lines in your panorama, such as an ocean horizon, a bridge, and so on.
2. “Stack & Stitch”
This is basically the reverse of the previous method:
Step 1
- Focus stack the three shots that represent image 1 of the panorama
- Focus stack the three shots that represent image 2 of the panorama
- Focus stack the three shots that represent image 3 of the panorama
- Focus stack the three shots that represent image 4 of the panorama
- Focus stack the three shots that represent image 5 of the panorama
Step 2
Now you have five focus stacked individual images. The next step is to blend them together horizontally in order to produce the final result.

Advantages
Unlike the previous method, you will only be doing one panoramic stitch process here with the five stacked images. Therefore, the software might be more successful in stitching and blending the five images together.
Disadvantages
This is a more time-consuming process, which will especially matter if you need to make raw file adjustments after you have started your final panorama processing. Let’s walk through the steps:
- Focus stack the 15 files into five separate images
- Stitch the five files together into a single panorama
- Perform any additional adjustments as part of your post processing
If you get to step 3 and you realize that you forgot to apply changes in the raw files, you now have to repeat all three steps again. The reason for this is that you have pretty much passed the raw file phase after step 1, unlike the Stitch & Stack method. However, for trickier stitches where the prior method doesn’t give you good results, it’s good to have this second technique available.
Conclusion
While both panoramic stitching and focus stacking are very useful and fun techniques, doing both together in a single photograph comes with its challenges. It can be done, but takes more effort and understanding of the entire process. Therefore, it is important to understand the different factors which play a role in the final result, and perhaps to start with simpler scenes (totally nonmoving, just a three-image panorama and three-image focus stack) before moving on to more complex subjects.
The other thing to remember is that there is no perfect process. Every scene, every image is different and unique. Sometimes it takes some experimentation in order to achieve a great focus stacked panoramic image. I hope this article helped give you a good starting point.
Thank you to Lazar Gintchin for sending this guest post to Photography Life! We recommend visiting Lazar’s website here to check out more of his amazing panoramic photos or purchase a high-quality print.
I have a question, I have always stacked my Panoramas in light room for the most part, up to 30 shots, focused, stacked and overlapped, and for that matter, sometimes exposure is even varied… And light room is done an excellent job of finding the sharp pixels and tone mapping without asking it to do anything Now I’m wondering if I need to up my game and use PT gooey, or I’ve tried Photoshop and it gives me the option to be able to mask layers and change for instance water areas specifically, but I don’t think PT gui or pro actually gives you enough flexibility to adapt different parts and layers? What about focusing? How does it choose? What’s focused close for ground versus background? Photoshop do any of that as far as choosing which is sharp for ground and background when stacking Panoramas together? All these questions I haven’t really noticed a problem with focus but, if I buy PT gui pro it seems like a lot of money if it’s not going to take focus in account. I will agree with most that Lightroom algorithms are different than Photoshop algorithms when it comes to stitching even large 20 to 30 picture Panoramas Panoramas, Lightroom does an excellent job quality, wise and speed wise, where sometimes Photoshop just fails and takes a half an hour. But to get the highest quality raw and quality output for large 80+ inch prints, I want to start making sure that I’m working with Panos the correct best way.
And then suddenly, HDR and PixelShift walked into the room. :-)
A long and intimidating process to obtain a panoramic photo. My cameras are a Panasonic DMC-FZ200 and a Panasonic DMC-FZ1000. Both provide a panorama scene choice and those cameras have all the features of an interchangeable camera without the hassle of changing lenses
Thank you for this insightful read, including the practical aspects of actually taking panoramas! Unfortunately, the best panoramas can be produced when the sky is not uniform, and in lighting conditions that often exist when there is some wind and movement of the clouds, so time is quite important.
Do you know whether changes in the focus distance induce changes in the location of the entrance pupil (no-parallax point) that should be corrected for?
If I were doing this I probably would focus the foreground and take 5 images left to right, focus the middle and take 5 images right to left, focus the background and take 5 images left to right. That way I’m only focusing 3 times and the overall capture time is less.
very clever…thank you for this comment
However, the stacked images must be taken at the same place and angle, and that is difficult to realize when you turn the panorama plate between images, even if it has notches.
With the Nikon Z cameras, you can focus stack quickly and automatically! This should be very helpful and quick.
Just curious: what post-processing sequence is recommended for a focus-stacked exposure blend (“stack & blend” or “blend & stack”) – and why?
Helicon Focus can process multiple raw files into a single raw file. Worth the extra bucks because you can do all your raw processing post-stack. HF also offers a lot of stacking options.
I’ve used technique this for indoor based macro shots where I wanted a lot more of the scene than a 105mm macro lens allows and also for wide landscape panos with a 24-200mm, where my nearest subject is under a few feet away. I use Helicon focus Remote for the stacking and then stich them in Affinity or PS. The hardest part, for outdoors, is to try and ensure that the light levels don’t change to much as you do the stack and then the pano. It can take quite a few minutes to do complete set of, say 6 stacked portraits for each scene and then swing the camera around to do a pano of each stacked scene. Good to see that PL is covering this subject as I haven’t come across it elsewhere.
Indoor example: photos.app.goo.gl/sCUohwEfQYpa2fBu6
Outdoor example: photos.app.goo.gl/MnirjGHD5npMDHXN7
You might want to use Photoshop for a simple 5 image Pano. I’d always stack first. You just have to remember in which order you took the images or even take short notes.
As Pieter pointed out before, this will not work with a 360 degree panoramic image and photoshop, especially when you do a 360*180 degree ball sphere. PS will never ever know how to sort the images of the sky. Therefore I’d always recommend a dedicated stitching software. One has to be able to manually sort the images.
The crown solution is the use of an xml file to sort the images in the stitching software.
And after you have eventually successfully stitched the image comes the “great pleasure” of leveling the sky colors. I had only rare occasions where these where acceptable after stitching.
Greets,
Dirk