If you’re trying to photograph the small world of plants and bugs, you’ll face plenty of challenges along the way. Macro photography is a difficult genre — you’re pushing up against the physical limits of depth of field, diffraction, and motion blur. Naturally, focusing in macro photography isn’t an easy task, but it’s a crucial one. How do you optimize your focusing technique for capturing small subjects? The answer depends upon exactly what you’re photographing.
Table of Contents
Scenario 1: Photographing relatively large subjects
In macro photography, a “relatively large” subject is something the size of a dragonfly or a flower. It’s still small, but it’s not at the level where you need very much specialty knowledge to capture a sharp photo.
If your subject is about four inches (10 centimeters) or larger, my recommendation is just to focus like you normally would on a moving subject. Use your continuous-servo autofocus (AF-C), with an autofocus area mode that does a decent job tracking your subject across the frame (something like dynamic area or 3D tracking mode).
Even if your subject is staying still (say, a flower on a day without much wind), it’s still best to use continuous-servo autofocus. That’s because, while your subject might not be moving, you will be, no matter how still you’re trying to be. It’s impossible to remain completely motionless while handholding a camera, and any slight movement is very easily visible at such close distances.
The biggest difficulty here is that fast-moving subjects still won’t be very easy to focus on, and there’s not much you can do about that. My main recommendation is to take several photos in a row — on burst mode, for example — since there may only be a fraction of a second where your image is perfectly focused. You don’t want to miss it.
Scenario 2: Photographing smaller subjects
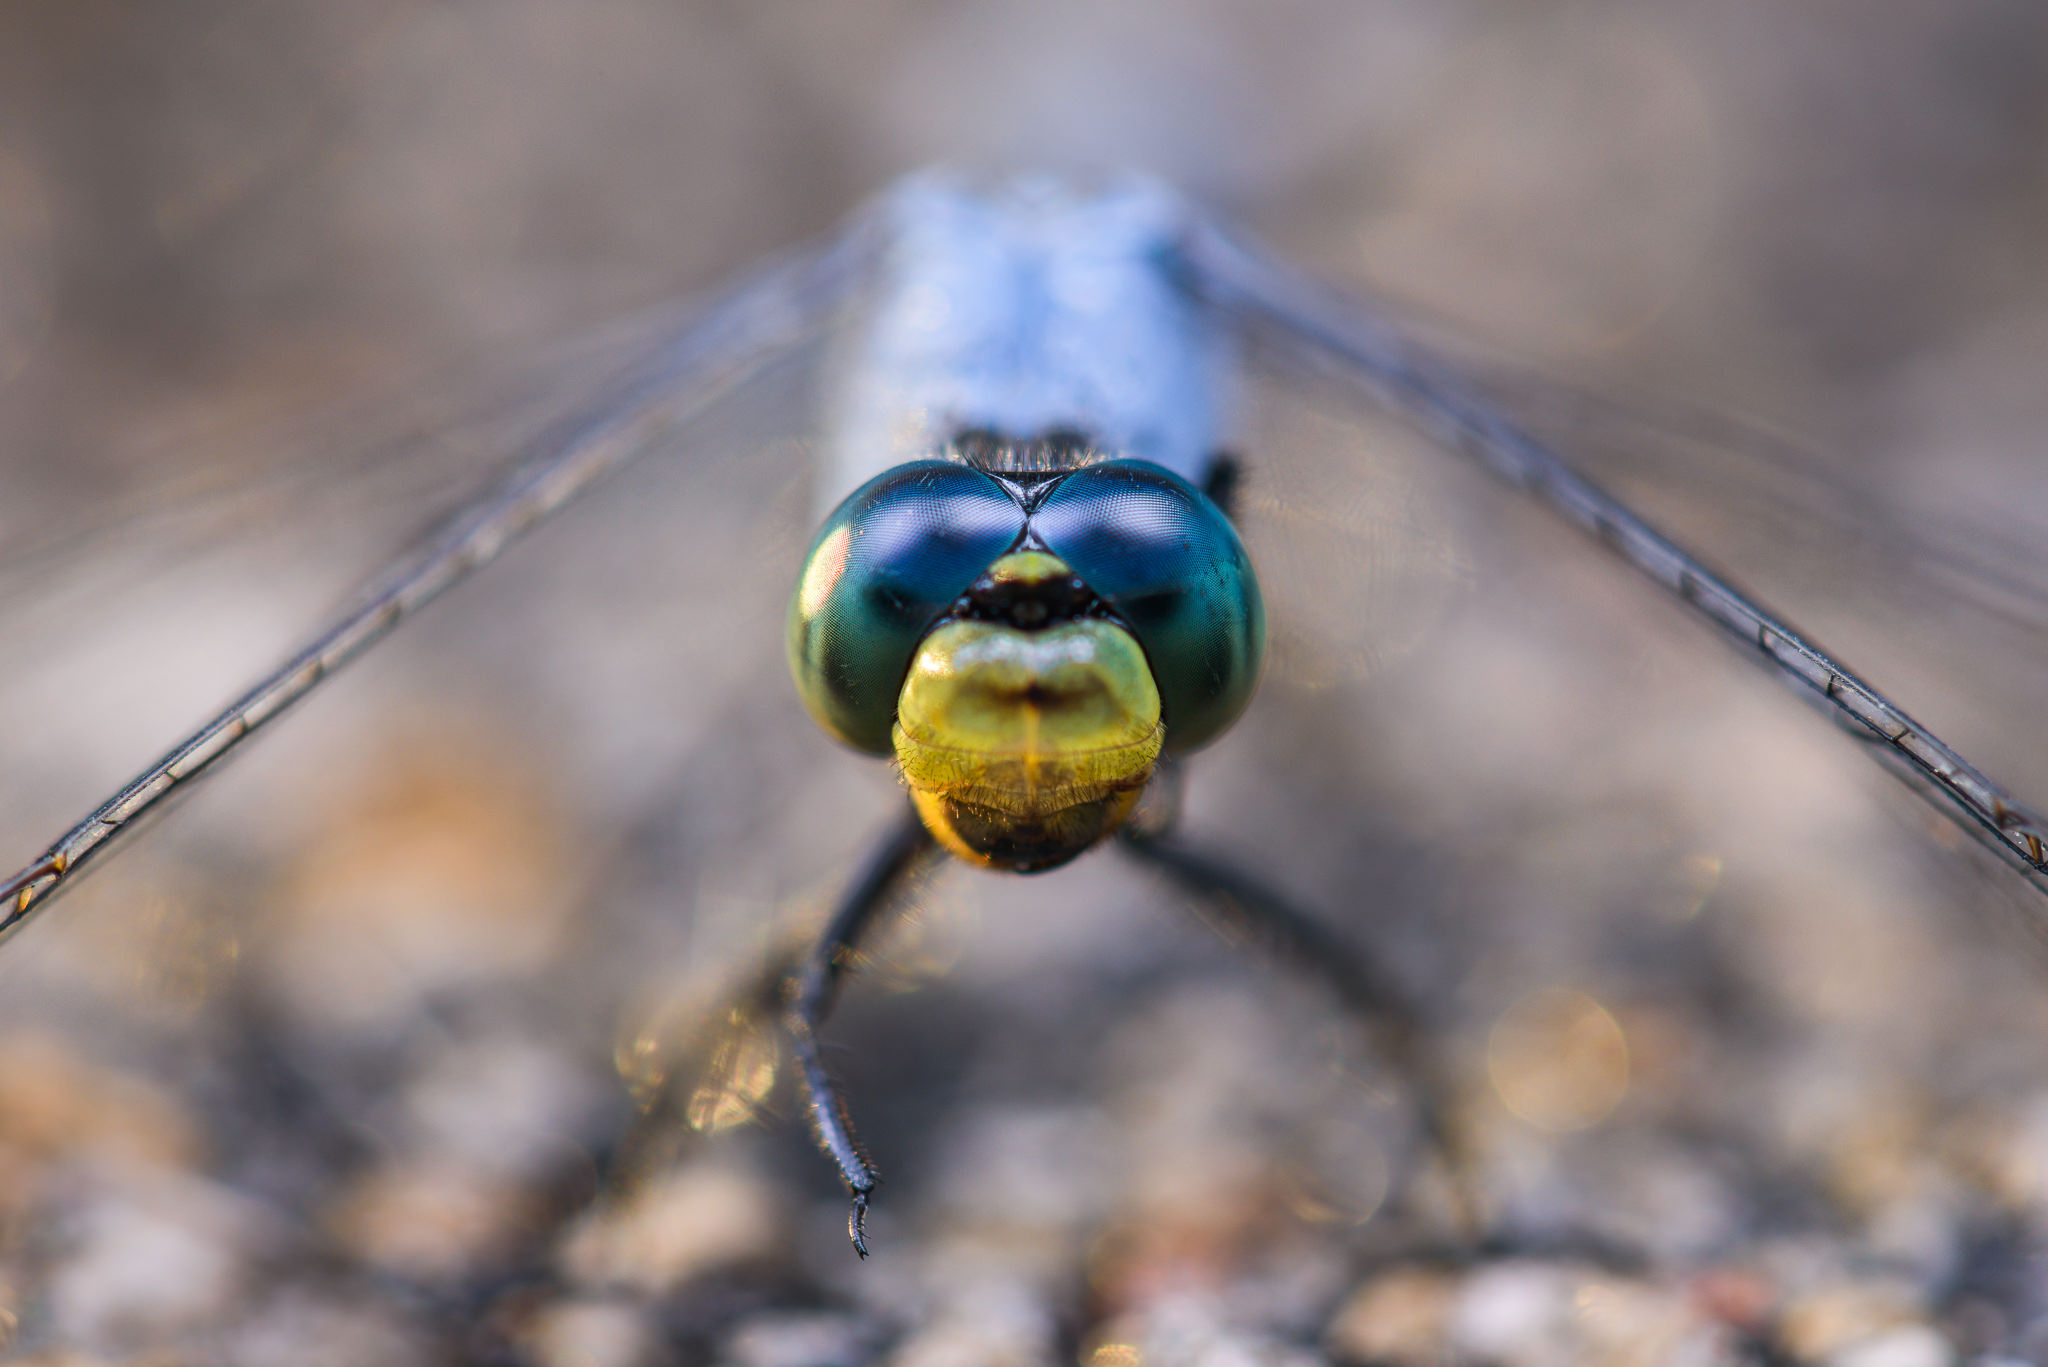
By the strictest definition, “macro photography” means that you’re focused at 1:1 magnification or stronger. So, if your camera sensor is 1.5 inches wide, the scene captured in your entire photo will also be 1.5 inches wide, or smaller. That’s where things get tricky.
At this magnification, moving your camera forward or backward just a few millimeters at a time is more than enough to throw your entire photo out of focus. And even if you do focus successfully, your depth of field will be remarkably small. In fact, if you want just the head and body of an ant to appear in focus simultaneously, you’re probably out of luck.
As you might expect, even the best autofocus systems on the planet will struggle in situations like this. The problem becomes even worse if your subject is moving around quickly, and you have to track its movement without losing focus.
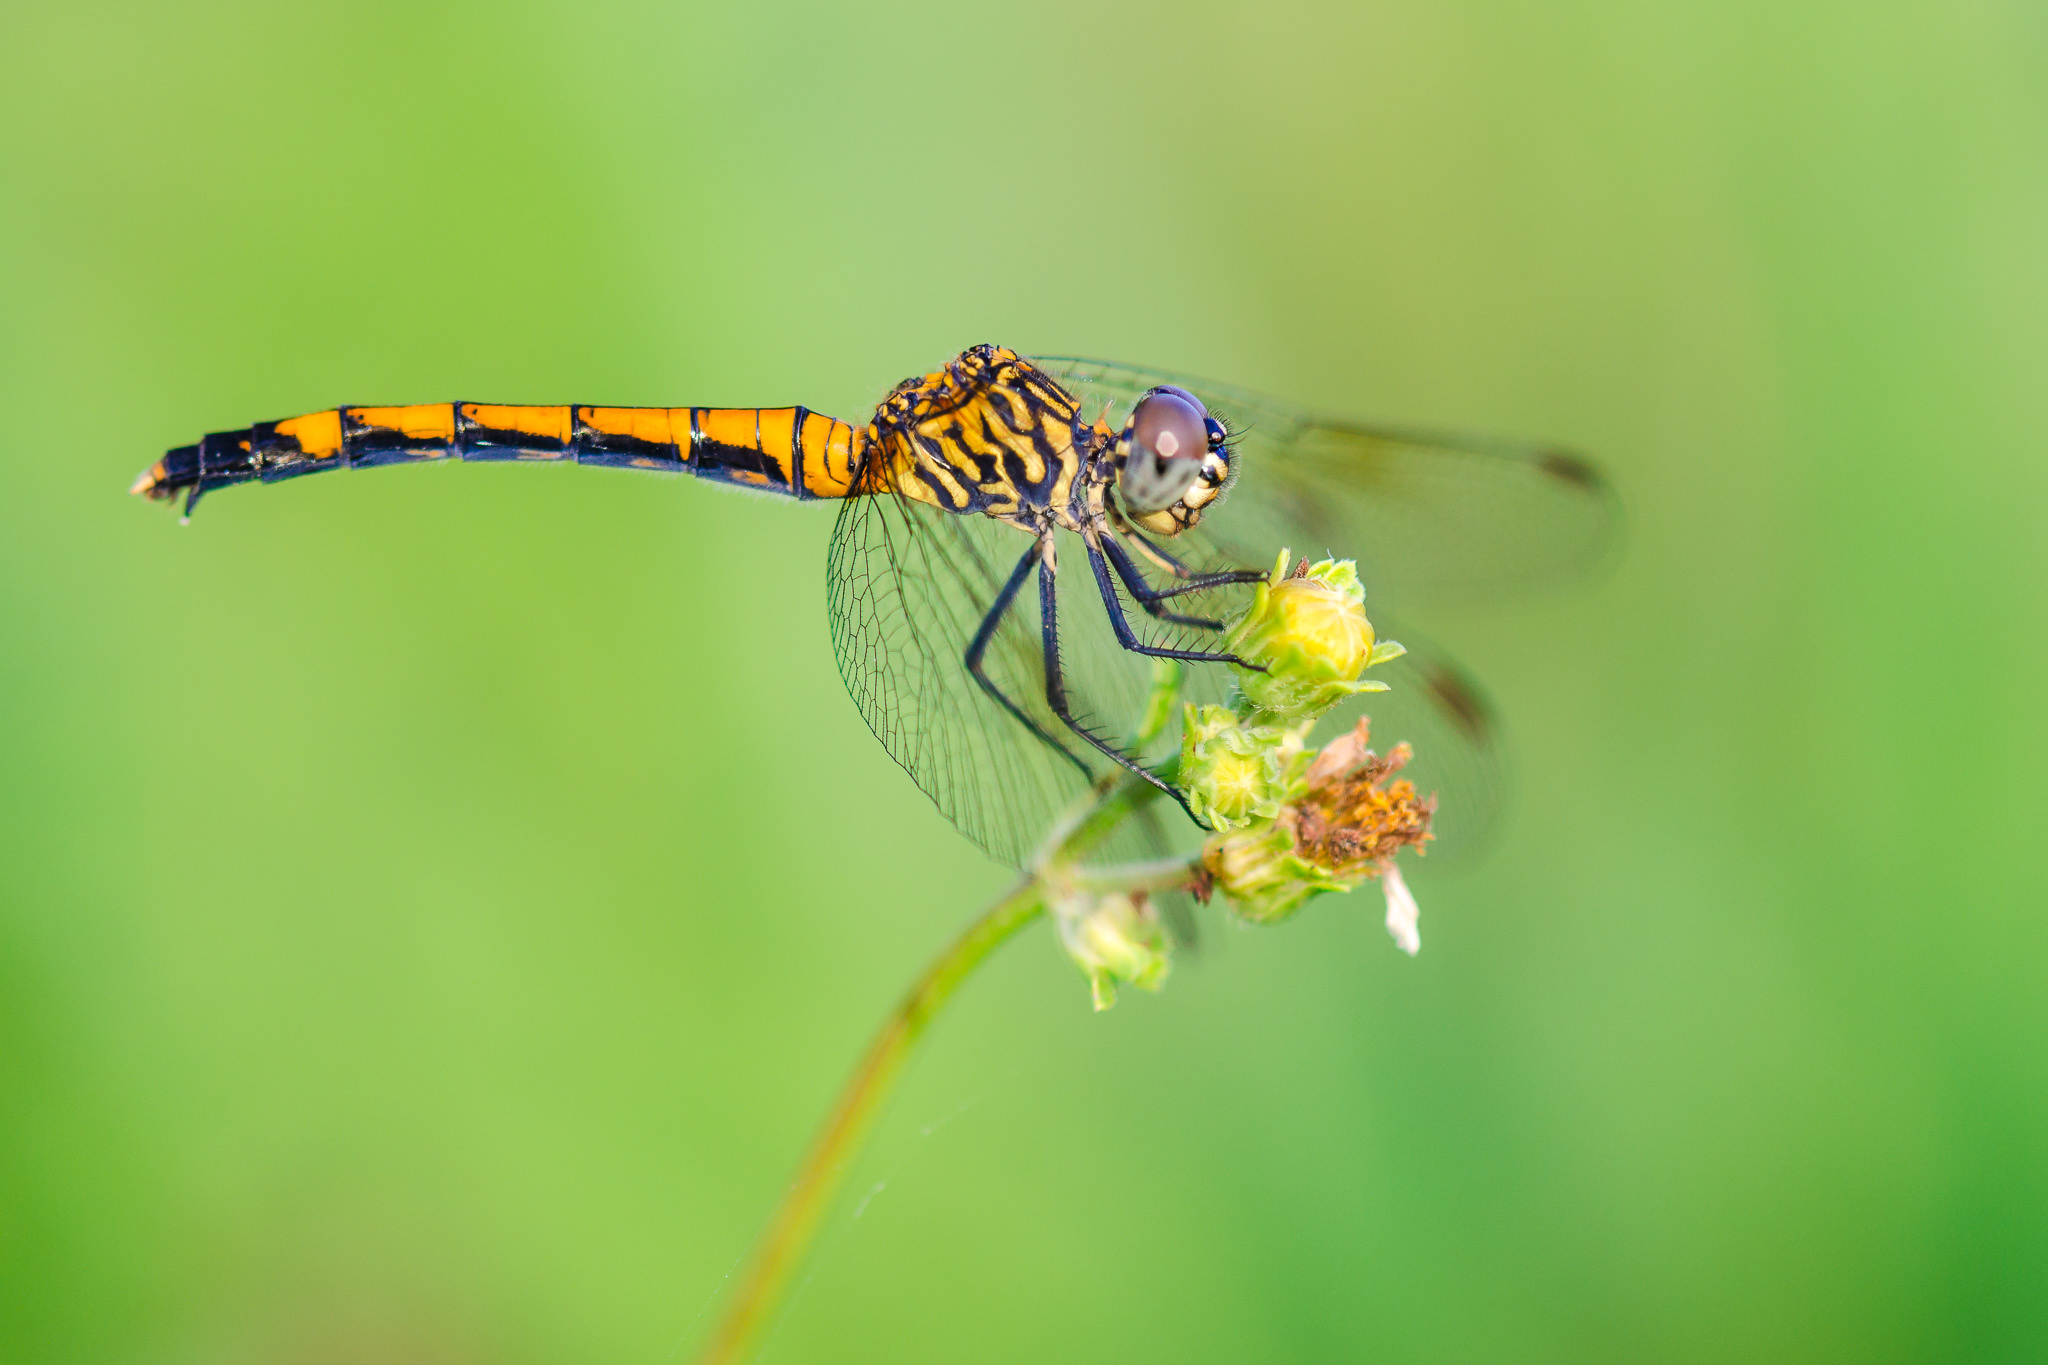
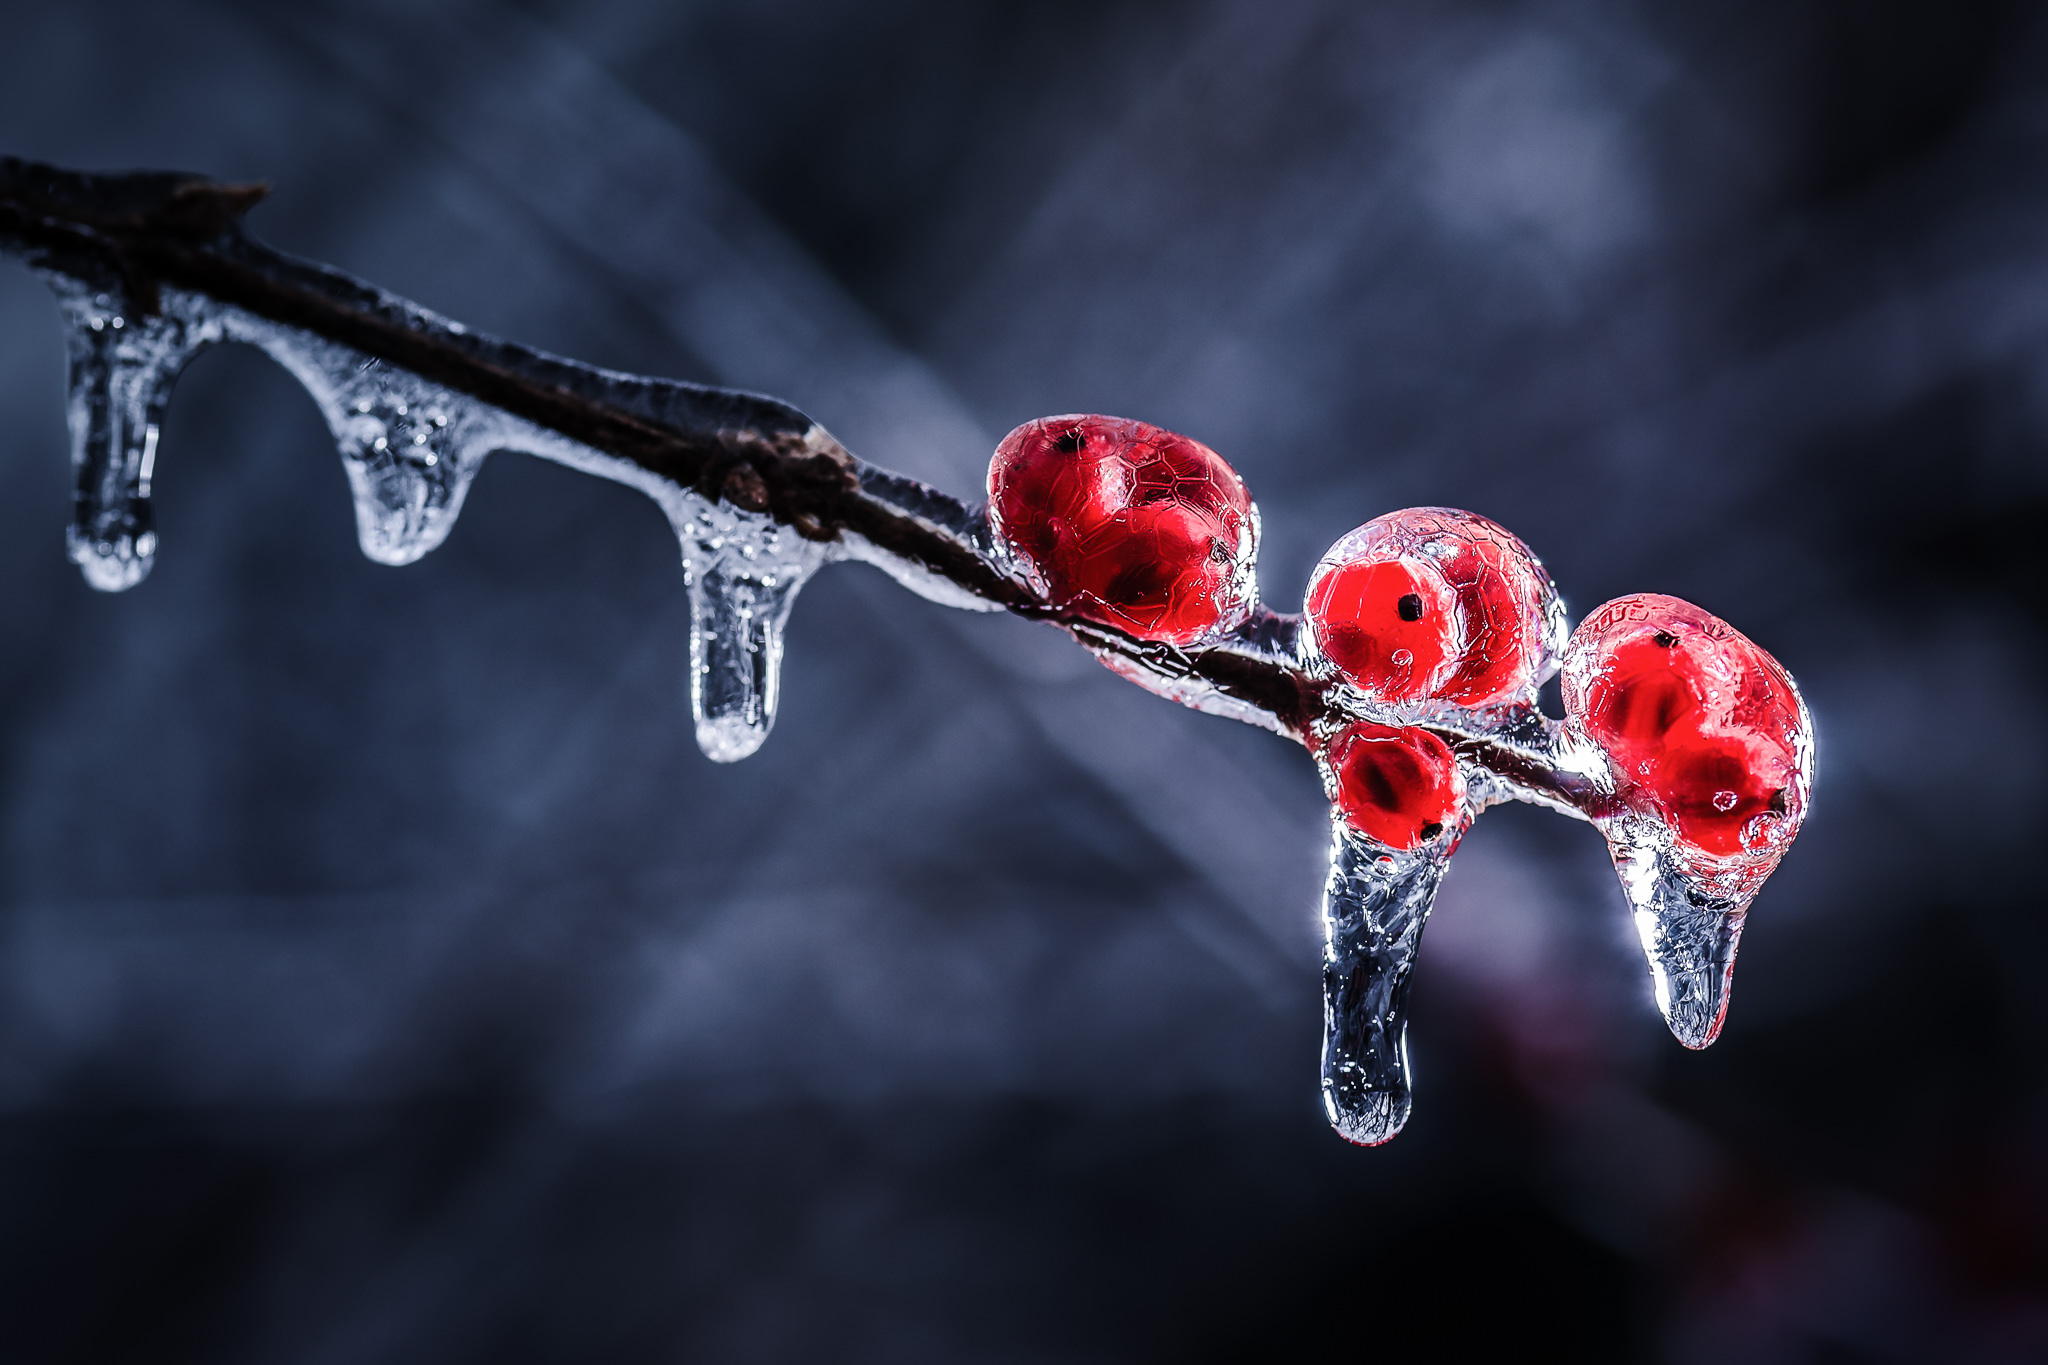
But that doesn’t mean it’s impossible to focus on tiny subjects, even if they’re moving. The insect in the photo below, for example, was moving around very quickly, and I was focused at 1:1 magnification for this shot. How did I manage to get it so sharp?

The answer is surprisingly simple, yet counterintuitive: Use manual focus.
Yes, for normal photography, manual focus tends to be slower than autofocus. Plus, for fast-moving subjects, it is generally less accurate. High-magnification macro photography is a different beast, though, and this is one case where manual focus is the best option available — but only if you use it correctly.
The proper way to focus manually for macro photography isn’t to compose your photo, then spin the focusing ring until the image in your viewfinder appears sharp. Instead, it’s to set your focusing ring at a particular point, and then move forward and backward until the image appears sharp.
For example, for high-magnification macro photography, I’ll set my lens to its closest focusing distance of 1:1 magnification. Then, I’ll slowly rock forwards and backwards in the field, by no more than a couple centimeters at a time, waiting for my subject to look focused. When it’s perfectly sharp — which may happen for just a fraction of a second — I take the photo as quickly as possible.
This process is made easier by using a relatively small aperture, typically somewhere from f/11 to f/22. That, of course, cuts down significantly on the amount of light in your photo, and chances are good you’ll need to use a flash to optimize your photo. I’ve covered some of this before in an article on macro photography lighting.
If it helps, you might consider resting your camera on top of a monopod or stick while you move it forward and backward. That can cut out on some of the extra vibrations and imprecision from handholding the camera, although the downside is that you’ll lose some flexibility with regards to your camera’s height.
Also, be warned that even a good macro focusing technique won’t give you a perfect success rate. Personally, even under the best possible conditions (no wind, and a nonmoving subject), only about 1/3 of my handheld 1:1 magnification photos are as sharp as possible. It’s not an easy job.
However, this is the type of thing you’ll improve upon over time. Like all areas of photography, it takes practice.
Should You Use a Tripod?
Some macro photographers get around the difficulties of handheld focusing simply by using a tripod. Which types of subjects lend themselves to this method? In general, for a subject that is moving, it is almost impossible to use a tripod and accurately capture an in-focus macro image. Instead, it’s best to use a tripod for relatively stationary macro subjects.
If your subject is staying still, you have a lot of flexibility in how you set up your tripod. You can take as much time as you need to move the tripod forward and backward, adjust its height, and change your composition. Still, there are some tripod attachments that are invaluable for this type of photography, since they’ll make your work much, much quicker: Focusing rails.
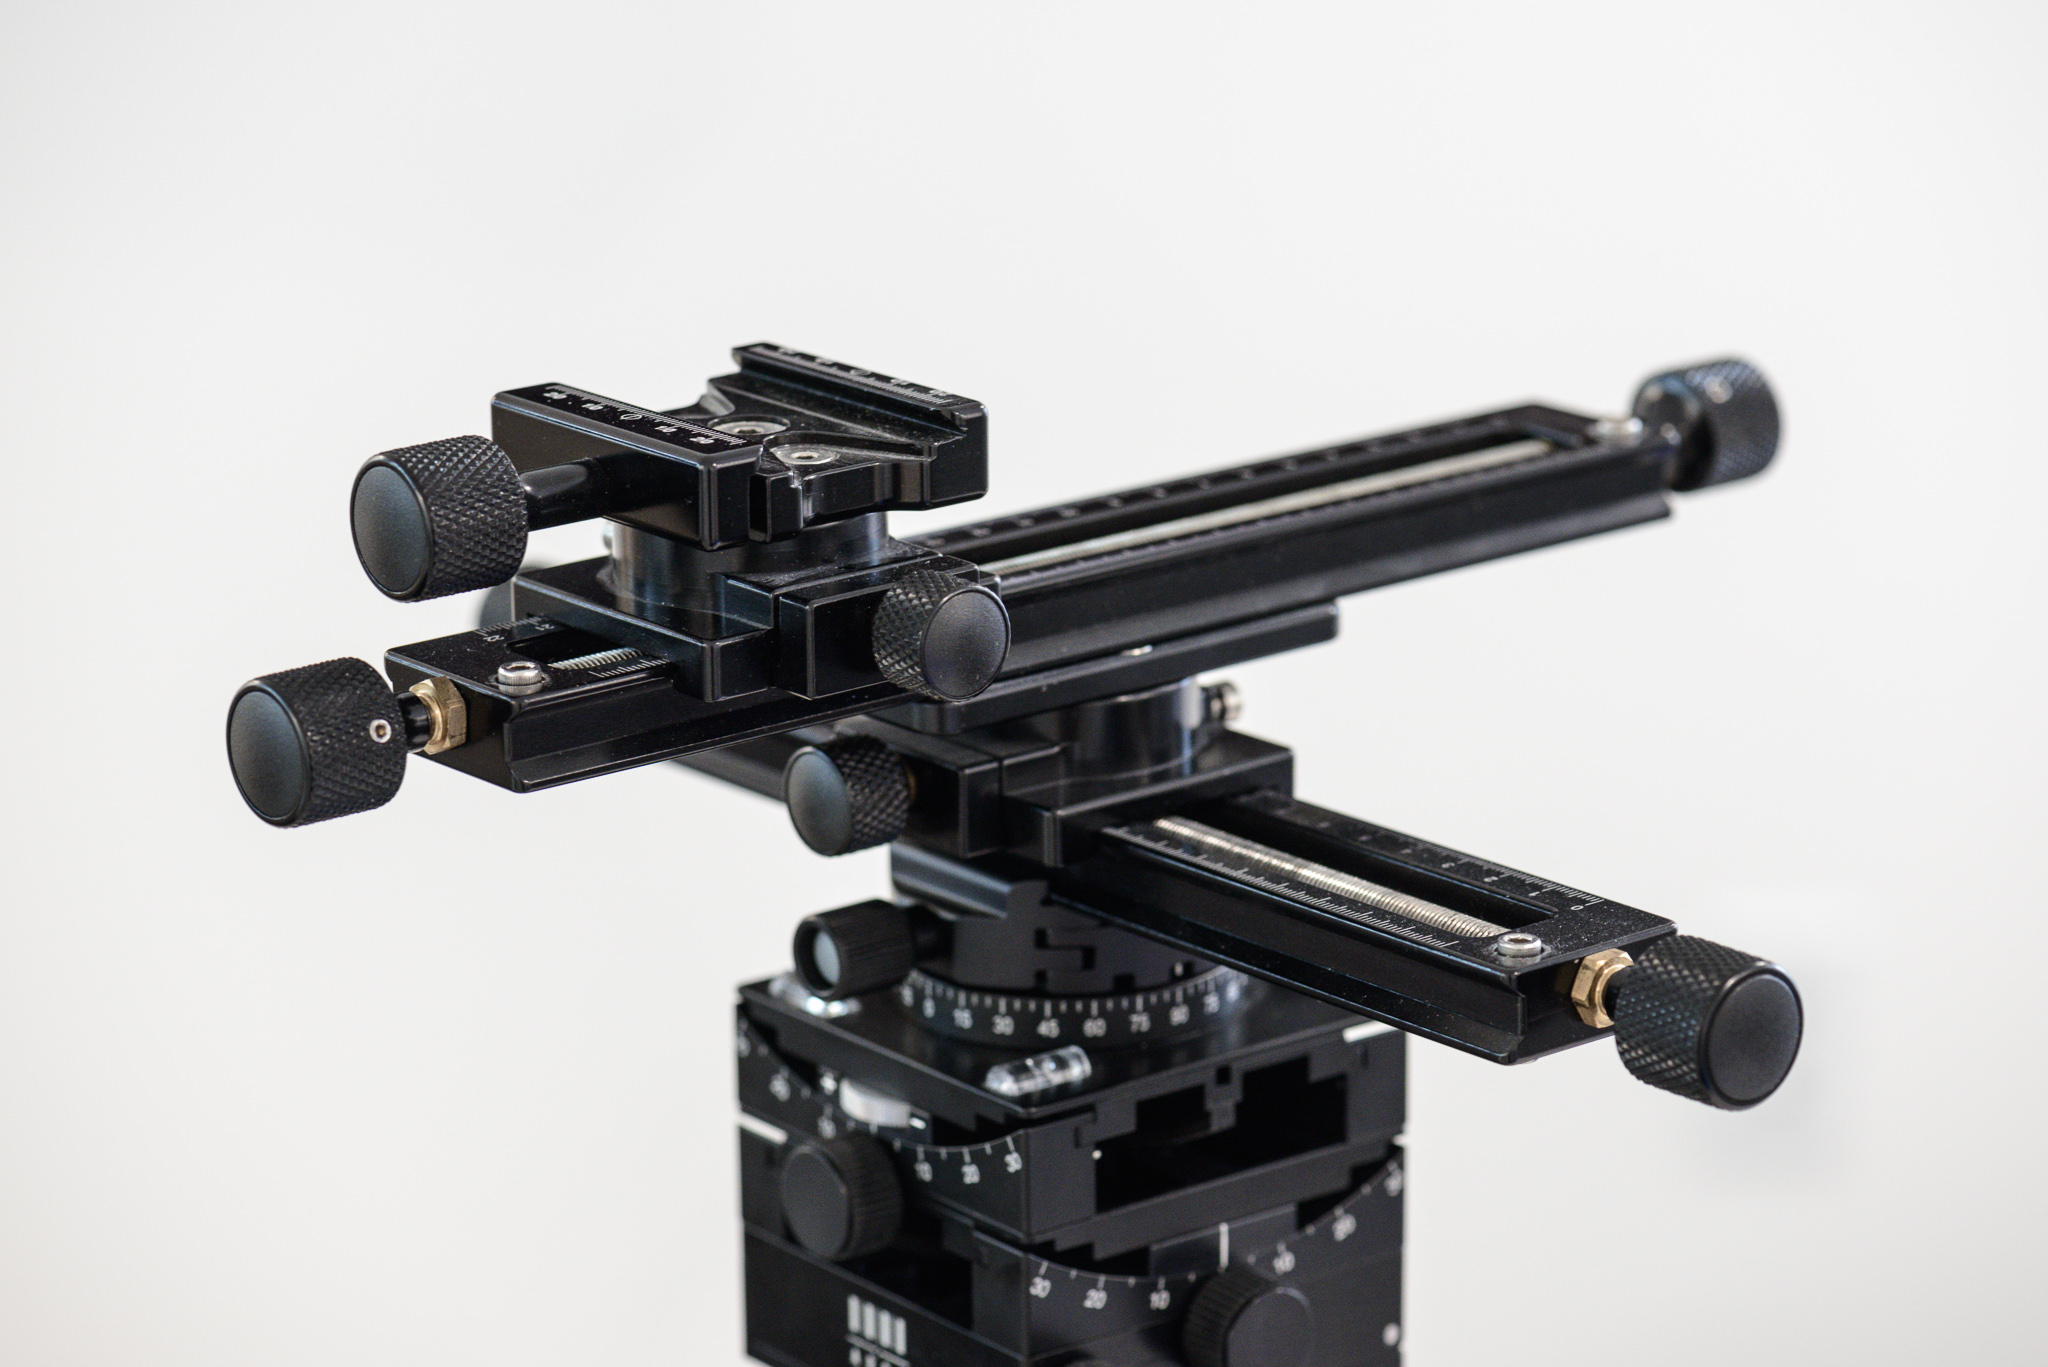
With a complete focusing rail setup, you have the ability to move your camera by fractions of a millimeter at a time, in any direction. Compare that to a typical ballhead, where the finest movements you can make are very large and imprecise. The difference will be night and day; a focusing rail setup can save you a lot of time and headache in the field.
Also, focusing rails make it far easier to focus stack your macro photos, which can be valuable for capturing the greatest possible depth of field with nonmoving subjects.
Conclusion
Where there’s a will, there’s a way. Focusing in macro photography isn’t an easy task, but you still have options at your disposal to capture the sharpest possible photos.
For relatively large subjects, just focus like you would for typical handheld photography, as if you’re just taking normal pictures of wildlife. For smaller subjects, though, your best bet is to focus manually, while rocking forward and backward until your subject looks as sharp as possible in your viewfinder. Neither of these is a perfect method, so, if you’re photographing nonmoving subjects, you may prefer a tripod-based setup with focusing rails instead.
As with all things in photography, the method you use will depend upon the specific subjects you tend to shoot. It’s possible to focus on nearly every subject in macro photography (though bugs in flight still remain my nemesis), so the best thing to do is simply to practice. The more time you spend perfecting each focusing method, the better your macro photos will be.
Aha! I found the MOST relevant place in your website, to pose my questions.
Some macro photogs suggest in their YT tutorials to first set your lens to INFINITY, leave it there, and move your camera (or subject) into focus.
Why is that suggested?
My lens has no infinity indicator – how would I know/ how would I accomplish setting my lens to infinity?
I’m presuming that my “infinity” would change when adding extension tubes – and I’d have to adjust my focus lens for those changes, would that be correct?
BTW – my main lens for macro is a Canon 50mm F1.8 STM. I have two other lenses from Canon, each have infinity indicators, but to achieve infinity, each needs to be revolved opposite to each other – so Canon lenses aren’t standardardized and that befuddled me, trying to reach an answer to my “which way to turn my lens to achieve infinity”?
Many thanks in advance for educating me!
Hate to be a smart ass, but I’m just wondering how a 105mm f2.8 lens can be at any other focal length than 105mm?
Our caption system automatically extracts the name of the lens and the focal length it was shot at. When a teleconverter is used, it will say something like Nikon 105mm f/2.8 @ 210mm.
Thanks for explaining the “focus by leaning” technique. I am planning to try it to get some use out of a Leica 180mm Elmarit-R that is jammed at the minimum focusing distance. It had been converted to Nikon mount and I added pre-ai K extension tubes to my old D700 to complete the setup.
Hi, great article love the photos. Wonder if you can give me any pointers on using a macro converter recently got a neweer .43 mm wide angle lens with a macro lens that detaches but for the life of me cannot get it to focus, wide angle works perfectly but I am obviously missing something using a d3300 Nikon on manual mode on a tripod or do you have any helpful article on using these? Apologies if this is the wrong place to ask
I have Tamron 90 mm macro lens. I tried to click tiny flower whose diameter is almost 1 to 1.5cm. To get the bigger size in the frame I tried to click the shot a distance lower than minimum focusing distance . I used manual focus method & used the camera in hand held mode. The result was image partially out of focus & subject size was bigger than actual. How to get sharper image of small subjects at a distance lower than minimum focusing distance . I didn’t use any macro extension tube . Please suggest the way forward.
You should try some extension tubes like you mentioned. They will work on your macro lens and they are not expensive. I have had very good results using a middle-sized extension tube on my 100 mm macro lens to photograph small insects. Good luck.
Excellant article, thank you. I have photographed wildlife for many years, but only recently got into macro, dragonflies, etc. I was confused regarding my recent poor focussing results, until I came across your article. In particular the mentioning of the photographer moving back and forth, and so continuous focussing becomes useful, (mostly I had previously used fixed focus mode). Thanks again!
Macro photography is something that I want to start getting into. I am looking for the right equipment to get started with. These tips are very helpful to know for any beginner. Your photographs are stunning. The way you capture these photos are stunning. You take such a small object and make it the center of attention. You have to remember to take a look at the small aspects of the larger surroundings.
I am happy to hear that you enjoyed the article and photos! I hope it gives you a good jumping-off point for starting in macro photography. You may find the general macro tutorial I wrote (photographylife.com/macro…y-tutorial) to be useful as well.
If you’re using a 105mm macro or longer, you can improve your DOF by backing away from your subject about 12-18 inches. The lens is long enough to bring in a very small subject as if the camera were right on top of it. Works for me, anyway. The other tips I know and use effectively. Also, macro is one place where a really good (really expensive) normal lens pays off. I think. Jim I.
Yes, at magnifications like 1:2 or 1:3, you’ll get much more depth of field than at life-size magnification (twice as much at 1:2). Thanks for adding this.
As always, a very instructive article by Spencer. Great follow up discussion.I am a beginner and have ventured in Macro a little. I have a Tamron 100 mm Macro prime lens, w/o image stablization.
I find impossible to use a tripod for outdoors shhoting. Even a monopod is not stable enough. I wonder if image stabilization is available on Macro lenses? Thanks for the suggestion of using AF-C and burst mode. It should be helpful.
Often, image stabilization becomes less and less effective as you focus closer and closer. I’ve found some benefit even at 1:1 magnification, but it isn’t as much as you’d expect. (It’s more effective on some lenses than others.) Personally, the method I use instead is to light everything with a flash, so that blur from camera shake no longer becomes a problem. The duration of the flash is around 1/8000 second, depending upon its power, so it totally freezes nearly any movement you can think of. It doesn’t make focusing any easier, though!
One other thing I’d add is that if you’re shooting a subject low to the ground and using a tripod, a right-angle finder is extremely useful. With a RAF and a camera a few inches off the ground, you can see what you’re doing without getting a crick in your neck.
For these situations, I have found the fully articulated lcd screen of my camera invaluable! It’s given me the flexibility to comfortably shoot from any position, from right on the ground to high up at the end of my fully extended balancing-on-my-chest tripod (triggered by wireless shutter release). The swivel screen has also saved my fragile neck during astrophotography/time lapse photography off a tripod.
Totally agree – having that feature on the newer bodies has been great for really low and high shots, too.
Thanks for adding this, David!