This is a follow-up article to the tutorial I published a few days ago on how to create a panorama image in Lightroom. In the article, I used a very simple and straightforward panorama image which could be merged without any errors virtually on first try. The image did not have a main object of interest and only a few points that needed critical precision during stitching process. I chose this image for the sake of convenience – I didn’t want it to cause any apparent problems while I tried to explain how to seamlessly include Photoshop or any other panorama merging software in your Lightroom workflow. However, we all understand that, more often than not and especially with Brenizer method panoramas that I love so much, the stitching process is far from being perfectly accurate every time. More complex panoramas require several tries before the stitching is done properly, or manual correction. But how do you manually correct a panorama that you are trying to merge through Lightroom? It is actually easier than you may think and is unlikely to upset your workflow in any way.
In this tutorial I will take you through the steps of merging a panorama that initially has stitching errors, start to finish. I show you how to deal with panorama inaccuracies in Photoshop as Lightroom’s External Editor. As before, most of the work will be done in Photoshop, but the goal is to do so with every step integrated into your Lightroom post-processing workflow. Even if you do not use Lightroom, this article should help you correct any mistakes Photomerge may have made during panorama stitching process.
Table of Contents
1) The Disclaimer
I feel I must once again mention that Lightroom alone, as unfortunate as it may be, does not have panorama stitching functionality. There is, of course, a workaround. What Lightroom can’t do on its own, it can do with the help of External Editors and plug-ins. Panorama stitching happens to be one of those holes you can fill in quite easily if you own a Lightroom-compatible panorama stitching software which, in my case, is Photoshop. So, in order to create a panorama in Lightroom (sort of), you need to export those files to an External Editor.
A lot of beginner and amateur photographers end up comparing Lightroom and Photoshop for their post-processing work, with Lightroom usually being the step up. The same photographers are likely to try and find out how to perform one or another task with Lightroom. Panorama photography is bound to come up sooner or later. Sadly, I can not provide such readers with a positive answer saying, yes, you can merge panorama images with Lightroom alone and fix them up any way you like. But I can provide an alternative solution and highlight one of Lightroom’s biggest strengths – the ability to use other software tools to perform tasks Lightroom itself can not do on its own. So, yes, we are not merging panoramas with Lightroom and not using it to fix any errors, either. But we are using Lightroom as the base for our workflow and finding ways to incorporate panorama merging, however difficult, into said workflow. With that out of the way, let’s get to work.
2) The Photograph
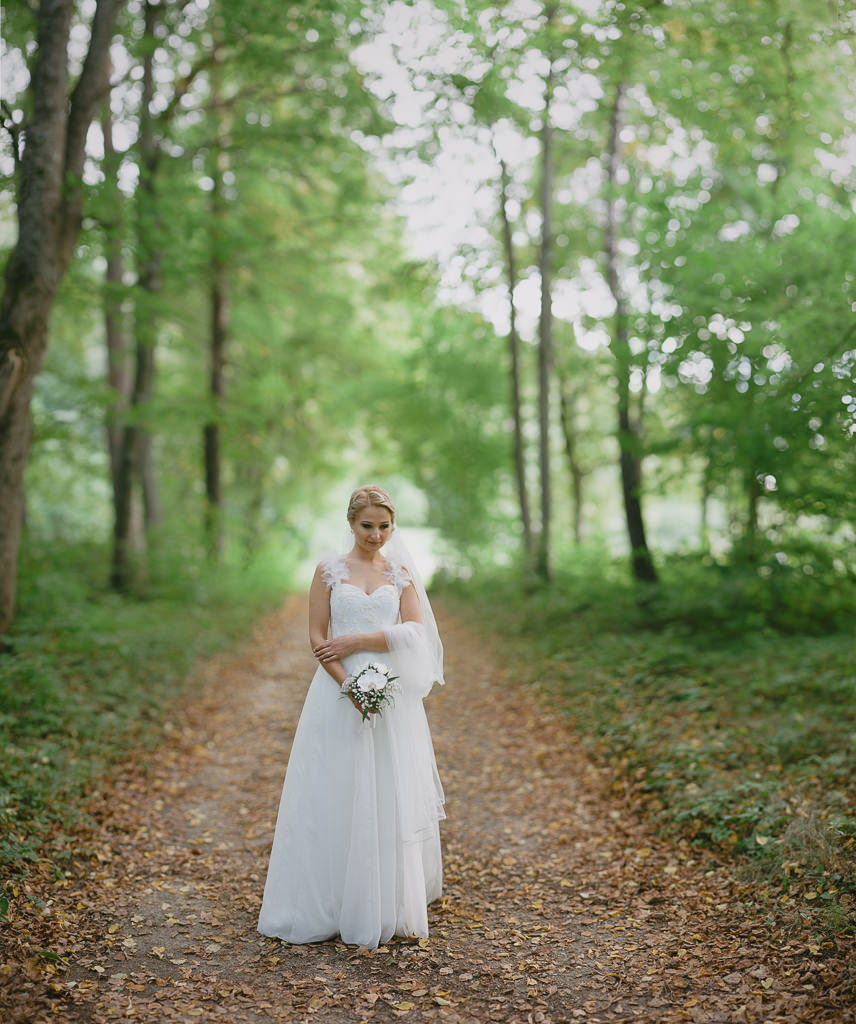
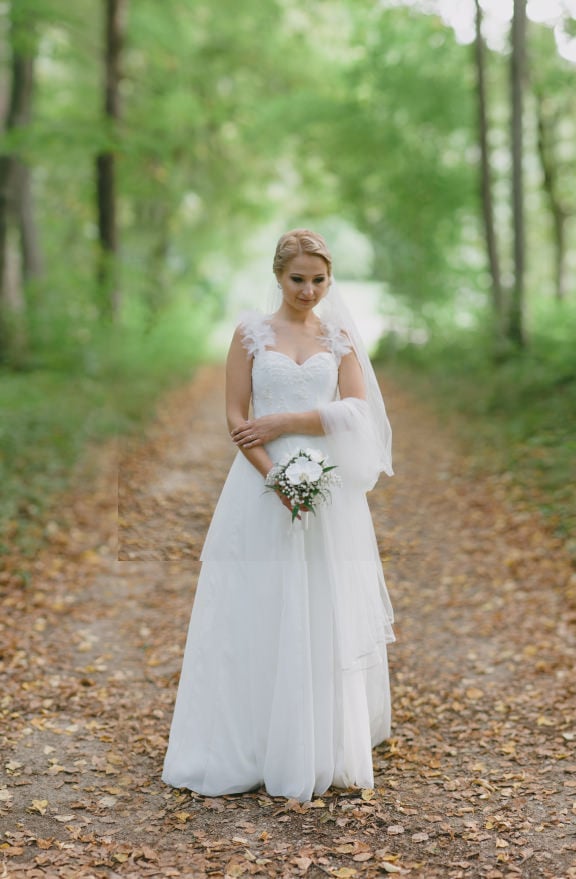
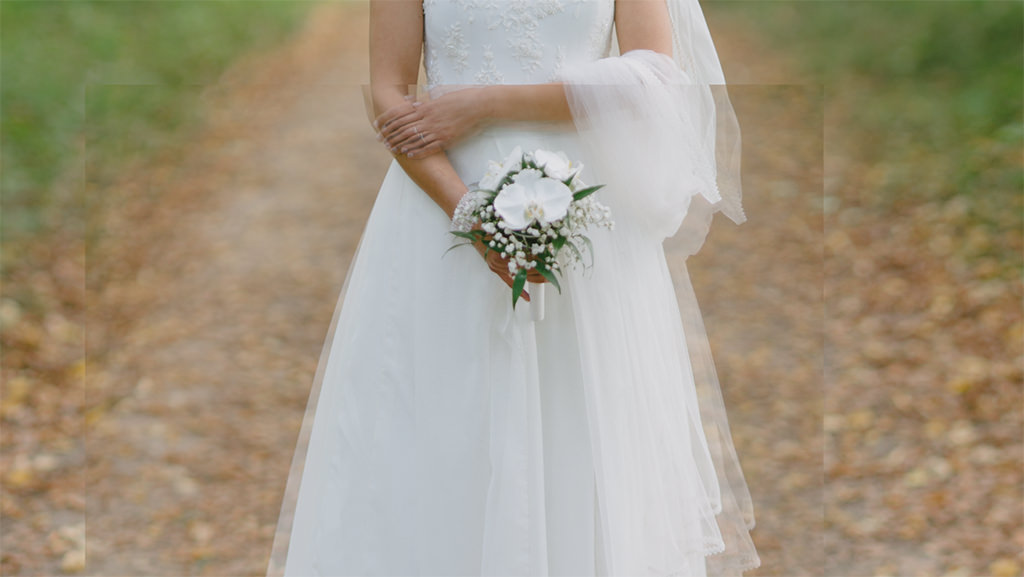
First, we need an actual panorama to work on. One that will have an error or two for us to fix. Not accidentally, I happen to be working on one such image and it makes a perfect example. It is a 34-image panorama overlaid, as I usually do, with extra care. Notice how much negative space there is around our main subject:

These out-of-focus areas are very easily merged and allow plenty of room for error due to how chaotic they are. These areas we do not really need to worry about unless we get three identical trees one next to another in the background to cause suspicion. What we do need to worry about is making sure Justine is as God created her – not bigger or smaller than she is, with two normally sized hands, one head and everything else where it should be. We also want to make sure her dress is not somehow messed up during the stitching process. So, these are our goals. Let’s get on with the actual stitching and see if perhaps everything’s dandy to begin with (which, of course, it is not).
3) Run the Fragments Through Photomerge Tool
The first few steps I talked about in my “How to Create a Panorama in Lightroom” article are perfectly applicable in this case, as well. So, as before, we need to import the fragment RAW files first and post-process them – apply color correction, sharpening, noise reduction and so on. Again, it is necessary to correct distortion and vignetting before stitching the images into a single panorama through the use of Lens Corrections tab to avoid dark patches caused by vignetting throughout the final photograph. It is especially important with Brenizer method panoramas, which are taken at wide aperture settings that result in easily noticeable vignetting.

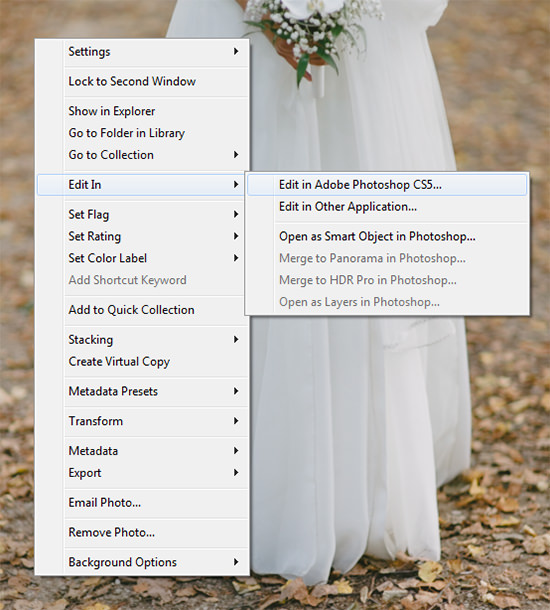
Photomerge can do vignetting and distortion correction on the fly in Auto layout mode, but I’ve learned not to trust it. Often, these corrections mess up the highlights (which become dull and gray), plus, when using Lens Corrections tab, Lightroom knows exactly how much vignetting and distortion correction to apply with each lens (if supported with a lens profile), so it is a lot more accurate than Photomerge. It, too, uses metadata from the file to identify the camera and lens used, but I just find it less dependable. Your preference may vary. Once you are done with post-processing the images, select them and export to Photoshop’s Photomerge tool by right-clicking on any one of the selected files and choosing “Edit In” – “Merge to Panorama in Photoshop…”. This will automatically open your version of Photoshop with all the image files already listed in Photomerge.
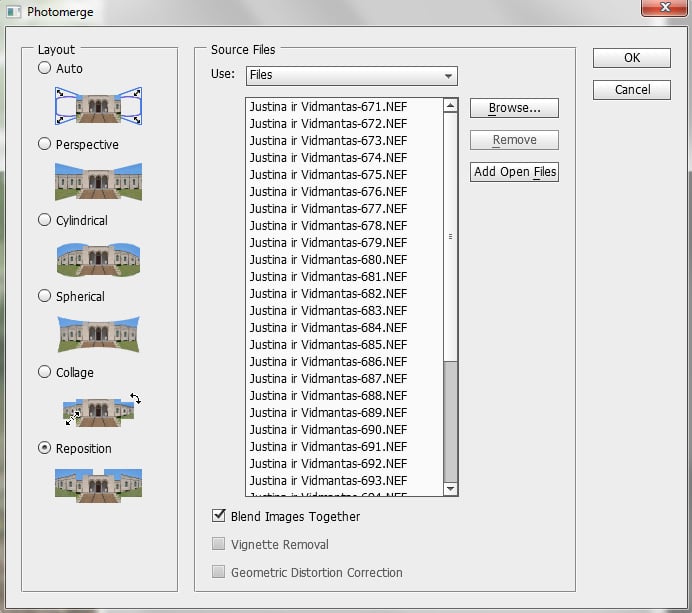
Choose which merging layout you want Photoshop to use. Auto works well most of the time, but is also somewhat of a compromise. I don’t like how it distorts the final panorama. For the way I shoot, simple Reposition layout does wonders, and that is what I’ve chosen for this portrait. Make sure to select the “Blend Images Together” checkbox and click OK to start the stitching. Here is what the result I got on my first try:

Notice how the image looks good already with no immediately apparent errors, like three arms sticking out of a tree in the background. It is not distorted, either – because I chose the right merging layout. This means I can go ahead and flatten the image (merge all layers into one and apply layers masks) by hitting Ctrl+Shift+E (Windows). Do not think it is perfect just yet, though. Now it is time to examine the shot a bit more closely and see if indeed everything is as fine as it looks.
4) Find the Errors
Photoshop’s Photomerge tool is usually very capable, but can occasionally fail to deliver an image that is stitched perfectly. Often when working with complex Brenizer method panoramas with sensitive subjects, such as people, I get one or two errors that I need to take care of myself. Mostly these errors happen due to parallax and lens distortion (especially with wide-angle lenses which stretch the corners of the image). That does not mean errors can not be avoided or masked with proper shooting and merging technique, of course. To learn more about panoramas, read our dedicated tutorial. Now, let’s take a closer look at the areas Photoshop rendered incorrectly. The first error is with my bride’s face:

See how she is winking with her right eye? That is not because she winked at her husband as I was photographing, it is because the area that includes her face is made up of at least two images while it should be just one. In one of the photographs used she blinked at the time of exposure, while in the other one she had her eyes fully open. Unfortunately, Photoshop decided to stitch this part of the panorama from two different images. Here, take a look at how this part of the panorama was merged:

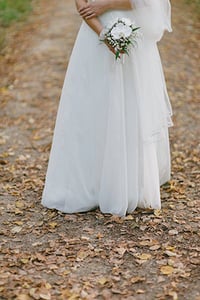
But that is not the only area that needs attention. The bride’s dress is also rendered with errors which make it look slightly stilted. It is not as noticeable at first glance as the first error, but I’m very thorough with my panoramas, especially when poor stitching happens with my main subjects. If you look closely at the bottom of her wedding gown and the fallen tree leafs right next to it, there are repeating details in there from several photographs:

That we also need to fix. But how?
5) Dealing with Stitching Imperfections
There are at least three ways you can get rid of inaccurately merged parts in a panorama. Two of the three are also very easy, so let me start with those.
5.1) Minimize the Number of Fragment Images
The easiest and best way to fix mistakes is to avoid them altogether. One way to do that is to choose the right merging layout in Photomerge dialogue, of course. But it is not the only way. As I’ve mentioned, I took this panorama image with my usual tendency to overlay too much just in case. This means that, out of 34 images, about 25 or possibly even less would be enough. Some of the images are unnecessary and will actually cause errors. You see, for such a relatively narrow angle of view (of the final panorama) having 34 images means several of them can and will be used to stitch a part of the final image that would otherwise make do with just one source file. Remember, the more images, the more stitches, the bigger the possibility for errors. Were I not trying to show how to fix stitching problems, I’d throw away all images that are dominated by the bride but two best ones (since I was standing too close to frame her in a single photograph). That way, I would have avoided both stitching inaccuracies we identified earlier. However, since I am actually trying to simulate a badly stitched panorama, in this case sorting through them was not important and I included all of the 34 photographs in the merging process.
So, the first advice I can give you that will help you create a flawlessly stitched panorama is to bring the number of images used down to a necessary minimum. It is less important with out-of-focus areas, but can do wonders with your main subject. Do not refrain from making sure all the images are properly overlaid as you photograph even if that means snapping too many. Just in case. After all, this way you’ll have something to fill the gaps with should they occur with chosen images. Just don’t use all of them if unnecessary.
5.2) Crop!
When shooting panorama images, it can be very difficult to accurately previsualize your composition. Unless certain objects can acts as guides in your scene, you are bound to cover too much (or too little, perhaps). Once you’ve gone through the first steps of merging your panorama, think carefully on how you are going to crop it. If what you are trying to fix manually is outside your final frame, why bother messing with additional image blending?
5.3) Align and Blend Image Layers
Assuming none of the above two solutions are suitable, you will likely have to do some old fashioned layer blending yourself. But if you are working with Lightroom and using Photoshop as an External Editor, there is a problem, or at least it may seem so at first. To fix the above errors I will need to overlay them with the appropriate images out of the 34 that I took and replace the Photomerge-stitched bride with a new one made of just two images. Normally, I would just drag-and-drop them into Photoshop from wherever they are located on my computer. In this particular case, however, we are merging our panorama in Lightroom with Photoshop as an External Editor. Which means all the post-processed images are in Lightroom – the actual source files are in their original state with no permanent adjustments. Here are the detailed step-by-step instructions on how I choose solve this problem:
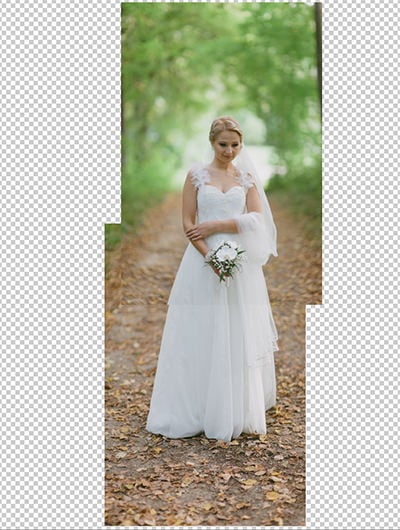
- Usually, I attempt to fix the errors manually before cropping the image and right after merging all the layers into one so as to not waste my computer’s resources unnecessarily. First, I will identify the best fragment RAW file in Lightroom that I could use to overlay the stitching imperfections. Let’s start with the dress. I need an image that contains the biggest part of my bride’s gown so that it is stitched from as few separate images as possible. This should work nicely:
- Next, right-click on the image in Lightroom and choose “Edit In” – “Edit in Adobe Photoshop…”. This will open the selected file in Photoshop as a separate document.
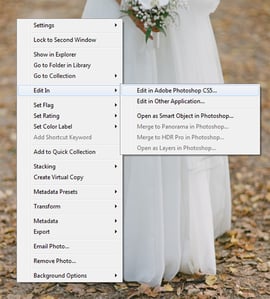
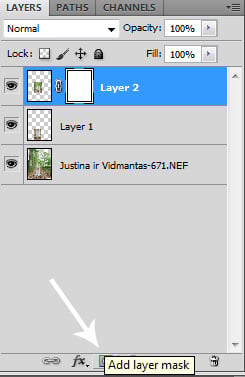
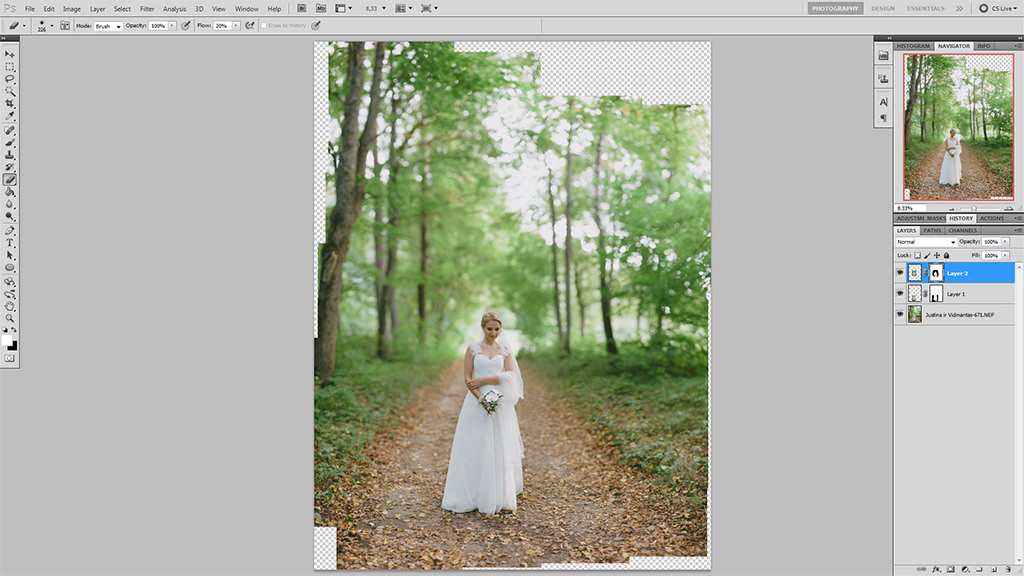
- Once the image is opened in Photoshop for processing, drag-and-drop it to the panorama document as a new layer (let’s call it the first corrections layer). Just click on the image itself with the Move Tool (hit “V” to select) and drag it to the panorama document tab. Keep holding down until Photoshop window switches to the panorama document, then drag your cursor down on to the panorama and release:
- Make sure it is placed at the top in the Layer tab (hit F7 to toggle) and not hidden underneath the main panorama layer. At this point you can close the just opened image without saving it (otherwise Lightroom will import what is basically a duplicate back into its Catalog as TIFF).
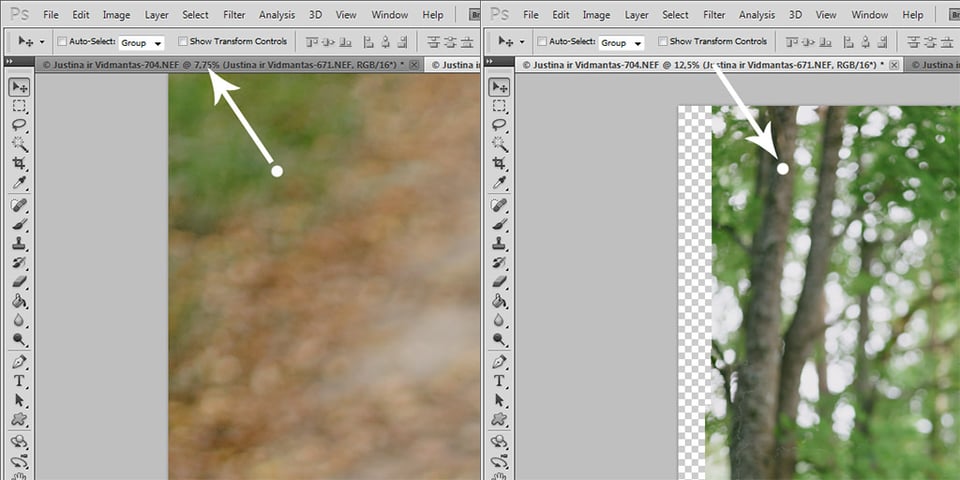
- With the first corrections layer in place, it is now time to align it with the panorama layer. You can try and let Photoshop auto-align them for you, if you want to try your luck. To do that, select both layers and choose “Auto-Align Layers…” from the “Edit” menu. Auto-Align Layers dialogue will pop-up asking you to choose the layout. Once again, I’d go with Reposition as my first try. But since Photoshop failed to do a proper job the first time I rarely use the Auto-Align function and prefer to do everything myself, which really is just as simple. First, change the opacity to around 50-60% of the first corrections layer (in the Layers tab). Then, zoom in close enough for accurate alignment and simply drag it to its appropriate location with the Move Tool. The image will not align everywhere – in fact, only a limited amount of detail will match perfectly between the layer you want to use for correction and the main panorama layer. Search for the most suitable points. In this case, one such point is just below where the bride is touching her right hand. Notice how much difference there is between the two layers!
- See how only one side of the gown has a decent align spot? No need to worry, because the base panorama layer serves only to roughly show us where the bride should be placed in the frame. What matters is how the first corrections layer will align with the second one. Now, let’s change the opacity of our first corrections layer back to 100% – it will completely overlay the panorama layer. Next – import the second corrections layer the same way we did the first. Right-click on it in Lightroom and choose “Edit In” – “Edit in Adobe Photoshop…”. Then, click-and-drag the newly opened image in Photoshop to your panorama project and place it at the top in the layers tab. Close the just-opened document without saving it. Change the Opacity of the second corrections layer and align it with the first corrections layer at the most suitable point. This point is where the first corrections layer will be overlaid with the second corrections layer with no noticeable sign of merging. In this case, it’s the sides of the gown somewhere near the level where Justine is holding her bouquet. Once you’ve done that, change the Opacity of the second corrections layer back to 100%. Take a look at how the two corrections layers aligned for me:
- I would expect that at this point the rest of the process should be relatively easy to understand even if you’ve never done any sort of manual layer blending. This is also where we finally start working with layer masks. Since the second corrections layer is located above the first one, the second corrections layer will be the one to gradually blend into the first one. So, let’s select the second corrections layer and create a Layer Mask for it:
- In the Layers tab, next to the thumbnail of your second corrections you will notice a new thumbnail appear that represent the Layer Mask. Layer Mask is one of the most powerful tools Photoshop has. Basically what it does is allow you to control to great extent the transparency of the layer the mask is applied to using the Eraser (more transparent) and Brush (less transparent) tools.You could make a layer transparent in certain areas simply by using the Eraser Tool without the Layer Mask and deleting parts of that layer. However, using Layer Mask is also non-destructive, which means you can adjust it at any point unless you discard it or permanently apply it to the layer. We will talk about Layer Masks in more detail in future articles. For now, make sure the Layer Mask is selected by left-clicking on its thumbnail once. Next, select the Eraser Tool (hit “E” on your keyboard). We will use the Eraser tool to make parts of the second corrections layer transparent and thus gradually fade into the layer beneath it (the first corrections layer that contains lower half of Justine’s gown), or, in other words, blend it with the first corrections layer. To make the blending less obvious, be sure to adjust Eraser Tool setting – change it’s size for precise action and adjust Hardness, Opacity and Flow settings to make the fading effect very gradual, smooth and virtually undetectable.
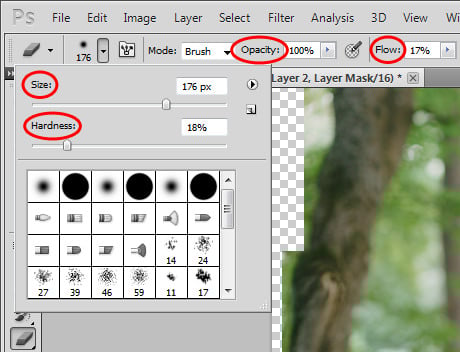
I will start blending the sides and top of the second corrections layer first so that it fades into the panorama layer seamlessly in the out-of-focus areas surrounding the bride. For this, I will choose a low value of Hardness and Flow settings both at around 20%. The Opacity is set to 100% with a relatively large brush size of 900 px. As soon as I “brush” the corrections layer lightly, it starts to make those areas transparent and fade into the background. The out-of-focus areas of the second corrections layer and panorama layer are now seamlessly merged:
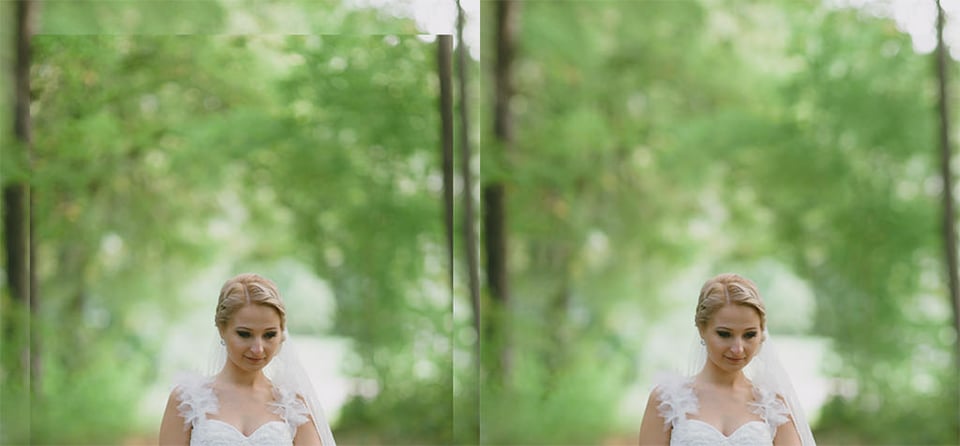
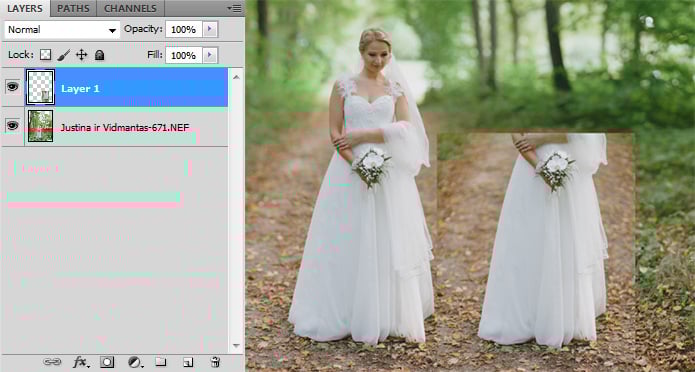
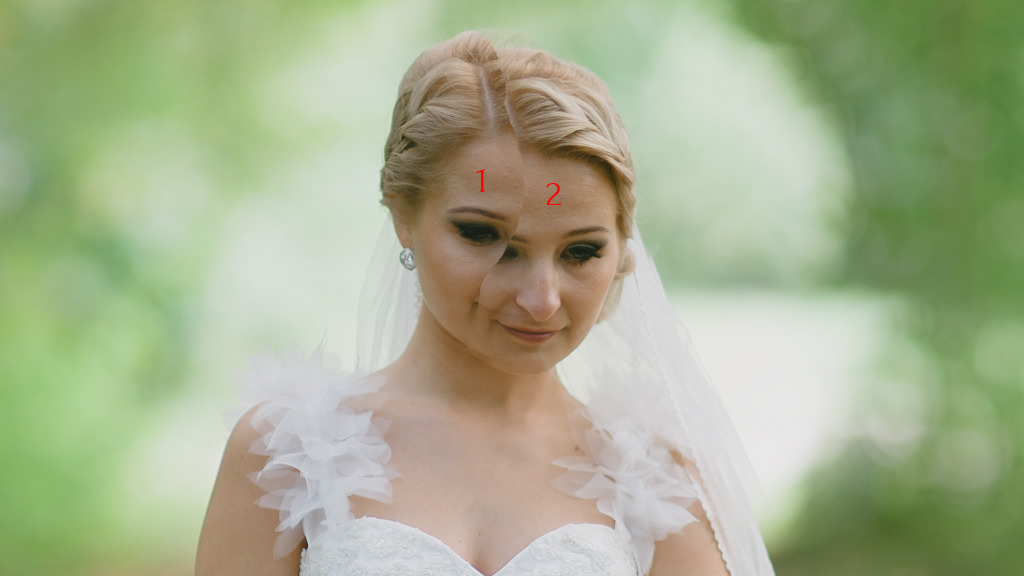
- As I’ve mentioned before, blending undefined, out-of-focus areas is very easy as long as you choose the right settings and does not require too much precision. However, take a look at the effect when the Eraser Tool is accidentally applied too enthusiastically with poorly chosen settings and covered parts of the image it wasn’t supposed to:

The part of the image marked with number 1 is the second corrections layer which is used to fix the errors after Photomerge panorama stitching. This is the layer I am overlaying over the panorama, which is marked with number 2, and one of the two layers I imported separately from Lightroom to “stitch” the bride by myself. As you can see, I applied transparency with the help of Layer Mask and Eraser Tool to an area that was supposed to be 100% solid. Luckily, fixing such mistakes is easy – instead of applying transparency to the second corrections layer with Eraser Tool, revert the effect with the Brush Tool (hit “B” on your keyboard). Don’t forget to adjust Brush Size, Hardness, Opacity and Flow for the Brush Tool for smooth blending just as you did with the Eraser Tool.
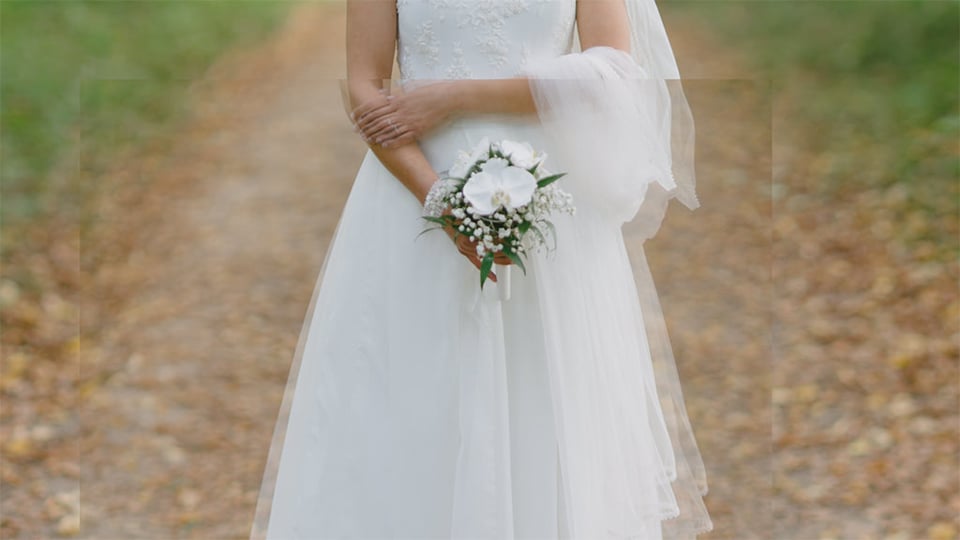
- As soon as the second corrections layer is seamlessly blended with the background layer, it is time to do the same with the first corrections layer that covers the lower half of Justine’s gown. Again, I created a Layer Mask for the first corrections layer and used Eraser and Brush tools to blend it with the background. Here is what I’ve got so far:
Can you spot the last area that needs blending? We already took care of the transition from corrections layers to panorama layer. Now we need to work on the transition from one corrections layer to another, since they overlap. This part of blending will also require a bit more finesse to it, because there is only one perfect spot where one layer is perfectly aligned to the other. This time, some careful Eraser action with the second corrections layer Mask selected was enough. Here is the result:

- Usually, I attempt to fix the errors manually before cropping the image and right after merging all the layers into one so as to not waste my computer’s resources unnecessarily. First, I will identify the best fragment RAW file in Lightroom that I could use to overlay the stitching imperfections. Let’s start with the dress. I need an image that contains the biggest part of my bride’s gown so that it is stitched from as few separate images as possible. This should work nicely:


That’s pretty much it!
6) Finishing Touches and Final Words
The final steps remain the same as described in the first article. At this point I flatten the image by merging all the layers into one (Ctrl+Shift+E for Windows users) and crop it to desired aspect ratio. With that done, close the document and, once prompted whether you want to save it, make sure to click “Yes” – that’s very important. Otherwise, all this work is for nothing and the final panorama will not appear in the Library of your Catalog in Lightroom!
Shooting panoramas can be, no doubt, very fun. There are some very dependable techniques, tips and tools that can help you avoid most, if not all, errors during the stitching process. But in those cases when an error or two does happen, it pays to know how to fix them manually. Hopefully this article will help you learn how to do not only that, but also integrate the process of panorama merging and fixing into your Lightroom workflow as seamlessly as possible. It may have taken me a lot of time to explain how blending layers works, but in practice, once you learn all these steps and know how to perform them, fixing panorama errors won’t take longer than a couple of minutes. Good luck!
Exactly the tutorial I was looking for. Thanks!
This is an exquisite post how to fix panorama inaccuracies in Photoshop. Really, it is a very informative and beneficial article. I’m very impressed to read this article. Before reading this post I didn’t have clear idea how to fix panorama merging errors in Photoshop. Thanks to spend time for posting such an excellent tutorial.
I am getting error: “Unable to merge photos. Not enough info to estimate camera motion.”
I tried merging 1&2 pictures and 3&4 and then merging both with each other but I am not able to do..
This website illustrates it well:
joachimwagner.blogspot.com/2012/…s-f14.html
How did he go from the stitched pano with weird lines like I got, to a seamless shot?
Highlight all of the images on the right panel. Then push control+E on a PC. Command+E on Mac
I have been trying to do Brenizer method panos for some time now with little success. I take great care in overlapping the photos just enough, but not too much or too little. My problems arise when I try to stitch them in photoshop CC 2015. All of the pano images have vertical and horizontal lines running throughout them, both in the in focus and bokeh areas. I cannot seem to fix the issue, and my searches of the internet have yielded nothing similar to my problems. Do you have any advice or solution for this? The images are aligned very well, but there is a slight exposure difference occurring in odd straight lines. My exposure didn’t change for any of the images.
Very interesting article. Personally, I’ve been using Autopano Pro which has produced amazing results with little or no intervention.
Greg,
not something I could use for portrait panorama shots, too cumbersome and would take much too long. :)
Hi thanks for the tutorial.
I was just wondering the point of such photo… did you just take that photo for the purpose of a tutorial or do you ever need such panoramic photos?
Just having a very hi def photo ?
Couldn’t find the answer while reading the tutorial. sorry if I overlooked it.
Cheers
Duncan,
you can read about Brenizer method panorama photography by clicking here.
thank you very much Romanas , it was really useful
Great tutorial. I tried it and works perfect. Thanks.
Great tutorial. I use ptgui to merge panoramic images and haven’t faced any big issues so far.