Lens distortion is a common issue we photographers deal with on a daily basis. It can be split into two groups – distortion by perspective and distortion by optics. Be it one or the other, it often causes unnatural-looking deformation of photos we take. As a result, we end up searching for ways to address distortion issues in the field, or afterwards in post-production. Usually lenses with longer focal lengths produce less distorted results than wide-angle lenses. And as you might already know, distortion is much more noticeable closer to the edges of the frame than in the middle. If you shoot landscapes or cityscapes at wider focal lengths and you have straight vertical elements near the corners of the frame, distortion might significantly bend and skew those elements, making them look very strange. There are several ways you can address such problems, so let’s talk about those now.
When working in the field, there are some techniques you can utilize to take care of distortion, but they might not prove to be very effective. You can change your position and shoot from a spot further away from your subject with the same lens. Another way is to use a longer lens, which should hopefully exhibit less distortion compared to a wide-angle lens. Unfortunately, both ways will affect your composition and framing, which might not always be desirable.
By taking a few steps back and keeping the same lens on your camera, you will either reduce or take care of distortion issues completely. On the negative side, more of the environment will be included in the image. If you switch to a longer lens, the relationship between the foreground and the background will change and if you are forced to move back, it will also trigger a change in perspective. As a result, your photo might get a completely different look and feel to it than originally intended.
The last way is to switch to a tilt-shift lens (PC-E lenses for Nikon users). PC-E lenses have advanced optics, which reduce distortion on edges, and you can shift and tilt them to some extent. Shifting helps fix some of the perspective distortion depending on how much shift is needed. The counterpart is they are extremely expensive and come in few fixed focal lengths. Because of this, the majority of photographers decide to correct distortion in software instead.
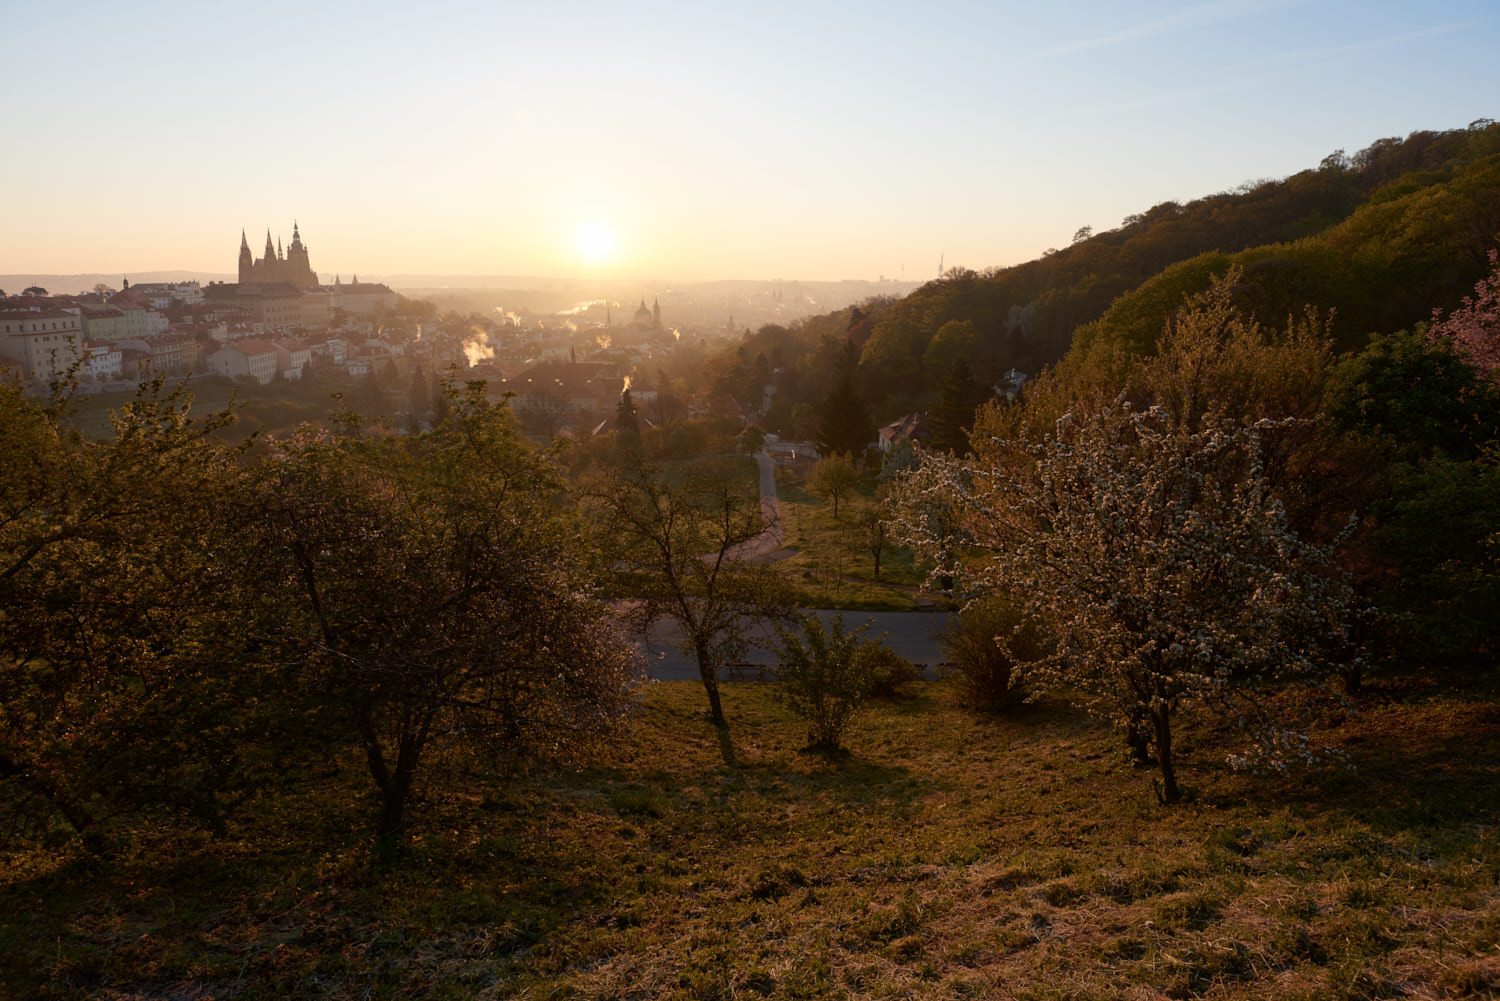
Any modern photo editing software has at least one way of dealing with distortion. The tricky part is, their usage might not always yield great results. Quite recently I took a sunrise shot of Prague. The Prague`s Castle is placed on the top left corner of the frame and clearly suffers from distortion, as you can see from the picture bellow. The architectural monument cannot be left distorted, because it just looks strange if it is left that way.

There are a few ways to fix such a problem. Choosing the Lens Corrections option under Photoshop`s filter drop-down menu is often the first thing that comes to mind. The correction is pretty similar if you use Lightroom or Adobe Camera RAW. By changing vertical transformation, the walls of the Castle and the surrounding buildings will be straightened. The process works well with little to moderate distortion levels, however, quite a big portion of the image will get wasted during this process and it gets worse when attempting to take care of heavy distortion.
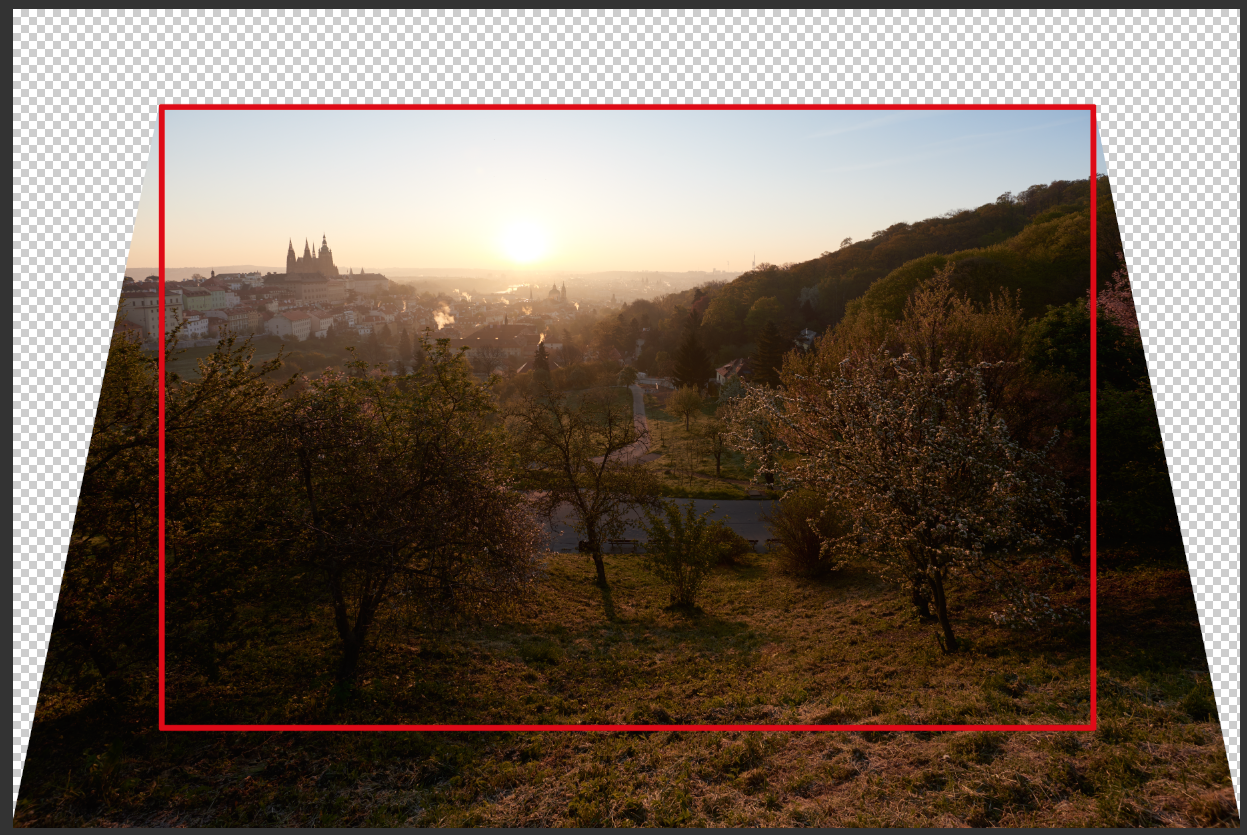
In the above case, a huge chunk of the foreground and the corners with that morning`s golden light will have to go. So in this case it might not be the best way to take care of this issue, as I want to keep the foreground in the final image.
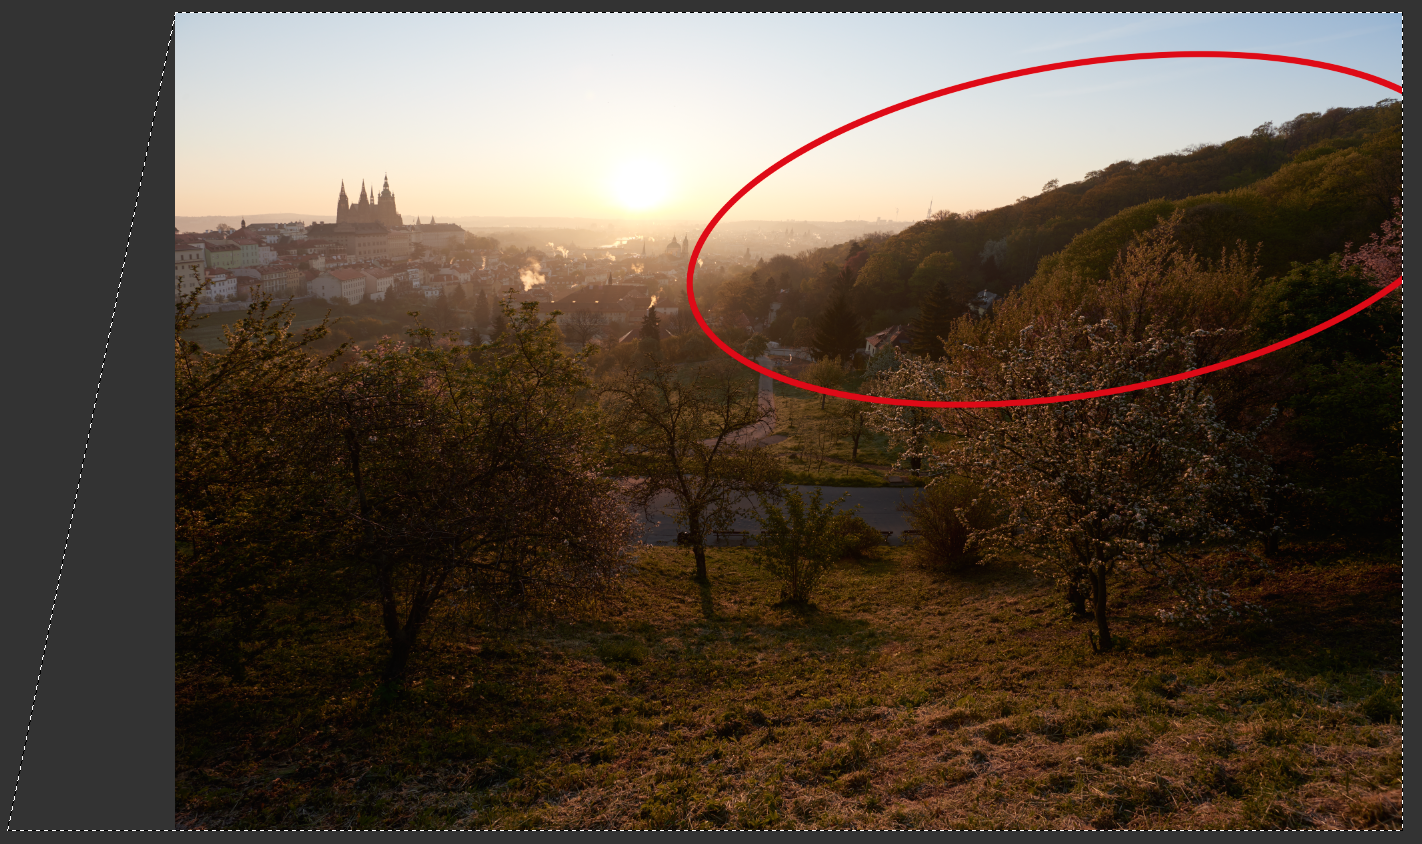
The second option is to use the free transform tool. By moving the bottom left corner even more to the left and out of the image, the left top corner will be straightened. More of the image will be saved this method. Unfortunately, this method also affected the hill on the right side and deformed it quite a bit by stretching it.
To fix distortion, you will need to do a bit more work in Photoshop, since these two “easy fixes” won’t do the job correctly. The first step is to duplicate the layer you need to correct, which in my case is the background. The second step is to straighten the newly created layer using the free transform tool technique. To do it, just hold CTRL on Windows or Command on Mac while clicking and dragging the left bottom corner. This way the relationship between the foreground and the background won’t change. If you do the correction with the Lens Correction filter, the relationship and angle will change, making the blend more difficult and in some cases, almost impossible. The third step is to change the blending mode of the corrected layer to “Difference”. This will make the photo look messy, but don’t worry, as we’ll fix it in no time. The fourth step is to align the top layer with the layer bellow based on the subject we corrected, which in our case is the Prague Castle.
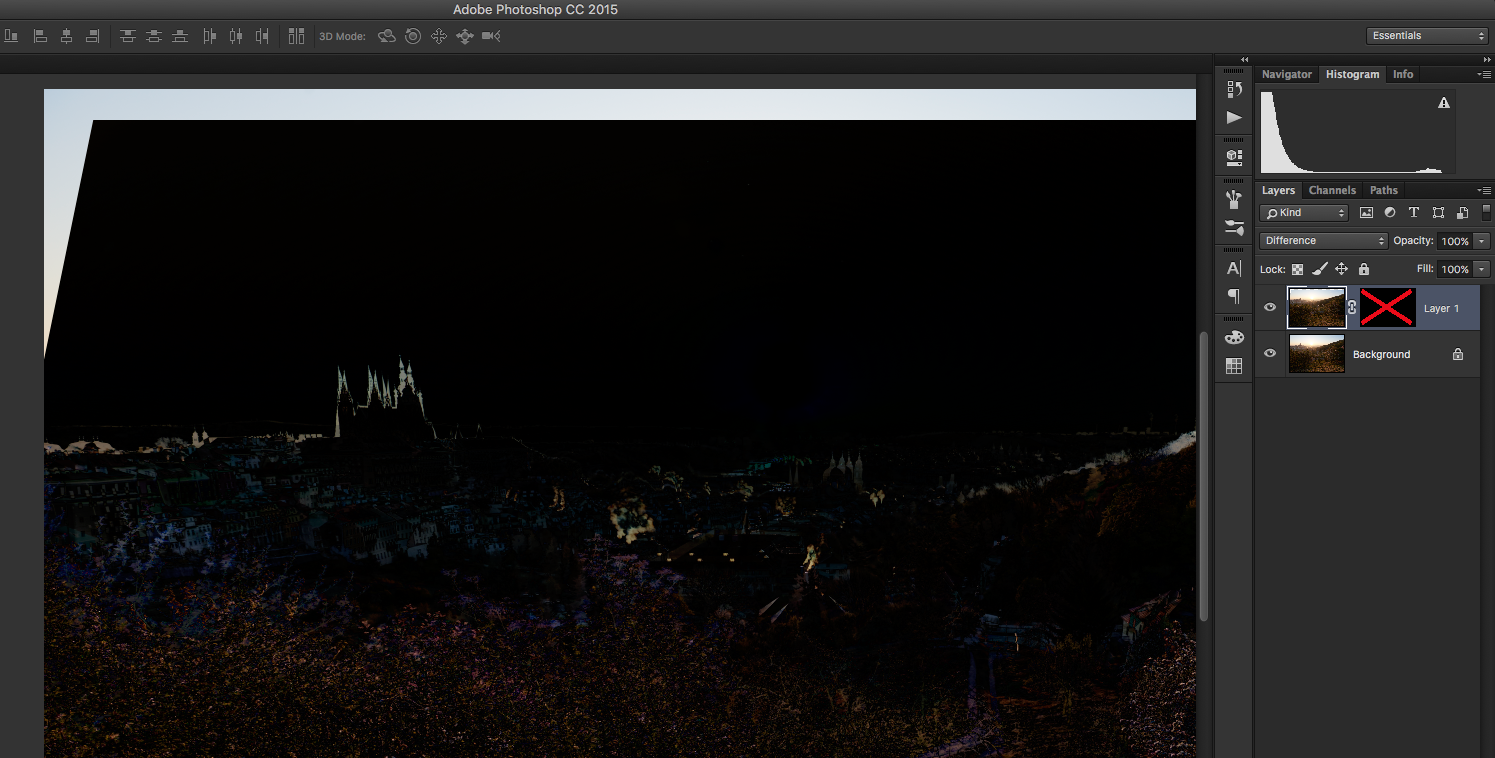
Try to get as much black color as possible. Black indicates that the pixels match exactly. The brighter the pixels’ colors get, the further away they are. There is no way to get it to match perfectly without deforming the layer back (which would be counter-productive), so don’t worry about it. After finding the best position, just apply a black mask, which hides the corrected layer and set blending mode back to “Normal”. The final step is to use a white brush to reveal the part that you have just fixed. Some additional cloning and fixes might be required. If so, execute them on a new blank layer.
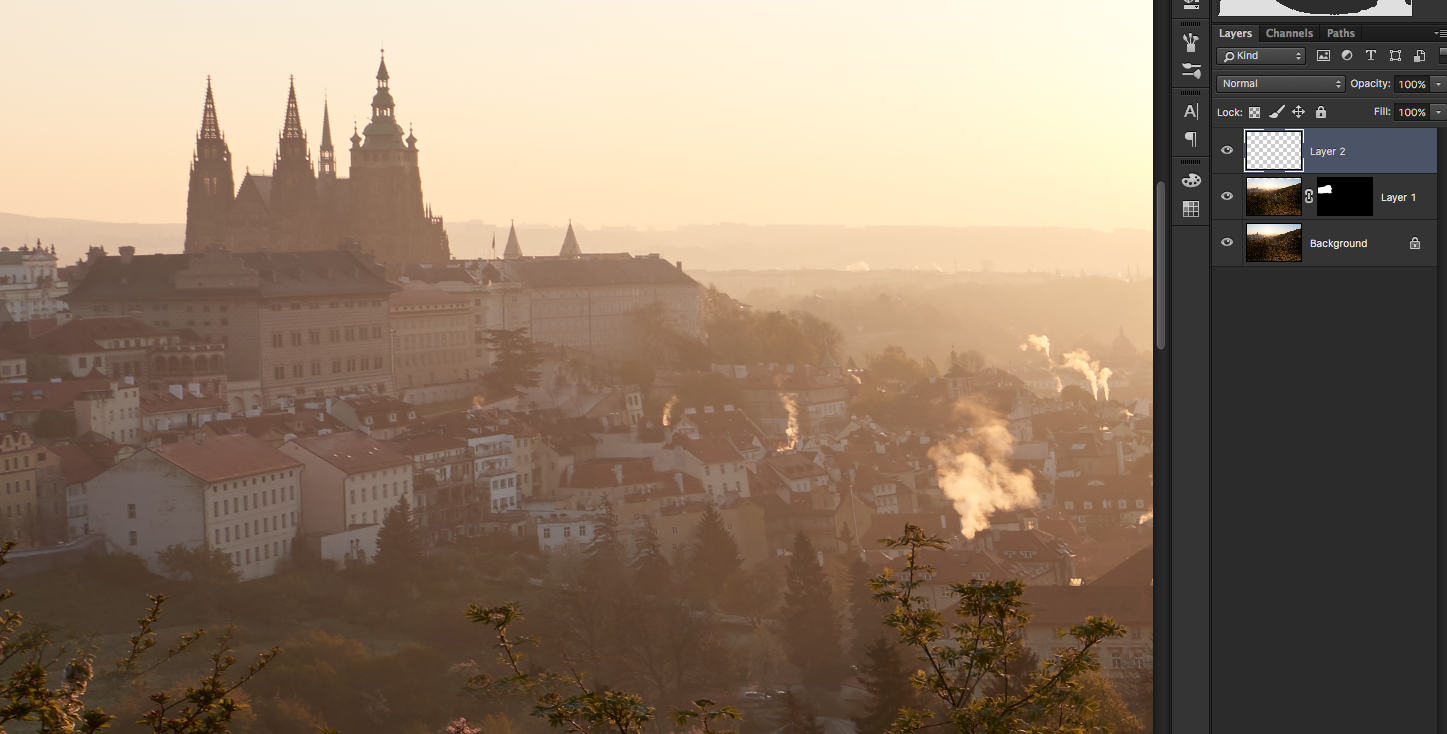
Following the above steps, you can fix distortion on photos without losing a big chunk of pixels and take your images to the next level. And here is the final edit of the sunrise in Prague:
To find more about me and to see more of my work, along with other photography tips and tricks, please visit my blog.
I have to admit that a lens that would give me THAT kind of distortion in such a distance to the subject, I’d send to junk. Because I can’t
Believe the camera / lens axis had been titled that much against a proper horizontal set up.
I’m (perhaps not) surprised that the author didn’t mention DxO Pro, which was designed from the ground up to deal (easily) with distortions from lenses and perspective corrections…
Also, the first image is somewhat misleading, as it’s a small crop from a much larger wide angle image, as the second image makes more clear.
When I saw first image with so severe perspective distortion I wonder if it was a real one or one distorted for teaching purposes.
I have pictures with severe distortion (with extreme wide angles) but it was the first time I saw one so.
The important part of this article is:
“To find more about me and to see more of my work, along with other photography tips and tricks, please visit my blog.”
Not sure I see a fix in the final image. The buildings on the left are still distorted.
I have to say, I feel the title of this post is misleading – the fix described is for only one aspect of perspective distortion and does not address “lens distortion” at all, in my opinion. (By “lens distortion” I mean distortions attributable to the lens and not the focal length and angle of the camera/lens.) Also, only Photoshop was mentioned. DxO makes a powerful tool called ViewPoint that probably could do at least as well.
An old “trick” that has been used by photographers since forever to minimize perspective distortion at exposure time is to make sure that the camera back (the “film plane”) is perpendicular to the horizon and parallel to the verticals in the frame, regardless of the lens being used, and to eliminate unwanted features by means of cropping, or by careful choice of camera position. This method is hinted at in the article but passed over very quickly in favor of post-processing work.
And finally, the Ps techniques were covered in rather a rush, with two or three short vague sentences used to describe the final steps. “Some additional cloning and fixes may be required.” This is almost as bad is waving a hand and saying “just fix it in post”. Which of these, exactly, were done in this case? And can you look at the final result and say it’s really that much better than the first vertical transformation result, with cropping?
It promises much but would probably be a much better read split & expanded into 2 or 3 different sections which deal in more detail with specific post processing aspects or techniques that you mentioned such as the ‘camera back’