As I’ve said time and time again, Lightroom is all about speed. And that’s the beauty of it. You can do so many things without actually needing to save the images as JPEG files on your computer, you hardly ever need to Export them at all. In this article, I will show you how to use Lightroom’s Email Photo function so that you can send any image in your Library by email without ever leaving Lightroom environment. It is quick, simple and very easy to set up, so if you’ve never used the feature but tend to send image files by email frequently, you should definitely try it out.
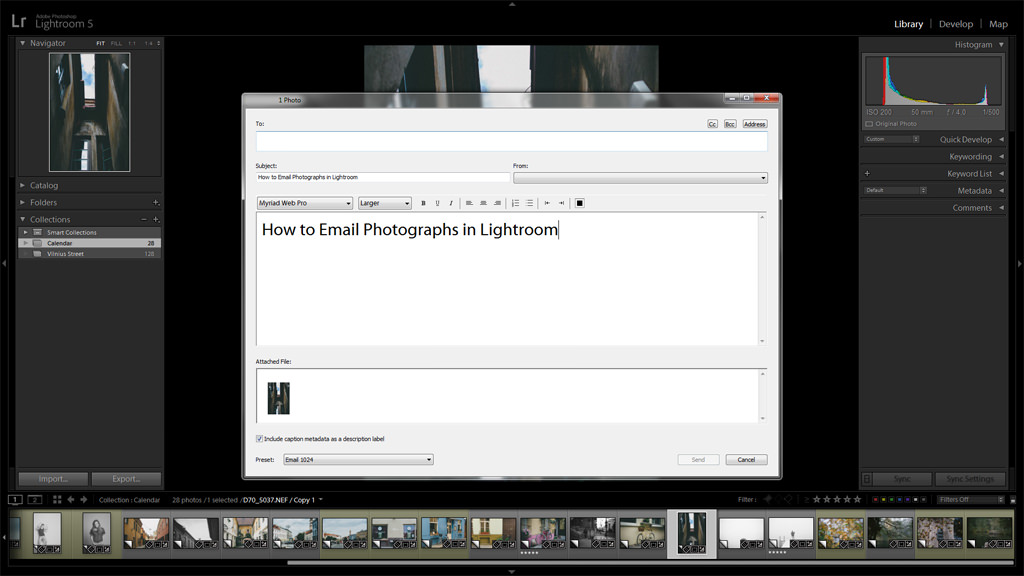
Table of Contents
1) Set-Up Your Email Account
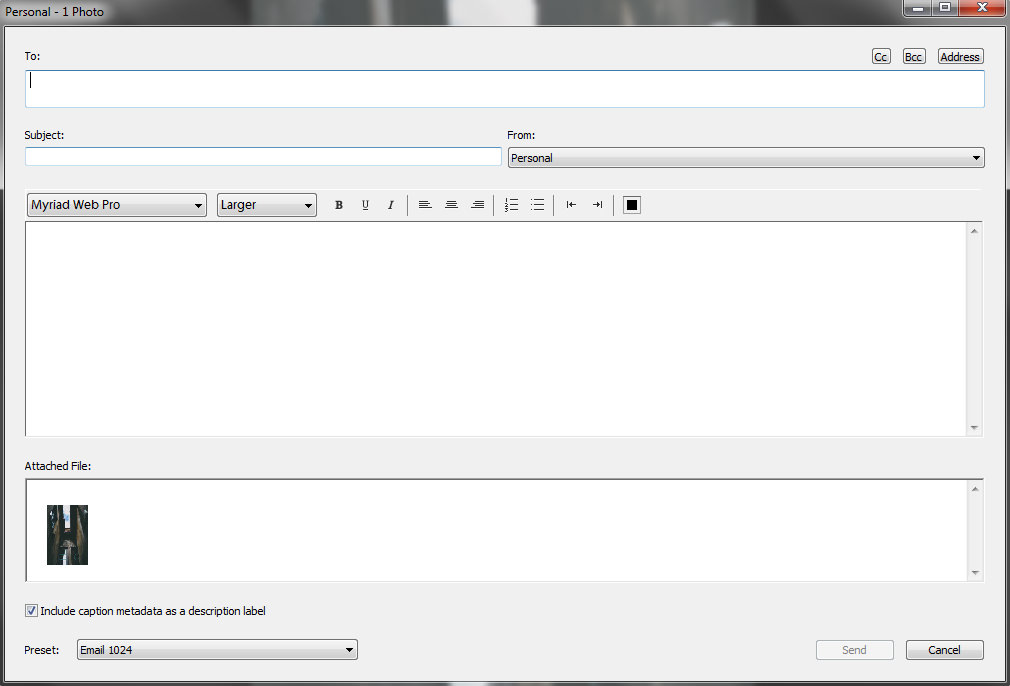
First, in order to send photographs by email through Lightroom, you need to set-up your account just as you would with any other email client. To do that, you need to access Lightroom Email Account Manager. Right-click on the photographs you want to send by email and choose “Email Photo…”. A new dialogue will open which is similar to any New Email dialogue you might have come across. From here, you can access the Email Account Manager by using the “From” drop-down menu, as shown in the following screenshot:
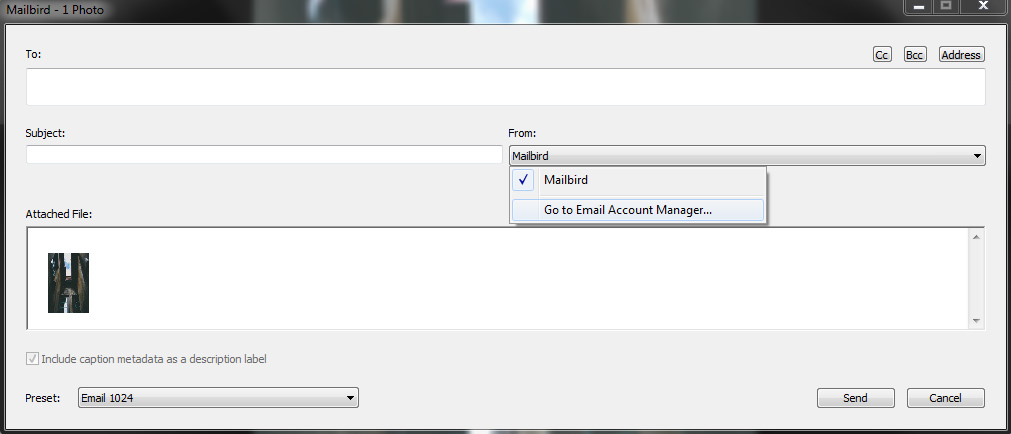
Notice how Lightroom is already listing Mailbird – my default email client – as an “account”. It’s an annoyance, really, and I will talk about it a bit more at the end of the article. For now, let’s just work our way through the Account Manager, which is extremely simple and looks like this:
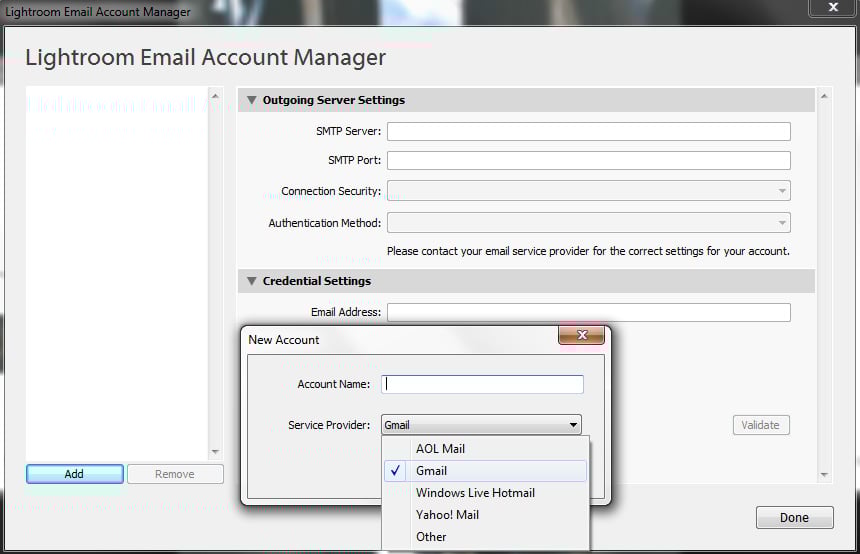
To start setting up the account, click the “Add” button at the bottom left of the window. A new, small dialogue will pop up where you’ll need to enter your account name (something that will help you easily recognize which email address this is in case you choose to set up several). There is also a “Service Provider” drop-down menu which has several popular options to choose from to fill-in necessary server settings automatically. If your email service provider is among the listed, the whole procedure will be absolutely fuss-free. In my case, it is Gmail, and if yours is neither one (AOL Mail, Gmail, Hotmail or Yahoo!), select “Other”. Once done, click “OK”. Your email account will now be listed on the left side of the Email Account Manager as “Not Validated”.
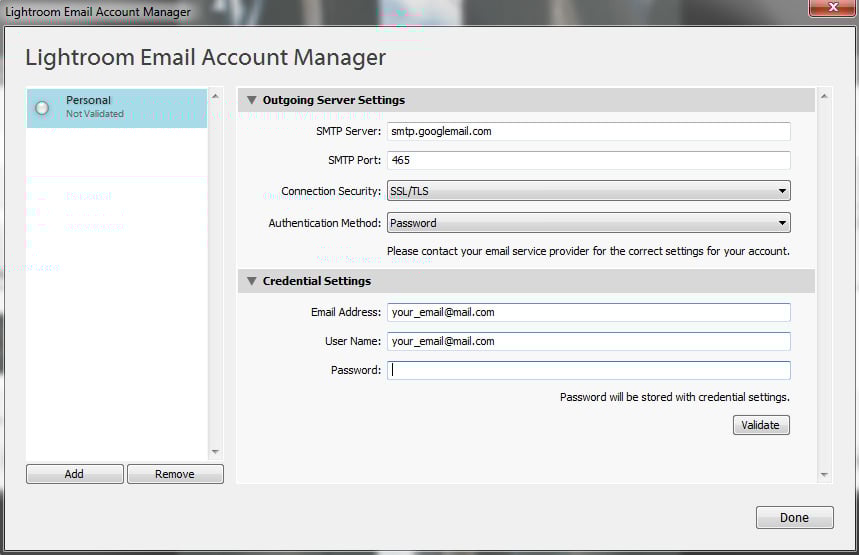
If your service provider was in the list, Outgoing Server Settings will be filled in for you. If you had to choose “Other”, you will need to enter this information yourself. Only Outgoing information is needed because Lightroom does not pretend to be an email client. It is not there for you to check your email, only to send photographs conveniently without having to export them first. Also, I would suggest you use SSL/TLS Connection Security setting, which should be selected by default.
The next step is entering credentials for sign in purposes – email address, user name and password. You will not need to enter the password again when you try to email the photographs unless you change it on the server, in which case you will need to update it in Lightroom’s Email Account Manager. Finally, once all the information is entered, hit the “Validate” button. Unless you made an error somewhere, your account will be listed as “Validated” in a couple of seconds.
That’s pretty much it, you can now conveniently email photographs directly from Lightroom! How about we take a closer look at the New Email dialogue?
2) New Email Window in Detail
I should point out that the email creation dialogue is not actually called New Email window, at least not officially, but just for the purposes of this article that is how I am going to call it. And, as you can clearly see, it is not just about sending photographs and nothing else – some basic text formatting is also included:
You can choose from any of the fonts you have and specify text size, too. There’s also the choice of bold, italic and underline style. Paragraphs can be aligned left, right and center, with increased or decreased indents. You can also create numbered lists or with bullets, whichever you prefer. Finally, you can specify font color. And none of this is in any way interesting or unexpected. What is more useful is one of the three buttons at the top right corner of the window. Clicking on CC will add a new address field where a copy of the email will be sent. BCC is for hidden copy. And here is a screenshot for the third button, the Address Book:

Now this is convenient. This basic address book allows you to save the most used email addresses. You can actually group them, too. Whenever you have a saved address, should you start typing it in the “To” form, it will automatically pop up as an option saving you time. You can select several email addresses from the Book, too. A nice touch, the Address Book, and I didn’t expect to find it in a RAW converter and photo manager.
3) Create a Preset
Lightroom offers several default presets for email, and most of them are bang on. You can send a super light 300px (long edge) image of low-ish quality purely for previewing purposes, a 500px image of better quality and an 800px image of good quality that might be good for showcasing online. There’s also a preset for sending full-sized JPEG images with no resizing:
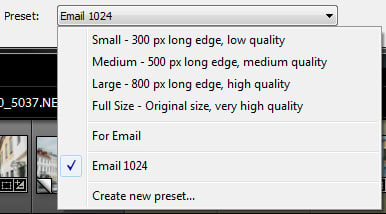
As you can see from the above screenshot, I created an additional preset that sends 1024px (long edge) images that are suitable for most online showcasing. To create your own preset, choose the “Create new preset…” option from the “Preset” drop-down menu. Lightroom Export window will then open. There, specify all the settings you want the preset to incorporate – File Naming, Size, Quality, Watermark, Metadata and more (the Export window will be covered in full detail in our upcoming “How to Export Photographs in Lightroom” article very soon). To save the preset, simply hit the “Add” button below the list of default presets:
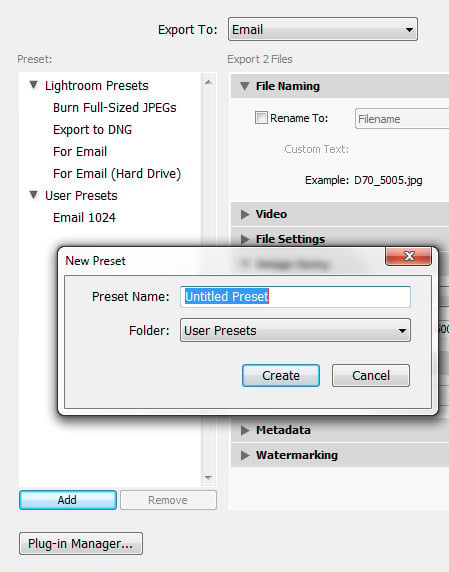
Name it and choose a folder to place it in (new Folders can be created from the “Folder” drop-down menu). And that’s it! Your new preset will now be listed in the “Preset” drop-down menu.
4) The Weird and Irritating Bits
It is not hard to tell that Email Photo function was not all that high on the priority list of Adobe’s developers, as there are a couple of niggles I find difficult to understand. First and foremost it is the inclusion of Mailbird – and I can only presume that the same goes for any other email client – in the “From” list, as if it was actually an account. It should not be there. Using another email client for the purpose of sending a few photographs by email is too complicated given that Lightroom has the function by itself, so I can hardly imagine anyone using some other software as an “external email client”. Even if it worked. Which it doesn’t, at least for me. And why would it given that I set up three separate accounts on Mailbird? Which should Lightroom choose by default? Perhaps it is actually a glitch and Adobe did not intend email clients to be listed as “accounts”. In which case, I do hope they fix it. Otherwise, I still hope they fix it by removing, for the lack of better word, external email clients.
The second, admittedly smaller, issue I found was the accessibility of the Lightroom Email Account Manager. Unless I am missing something, the only way to access it is the way I described it. I could not find it anywhere in the File or Edit menu. It takes two steps to get there, which is one too many, and finding it is perhaps not as simple as it should be. Email Account Manager should be accessible from the New Email window, yes. But that’s not the only place it should be accessible from. A one step solution would not hurt.
Finally, you can’t actually remove any of the attachments whilst in New Email dialogue once the images have already been selected. So if you’ve made a mistake and, say, selected more image files than is necessary, you’ll have to close the New Email dialogue and start over.
5) Final Words
Other than the few issues, the Email Photo function has proven to be extremely simple to use and, more often than not, invaluable, especially when I need to send the photographs very quickly and there’s no time to spare, as it saves the step of Exporting the image files to the hard drive and then manually attaching them online or with a dedicated email client.
The tool getprospect.com/blog/…ster-sales also provides a preview of the prospecting strategies format that the prospect uses. This can be helpful because business email addresses are generally comprised of the first name, domain name, and last name of the prospect. This allows you to determine the most common email format that the prospect uses. You can then improve your search results by adjusting the information you have. You can also improve your search results by analyzing other data about the prospect.
What password is to be inserted in the LR email Account Manager under Credential Settings? Thanks.
Apple, Adobe and Google are in collusion with each together to point fingers at each other regarding basic services such as mailing. I will point a different finger in a different direction regarding your ability to fix real problems. You know where to stick it. I still cannot send a photo in an e-mail. I need to remember to use my iPhone to take a picture of a scene that WILL ACTUALLY WORK!
I’m with 8) RobB on this, for his reasons and more. Some of us out here don’t consider setting up a new email account, when we already have accounts up and working, a simple nothing task. I’m not looking for makework. LR’s inability to use what is already set up, insisting on running things itself, seems roundabout, and for no good reason.
Of course I find Export way awkward as well. Everything about it. You’ve already imported to a location, and if you export to the same location . . . so you, I at least, wind up with redundant subfolders or more than one version of everything in the same folder. And though you hardly ever export, I have to export everything. Printing from LR results in off color, no issues printing outside LR. An how to just access photos for any purpose – it’s always easy, there in the file tree, outside of LR. Inside, not so. Often the file tree is LR’s own, not the actual Windows file structure. It’s just not “all there,” it’s unique to LR.
Coming from aperture the Email feature in LR seems like a pile of rubbish . In Aperture you select the pics , click the email button and it opens the Apple Mail prog with your pics loaded into an email … then you just address it from your contacts list … I can’t see any simple way of giving LR access to my contacts list …addressing the damn things is the most time consuming part of the job and my 2000 contacts are not gonna be re-copied just for bloody Adobe LR …arrrgh Crap like this is why I got off PC’s in the first place
For anyone who’s using gmail with a two step verification and wanting to email from lightroom, you need to create an app-specific password for lightroom. In Google security settings search for that and create a new one, use that as the password and you should be good.
For anyone having trouble setting up their Gmail account in Lightroom, you need to go to your Google account settings and Allow access for less secure apps, otherwise Gmail blocks the login and password being sent from Lightroom and will not validate the settings.
Did as you suggested in Lightroom Email Account Manager and ‘green dot’ came up in left habd box with word VALIDATED. Clicked DONE vand returned to email. Completed box, to attached photo, Preset medium 500 selected and clicked send. Sending email bar moved left to right, thinking it had gone, when box appeared , ‘ LR Failed to send Email’. Nothing else appeared as to why, so I am no wiser? Can you suggest what I might be doing wrong?
One additional annoyance is that you have to enter email addresses manually into Lightroom. Why can’t it access my contacts already on the machine`?
Hello Romanas,
I have bigger problems with exporting emails in Lightroom 5. I want to be able to send text with each photo in order to tell a story for each photo, but there is only one dialog box for the whole set of photos, so right there I can’t do what I want. I sent the photos successfully to my email and then copied/pasted the photos into another new email with text for each photo. This seemed like a solution – it looked good in my email – but when I sent them (about 15), only about a third of them got the photos, and the rest only the text. I thought, well maybe there was something wrong with sending so many emails together. So I re-sent the emails one at a time individually again to each person. Same thing. I even got reply’s back from a couple that said they got the photos the first time but not in the second try. I have tried for hours to get into the Lightroom forums but can’t. They ask me to sign in, but would not recognize my password, so requested password change. They sent me an email to do that and I changed my password. They then sent me another email validating the password change. So I went to the sign in again. Guess what – they didn’t recognize the password change. So I am completely lost – no solution to my problem and no where to go to get help. Can you help me? HELP!