As I sit back and relax, I can still hear mama’s words, “Watch out what you do today because someday your background may come back to haunt you.” Was mama psychic? Did she peer into a crystal ball knowing of my passion for photography? Was she a closet photographer versed with knowledge about how important a background check is? You see, learning how to eliminate background distractions in a photograph is imperative. As meticulous as one can be in composing a perfect subject, if the background isn’t treated with equal care, the end result will not be successful.
What constitutes a poor background? The cliched example of a tree or telephone pole extruding from Aunt Sally’s head immediately comes to mind. Yet sometimes the interfering elements aren’t as obvious. Simplify a background by throwing it out of focus, shoot against an unobtrusive background, create black backgrounds with the use of flash, and harmonize the background with the subject so they complement each other.
The means to the end to create a pleasing background can be accomplished a number of ways. To maintain the most control, especially when working with small subjects, I create my own and place it behind the subject. I also choose specific f stop / shutter speed combinations to give me the aesthetic look I desire. The focal length of my lens, the aperture, in addition to the amount of subject magnification determines how much of the background I render sharply. Lastly, I make the subject more prominent and use color harmony to offset it.
In each of the ten images that accompany this HOW TO, a specific technique was used to highlight the subject and/or obscure the background. Learn how to pre-visualize what your photos will look like. Use these tips alone or in conjunction with each other.
Table of Contents
1) Create Your Own Background
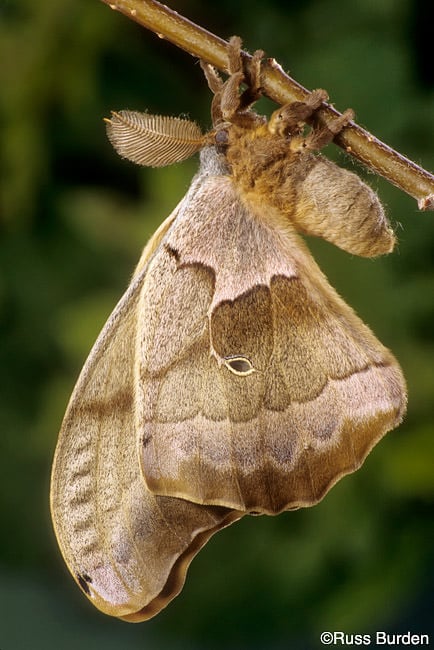
When I go into the field to work on small nature subjects, I bring two 20″x30″ sheets of cardboard. One is dark green on which I’ve stroked patches of green and brown acrylic paint to simulate a natural backdrop for photographing flowers, small animals or insects. I place the background far enough away from the subject or use a wide open aperture so it becomes a wash of color. The other sheet of cardboard is sky blue in color. I use it to give the effect that the subject was photographed against the sky.
2) Shoot in the Fog
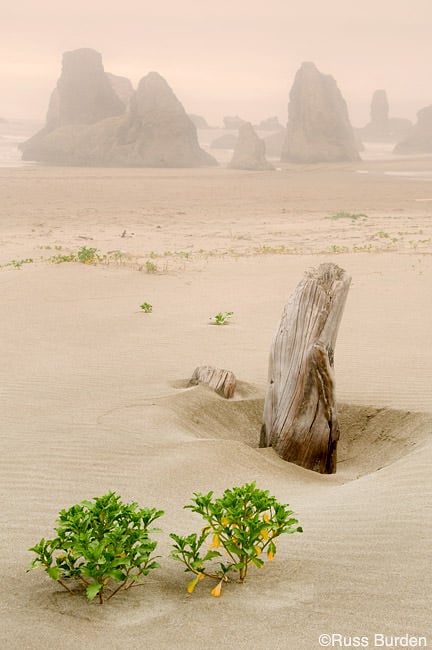
Shooting in the fog has many benefits. Images take on mysterious characteristics unmatched by any other quality of light. This essence of light magically seems to compel a photographer’s mind to slow down and appreciate what’s been bestowed. Subjects recede into a wash of gray. It’s this fact that should be exploited.
The background of gray hides all the elements that on a clear day would be considered obtrusive. If you get close to your subject, it dominates the photograph while everything else slowly fades into a monochromatic blanket.
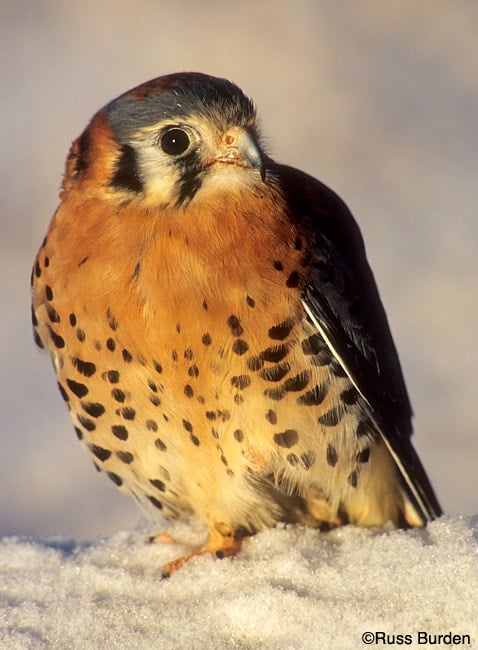
3) Fill the Frame
When possible, fill the frame with your subject. This way much of the background is eliminated which prevents distractions that take your eye away from the primary element. Filling the frame does not guarantee a clean background so it’s essential you carefully compose the image. Study the peripheral areas of the viewfinder. Don’t use filling the frame as an excuse to be sloppy. In actuality, composing the photo requires maximum concentration in that the subject takes up so much of the picture area, it’s easy to overlook what’s at the edges.
4) Use Clean and Neutral Backgrounds
It’s truly a luxury when a subject is set against a clean and neutral background. But the chance of this happening all the time is low. The truth is, in most cases, the photographer found the angle that made this harmony work rather than chance upon it.
Frequently a small shift in camera position of just a few inches can make the difference between a great shot with a background that works compared to a mediocre one laden with confusion and chaos. Move to the left or right while you view your subject through the camera and look to see if the image improves. Extend or compress the legs of your tripod to get a different vantage point.

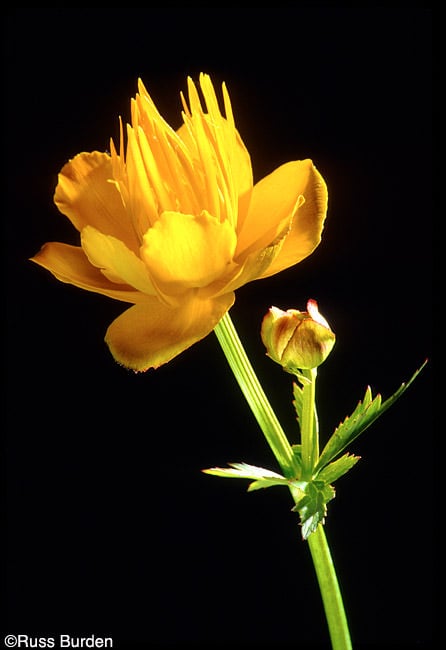
5) Use Flash
Use flash to control backgrounds especially when you photograph small subjects. In that the light from a flash falls off quickly, the distance it travels is short; therefore, backgrounds tend to go black. The smaller the aperture, the more quickly the light falls off. Mount a flash on your hot shoe if the subject is far enough away so the beam from the flash illuminates it. If the subject is too close, as may be the case if you use a 50mm macro lens, the light from the flash will shoot past the subject.
Subjects set against dark backgrounds tend to have impact. Brightly colored subjects work best. Dark subjects blend in necessitating the use of an additional flash to place a halo of light around the perimeter. Take the flash off the camera and place it to the side or behind the subject. Multiple lights can be used to create dramatic lighting effects while at the same time, maintain a black background.
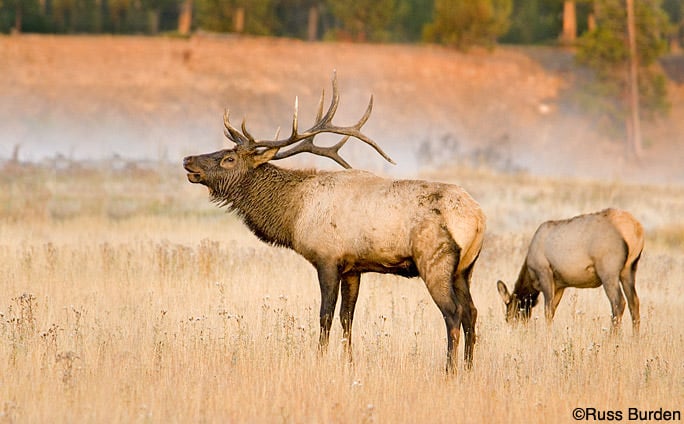
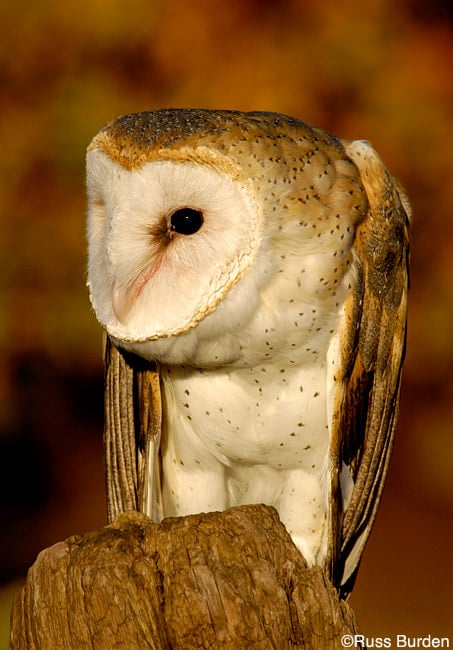
6) Use the Background to Tell a Story
There are times when including the background is advantageous in that it gives the viewer a sense of place about where the photo was taken. If you show the subject in its environment, more of a story is told regarding the time of year and what type of surroundings it inhabits. You need to be careful about how much of the area is shown. Don’t overdo it and make the subject insignificant and in reverse, don’t come in too close to destroy the sense of place. The rule of thirds works well when composing environmental portraits. Place the subject off center in either the upper or lower portion of the viewfinder.
Environmental portraits can be difficult to create in that both the subject and background must be clean and work together. Be it animal or flower, finding a pristine specimen is hard. Couple it with juxtaposing a clean background and the issue is compounded. Careful looking, perseverance and persistence pay off. I first look for a subject in prime condition and then try to find an angle from which to shoot it where the background complements it. If the pieces of the puzzle don’t fit, I continue my search.
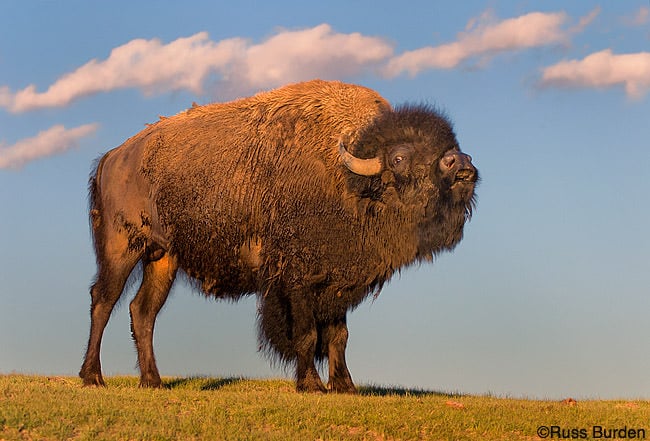
7) Use the Sky
A clean or dramatic sky as a backdrop can be an asset. Be it a great sunset, a clear blue sky, an impending storm or one full of puffy white clouds, many a great photo can be made. Shoot against a clear blue sky to separate the subject from the background and emphasize it. The ominous light from an impending storm is extremely moving. Whenever I encounter these magical moments, my main focus is finding a foreground subject to use as a center of interest. This type of light doesn’t last long so work quickly. The same goes for the light of a great sunrise or sunset as it reaches its climax.
Images made with the sky as a background can commonly be enhanced through the use of filters. For blue skies I’ll either use a polarizer to enrich the saturation or a graduated neutral density to bring the exposure values of the sky closer to the value of the foreground elements.
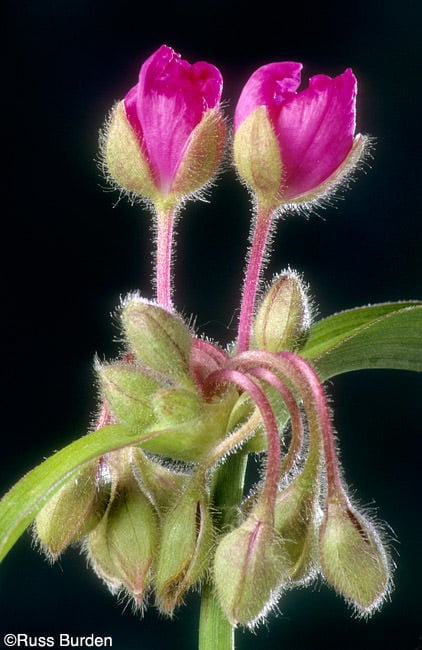
8) Use of Back Light
Backlighting the main subject is a great way to separate it from the background. If you create a ring of light around the subject, a halo effect delineates it with a radiant glow. Backlighting can be achieved by the sun or with flash. With small subjects, flash is a more practical way to go because the intensity and direction can be controlled. For large subjects, the sun’s assistance is needed. For either source, flare can be a problem so the use of a lens shade is recommended. Also, remove all filters as they are a primary cause of flare.
My favorite backlit subjects are flowers or insects outlined with moisture drops or tiny hairs. Many flowers are rimmed with cilia like whiskers that glisten when lit from behind. Whatever reading I get from the ambient light, I adjust the back light to be one stop brighter. It’s the overexposure that makes the hairs of the flower glow.
9) Use Depth of Field
The strategic use of depth of field controls how much will be in focus. Wide open apertures give the least amount of depth of field while small apertures increase the range of focus. To defocus the background if the subject is near, it’s essential to use wide apertures. The farther away it is, smaller f stops can be utilized to ensure sharpness throughout the subject and still give the background a wash of color.
An integral feature of many camera bodies that is underused is the depth of field preview button. Realize its capability to allow you to preview what the capture will look like. Unless you take every picture at your lens’s widest aperture, every picture will turn out differently from how you view it in the viewfinder. If your lens is set to f11, the way it’s viewed when you make the composition will net an image with much more in focus. The result is an in focus background. If you learn how to use the depth of field preview button, you’ll be able to see the amount of sharpness in a subject / background relationship. If the subject is not sharp, you can determine what f stop gives you the needed depth of field to keep it in focus while simultaneously blurring the background.

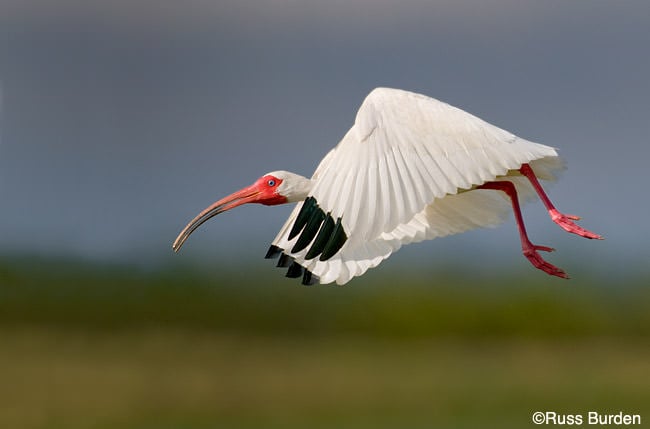
10) Long Lenses to the Rescue
Long lenses are often used to create separation of the background from the subject. As the focal length increases, the angle of view is decreased. This is used to a photographer’s advantage. Since the angle of view is narrower, less of the background is shown. Potential distractions are eliminated. For instance, a 50mm lens will take in four times the amount of background area as a 200mm lens with the subject the same distance from the photographer. This is why I use longer focal length lenses to do macro work. An added bonus is that the working distance to the subject is greater. This way I don’t intimidate what I photograph. If you stay out of an animal’s flight or fight zone, it ensures a longer working session.
Knowing that mama is still watching me, I’ve vowed to follow my ten tips to keep my background in check: Create my Own; Shoot in Fog; Fill the Frame; Clean and Natural; Use Flash; Tell a Story; Use the Sky; Back light for Impact; Wide Open Aperture; Use Long Lenses. Mama didn’t raise no fool!!!
Russ is the owner of Russ Burden Nature Photo Tours and runs workshops around the country to the best locations at the times they appear in their utmost glory. His stock work is sold through Getty Images and often shows up in magazines and advertisements around the world.
Russ writes The Tip of the Week for the Outdoor Photographer website. He also writes a weekly Photo Tip and a monthly Photoshop column for TakeGreatPictures.com. Russ teaches classes of all levels for the Panasonic Digital Photo Academy in addition to writing all the curriculums for the national program. Russ has been published numerous times in Outdoor Photographer, Popular Photography, and Petersen’s PHOTOgraphic. He has two books to his credit.
Russ is a multiple time winner of the prestigious Nature’s Best Windland Smith Rice Award in the Art In Nature category in addition to the Backyard Habitat category. He also won Highly Commended honors in a number of other categories. As a result, his images have appeared in the Smithsonian in Washington, DC.
To learn more about Russ and see more of his photos, check out his website as well as his Facebook page.
Nasim Sir,
I like bird photography & wildlife photography. My question is how to take a well composed bird photo, in case the bird is sitting on a branch with bright sky background?
Regards,
Hi Russ,
It seems like I am 2 years behind everyone here on this forum :O) I love your photos and your writing, the moth and the white bird, not sure if it is a crane of some type but they are absolutely beautiful and I was wondering. For your wonderful focussed moth photo (which you used the ingenious idea of holding card board behind the subject) could I ask what camera did you use? I have read all the comments here and I cannot see anyone asking this question. Insects and flowers are two of my favourite subjects to capture as I am unable to get out much due to my health, but my garden has a lot of wild life and I am in sore need of a new camera before summer ends! Please help and thanks in advance.
Excellent article, great points, very well written and beautiful examples. Way to go, Russ!
Fabs
Fabs – thanks girl! Hope to see you again in FL. Be there end of Feb and beginning of March!
Drop me a note, [email protected] and I’ll try to meet up!!!!!
Big hugs!
Beautiful photos and great HowTo. Was on my to-read list for a while. Feel like I am smarter now :).
I also used some of those techniques on my photos without actually reading about them :).
And again, I did not know about the cardboard one and that explains alot :).
Glad that you found the article helpful!
Nice article and great ideas. I liked all of them, but the one with green leaf/blue sky cardboards is one of the most useful.
Congrats!
Rafael – glad I could supply some helpful tips for your repertoire. Use them well!
I liked the idea of creating your own background. That was a great tip.
Sometimes, there is no other choice. Bringing your own background beats the heck out of using photoshop to create one. There is a market for artificial backgrounds.
Thanks for a great article.
Don – Thanks for the support!
Example of of distracting backgrounds and how creatively author got around that would have made this article. Unfortunately, this article became just another superficially written and very ordinary article, I expected much better here.
YM – sorry you feel this way. I’ve written many articles showing BEFORES and AFTERS. If you search the web, I’m sure you’ll find them. Perhaps the next article I write for Photography LIfe will demo that technique. Until then, I hope you were able to glean at least one or two tips from this one!
Wonderful article Russ,
Its good to see Nasim getting people from various parts to the site to share their views and skills.
Can you please give us all some idea of the camera and lenses used for the photos posted in the article.
Thanks for the kind words! All were shot with Nikon gear. The long lens images were either my 80-400 or my 200-400. For the close ups I used a Nikon 5T dual element close up filter. For the wide shots, I used my 18-200 with a polarizer.
Thanks for this very constructive article, Peter
Thanks Peter
Thanks Russ. The post was good and look forward to more of your experience being shared. How would you handle if you shoot with camera towards the sun. Roji Jacob
Lots to think about when you shoot into the sun. My favorite technique is to create a sunstar. Stop the lens down to f22 and let the sun peak out from behind the subject. Google the process and I’m sure you’ll get more info than I can provide here.