As you might already know, Lightroom is extremely slow when it comes to image culling. Although Adobe updated Lightroom CC to be able to fetch embedded JPEG previews from RAW files for the sole purpose of speeding up image culling, the process is still painfully slow when going through many images. In addition, looking at the embedded JPEG previews from the camera is far from ideal due to the fact that JPEG images do not contain enough information to be able to judge underexposure and overexposure. On top of that, if one has particular color, sharpness and other settings set on their camera, those settings could seriously impact JPEG previews and lie about what’s actually contained within the RAW file. In order to avoid such issues and move away from Lightroom’s horrid performance, I have completely moved my image culling process to FastRawViewer. Thanks to this lightweight and powerful software, I am able to cruise through hundreds of images and select the ones that I will import and edit, while making sure that bad images never make it into my post-processing software in the first place.
Table of Contents
1) Image Culling: FastRawViewer vs Lightroom
As a long time Lightroom user, I have been extremely frustrated with its lack of performance, even on the fastest PC I can build. While I can understand that software can be slow when doing the actual editing (since it is a complicated process that might require a lot of computer resources), going through images, zooming in and out them and starring / color-labeling them should not be as painful as it currently is in Lightroom. Adobe has been promising to make Lightroom faster, but its overall performance seems to only be decreasing with each new release, which is unfortunate. To make the process of culling images in Lightroom faster, Adobe updated Lightroom CC to be able to show JPEG images embedded into RAW files, so that one does not have to wait for each file to get re-rendered with the “Loading” notification that takes forever to clear. However, even after this feature was rolled out in Lightroom CC, I still encountered a lot of slow downs when doing basic operations, such as moving between different RAW files.
In short, as of today, Lightroom is simply an inefficient piece of software for image culling. Because of this, many photographers rely on third party software such as Photo Mechanic and ACDSee for basic image culling and file management. For years, I relied on using ACDSee for image culling and I was relatively happy with its performance. However, I was not happy with its slow update cycles, making it difficult to use it when shooting with a new camera, and I always knew that I was looking at embedded JPEG images instead of real RAW files when assessing files.
FastRawViewer changed all that. Not only is it far faster and more efficient than any other image culling software tool I have tried to date, but it is also very accurate for evaluating RAW images. With all other RAW viewers, I always wondered if my images were truly overexposed or not, so I had to leave the ones I doubted to be imported into Lightroom in order to see if they were salvageable. With FastRawViewer, I no longer have to do that – I can quickly decide whether an image is a keeper or not by looking at the accurate Histogram and I have other tools to assess image quality at 1:1 pixel level view. Camera updates happen even faster than Adobe’s and thankfully, I don’t have to spend upwards of $100 for all this!
2) Download and Install FastRawViewer
If you have never used FastRawViewer before, go ahead and download a trial version for your PC or Mac from FastRawViewer.com (and if you want to purchase, a PL-exclusive 25% discount code is provided at the bottom of this article). Once it is downloaded, installing the software is super easy – just follow the on-screen instructions and you will be up and running within a couple of minutes.
3) Culling Images Directly from Memory Card
Previously, my workflow used to rely on importing or copying images from my memory card into my computer. The main reason for that was speed – trying to view images from a memory card was a painfully slow and inefficient process. However, thanks to faster modern memory cards, FastRawViewer’s superb performance and its ability to read RAW files quickly and reliably, I started culling images directly from memory cards, which made it possible to eliminate bad images early on and only deal with images I truly need.
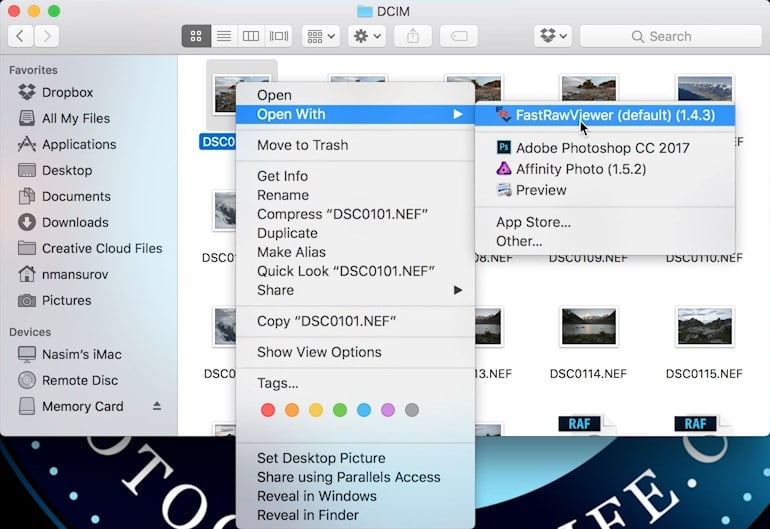
In order to cull images from your memory card, all you have to do is insert your memory card, go into the folder where images are stored (typically something like “DCIM”), then right-click the first RAW image and select “Open with -> FastRawViewer”, as shown below:
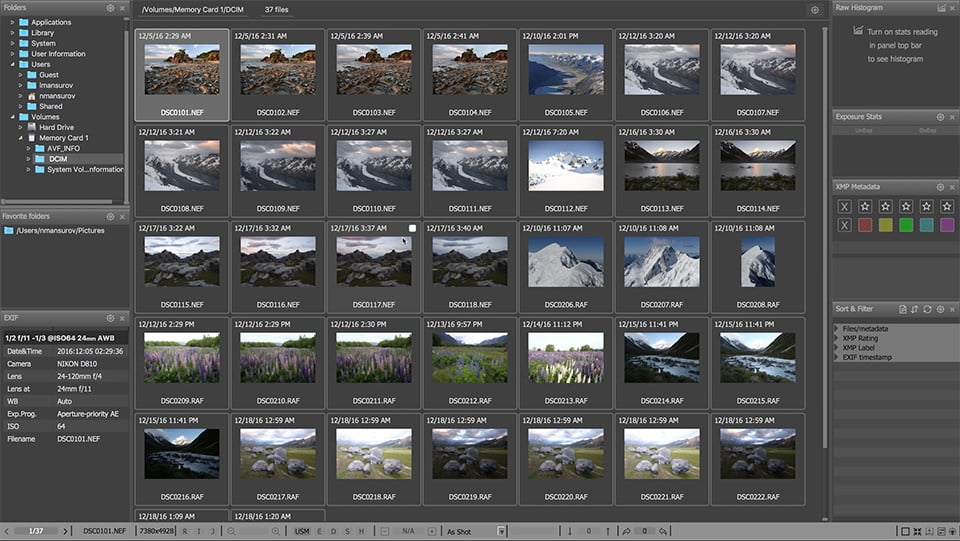
FastRawViewer will fire up, defaulting to its grid view:
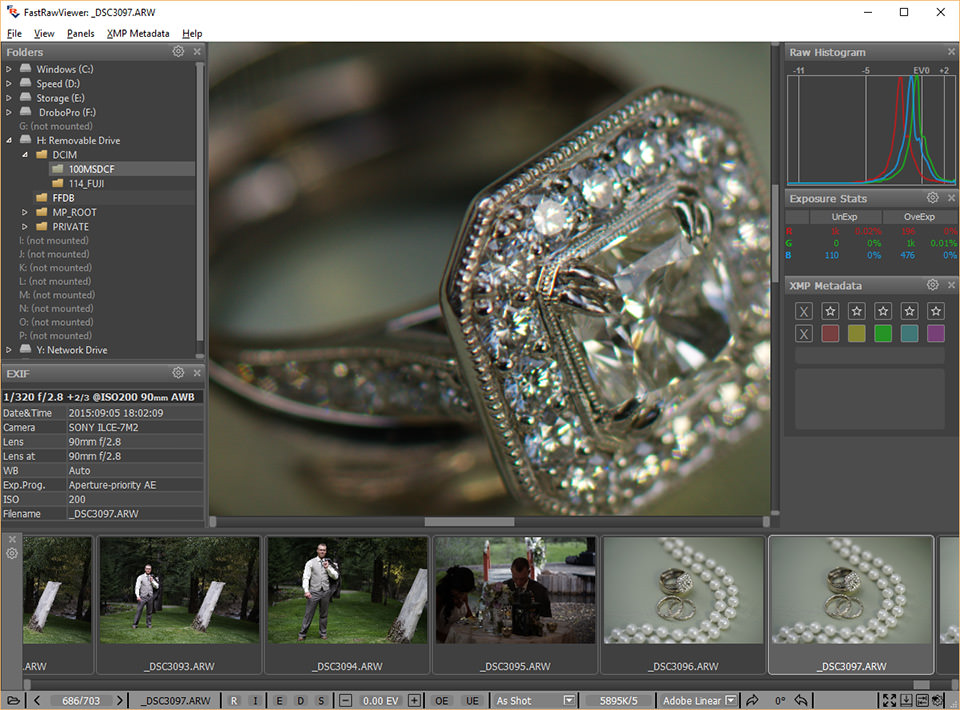
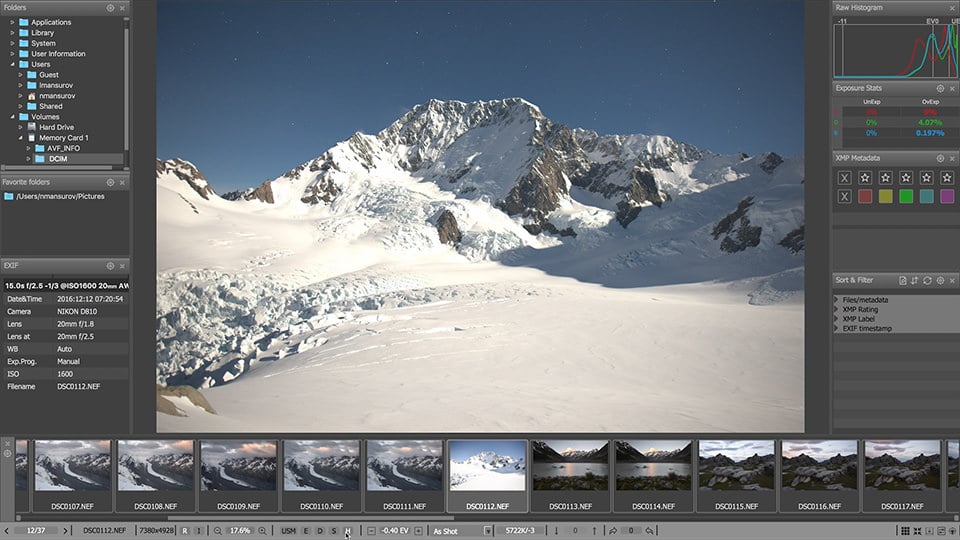
From here, select an image, then either double click it, or press “Enter” to view it. You will be presented with a screen that looks like the following:
FastRawViewer makes it extremely easy to assess the quality of RAW images. In addition to the real RAW histogram, which is highlighted on the top right side of the screenshot above, you also have two additional bits of data – UnExp (Under Exposure) and OvExp (Over Exposure) in “Exposure Stats” window. If you are blowing out any highlights and the image does not contain enough information, you will be seeing percentage numbers on one or more of the RGB channels under “OvExp”. This is very helpful, because it is an easy way to see how much data you have lost in your RAW files. I typically rely on Exposure Stats quite a bit, since it is a very easy and quick way to assess RAW files.
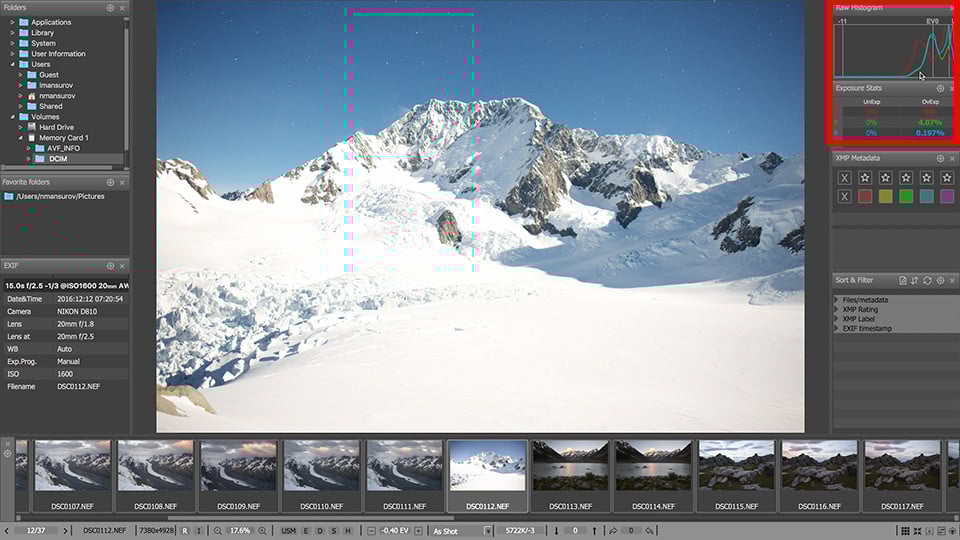
In addition to being able to see what’s going on with your RAW file, you have plenty of other ways to assess your RAW images during the culling process. FastRawViewer provides specific tools such as “Highlights inspection”, which you can turn on to see where you would be losing information in your images:
To quickly assess sharpness of your images, you can also turn on the very helpful “Display fine details” tool, which works very similarly as the focus peaking feature on modern DSLR and mirrorless cameras:
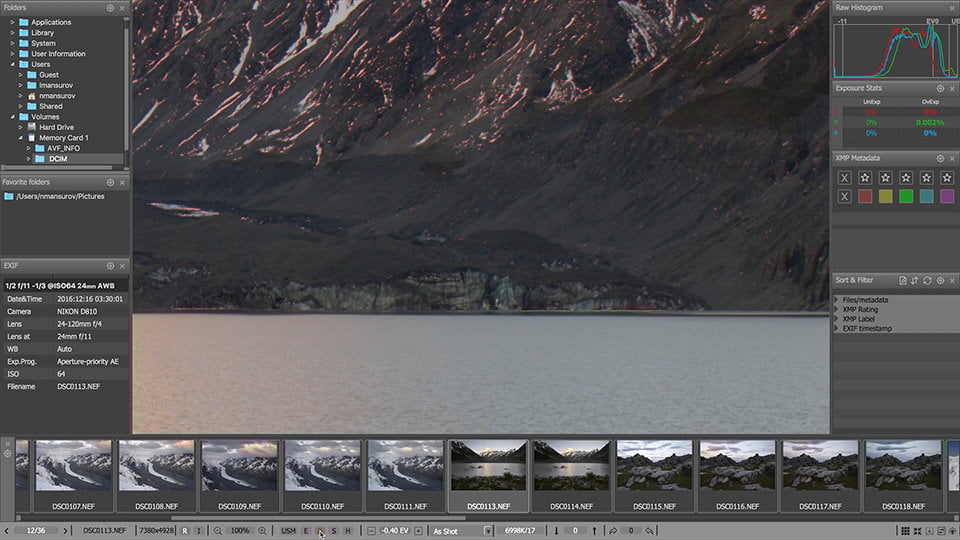
Before you do that, make sure you zoom into the 1:1 view by pressing the CMD+1 keyboard combination (CTRL+1 on PC). When looking through images, I always switch back and forth between 1:1 view and “Fit to Window” view (CMD+0 / CTRL+0) and I have my keys set up so that I can quickly navigate between images without having to constantly go back to the Grid view. Speaking of which, you can easily customize any of the keyboard shortcuts by visiting FastRawViewer’s Preferences (CMD+K / CTRL+K).
As I show in the above video, going through images within FastRawViewer is extremely easy. But the most beautiful part is that everything is instantaneous – I do not have to wait for any rendering to take place, because the software is reading the RAW files on the fly!
4) Culling Images From Local Storage
If your memory card is slow, or your memory card reader is too old, you might be disappointed by how slow RAW files open. If you experience this, you might be better off copying images from your memory card into your local storage first, then cull your images from there – you will gain a lot of speed by going this route. I personally like culling images directly from my memory cards, but if I have a few memory cards full of images and I want to cull everything at once, then I might copy everything to my local storage first, then take my time in going through everything.
Also, always make sure that you have a backup of your images (I always back up images from my memory cards before I start image culling). So if you are not saving images simultaneously to two memory cards on your camera, or you don’t have any backups, you might be risking potentially losing your images. While FastRawViewer never deletes anything when culling images (files are moved to a “Rejected” folder), if your memory card is about to fail, additional write operations could make matters worse.
Remember, the goal is to eliminate all bad images and only be left with real keepers that you will then import into your post-processing software of choice. You do not want to be losing any images in the process!
5) Importing Starred and Color-Labeled Images
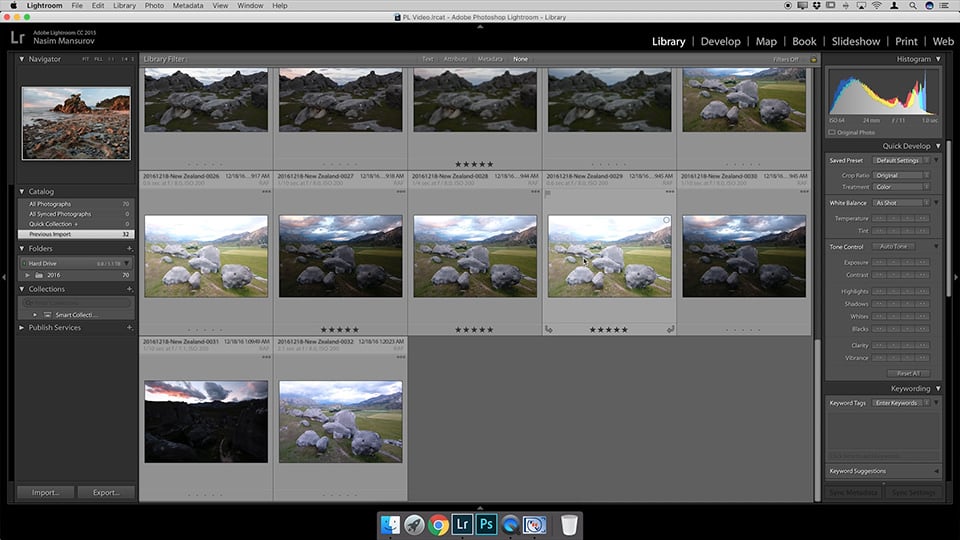
As I cull through images, I also make sure to select images that are worth editing. Similar to Lightroom, FastRawViewer provides two ways to mark images – using stars and using color labels. Once you star or color-label your images, the information is immediately stored in a sidecar file, so that Lightroom or other post-processing software can take advantage of it. This saves quite a bit of time, since you don’t have to render any JPEG previews and look through images again. Once imported into Lightroom, all star rankings and color labels are preserved, as shown below:
6) FastRawViewer PL Discount
We asked our friends at FastRawViewer for a special discount and they happily agreed! For the rest of February, you can use the discount code “LIBR-FO24-GCWQ” to get a 25% discount on all Libraw products! To purchase FastRawViewer, visit FastRawViewer.com.
Please note that PL is not affiliated with FastRawViewer and we do not receive any commissions from sales. We support FastRawViewer because we love using it and we are hoping that the company will continue to innovate and improve its software!
For more details about FastRawViewer, check out our detailed FastRawViewer review.
I went to the website from the link here .
Does the Coupon code still exist ? as it is not working.
Thanks
pankaj
Absolute game changer for my workflow! The interface and preferences do take getting used to. I thought this extra step was not worth the hassle. After using FastRaw for an hour and adjusting the hotkeys to be more like Lightroom, the culling process became so much faster and enjoyable. The focus peeking feature is amazing.
I posted a comment, which did not appear on the homepage. :-( Too bad…
“display details” (aka peaking function) is not the sole solution to judge sharpness BTW.
Like many I want quicker / better ways to sort and find “the good ones” / keepers.
I tried FastRawViewer and found it a very interesting approach — seems to be very configurable which is always a big plus.
Lacking for me is keywords and comparing more than one picture and renaming would be a plus also. I could possibly come around the lack of those three and use Bridge in addtion, _but_ I do not see how FRV is helpful for me, because it does not allow me to judge the sharpness of the images — which is for most images a crucial component if it is a keeper or not. When I zoom in to 100 % I see the coloured pixels at edges which do not show me in any way how the rendered image will appear after RAW conversion (because _no_ one needs / wants to see a RAW in the end). The USM sharping function for screen display does not help here either, because it just bumps up the contrast of those colored pixels. If there’s a setting I have overlooked I would like to hear that but I guess that’s the nature of the game here.
I looked at some example photos I took and no way I can make a meaningful decision about to keep or not a photo. I get that knowing the RAW histogram would be useful, _but_ IMO not in exchange of lacking the other informations of the photo. In that case I think one is quicker and better of to judge the jpegs and keep in mind that to quite a large extent over- or underexposed parts can be brought into a useable range, while unsharp photos will normally not be able to make usable!
On a side note: interesting to see the RAW image, when the distortion of the lens is still visible and a bit of the picture is not cropped — but not helpful for culling… :-o
Hi,Nasim.I recently bought the Combo FRV+Rawdigger,and I have a question for you (that is,if my recollections about your personal and occasional use of X-Rite’s Colorchecker Passport Plug-in for Lightroom are correct!) concerning the Application of White Balance in FRV to RAW Files (NEFs of Nikon D7200 + D3300,for that instance) during the Culling Process.As you already know when someone applies a Custom Camera+Lens Calibration Profile (made within Lightroom by the dedicated Colorchecker’s Plug-in) in the CALIBRATION Tab of Lightroom or ACR,the White Balance of any RAW Files is also automatically readjusted according to the Custom Profile’s interpretation of the Images’ RAW Data.My question is whether you actually use,or suggest using FRV for applying on-the-fly White Balance Corrections on any RAW File that is destined to have a Custom Calibration Profile applied to it later,once it has been imported in Lightroom for further editing,or will be developed through Adobe Camera RAW.I would like to thank you in advance for your precious time,and considerate reply,and note that I actually ask such a technically-laden question here only because our Workflows bear great resemblance,and your opinion as a more seasoned photographer than me -Having been involved in Digital Photography and processing only since 2011- could also benefit many other Photographers seriously involved in editing RAW Files in a Color-managed Environment.
Hi Nassim,
I bought the software after reading your recommendation. There is a major flaw. All raw file look blurry/mosaic like when viewing at 100%. The images look like they are upscaled. I have this problem for Nikon, Fuji, Sony and Canon raw files. and I don’t see this problem when I use LR, Photoshop or ViewNX. Can you help resolve this issue? I tried all different settings in the preferences and failed. I use Windows version.
Thanks!
Shawn, please keep in mind that you are looking at an actual RAW file that has no processing on it – that’s what you want to see when you cull through your images. I would recommend to try using the “Display Fine Details” tool if you are having a hard time deciding on an image. You can add display sharpening through the software, but it won’t be the same as what other software like Lightroom do – they actually add some sharpening by default and re-render your image. I am not sure about “mosaic-like” comment though – it should not show any mosaics.
I must say I’m dissapointed at FRV. At first I thought it was a perfect tool for culling, but for my use it is not worth the money. I’m an amateur bird photographer and I take all pictures with RAW. But if you look at a RAW image in FRV, you of couse see the RAW image, but that gives me a false impression of the quality. At first I almost deleted all my pictures using FRV and thought it was odd, that I suddenly couldn’t take sharp pictures. If I then looked at the deleted pictures from FRV in Lightroom, most of the pictures turned ud to be great. Even if I turned on the sharpen in FRV, it wasn’t fine. If I look at detail it shows part of picture sharp and again, in Lightroom it is fine. The only way FRV works for me is if I set it to show me the pictures in jpg, then I can see if they will turn out fine. But for culling i better like ViewNX-i. Maybe if your proffessional the FRV is better, maybe i’m using it the wrong way but for me it is a total waste of money.
Tommy, please keep in mind that the software does not add any sharpening to images by default, whereas other software like Lightroom do. When you look at an image in FRV, you are seeing the actual RAW file, with no sharpening added to it. Once you get a hang of how the software works, you will be able to make decisions on potential deletes vs keepers. It does take a little time to get used to it, but it is worth it in the long run for me and many others who use the software.
I use FRV as per your recommendation and I love it.
The point I think people are missing is that it is a great tool primarily for showing exposure information. When you take a photo you look at the histogram and that may not be the true information – it may be shifted to the right. When you load the raw image in LR you are looking at the “generated” jpg imbedded in the raw file – and then the adobe modifications. The strength of FRV is that it shows you the true RAW file.
Hi Nassim,
I appreciat a lot your work on this blog, and I learned a lot from what you share.
I use PhotoMechanic right now, but it’s very expenssiv indeed.
I was ready to try and buy FRV, but the code you gave seems to be invalid ?
I got this message : “entry.error.invalid.coupon”.
Could you let us know if there’s a way to have a working one, please in order to buy it ?
Best regards,
Interesting read; thank you.
I would like to throw another bit of software into the discussion; that being On1. I’m a long time Lr user but stopped buying at Lr5 — never went to CC at all — and have been working with On1 for about 12 months. Certainly not a smooth working relationship however the better bits out-weigh the poorer bits and atm I still prefer Lr for organizing. Bit to with knowing/understanding Lr already and the drama with On1 picking up every last keyword I ever typed!!!
So my question is basically will FastRawViewer be better than the “fast On1” browse/organizer section? I’m a bit over buying/trying/learning new programs that often promise to do it all but they fail to mention what they don’t do or don’t do very well. On1 has been a real love it hate it affair; but I never totally regretted buying/trying/learning the program.
Do I need something else? (??)