Cropping is one of the first steps in most post-processing workflows. In fact, most photographers apply some level of cropping to their images while editing. Reasons to crop an image go way beyond just getting closer to the subject. It could be for image stacking, panorama, straightening, or changing the aspect ratio of the photograph. In this article, I will take you through all the options that Photoshop offers with respect to cropping.
Before I guide you through the steps to crop an image using Photoshop, there are a few points that are worth pointing out:
- Cropping too much into an image will compromise the overall image quality due to loss of resolution. As a general guideline, it is better not to crop more than 50% of the image.
- It is always best to check the horizons or the alignment of the subject in an image. A straightening angle of about 5-10 degrees should be the maximum. As the angle increases, so does the loss of pixels. In addition to losing pixels, one might end up misplacing or in worst cases, losing some of the elements that complement the picture.
- When shooting stacked images hand-held, it is always best to shoot a bit wider due to potential changes in the alignment of images in post-processing software. Aligning and straightening images afterward might affect the composition.
Table of Contents
Crop Tool in Photoshop
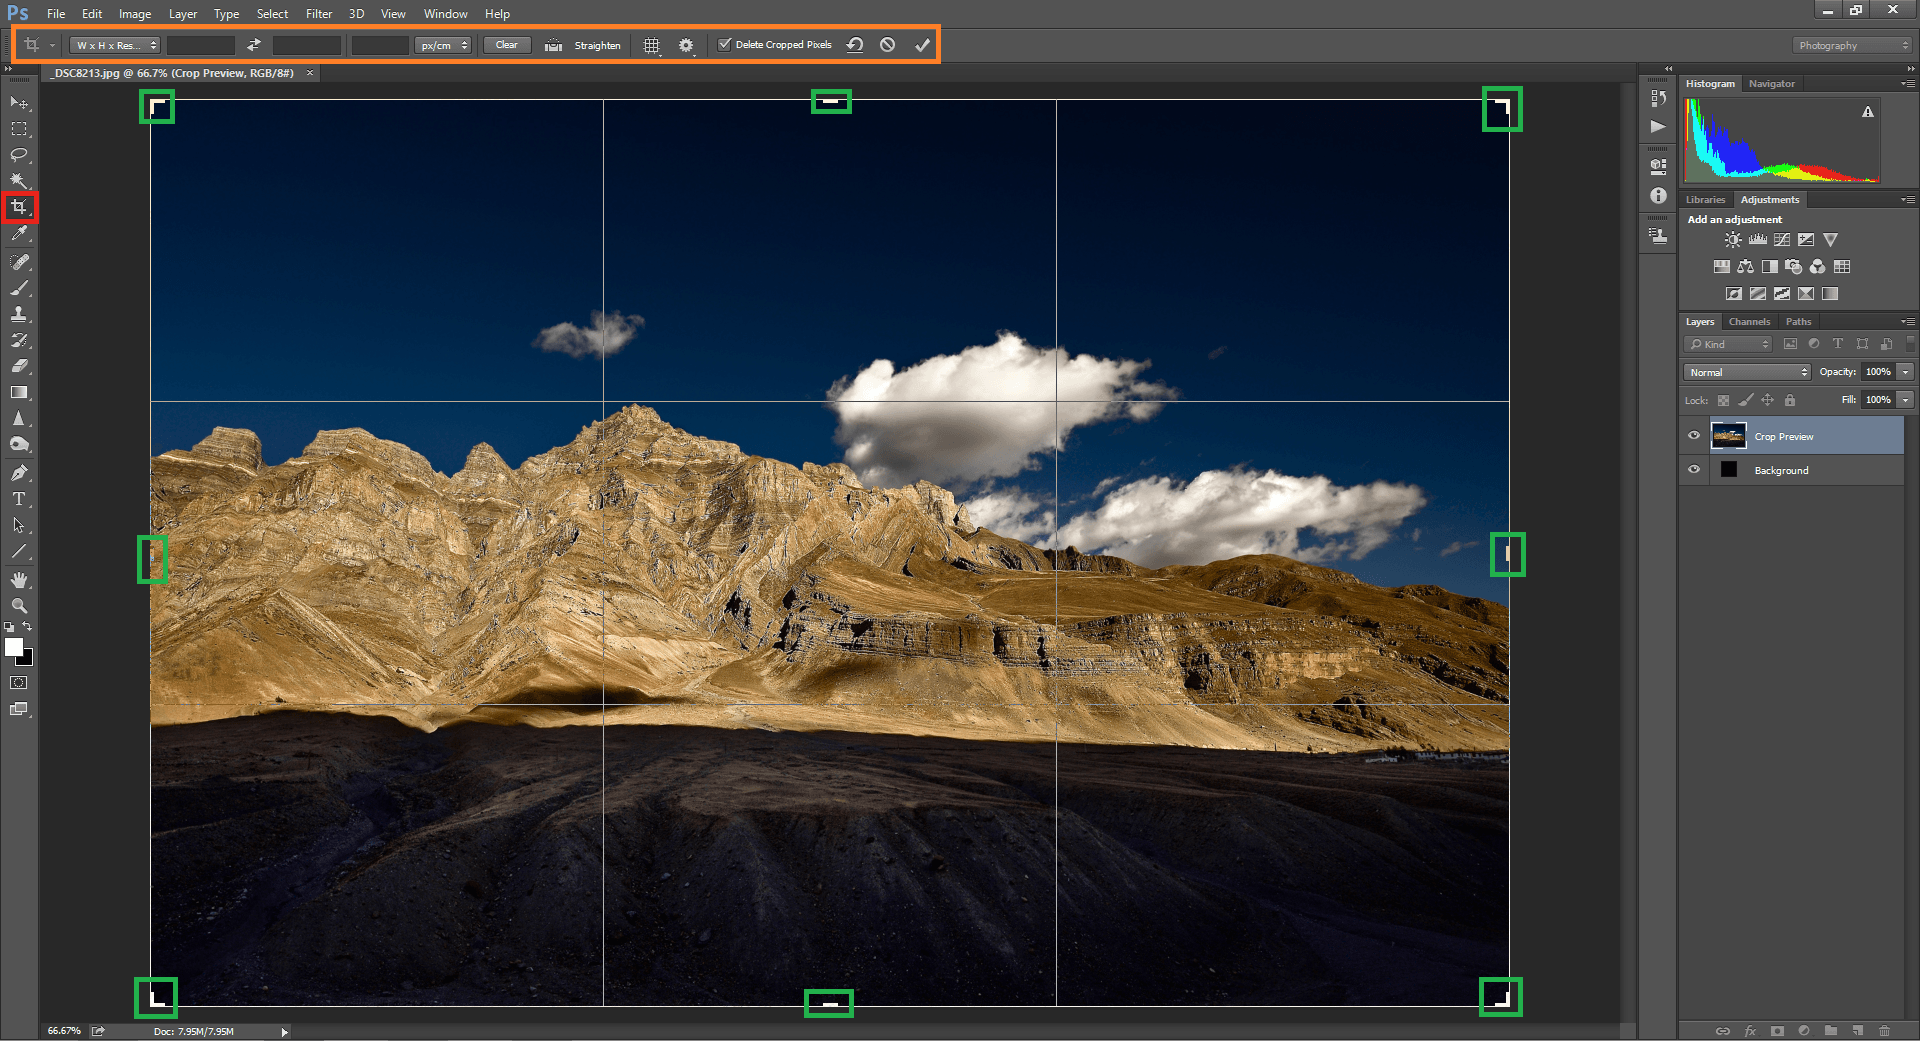
The crop tool in Photoshop’s toolbar (marked red in the illustrative picture below) can be used to crop an image. The crop toolbox appears (marked orange) after the crop tool is engaged. Clicking on the image area with the crop tool selected brings gridlines to the image.
Clicking on the resize holders (marked green) and dragging outside the image zooms out the crop. When one tries to zoom out of the actual image size, the background layer adds to the image area. In most cases, the background is transparent. So when the image is saved as a JPG, it becomes white and when saved as a PNG, it stays transparent. On the other hand, dragging it into the image zooms into the crop.
The mouse pointer turns into a curved double-headed arrow when it is moved to the dark grey workspace area outside the image. Drag the curved double-headed arrow to rotate the image (marked in green boxes):
Aspect Ratio
Simply put, the Aspect Ratio is the ratio between the width and the height of an image. For example, if the aspect ratio of an image is 16:9 it means that the longer side is 1.77 (16/9) times longer than the shorter one. Most cameras since the days of 35mm film have a native 3:2 aspect ratio whereas most video formats including some monitors, TVs, and cinema screens have a 16:9 aspect ratio. For more information, check out Nasim’s detailed article on the Aspect Ratio.
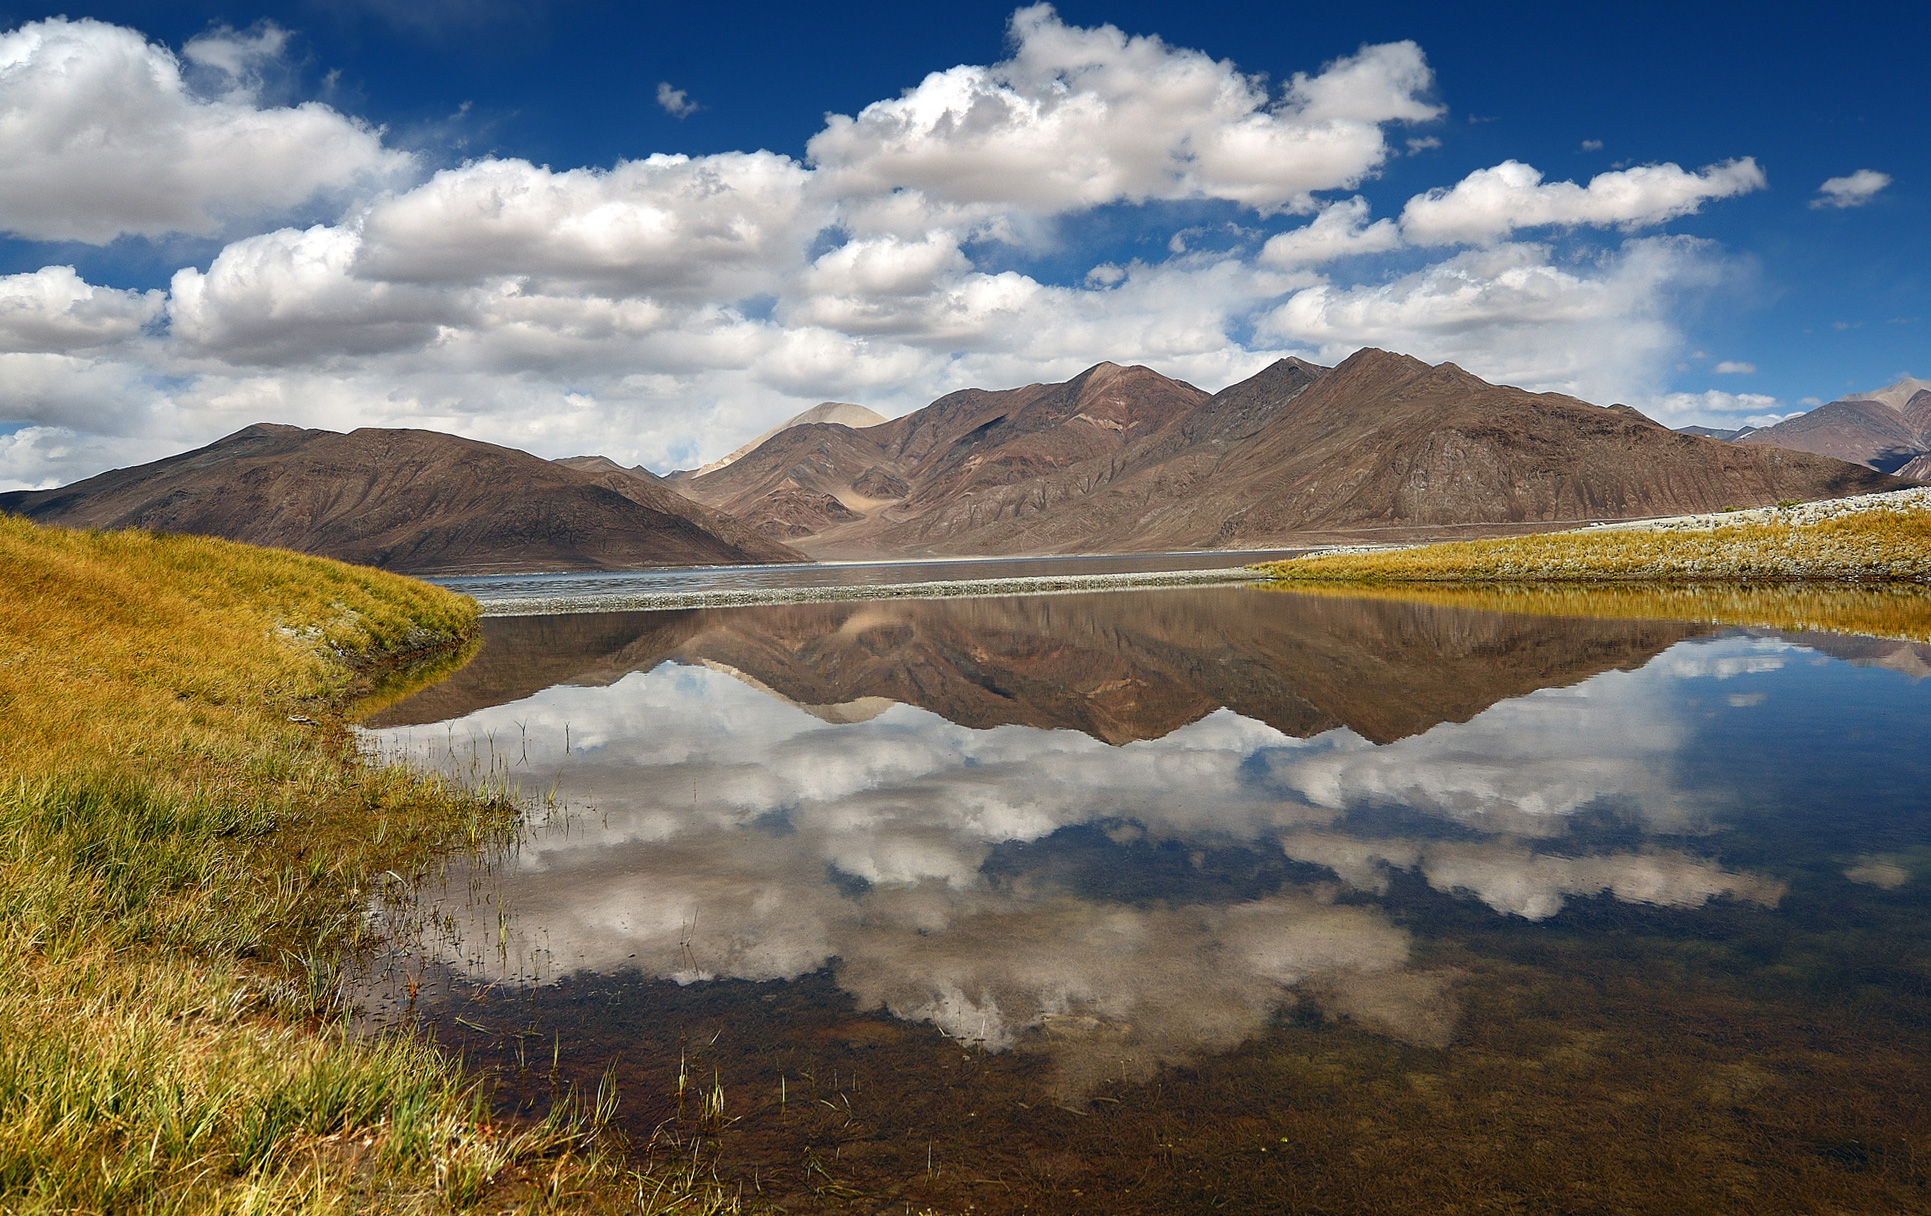
The aspect ratio can alter the storytelling capacity of an image by a noticeable margin. To understand it, let us compare the two images below. The first one gives a perception of depth. The viewer’s eye is directed bottom-up starting from the lake to the tall mountain in the distance. On the other hand, the image below it gives a wider perception of the scene. Even though the seemingly wide image has more depth in terms of distance from the foreground to the background, it is not conveyed as much as it is in the first one.


Changing the Aspect Ratio in Photoshop
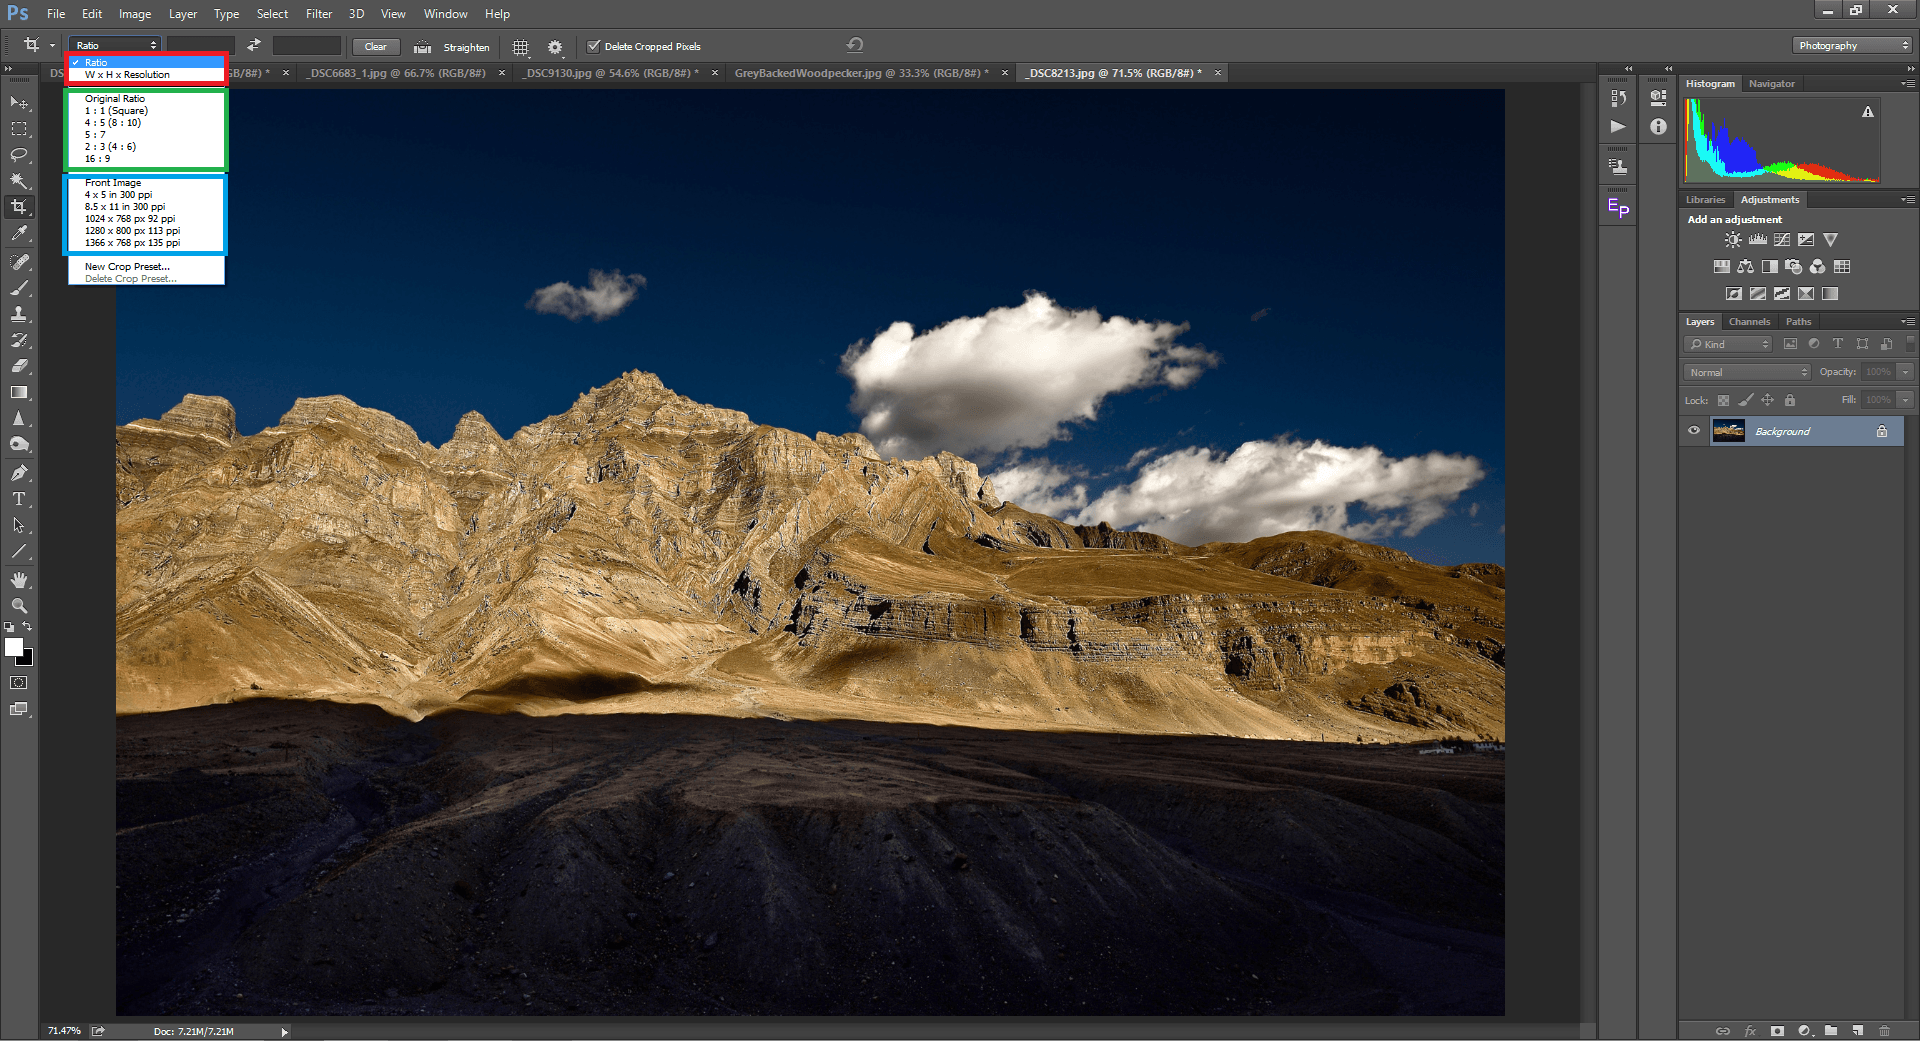
The aspect ratio drop-down menu holds most of the widely used ratios (marked green in the image below). Selecting a ratio will fix it and as a result, that ratio will be maintained immaterial of the position of the mouse while dragging the resize place holder.
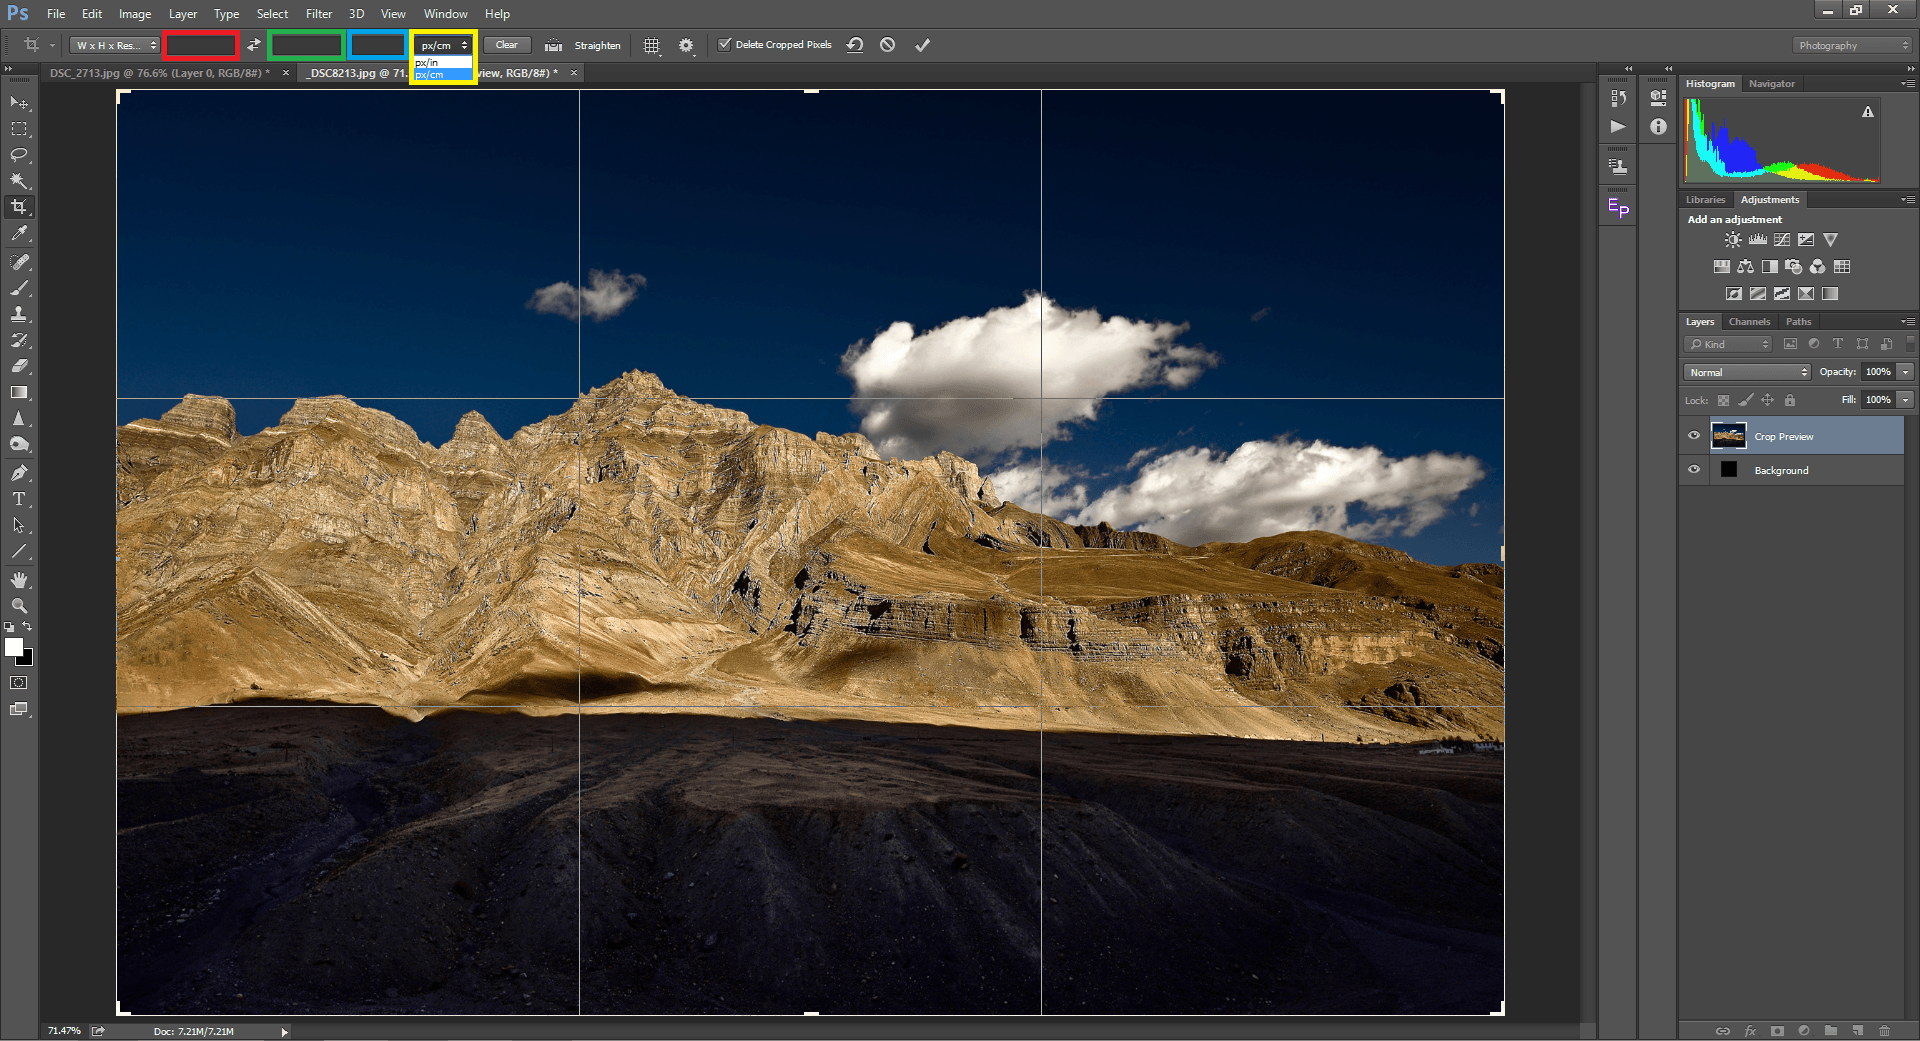
It can be seen that the corresponding numbers with respect to width (marked red in the image below) and height (marked green in the image below) of the image appear in the text boxes right next to the drop-down. The ratios can be swapped between width and height using the swap button that could be seen in between the width and height text box. Select the W x H x Resolution option to choose a custom aspect ratio. When this option is chosen, you will see a third text box (marked blue) where you can specify numeric values. Further, the units, whether imperial or SI can also be chosen in the drop-down (marked yellow).
The clear button can be clicked to remove the aspect ratio and have a free hand crop. In this case, the aspect ratio keeps changing as you drag the resize placeholders.
Image Straightening
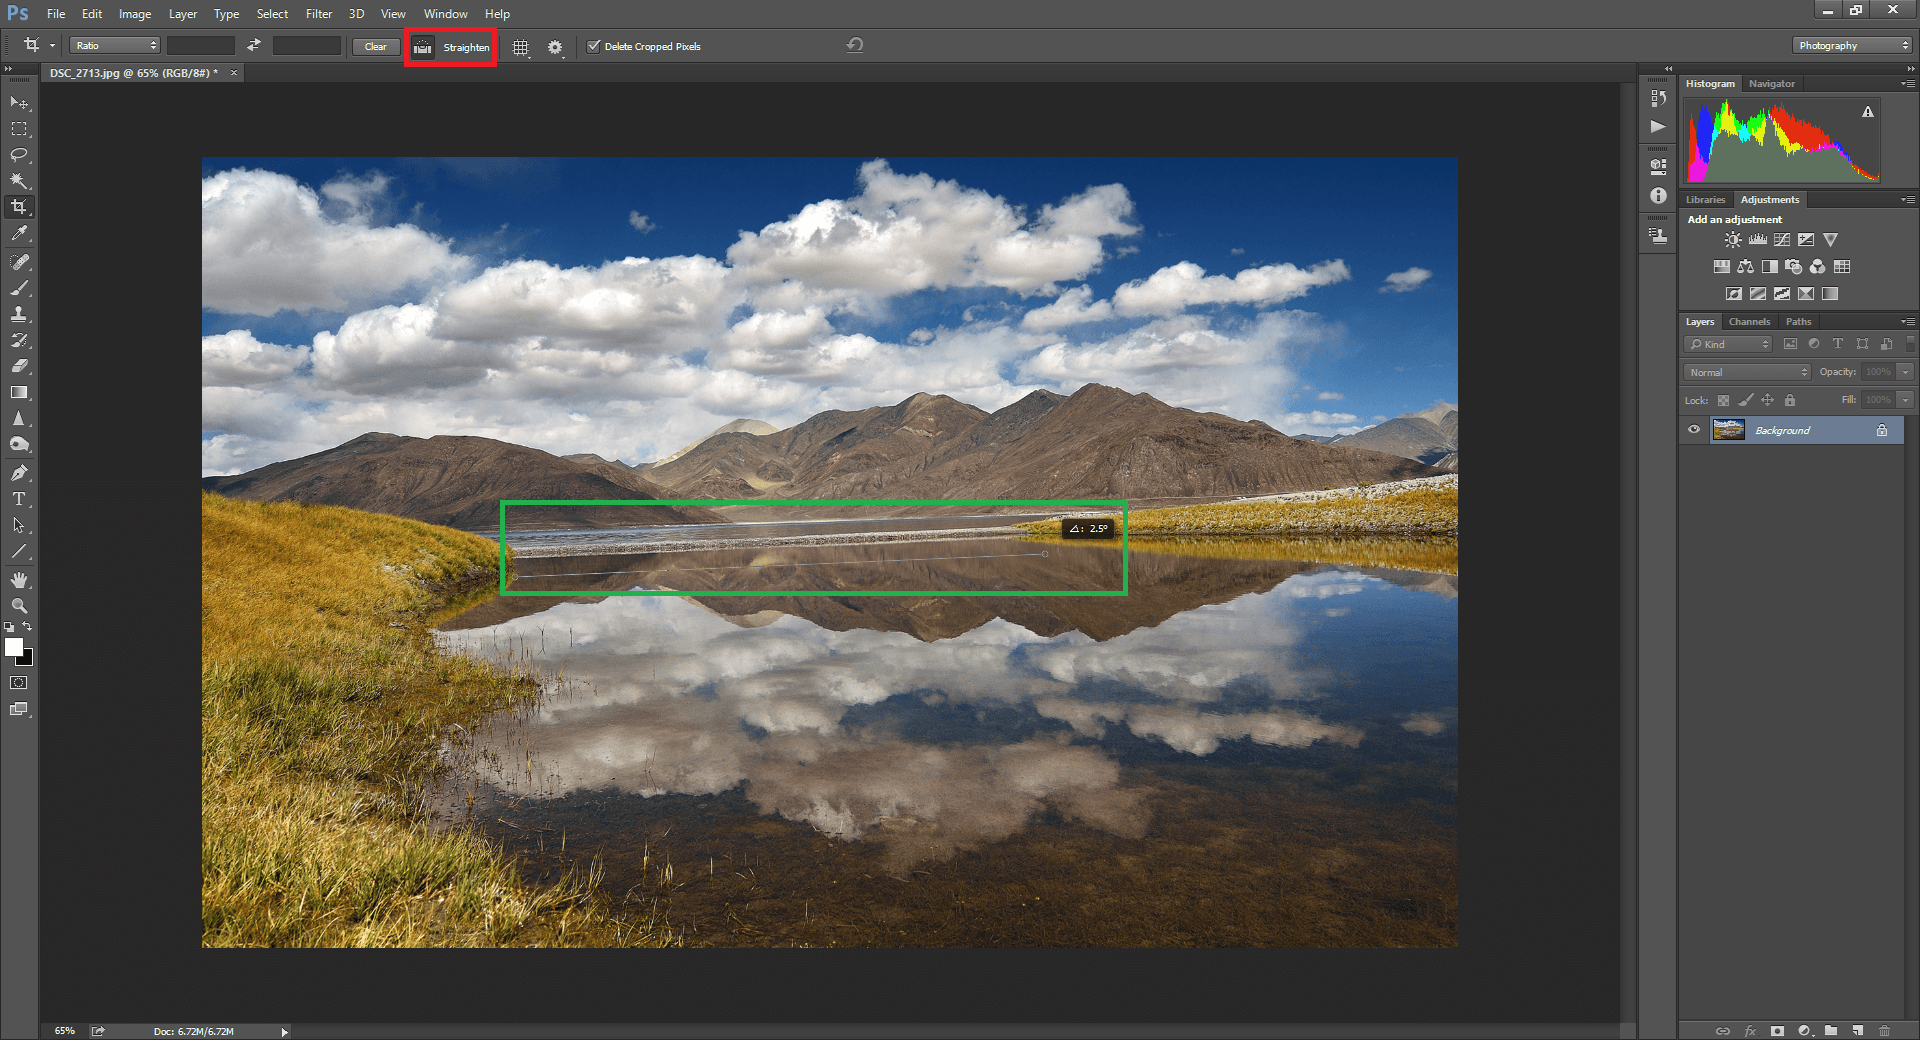
Take a look at the image below. It can be clearly seen that the image is tilted to its left. This is a common mistake that quite a lot of us end up making while photographing. It is even more common when we are not using a tripod. A 2-degree tilt can make an image look utterly unprofessional. The cropping tool in Photoshop provides a one-click option to straighten the image.
First, click on the straighten button (marked red in the image below). Then, draw a line by dragging the mouse parallel or on the horizon with respect to which you wish to straighten (marked green).
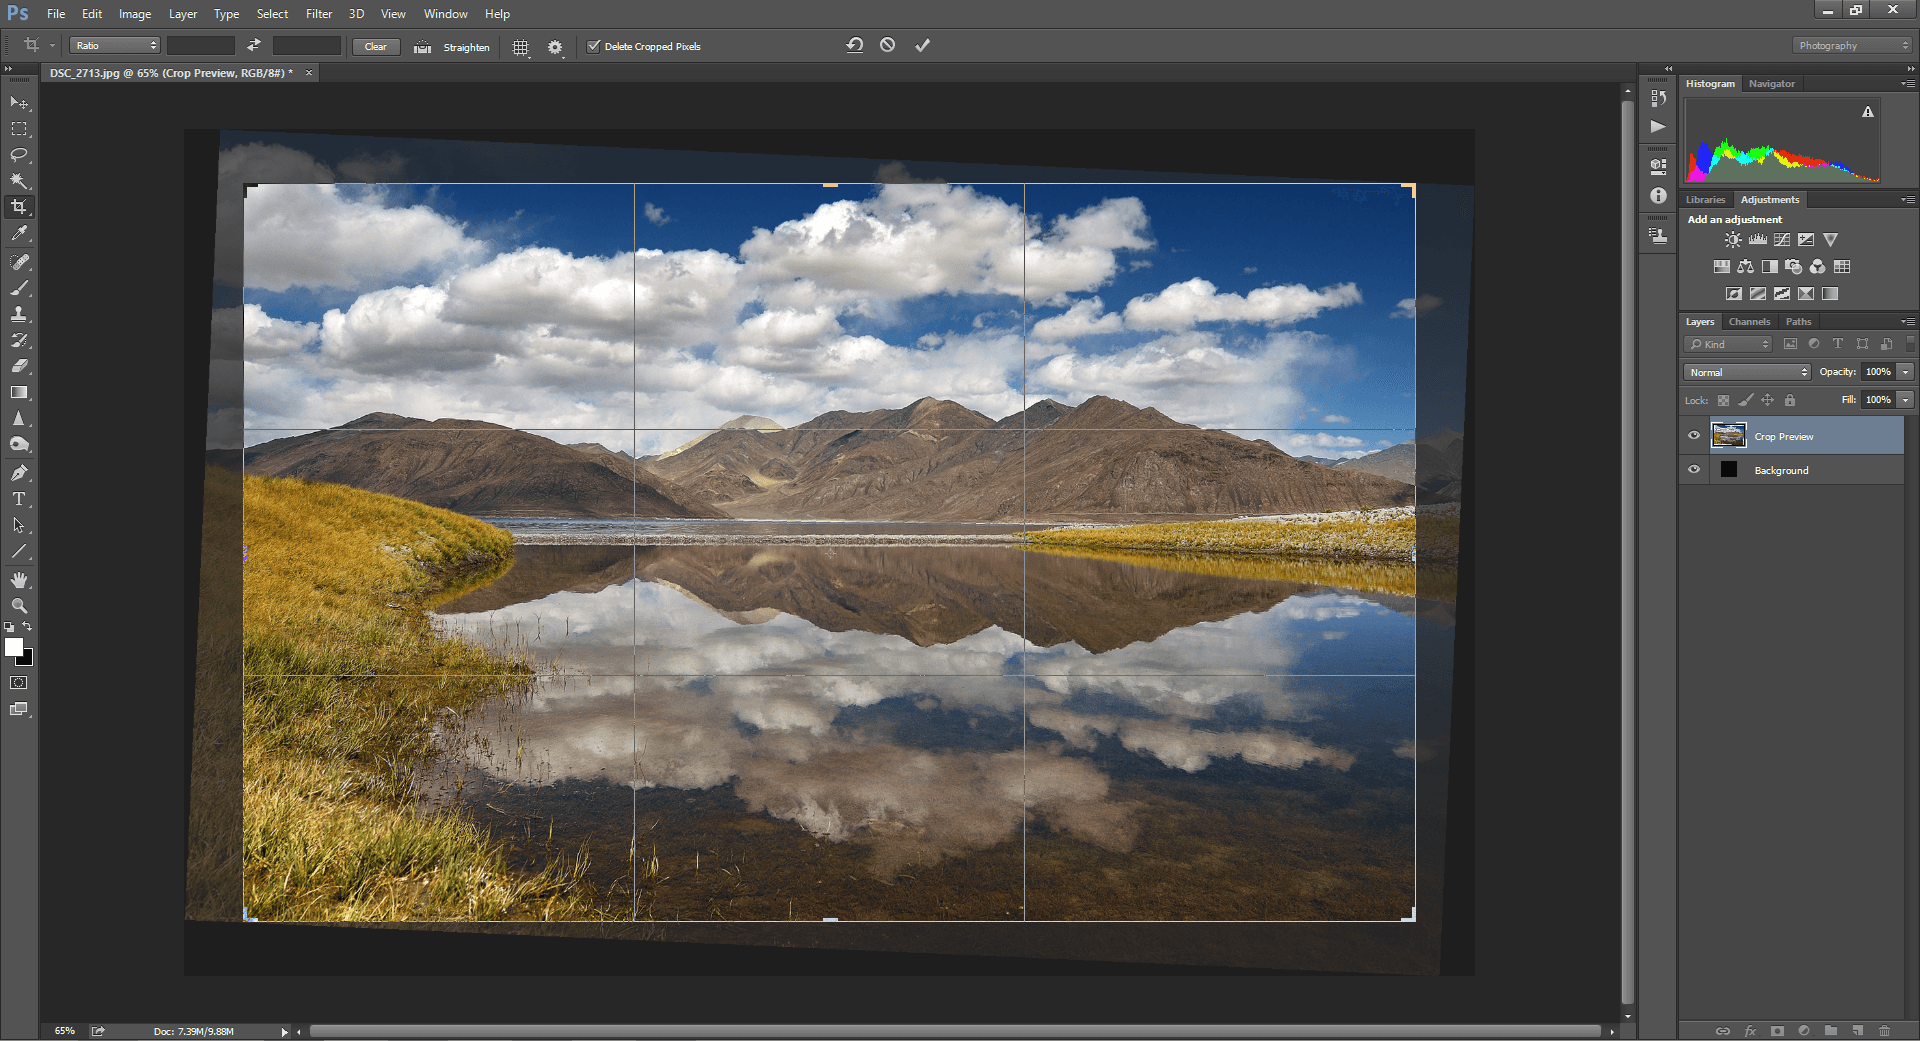
You can see that the image has been straightened accordingly when you release the mouse button. As you can see in the image below, there is a significant loss of pixels when one tries to straighten or tilt an image, as mentioned earlier in the article.
Overlays
Crop overlays are merely guidelines that help us compose better and geometric shapes that divide the frame. When the key points of your image like the eye of a subject align with certain intersections of lines, they grab more attention. This is because when you align your frame with reference to geometric proportions, you end up with a geometrically balanced image.
To select an overlay, click on the overlay button to get the drop-down menu. The cycle overlay option (marked blue) cycles through the overlays in order of appearance in the menu. Overlays can also be cycled using the keyboard shortcut “O” while the crop tool is selected. Certain overlays like the Golden Spiral are not symmetrical. The orientation can be changed using the cycle orientation option or using the “Shift+O” keyboard shortcut with the crop tool selected.
Even though there are over half a dozen overlays that help compose images better, most people are aware of only one. Let us take a look at all of them, one-by-one.
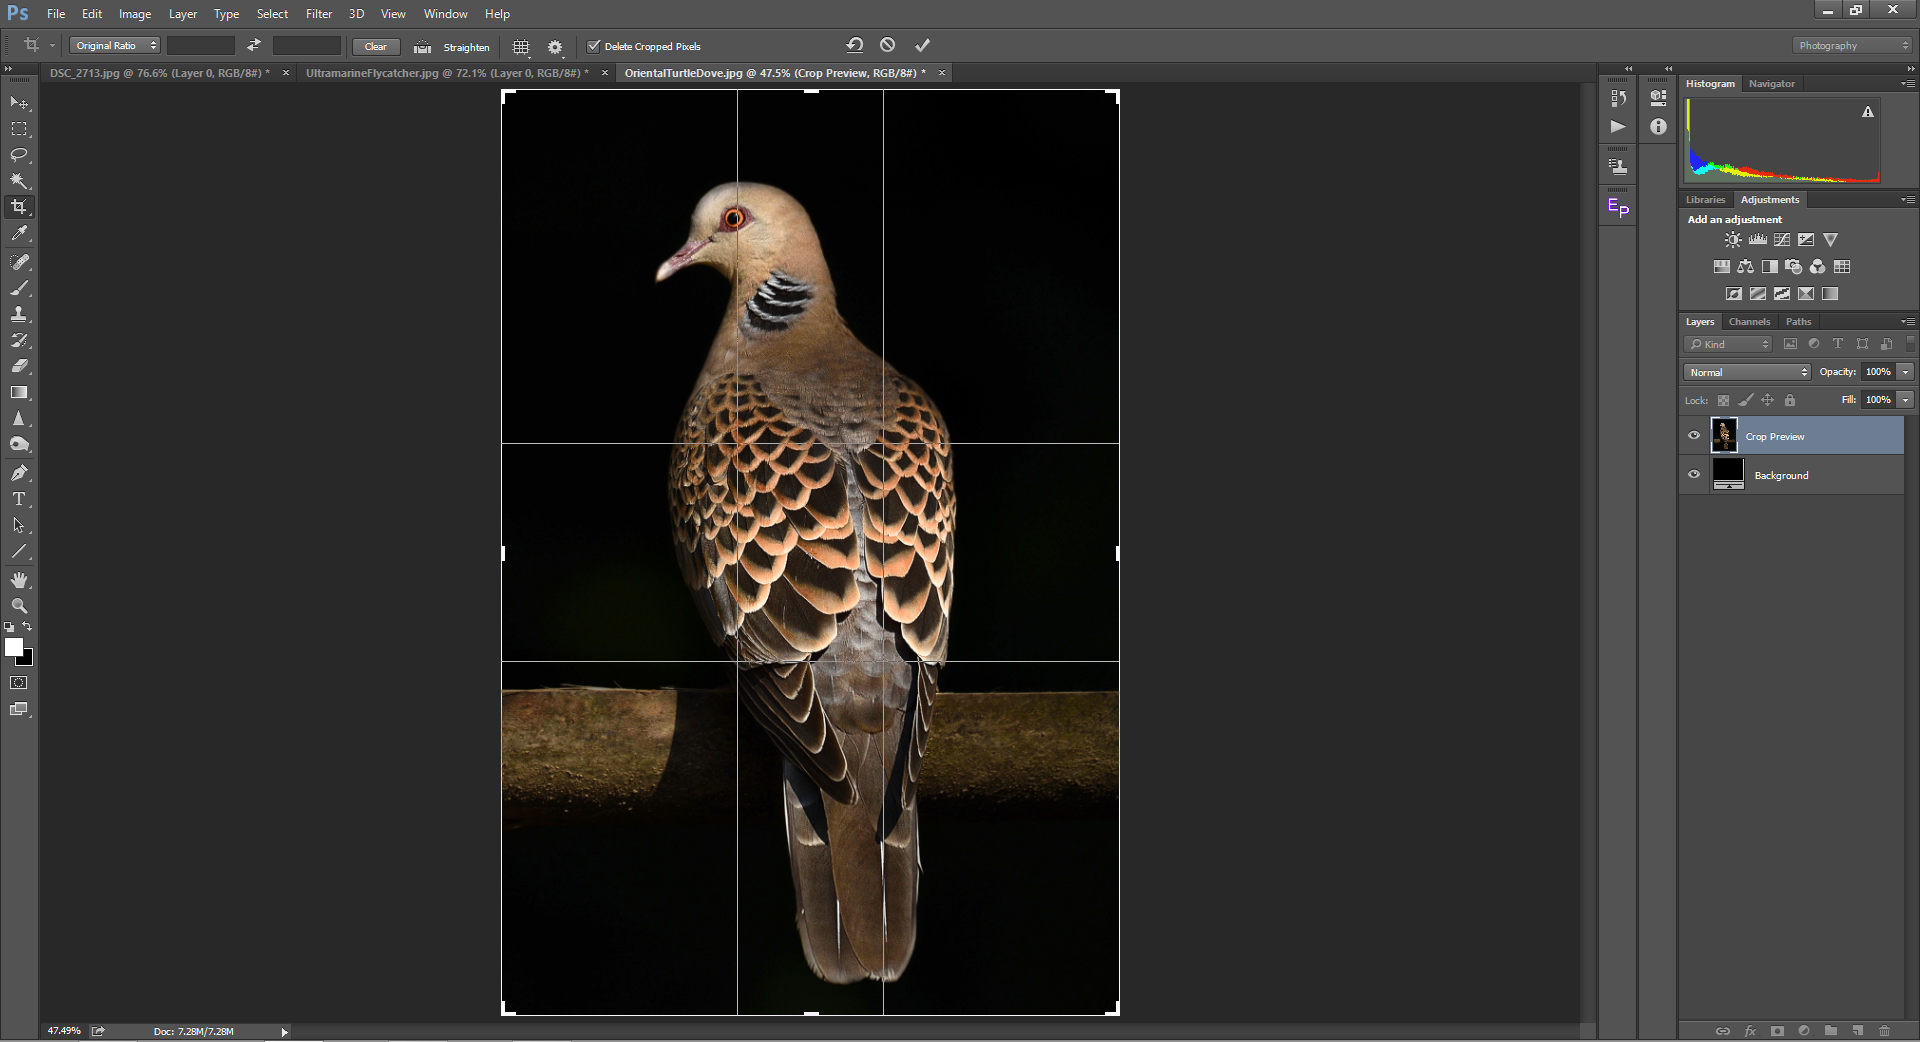
The Rule of Thirds
The Rule of Thirds is pretty much one of the most widely used, and in many cases, widely abused overlays. The Rule of Thirds is also the default overlay in Photoshop. The overlay simply divides the image into nine equal rectangles. The observer’s eyes are drawn more into the image where the lines intersect. In the image below, the eye of the subject is aligned to the top-left intersection to grab the observer’s attention to the eye of the subject.

Rule of Thirds has become so common that most viewers are used to seeing tons of images aligned to the thirds. Sometimes, the Rule of Thirds can create unbalanced results. Even in the example above, I would have liked more negative space on the left. Since the eye is aligned to the left third, I was forced for a tighter frame-filling crop. If you are wondering about the Rule of Thirds and its limitations, we have a few interesting articles at PL that are worth checking out:
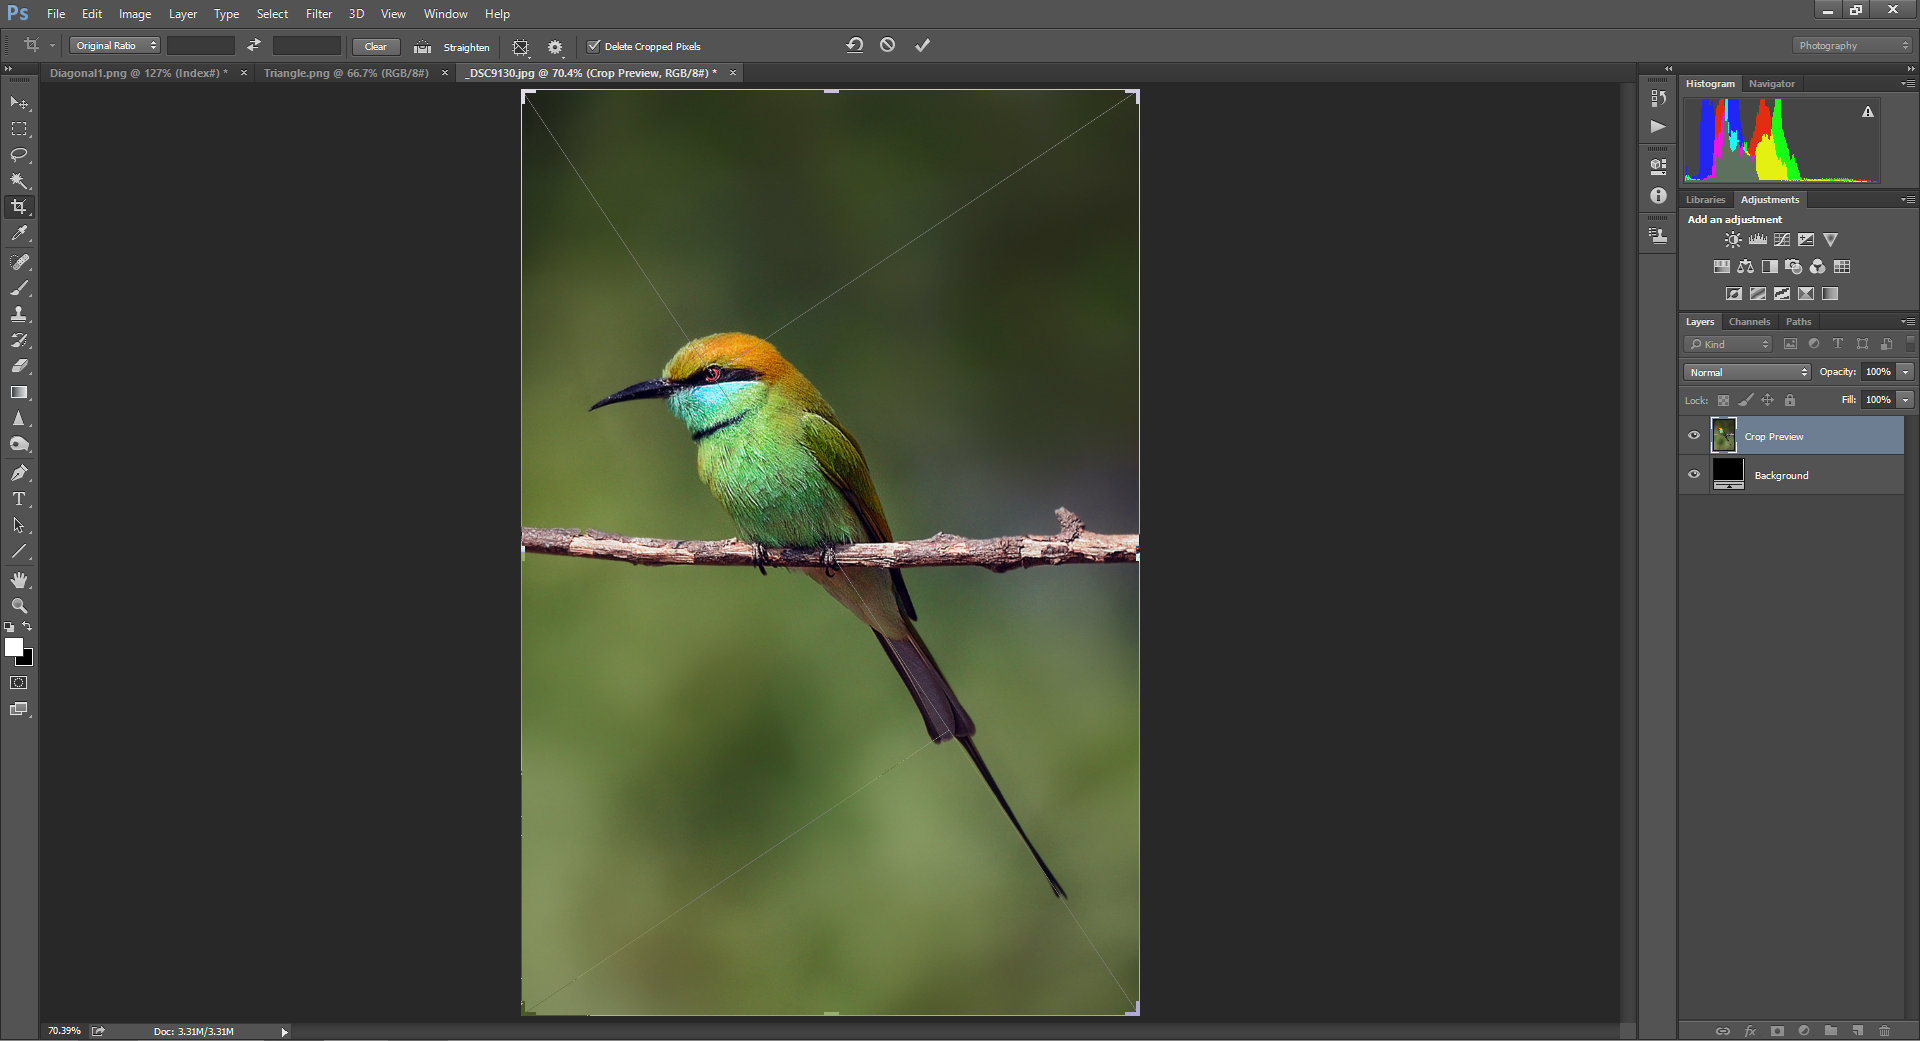
Diagonal
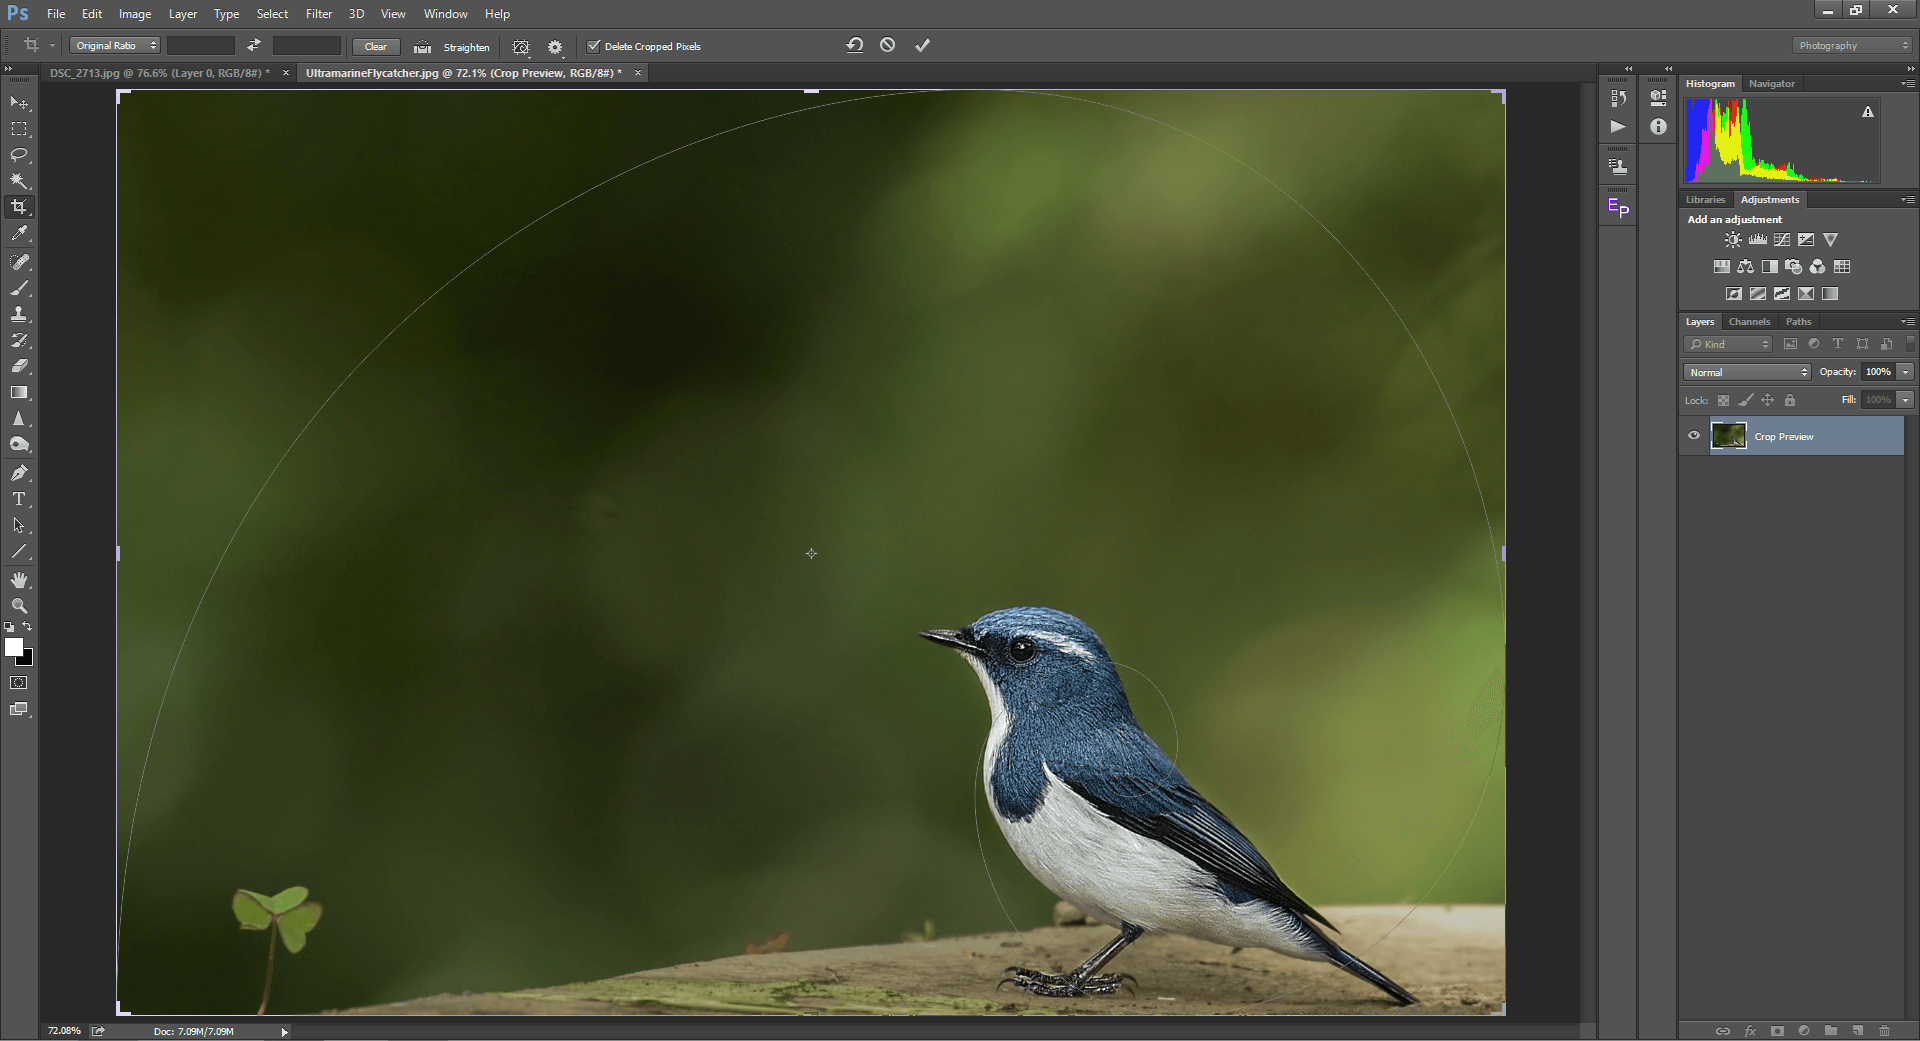
As a matter of fact, when we use overlays other than the Rule of Thirds, it becomes a rare composition in itself. The diagonal overlay simply has lines running diagonally (45°) from each corner of the frame. To understand when and how to use Diagonals, let us consider the image below:

The subjects would have moved more towards the top or to the bottom of the frame, had I aligned the eyes of the birds to the intersection based on the rule of thirds. As seen above, using the diagonals to crop this image aligns the eyes of the birds closer to the intersection. As a result of aligning to the diagonals, one can avoid negative space either above or below the subject. Just like the Rule of Thirds, the points of intersection also grab the user’s attention.
Triangles
The triangles overlay is used predominantly for closer crops, frame-filling shots to be more specific. As can be seen in the picture below, this overlay has one diagonal running across two opposite corners and two vertical (90°) lines bisecting it reaching the other two corners. The central idea remains the same. Subject alignment to the intersections or when aligned to the lines attracts attention.
The Golden Ratio
The Golden Ratio overlay is similar to the Rule of Thirds with respect to dividing the frame into nine rectangles. The difference is, the length and width of the four corner columns are 1.618 times bigger than the ones in the center as seen in the image below. Also called the Phi ratio, this overlay is used for center-heavy compositions. The Golden Ratio heeds to the Fibonacci series which is found all around us in nature. As you can see in the picture below, the eye of the subject passes through the left vertical line. Even though the subject is center-heavy, it isn’t aligned to the dead center which in most cases makes the image boring. It can also be seen that the highlighted repetitive patterns on the wings fall inside the central rectangle.
The Golden Spiral
The Golden Spiral is a more artistic implementation of the Golden Ratio (1.618). The picture below looks pleasing even though the subject is around the corner. Arguably, it is because it heeds to the Golden Spiral, or perhaps there is simply a healthy amount of negative space and “breathing room”:
The Golden Spiral has been an artistic rule for centuries. Some works of art as famous as the Mona Lisa could have been drawn in accordance with the Golden Spiral. Starting from the arrangements of seeds inside a flower to conch shells to spiral galaxies, spirals are a repetitive form in nature. Each consecutive side of the spiral is approximately 1.618 times bigger as it goes outwards. When the subject is placed towards the innermost spiral, it draws the viewer’s attention.
Overlays like Triangle and Golden Spiral can have the orientation changed using the “Shift+O” keyboard shortcut or from the Overlay crop tool. The grid overlay is more useful for graphics designers than photographers and hence not covered in this article.
Perspective Crop Tool
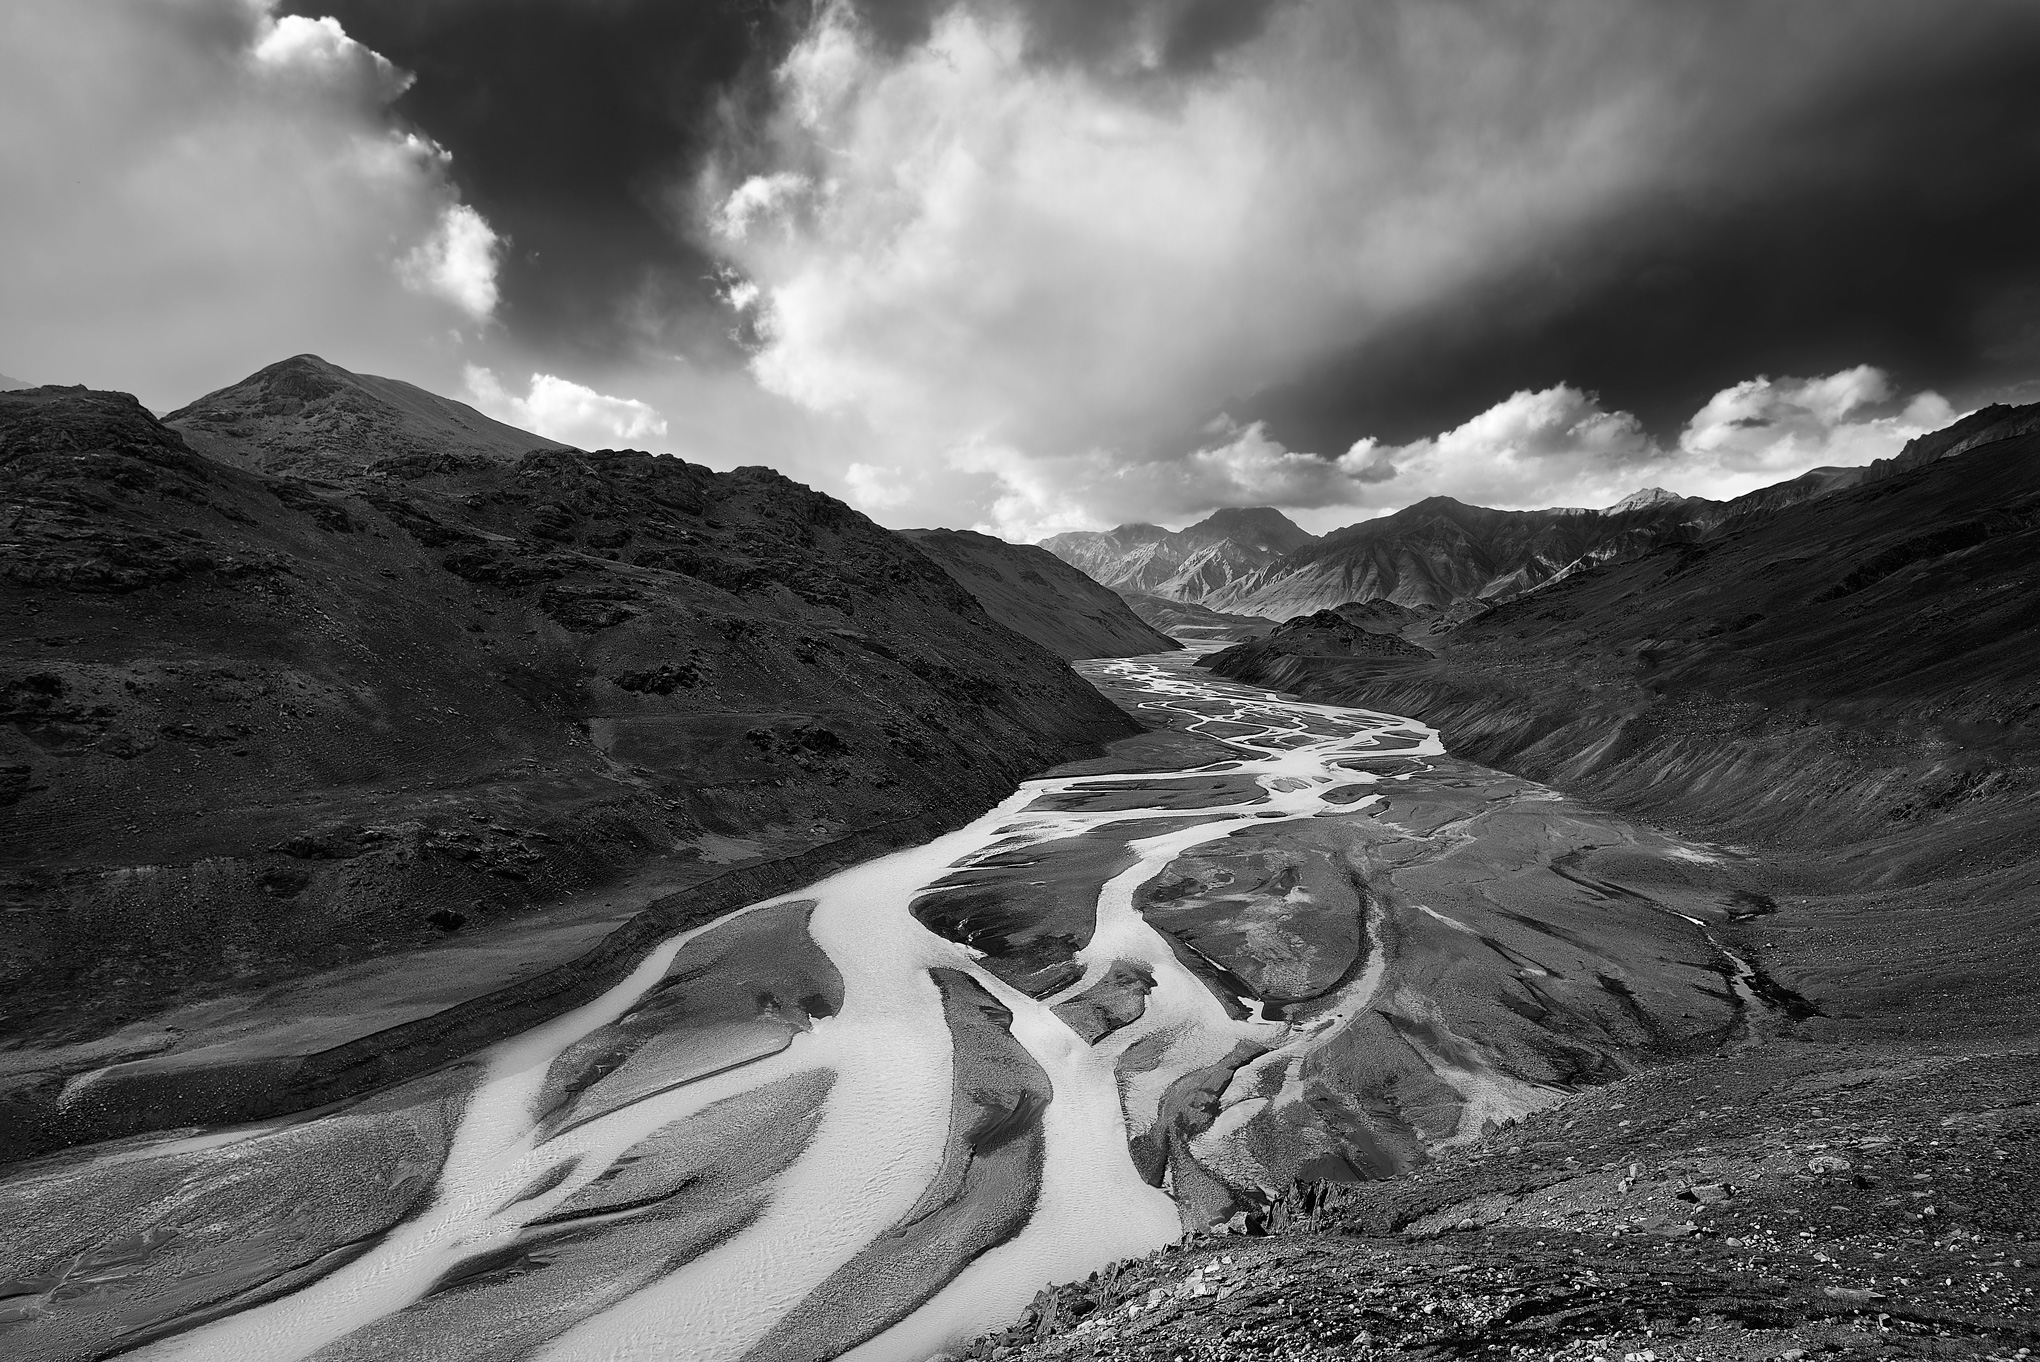
The perspective crop tool comes in handy when we need to crop out triangular areas out of an image. As seen in the below image, there is more negative space on the bottom right corner. But when I attempt to crop, I would end up losing the mountains at the top right side, tilting the balance of the image and making it right-heavy.
This tool allows us to crop the corners at angles. It then stretches the image into a rectangle. As you can see in the illustration below, the perspective crop tool crops out the bottom right, leaving the mountains and the sky comparably unaltered:
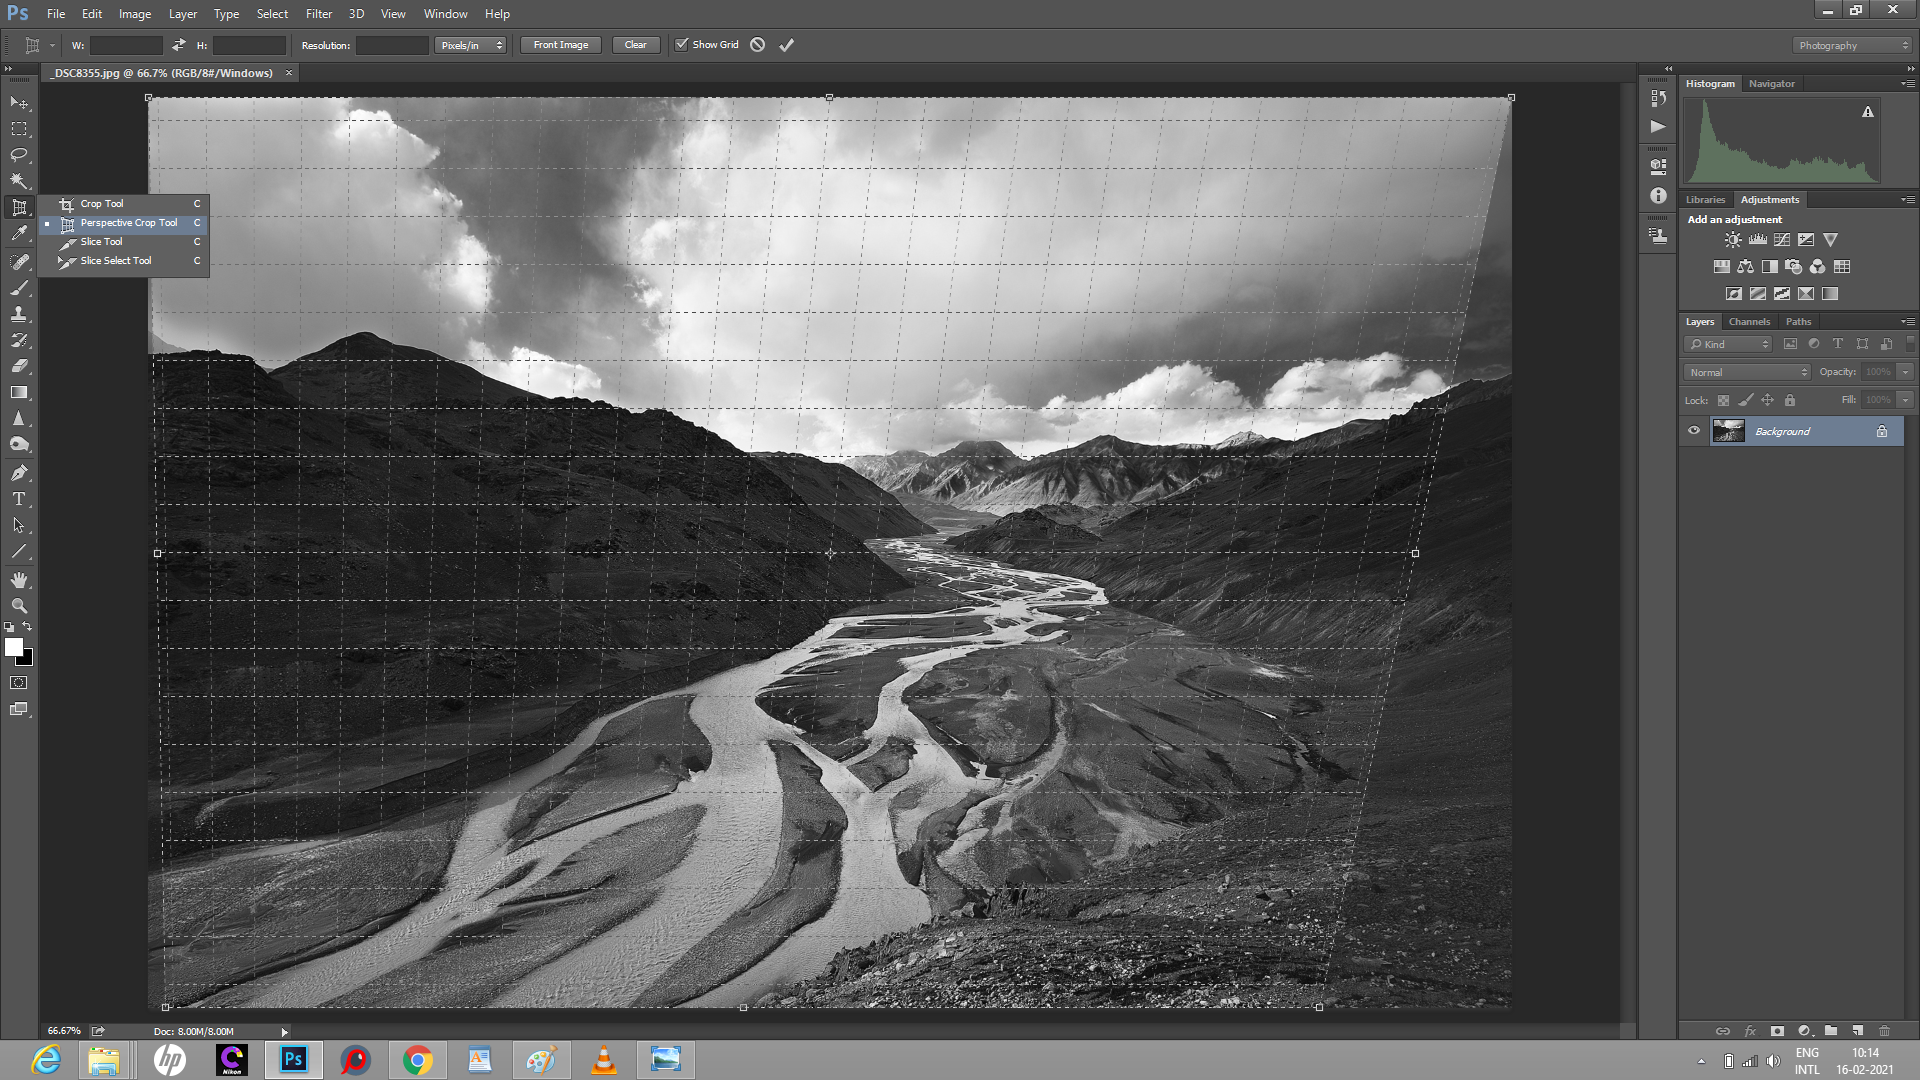

The foreground in the resulting image is more enhanced, leaving the mountains on the top right comparably unaltered. However, one needs to be cautious when using the perspective crop. As mentioned earlier, the pixels are stretched respective to the area cropped out to make a rectangular frame. So obviously, there will be a loss of resolution where the stretch is maximum. Care should be taken not to crop too much using the perspective crop, as it can yield distorted images.
Conclusion
This article covered most of the frequently used cropping options that Adobe Photoshop provides. It also covered how one overlay does not fit all images. The geometry and balance of the image should dictate which overlay guideline to use rather than trying to fit the composition into the default overlay. If there are any queries or if there is anything you feel that I have left out, please pen it down in the comments section below. I shall update or cover those in my upcoming articles.
Great material, thanks, Madhu! I wish photo editors would offer us some signals so that we’d know that cropping is going out of control. Otherwise it’s hard to stop sometimes, and I ruined a lot of good pictures with decent Photoworks edits by cropping out too much.
Yes, Its a very important to crop image for web or online publish/submit specially ecommerce web.
excellent thank you
Thanks, Madhu, for the good information. I wasn’t aware of the Perspective Crop so thanks for bringing that to my attention. One thing about the Straighten tool and loss of an image’s edge pixels when used, the Content Aware function can be used to prevent that by filling in the portion that would be cropped out with information that matches the edges, at the same time straightening the photo. It doesn’t always work, but when it does it can save your image from losing any edge pixels during straightening. It’s activated by a checkbox in the Context Sensitive menu for the Crop tool.
Thanks for pointing it out Watanabe.
I have found issues with the content aware function as you have already pointed out. When we have a repetitive or a seemingly even area to fill, then it works well, but with dynamic textures, it renders problems. One solution could be to use the stamp tool to graft a portion in a separate space before cropping and then using it to fill it. Nevertheless, if one isn’t going for a large print, then the loss of resolution wouldn’t be a major issue.