Without a doubt, Lightroom is a powerful software package for editing images. But did you know that it is also one of the most preferred tools to stitch panoramic images? Ever since Adobe released Lightroom 6 and CC, the capability to stitch images into DNG files has been integrated right into the product core. If in the past one would have to either use Adobe Photoshop or third-party software such as PTGui to stitch panoramas, with the latest versions of Lightroom, one can easily stitch single row and even multi-row panoramas directly from Lightroom. In this article, we will demonstrate how one can successfully stitch panoramas in Lightroom and explain why the use of Lightroom specifically might be a preferred method when compared to other third-party tools on the market.
GFX 50S + GF63mm f/2.8 R WR @ 63mm, ISO 100, 1/1250, f/5.6
There are many factors one needs to consider when shooting panoramas, such as camera-to-subject distance, focal length, finding the no-parallax point, image overlap, etc. If you are new to panorama photography, the best place to start is by reading our Panoramic Photography Tutorial, where we go over many of the basics. And if you are wondering why you should try making panoramas, you should check out Spencer’s article on The Hidden Benefits of Panorama Photography. In this tutorial, we will only be focusing on the actual process of stitching images in Lightroom.
Table of Contents
1. The Power of Merging Panoramas in Lightroom
In the past, many of us who work on creating panoramas used to rely on third-party tools such as PTGui, since the only other alternative was Photoshop, which did not do a very good job with stitching panoramas, especially in its earlier versions. Without a doubt, PTGui is a very powerful tool and it is still used by many professionals today to stitch complex multi-row panoramas and it even has the built-in capability to stitch HDR panoramas. However, once Adobe implemented the Panorama merging capability right into Lightroom, many photographers, including myself, started switching away from PTGui to Lightroom for two main reasons – simplicity and ability to merge panoramas to DNG files. While I love the flexibility PTGui provides and still use it occasionally for complex panoramas, I found Lightroom’s Panorama Merge tool to be good enough for most panoramas I create today. And the fact that the resulting panorama is a DNG file means that I no longer have to worry about making any post-processing adjustments to images before I merge them – I can stitch a panorama with newly imported RAW images and if the panorama is worth working on, all the sliders and editing tools within Lightroom are available to use, unlike flat JPEG or TIFF files that cannot be edited with the same flexibility within Lightroom in the future. With a powerful machine, I can even stitch high-resolution multi-row panoramas in Lightroom, and most of the time, it does a pretty good job with the stitching process.
2. Panorama Photo Merge
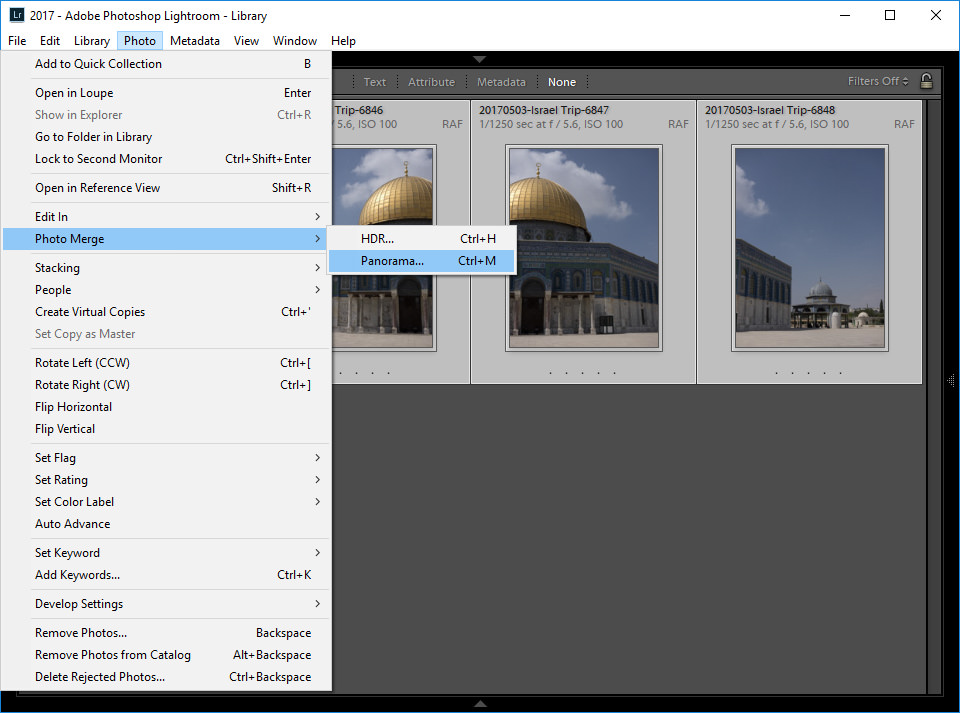
Start off by selecting images you want to stitch to a panorama. As explained above, you don’t need to edit images, since the resulting image will be a RAW DNG file that you can post-process after the stitching is complete. Lightroom’s built-in tool for merging multiple images is called “Photo Merge” and it has two available functions – to create HDR images and to stitch panoramas. We will be obviously focusing on the panorama feature specifically. To launch the tool, select the images you want to stitch, then right-click on them and go to “Photo Merge” -> “Panorama…” or go to “Photo” -> “Photo Merge” -> “Panorama…” in Lightroom menu (you can also use the “CTRL + M” / “CMD + M” on Mac shortcut to launch the tool):
This will launch the Panorama Merge Preview, which will look like the following:
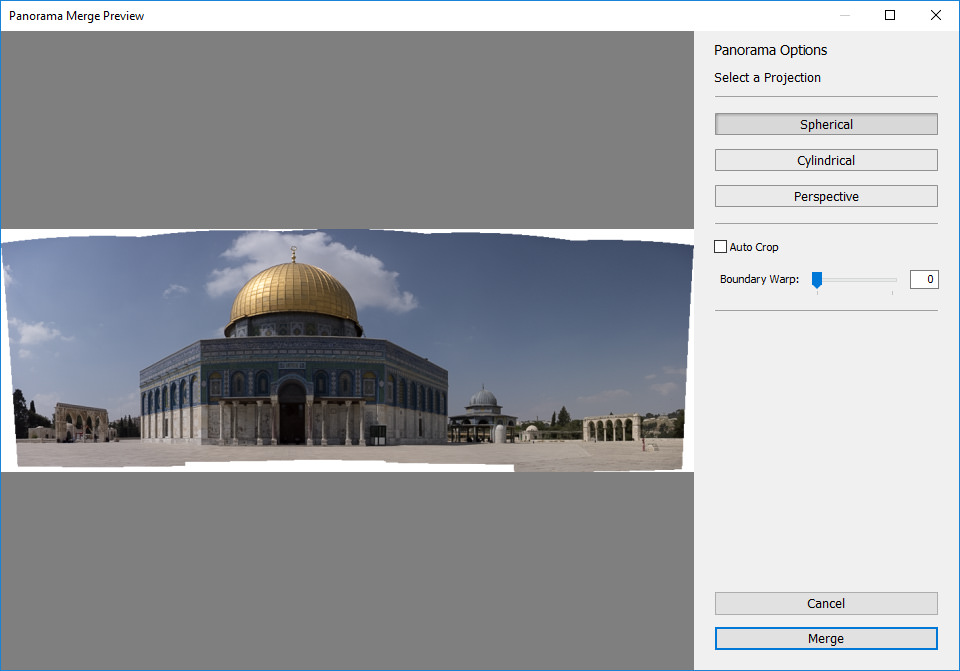
As you can see, unlike some third-party software, the Panorama Merge tool is quite simple with very few options to choose from, which is great for those who are starting out with stitching panoramas. You have three main options for panorama projection: Spherical, Cylindrical, and Perspective, and there are two more options – “Auto Crop” and Boundary Warp. Let’s explore these tools in detail.
2.1. Panorama Projections
The default projection is Spherical and for a good reason – most of the panoramas that you will be creating with Lightroom will be spherical. But what is the difference between Spherical, Cylindrical, and Perspective projections? Let’s take a look:
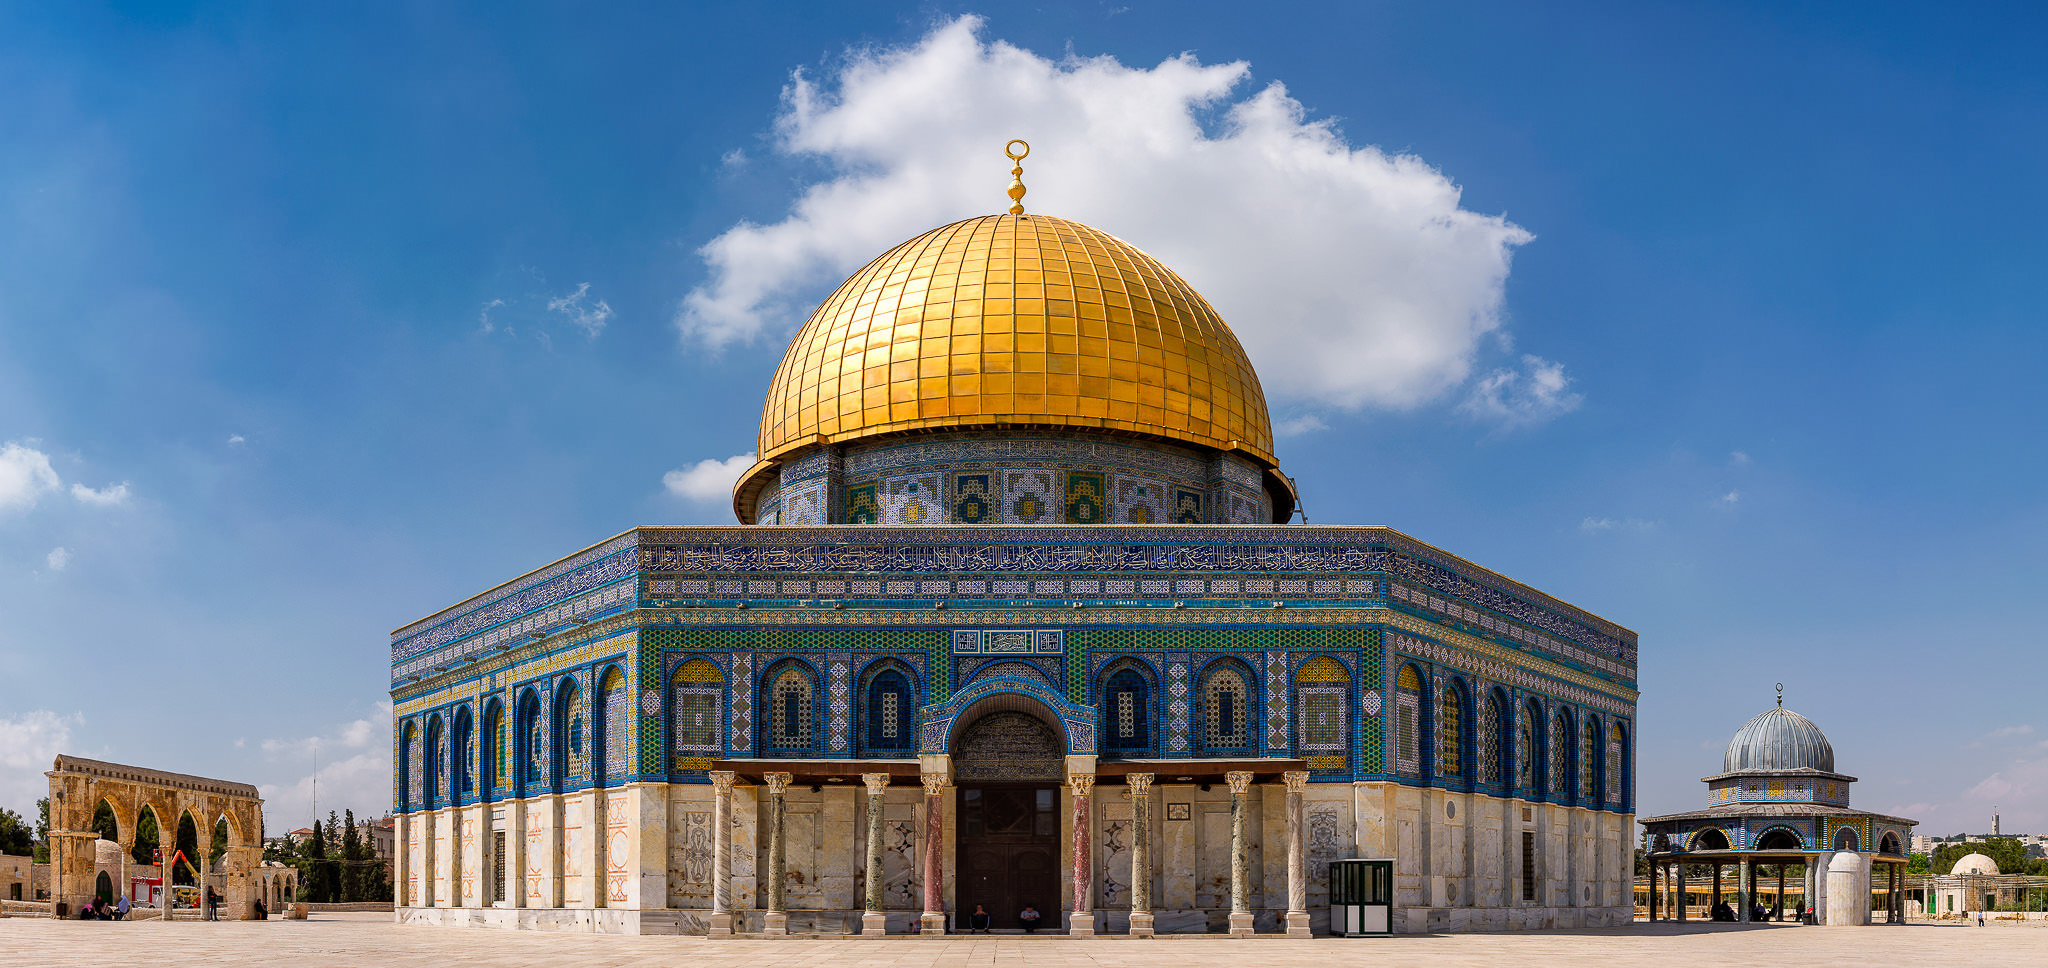
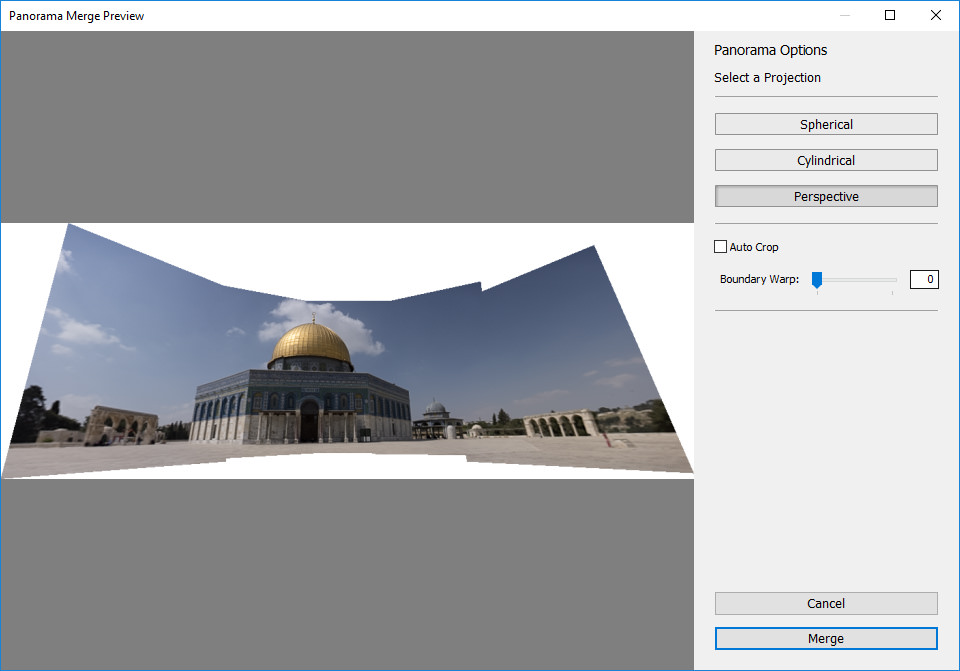
- Spherical Projection: the default projection option, which transforms images as if they were mapped to the inside of a sphere. Works great for wide and multi-row panoramas. When shooting close subjects, the spherical warp typically produces the most natural result without stretching anything. Take a look at the panorama of the Dome of the Rock, which I photographed hand-held in Jerusalem:The resulting image is a bit warped, but it looks pretty natural, close to what one would see at the same distance.
- Cylindrical Projection: this one transforms images as if they were mapped to the inside of a cylinder. It can work well for wide panoramas, but you have to be careful when using it, as it can significantly deform your subjects since it will try to keep vertical lines straight. Take a look at how it stretches and deforms the building from the same set of panoramic images:
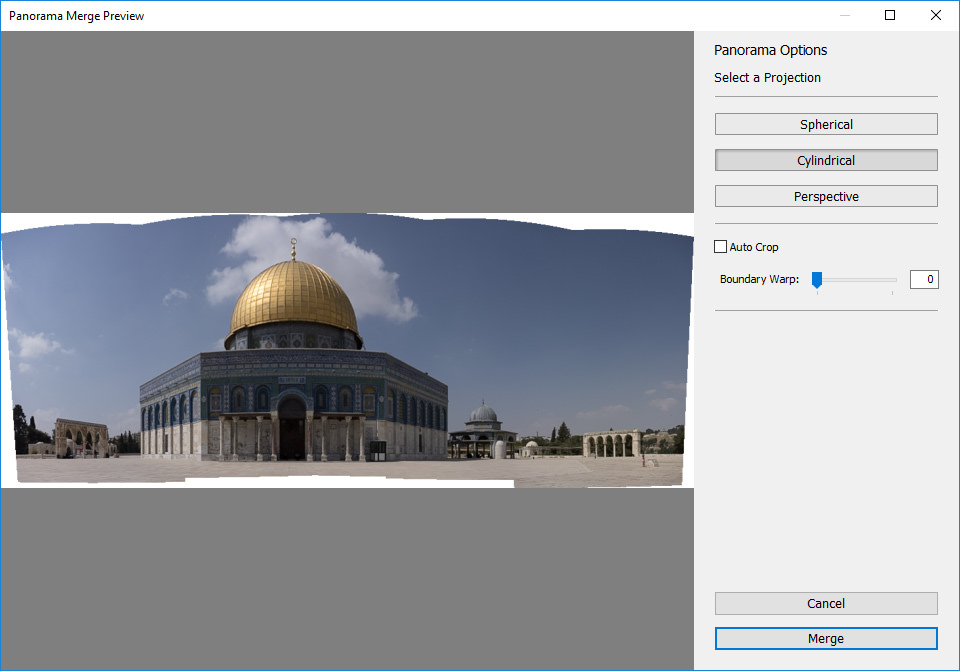 The dome looks over-stretched and it does not represent reality. I would not recommend using Cylindrical Projection for landscape images, since it might stretch the landscape, making it look very unnatural. Use it with care.
 - Perspective Projection: this one is typically best to use for architecture photography and specifically when stitching vertical panoramas. For wide horizontal architecture panoramas, it can be problematic to use, since it might bend lines at the edges of the frame, especially when shooting at shorter focal lengths. Take a look at the same panorama in Perspective Projection:
 The Perspective Projection tries to keep straight lines straight, but if you have a panorama like the above, it might not work very well due to excessive stretching, especially towards the edges of the frame. It does a good job of stitching the building, but everything around the building seems to tilt towards it. There are, however, cases where the Perspective Projection is the only way to go, such as when shooting vertical architecture panoramas. Take a look at the below panorama in Spherical Projection made from 4 vertical images:
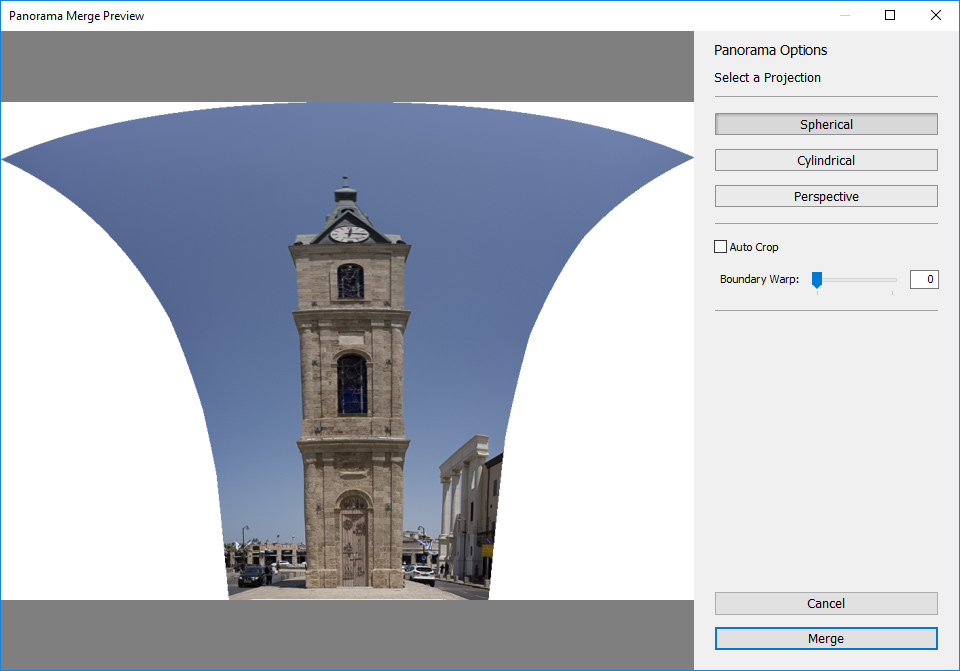
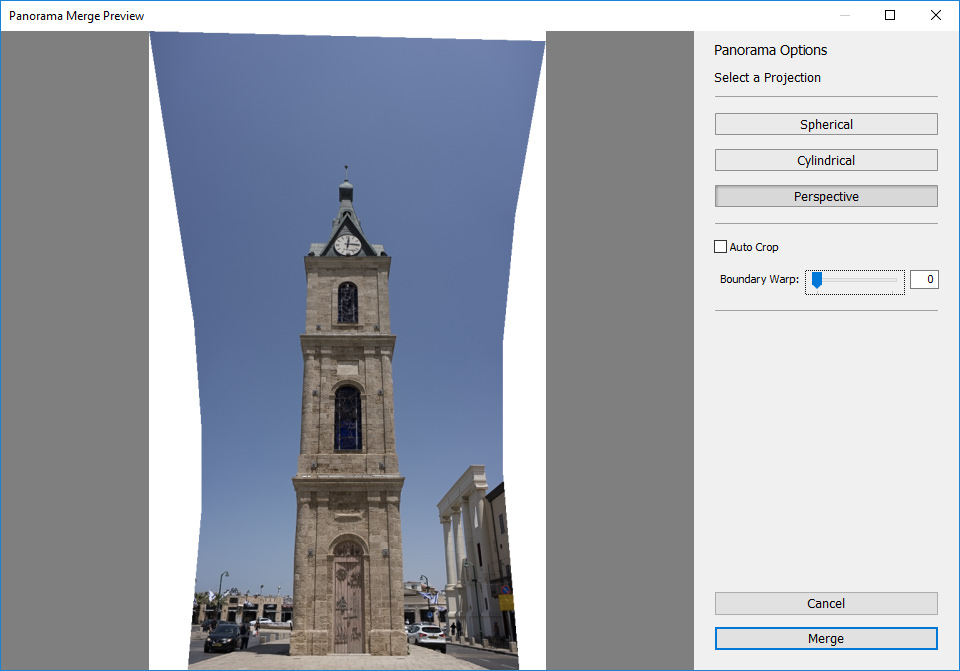
As you can see, the clock tower looks weirdly deformed, with the top of the building appearing curved and larger than the bottom. Switching to Perspective Projection takes care of the issue and makes the building appear naturally, with the correct perspective:
My recommendation would be to try the different projection methods to see which one works best for each panoramic image. You will find that some panoramas will only work with one projection method, while others will work with all three. Personally, I stick with Spherical projection most of the time, as it tends to produce the most natural-looking images. However, there are cases where Cylindrical and Perspective projections work better, as shown above.
2.2. Auto Crop
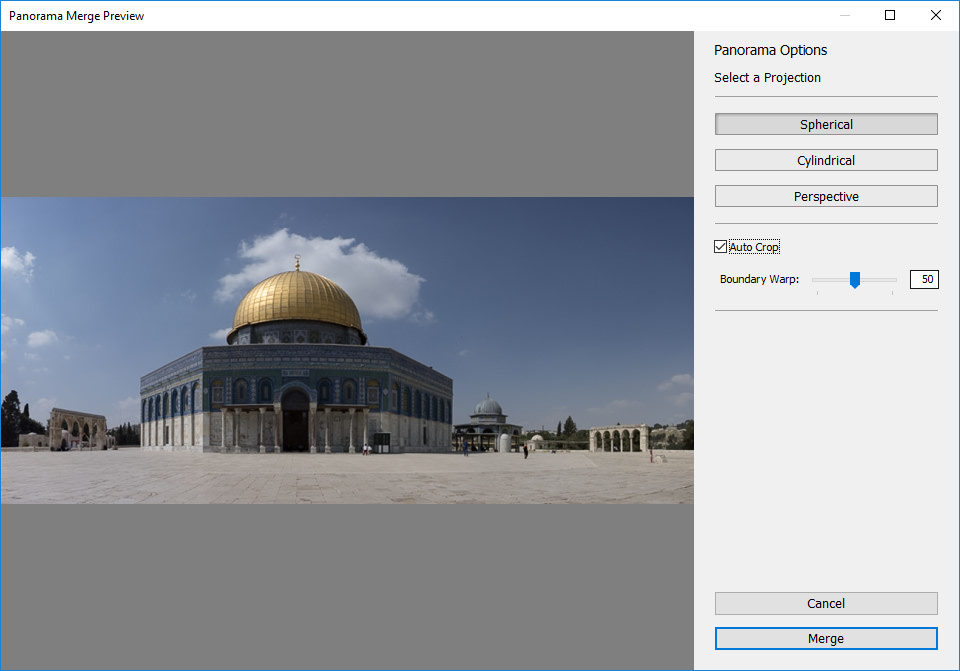
Since most panoramas require stretching of images for the different projection types, you will often end up empty space towards the edges of the frame, as shown in the screenshots above. The option to “Auto Crop” can be quite useful in such cases – it will automatically detect those empty areas and crop the image accordingly. Take a look at the below panorama in Spherical Projection, with the “Auto Crop” option checked:

As you can see, Lightroom automatically cropped the image to eliminate the white borders, so that I can start working on the image without having to crop the image in Lightroom.
While I like this feature and use it quite a bit, in some cases you do not want to use Auto Crop, as it might crop parts of the image aggressively. If your panorama is wide and parts of the stitched panorama appear way lower than the rest, you will lose quite a bit of the image as a result. In some cases, you will be better off cropping images manually to avoid excessive cropping. In the above example, I don’t like the fact that the top of the dome is so close to the edge of the frame. This happened because the extreme right edge of the panorama had too much empty space compared to the middle. In such situations, I might choose to crop the right of the panorama and only sacrifice a little bit of space on the top of the frame.
Another option that you can utilize in such situations is “Boundary Warp”, which we will discuss next.
2.3. Boundary Warp
Boundary Warp is a relatively new feature in Lightroom (available only in Lightroom CC at the moment), but a much-needed one. It warps the entire panorama, so that it stretches towards the empty space and fills it. In cases where you do not have clearly defined lines or a horizon, the boundary warp can work very nicely, preserving most of the image and reducing the impact of the Auto Crop feature. Let’s take a look at the same Dome of the Rock panorama, but this time moving the Boundary Warp towards 100%:

At 100%, there is no need for “Auto Crop”, because the image is stretched fully all the way to the edges of the frame. While such high usage of this feature can work in some panoramas, I personally find 100% to be a bit excessive for most panoramas, since it can stretch lines way too much. In the above example, you can see how the horizon line is no longer straight – it appears a bit warped on the left and right sides of the frame. In such situations, it is best to evaluate each image individually. For the above image, I found the value of 70 for boundary warp to work the best, with Auto Crop checked:

As you can see, I have a lot more “breathing space” on the top of the image, making this a preferred version to work with. However, I am still not happy with the result, since the cloud is cut off and I want a little bit more sky in my resulting image. Since I did not have the option to zoom out or walk back in the field, my only option was to make a two-row panorama, which is what we are going to discuss next.
3. Stitching Multiple-Row Panoramas
If you want to end up with a super high-resolution panorama, or you want to capture more of the scene than your focal length will allow, you can make a multi-row panorama comprised of two or more rows. And that’s exactly what I ended up doing for the above panorama of the Dome of the Rock – I made a two-row panorama:
As you can see, Lightroom did a pretty good job with stitching a total of 8 images: 4 on the top row and 4 on the bottom row. It took a while to stitch, but once it was done, I had a high-resolution version of the panorama that was wider than a single-row version. While I ended up cutting the foreground and part of the sky for the final image anyway, you can see how shooting in multiple rows could be advantageous in some situations.
To date, I have created many multi-row panoramas in Lightroom. Most of the time, I intentionally make two-row panoramas to get more resolution from the resulting panorama. However, you have to keep in mind that the more rows you have, the tougher it will be to stitch panoramas. Lightroom might fail to stitch more than two rows due to high resource use and large memory requirements. I rarely go over 2 rows, although I have experimented with stitching three-row panoramas in the past as well, with varying levels of success.
4. Finishing Up in Photoshop
While Lightroom often does a great job at stitching images, there will be cases where you might need to take a panorama into Photoshop to fix stitching and other warping issues. While this is a rather rare case, there might be situations where you might have slight parallax errors, some excessive warping that that needs to be corrected, or subjects that need to be cloned out. After Lightroom was done stitching the above photo of the Dome of the Rock, we can clearly see warping issues in the image – the lines appear to be unnaturally bent in a number of areas. In order to take care of the issue, I had to take the panorama into Photoshop, then use the Warp tool to correct the lines and make them appear straight again:
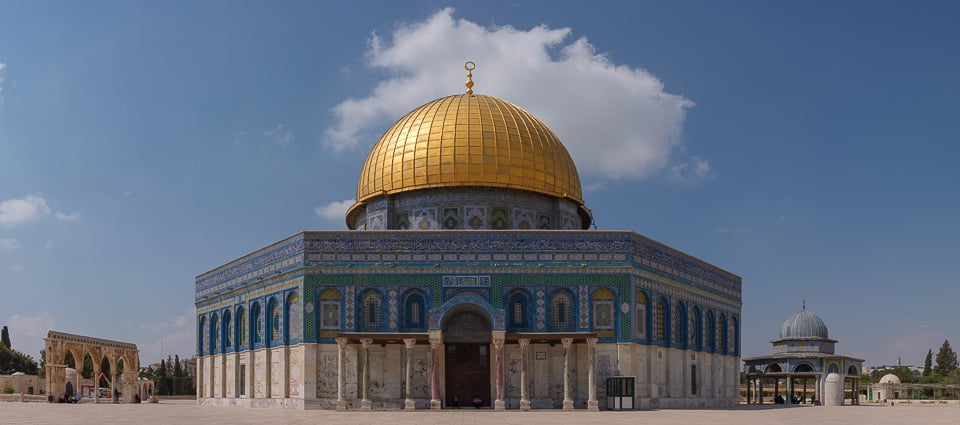
And here is the final image after I post-processed it in Photoshop:
GFX 50S + GF63mmF2.8 R WR @ 63mm, ISO 100, 1/1250, f/5.6
I evened out the sky, boosted contrast, and applied additional cropping for a slightly tighter composition (click to enlarge). The resulting image has roughly 20,000 pixels in width and 8200 pixels in height, which is enough to make a 133″ x 54″ print @ 150 dpi.
5. Summary
As you can see from this article, Lightroom’s built-in Panorama Photo Merge tool is a highly versatile tool that is capable of creating single-row and multi-row panoramas. While many third-party software solutions on the market potentially have more features and capabilities, Lightroom does a great job of merging panoramas, proving to be good enough for most photographers. Personally, I have pretty much switched from using PTGui Pro to Lightroom, not only because it simplifies the process and does a great job overall, but also because Lightroom produces a RAW file in DNG format instead of a JPEG or a TIFF file, which means that I have more leverage to edit the image in Lightroom after the stitching process is complete. If you have never tried to stitch images in Lightroom, give it a try!
6. More Sample Images
Below are more image samples that I created using the Panorama Photo Merge tool in Lightroom:


Thanks to Vibe Israel for organizing a photography tour to Israel, which made it possible for me to capture many great photographs, including the photo of the Dome of the Rock in this article.
Hi, Nasim! Thank you for the tutorial. I’ve an issue when stitching 3-row panorama, where in the middle row the focus is on the sea (far), while in the bottom row the focus is on the bushes, that are closer to the camera, and the sea is out of focus. Auto-merge creates a very distinct transition between in-focus and out-of-focus sea areas, while I’d like it to stitch 2 photos along the line of the bushes. Is it possible in Lightroom or do I need to do it in Photoshop?
Does Lightroom 6.0 have this feature? I see in the Lightroom Wiki page that v6 has “Panorama Merge” as a new feature. I assume that is what this is. So 6.0 and CC (unofficially 7.0) has panorama merge feature. Makes sense to have this feature in lightroom, no need for photoshop.
Nice article, thanks. I have a question though.
I just reread the introductory article you linked to, and I understand it suggests to use a moderate wide-angle, as ultrawides generally have more distortion that makes stitching more difficult.
You may not be able to answer this as an APS-C or FF shooter (but perhaps some readers may help…), but I use MFT, which for some lenses relies on software correction to get rid of distortion, vignetting etc. Could shooting RAW with MFT lead to stitching difficulties because of the software corrections and would using JPGs giver better results? Or does Lightroom stitch the (distortion and vignetting) corrected RAW images?
Kieksjeskieker
I know that Nasim is Full Frame shooter like myself. I use the worst possible lens distortion wise A Samyang 14mm F2.8 but i suggest you look at the links above and the result and see just what can be done regardless. PTGui and Light room handle the distortion very well if you shoot in verticals from my own experience. I also stitch Raw in both works very well but I find better control over the image in PTGui I can only suggest you try and see for yourself.
Try before you buy where you can day does not always work for night so be aware of that up front. I have on my computer four panorama makers. hope this helps you
Thank you! I guess I have no more excuses now for not going out and trying panoramas…
Nasim good article as usual but I have a tip for a great bit of software for panoramas which also happens to be free. ICE or Image Composite Editor is free Microsoft software that does make great panoramas. Try it, link can be found on google.
Great panoramas nasim. You know what would be a great follow up article? Alpha whiskey posting some panos taken with his iphone.
Hai Nasim,
I am sure that Lightroom can do a good job, but i prefer ptGui;
All you have to do is tak care how you took the shot. If you do that ptGui delivers pixel perfect images.
Also it has no hocus pocus and just does what you want it to do with all the control you need.
It’s a great tool and quite easy to handle. Ever since I discovered it, I use it extensively for amazing high-res landscape photos.
How did you even out the sky?
Hi Nassim. This is a fantastic photo! How were you able to capture this without any people? Did you use an ND filter?
Thanks!
Nasim great article and can say my self I have been here as well. you see I stitch Milky way bows 10 shots to full 360 degrees
www.ipernity.com/doc/1…up/2279870
www.ipernity.com/doc/1…up/2279870
www.ipernity.com/doc/1…up/2286364
360 shot same tree each end
I took me about three months of searching for the right program before i could even start to produce a Bow of the Milky Way. you see the day stitch to a starry night stitch are very different what is a good day is not a good night program. I have been down photo shop. light room, Acesoft, Ice, Hugin. I got such mixed results donuts to great panoramas but you can see all the join’s as blank spots or double stars. in the end I paid the money PTGui but I still use the others for my day stitch yes they work well for normal day work but I think its always a case of try and see what works for what you want not all work out under different conditions.
PTGui You have also far more control over the whole project( night work) its not just add photos press go and thats your lot. you have to put more work into it with control point( the more the better) but I would say the results do speak for them selves have even done a double row bow nothing Auto but for my own head.
I would say if you are doing Panoramas try them all first till you get one that does the job you want cause they are are not equal to the job but there are ones out there that will be up to the job.
I hope this comment is not off topic but looks at the whole topic in a different light and not brought up in the article.
Steve