In this tutorial I will show you how to convert a portrait (shot in RAW format) to a black & white image using Lightroom 4. By the end of the tutorial, and with some practice, I hope to teach you how to have full control over the look of your B&W images. While I chose this particular look for this particular portrait, Lightroom offers many kinds of different ways to convert your images to black & white, and so it’s impossible to put all the looks into one tutorial. Certain conversions fit certain images better than others, and it also depends on taste and goal of the author. In the future, I hope to make more tutorials for both black & white and color photography with different conversion methods and looks.

Before we start, I would also like to note that, despite the fact that our final image will be in black and white, it is important to understand how everything works in color during the conversion process. While sometimes a simple contrast slider and curves tool can lead to a good-enough conversion, usually it is better to spend some more time tweaking different color ranges and working with white balance to affect color, and thus the tone of the image in order to achieve the best result.
With that in mind, here is the image I will be working on:

Now, lets get to work!
Table of Contents
1) Choosing the Starting Point
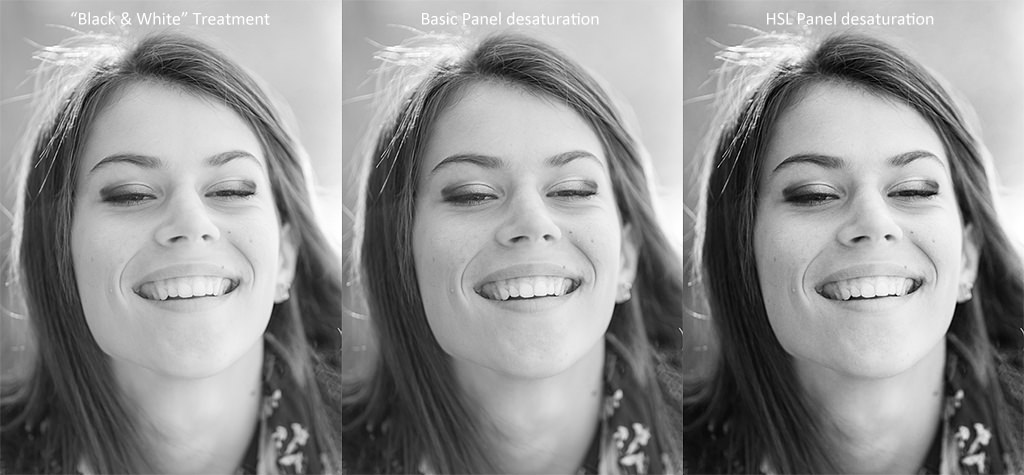
 Lightroom offers three ways of changing your photographs into black & white. While in essence each way leaves you with a grayscale image, the results usually have subtle or sometimes even very noticeable differences – try going through each of the images by clicking on the first one and then moving to the next two by using arrow keys on your keyboard. Also note the change in histogram at the top right side of the screenshot.
You may find that each of these ways may fit different images better, and so it is usually a good idea to see how they all look before proceeding with more thorough conversion techniques. Sometimes, depending on what kind of look you are after, you may even find this first step to be sufficient already. You may also find you like the final conversion of a particular look most even though you chose the starting point which, at first, may have looked the worst. The best thing I can do is find the starting point that’s easiest to work with. In the end, we will compare all three of them.
Here are the three basic ways you can use as a starting point to convert your image to black & white:
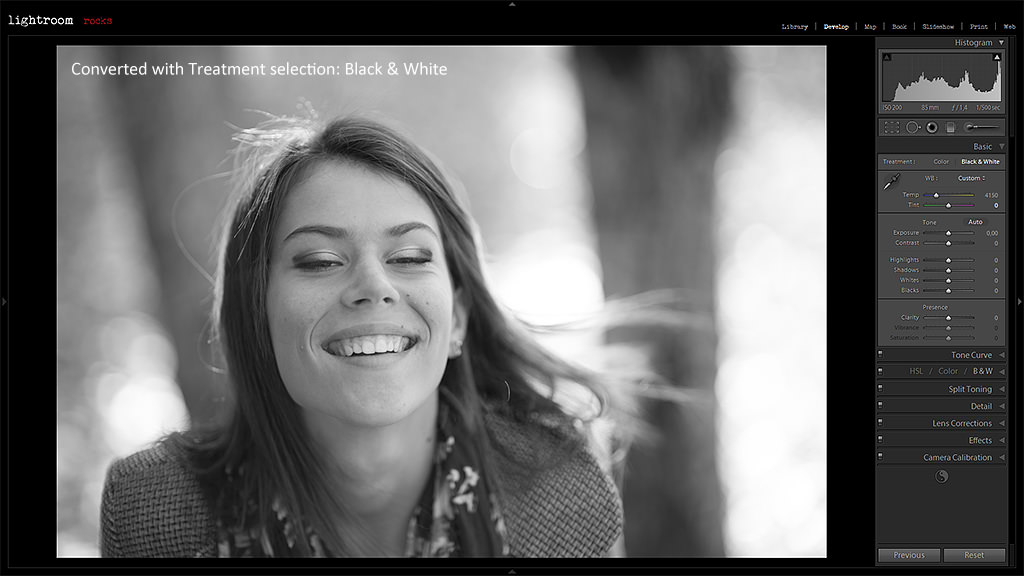 a) Changing the Treatment to “Black & White”: You will find the Treatment options at the top of Basic Panel. Changing it to “Black & White” will convert your picture in one mouse click. Choosing “B&W” in the HSL panel (Hue/Saturation/Luminance) has the exact same effect, too. With this method, you can already see it doesn’t look too bad, but for my taste, the skin tones are too uneven and a little flat. It might work for some other picture better, or if I was trying to achieve a more dreamy look. Still, lets not forget this is just the starting point and things will look completely different once we’ve done some key adjustments. Lets move on and see what other way we can get our basic B&W image.
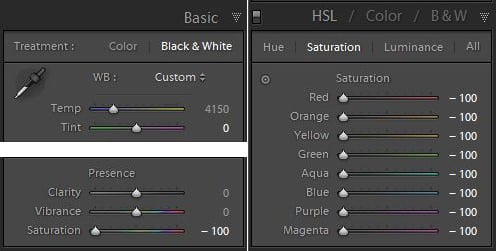
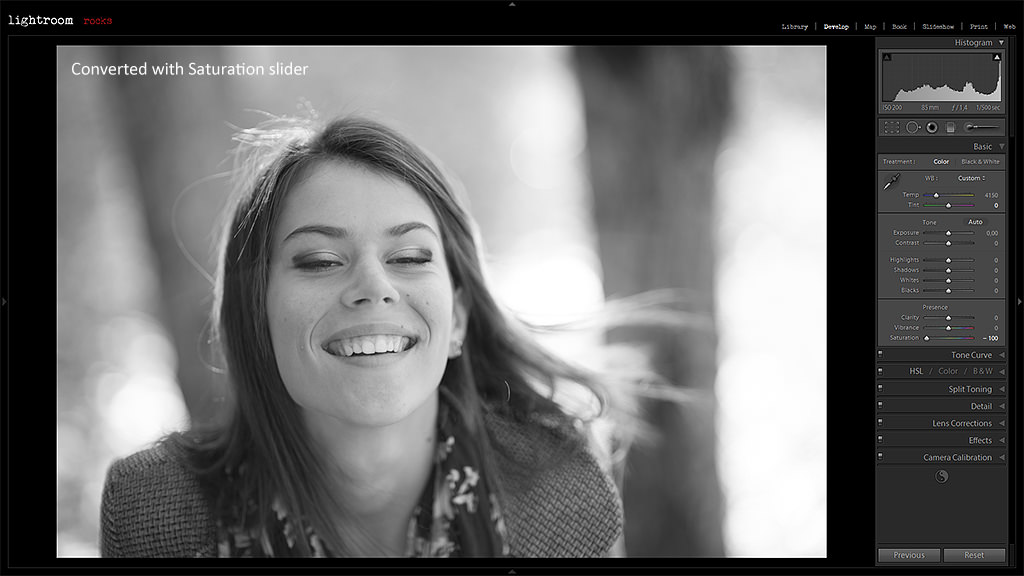 b) Setting the Saturation slider in the Basic Panel to “-100”: The second easiest way to turn your picture into a basic black & white, this one shows much better skin tones and gives the image a little lightness. You can find the Saturation slider in Develop module, bottom of the Basic Panel. Looks pretty good overall, I think – the low contrast is not always a bad thing and can create an interesting mood, also it’s easy to work on. However, there is one other way to do this, so lets move on.
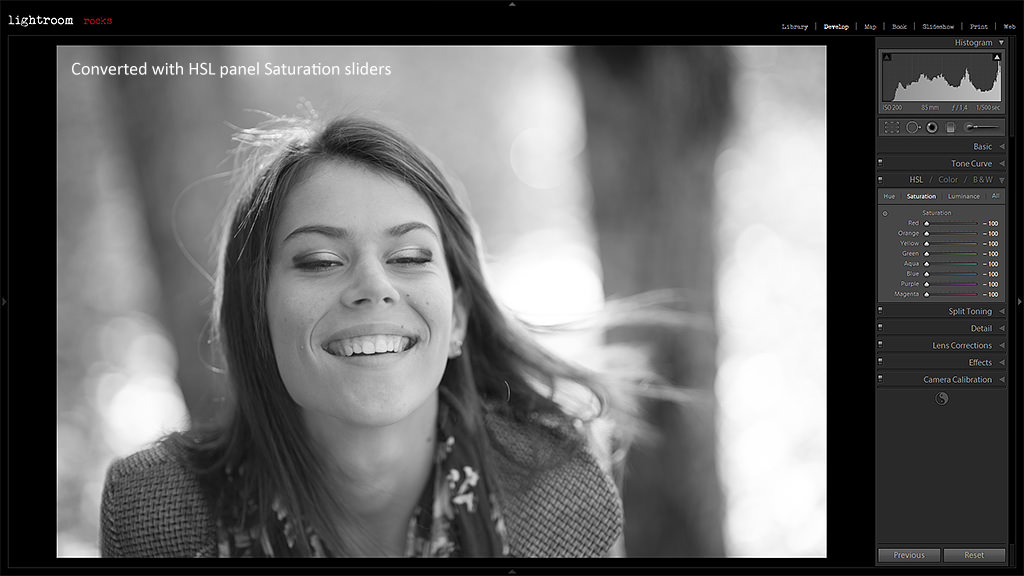 c) Desaturating all colors separately in the HSL (Hue/Saturation/Luminance) Panel: To do this, you need to choose the Saturation column in your HSL panel ant pull all sliders to the left, the -100 mark. This does take the longest, but you can easily save it as a preset to make it a one-click action. How’s the result? I see it as a nice compromise between lightness and punch with also good skin tones. You may notice, if you take a look at the histogram, that the difference in comparison to the first conversion is very subtle, yet visible. The skin tones are smoother and slightly lighter, almost as light as the second variant, but with more punch. Again, it looks quite good. But we’re not satisfied with “quite good”, are we? Lets move on to tweaking all three of these.
A side note – you can also use standard Lightroom presets as starting points, which you can find on the left-side panel. Still, the goal of this advanced tutorial is to teach you how to create a particular look from scratch, so that when there’s a need for a certain B&W conversion, you would know what to alter for desired effect.
2) The Fun Part
Lightroom was developed with an intended left to right, top to bottom workflow, but of course, frequently going back and forth is necessary in order to achieve what you pre-visualized. What we are aiming for is a sort of a medium-to-low contrast, bright image with smooth, bright skin-tone of our wonderful model. We don’t want our shadows to be very dark, but the blacks shouldn’t be light grey, either. With that in mind, lets move on to the actual adjustments, starting with the Basic Panel.
2.1) Basic Panel adjustments
 White Balance: While editing photographs in color, we generally try to set a pretty accurate value on this. This isn’t what I do with black & white, however. While dealing with B&W portraits, I understand that skin mostly contains orange, some red and sometimes a bit of yellow color, the exact proportions vary with light and model (note that, depending on other conditions, such as weather and light and if the subject is warm or cold, there might be a tad of purple and magenta color on the face of your model). With black & white, as we go on further, I will try to make the skin bright and smooth without having to blur it and make it look like plastic. I’ve had quite a bit of practice with this and know that, generally and depending on light, setting the White balance to around 6-7 thousand K degrees works best, so we will set it at 6600 K this time. You can play around with this, make it cooler or warmer and see what you like the most. Remember – it’s all based on choice and taste, and Lightroom has no limit on how many presets you have, so don’t hold off your experiments. While working further on you should sometimes go back to this setting and see if it needs readjusting.
You may find that the image already looks different, but we’re not stopping yet. Lets move on further down – I prefer to leave the Contrast, Black-White and Shadow-Highlight adjustment for much later as I like to alter certain color rather than just the tone at first. We can take a short stop at the Presence section of the Basic Panel and set Clarity to “-10” – it’s smooth skin we’re after, and so we can be sure we don’t need this setting high.
2.2) Hue/Saturation/Luminance Panel Adjustment
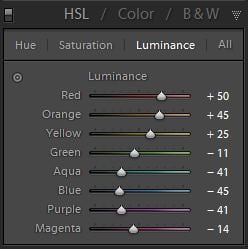 Adjusting the Luminance of particular color ranges: If you choose to desaturate the image by sliding the Saturation slider left in the Basic Panel or desaturating separate colors in the HSL Saturation Panel, you will need to adjust the sliders in the HSL Luminance section. As I mentioned before, skin contains orange, redand some yellow, depending on light and subject. And we want skin light and smooth, which means we now have to move those sliders slightly to the right. As you start to move them you will see the image change right away – skin will get much lighter, yet the rest of the image won’t change that much (it will a bit due to warm white balance as it makes the colors a little more orange in the image, depending on the setting you chose). You may find that it’s, at first, rather hard to find the right balance between the two main colors – orange and red. Yellow is more forgiving and sometimes bears almost no visible effect on the lightness of the skin tone. I found that a slight “S” curve works nicely in a number of situations, and so it’s what I did now. In this particular case we want to make the skin tones lighter and then darken the rest slightly to create separation.
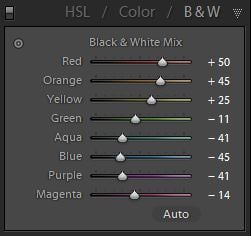 If you chose to desaturate your image by changing Treatment to “Black & White” in the Basic Panel or highlighting “B&W” in the HSL panel, you will be faced with that panel rather than Luminance adjustment, which you don’t need to touch or you will go back to color image. In the end they do the same alterations. In our case, I set the values just as I set them in the Luminance section of the HSL Panel.
A side note – if you ever find yourself not knowing which particular color combination to adjust to make your main subject darker or brighter, you can always use the automated Lightroom tool, which appears as a dot in the HSL Panels. All you have to do is click on it to turn the tool on and then click-and-drag on the particular color range or area of the image to adjust its Luminance, Saturation or Hue. As you drag you will see the color sliders relative to your subject move left or right changing the values. Very easy to use and gives great results.
Now, the photographs have again changed significantly. In some cases they may even look over- or underexposed, but that’s not what matters – it’s how the tones look. Are they smooth? If you find the skin to be blotchy, you may want to readjust the Luminance settings or the White balance at the top of Basic Panel – both ways work, both lead to different results. Do you like the difference in the lightness of the tones when comparing them? In our case, the tones are quite nice in all three variants with the HSL Desaturated and B&W Treatment conversions looking best, if slightly overexposed and bright, but that we can fix by going back to the Basic Panel and adjusting the remaining settings. Before we do that, have a look at where we stand:
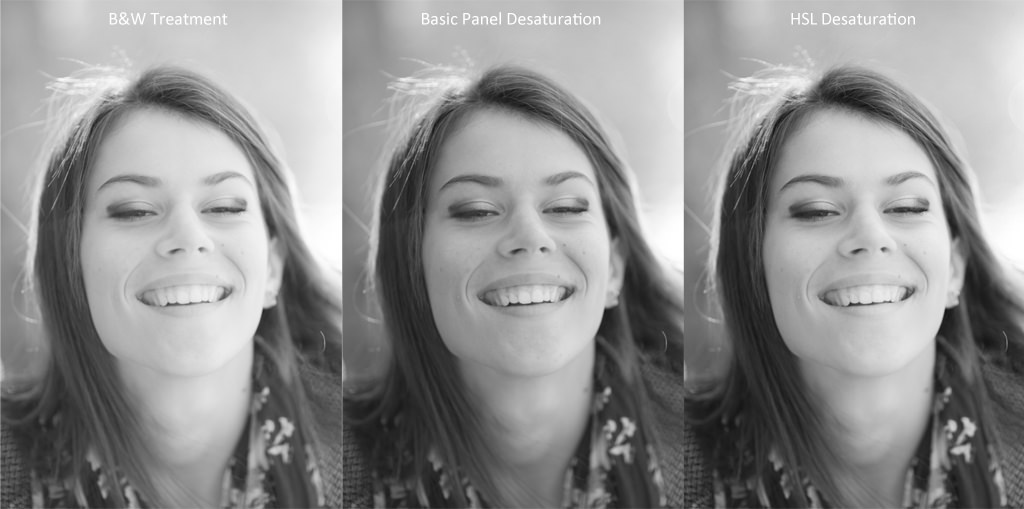
Look good, don’t they? The first example is a little too bright, but I like the tones overall, the skin is very smooth. I also like the subtle contrast. The second one is slightly less bright, but still smooth with a lower contrast, which also looks good, yet different. The third variant is the punchiest, but retains smooth skin tonality. The slightly higher contrast makes it look rather nice, too, and the overall choice, again, depends on taste. We are nearly done and in some cases, this, coupled with some Exposure adjustment, could be enough. I want to, however, work with the tones a little bit more and show you what else can be done. It’s a personal choice when to stop, but knowing how to continue if needed is important because it gives you more options depending on your needs. Shall we go back to the Basic Panel?
2.3) The Basic Panel Again
Previously, we left off with just the White balance and Clarity sliders moved. That hasn’t changed. Why I like Lightroom 4 most is because it has much improved black-white and shadow-highlight tone adjustment, and we are about to use this feature. Up until now everything also applied to Lightroom 3 users. Starting now, Lightroom 3 users will need to adjust accordingly with their Contrast, Fill-light, Blacks and Restore sliders instead of the ones I mention further on.
 Adjusting the whites, highlights, blacks and shadows: The extent of these adjustments will vary greatly depending on your photograph and what you want to do with it. We want to improve the tonal transition of light parts of the image to the dark parts of the image. They also look a little flat, and will look even more flat once we’re done with the following changes, but not to worry, we will fix that in the next step.
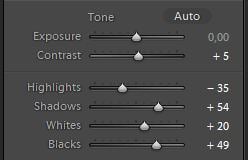
I’ve set the Highlights slider to -35 to bring back some of the details in parts of the image that may be too bright, so this saves me from having the brightest parts of the image being blown-out to a complete white. The skin is most important here. The change can be very subtle, but subtle and smooth is what we want. Moving on.
I’ve then set the Shadows slider to +54, which lightened the shadow parts of the image, the darker ones more so than the lighter ones. It gave the image even lower contrast, but what I want now is the quality of tones. I can tune them down later.
I’ve then set the Whites slider to +20 and the Blacks slider to +49.
What the screenshot doesn’t show is how I then altered the Exposure. Each conversion variant needed different adjustment in Exposure compensation, and so I set the HSL Desaturated image to -0.6, the Basic Panel Desaturated image to -0.3 and set the “Black & White” Treatment image to -0.8. You might be coming back to this adjustment depending on the photograph, but in our case it looks about right.
While all these steps may have looked like going back and forth between what we’ve already done, they actually allowed us to set the tonality of the image very precisely. I chose to lighten the image with the Shadow-Highlight, Black-White controls, but then tuned the image back down with Exposure compensation. Why did I do that? Why couldn’t have I just used the Exposure in the first place? Well, even though I brought the image back to the overall lightness I wanted (with future Tone Curve adjustments in mind), the Shadow-Highlight and Black-White adjustments still do their job of filling in the dark portions of the image and preserving those tones. Now we have plenty of detail in the shadows and the bright parts of the image, while being bright, are not blown-out, especially the skin tones, which are smooth and light. That is what we wanted in the first place, right? Having space to work with the Tone Curve later on was my intention here, and we now have that space. To give the images just the slightest initial punch, I set the Contrast slider to +5. I rarely use this slider as I prefer the greater control Tone Curve tool gives me, but your approach may vary – in some situations one doesn’t need greater control. So, lets move on to the last important adjustment.
2.4) The Magic of the Tone Curve Panel
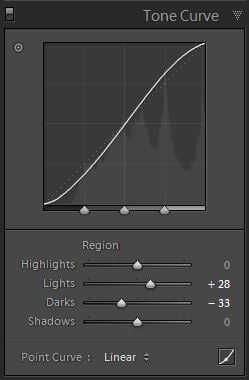 Modifying the Tone Curve: I added a very gentle “S” curve in the Tone Curve Panel (Lights +28, Darks -33), and that was enough to do the magic. Suddenly, the image is not flat anymore, but has a very nice shadow-highlight transition to it. While there are brighter portions of the image and darker ones, and the overall contrast is about medium, we still have details where we need them. The hair looks great, with smooth gradation of light-to-dark tones. Exactly what we wanted. Also, look at the skin tone – it’s very smooth, yet has both gentle shadows and highlights to it, it’s bright and very complimenting to our gorgeous model. With that, it also has detail to it, her face isn’t a plastic mask.
3) Finishing Touches
Detail Panel: I set the Sharpening setting to 70 and the radius to 1.8. Setting the radius to a higher value would increase micro-contrast, which in this case I don’t really need – I want the eyelashes and eyes a little sharper, that’s all. For this reason I also set Masking to 70 and left Detail at it’s default setting of 25.
Effects Panel: A little bit of subtle vignetting might suit this photograph. I set the Style to Highlight Priority, changed the Amount to a value of 20 and then, to make it more similar to the natural vignetting produced by the lens, I set the Midpoint to 9 and both Feather and Roudness sliders to +/100. Not wanting to make the vignetting too apparent, I usually try to make it look very mild to subtly aid the viewers eye towards my subject and away from the border of the image.
Last but not least – save the preset!
4) The Result
That’s it! Have a look at the results:

Contrary to how I felt about this conversion at the beginning, I like it the most. Contrast is low-ish, but there’s plenty of tonal range – we have both shadows and highlights. The skin looks the smoothest of the bunch, the image is very light and compliments our model well. For me, this image resembles what I wanted to achieve in the first place the most. Still, it’s a close call and may vary depending on taste – it’s my personal choice at this time.

This one looks nice, as well. It’s even less contrasty, the skin is a little darker and less smooth overall. Even with that I like the dreaminess of the picture. It’s close to how I wanted it, too, and I might choose this another day, depending on my mood.
This one, just as I knew it would when I started the conversion, is the punchiest of the lot, and I’m sure plenty of people will prefer this look to the above two. Even though it has more contrast to it, the skin still has a very nice transition from dark to light, it’s very seamless and smooth, which looks nice. Really, whatever differences these images carry, it’s all about the taste and mood of the person choosing. I like them all.
5) Was It Worth the Effort?
While in some cases working with Tone Curve or Contrast slider might be enough, it often doesn’t look nearly as good. Good, but not as much. Also, having the B&W preset with more settings makes it much more flexible in terms of light. Look at it this way – you have a modular camera system and a point-and-shoot. The modular camera takes more time to set up and is not as easy to use, but if something brakes, you only need to replace that part. The point-and-shoot is very easy to use and simple, it also can give great results. But if it doesn’t work, it doesn’t work. Flexible and easy to adjust is the key here, and once you’ve saved yourself that preset, it also makes things just as quick.
But that’s theory. Lets see if it really makes any difference. Below I have two images compared. The one on the left side (“before”) is one of the results I showed you a little earlier, and it involves the above-mentioned color and Shadow-Highlight, Dark-White adjustments. The one on the right was done by simply tweaking the Tone Curve (which now looks much more complicated, too: Highlights 0, Lights +31, Darks +63, Shadows -27). Both were converted to basic B&W by changing the Treatment at the top of the Basic Panel to “Black & White”. I tried to make the second sample as similar to the first one as I could without using any advanced techniques. Which one has the better skin look? While it also depends on taste, I would say the left sample looks much better and smoother. I didn’t use the Contrast slider for the second sample as it made matters worse. The Detail settings are identical. Take a look:

In my opinion, it’s worth the time spent on learning and making the needed adjustments to achieve the best look possible for that B&W image. I hope this tutorial gave you a better understanding of how to control each step of the conversion. Try to experiment – you may find some very interesting looks to choose from for your portraits.
Great ideas & Techniques. I’m learning a lot here.
I’m from the old days of 5×4 Linhofs shooting B&W sheet film and tray developing. I like a lot of mid tones.
I’m a bit lost in that there doesn’t seem to be a SAVE command in Lightroom?
Norm Ford
Hey I know you wrote this article 3 years ago but just wanted to thank you. I scoured dozens of articles on Google before finally arriving here. You touched upon all the little nuances I wanted to know about like temperature, orange/red luminance etc. That really helps a lot, thanks SO MUCH!
Brilliant article. Now, my black and white photos look so much better. Thank you Roman
Great Article!!
Just learned many thing i haven´t been using in my photos!
Thanks a lot!
When doing black & white is it ok to do the skin softening & eye & teeth brighting? I usually do those first then turn it to black & white. Thanks for all the tips on B&W.
Thank you for an excellent article on black and white conversion. I am able to use your technique only when I click on the “black and white” button. If I put the saturation at -100 or do it via HSL, the luminance sliders have no effect on the image. I’ve tried this on 2 computers one running LR4 and one LR3. What am I doing wrong?
Thanks for any help!
Hmm…seems to be working now, but only with the HSL method. The -100 saturation method doesn’t work.
As I mentioned in the article, Jamil, “If you chose to desaturate your image by changing Treatment to “Black & White” in the Basic Panel or highlighting “B&W” in the HSL panel, you will be faced with that panel rather than Luminance adjustment, which you don’t need to touch or you will go back to color image. In the end they do the same alterations. In our case, I set the values just as I set them in the Luminance section of the HSL Panel.”
The panel will also be found in HSL section, it is named “B&W”, see 2.2 section of the article, second screenshot.
Was that your problem or is it something else?
Thanks for your reply Roman. I have a different issue only when using method 1b above – setting the saturation slider to -100 in the basic panel. After doing this when I go to the Luminance tab in the HSL section, the changes have no effect.
Methods 1a and 1c work perfectly.
Thank you for pointing that out.
Up until now I thought that these were all just simple ways to desaturate an image for further adjustments. Now I see there is a serious limitation to the Basic Panel Desaturation method – really, I never even thought it could be so. While creating this tutorial, I had all the images as virtual copies with Luminance adjustments copied from one to another and never really bothered to check if the b method had such a drawback, maybe because I don’t usually use it.
Thank you, indeed! We live and learn. I will edit the article.
Ah…sounds good! Thanks again for your great article.
Hi Roman,
This is very informative.
I would like a detailed article in the PP section explaining “Dragan style portrait effect (Lazlo effect)”.
I had found some articles on web but they are not comprehensive.
I think this article would be really helpful for us in retouching of our portraits.
Hey, Kumar!
Thank you for your kind words.
I’m not familiar with Lazlo effect – I’ve never tried such post processing, nor does it suit my subjects, but if done subtly and correctly, it does seem to add a noticeable pop to an image.
I can’t promise you an article, but will keep this in mind!
Hi Roman,
I found some some articles on Dragan style portrait effect (Lazlo effect)
wegraphics.net/blog/…n-5-steps/
These kind of effects mostly suit portraits for older people.
This is phenomenal . . . I will have to try it because I found myself not able to get my digital B&Ws to look like my film and thus I was still preferring film. With film, you choose the film to use based on the look you want: high contrast, grainy, sharp, low contrast grey, etc. and then you can tweak a little afterwards. But I found that the simple B&W conversion techniques never got me what I wanted in my digital images . . . I will have to give this a good try . . . I knew it was my lack of post-processing ability and not the digital format.
Thanks!
Roman I like B&W conversions like this photographer does in this thread www.dpreview.com/forum…ad/3172979. There are several pictures there. I particularly liked this one farm8.staticflickr.com/7249/…368d_o.jpg
Since you have experience in conversion, can you tell what was done to achieve these tones and contrast?
Hello, David!
I’m sure I could try to create a similar look if I had the RAW image, what you need to learn, however, is to notice WHAT makes that particular conversion so good.
First of all, notice the light in the image you gave me a flickr link to. It’s very soft, isn’t it? Judging by the background it was cloudy when the image was taken. Also notice highlights on her face – while you could create those in post, I’m quite sure they are the result of a natural reflector, which in this case is the pavement (I have an article about natural reflectors planned). So that gives a certain pop to the image, it’s not flat to start with. So it’s the actual photograph that looks great, and lots of B&W conversions work with such light.
Other than that, it’s a medium contrast image with, I’d say, Shadows part of the Curve pulled down somewhat. It looks like a very simple conversion, but simplicity is an awesome thing and works great here. I do love the images :)
Thanks Roman. The author contacted me and stated he uses Silver Efex Pro 2. This is the second time I am hearing about Silver Efex so I gotta check it out. Thank you for your reply!
It’s indeed a very powerful tool by Nik Software, I like it a lot and use it with Photoshop. Has a lot of presets and also gives plenty of controls to adjust whatever you may like, even color sensitivity. I’m sure you will like it :)
Great read. I like the way you presented this tutorial (which is better than the tutorials you find in youtube”). Anyways, I will be lookong forward for more!!
Cheers!
Ray
Thank you, Ray!