Subject isolation is one of the most sought-after effects in photography. It is one of the primary reasons (along with low-light capability and sharpness) why anyone would even think of buying those expensive fast primes. It is undeniable that there is no replacement for getting it right in the camera. But most of the time, we are thrown into less than ideal situations. Be it not being able to afford an expensive fast prime, or that we simply could not get close enough to the subject. And this is when Photoshop can potentially save the day. In this article, we will go through the underlying concepts of how our lenses achieve desired “bokeh” and use Photoshop to get similar results. Before you read on, I recommend that you check out the article on bokeh and how to obtain maximum bokeh.
Take a look at the above image. The creamy background blur is straight out of the camera. The image was shot at close to ideal conditions where the subject was relatively close, and the background was pretty far away from the subject. More importantly, the entire background is evenly blurred. Now compare the image above with the one below:
This image has varying levels of blur. You can see a bit of blur in the foreground grass, and the background behind the tiger transitions into a more pronounced blur as the distance increases from where the focal plane is. Most of us end up blurring the entire frame with the same magnitude. This is one of the most common mistakes people make when they blur the background in post. There is no way for Photoshop to accurately determine the distance between a particular pixel with respect to what is in focus. You need to tell Photoshop which pixels are near and which ones are far. So blurring the background in Photoshop has three sequential steps:
- First, we need to make a selection. This is pretty much the first step most of the time when we edit any image in Photoshop. The selection is generally made either using a layer mask or an alpha channel. Remember that when you see the layer mask attached to a layer, whites are shown and blacks are hidden.
- We have to tell Photoshop which pixels are closer to focus and which are far away. It is done so by creating a depth map.
- We do the actual blurring using the Lens Blur tool. Remember that the lens blur is directly applied to the selected layer. Once done, it cannot be modified, making it a destructive form of applying a blur. So always make it a habit to duplicate the layer before proceeding and if the blur goes out of hand here and there, you can always adjust it using the opacity with respect to the original layer using layer masks.
Take a look at the above image. The subject was pretty far away from me and the background was comparably closer to the subject, hence making everything sharp. In other words, there is no subject isolation. Whenever we decide to blur the background of an image, it is of primary importance that we understand the image.
For example, in the above image, if I attempt to completely blur out the leaves surrounding the subject, I would only end up with an artificial-looking image. I would be doing more so if I end up blurring the entire background equally. So the first step is to decide how much blur is actually possible without making the image look “plastic” and the second step would be to decide which part of the image gets how much blur in post. In other words, deciding how much is too much will be one of the most important factors that makes or breaks the image.
Table of Contents
Making a Selection
Selecting an area of an image to be edited locally is one of the most challenging tasks in Photoshop. As always with Photoshop, there are multiple ways to make a selection. I will explain two options for selection in this article. The first one is to select and isolate the subject alone, which comes handy most of the time. The other is to apply a gradient of selection from the focal plane. We use the latter method when there is already a certain degree of subject isolation in the image.
Quick Selection Tool
This is one of the most common tools in Photoshop. You can use it by clicking the tool selection option from the toolbox (highlighted in red) in the illustrative picture below:
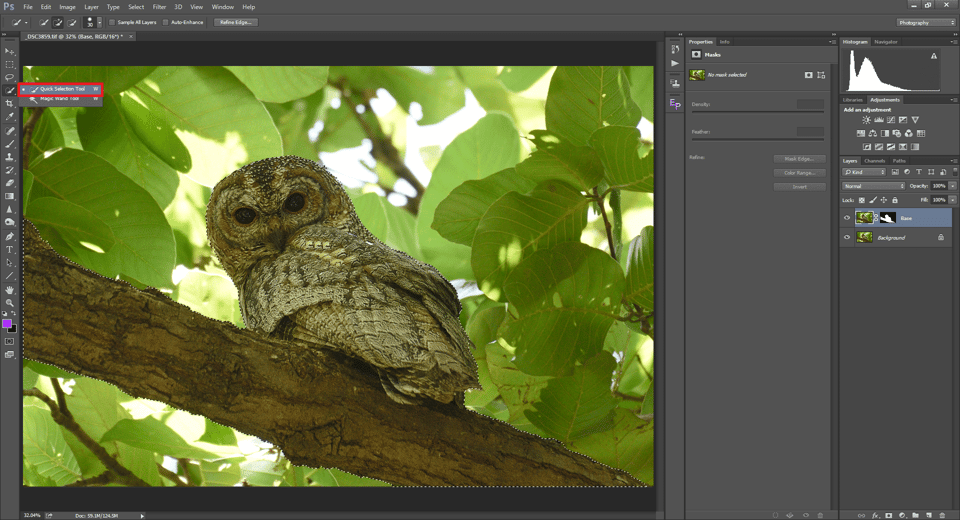
When you hover around the image, you can see the mouse pointer with a “+” symbol in the center. Click near the border inside the subject and drag the mouse around the area that you wish to select. You can see the marching ants around the selected area and the selection adds up as you move it through.
Photoshop makes the selection using the contrast between adjacent pixels. It seeks well-defined borders to make the selection. Sometimes, if there are no definitive borders, Photoshop ends up selecting a part of the background. You can always click on the Alt (in PC) or Option (in Mac) to subtract an unwanted selection. When you press Alt / Option, you can see the “+” symbol inside the mouse pointer turn to “-“. In the illustrative image, you can see the selection I have made. It is the Owl and the branch on which it is resting, which obviously lies on the same focal plane.
Now that I have an isolated selection of the subject, I cannot just go ahead and blur the rest. There is a problem. Take a look at the illustrative image below to understand how the output would look if I just make a selection and blur the rest. You can see that the subject actually looks “copy-pasted”. That is because the selection is harsh ie., there is too much contrast between the background and the border of the subject that makes it look cut-out. I am going to show you how to fix this issue by refining the edges.
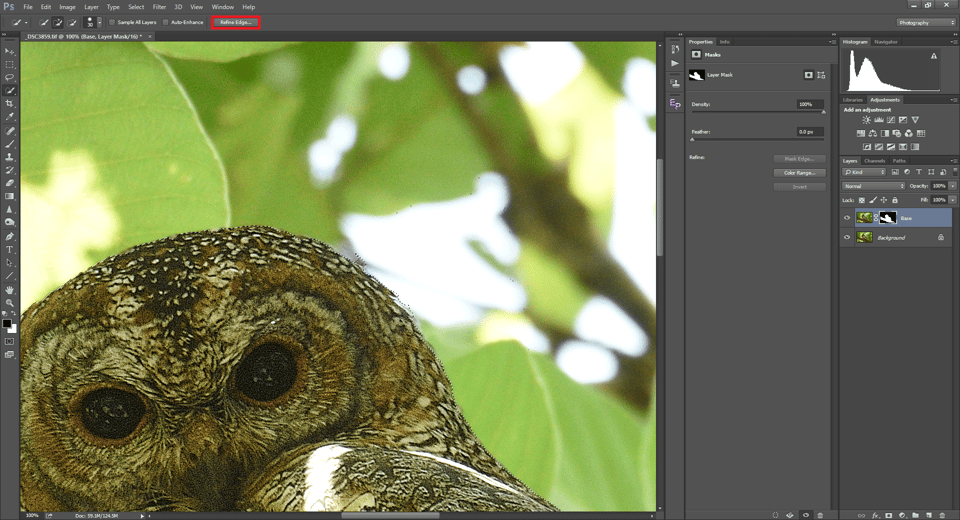
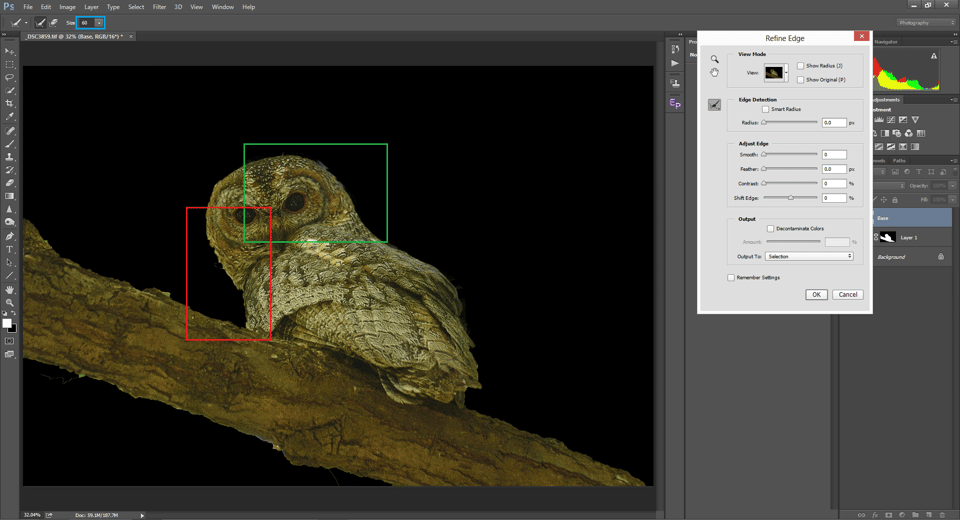
As I have mentioned earlier, the edge of the subject which is right next to the blurred background is what gives the image an unnatural look. If I manage to soften the borders (edges) of the subject, I can make it look comparably more natural. The “Refine Edge” option of the quick selection tool (highlighted in red in the image below) comes to rescue in such a scenario.
Once you click on the Refine Edge button, a new window pops out and the image appears to have been changed. You can notice that the selected area is visible and everything else turns black. To make the edges smooth, I have to select an appropriate soft brush and hover the mouse around the edges. You can now see the difference between the smooth edges (highlighted in green in the image below) versus the harsh selection (highlighted red) that was done previously.
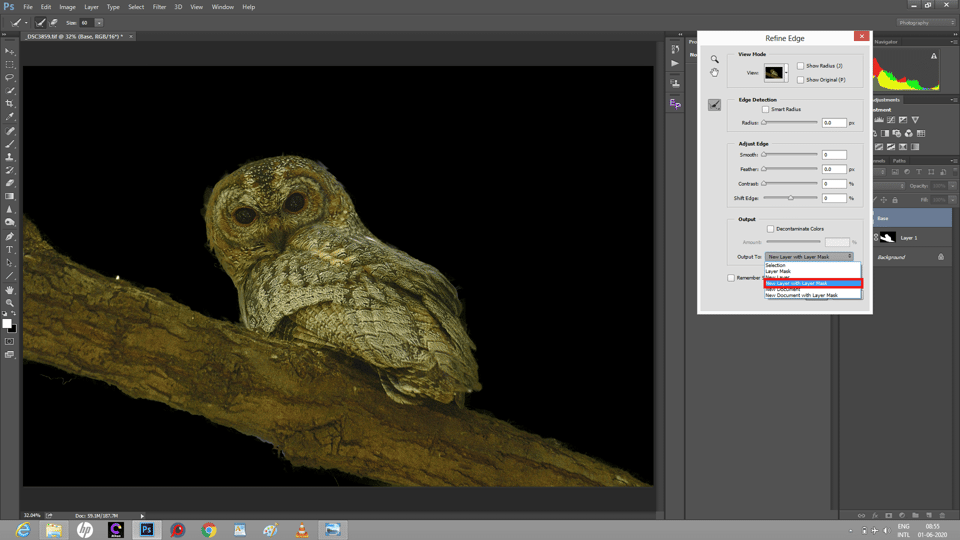
As mentioned earlier, the blur is applied directly to the layer and since there is a mask involved, converting it into a smart object will not work. Once you have made the selection and refined the edges, it is always a good practice to create a copy of the layer with a mask. You can do so in the refine edges window itself by using the “New Layer with layer mask” option from the output section. Now this layer and the mask attached to it will be the Depth map ie., it will tell Photoshop which pixels of the image are used to mark the plane of focus.
Blurring the Background Using Lens Blur
Once the selection is made with the edges refined, the next step is to feed the selection as the plane of focus to create a depth map. Now I have a layer with the mask (selection). With the layer selected, go to the menu option Filter -> Blur -> Lens Blur. This will bring up the lens blur window.
Note: Make sure that the layer is selected and not the layer mask. Since it is a filter, the result is applied directly to the selected layer.
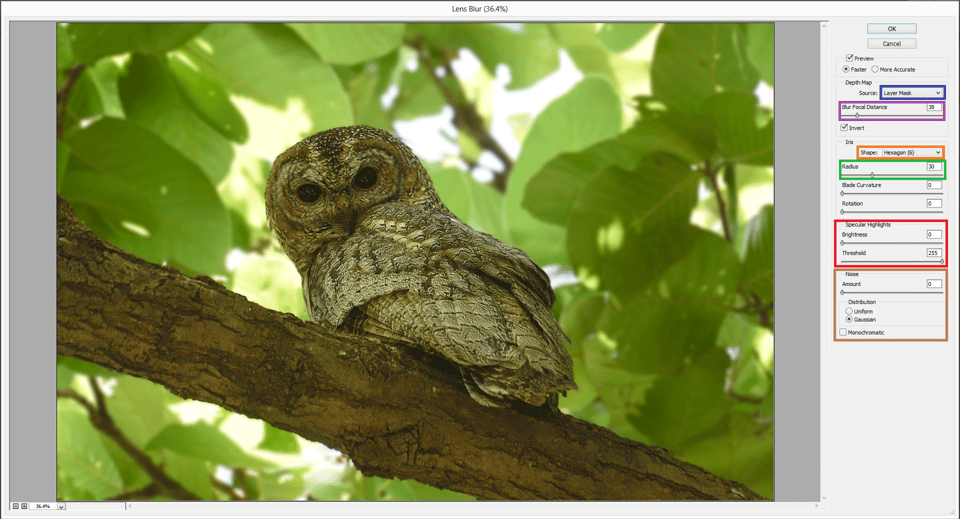
- In the Lens blur window, the first option you will see, is the preview section. This only changes the preview of the lens blur applied in the lens blur window. Depending upon the size of the image, applying lens blur takes time. So it is always advisable to choose “faster”.
- Below the preview is the depth map. We have already made a layer mask that defines the dept map ie., the selection (whites) in the layer mask becoming the plane of focus. Make sure that the Layer Mask option (highlighted in blue) is selected from the source.
- Next is the blur focal distance (highlighted in purple). This option is to tell Photoshop either to blur the selection or to blur everything excluding the selection. You can understand it better by toggling “Invert”. For this image, I thought the focal distance of about 38 worked pretty well. As you increase the blur focal distance, you can see that the pixels closer to the focal plane undergo less blur than the ones that are farther from it.
- Below the depth map is the Iris option. You see a drop-down called shape (highlighted in orange). This option is used to define the shape of the blur. For example, if I have blocks of blurred highlights in the background, selecting hexagon in shape will render hexagonal highlights. In other words, it mimics the effects created by the aperture blades.
- Below that, is the Radius (highlighted in green) which defines the aperture. A lower value corresponds to a wide-open aperture and a higher value corresponds to a smaller aperture.
- The Curvature option defines the curvature of the aperture blades and the Rotation option below that signifies the angle of curvature.
- The highlights marked in red in the illustrative image is to define the Specular Highlights. This option is used to tell Photoshop if we want to blow out any highlights. A blown-out highlight with no details appears to be blurred overall. The threshold option gives the maximum luminosity value of the pixel that is to be thrown out as specular highlights. This option works similarly to “Blend-If” when it comes to selecting highlights. For example, if I choose a value of 200, every pixel brighter than 200 will be blown out.
- The last section is Noise. Always remember, when we apply blur, the noise in the image gets blurred too. If you have a noisy image, blurring the background will blur noise as well, leaving noise in the focus intact. This sometimes yields results that look unnatural. This option is used to suppress noise reduction. In fact, Photoshop does what it usually does and then adds a bit of noise. Use this slider to match the noise in the area that is in focus.
- Now when you click on the “Ok” button, the corresponding blur is applied to the image. But it appears as if the blur is not applied to the layer. This is because the layer mask is attached to the image with the selection of the focal plane alone. So everything except the focal plane is masked out. Delete the layer mask by right-clicking on the layer mask and selecting Delete Layer Mask.
Applying Selection Gradient
As mentioned earlier, using the same technique does not help every image. The first step is to understand the image and then apply the blur accordingly. So obviously, each image demands it’s own algorithm to blur. Let me explain with another example where the blur needs to be a gradient. Let us go back to the tiger image:
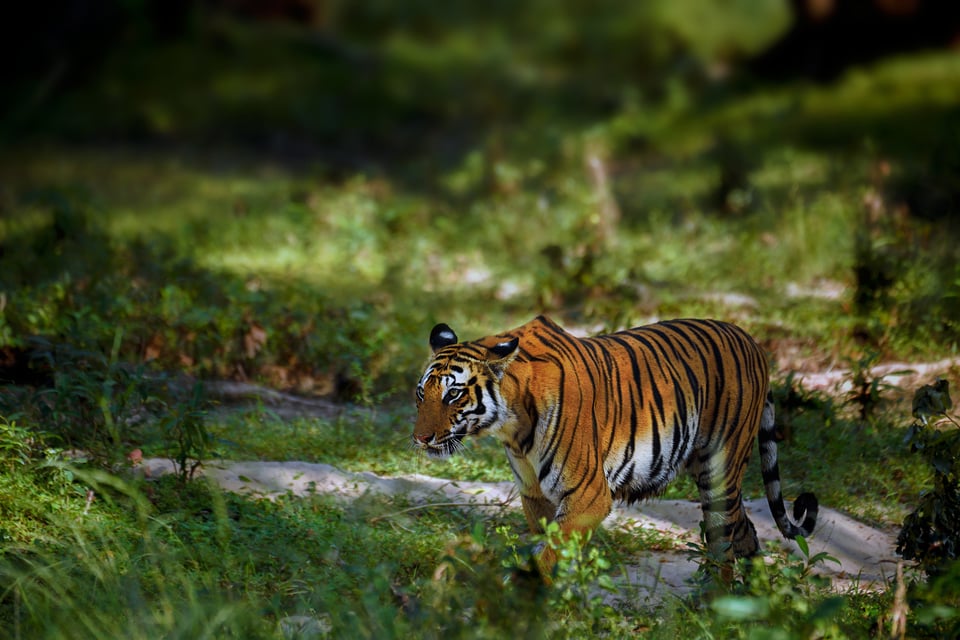
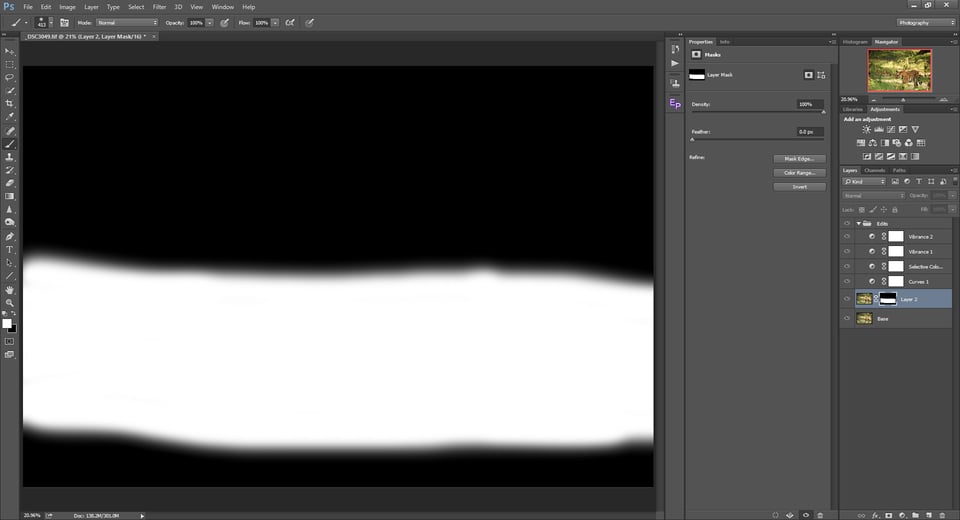
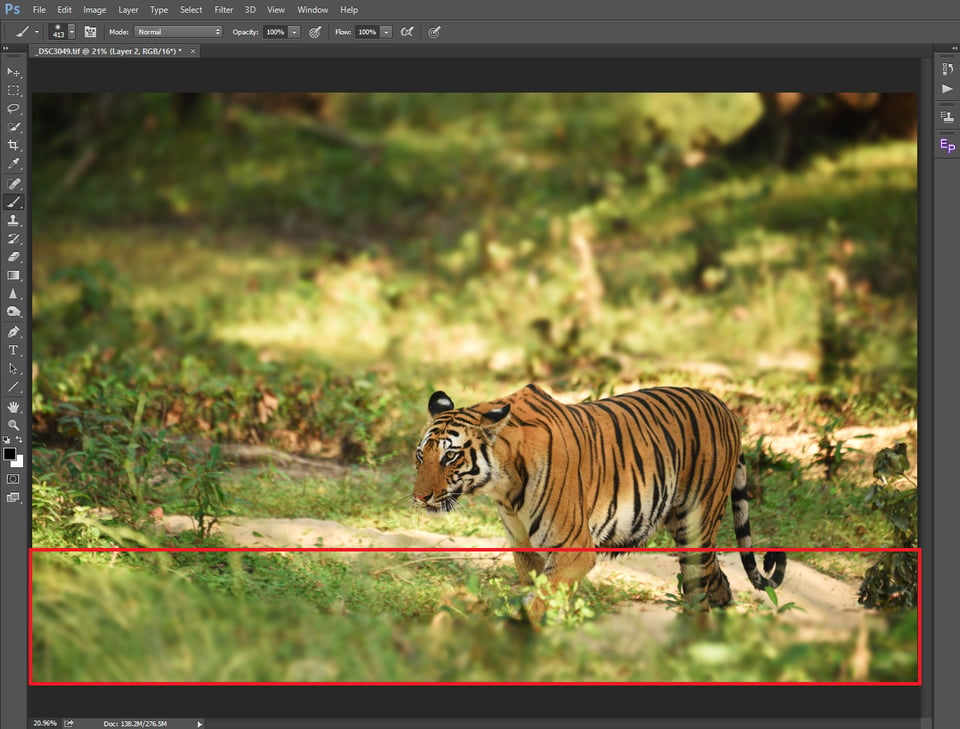
In the previous example, I selected only the subject and blurred everything else out. That approach is not likely going to work for this image. You can see a little bit of sand and grass in focus which is pretty close to the subject. It would look artificial if we blur everything except the tiger as the plane of focus extends beyond the subject. For this, selecting the entire plane works as shown in the illustrative image below. I have selected a soft brush and brushed over the entire plane of focus:
With this selection made I repeat the same procedure as we did with the previous example. The result is the image shown below. I just missed out on one little detail. The Foreground was not selected in the depth map. As a result, the grass at the bottom is blurred and a part of the tiger’s leg is also included, making it completely unnatural. Since the blur has been applied to the selected layer as a filter, it cannot be modified. This is why it is always advisable to take a copy of the layer before applying filters. You can do so by selecting the layer and by pressing Control/Command + J. Now that I have the source (depth map) as a new layer with a mask, I can always add a layer mask and mask out inappropriate areas of the current layer.
Conclusion
In this article on How to Blur the Background Using Lens Blur in Photoshop, we understood the factors that need to be taken into account while blurring the background in post-production. This is only one of many ways to blur the background using Photoshop. There are other filters just like Lens Blur viz., Gaussian Blur, Field Blur, and Tilt-Shift blur. We will be covering those in future articles. If there are any queries or if you wish to know about any of the specific options, please pen it down in the comments section and I shall try to address it as soon as possible.
Thank you for the article. An in-depth video of how to do this will be more helpful.
My name was garbled in the previous post. Guess it’s the portable keyboard (surely not my own incompetence).
Thank you for the article. In Photoshop, you can certainly do this work using smart objects. Just create a new layer above the smart object, enable “sample all layers” and work on that layer. It’s non-destructive, and can easily be returned to and modified as needed.
As the author accurately points out, getting it right in the camera is ALWAYS your first choice and it does not always require the exotic glass, most of which I do own. That said, with these kinds of images, you can come quite close with variable zooms, but it will take a practice shot or three to get aperture and focus point properly selected. Some landscape thinking serves well in terms of capturing the wildlife shots we intend. Wildlife is my primary interest, but I have learned a lot from landscape, portraiture, and sports, that can help me improve as a photographer of wildlife.
You have chosen two challenging images to demonstrate these techniques. Each have their own challenges. The owl shot, as another has pointed out, is problematic in terms of exposure. With a critter as still as this one, it would be better to take a quick series of shots, at varying exposures, then chose best for critter and best for background, then do the work.
In terms of the tiger, I think this technique would be problematic to pull off – at least for informed eyes. The main problem you aren’t calling out is that – and the tip off that this was manipulated is that the background at the same distance from the front of the tiger has been blurred while the tail, at the very same distance is sharp. That is one of the challenges of this technique. It works best when the subject is within the same distance plane. When that is not the case, it is a very complex job trying to blur the background – believably AND keep all of the subject tack sharp. Lenses don’t do that, which is why it takes some practice shots to get this dialed in AND it’s rarely at those exotic apertures since they would have a plane of focus that is too shallow.
While I prefer shooting with FX bodies and exotic lenses, I also have found enjoyment in shooting with a bridge camera affording me the option of traveling/hiking with a fraction of the weight, though still using a (much smaller) tripod and aiming to get the same kinds of shots. It takes more practice, but it is a matter of selecting the best aperture and focal point to get the parts of the subject I want in focus. It is far easier to take a few practice shots to get the desired image than spend hours creating it after the fact.
The other standout, in terms of believability to me, is that the level of blur for the tiger is just too much. It’s like the author has not shot enough of these in real life to know how a lens actually works in this kind of scenario. In Photoshop we can tweak things in ways that optical glass won’t – it’s just a matter of a few numbers. I’d suggest the best results come from having a mental database of what shots like this ACTUALLY LOOK LIKE when captured with camera glass.
A big key to capturing great shots is knowing, before you take them, what you want them to look like, then developing the skill to first see it, then develop the skill to know what camera parameters to change – to get the shot. Sometimes it may mean a change of lens, since some lenses are better than others when it comes to these things. Knowing what works best at different distances, etc. AND FX compared to DX requires a whole other set of skills/experience since some of this stuff gets mucked with. In my experience some FX lenses seem designed to work well on FX and DX bodies, while some others are clearly not a good fit. Bokeh is one of those tip offs for good fit or not.
I vote for practicing camera skills over developing image manipulation skills.
I think that the after tiger looks better, in part, because it is brighter. The eye goes to brighter parts of an image, so irrespective of sharpness, exposure is important, and it is hard to compare 2 images if you have increased exposure and sharpness.
This is really an issue for your owl, which is under exposed. The branch he is on is very dark, and the background is bright. I think your owl shot would be improved more by dodging the background and burning the owl and branch, to use historic terms.
It’s all a question of personal preference, but I find the foreground grass in front of the tiger to look Photoshopped.
The author starts out with ” So the first step is to decide how much blur is actually possible without making the image look “plastic” and the second step would be to decide which part of the image gets how much blur in post. In other words, deciding how much is too much will be one of the most important factors that makes or breaks the image.”
Then in the first example at the place where this logic matters we get the statement “For this image, I thought the focal distance of about 38 worked pretty well.”
Where is the explanation or illustration as to why the selected value of 38 is appropriate? Even more important would be examples of what to look for in overcooked adjustments so as to avoid them. That would seem to be just as important as the process of using the technique.