During our recent photo walk in San Francisco, where we had over 30 Photography Life readers join us for some awesome time together, one of the participants noted that a number of photographers who came to the photo walk were carrying tripods. As we were shooting a brightly-lit scene, his question was – why would you even want to bring a tripod to photograph in bright light? He then pointed out the fact that he almost never carries a tripod, that considering how good the performance of digital cameras is today, that a tripod is unnecessary. While I agreed about the fact that modern cameras are certainly very good at handling noise and the fact that I rarely use a tripod in broad daylight myself, I stated that I still carry a tripod with me when I travel and pointed out one specific situation that took place a couple of days earlier, where a tripod made it possible to capture a dynamic scene that I could not have captured otherwise. I asked if the participants had previously seen the below photo of San Francisco, captured from Twin Peaks (which was in my San Francisco at Night post):
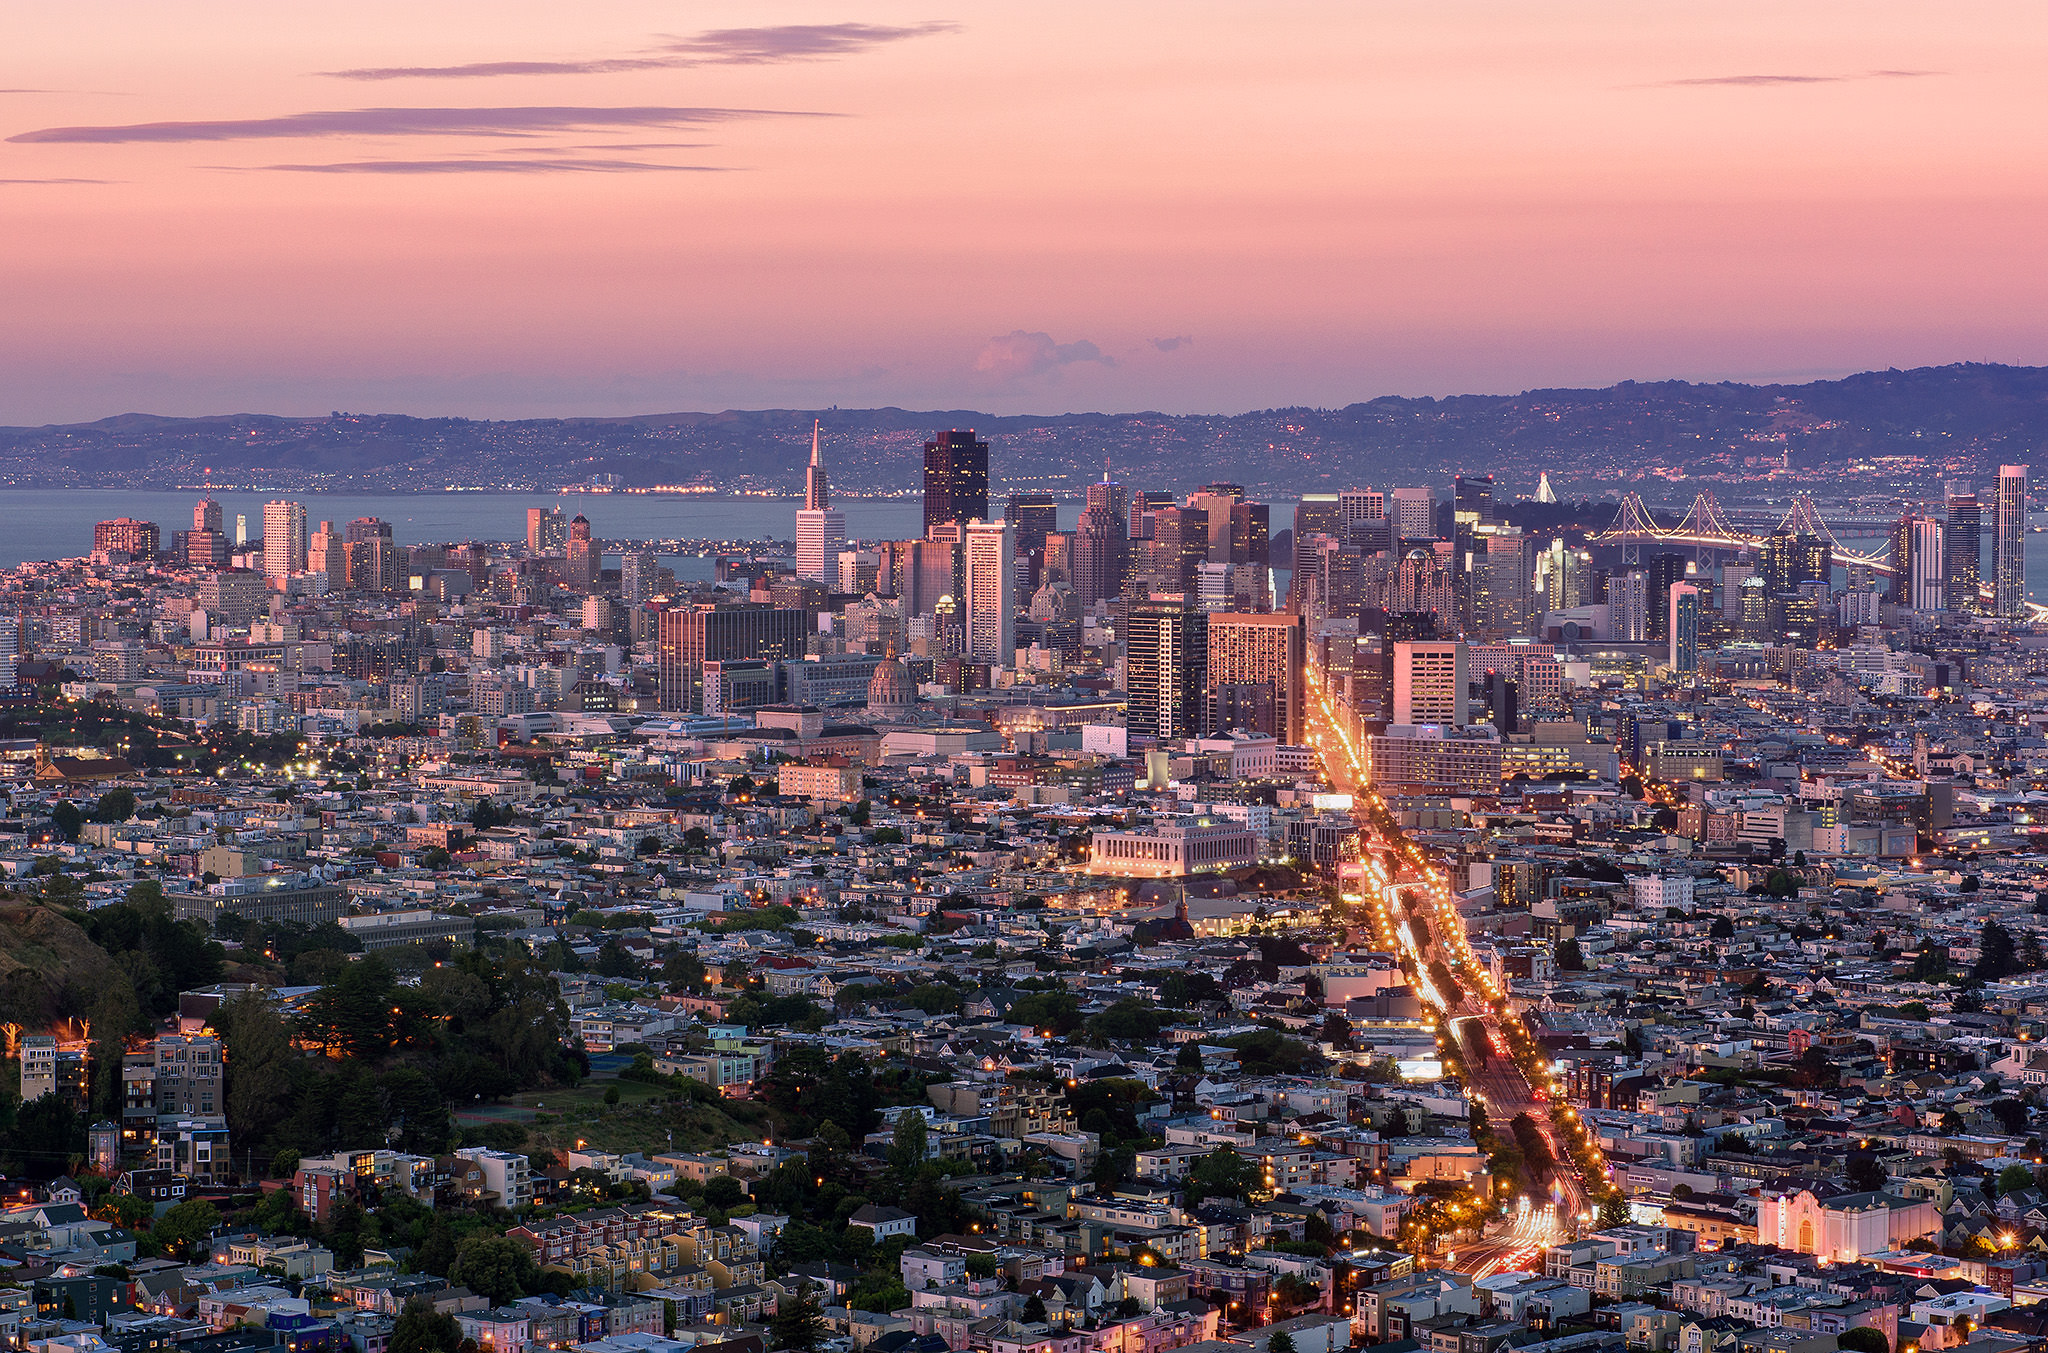
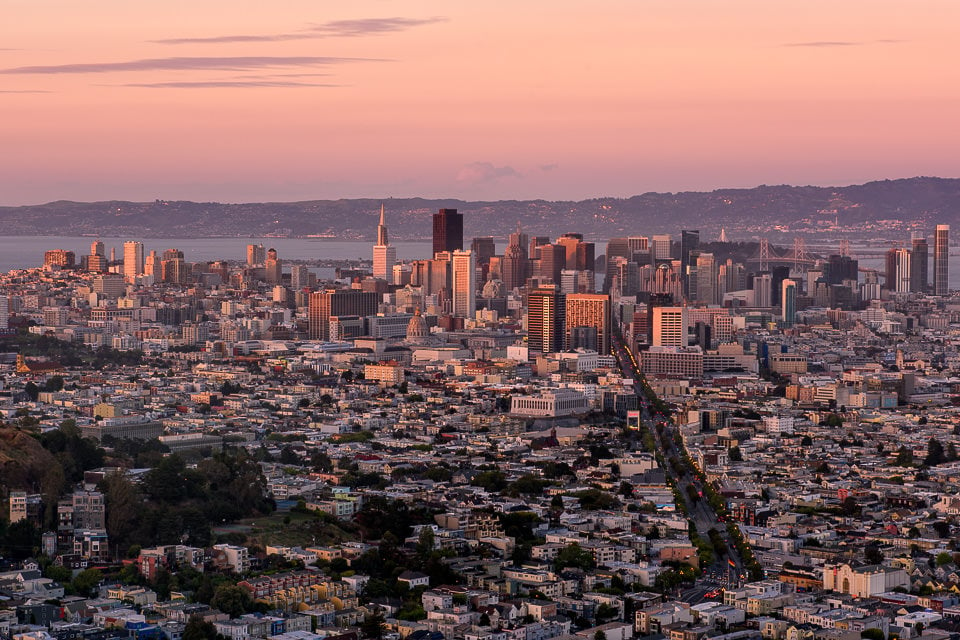
Most said that they had seen it and for those who had not, I showed it on my phone. Next, I asked if they noticed anything strange about the photo, perhaps something that looked a bit out of place. Everyone said that the photo appeared just fine to their eyes. When I talked about what I actually did to the photo and the fact that it only took me a couple of minutes to get the result I wanted, the group was quite shocked. To understand what is going on in the above photo, you have to analyze the scene – particularly the sky, the buildings and the street lights. It is pretty clear from the image that it was captured at sunset time, since the sky looks pretty dramatic and the buildings have an orange glow in them. But is it realistic that I could have captured the city lights at the time? Of course not – most lights weren’t even on! In fact, here is what the actual scene looked like at the time of capture (with a few Lightroom adjustments):
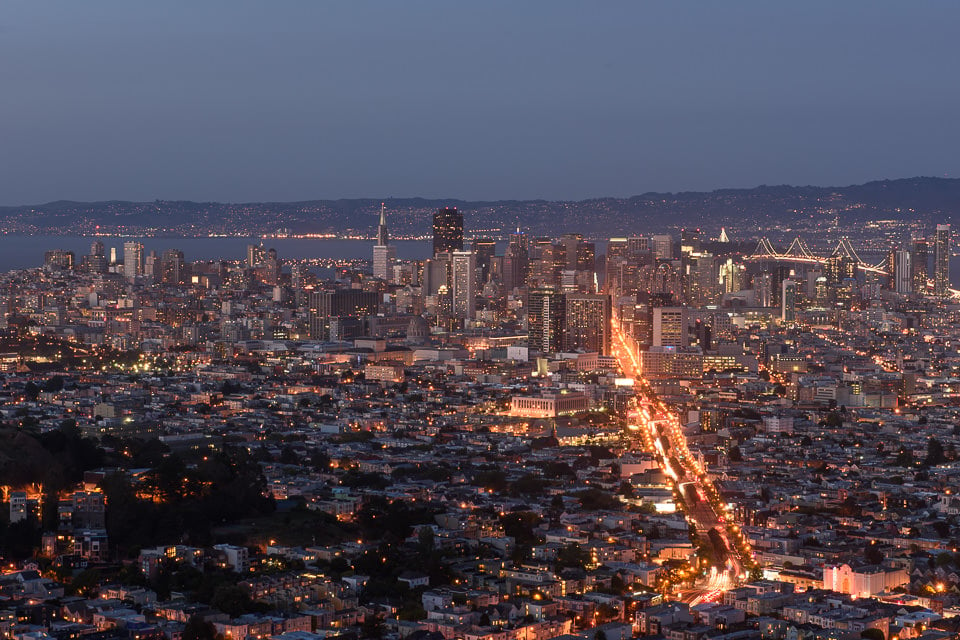
Whoops, there are practically no lights! Where did they come from? They came from this separate image that I captured about 30 minutes later:
With a single action in Photoshop, I was able to combine the two images into a single image shown on the top of that page. And after I was done, all I did was make a couple of tweaks to contrast in the image – it took me less than a couple of minutes of total time. Let’s walk through the process real quick, it is super easy!
Capturing the Scene
By now you probably understand why a tripod is a must to be able to do this – you will need to capture two separate shots, one at the golden hour with a dramatic sky and the scene and one much later, with all the lights of the cityscape on. The first photo will contain the beautiful colors of the scene and the second photo will contain just the building lights and the street lights.
Ideally, you want to frame your shot on your tripod and start capturing the scene right at sunset, then shoot past sunset without moving the tripod. The goal is to capture two images with the same framing, so that you can easily align them in Photoshop / Photoshop Elements. But if you mess up and end up moving your tripod a little, you might still be able to get the two layers aligned (Photoshop has a nice “Auto-Align Layers” feature that lets you do that), as long as you have not changed the perspective. Even changes in focal length can mess things up, so I would recommend to keep the tripod in place as you capture the scene.
Once you have two images captured, your next step is to import them into Lightroom, or open them straight up in Photoshop (depending on your current workflow).
Blending two images in Photoshop / Photoshop Elements
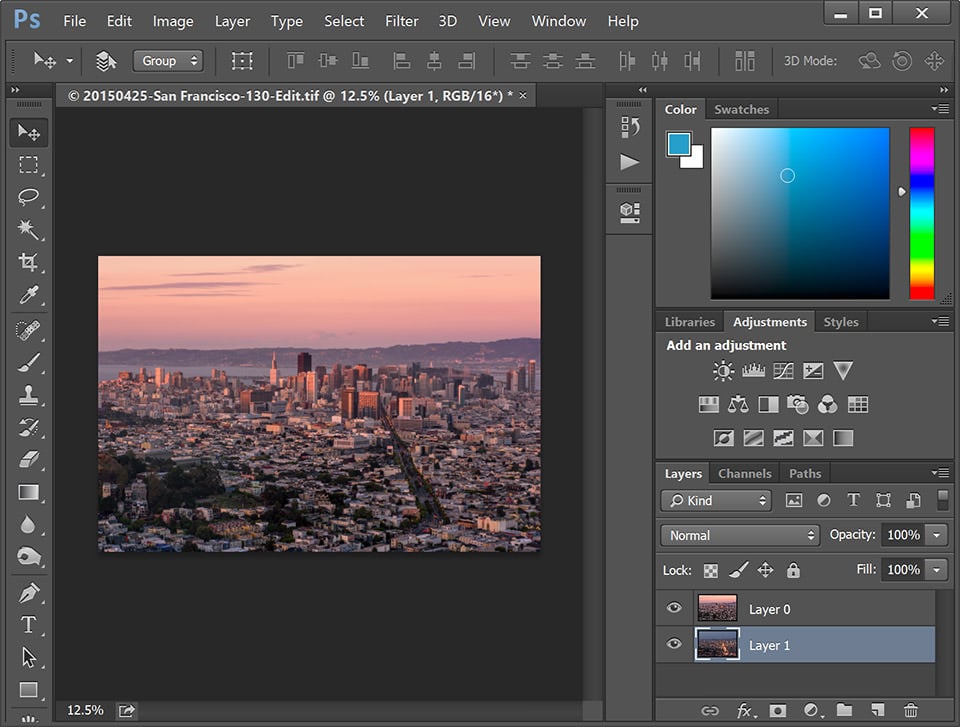
You start working on the image that has the nice colors, the one that you want to use as the primary image. In this particular case, I started off with the sunset image in Lightroom and made some tweaks to it to make it look more colorful. I changed white balance, added some shadow detail and clarity and added a bit of saturation to the sky. This took me about a minute. I did not make any changes to the second image, because all I needed from it was the city lights.
The next step is to open both images in Photoshop or Photoshop Elements, depending on what you are using. When both images open, they will do so separately, so the following step is to put them together. You can do it easily by simply dragging one image on top of another. This will create a separate layer on top of the background layer. It is a good idea to convert the background layer to another layer (Right click on the layer -> Layer from Background), because you might need to adjust the opacity of that layer later. Here is what my screen looked like after I did all this:
Now that both images are in a single file as two layers, all you have to do now is change the Blend mode from “Normal” to “Lighten” on the top layer:
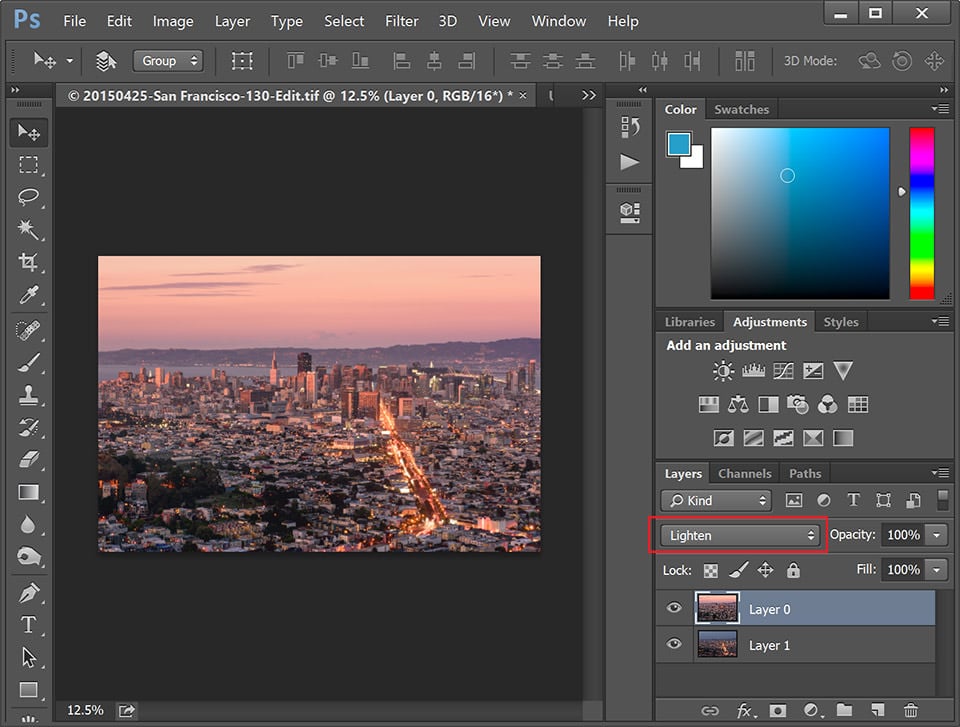
What this does, is keep only the brightest pixels in the two layers. Since our sunset layer is much brighter than the night layer, most of the top layer will be preserved. However, the bright sources of light in the night layer are going to still be brighter, so those will be added to the result as well.
Now you should be able to see the nice sunset image, with the streetlights and building lights in the image as well. We have successfully blended the two images together to create a nice composite. We are almost done!
From here, take a look at the entire image and make sure that everything looks good. If the lights are too bright, you can reduce the opacity of the night layer. If a particular area of the scene is too bright, you can add a layer mask and reduce it manually – it is all up to you.
For the above image, I toned down the opacity a little, made a few other quick adjustments to boost contrast and I was done. Altogether, it took me approximately 2-3 minutes total to do this! Here is another composite of the same scene captured on a different day using the same blending technique:

If you have never tried blending images like this, give it a try – it is a great technique and it really works, particularly for cityscapes.
Hey Nasim!
I saw this on the BBC today and I’m completely fascinated – How did he do this?
www.bbc.co.uk/news/…-one-image
Jeanine
Hi sorry but I don’t see any way to combine the images. You say simply drag one image onto the other image, however when I open them in Photoshop, each image is in its own tab, there is no way to see them both at the same time, and no way to drag them onto each other.
hhhiii dears 88dollors can you like life < < www.Netcash9.Com
Nasim a really lovely shot and explanation. Would you be able to do this same 2 shot merge now in Lightroom 6 with new HDR merge feature? I ask as I do not use photshop but only Lightroom, but love this effect that you did?
Looks awesome, thank you for sharing!
Hi Nasim
I followed blending technique as per your ‘receipt’ and here is the result. It is Melbourne Scape as seen from Williamstown (Melbourne suburb). Thanks.
Waldemar, that looks great! Thanks for sharing and I am happy that you are pleased with the results :)
Looks nice, and so easy to do this way, great article for giving interesting options on a cityscape. I suppose the only danger with a lighten layer is on the highway you could have some lights without any cars attached to them (but they would be from the longer exposure so not that easy to see), and cars with no lights is possible too depending on how much lighting the street has compared to the earlier photo. Suspect that even on a large print you’d have to really look for this, and who would view a great photo like this looking for processing artifacts anyway..
Richy, but you would not want to see cars attached – in long exposure shots cars are never visible…
Great! Thanks.
You are most welcome Keith!
Great idea! I will try some research to do this with Gimp.
Hopefully there will be a way to do this in Gimp. If you find out, please share!
Thank you for this great article!
You are most welcome Alis!