Noise is the sleet storm Satan drenches our photos in when we stupidly leave our tripod in the trunk thinking VR will save our lazy butt, but instead we end up shooting at quadruple digit ISOs. In this article, we will take a look at a couple of techniques on how to reduce noise and how to avoid it in the first place.
That grainy look to our photos is the punishment for our lack of photographic purity and wholesomeness. So how can we go about trying to minimize noise in our images and fool people into thinking we are without sin? I’m glad you asked.
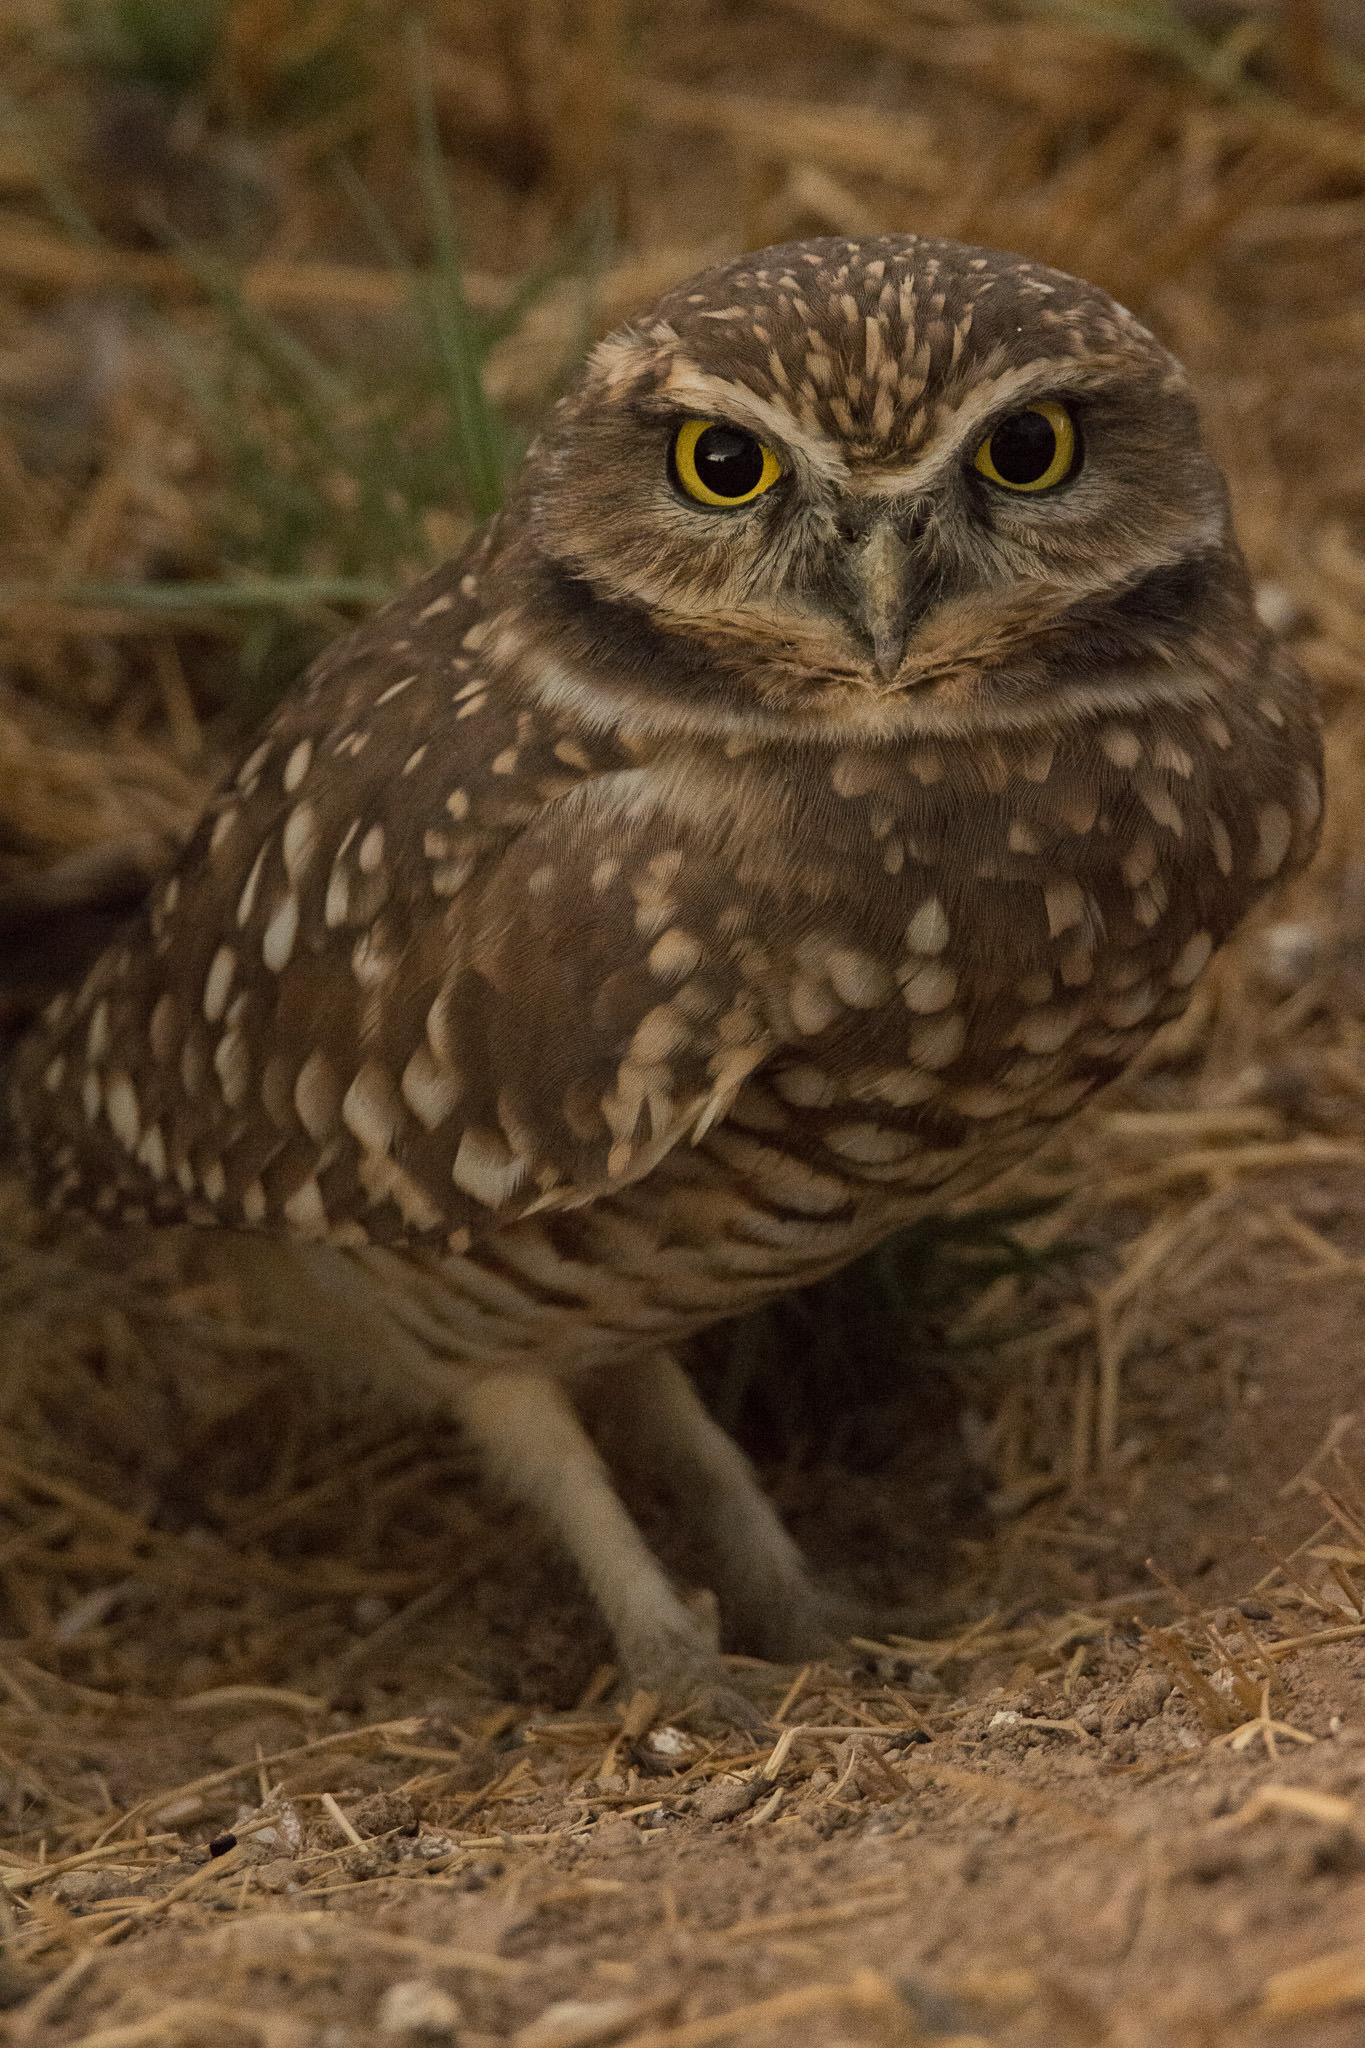
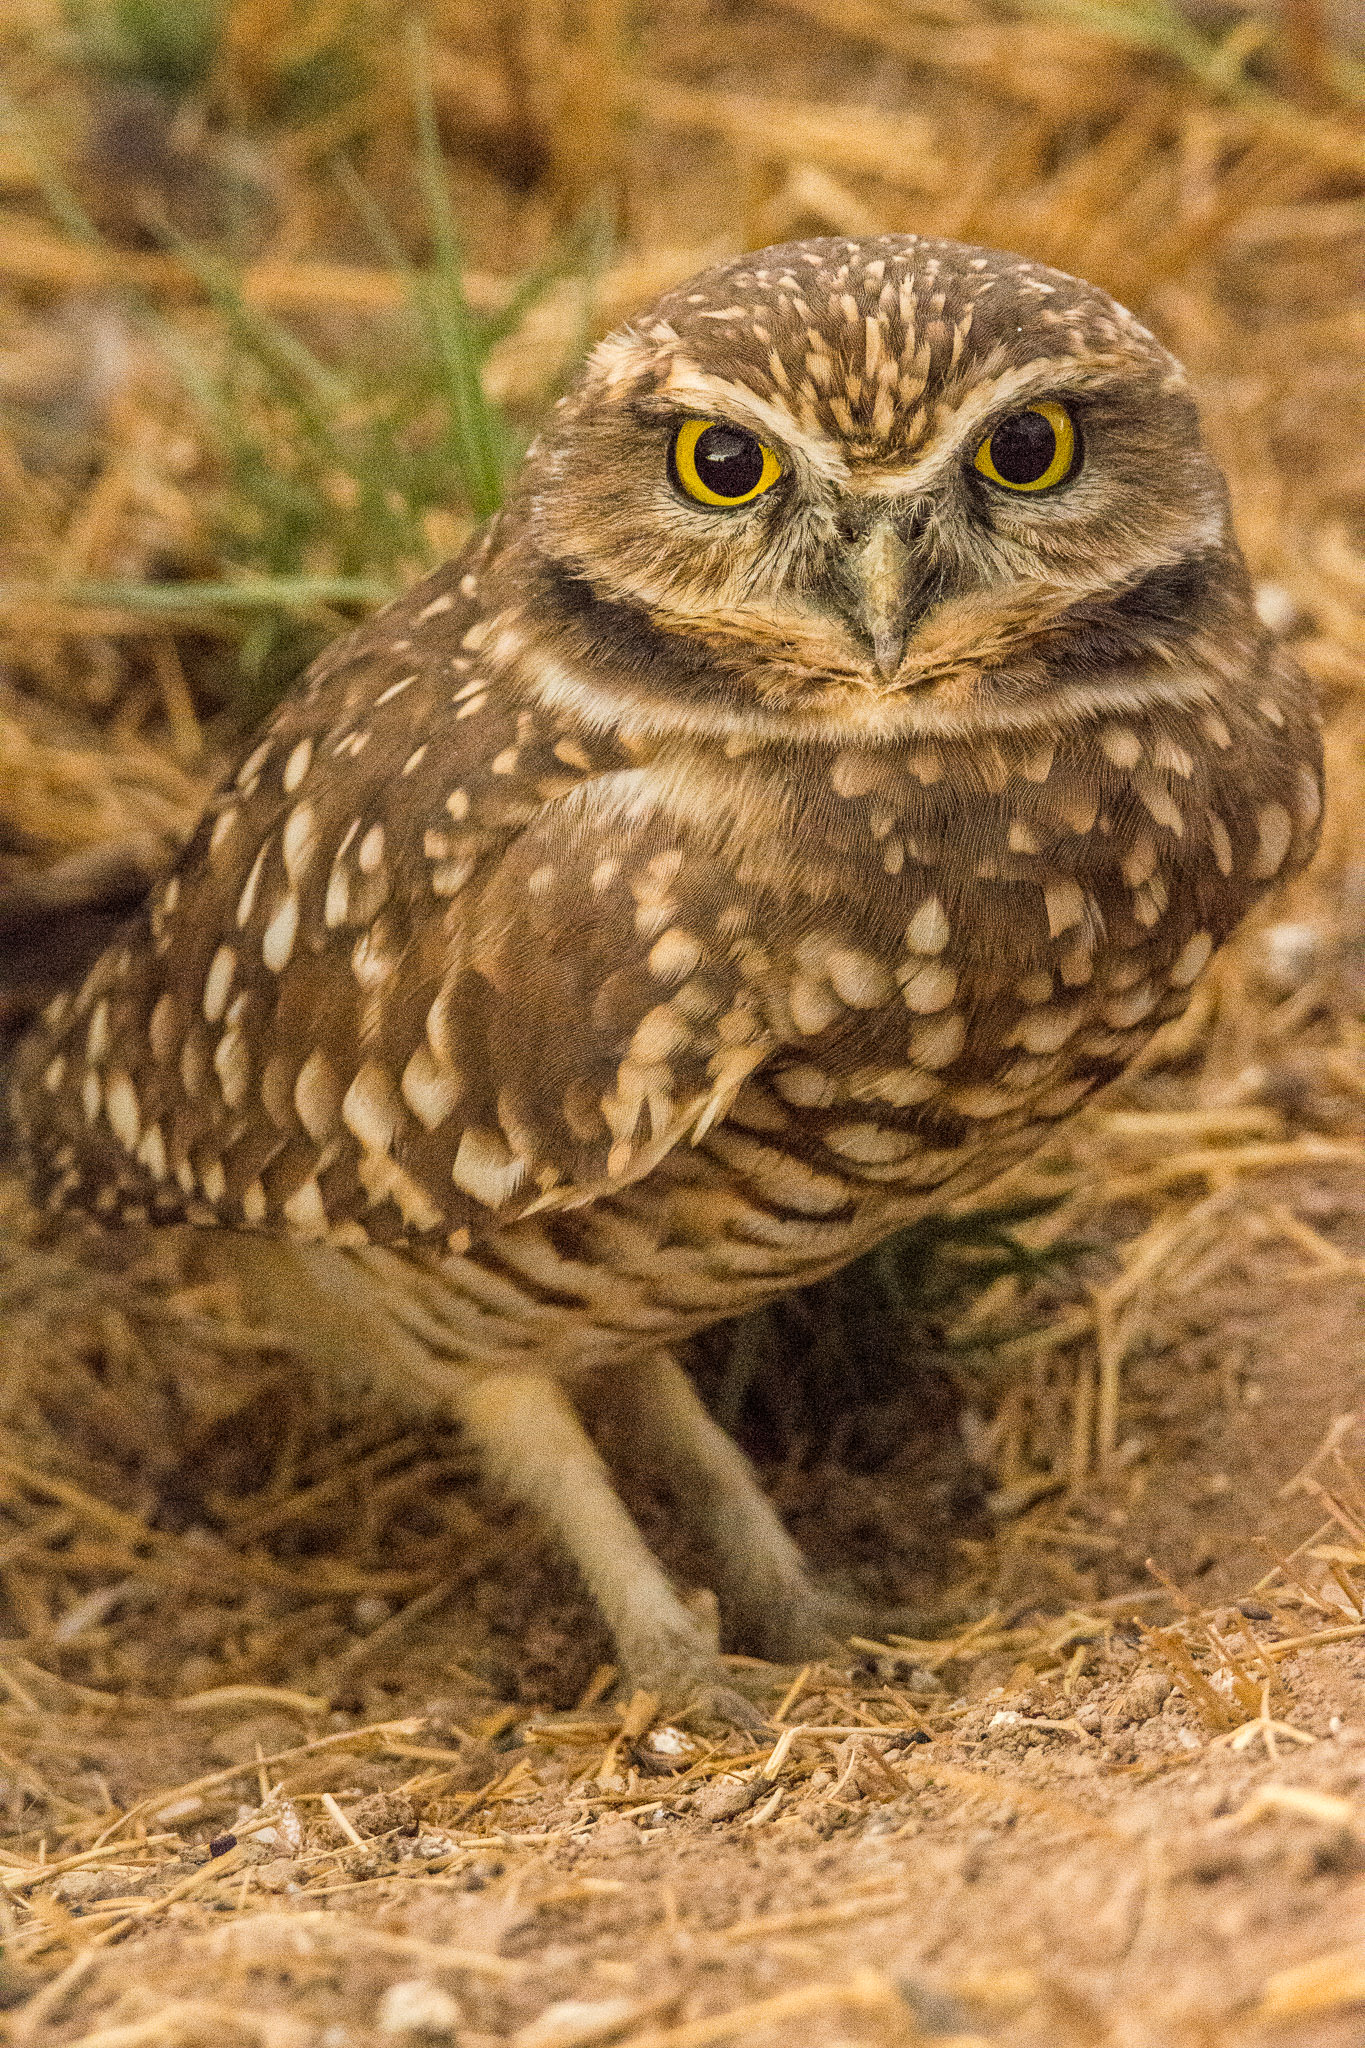
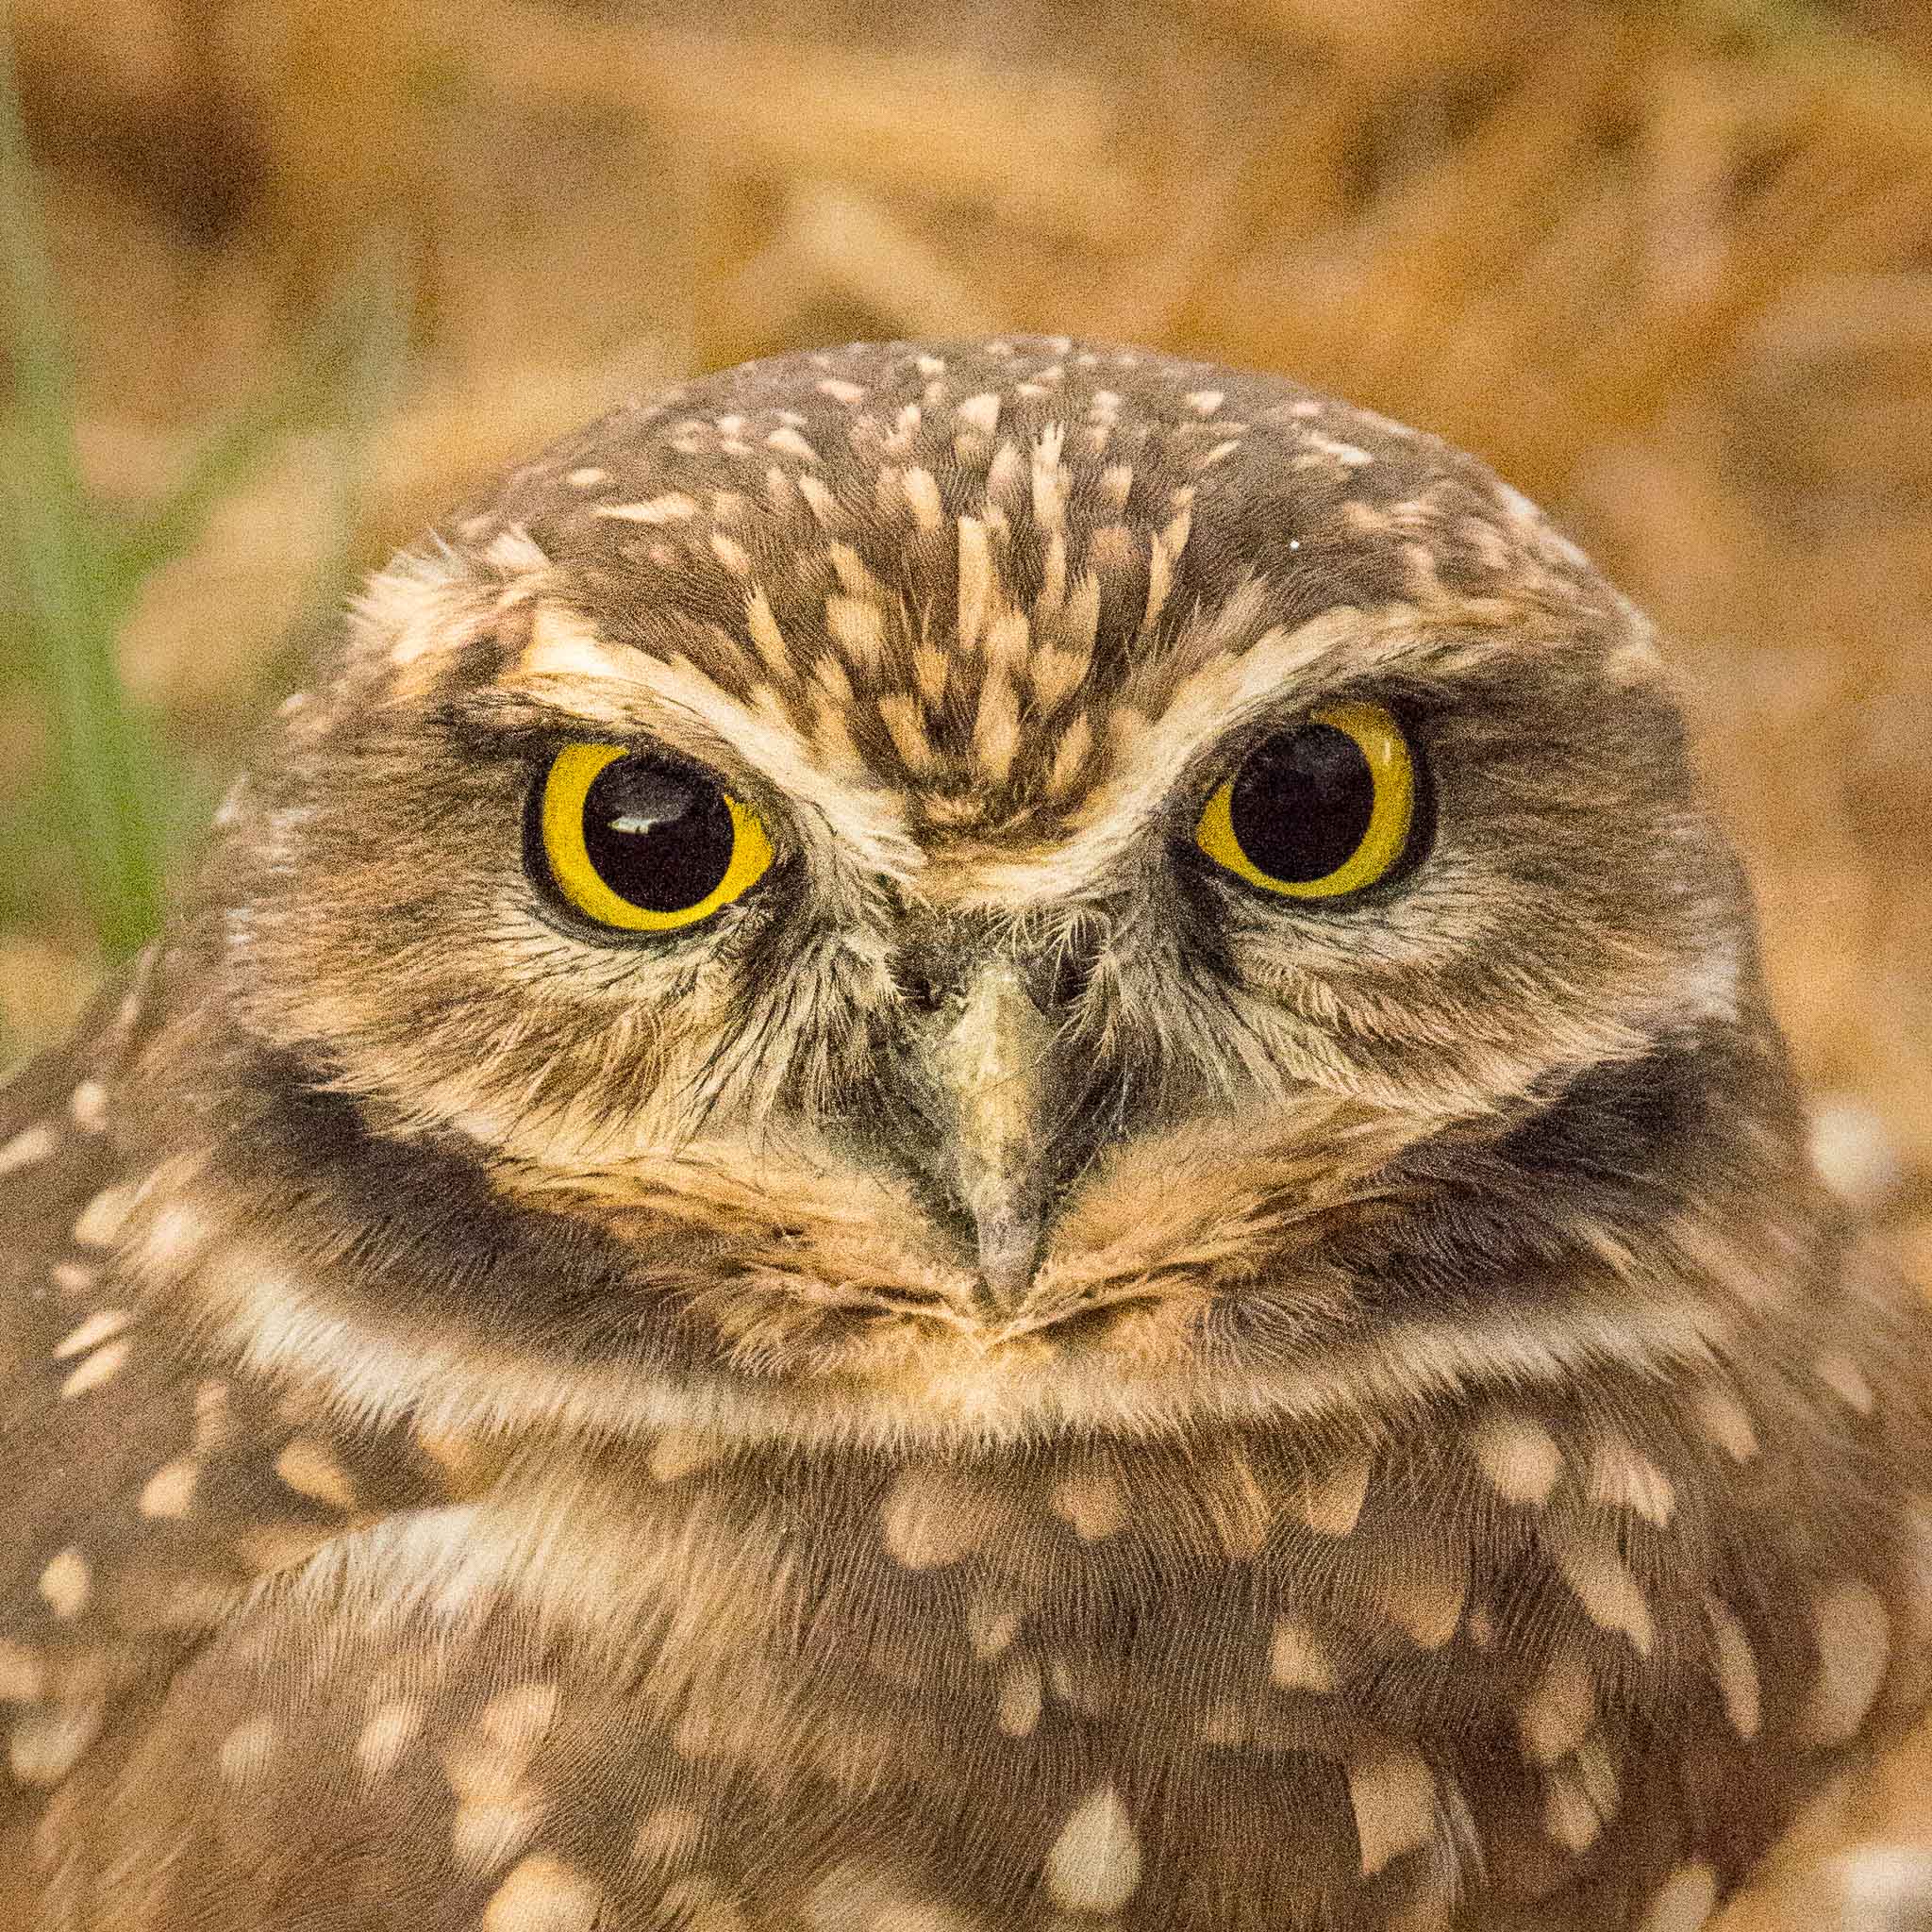
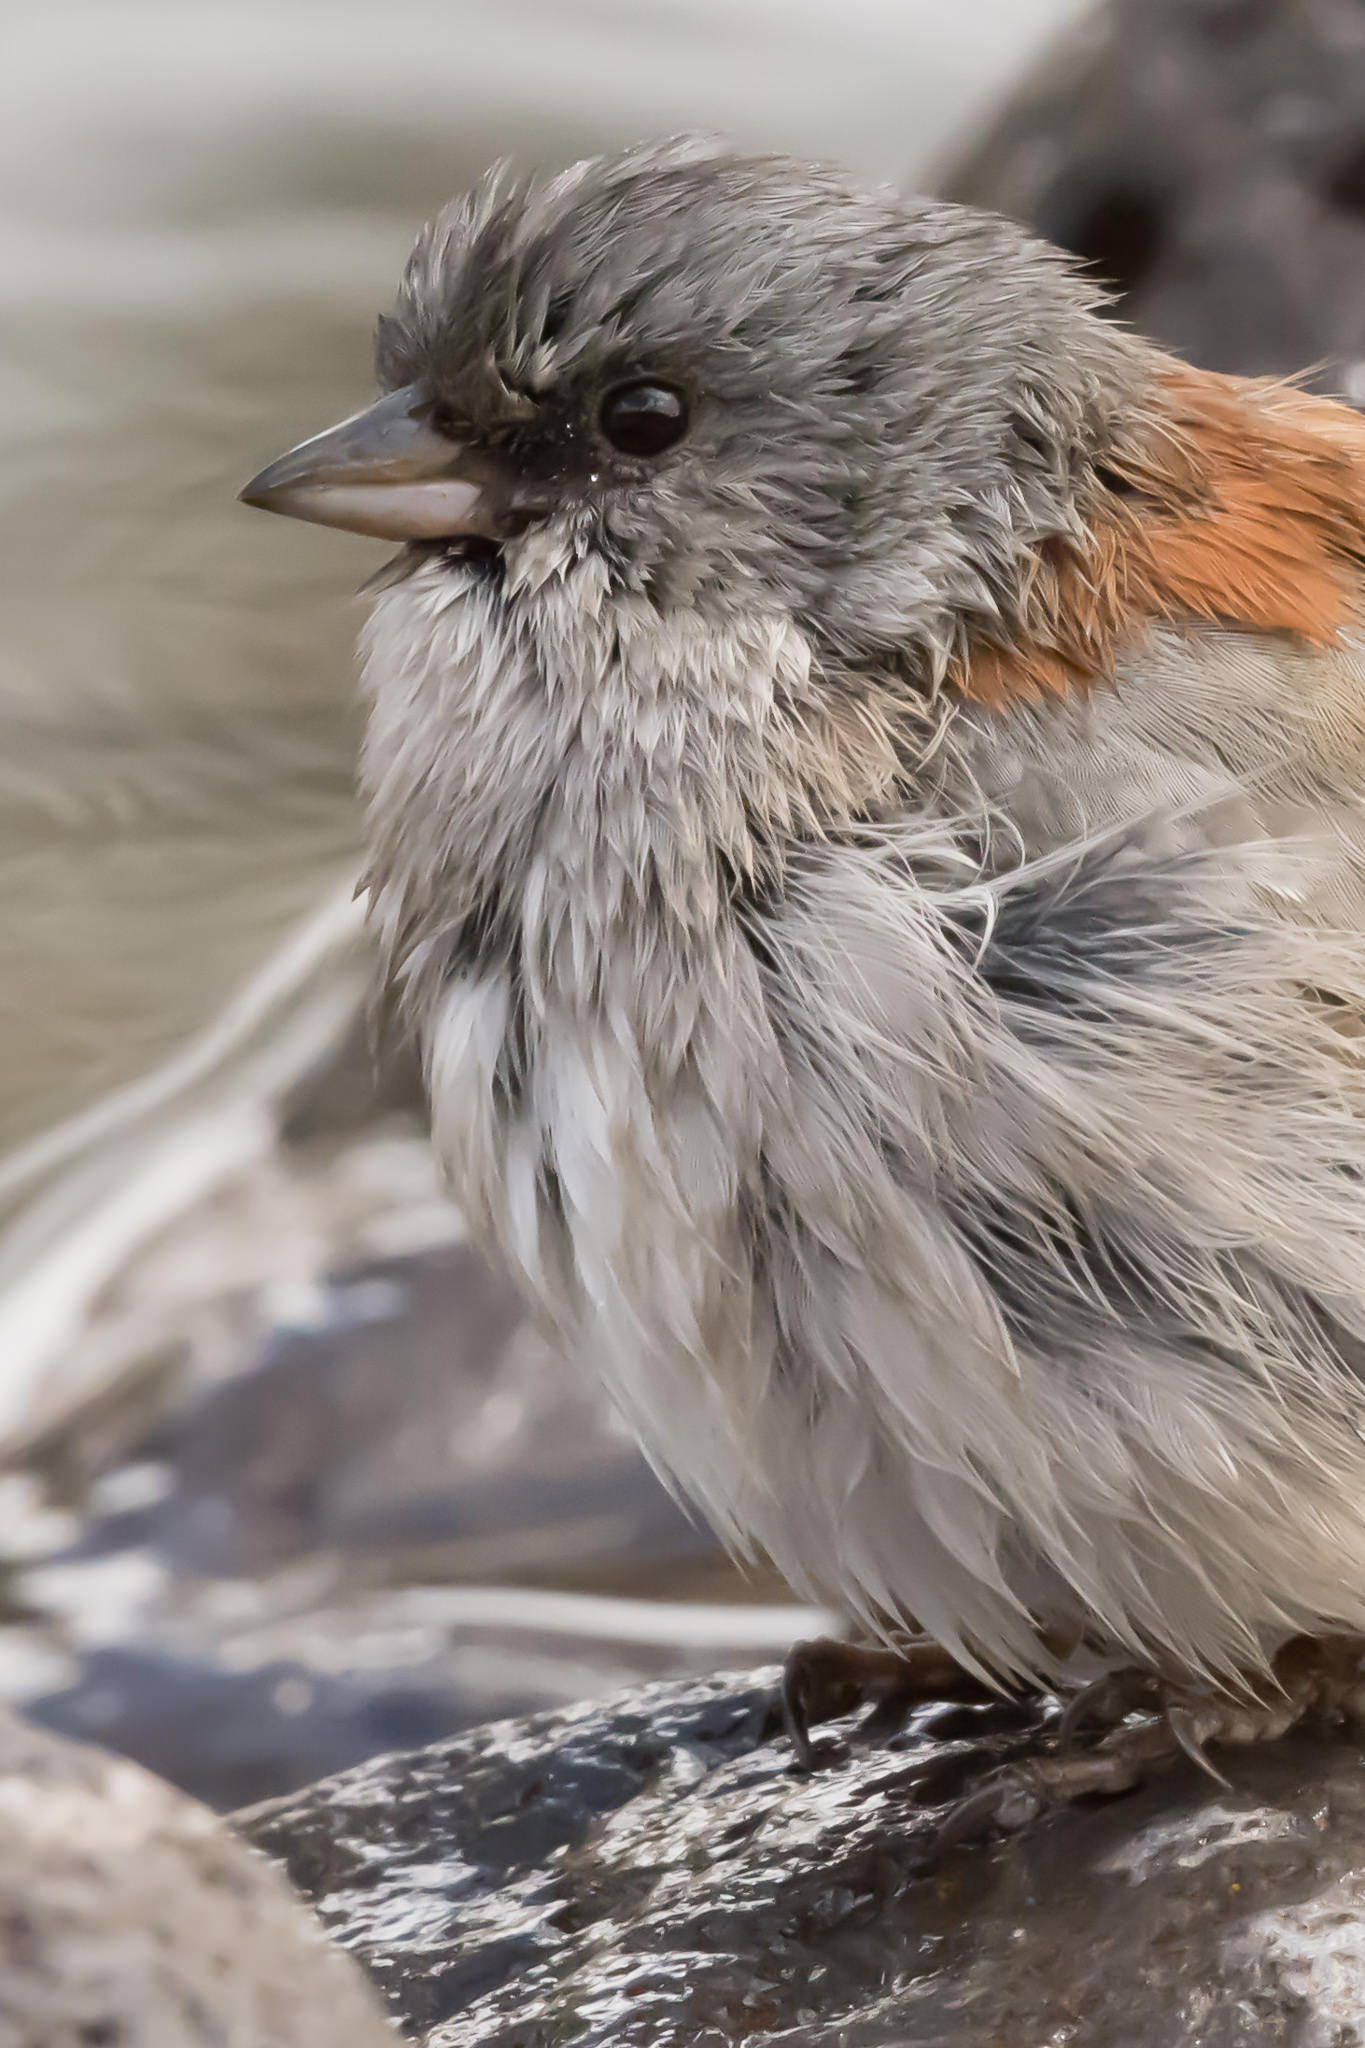
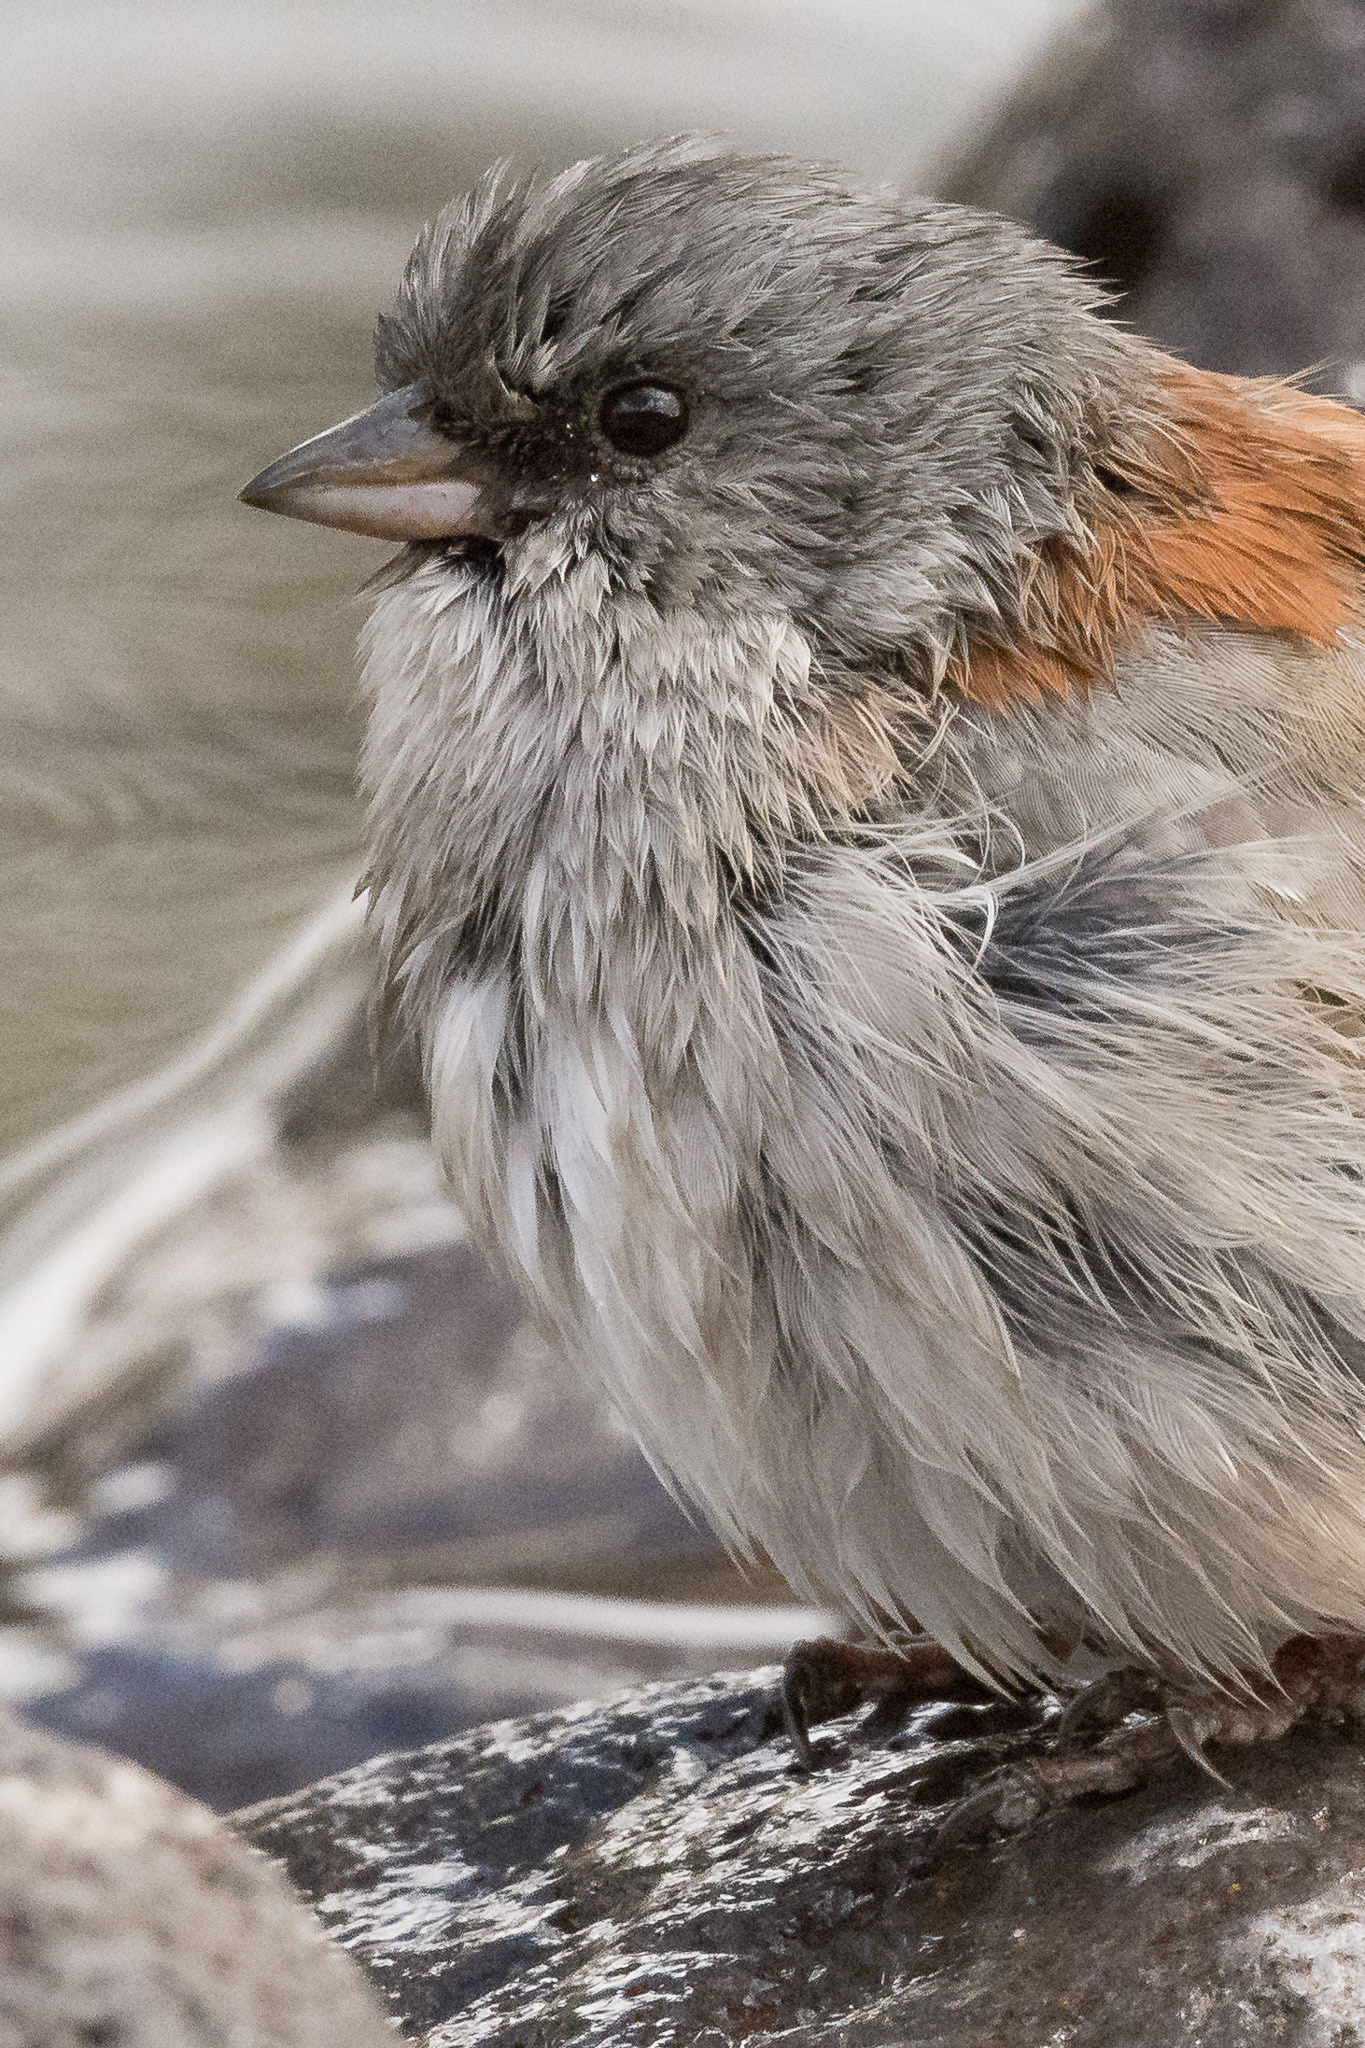
My girlfriend has this nasty habit of taking better photos than me. To fix this problem, when we see a great subject like this Burrowing Owl. I hand her my D7200 set at White Pelican in Flight settings (-1 stop exposure compensation with Auto ISO enabled). Before she knows it, she’s already at 10000 ISO and still underexposing as seen above. Ha, I win! Talk about a recipe for noise stew. Fortunately, she’s kindly let me use the resulting file to demonstrate some noise reduction tricks and I only have to wash all the dishes for the next ten years.
Here’s a version I tweaked in Lightroom. It looks minimally noisy to me and get this, I didn’t nudge the sliders in the noise reduction panel at all to get this result.
Before we get into how to minimize the appearance of noise in our images let me state here that noise is one of the least important components when it comes to an image’s strength and appeal. Good composition, alluring lighting, proper exposure, appropriate focus, astute timing, etc. etc. are all much more important to a photo’s success. Noise is the last nitpicky thing I worry about when working on a photo. Some noise can even be desirable, for instance if you’re trying to achieve the gritty B&W photojounalistic look that came from the days of Tri-X film (very popular in the 60s and 70s). That said, at a certain point, noise can get so bad it degrades image quality by obliterating fine detail.
This article is written assuming we are capturing RAW images, not jpegs. In it, we’ll discuss controlling noise both in camera and when post-processing in Lightroom. Further noise reduction in other software programs such as Noise Ninja or Topaz DeNoise is beyond the scope of this tutorial.
Table of Contents
1) Noise Basics
Noise comes in two flavors; luminance noise and color noise.
Luminance noise gives the grainy look above.

Color noise gives multicolored speckles.
Noise is most often the result of amplifying the signal (in this case the data collected by each photosite on your camera’s sensor) to output a file of the desired apparent brightness. As light levels drop and each photosite gets less information in the form of photons landing on it, to achieve a file that doesn’t look underexposed, we need to amplify the signal by boosting the ISO. The higher an ISO you shoot at (assuming you’re shooting the same camera), the greater the noise in the resulting files. Sensors produce the cleanest results when shot at base ISO (the lowest numbered ISO on the camera).
Smaller individual photosites (common on high megapixel crop-sensor cameras, many mirrorless offerings and point-and-shoots) get hit by fewer photons per exposure than bigger photosites (found on lower megapixel full frame DSLRs and medium format digital bodies) hence have less information to send out and thereby need to amplify that signal more to achieve the same level of brightness. This is why the 16mp full frame D4s with its Rubenesque photosites is much less noisy at the same ISO than the 36mp full frame D810 with its anorexic photosites.
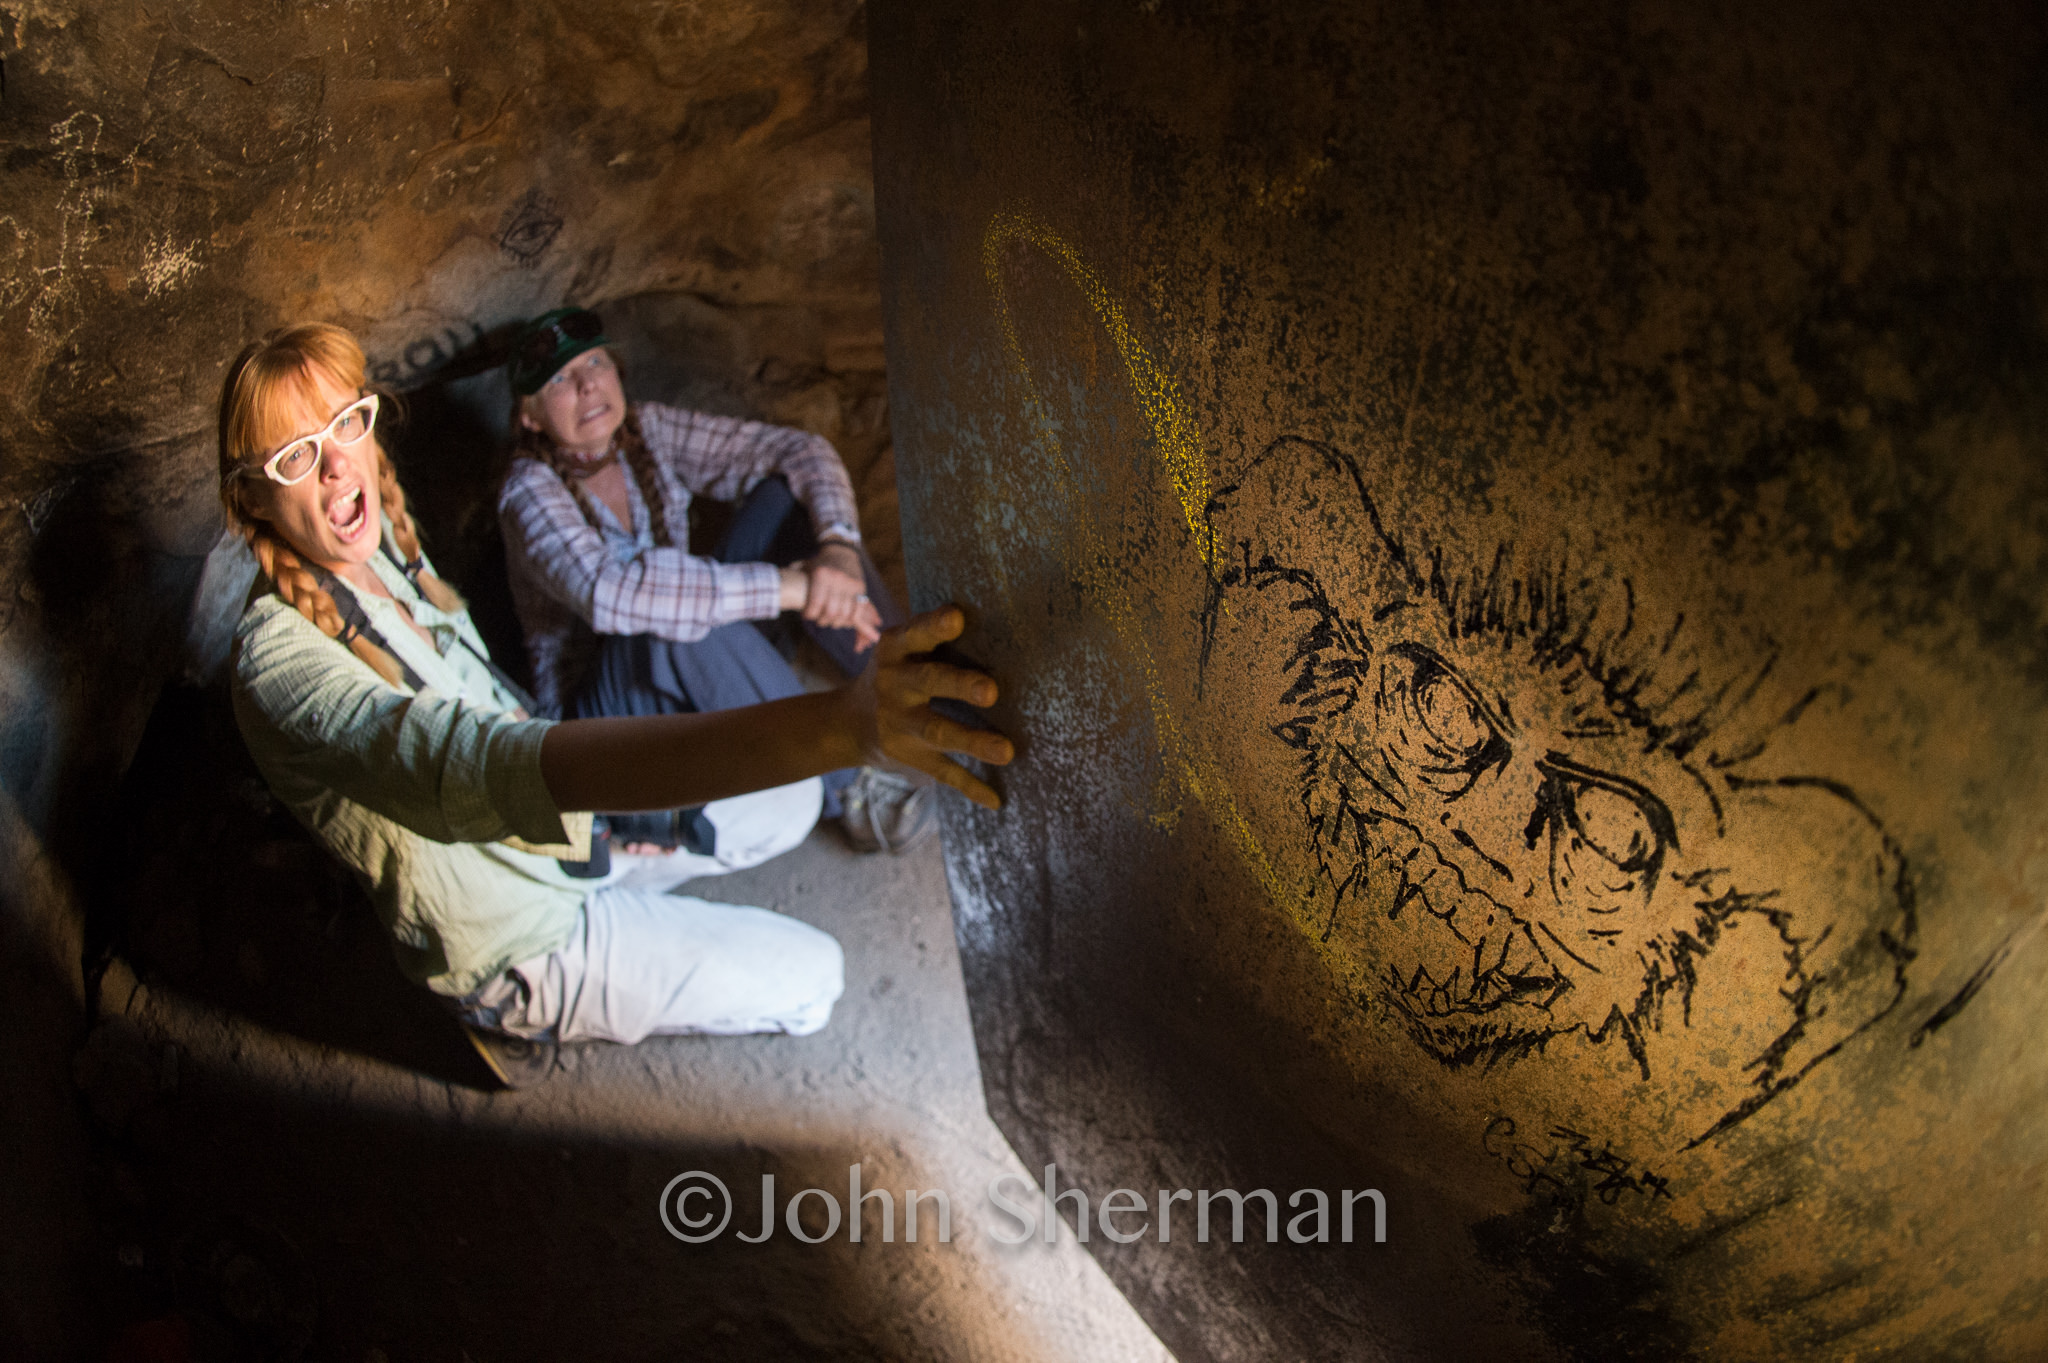
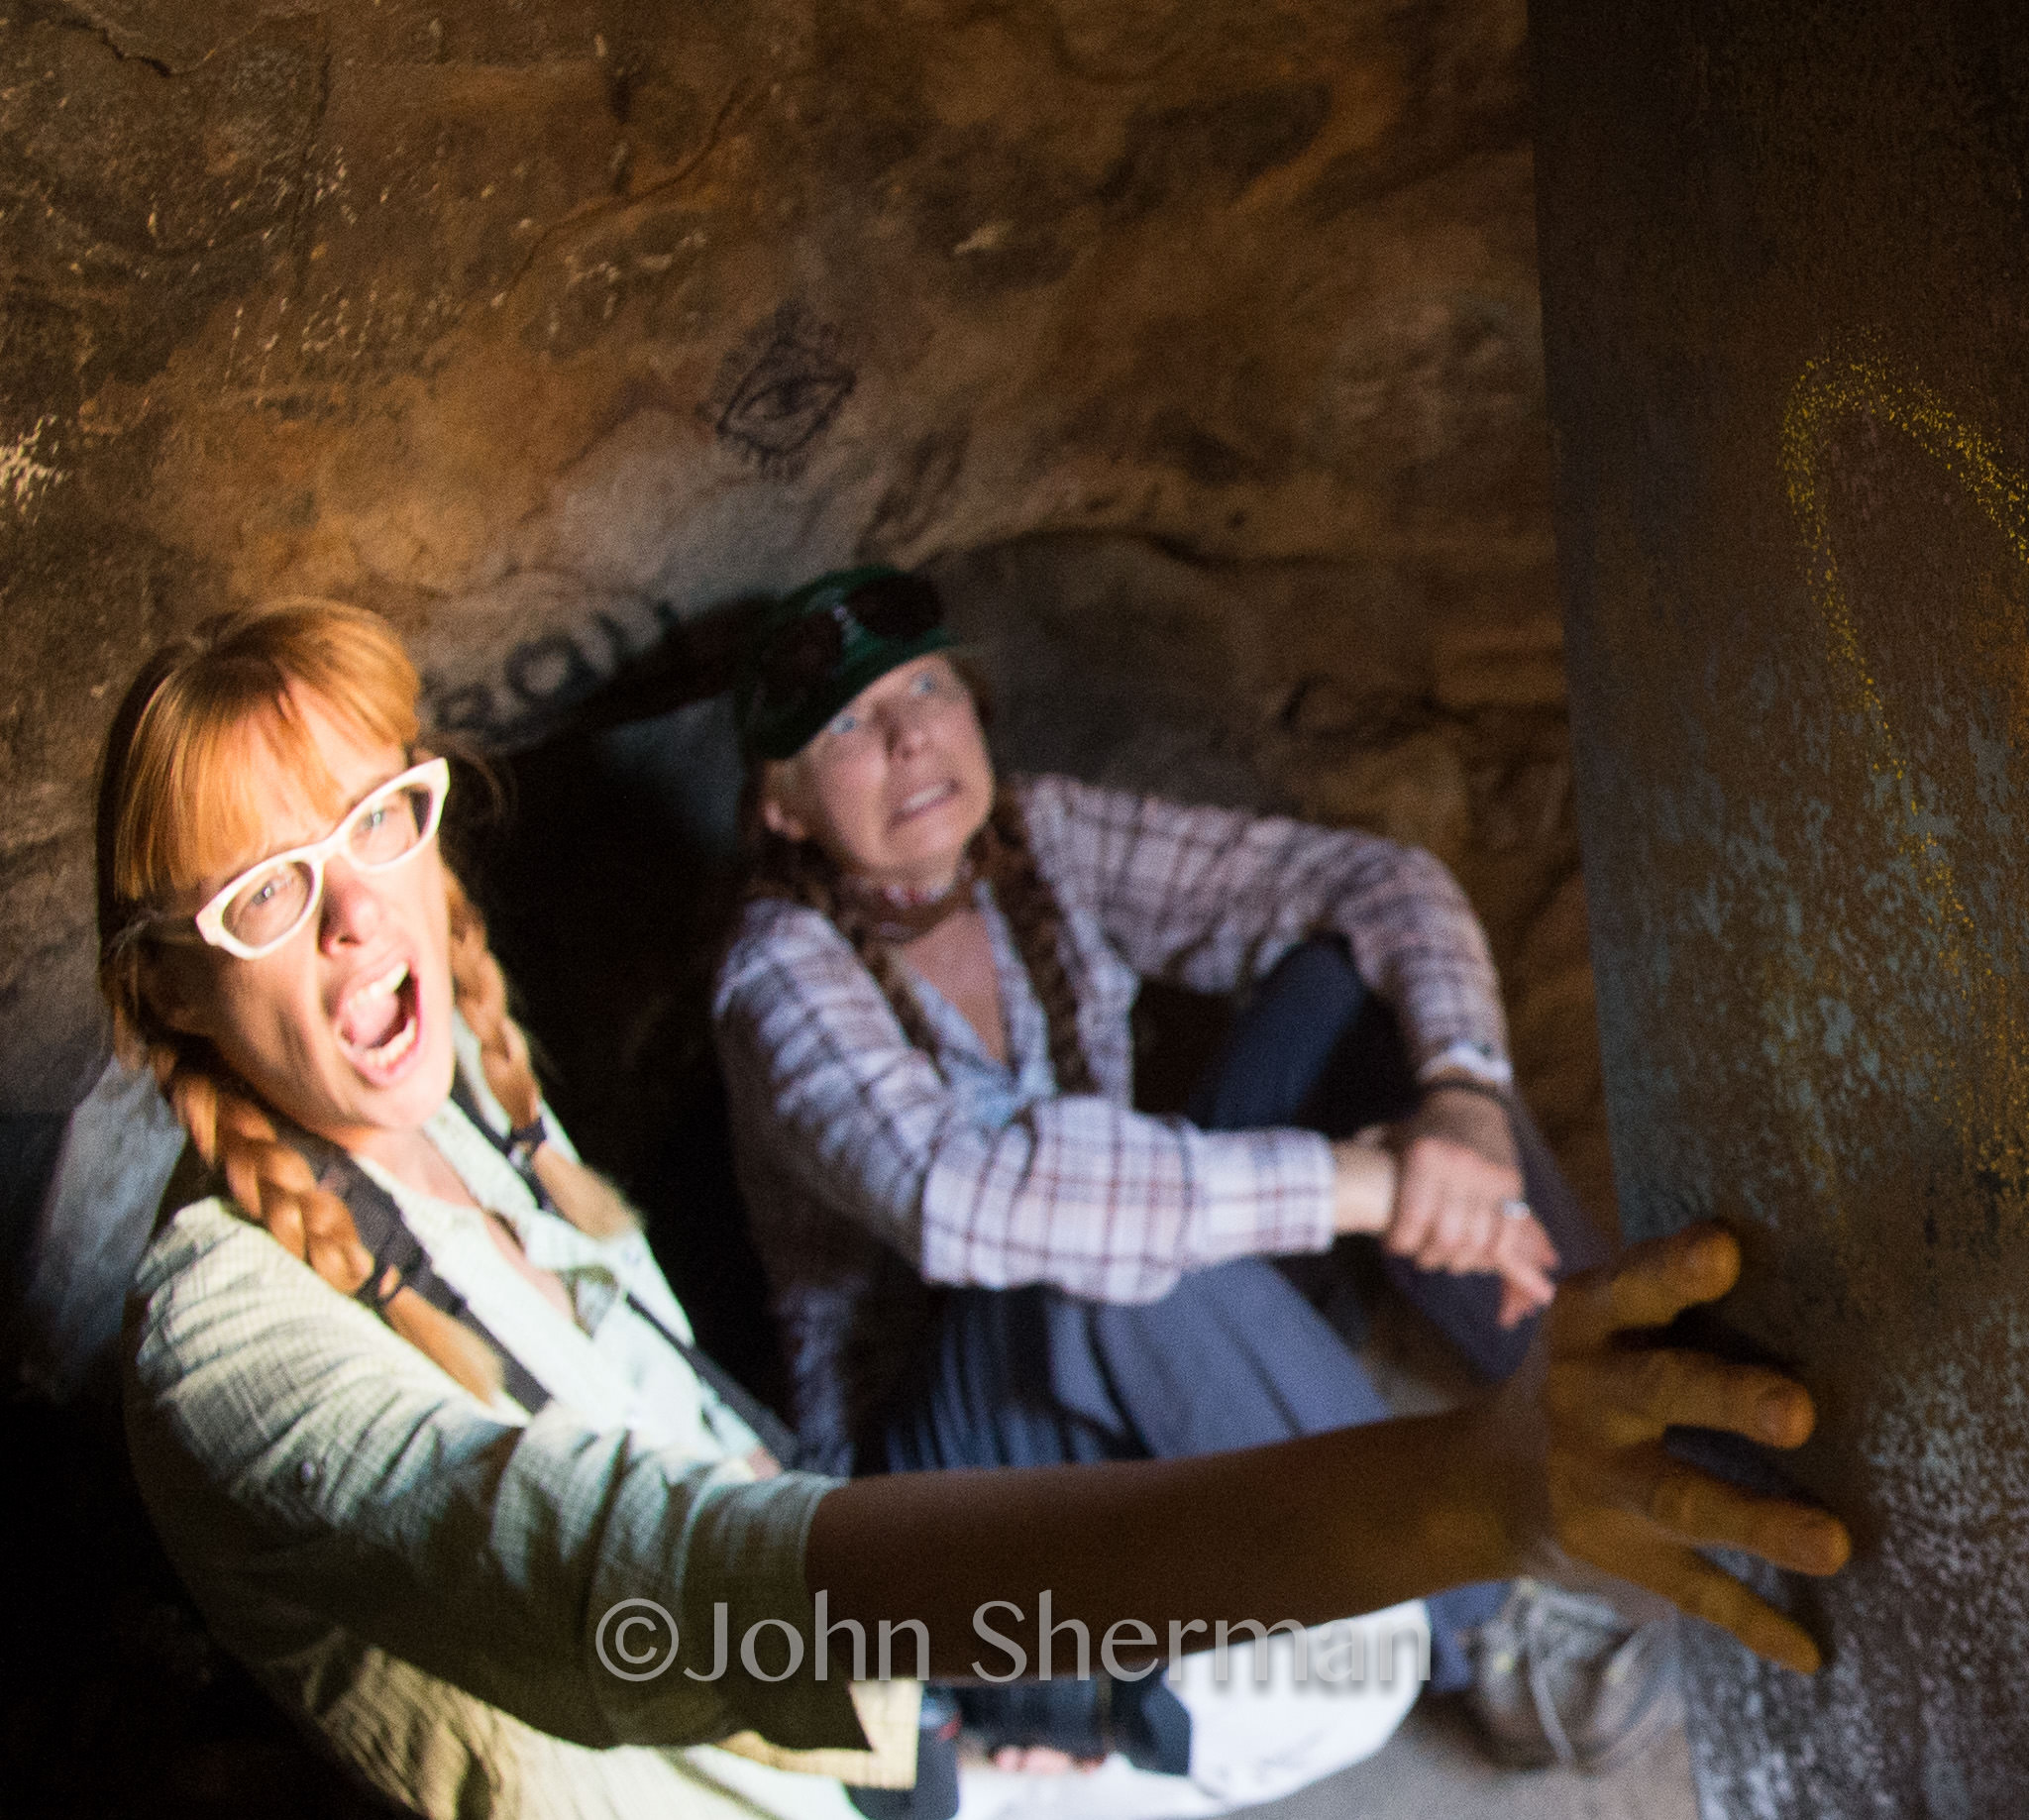
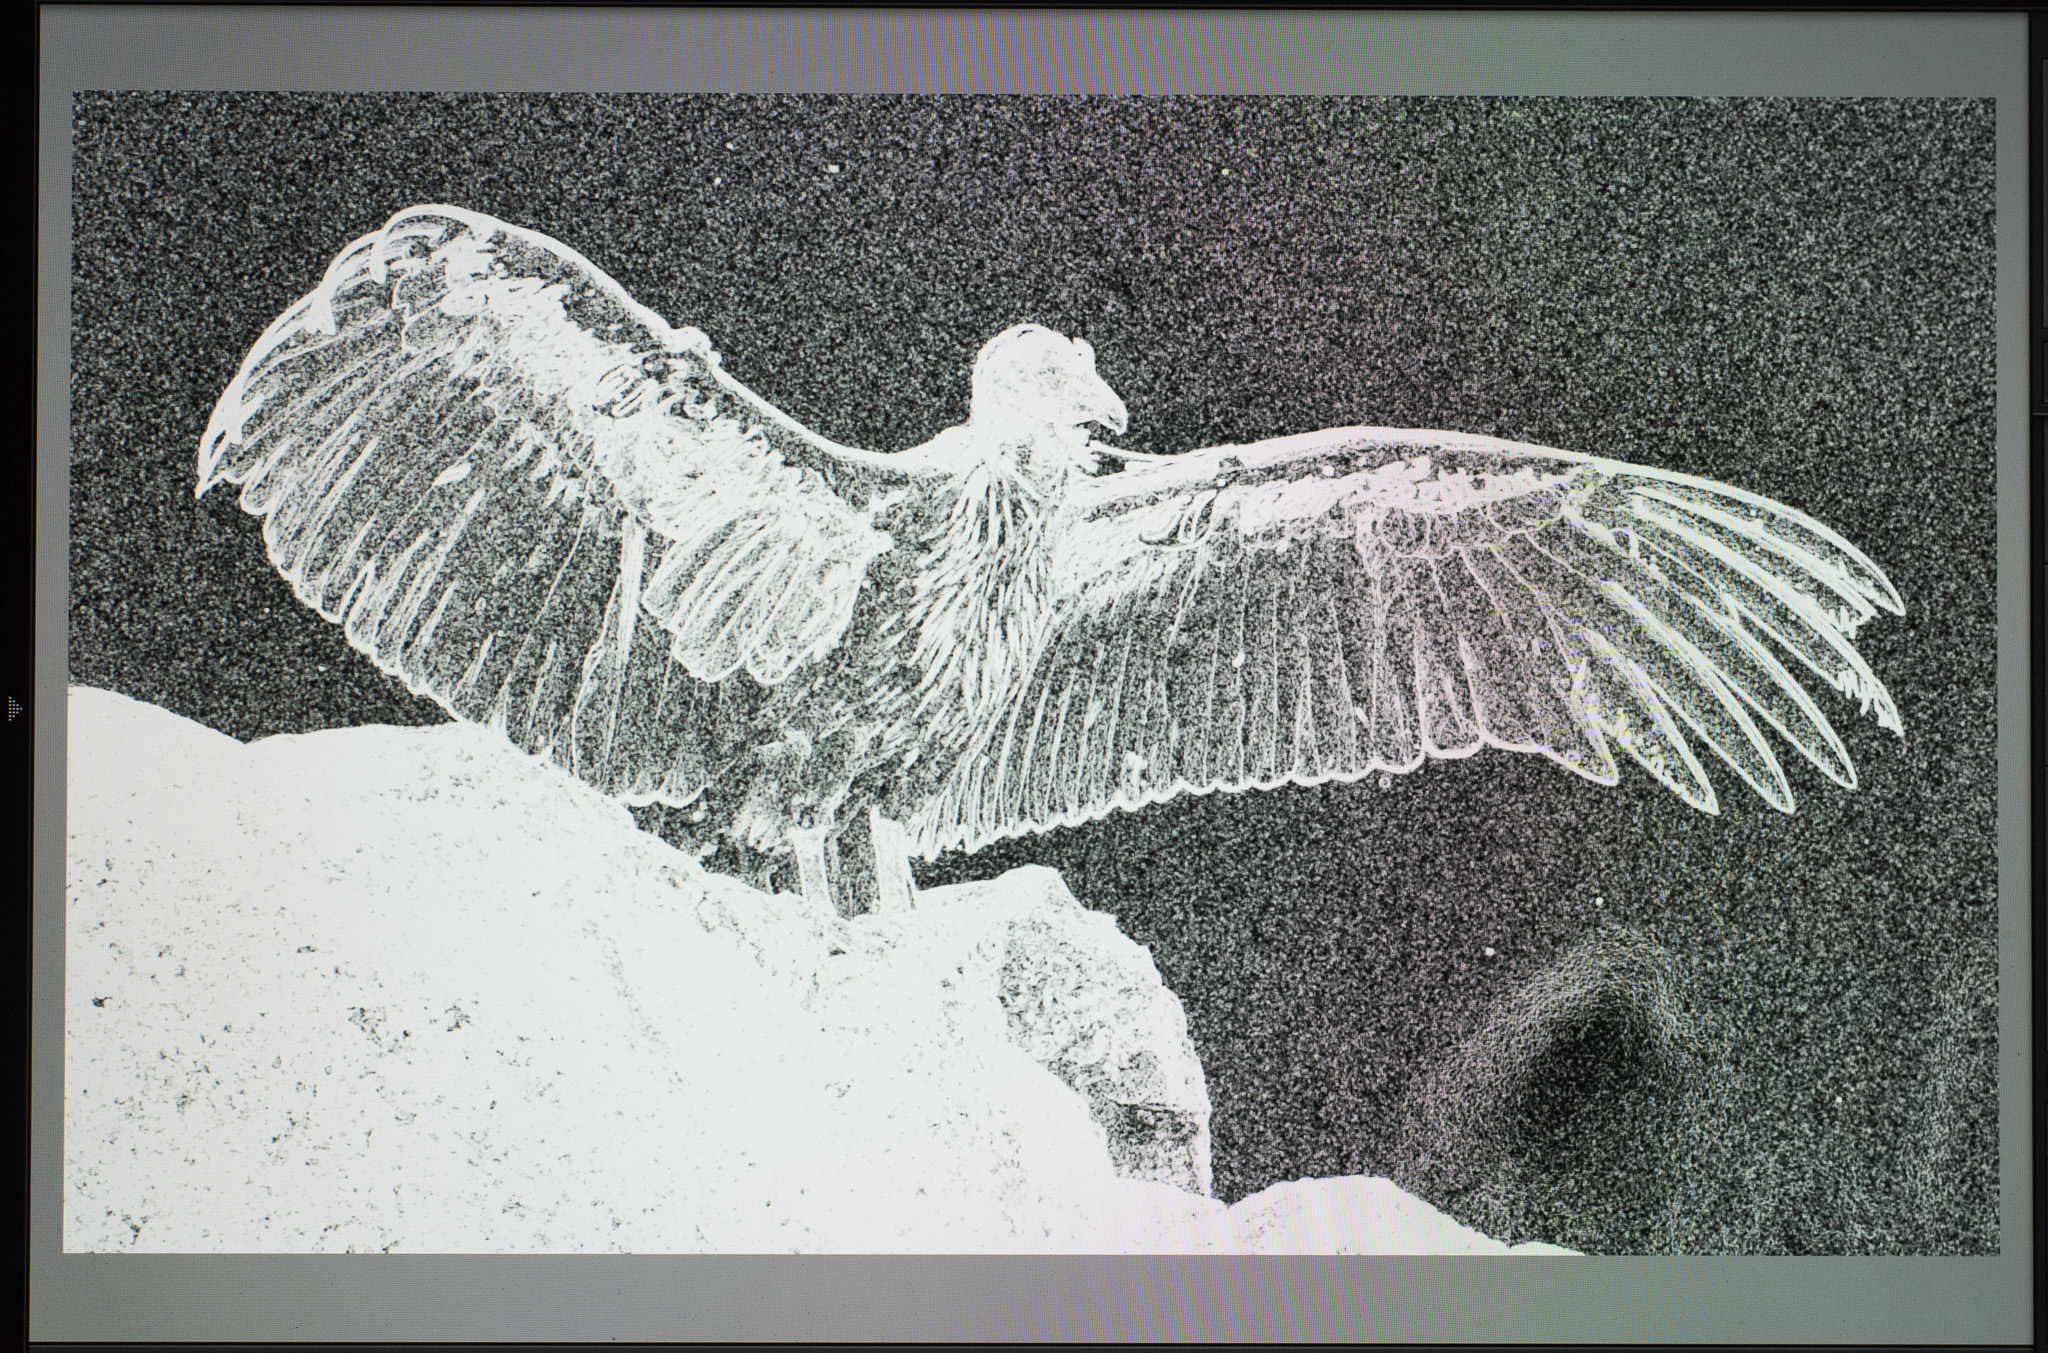
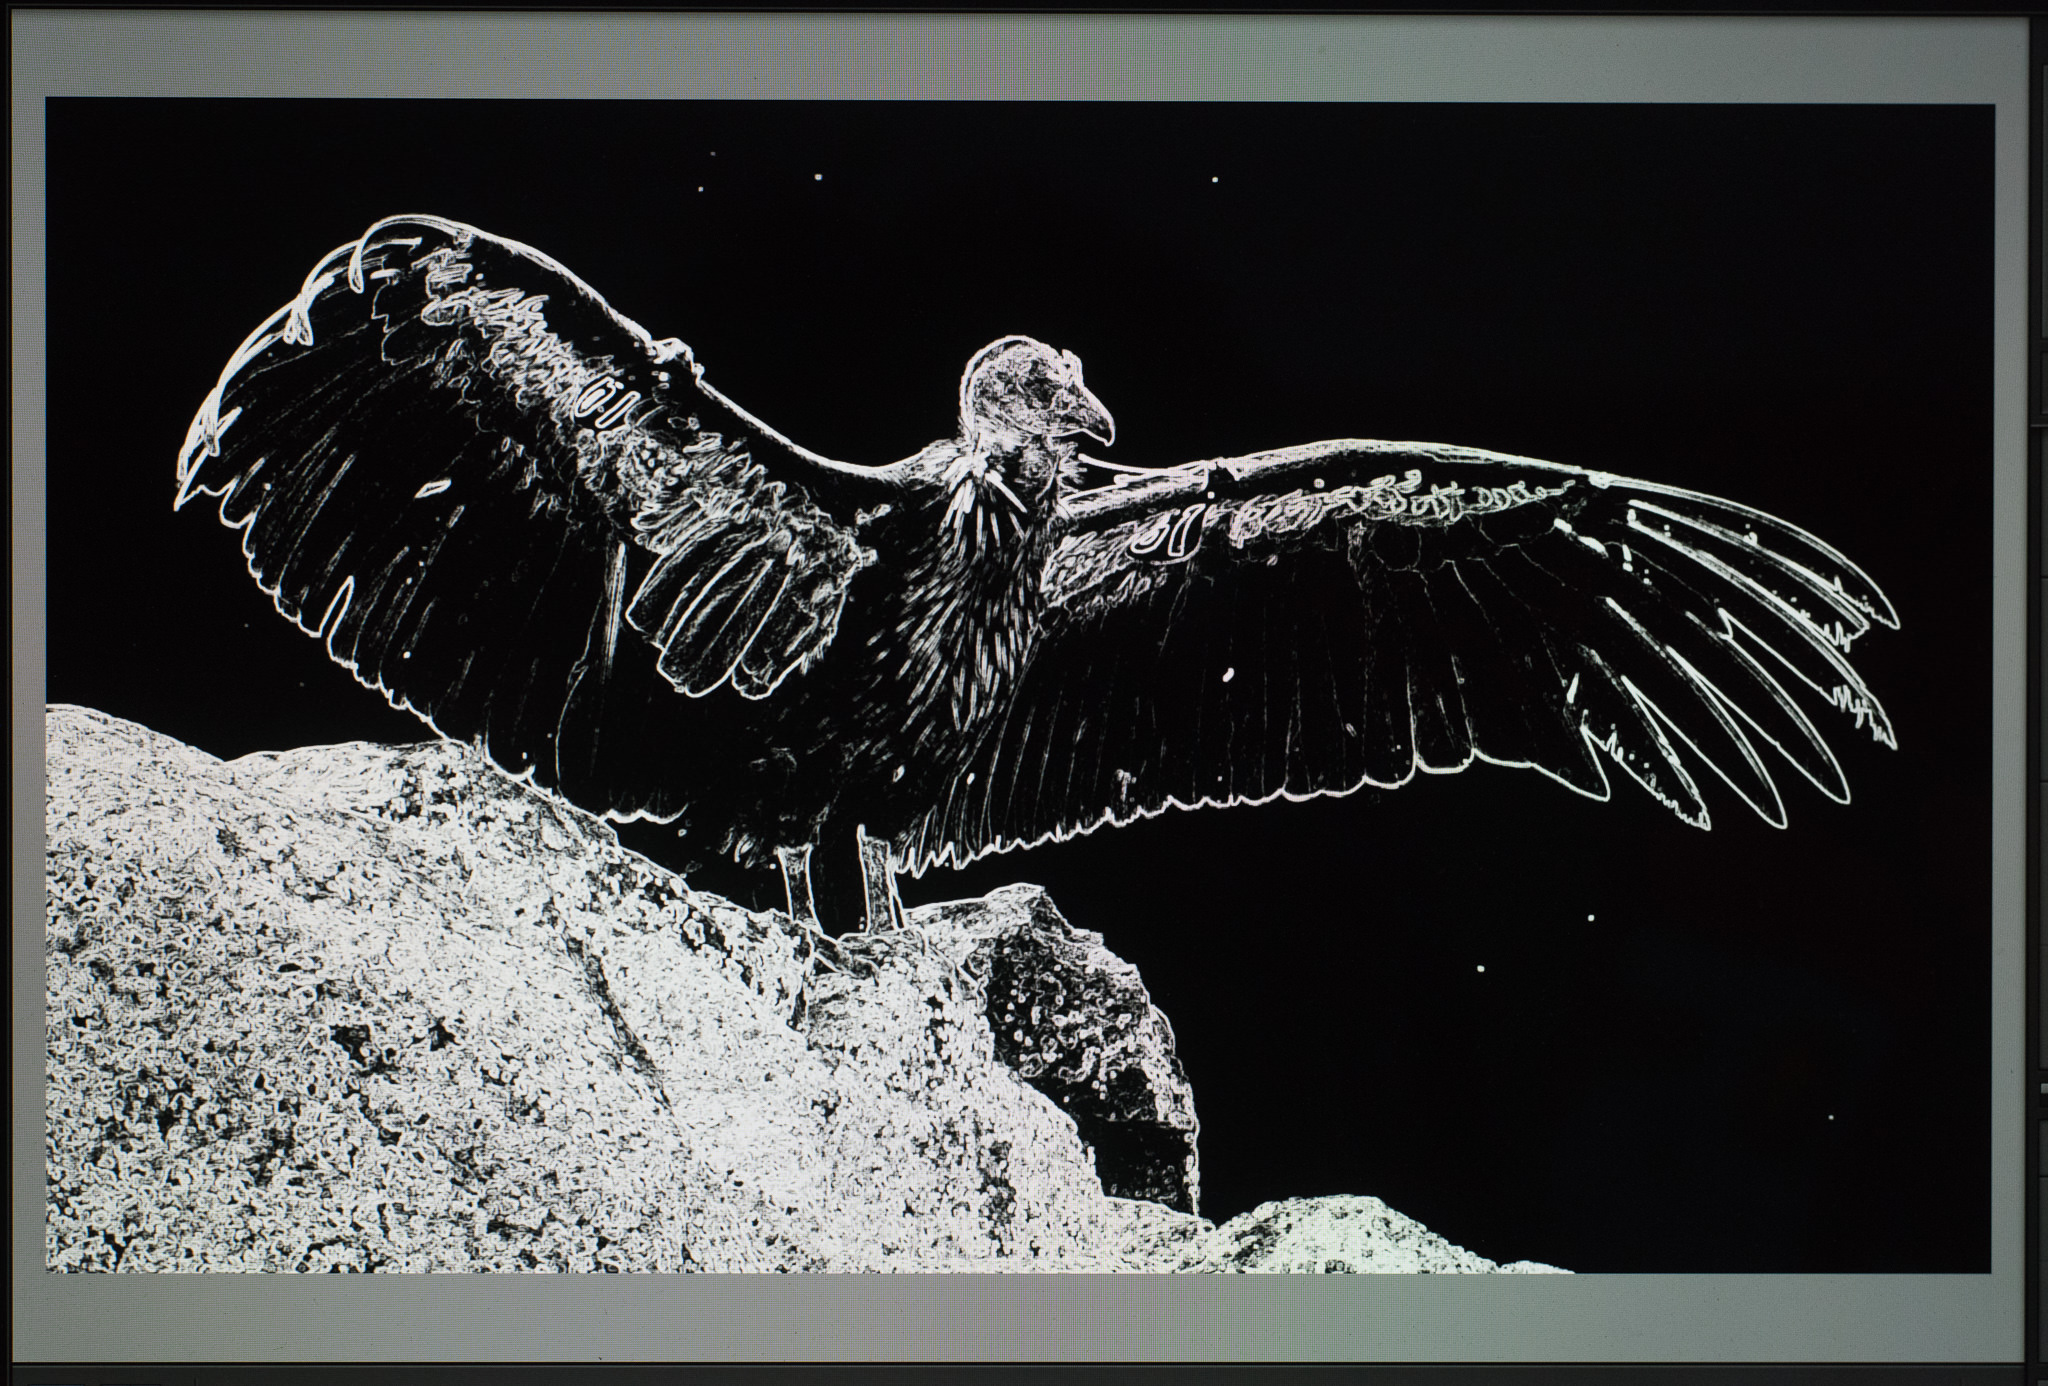
Here an example from the creepy Iron Door Cave in the Mojave Desert. Shot at 6400 ISO with a full-frame D4s, it suffers from very little noise – even the dark areas look fairly clean and this with some shadow recovery applied. And here is the original file with no shadow recovery applied and at 100%
Contrast this with a crop sensor D7200 image at 7200 ISO at 100%. The D7200 has much smaller individual photosites.
This file is untweaked. The background is noisy. However, we should realize when we zoom in to 100% on a higher megapixel file than a lower one, we zoom in tighter and this actually increases the appearance of noise. If we shot the same scene on the two different cameras and zoomed to the same final composition the difference would not be as great, but the D4s would still win.
Noise can come from amplifying the signal in camera by boosting ISO, or later by boosting the signal during post-processing, for instance to recover shadow detail.
2) Avoiding Noise in Camera
The best way to avoid noise is to shoot at the lowest ISO you can get away with. This might mean using a tripod or perhaps supplementary lighting (flashes, etc.). The more photons that hit your sensor (from a longer exposure), the more info each photosite collects and less amplification required to output the desired signal (how bright or dark that part of the photo will look).
In camera high-ISO noise reduction is only applied to jpeg outputs. If you are saving the images from your camera as RAW files, turning high-ISO noise reduction on will have no effect – you will have to do your own noise reduction in post.
- Avoid underexposure. Increasing exposure in post requires amplifying the signal and is an express ticket to Noiseville.
- Exposing to the right (ETTR) is a trick to get the maximum amount of info in a file so one needs as little signal boosting in post as possible. ETTR involves intentional overexposure of the initial file (just short of blowing out the highlights), then dialing back the brightness in post. A big ETTR benefit is less apparent noise in shadows. When I use ETTR tactics, I simply bracket shots until I find the brightest exposure that gives me a file without highlight blinkies. For a more detailed exploration of ETTR, click on Spencer Cox’s article here.
- Compose tightly in camera. Cropping in post will magnify the appearance of noise. Better to step a bit closer to your subject or zoom in if you can. Shoot multiple versions in camera so you can take the one that needs the least cropping in post.
- Favor light backgrounds over dark backgrounds. Noise is most apparent in the darker parts of a photo.
Note how noisy the midtones and shadows in the background are. Note how little noise is apparent in the brighter branch.
This background tip is one I put low priority on as choosing an appealing background is more important to me than choosing a background just to minimize noise.
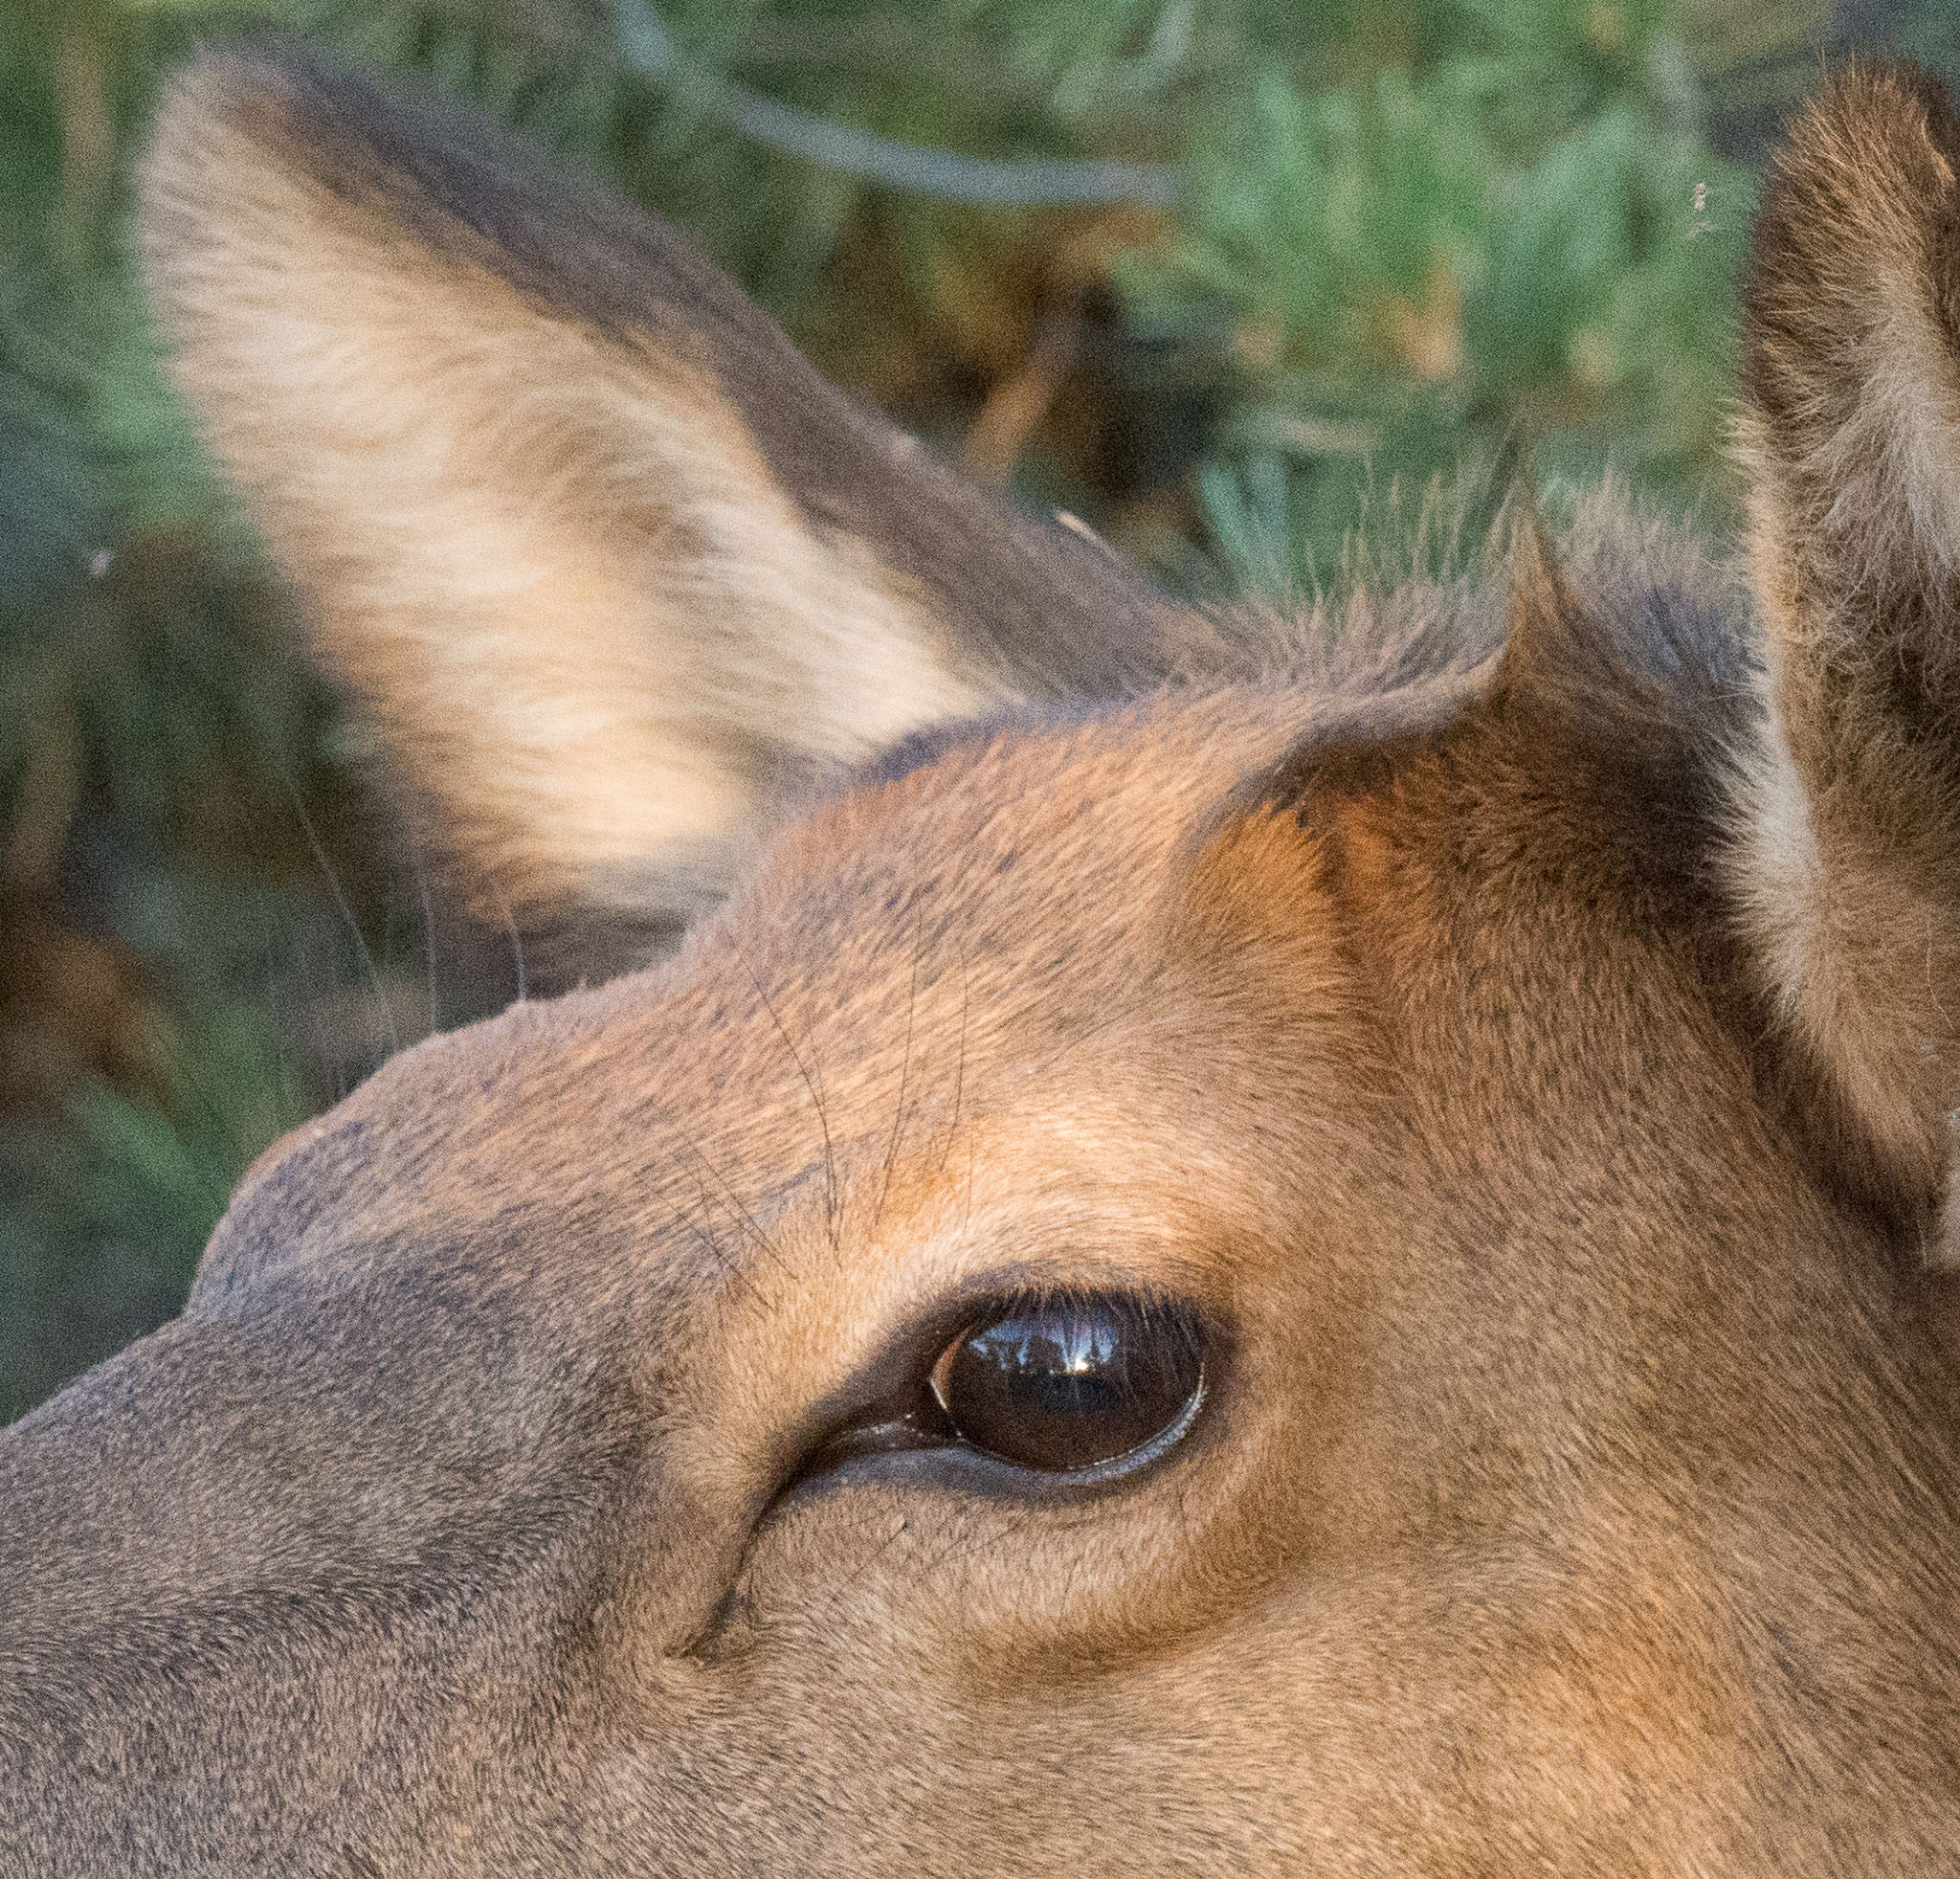
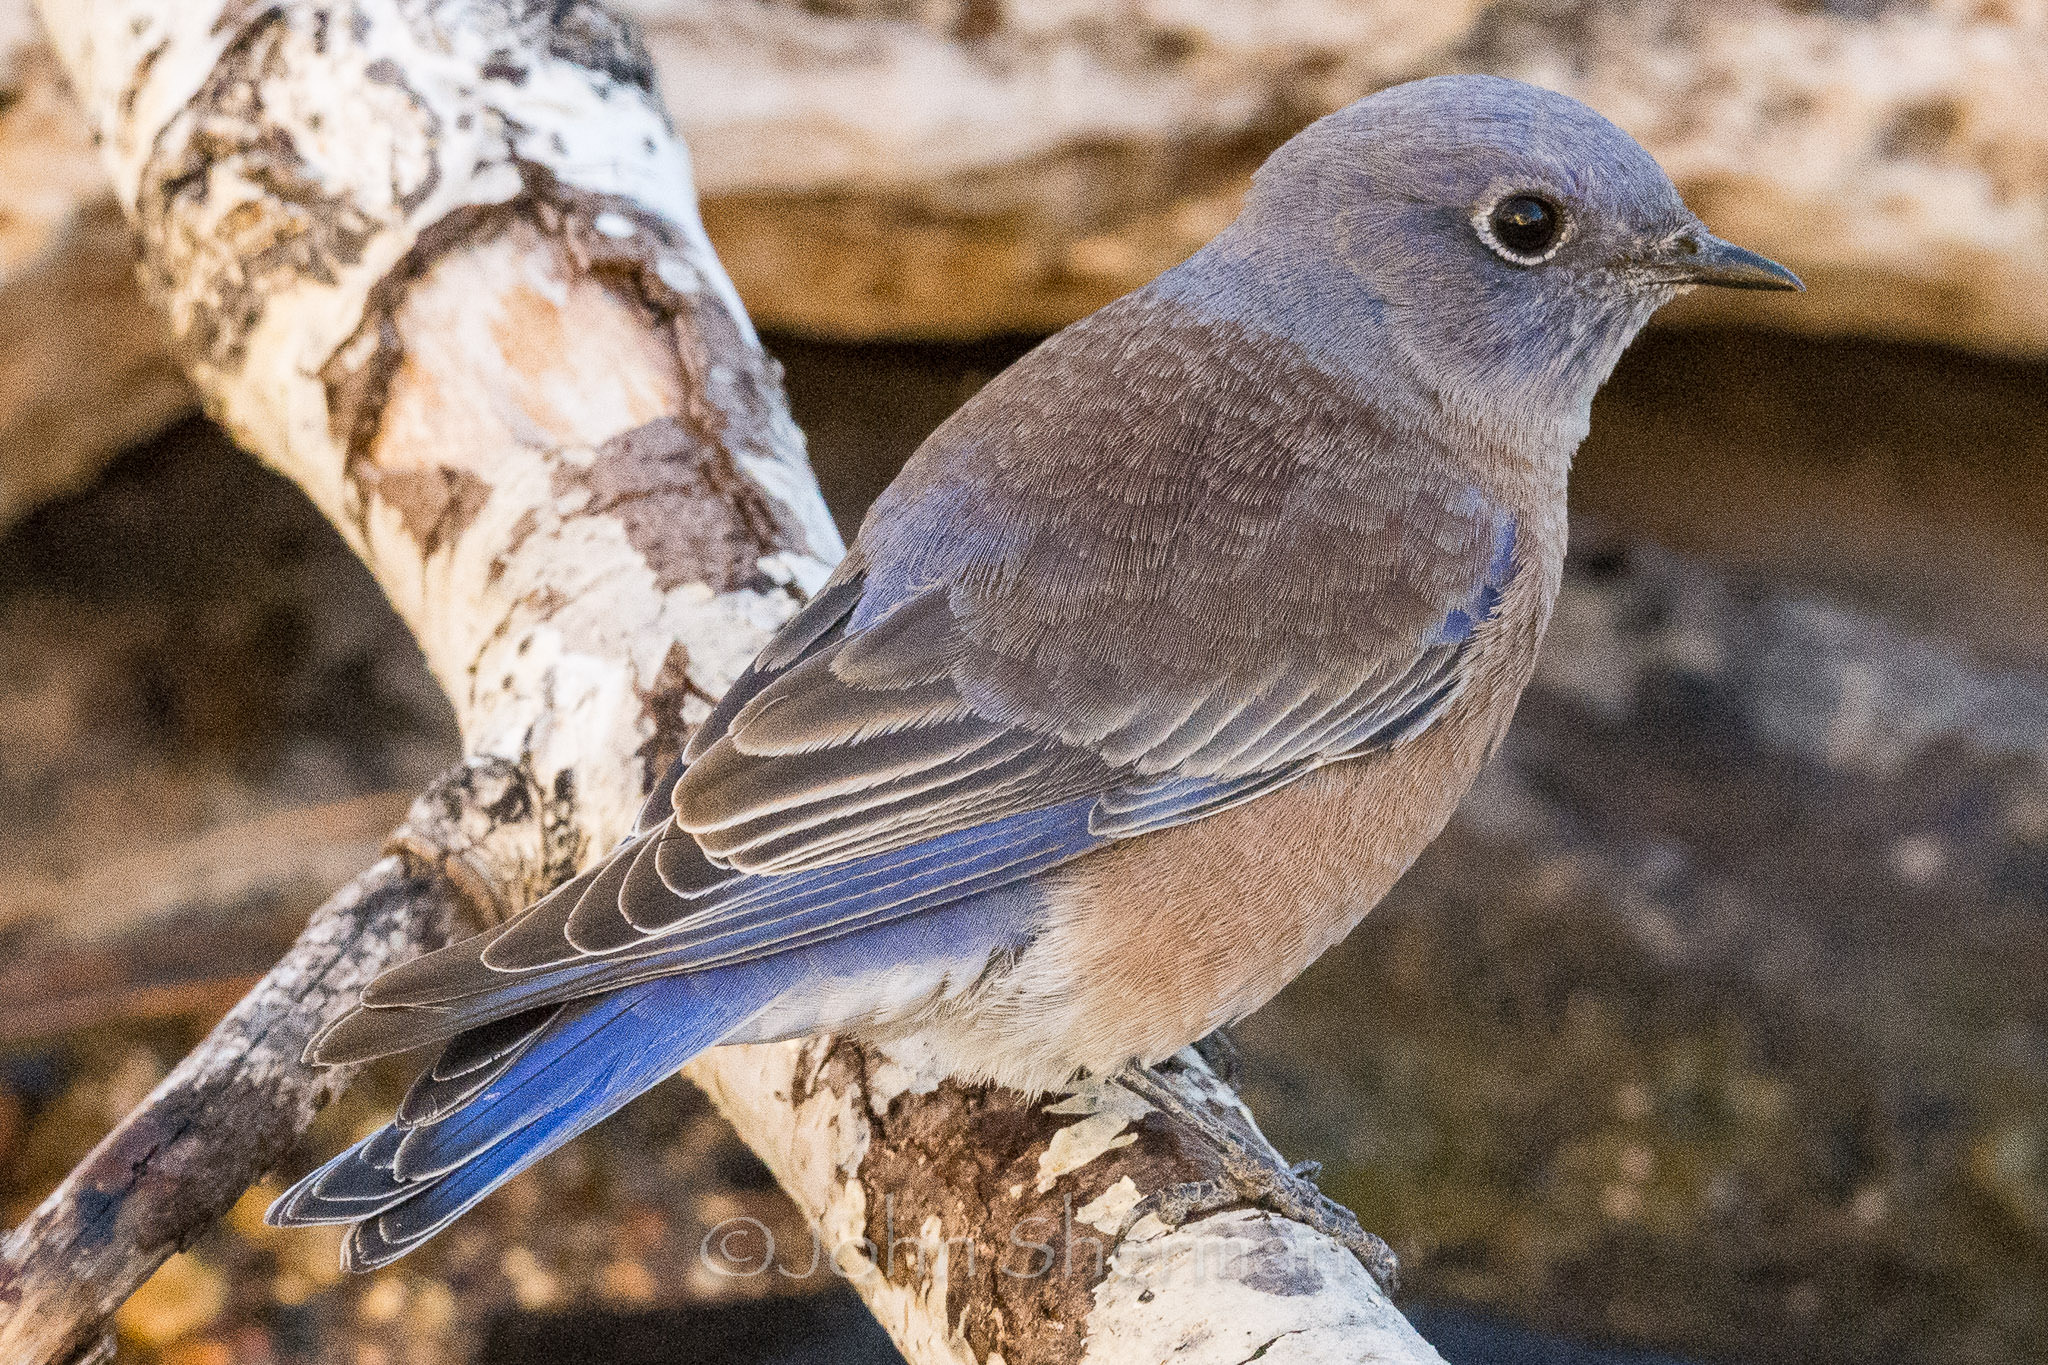
Realize that highly detailed parts of a photo can do a great job at hiding noise. Such areas might be fur, hair, feathers, grass, sand, etc. Conversely, smooth areas, like skin or sky, will make noise more apparent. Looking at the bluebird above little noise is apparent on it’s finely textured back feathers, however the broader smoother tail feathers do look noisy. The elk portrait also hides the noise well in the facial fur.
All the above is good advice, but how practical is it? Far more important than stressing about the issues above is to get the shot. If you need high ISO to get the shot, then by all means use high ISO. If you need to underexpose most of the frame to protect highlights elsewhere, then do it. There’s a lot of post-processing trickery we can do to minimize the resulting noise so let’s get to that.
3) Minimizing Noise in Lightroom 6
There are tons of tricks to minimizing noise in Lightroom. I’ll go through some of my favorites. Be aware that every photo is an individual case and not every trick will work with every photo.
Most of these tips don’t utilize the noise reduction sliders. The luminance noise reduction slider blurs away detail to smooth out noise. I’m a stickler for retaining fine detail and I don’t like how heavy amounts of noise reduction make images look plasticky or like paintings. I only use the NR sliders after I’ve done everything else I can.
Because dealing with noise is so individualistic, don’t be afraid to work and re-work images until you get the results you like.
Let’s consider a couple of Lightroom basics. First, when you import RAW files into Lightroom, there is a default level of sharpening and color noise reduction applied. Second, Lightroom’s develop module is designed to work best from top to bottom on the right side panels. Hence I suggest doing your tone mapping (exposure, contrast and color tweaks) before dealing with the detail panel (sharpening and noise reduction).
When doing these tone mapping tweaks consider whether you want to apply them globally (to the entire image) or locally (to just a part of the image by using the adjustment brush). It’s tempting to just hit a global preset like the “Punch” option and be done with it. However, the tweaks you make to exposure, contrast and clarity can involve amplifying the signal and that of course increases noise.
Let’s work an example here. We’ll use our Burrowing Owl buddy.
Here I’ve taken the file and done the following global adjustments:
Exposure +1.00
Contrast +19
Shadows +21
White +30
Black -31
Clarity +31
Vibrance +11
Saturation +5
Sharpening 75, 0.8, 50
Noise reduction was at default: luminance 0, color 25.
The result looks good and punchy but full of noise. Check it out at 100%:
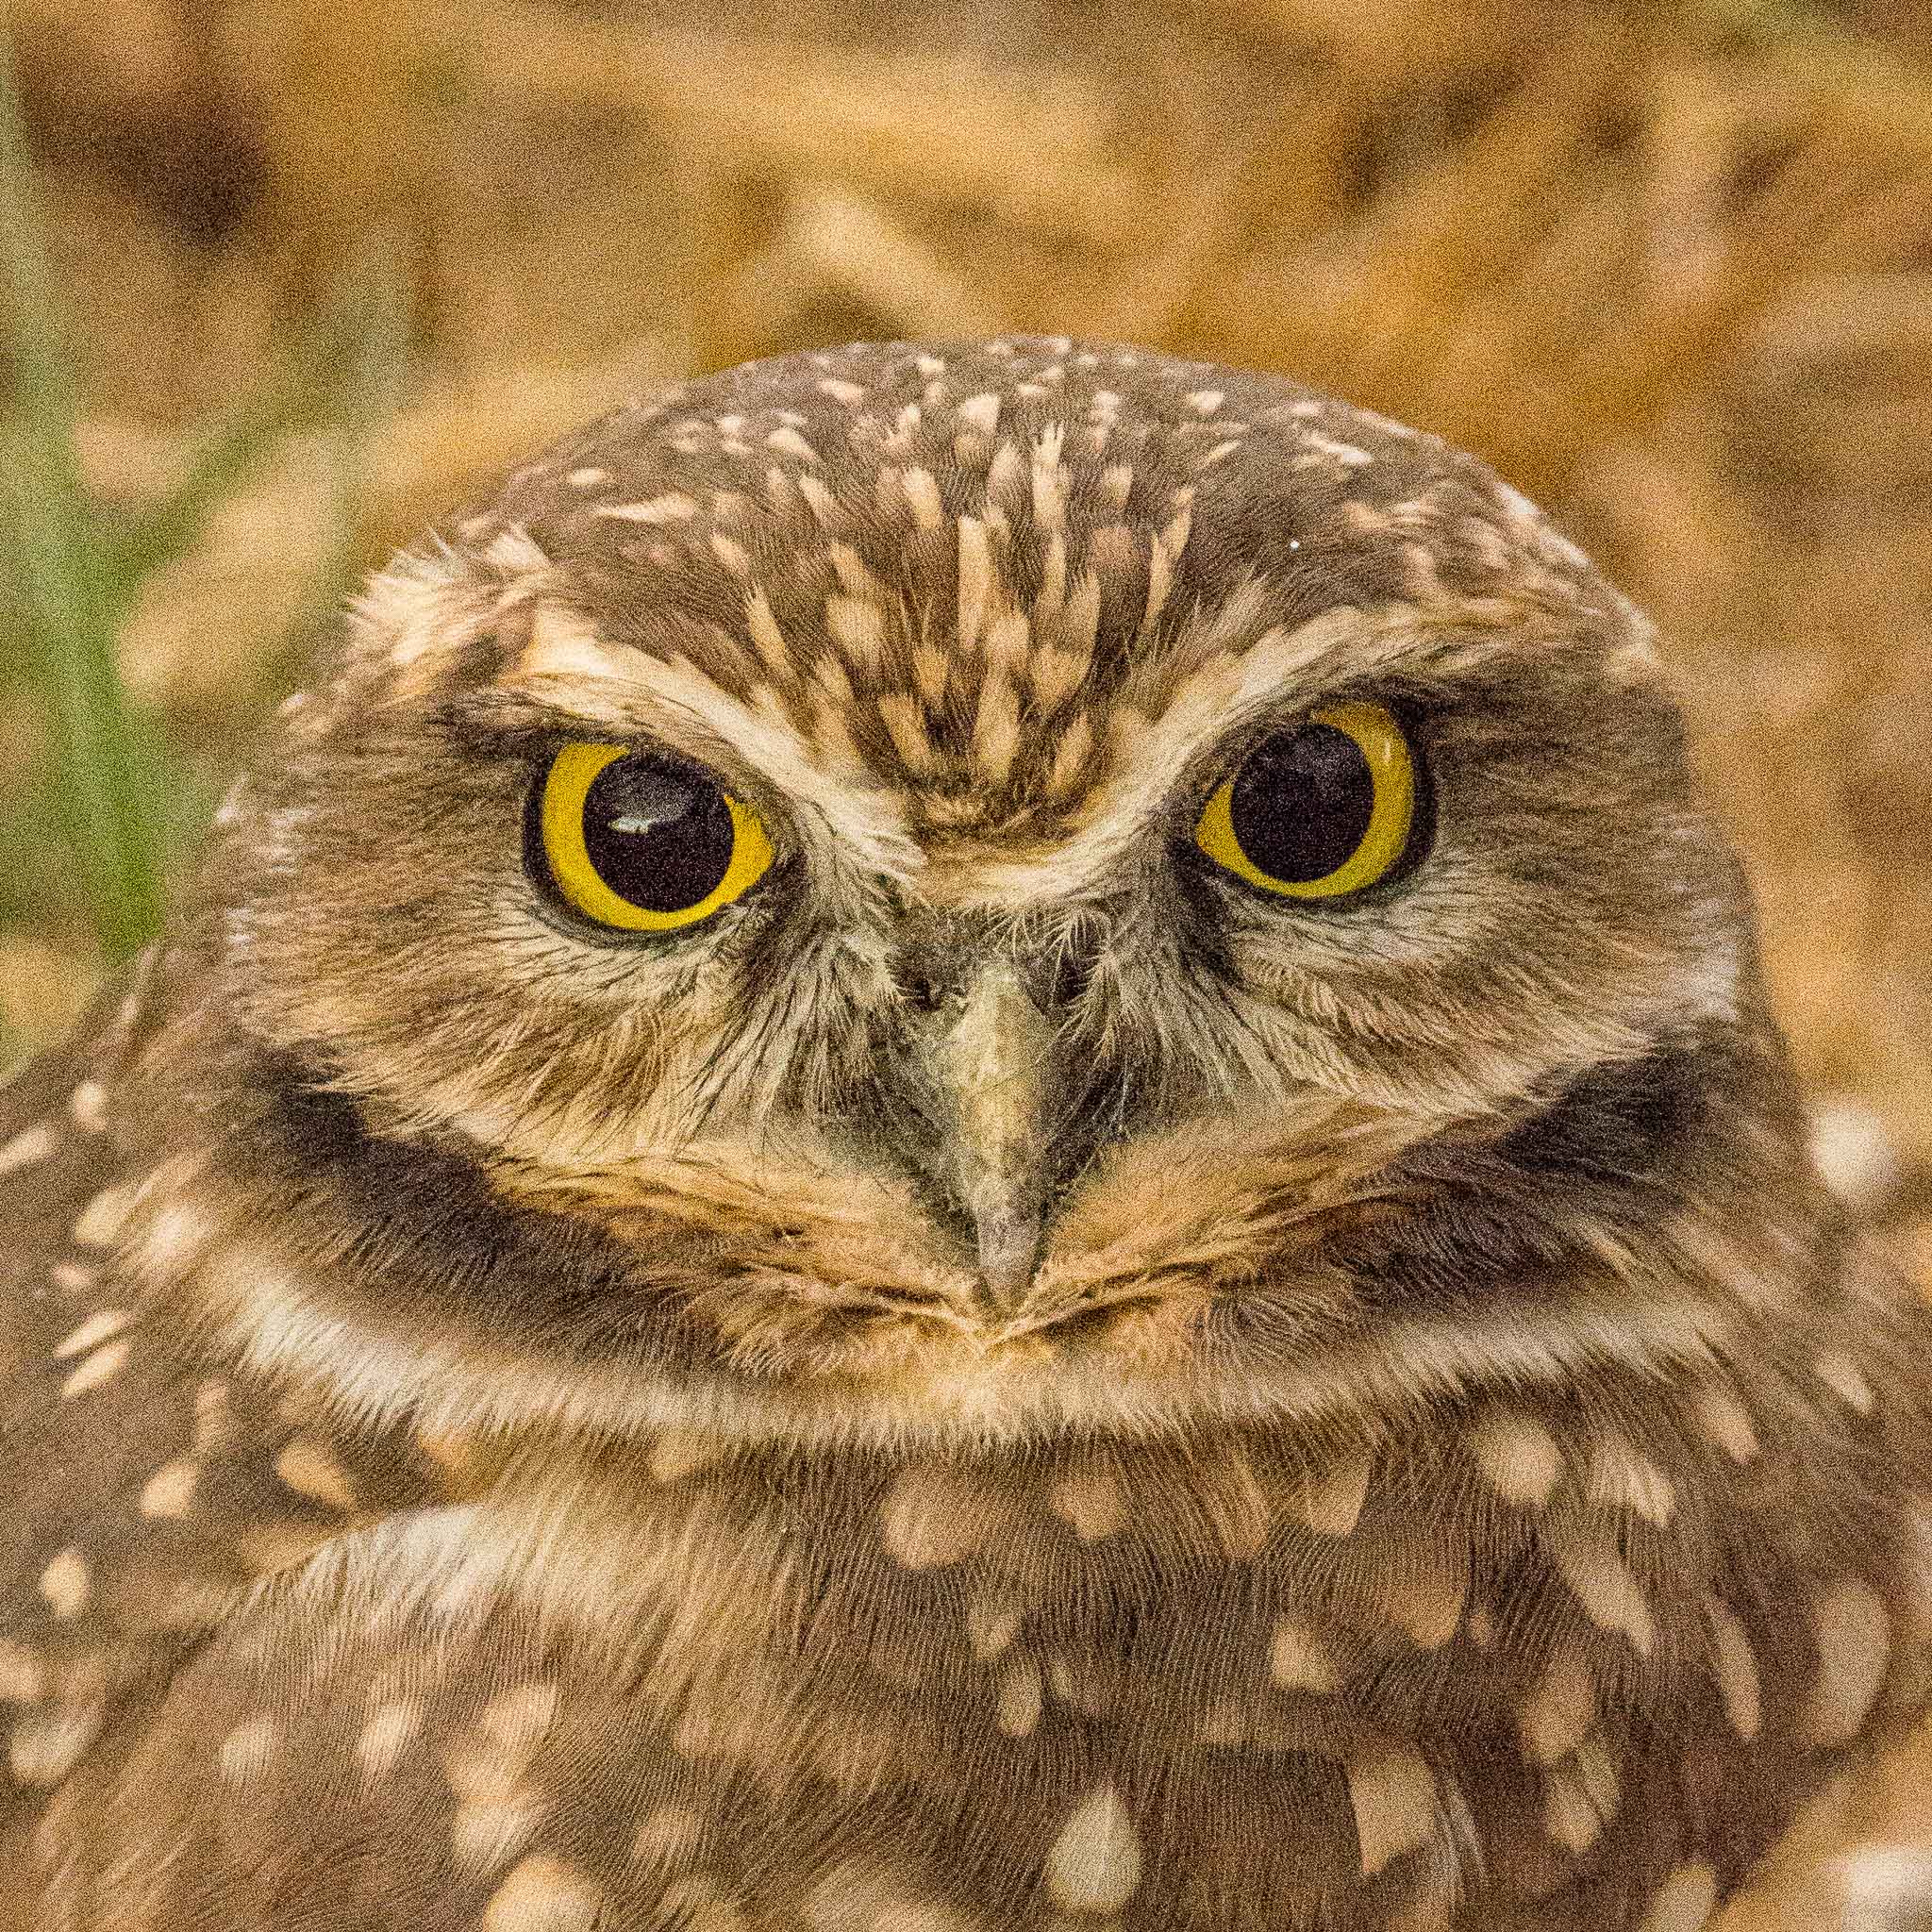
Blechhhh! Look at all that luminance noise. Well, I’d better apply some noise reduction.
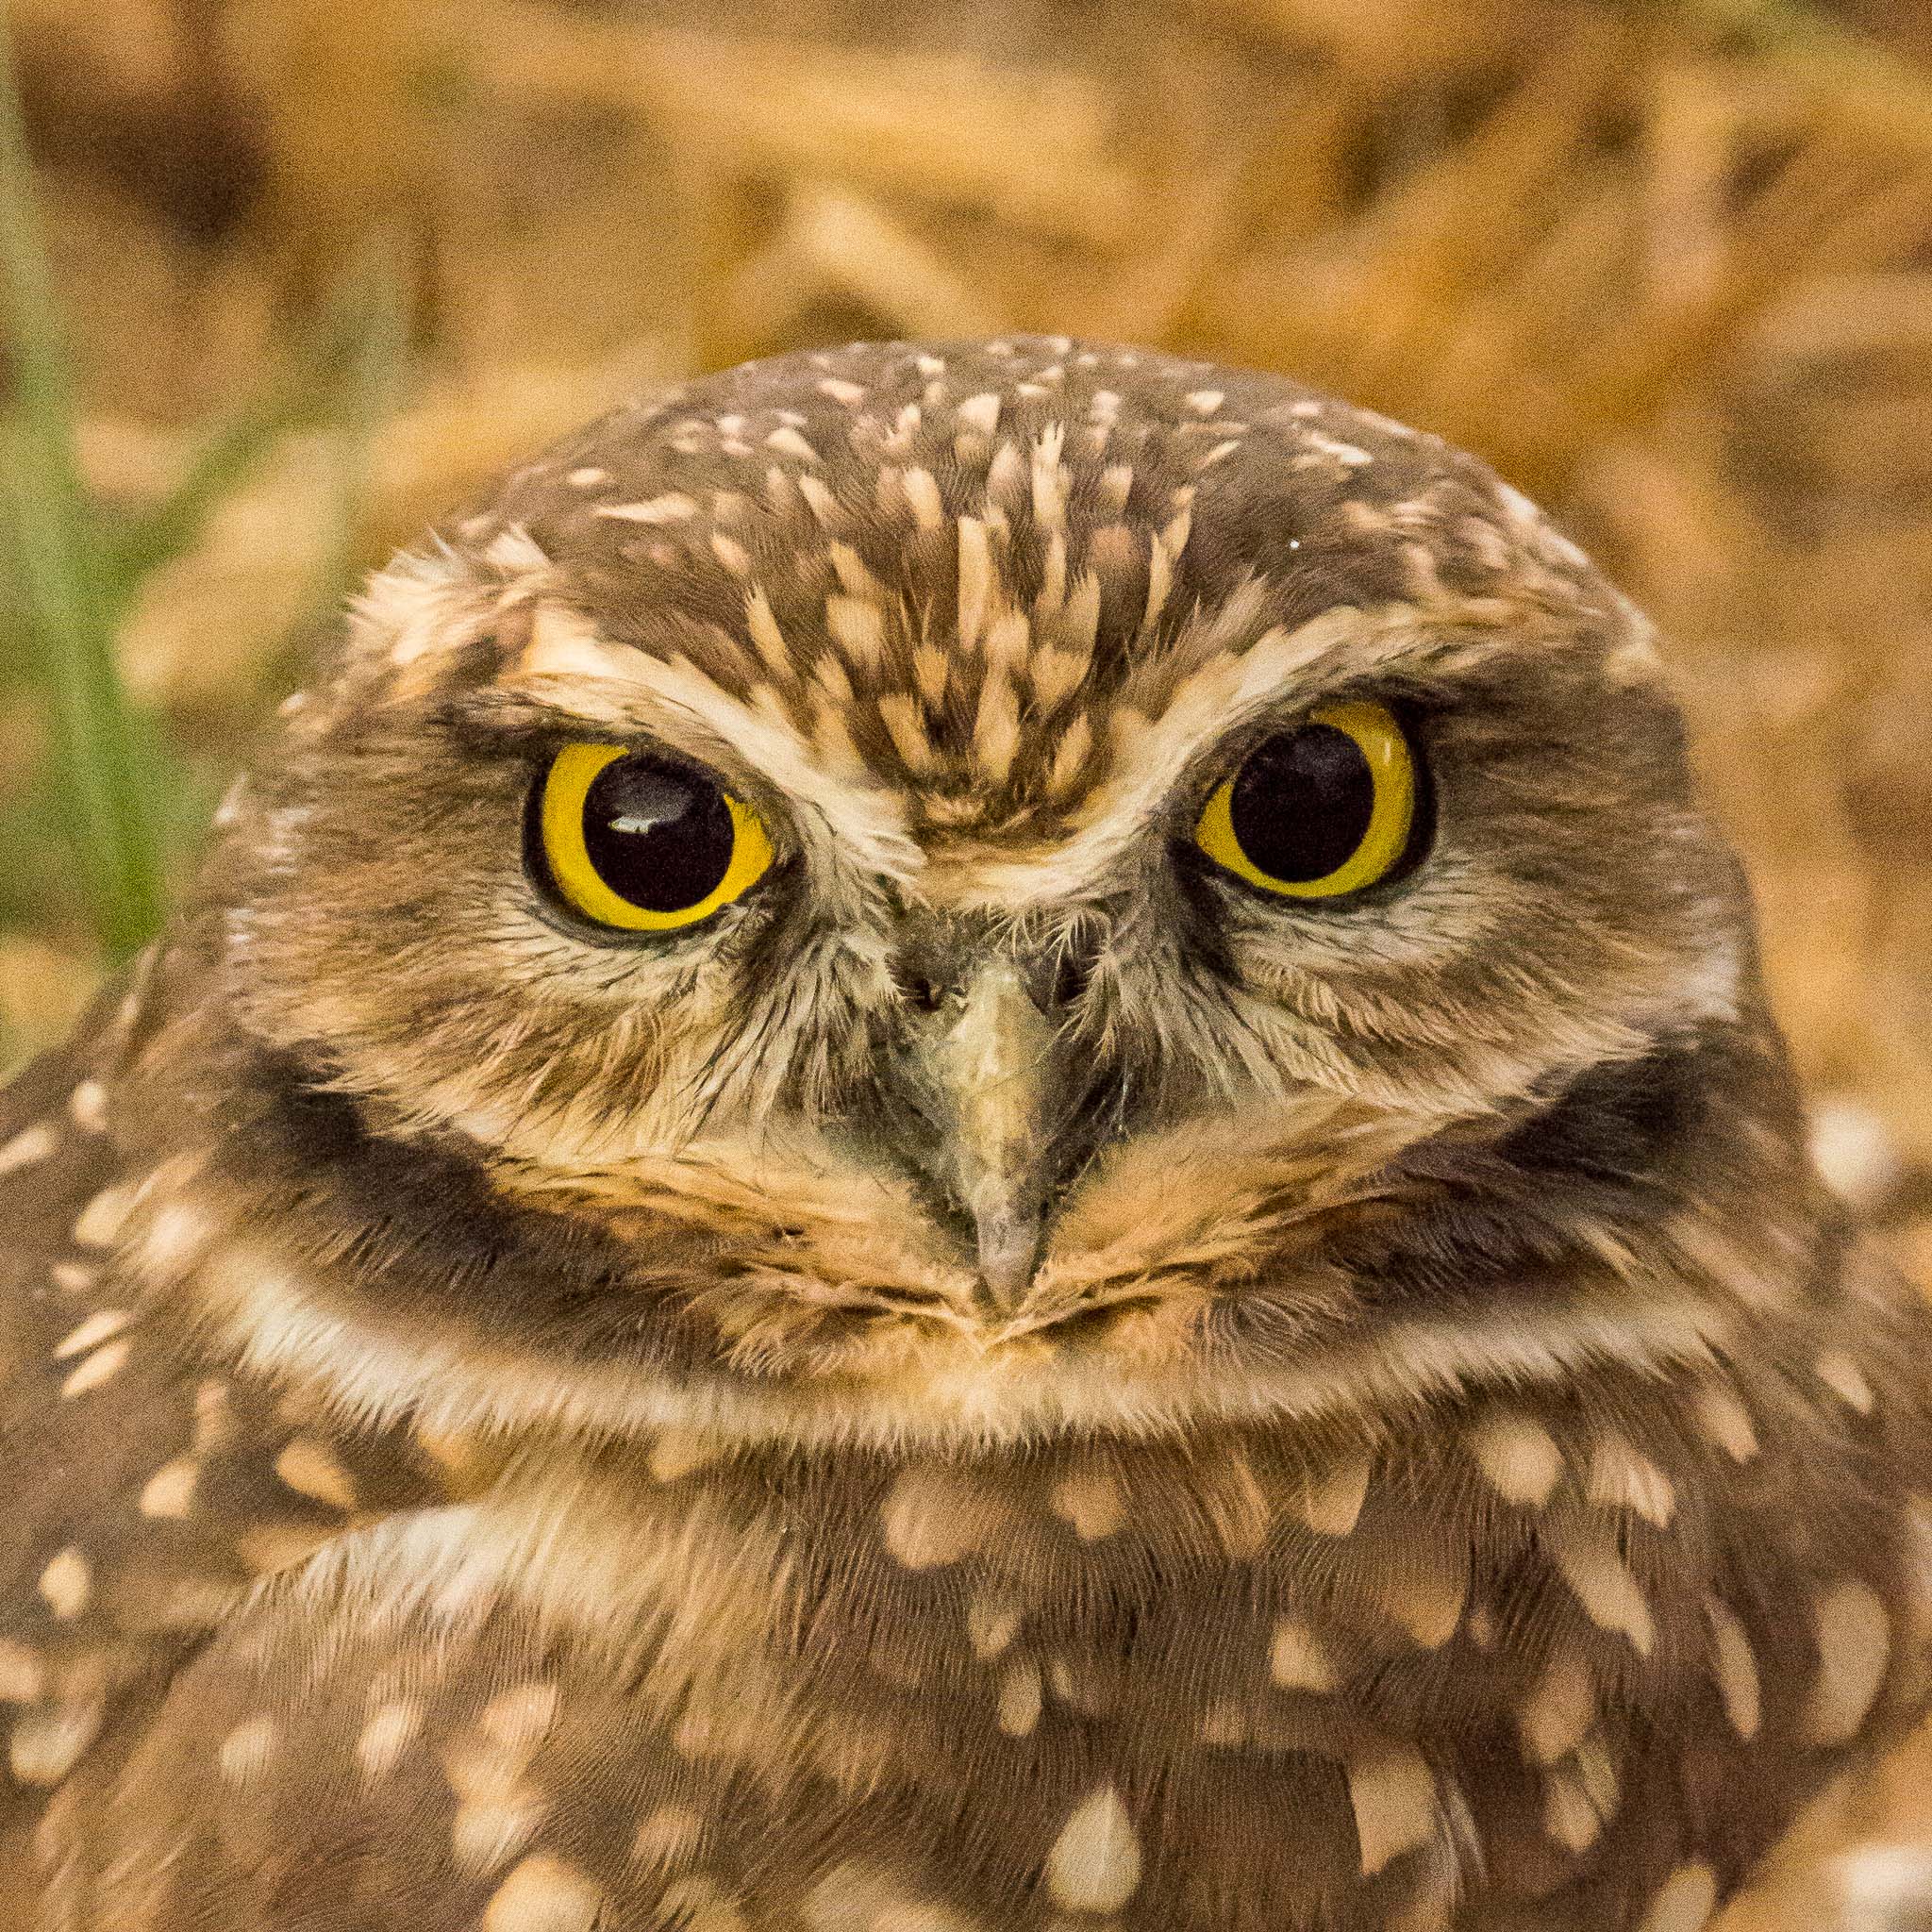
I’ve added +50 luminance noise reduction and much of the noise is gone. Let’s push the slider to +75 and obliterate the rest.

Now the noise is gone, but so is the fine feather detail, especially in those cool snowflakey bristles around the bridge of the beak.
Consider if the entire image is benefiting from your tweaks or just a portion. If it’s just a portion, then go into the adjustment brush to make a local adjustment. Case in point is the Clarity slider, or as I call it the “Add Noise” slider. This slider boosts mid-range contrast while leaving highlights and darks alone – it also enhances the appearance of noise. Because of this I suggest that if noise is an issue with your image, then only use Clarity locally. I often do this with bird photos as clarity can really make feather detail pop and as demonstrated previously, the noise increase gets hidden by all that fine feather detail. If I were to apply the clarity globally, then the smooth background around the bird becomes noisy.
Here’s our owl again with the global tweaks and at 100%:
And now lets only adjust locally. Our first pass with local adjustments is to the owl’s face:
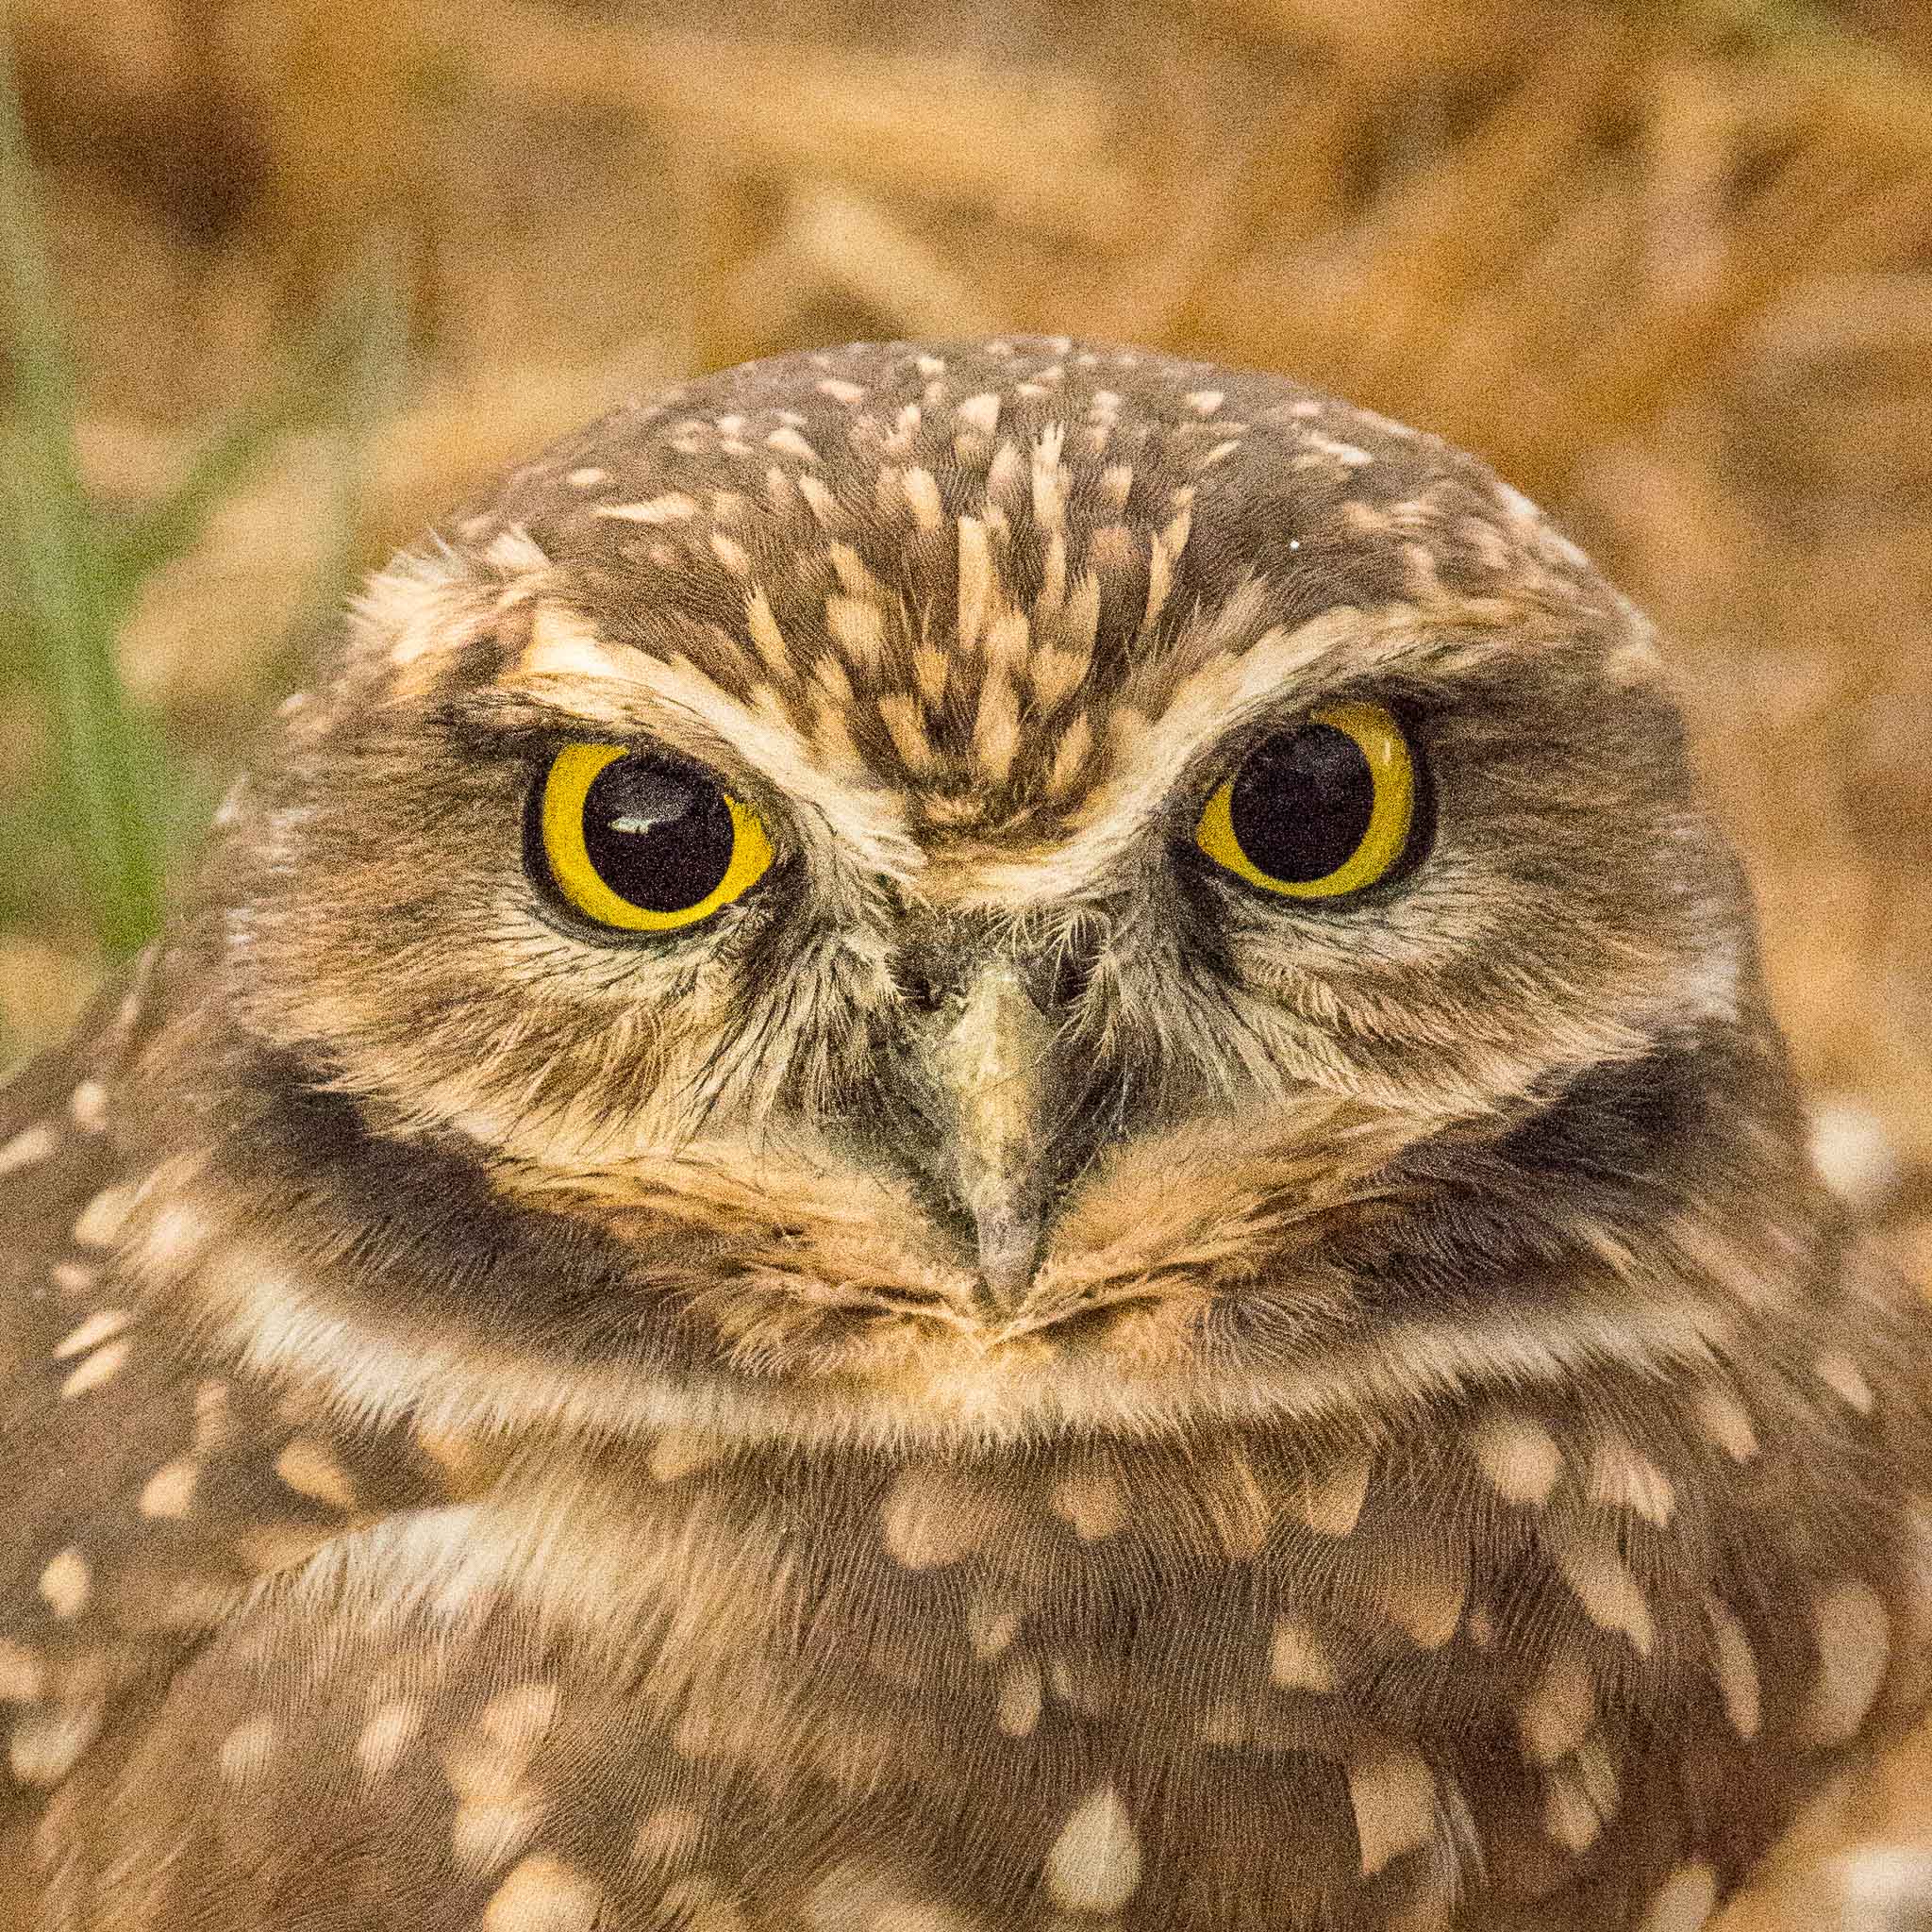
The adjustment brush was set at:
Contrast +100
Clarity +100
Sharpness +50
(Global adjustments are exposure +1.00, white +25, black -11, clarity 0, vibrance +11, saturation +0.5)
That’s a pretty aggressive adjustment brush setting so I set density at 100% but flow at 55 so I could gradually brush the adjustment on until it popped like the full global version, but just on the face. Now the bird’s face looks very similar to the first version, but the background noise looks finer grained because it hasn’t been tweaked.
My local adjustments to the face have left the eyes noisy so I go back to the adjustment brush and set it to shadows – 50, sharpness -74 and noise +76. I brush just the eyes and get this:

Another way to blur away noise is to use the adjustment brush with a negative clarity setting and paint away noisy sections. (Pushing clarity to the right increases mid-range contrast; pushing it left reduces mid-range contrast giving a softening effect.)
Here I’ve brushed a local adjustment of -70 clarity to the background.
In my experience this works best for big blank stretches of noisy background, this background is a tad busy for best results. Note that if you got the noise by globally increasing clarity that this will just reset the clarity amount for the area painted over. For example, if you increased clarity to boost cloud detail, but then paint over with a negative clarity adjustment brush you’ll lose that cloud detail you worked so hard to get.
We’ve still got some fine noise here. At this point I don’t find it objectionable and it will probably go away if I downsample this to print it at 8”x10” (this small owl will be life size at 8×10). But what if we want to print larger than life? Let’s go to the background adjustment and push the noise slider to +80 and get this:

Go back to the full frame crop for final output, in this case our 2048 pixel tall web output and here’s our result.
Pretty decent for a 10000 ISO crop sensor shot that was underexposed a full stop and we never even touched the noise reduction panel (though we did apply some local noise reduction to the eyes and background).
The other big popular “Add Noise” culprit is the Shadow slider. There seems to be a trendy obsession with showing off shadow detail in photos and I admit I fall for this a lot. However there is nothing wrong with shadows being shadows and hiding detail – this can add mystery to a photo. So before reflexively trying to recover all the shadow detail you can ask yourself does this particular image really need it? If yes, then get ready to deal with the noise revealed.
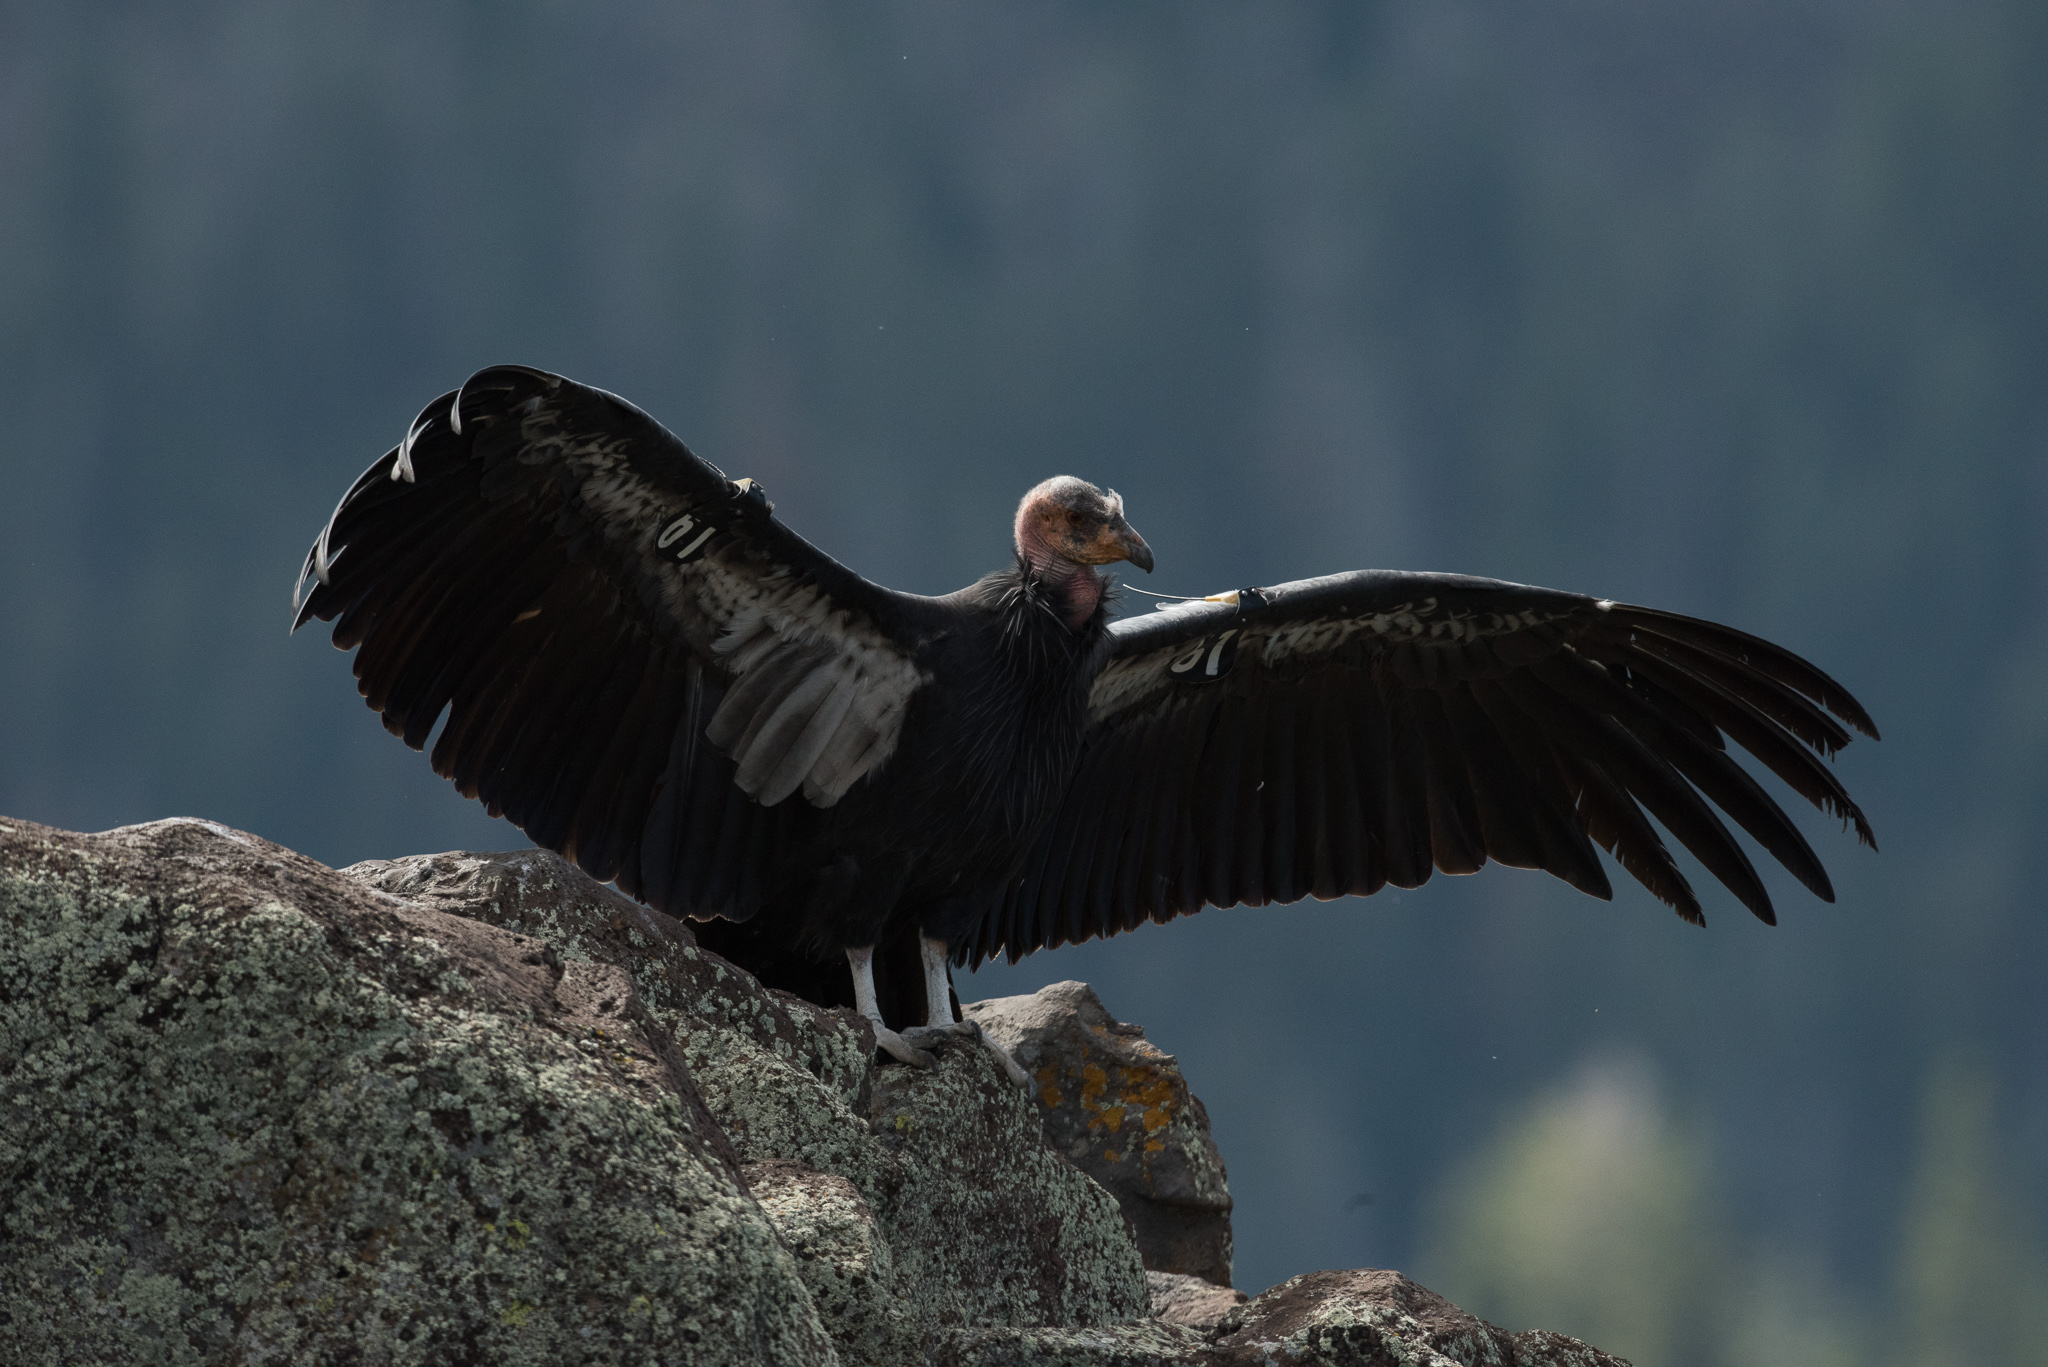
Here I’m messing around trying out a 1.4x teleconverter on a 800mm lens and due to the reach and some heat shimmers I’ve got some blurring so I’ve already applied some sharpening to this (78,0.9,51). I’ve exposed not to blow out the highlights on the rimlit wings. This is a decision I’ll question later, but for now I’m stuck with this file and there’s not much detail on the side of the wings we’re looking at. We’ll zoom in to about 170%. At 1600 ISO on the D810 it’s no surprise we’re seeing noise in the background. Let’s try and recover some detail in the wings by running the shadow slider to +100.
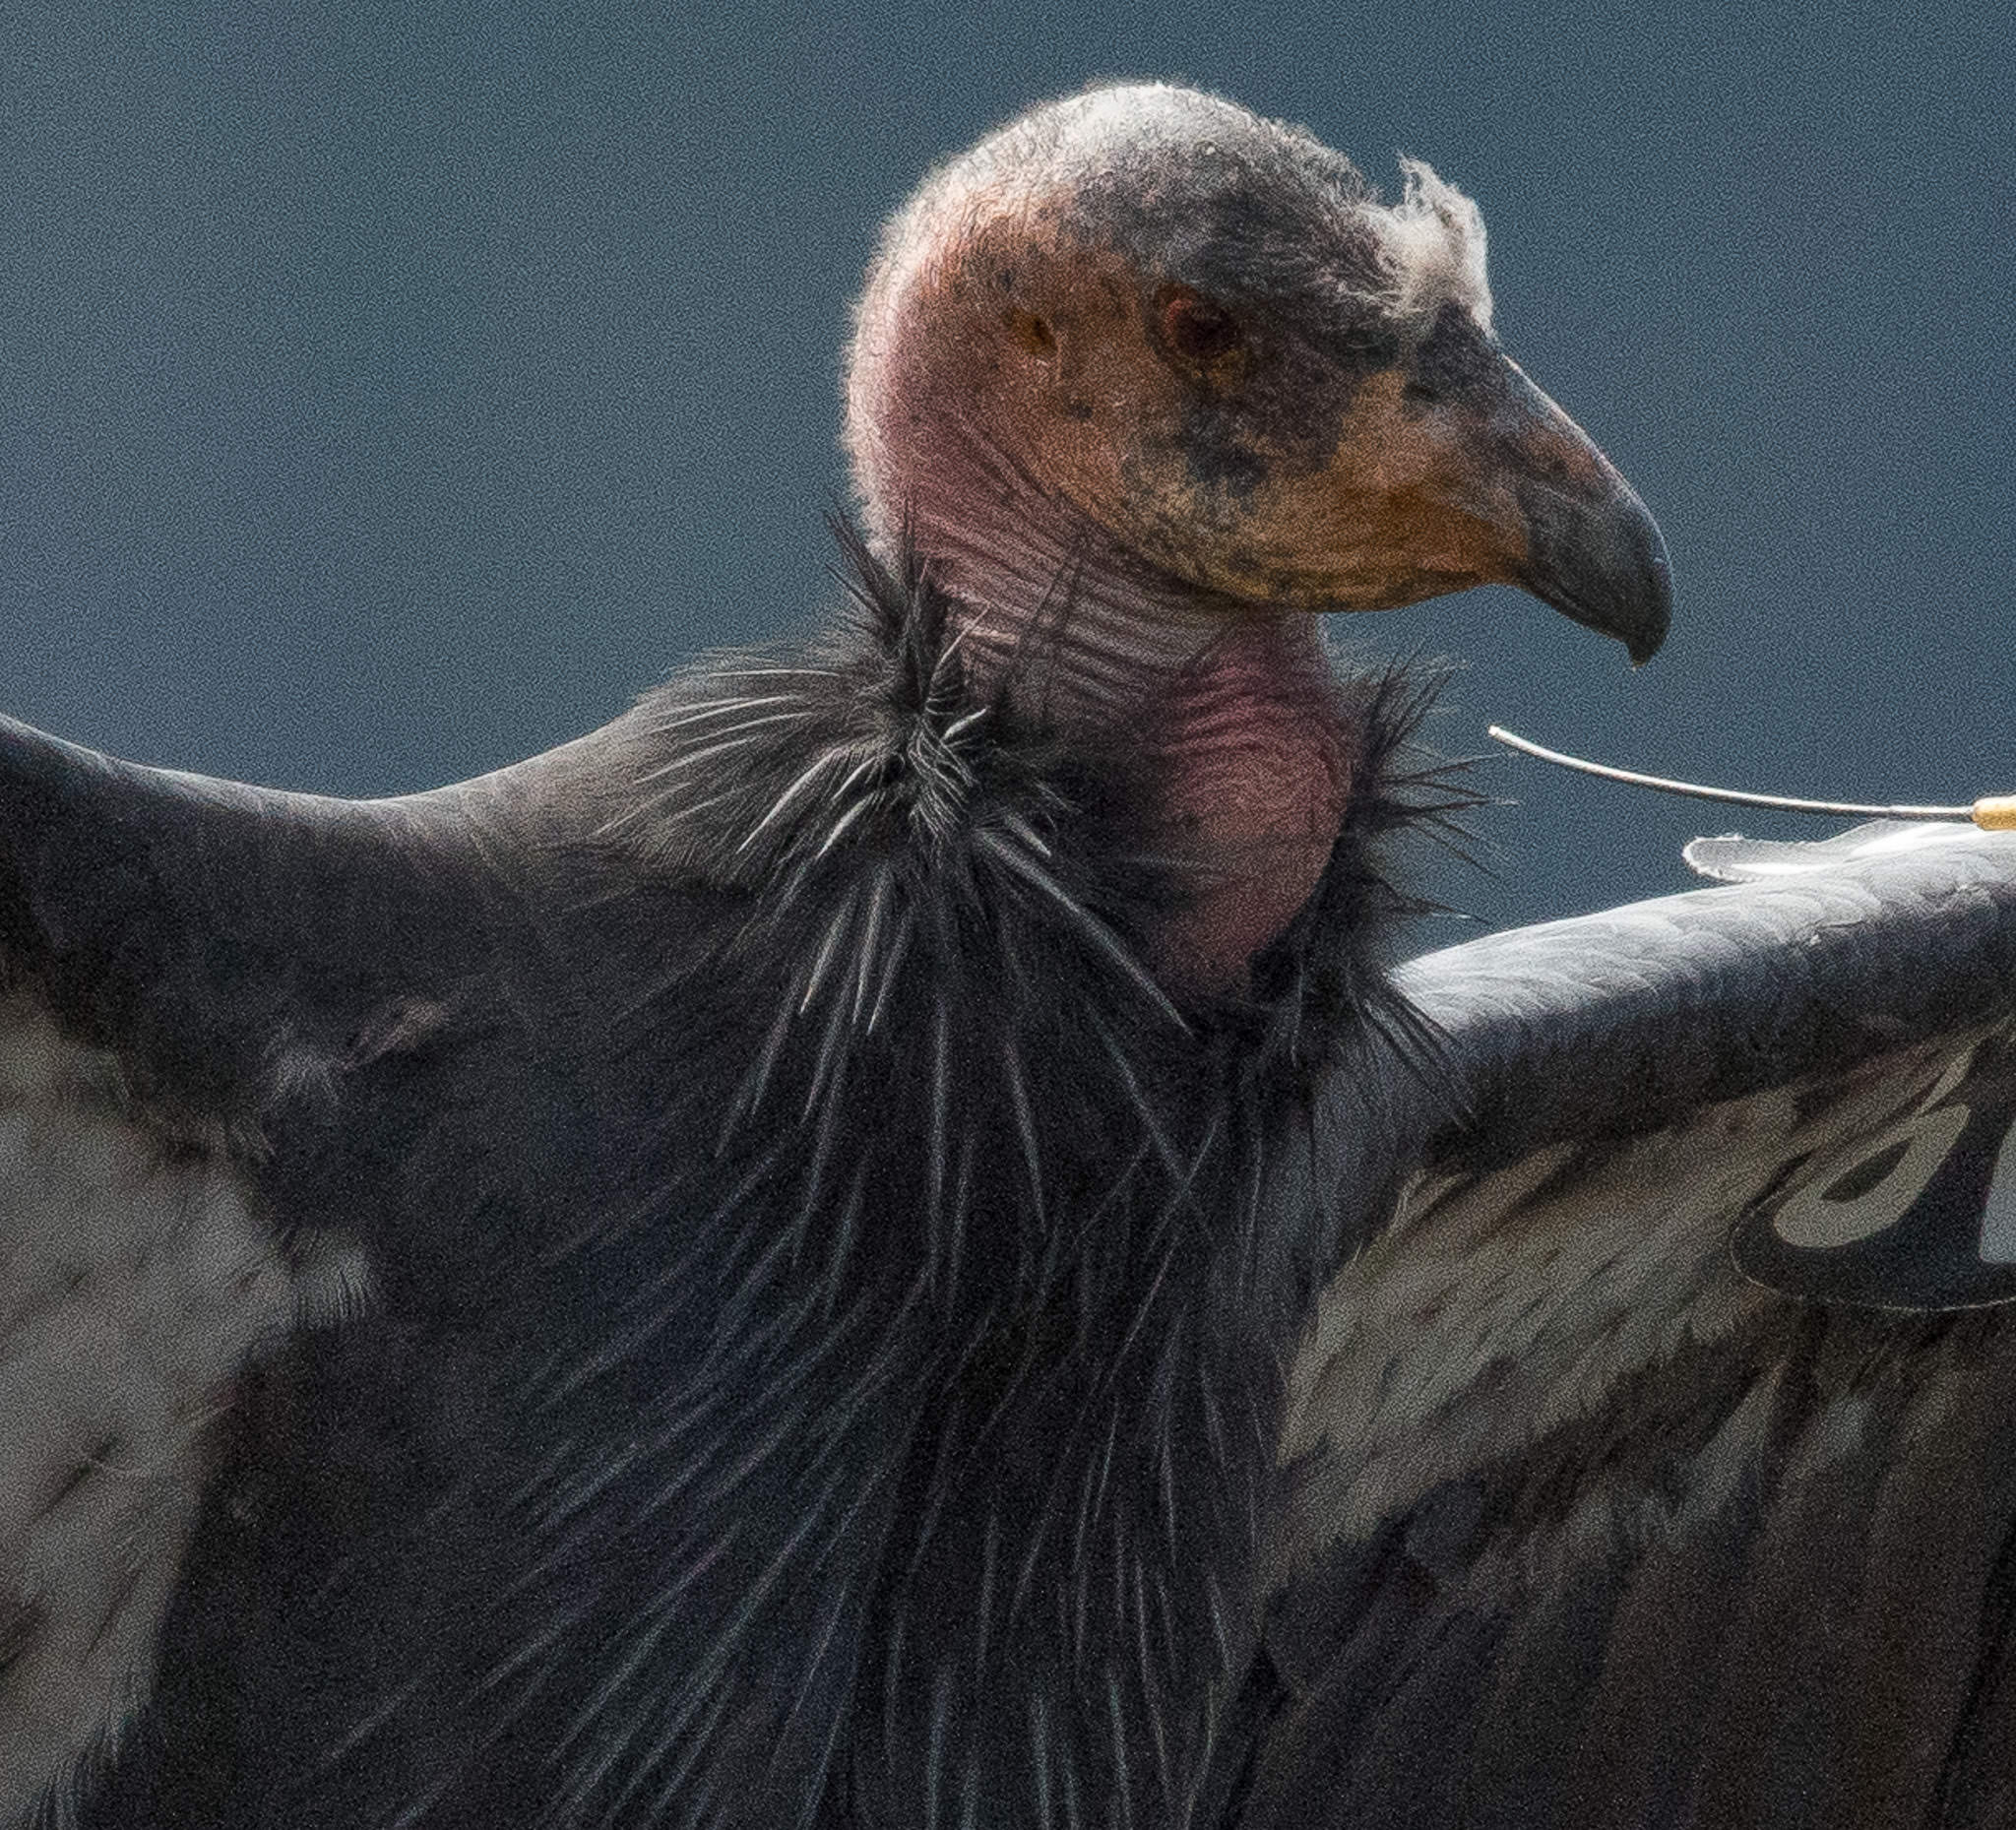
Yuck. Now we see a bunch of noise in the wings. Because the background is dark the noise is getting worse there too. I would have been smarter lightening the wings as a local adjustment, but for the sake of example let’s continue down the path we started on. I’ll apply some more tweaks as follows to get close to where I want the tonal values to be. I’ll deal with the noise after I get the tone mapping done. Adjustments:
Exposure +.80
Highlights -100
Shadows +100
White +32
Clarity +36
Vibrance +20
Saturation +16
Those adjustments to exposure, shadows and clarity aren’t helping my noise situation.
Time to head into the detail panel where we find the sharpening and noise reduction controls.
4) Sharpening
Sharpening images increases noise, however all RAW files need some sharpening to look presentable. In Lightroom all RAW files get the following sharpening defaults: amount 25, radius 1.0, detail 25. Sharpening works by detecting edges and increasing contrast along those edges and you guessed it, by increasing contrast it increases noise. Here’s where my favorite trick works wonders. Look at the masking slider – it has a default of 0. This means sharpening is being applied to the entire image. However by moving this slider we can mask away the parts of the image with less noticeable edges and only sharpen the more prominent edges. By using masking we can take this from a global adjustment to a local one. To judge what is being masked hold down the option key (or ALT key on Windows) while moving the masking slider. The screen will be all white at the 0 default. As we push the slider right, the image will gradually darken in the areas with less distinct edges. See Nasim’s excellent article on how to sharpen images in Lightroom to understand how this tool works in detail.
I’ve pushed the slider to about 25 and this is what I see. The areas in white are being sharpened; the areas in black are not getting sharpened. I’ll keep pushing the slider right until only the areas I want sharpened are still highlighted in white like this.
Voila – the bird is highlighted but the background is black, hence only the bird will get sharpened. Background noise will be minimized. In this case the white areas keep the 78,0.9,51 sharpening settings I already dialed in and the black areas get zero. Looking closely here’s the result.


In my opinion this is the single best Lightroom trick for keeping noise down. Here’s another example side-by-side at ~200%.

Unmasked.
Masked.
You can benefit from this trick even if you don’t add sharpening to your image because Lightroom will have already put its +25 default sharpening on your RAW file.
The Detail slider in the sharpening panel also boosts noise when pushed to the right. When pushed right it tries to analyze blur and sharpen to correct it. When your base level of noise is low, the added noise will be small, but if you are already dealing with a noisy file the noise will exponentially increase.
The radius slider doesn’t increase or decrease noise but can sometimes make the little “grains” look smaller (with smaller radius) or bigger (set at larger radius). The smaller grains may be easier to hide using other tricks later, but I recommend not sweating the radius setting for it’s effect on noise but instead utilize it to achieve the sharpening effect you want based on the spacing of the details in your image.
One other sharpening trick is to go to the adjustment brush and only sharpen the areas that really need it. Pushed to the right of center this increases the sharpening amount (like with the detail panel slider).
At last, we’ve finally made down the developing panels to the noise reduction sliders. But wait, there’s one super important thing we need to consider before messing with those. This is final output – i.e. what size and format the final image will be viewed at. If the image will be an 8×10-inch print on our wall it’s important we view it at that size. If it looks good at that size then we’re done. One huge mistake many of us make is that we obsessively view our images at 1:1. At that magnification any noise will jump out at us. But if the final output is to be viewed at less than 1:1 then our output file will be downsampled accordingly and downsampling does wonders for hiding noise.

This crop sensor ISO 7200 file is straight out of the camera with zero postprocessing other than the Lightroom defaults. You saw it at 100% at the beginning of the post and the noise was apparent. Now the noise is pretty much gone all from just downsampling the file to web resolution.
If we bust out a test print, evaluate it from a normal viewing distance, and still don’t like how much noise we see, then we might consider going to the NR sliders, but first consider if the file may have been overcropped and if a looser crop will still look good and shrink the noise away as well.
5) Noise Reduction in Lightroom
Still not happy? Time to blur that noise away. We can do that globally or locally. The simplest method is to go to the noise reduction panel. Default is set to 0 for luminance and 25 for color noise.
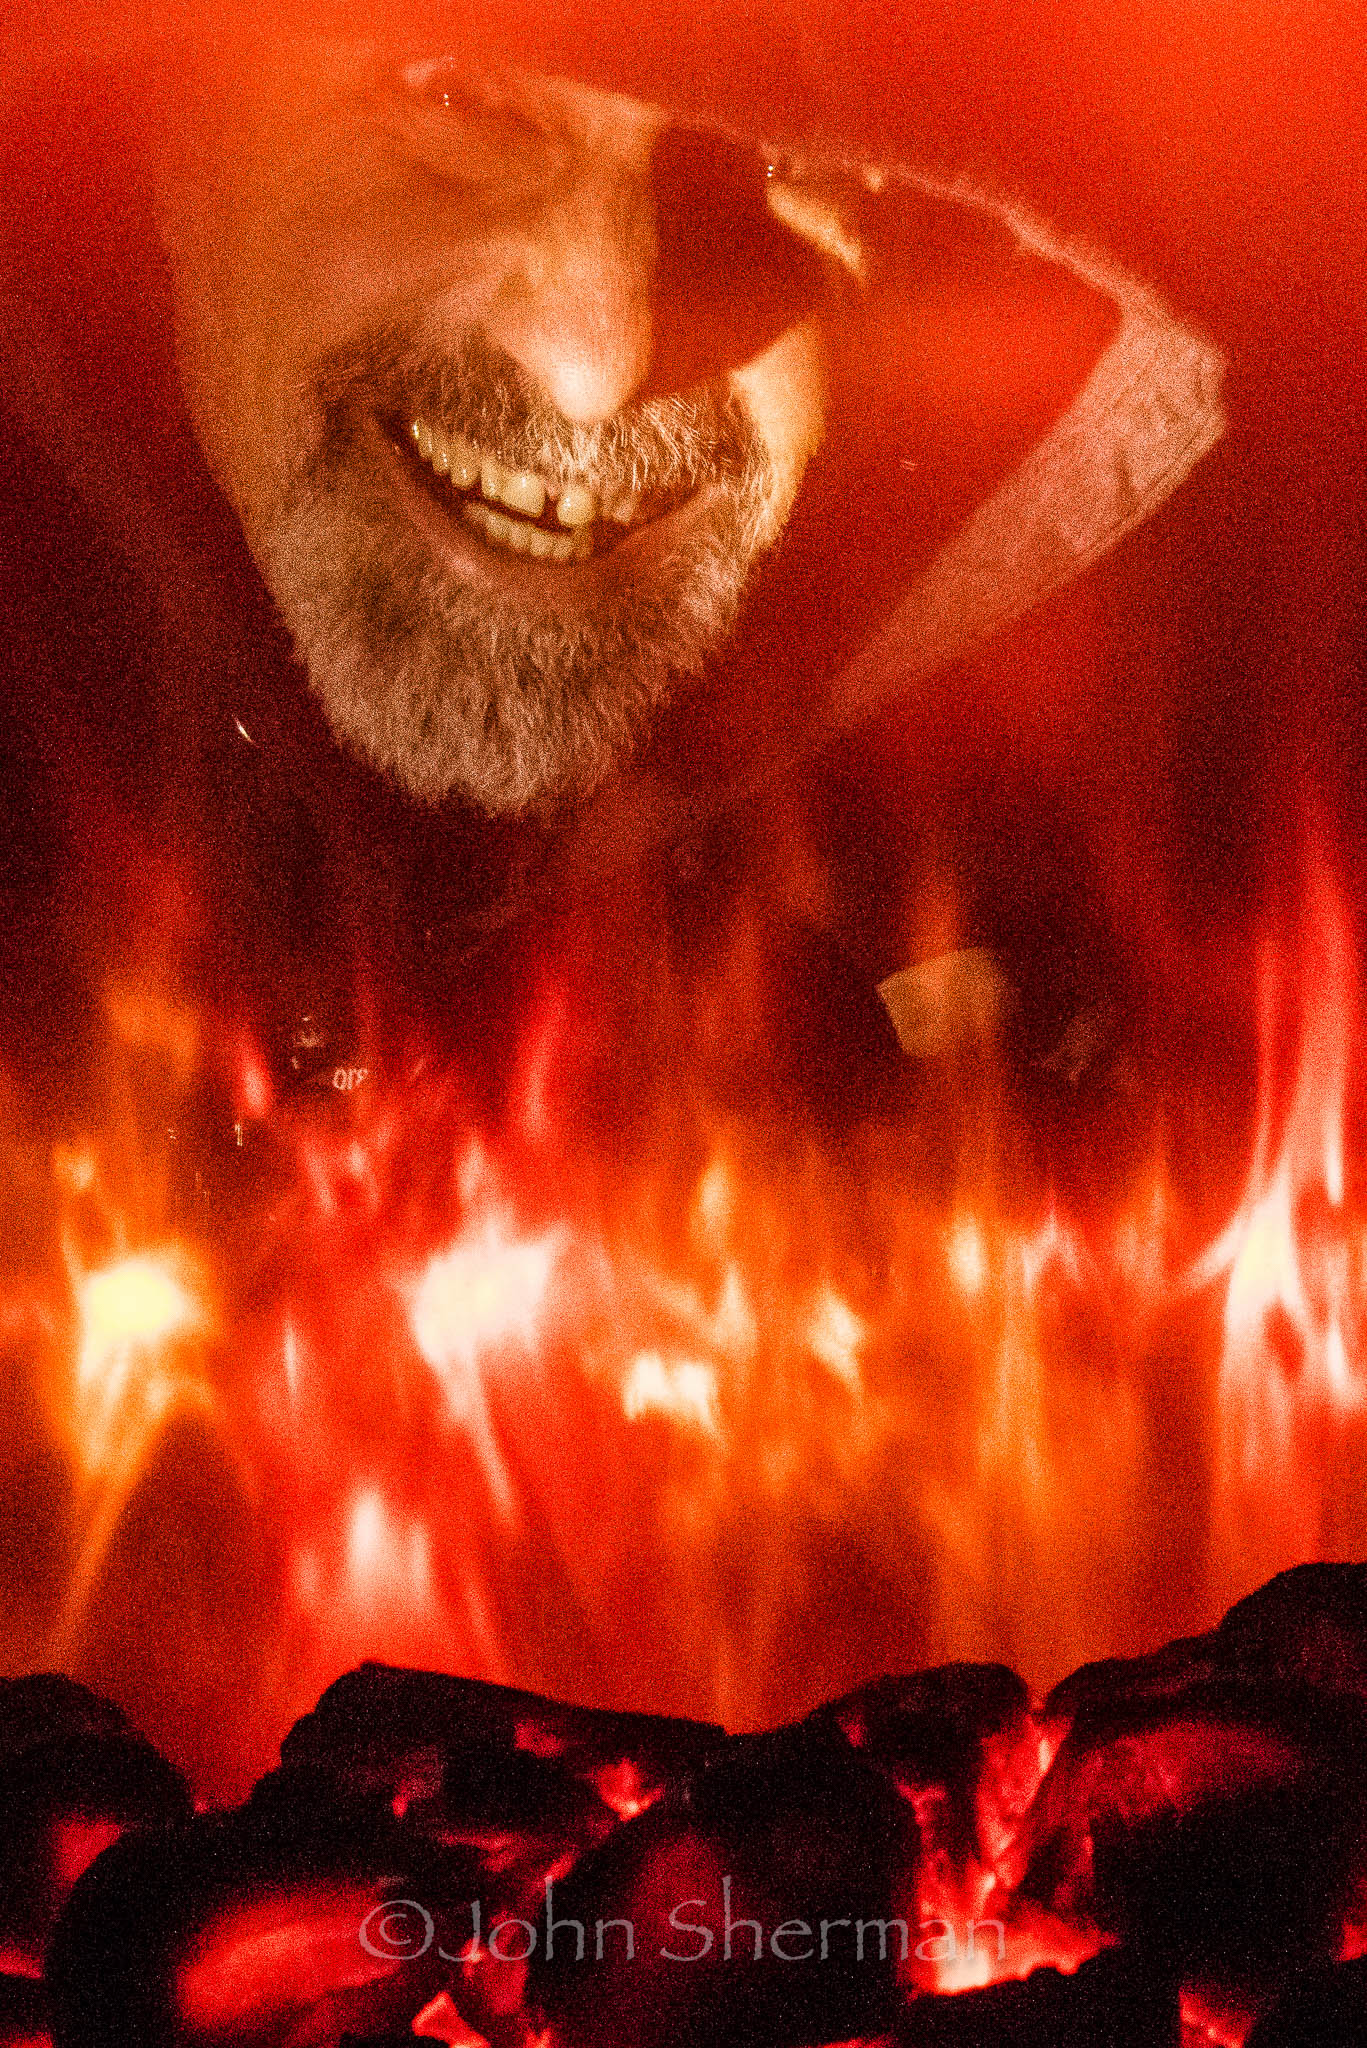
When noise gets really bad, such as in the opening fires of hell shot you will start to see horizontal banding artifacts or sometimes both horizontal and vertical forming a checkerboard pattern.
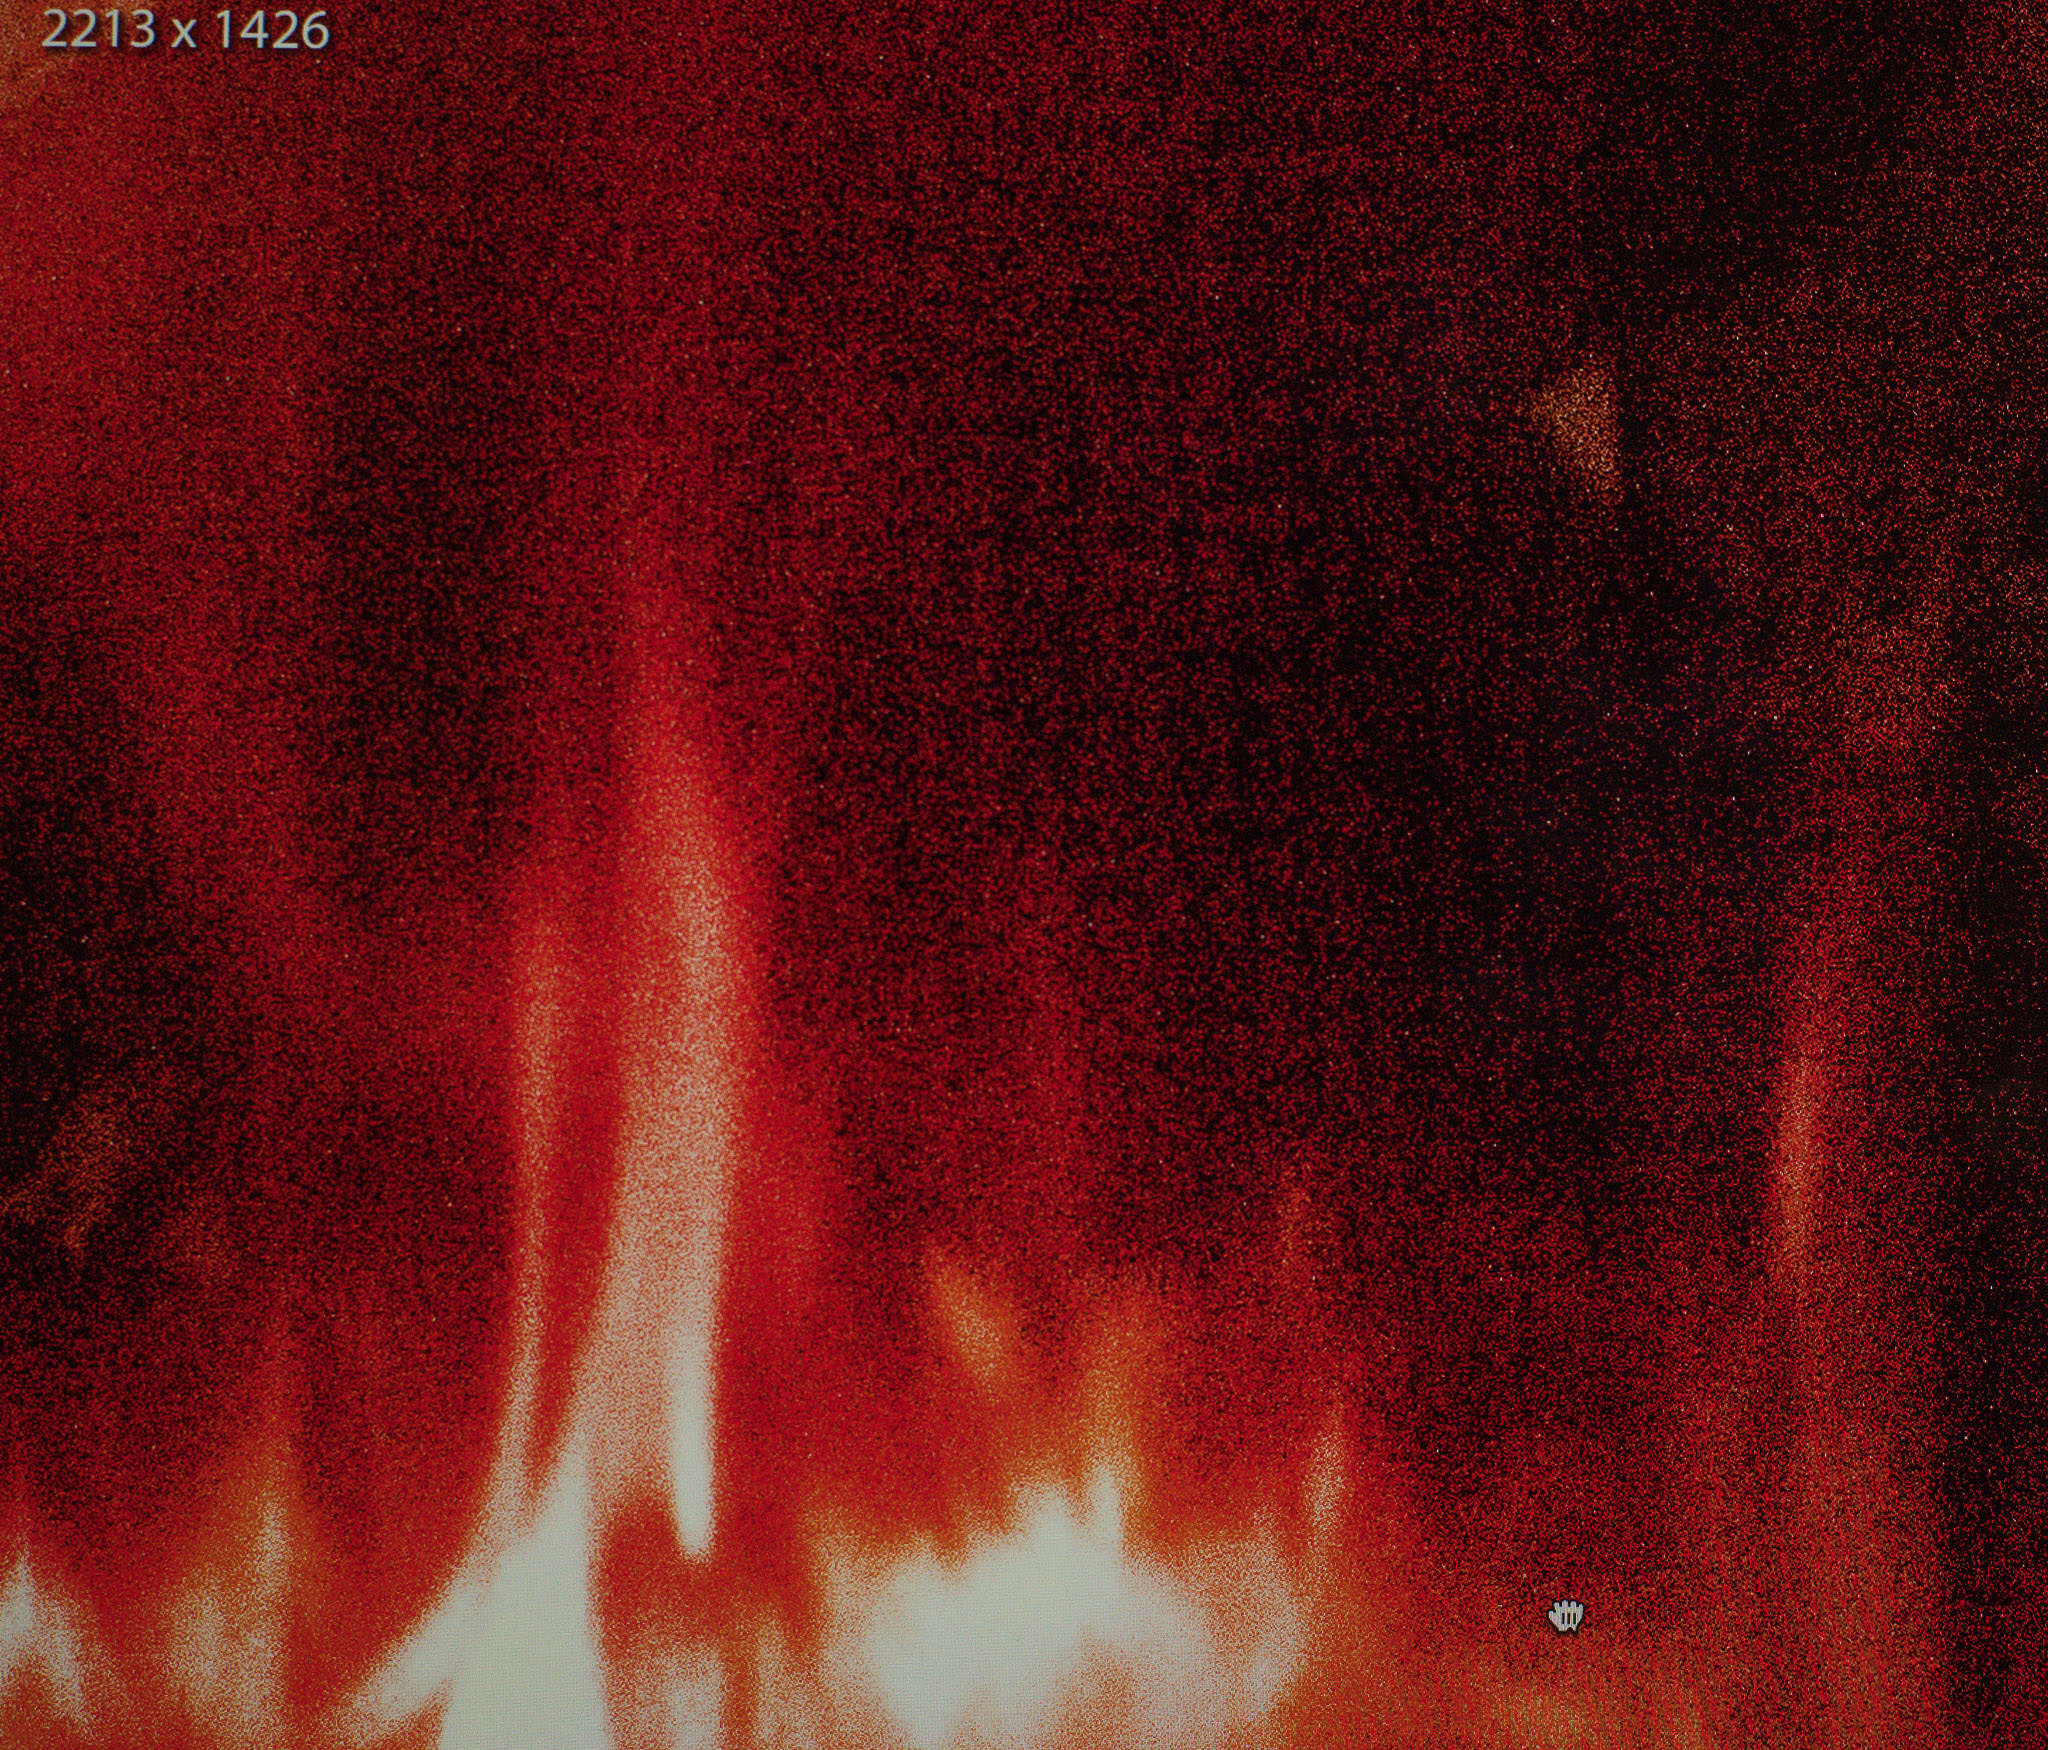
(Note: I increased exposure, shadows, clarity, contrast and sharpness in that output to make the noise worse so you can see the banding effect.)
The noise reduction sliders work by blurring the image – this can wreak havoc with details. If you add excessive noise reduction you get a result like this (100% view).
Hence it’s a real back-and-forth game adjusting sharpening and noise reduction to retain as much detail as you can (without halos or other artifacts) and keep the grainy look to a minimum. I find that by applying all the other noise minimization techniques we talked about above, that I rarely need to push the amount slider beyond 10. This while being primarily a wildlife photographer who shoots a lot at high ISO. I’d rather have a slightly grainy looking image than a smooth waxy-looking one – just a matter of taste.
The same 7200 ISO shot above, with added sharpening, masking the sharpening and +15 NR.
You can also use the noise setting in the adjustment brush to apply noise reduction locally. This adjustment works like the luminance amount slider but without detail and contrast adjustments. This can come in handy if you did some local adjustments, e.g. dodging, that caused noise in just that section of the image. You can actually go to that local adjustment, click on the dot marking it on the image and the setting panel will show the prior adjustments. You can then just add the noise adjustment to that set rather than paint a whole new mask.
Because I rarely go over 10 on the luminance amount the luminance detail and contrast sliders don’t make a significant difference so I just leave them at default.
Color noise is rarely apparent unless you’re shooting quintuple digit ISOs. If I see tell tale color noise at the default setting of 25, I will push the color slider right until the color blobs are minimized.
Here’s our color noise shot again. For this version I reduced the color noise correction from the default setting of 25 to zero to show what color noise looks like.

Here we see the color noise gone when we just accept the default amount of 25. Unless you deal with a bunch of night sky photos, chances are you will never need to monkey with the color noise sliders.
The color noise detail and smoothness sliders might be of use in images with extreme color noise, but I can count the number of times I’ve used these on my fingers. In theory they can make colors bleed and look smeary or desaturated along edges. I reckon if I had an important image with noise so bad I needed these that I’d try a different software program such as DeNoise first.
6) Summary
Dealing with noise has a lot more to do with noise avoidance than noise reduction. Avoiding noise in camera and during tone mapping is the best strategy. By doing this I find I rarely need to push the noise reduction sliders. The amount of noise reduction needed depends entirely on final output. Hence noise reduction should only be done after final output is decided. And when all else fails you can always do the gritty black-and-white conversion trick and your friends will think you’re such a great artist they’ll all give you black turtlenecks for Christmas.
P.S. Nasim has previously published a detailed tutorial on noise reduction that I recommend you take a look at, where he utilizes external tools to reduce noise. Selective noise reduction can yield excellent results when using such tools as Nik Dfine.
All content and photos ©John Sherman unless otherwise attributed. No reproduction without prior written permission.
Brilliant. Noise is killing me…..
Fantastic article! You answered so many questions I’ve had and some I didn’t even realize I had. Thank you.
No new information given in this article. First it starts with general tips, how to quickly reduce noise in images. Then, there’s the great new tip on best shooting at base iso and to avoid high iso settings – wow, really useful information. And finally, the article turns into creatings masks in a graphics program, so that you can blur the background in the darker areas and keep the noisy, sharp details in areas, that are brighter and show more details and thus, better hide the noise from the eye of the viewer, cause you always have to play with the inflexibility of the eye to differentiate the details, that is more attracted to colors, form, contrast and details in brighter areas and especially faces and emotions like eyes or mouth. Thats nothing new. It won’t help the people to go into heavy manual processing, because you won’t generally spend hundreds of hours in front of thousands of images, that were taken just within 1 week. It’s just not economical. Hours of work are much more expensive than buying a full format sensor with moderate resolution and run it smoothly with F2.8 even lenses, maybe just stopped down to F4 to have some controllable DOF and to run the lenses in their sharpest aperture. Full format sensors run smoothly up to ISO6400, exactly the much needed range for fast wildlife pics and fast enough night shots below 1/125s, to freeze movements without relying on VR, that doesn’t make sense with moving subjects. APS-C is totally noisy at ISO3200, so even F2.8 lenses will be to slow, to keep ISO settings below ISO3200 to get minimum 1/125s shots for slow moving subjects in bad light. It would be better to give values in tables for the corresponding sensor generation within the range of particular camera bodies of each manufacturer – e.g. use HQ NR with 25-0 (NR amount-details) in software program X for ISO values 100-800, for ISO values 800-1600 use HQ NR 50-30, for values between 1600-3200 use this and that setting… The result woud be a slightly blurry image, but afterwards in conjunction with lowering the resolution from e.g. 24MP APS-C sensor down to 14MP 4583px width images 3:2 – the result would be clean and detailed enough, getting rid of the need of time spent in post processing for a picture, that is not even needed at 1:1 resolution, because a buyer needs the whole image, not a highly detailed crop out of it. If the pixels move together, the noise goes down significantly – nothing more than a big sensor with low resolution. Creating masks only helps sometimes, if you absolutely need the full resolution – but once again, no professional likes to spent hours in front of a screen, just to get rid of noise and getting lack of detail or to remove noise partially, thus having to think about which parts need to get destroyed or not. They just buy the biggest portable acquirable sensor, to avoid lack of detail and hours of post processing. They just want to tweak the images slightly, e.g. color adjustments, slight exposure changes. Every change of an image in a program will not increase image quality. The input must be perfect and then it gets worse and worse.
Hi from Brazil. The best avoid and reduce noise article ever! Congratulations!
Evandro
Extremely enlightening, I am suffering on my d810 from noise at ISO200, on long exposure with a 24mm F1.4 at 2sec. So with these new knowledge, I will resett the all the pertaining in camera adjustments to try to rectify the problem. That even Nikon for professional users haven’t been able to help me with.
I’m curious at what step in the post editing do you correct the image for noise? At the end of start or towards the end just before you sharpen the images?
Thanks
Duane
Thanks for all of the detailed commentary; it’s clear you put an impressive amount of time and effort into your articles and love what you do. I have a D7200 and have been somewhat disappointed with the amount of noise I’m seeing in my RAW files compared to the D5200 I used previously.
I understand that there are no hard and fast rules and that everything depends on the image, but do you have any recommendations for what you typically find necessary as far as sharpening values or noise reduction values for the D7200 as RAW files have no sharpening applied out of camera? I typically aim to shoot at ISO values of 3200 or less (ideally 1600). I read on another website that recommended noise reduction settings of 25 for ISOs 100-400 and 50 for ISOs 400-1600. This seems excessive in my limited experience.
I would greatly appreciate your guidance. Thanks!
The recommended settings are zero noise reduction if possible. I would take a few noisy sample photos of yours and practice the techniques in this article. I think you will find you will need to use very little noise reduction after doing noise avoidance. I would never apply a default luminance noise reduction to any file, however I find no problem sticking with the default 25 for color noise reduction.
You’re my hero…
Thanks John .
When I used capture NX2 I used to use the control points for local adjusments and it worked wonder that tool was fast and amazing! Now that I made the move to the better software lightroomn I see my self doing less and less local adjustments because it is very time consuming and needs precision with the brush and you easily overlap the desired ”sharpenned area” . I just wish the u-points/control points with opacity would be bought by lightroom since NIK doesnt seem to be doin anything new with it anyways . And also using nik has a second software is also too much time consuming for me most of the time! ! !!
Thanks again for the article I’ve learned and ill be easy on clarity & shadows recovery ;) !!
Thanks for writing such an informative article. I learned a lot.