The old axiom that we should learn from our mistakes is sound, although sometimes those lessons can be a bit on the painful side. As a 15-year-old, freshman high school student in 1960 I was excited to work as a photographer on the school yearbook. Assigned the task of developing a tank of 4×5 inch negatives, I wanted to make sure I got it right – so I set up individual beakers of developer, stop bath, and fixer, pre-measured, to be sure I had everything ready. Then, like a total fool, I picked up the fixer first, poured it in, and ruined all the film. My faculty adviser was kind, and there was some other film from the event that had not yet been developed, so it wasn’t a total loss. Along with my considerable mortification, I gained some useful insight about how to be functionally organized when working in the dark room.
Since that time I’ve been blessed with many other mistakes or oversights that have been comparably informative. Given my apparent talent for this sort of learning process, I thought I might share some of my hard-won photography lessons, in the hope that others might avoid repeating them. Learning from someone else’s mistakes, after all, is a less trying approach than learning from your own.
Lesson One: At the end of every photography session don’t put your camera away until you’ve checked to make sure that all settings have been returned to your desired defaults. If you change settings for a particular subject within a session, make sure you reset to defaults before you move to a different subject. Anytime you pick up your camera to start shooting, be sure to verify that you did, indeed, previously restore the default settings.
One evening our neighbor’s young son appeared with a large cicada sitting on the back of his hand. It was twilight, so I cranked up the ISO setting on my Nikon D200 to take a close up with his hand and the cicada in good focus, and his face slightly out of focus behind. High ISO settings were not the D200’s strong suit, but it worked well enough for the purpose. A week later I carefully set my camera on a tripod to take a family portrait at a birthday gathering in Shenandoah National Park. I moved people about to get a pleasing grouping, checked exposure and focus carefully, and shot a series of photos – all of them at the ISO 1,600 setting I had used for the boy-and-cicada photos. The high levels of noise in these photos made them look awful. I spent a few hours in Photoshop playing with adjustments of luminance and color noise before I finally got photos that were acceptable. I could have spared myself those hours had I simply set the camera to default settings when I put it away, or had the awareness to check whether I had actually done so, before I took those family photos.
It’s easy to forget to reset changes in ISO, autofocus method, exposure mode, exposure delay / self-timer, and aperture or shutter speed, and so create problems later. I enjoy doing close-up photography, working carefully from a tripod and employing mirror lockup (the Mup setting on Nikon cameras) to minimize vibration. Too many times, after completing my close-up work, I have forgotten to change from Mup back to single or continuous exposure, and later wondered why my viewfinder image became, and remained, totally black when I pressed the shutter release. Sooner or later I figure out that I’ve once again failed to comply with Lesson One.
Lesson Two: Unless you’re about to lose a photograph of a scene so fleeting that it will be quickly gone, take time to scan the viewfinder image carefully to judge your composition, and to look for distracting or otherwise unattractive features that can detract from the subject of the photo.
Of all the mistakes I’ve made when taking photographs, this is the one that most often comes back to haunt me. Careful scanning of the entire viewfinder image can reveal flaws in the initially chosen composition, or detect other sorts of distractions. Conspicuous highlights, for example, can draw attention away from the subject of the photograph. These might be eliminated by a slight re-positioning of the camera, allowing the main subject to be the center of visual attention, or minimized by using a diffuser to soften the lighting. Objects in the background or foreground of the image that are not conspicuous when viewed at full aperture for focusing may come more into focus and so detract from the composition at a smaller aperture chosen for exposure. It’s worthwhile to use the depth of field preview on DSLRs, or live view (or an electronic viewfinder) at the shooting aperture, to assess any effects of enhanced depth of field produced by the selected aperture. I sometimes find that I’m better at recognizing distracting elements when I use live view instead of the optical viewfinder on my DSLR. Some distracting objects, such as twigs, dead leaves, or discarded candy wrappers, can simply be removed from the scene. It’s better to eliminate distractions before exposure, rather than trying to process them out later.
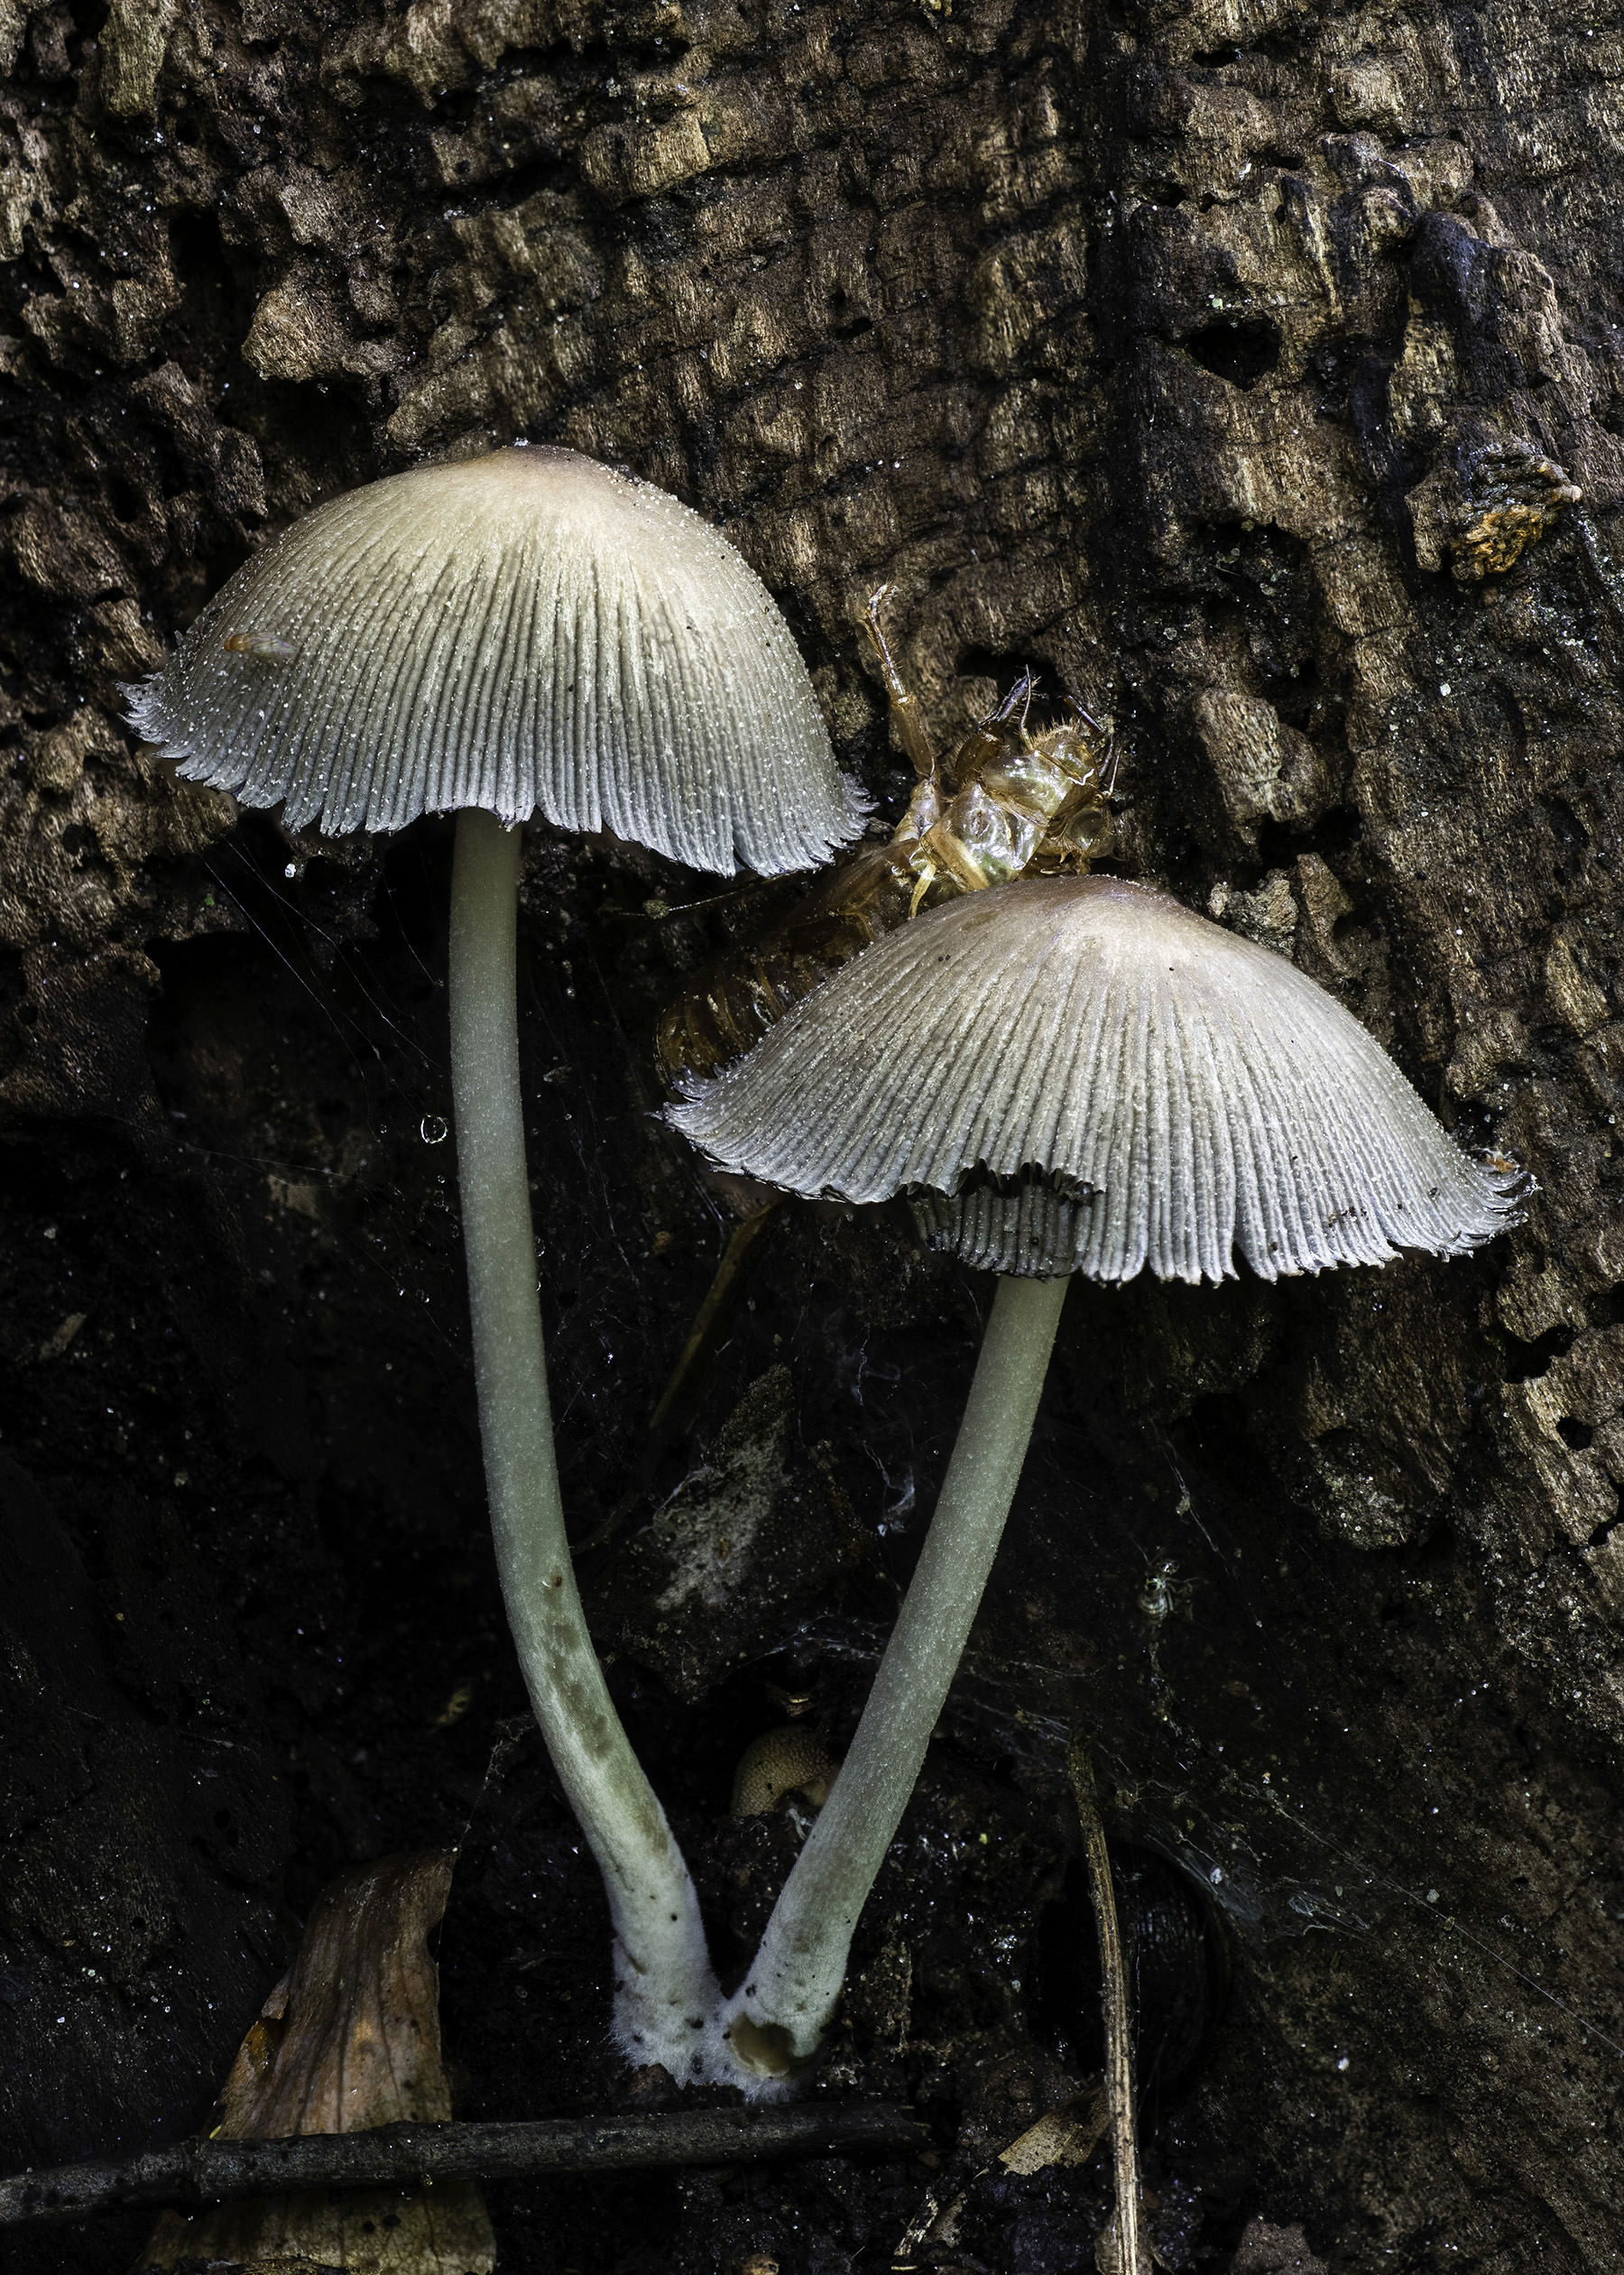
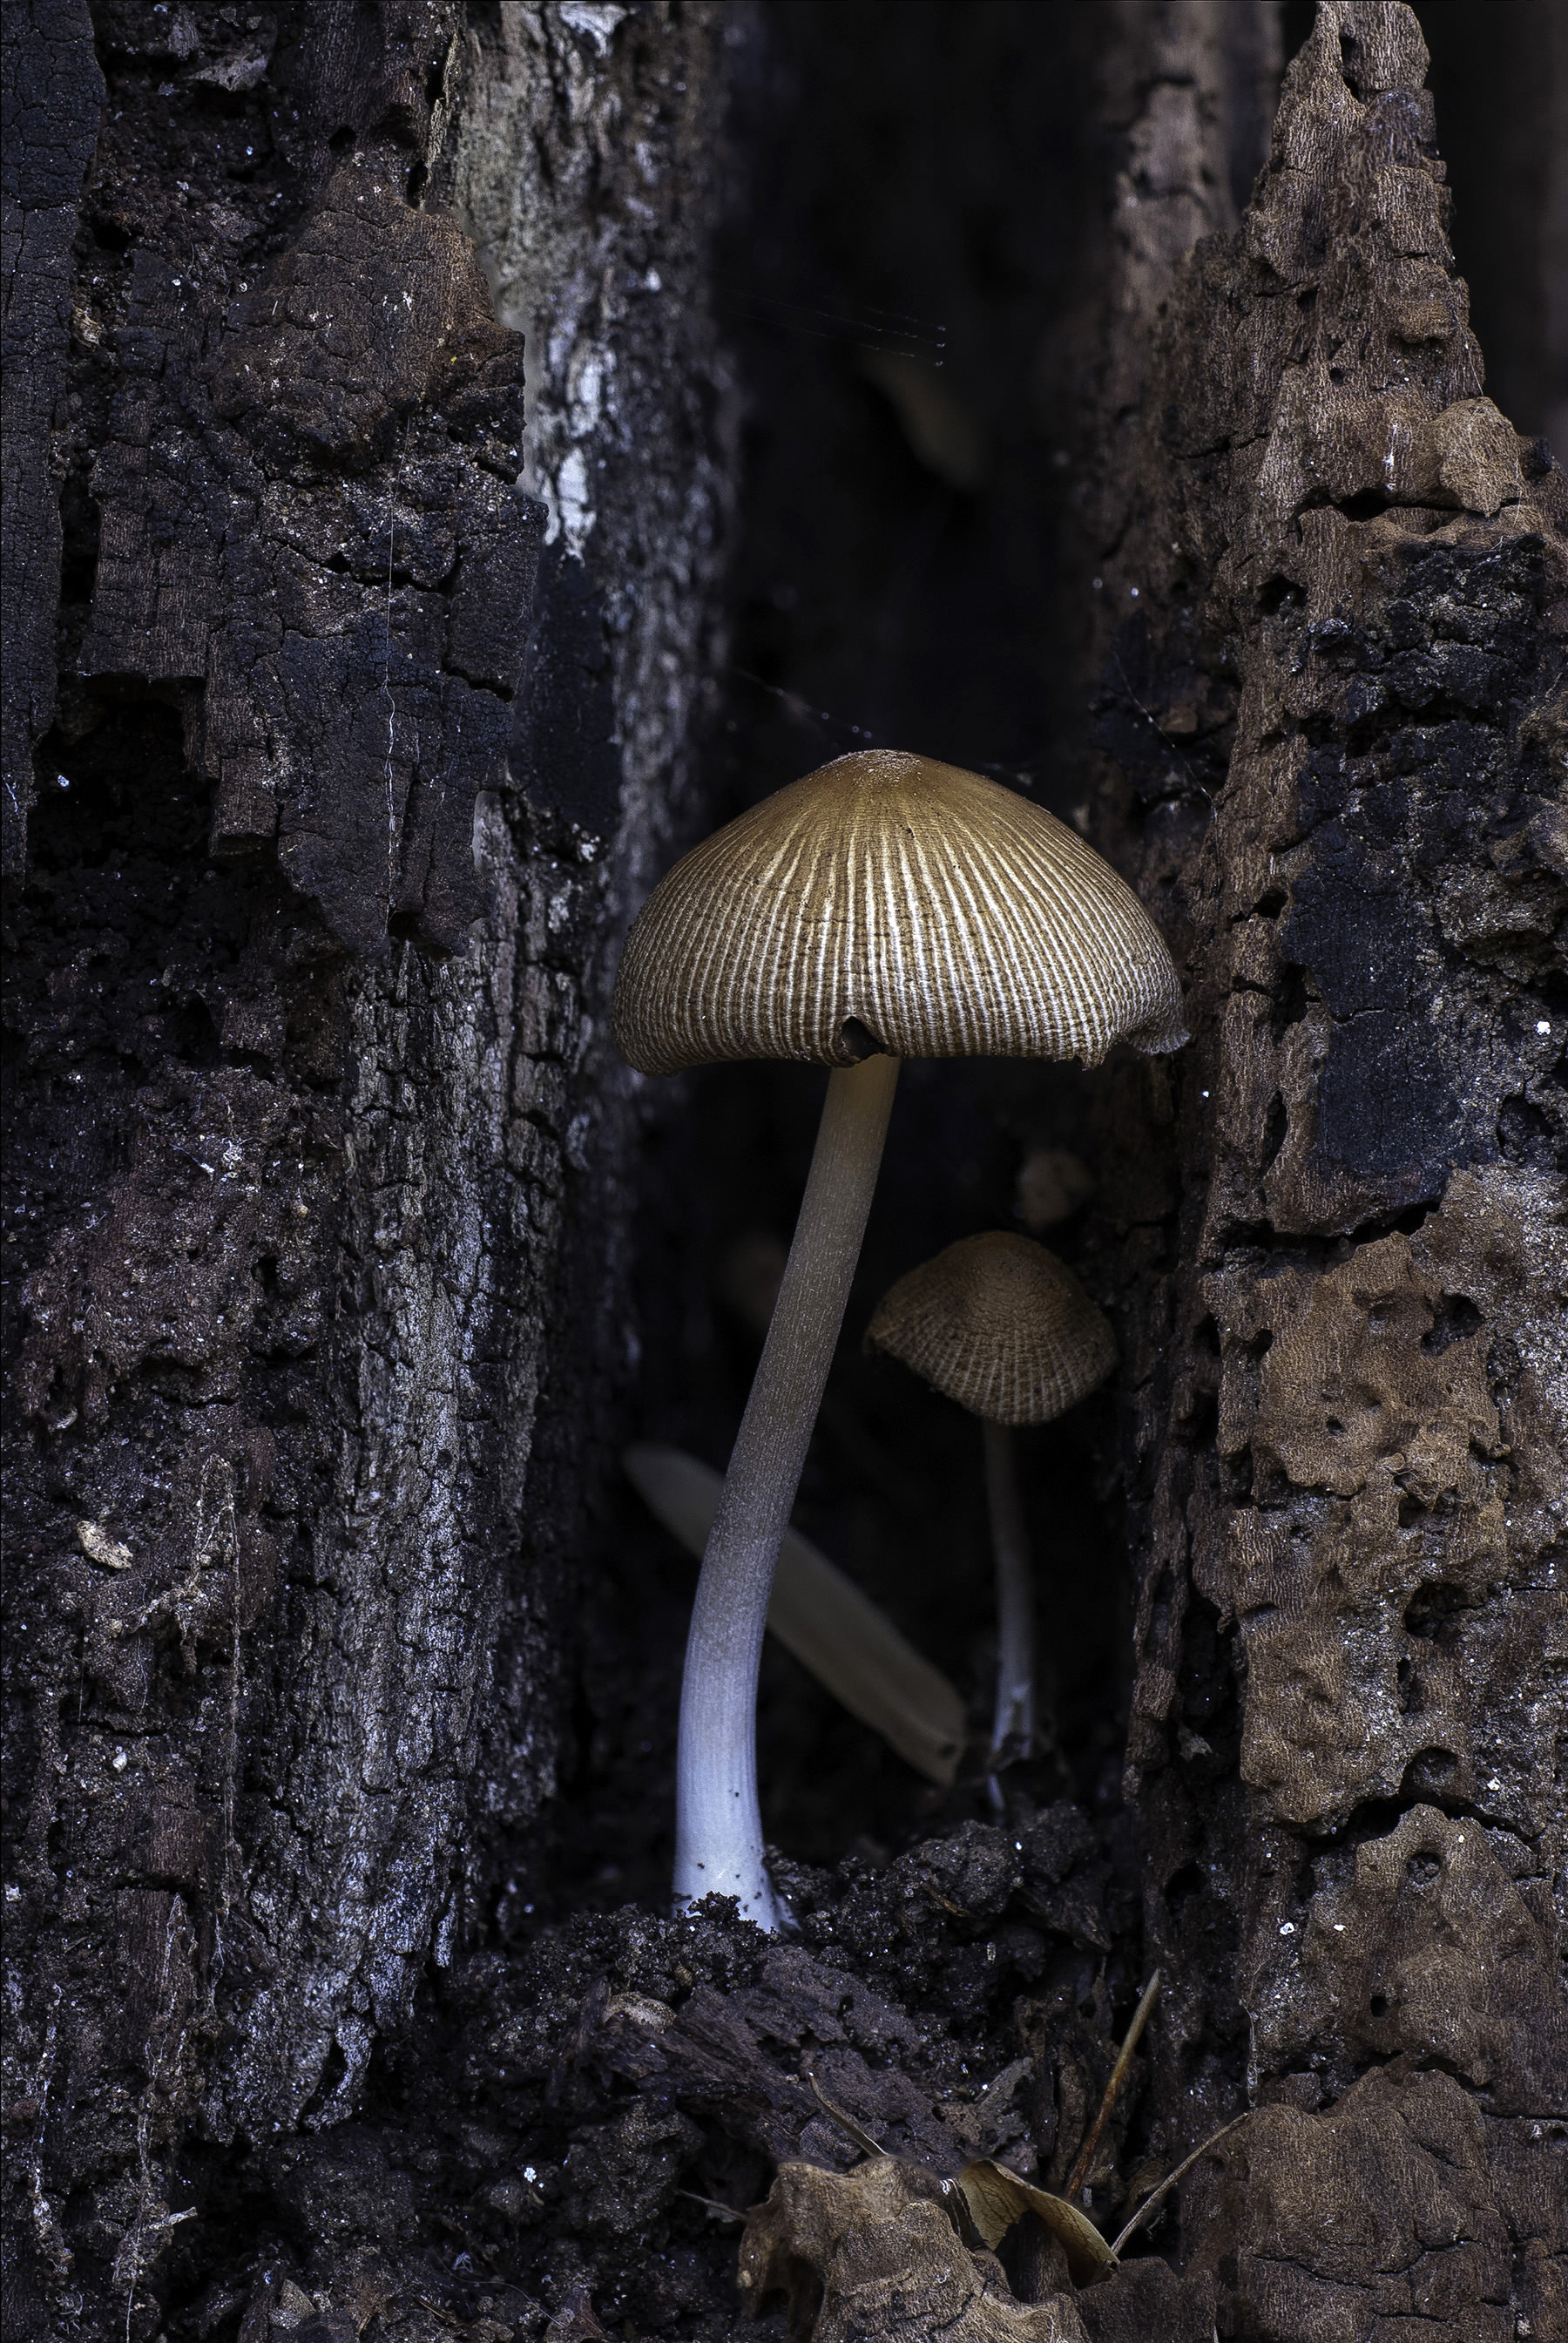
The photo below offers an example of a distracting element that I missed. I came across a group of mushrooms, some of which I thought worthy of photographing. With my tripod set low to the ground, and me practically standing on my head to look through the viewfinder (I didn’t yet have a camera with live view and a tilting LCD.) I set up what I thought would make a nice photograph of two mushrooms. Each was a little shopworn (see Lesson Five), but gracefully positioned relative to the other. I noticed the twig and dead leaves near their bases, but I wasn’t bothered by those, since they seemed a reasonable part of the scene. I locked the mirror up, and used electronic first curtain shutter to avoid shake. To get sufficient depth of field without using an aperture that would produce heavy diffraction, I shot twelve different photos, changing the focus slightly and carefully for each exposure. Back home I used focus stacking software to produce a single, sharp image from the focus stack. It was only after all of that, when I looked at the final image, full screen in Lightroom, that I saw the discarded cicada exoskeleton, wedged between the two mushroom tops. Why I didn’t see it when I took the photographs, I don’t know; it didn’t blend with the background tree bark, either by texture or color. I could easily have gently removed it without damaging the mushrooms. I tried processing the photo as a black-and-white image, which made the exoskeleton less conspicuous, but it was still obvious. For me, it ruined the photograph. I should have done a better job of looking at the subject before I put in so much effort. And yes, I did try cloning the thing out, but I really couldn’t do it without having it appear that there had been obvious manipulation of the photo. Following the mushroom-exoskeleton photo I’ve included a photograph of mushrooms in which I did a better job of heeding Lesson One.
Lesson Three: Take advantage of bad weather.
When I bought my first DSLR the thought of badly damaging the expensive thing made me hesitate to take it out in bad weather, despite the manufacturer’s claims of superior weather sealing. I feared that moisture might turn the camera into a smoldering, short-circuited wreck, only useful from that point as a paper weight. In the end I came to accept that, with reasonable care, I could shoot in light rain or snow without creating problems, and it opened up new possibilities for taking interesting, and sometimes striking, photographs. I also started getting out in subfreezing weather, and found a new world of interesting contours and textures in the ice and frost patterns on a local creek following cold snaps of several days. The two examples below show a snow-covered branch extending out over a stream during a snow storm, and a photo of a section of wire mesh fencing, decorated by snowfall. A photo of the stream ice is included under Lesson Four.


Lesson Four: Consider focus stacking software for Increased depth of field in both macro and landscape photography.
Not surprisingly, given a career in cell biology that involved nearly four decades of using various types of light and electron microscopy to study structural and functional relationships in the cell, I am drawn to photography in the close up to macro range. I quickly learned that I needed a solid tripod and the use of mirror lock-up (and first curtain electronic shutter if available) to minimize camera shake, and provide stability for exposures that often tend to be in the range of 0.25 to a few seconds. I also learned that the laws of optics decree that depth of field decreases progressively and dramatically the closer one focuses in on a subject. Extremely shallow depth of field can be used artistically to isolate a particular feature of a subject, but often it simply means that far less of the subject is sufficiently sharp than is needed to produce the desired image. The loss of depth of field can be counteracted, to some extent, by using smaller apertures, but f-stops in the f/16 to f/45 range also result in increasing levels of diffraction that rob photographs of acuity. My frustration with these problems was blunted when I discovered Helicon Focus software.
Helicon Focus allows the blending of multiple images from a set of photographs taken at different focus points through the subject, producing a final, blended image that includes the sharpest regions from each photo in the stack. (Zerene Stacker is used for the same purpose by many, and Adobe Photoshop also includes a more limited focus stacking ability.) Thanks to focus stacking wider apertures can be used to avoid serious problems from diffraction. If less depth of field is desired, some of the photographs at the front or back in the stack can be excluded from the stack before focus blending, to allow blurring in the foreground or background as desired. There is a learning curve for getting nice results from these programs, but they do a very nice job. The only real problem I’ve sometimes encountered is when objects at the front of a group of subjects produce such a pronounced out-of-focus halo that it is impossible to get good focus on objects positioned behind them; this can often be corrected by using a smaller aperture for exposure. Focus stacking obviously cannot be done on moving subjects, and even stationary subjects such as flowers may move sufficiently in a light breeze to render them a problem, too. Stationary objects, however, can be well handled under most circumstances. Landscape photographers can readily make use of focus stacking to produce photographs with foreground, middle ground, and background all in good focus, by creating a stack of 3 or 4 photographs focused at different distances from the camera, and then blending them together.
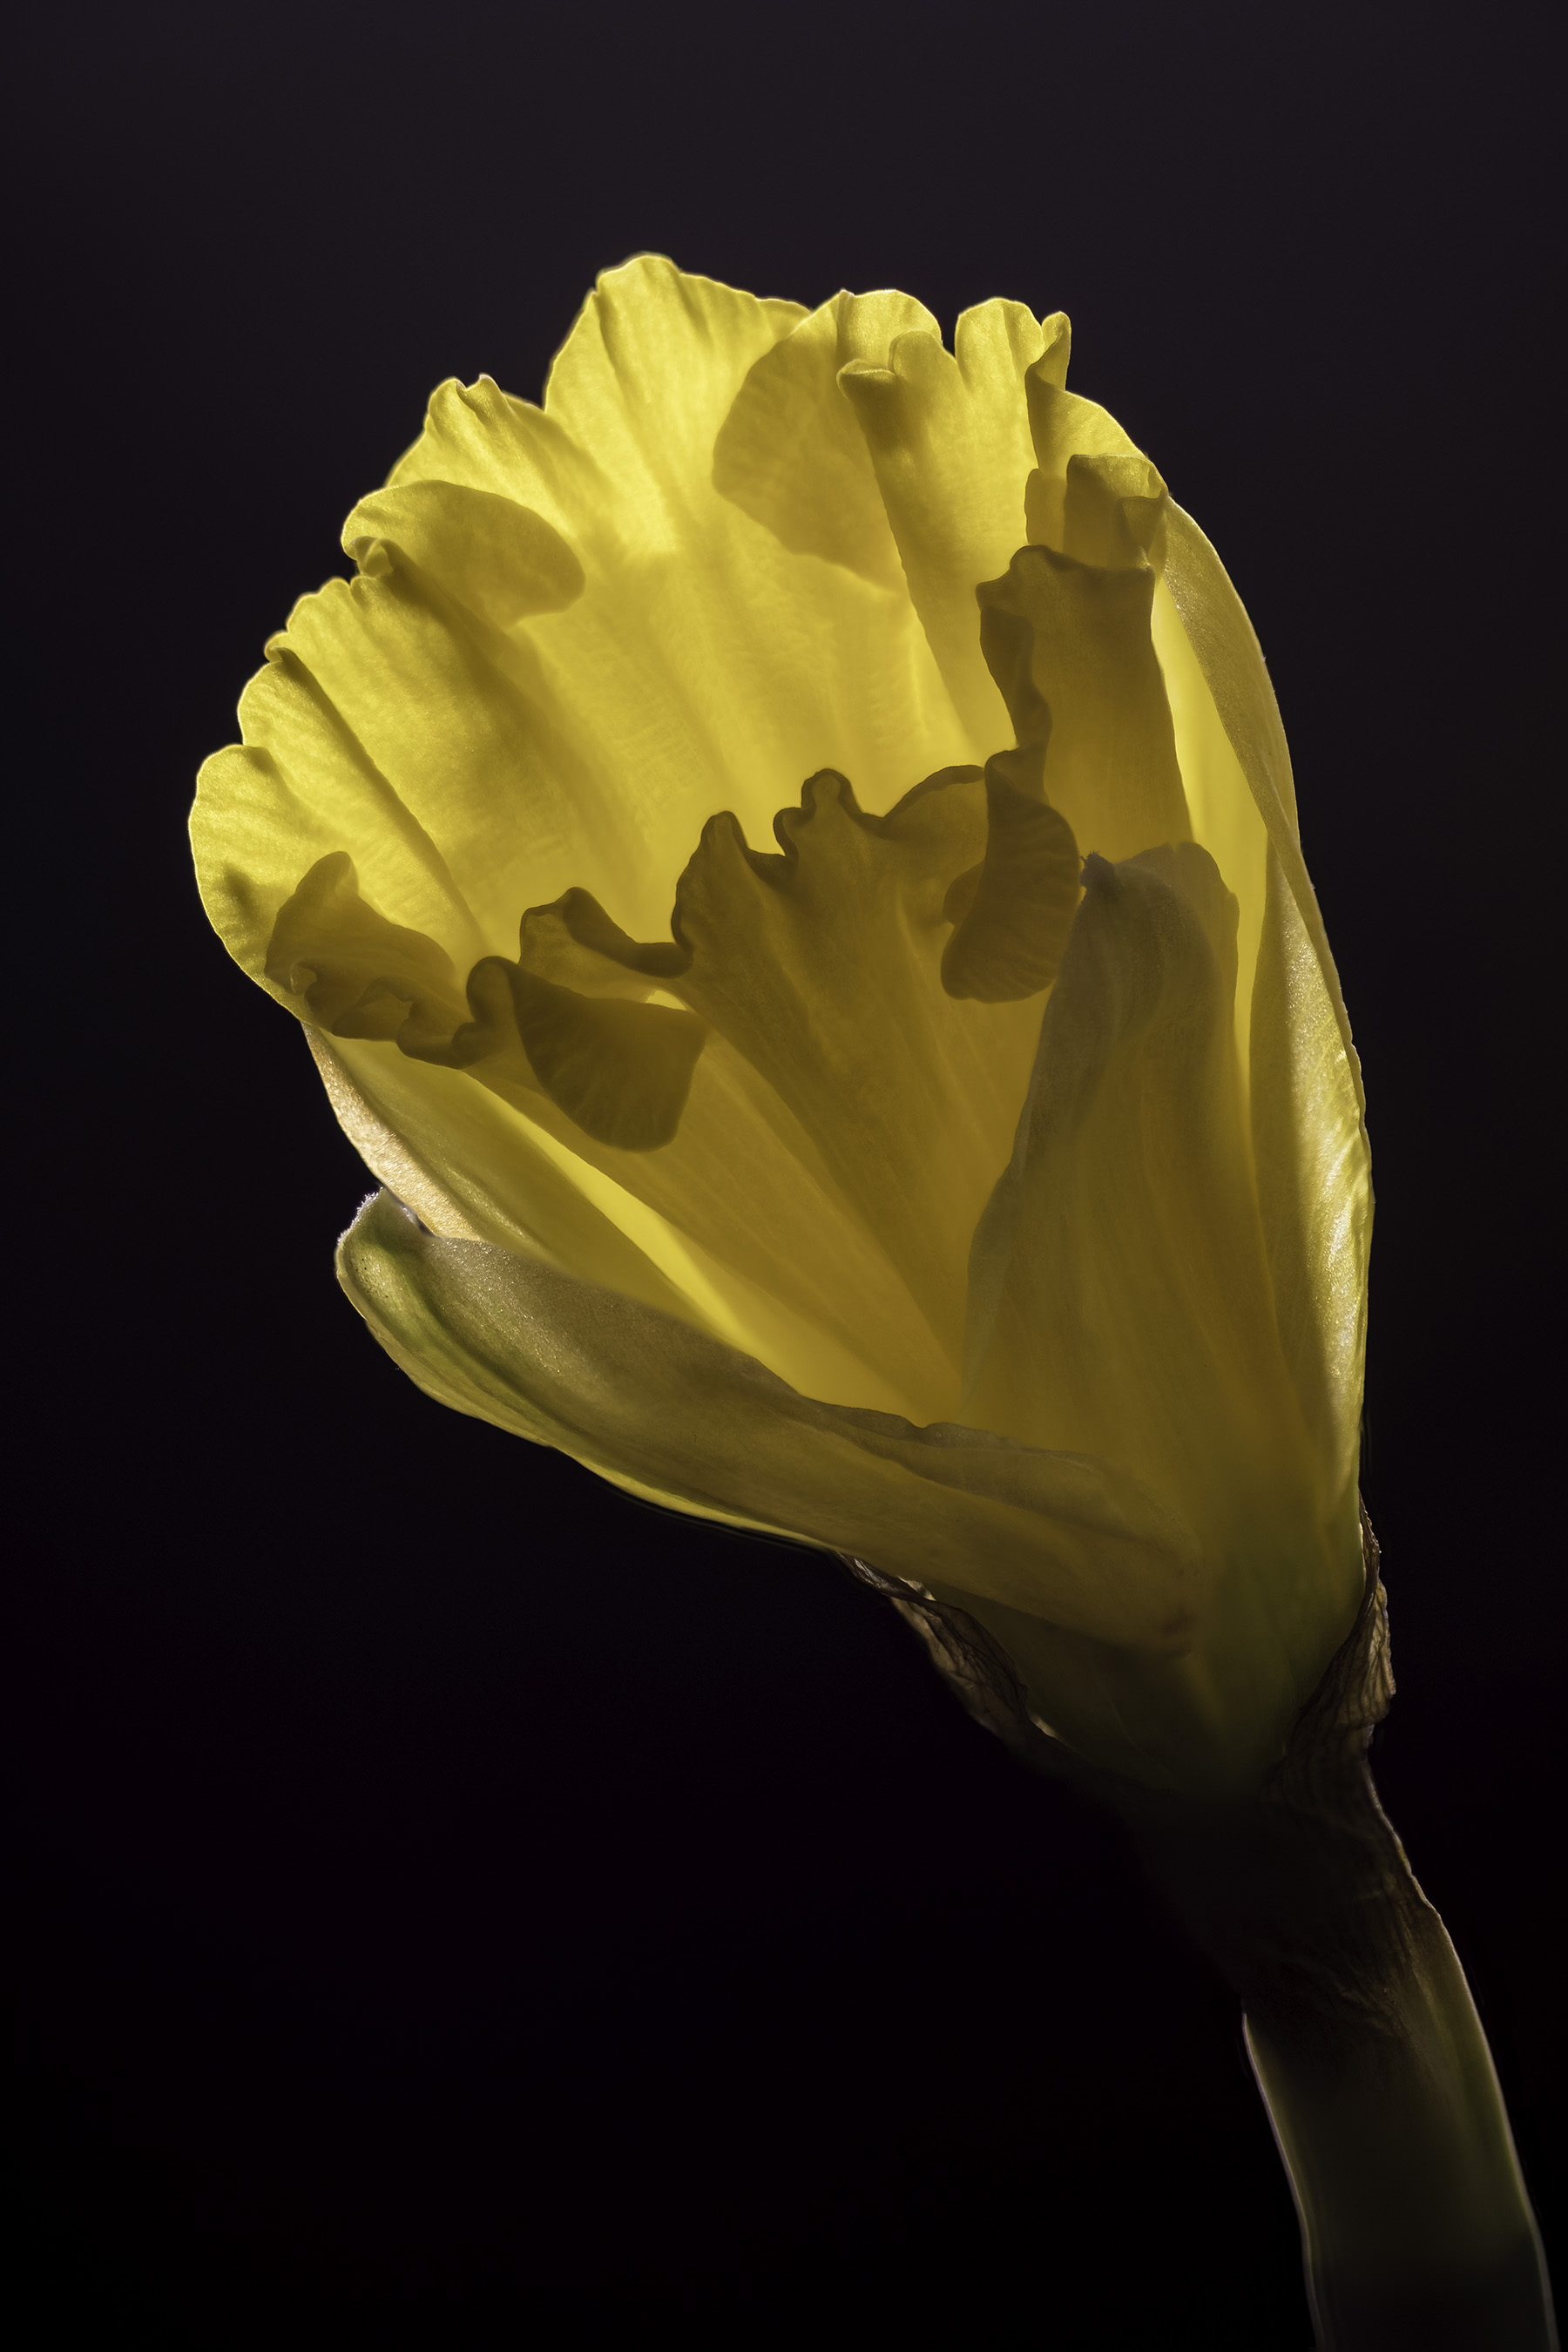
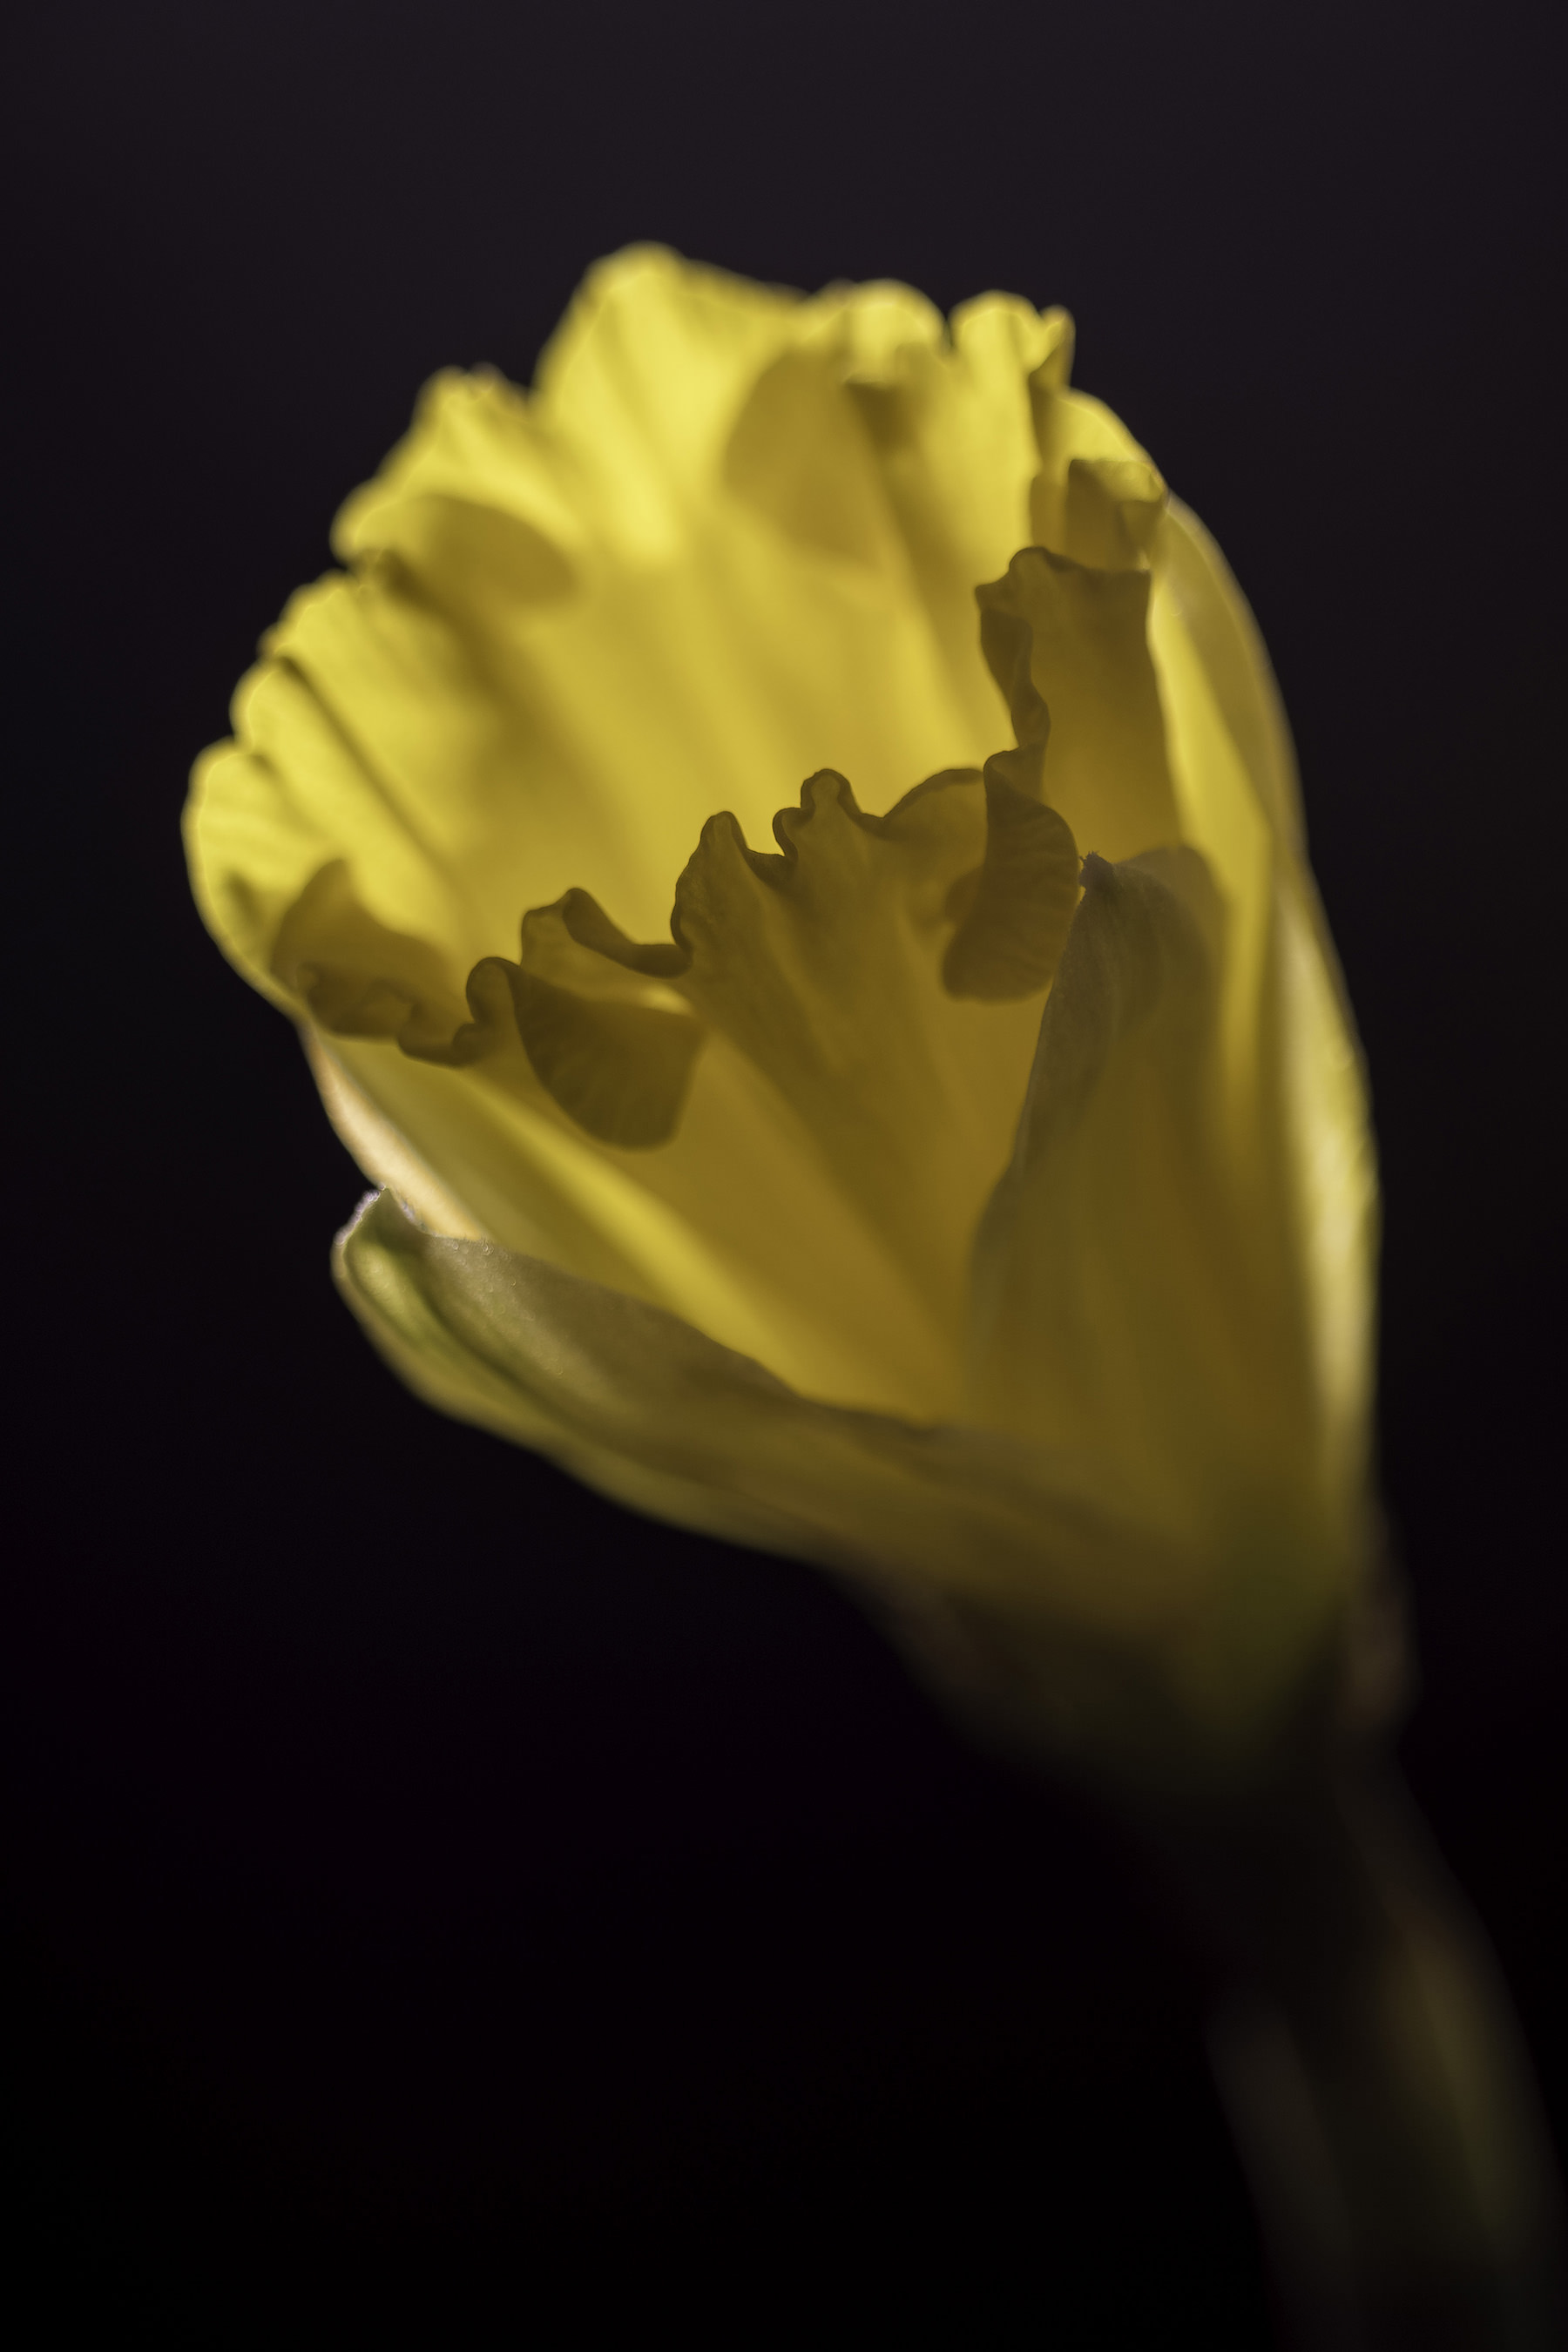
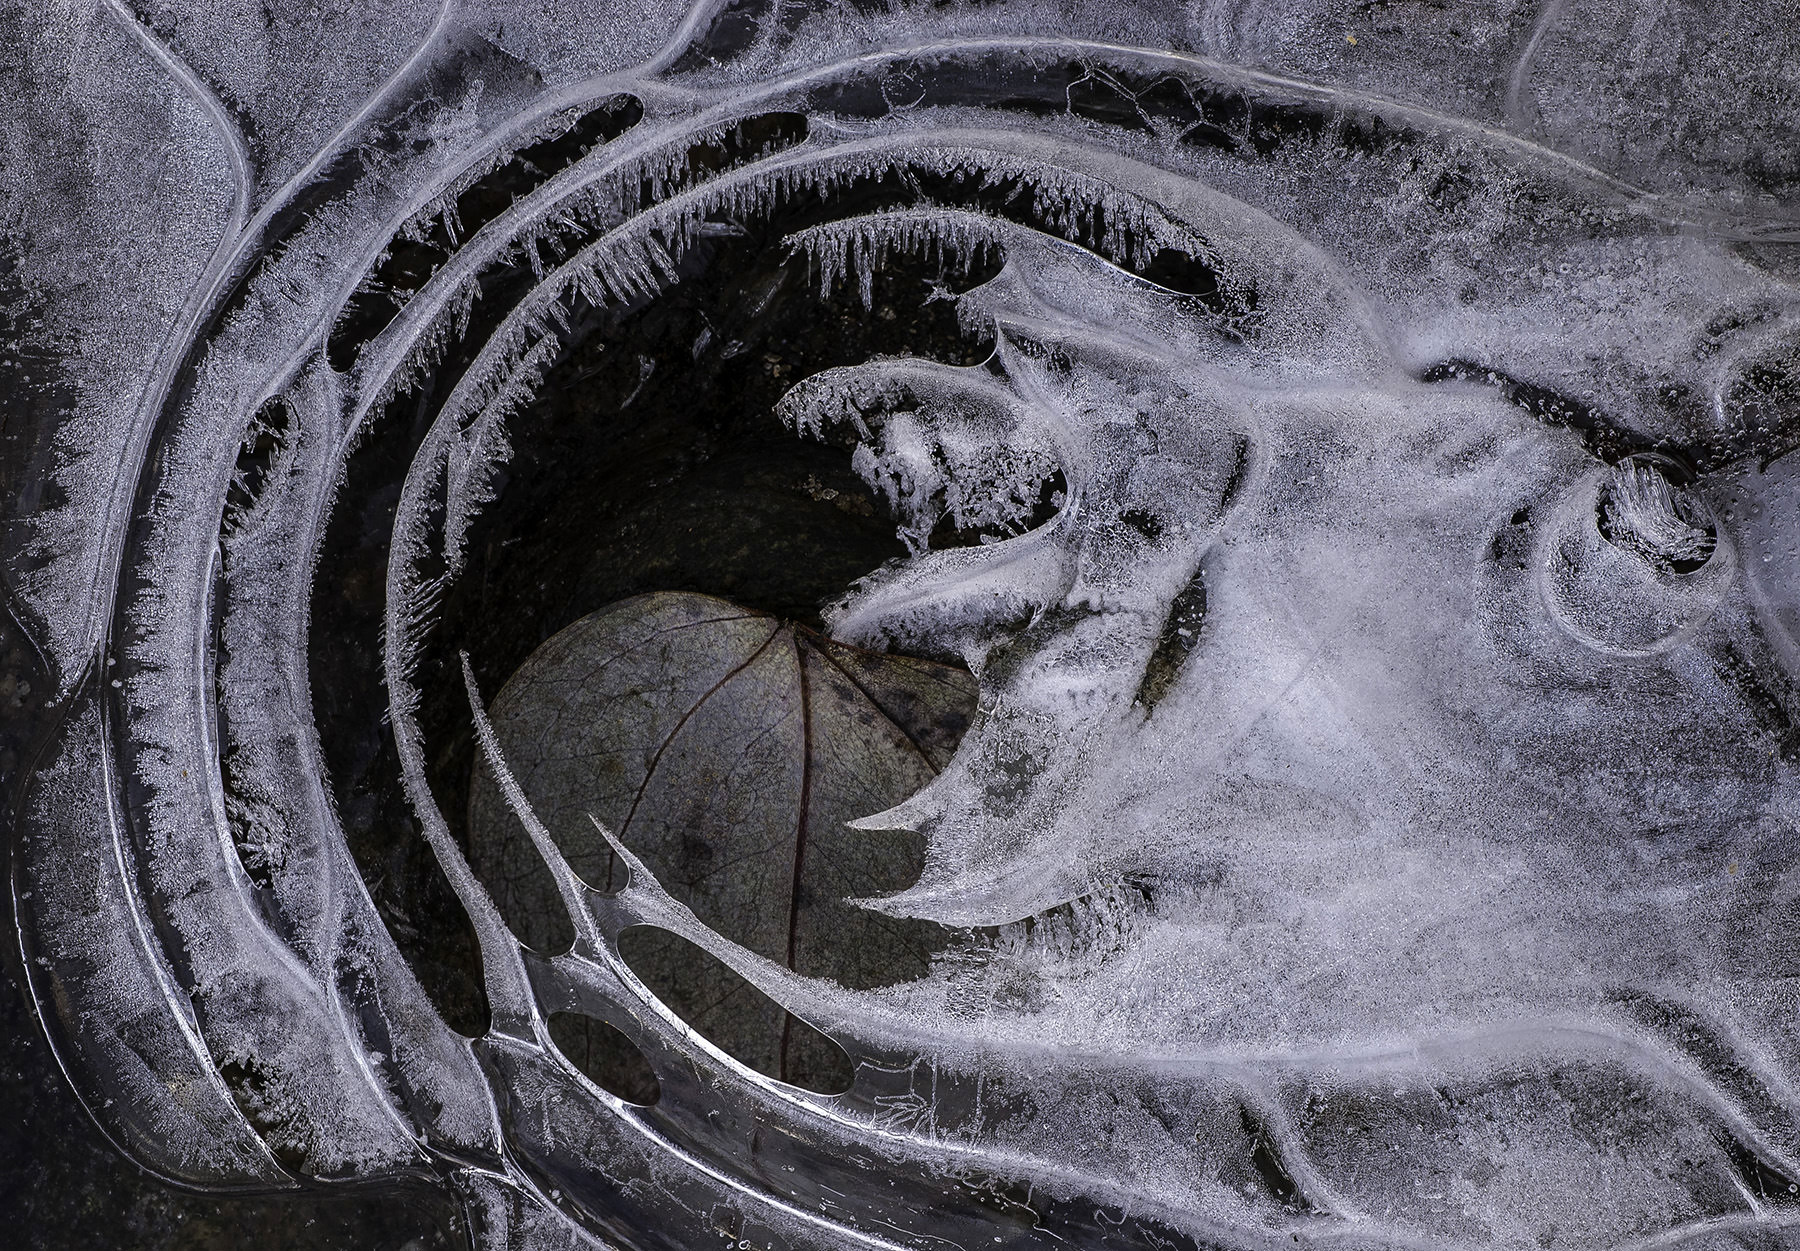
The photographs below provide examples of images obtained from processing focus stacks with Helicon Focus. The first photograph provides the focus blended image from nine frames taken of a daffodil blossom. For comparison, the next photograph is of an individual photo from the focus stack of the daffodil. It demonstrates the limited depth of field from a single frame, focused on the front-most lip of the petals. The last photo is a close up image of a layer of ice and frost that were positioned above a submerged leaf on a shallow stream. In addition to demonstrating focus stacking, it is also an example of taking advantage of bad weather (Lesson Three), in this case with temperatures around 20 ̊ F.
Lesson Five: The less-than perfect subject may turn out to be the most interesting.
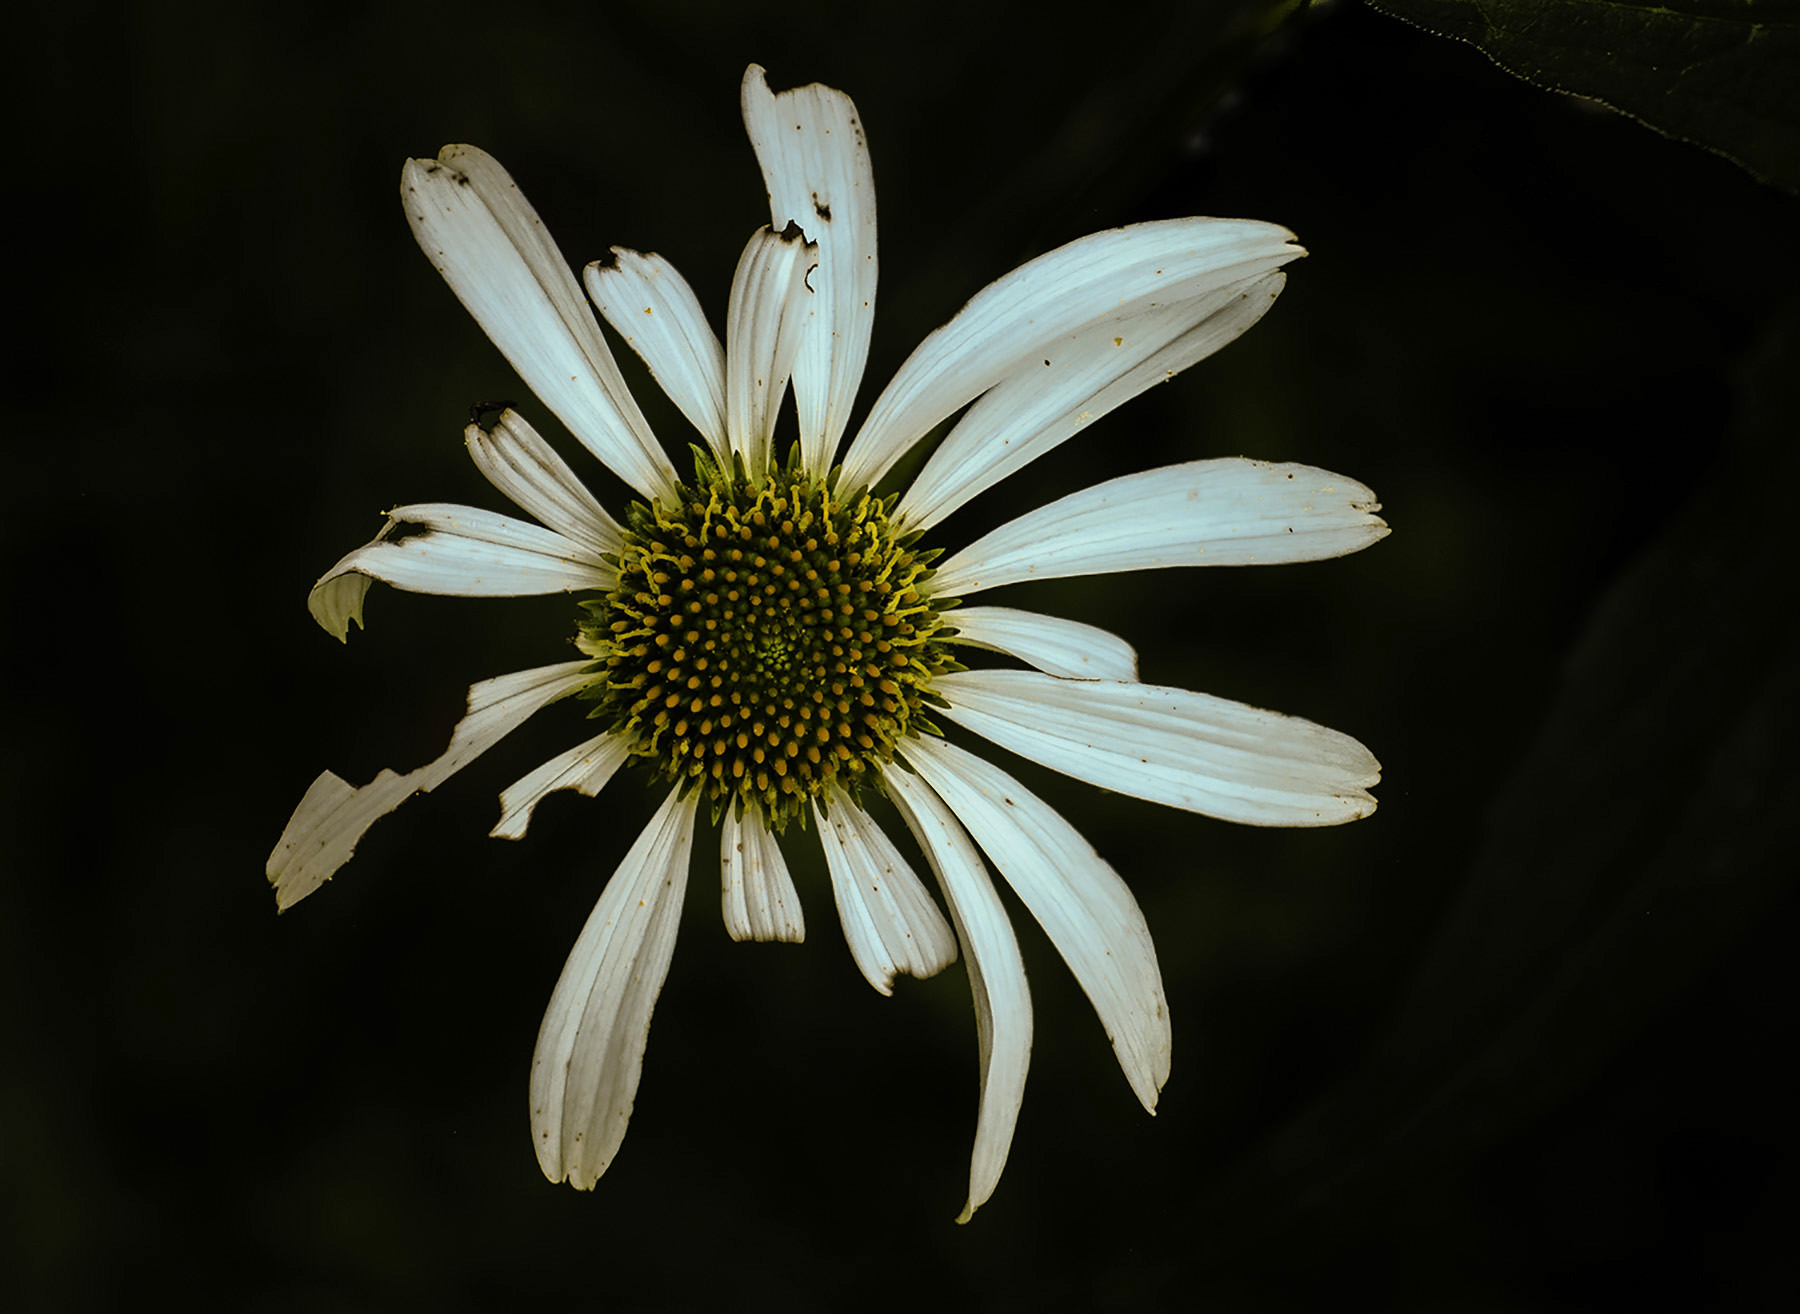
When you’re looking for likely subjects for photography, keep an eye out for objects that are a bit different: a flower with its petals in disarray, for instance, or perhaps a leaf that has had an interesting hole chewed into it by some itinerant insect. It’s not that a perfect, symmetrical flower isn’t a delight, but oftentimes the less perfect subject offers a particular appeal. As an example, the photo below is of a cone flower that was tall enough to catch the sun, above a background that was in shadow. I almost passed it by, but the more I looked at it, the more I liked the pattern of its somewhat deteriorated petals in contrast to the dark background, and also their contrast compared to the still bright center of the flower. I processed it as both color and a black-and-white images, and found that the color image appealed to me more. There are many interesting photographic possibilities that undoubtedly get passed by because they are the ugly ducklings of their genre, but they can be very nice subjects if you can appreciate their appeal. I’ve learned to keep my eye attuned for their presence.
This article has been submitted by James M. Mullins.
Very good text, nicely illustrated. Thanks, James.
Excellent articles James, and thanks for sharing these lessons. I am certainly guilty of a few of these mistakes myself. Like Tomas above, I too like the exoskeleton in the mushrooms – it’s a nice recording of a natural event. Lovely photos too – I simply adored the submerged leaf. Hats off to you for seeing the opportunity there and creating a beautiful work of art.
Thank you for your lessons, I can safely say I hadn’t really considered focus stacking that much but I’ll probably be looking into it a fair bit more. This may also be just me but I actually like the exoskeleton in the mushrooms picture and I can definitely see how you’d miss it while taking pictures (or I know *I* could have missed it without a doubt, goodness knows in the past I missed much more obvious things such as high voltage cables right in the middle of my viewfinder. Another thing to be considered for the third lesson is in both close-up photography (of flowers, in particular) and also wildlife photography, as both “subjects” look especially good after a nice downpour.
All in all, lovely pictures and a well written piece, thank you!