Adobe Lightroom is a complex piece of software, and it includes countless features that are buried beneath the surface. In this article, I will cover four useful Develop options that aren’t obvious at first glance, ranging from precision cropping to local color adjustments. If you are a Lightroom guru, you certainly may use each of these already; however, for most Lightroom users, these features are somewhat difficult to find.
Table of Contents
1) Precision Cropping
One thing that bothers me about Lightroom is that you cannot crop your images to pixel-level precision. Especially on a small monitor, it is difficult to crop to exactly the right spot in a photo. You can get close, certainly, but Lightroom’s cropping tool does not allow the fine adjustments that I sometimes need.
This doesn’t matter for the vast majority of images, but there are some scenes where it is important. Consider a landscape where you want to include as much of the sky as possible, but there is a tree branch at the upper corner; by cropping at the pixel level, you could include the absolute largest amount of sky possible. If you plan to make a large print, Lightroom’s standard level of precision simply is not enough.
Luckily, there is a way to remedy the problem. It certainly is not perfect – and not everyone needs such a careful crop in the first place – but you can make more precise adjustments simply by clicking the “crop” tool, then closing the sidebars of your editing window. By doing so on a small computer monitor, you can nearly double the size of your photo on-screen, which correspondingly improves your cropping precision. Look at the image below:
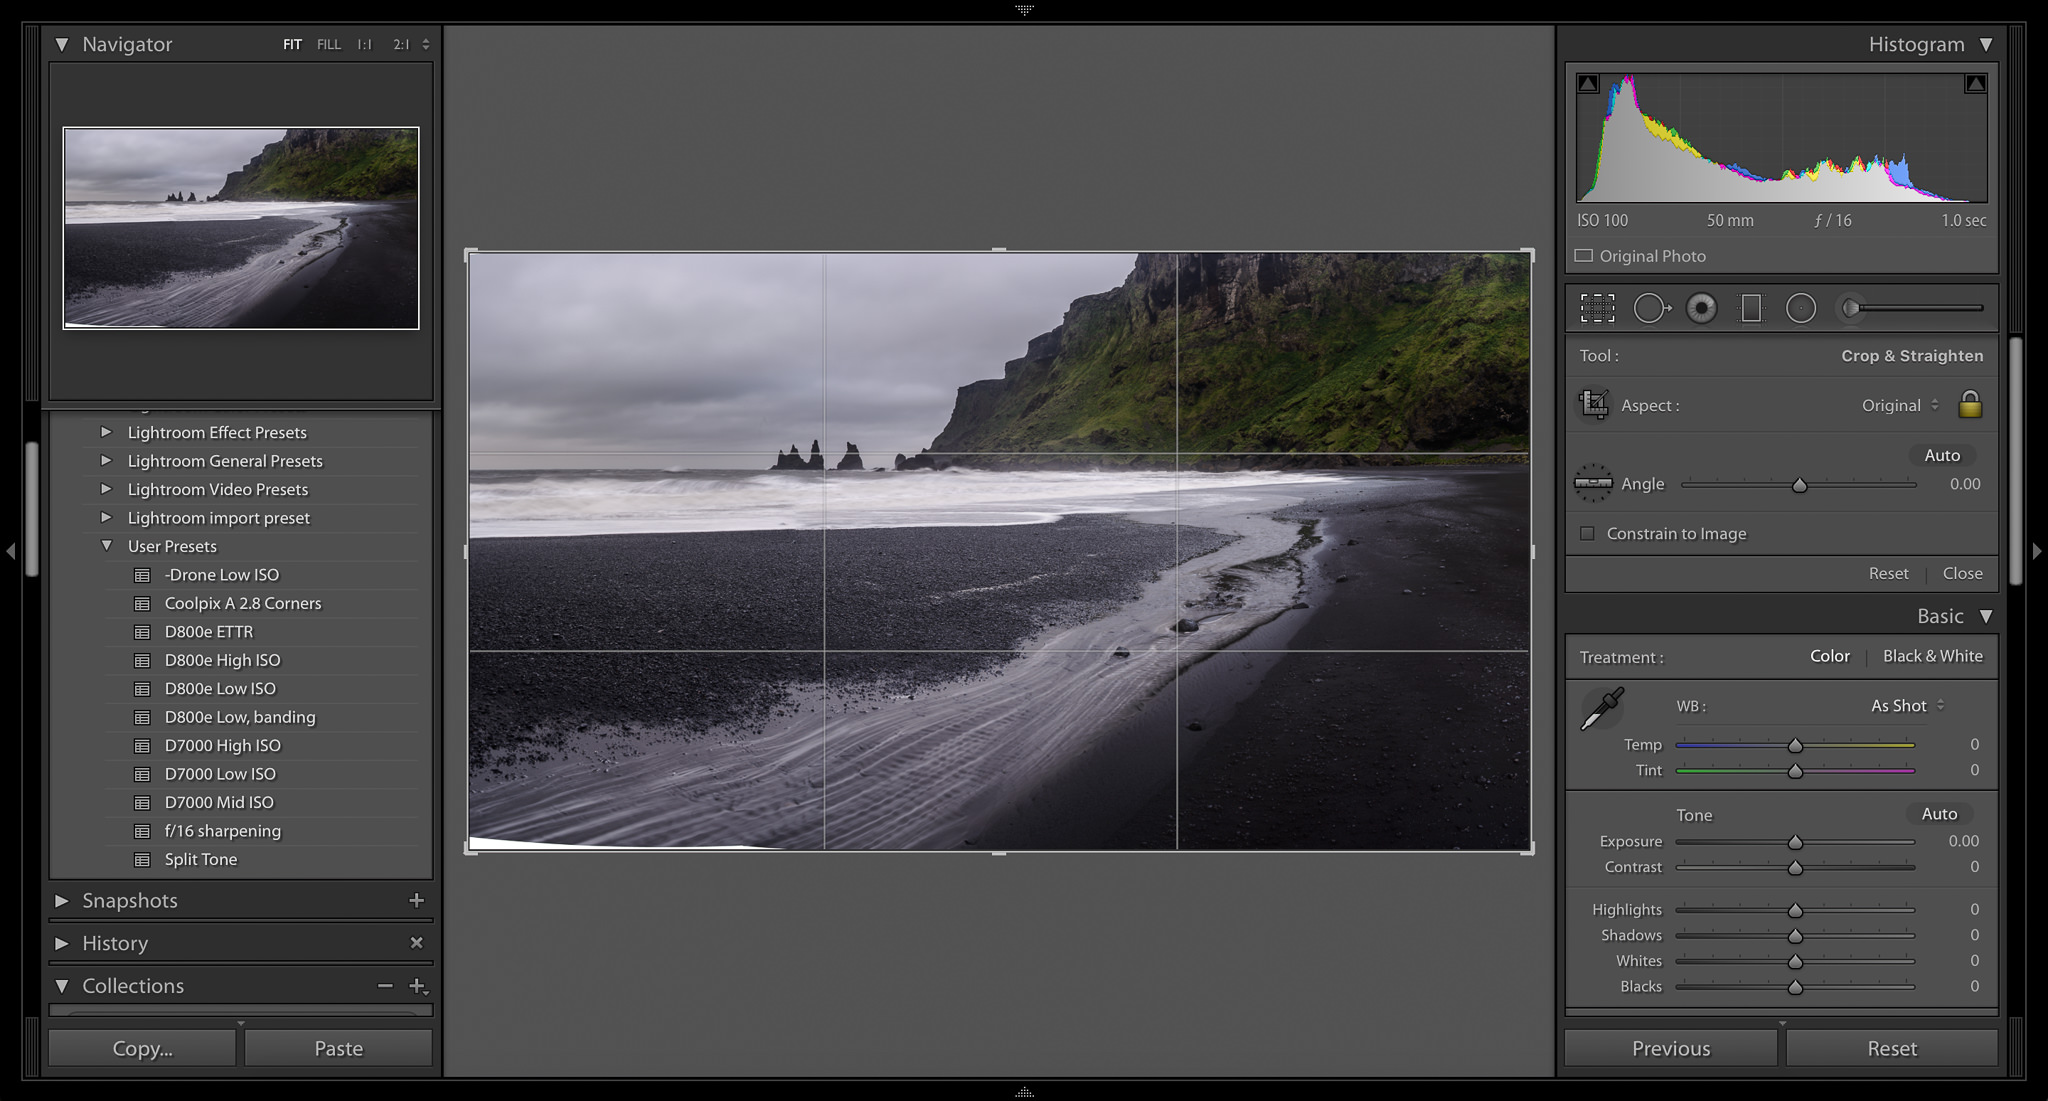
This is the standard cropping window in Lightroom. As you can see, the bottom-left corner of this image is white and featureless. (This is a panorama, and the lack of detail is a result of the photo-merging process.) I want to include as much detail as possible above that corner, but I clearly didn’t want to include any of the white area itself. Here, though, the cropping tool is not very precise; it is difficult to adjust the image exactly how I want.
To make the most precise crop possible – getting rid of the white space without removing any of the beach itself – I needed to collapse the left and right sidebars. See the screenshot below:
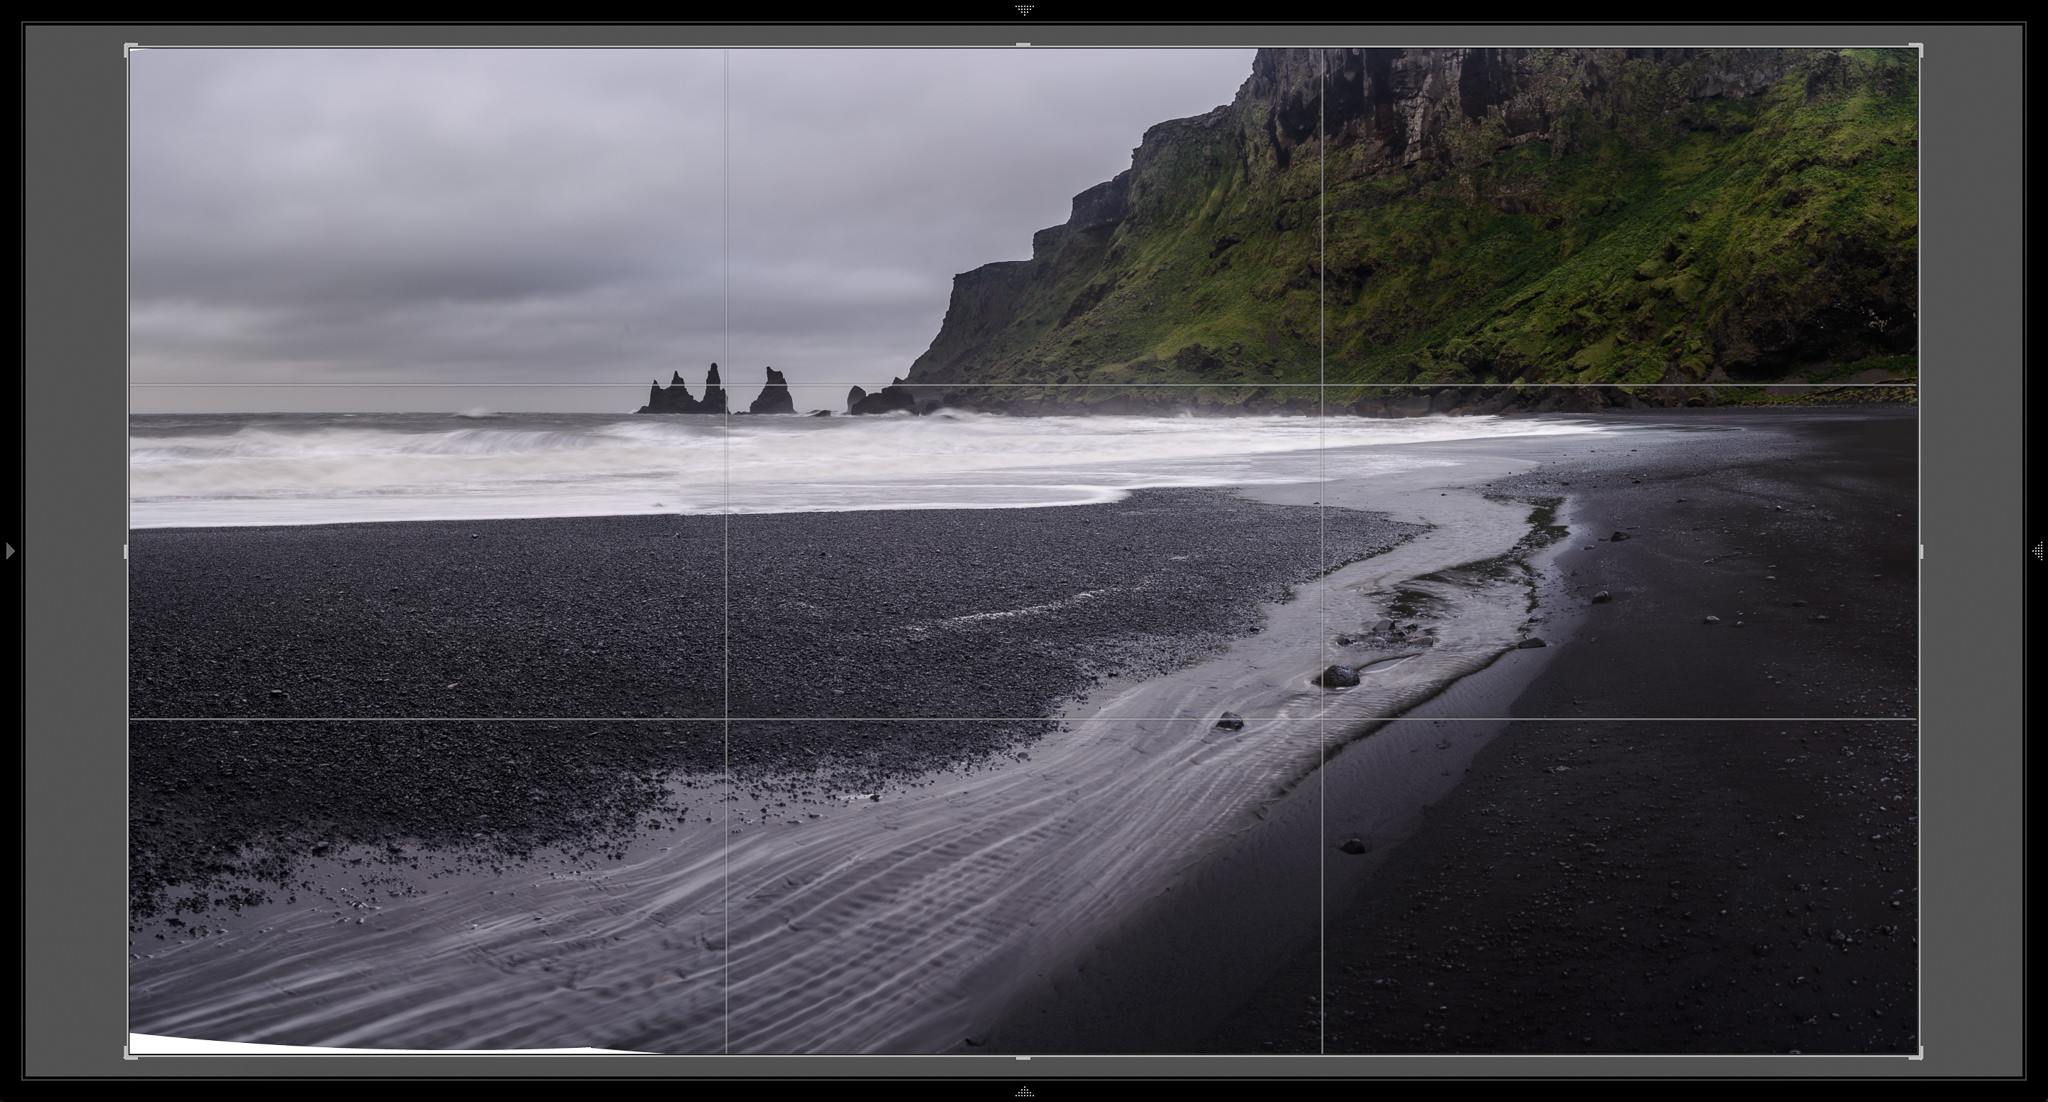
This gives me much more room! I can collapse the sidebars without closing the crop tool. Now, it is much easier to get the exact frame that I want. The final version is below:

I don’t use this technique very often, but it is invaluable for certain photographs. For your trickiest images, this extra precision is more than welcome.
2) The Alt Key
One of my personal favorite Lightroom tricks is the unassuming Alt key (Option for Mac users). If you are in the develop module, hold down Alt while making an adjustment; chances are, something about your screen will change!
The Alt key functions as a preview. If you hold Alt while adjusting exposure, Lightroom will show you which highlights are blown-out to white; the same is true if you adjust highlights or whites. Likewise, if you hold down alt while adjusting shadows or blacks, you will see which areas of your photo have gone completely dark.
Many common adjustments have a built-in preview. One of my favorites is the Defringe option under Lens Corrections > Color. This option lets you remove color fringes, or longitudinal chromatic aberrations (as explained in this article). When you hold down the Alt key, Lightroom shows you all the colors that can be removed through the fringe correction tool. This is incredibly useful! Check out the photograph below:
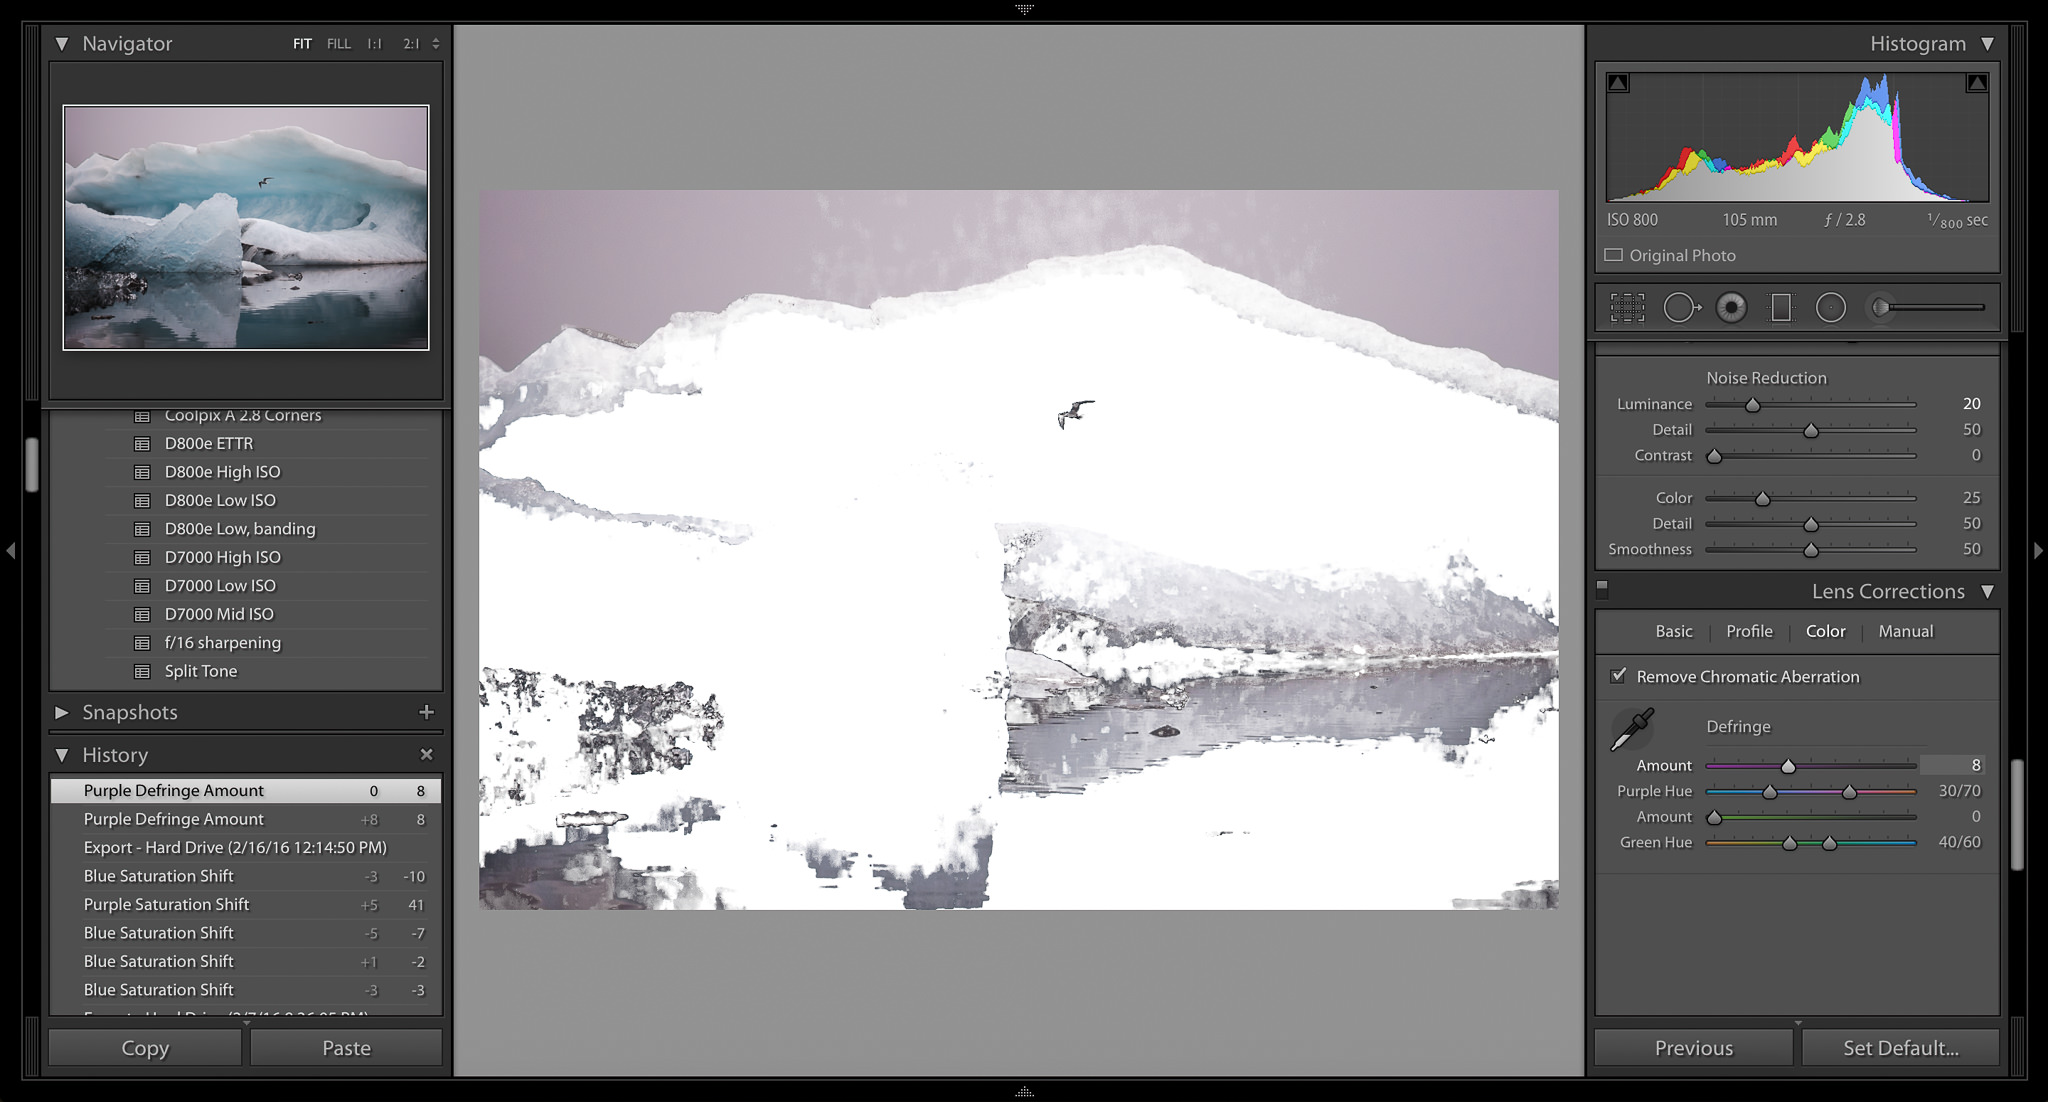
In the image above, everything in purple can be eliminated by a strong fringing correction. (In this case, there wasn’t actually color fringing; this is simply an example photo with a lot of purple.)
Here is a list of all the adjustments that open previews with the Alt key:
- Basic
- Exposure: Shows which highlights are blown-out to white
- Highlights: Shows which highlights are blown-out to white
- Shadow: Shows which shadows are completely black
- Whites: Shows which highlights are blown-out to white
- Blacks: Shows which shadows are completely black
- Split-Toning
- Hue sliders: Previews the hue that you are adding to your shadows or highlights
- Balance: Previews the balance between shadow and highlight colors (read more)
- Detail
- Sharpening amount: Makes the photograph black-and-white to preview sharpening without any color noise
- Radius: Exaggerates sharpening adjustments to show the radius, as if you have applied a high-pass filter
- Detail: Again, appears as if you applied a high-pass filter – only shows the edges that will be sharpened
- Masking: Very useful – darkens everything that won’t be sharpened
- Luminance noise reduction: Makes the photograph black-and-white to preview without any color noise
- Luminance detail: Makes the photograph black-and-white to preview without any color noise
- Luminance contrast: Makes the photograph black-and-white to preview without any color noise
- Lens Corrections
- Defringe amount: Shows which colors are detected by the Defringe tool
- Defringe hue: Turns black everywhere that is affected by the Defringe tool
- Effects
- Midpoint: Darkens the vignette that you have applied, allowing for a better preview
- Roundness: Darkens the vignette that you have applied, allowing for a better preview
- Feather: Darkens the vignette that you have applied, allowing for a better preview
- Highlights: Darkens the vignette that you have applied, allowing for a better preview
There are other adjustments that change when you press the Alt key – the gradient mask centers itself, for example – but the items above give you a preview of your edits. Depending upon the photograph that you are processing, they can be incredibly helpful.
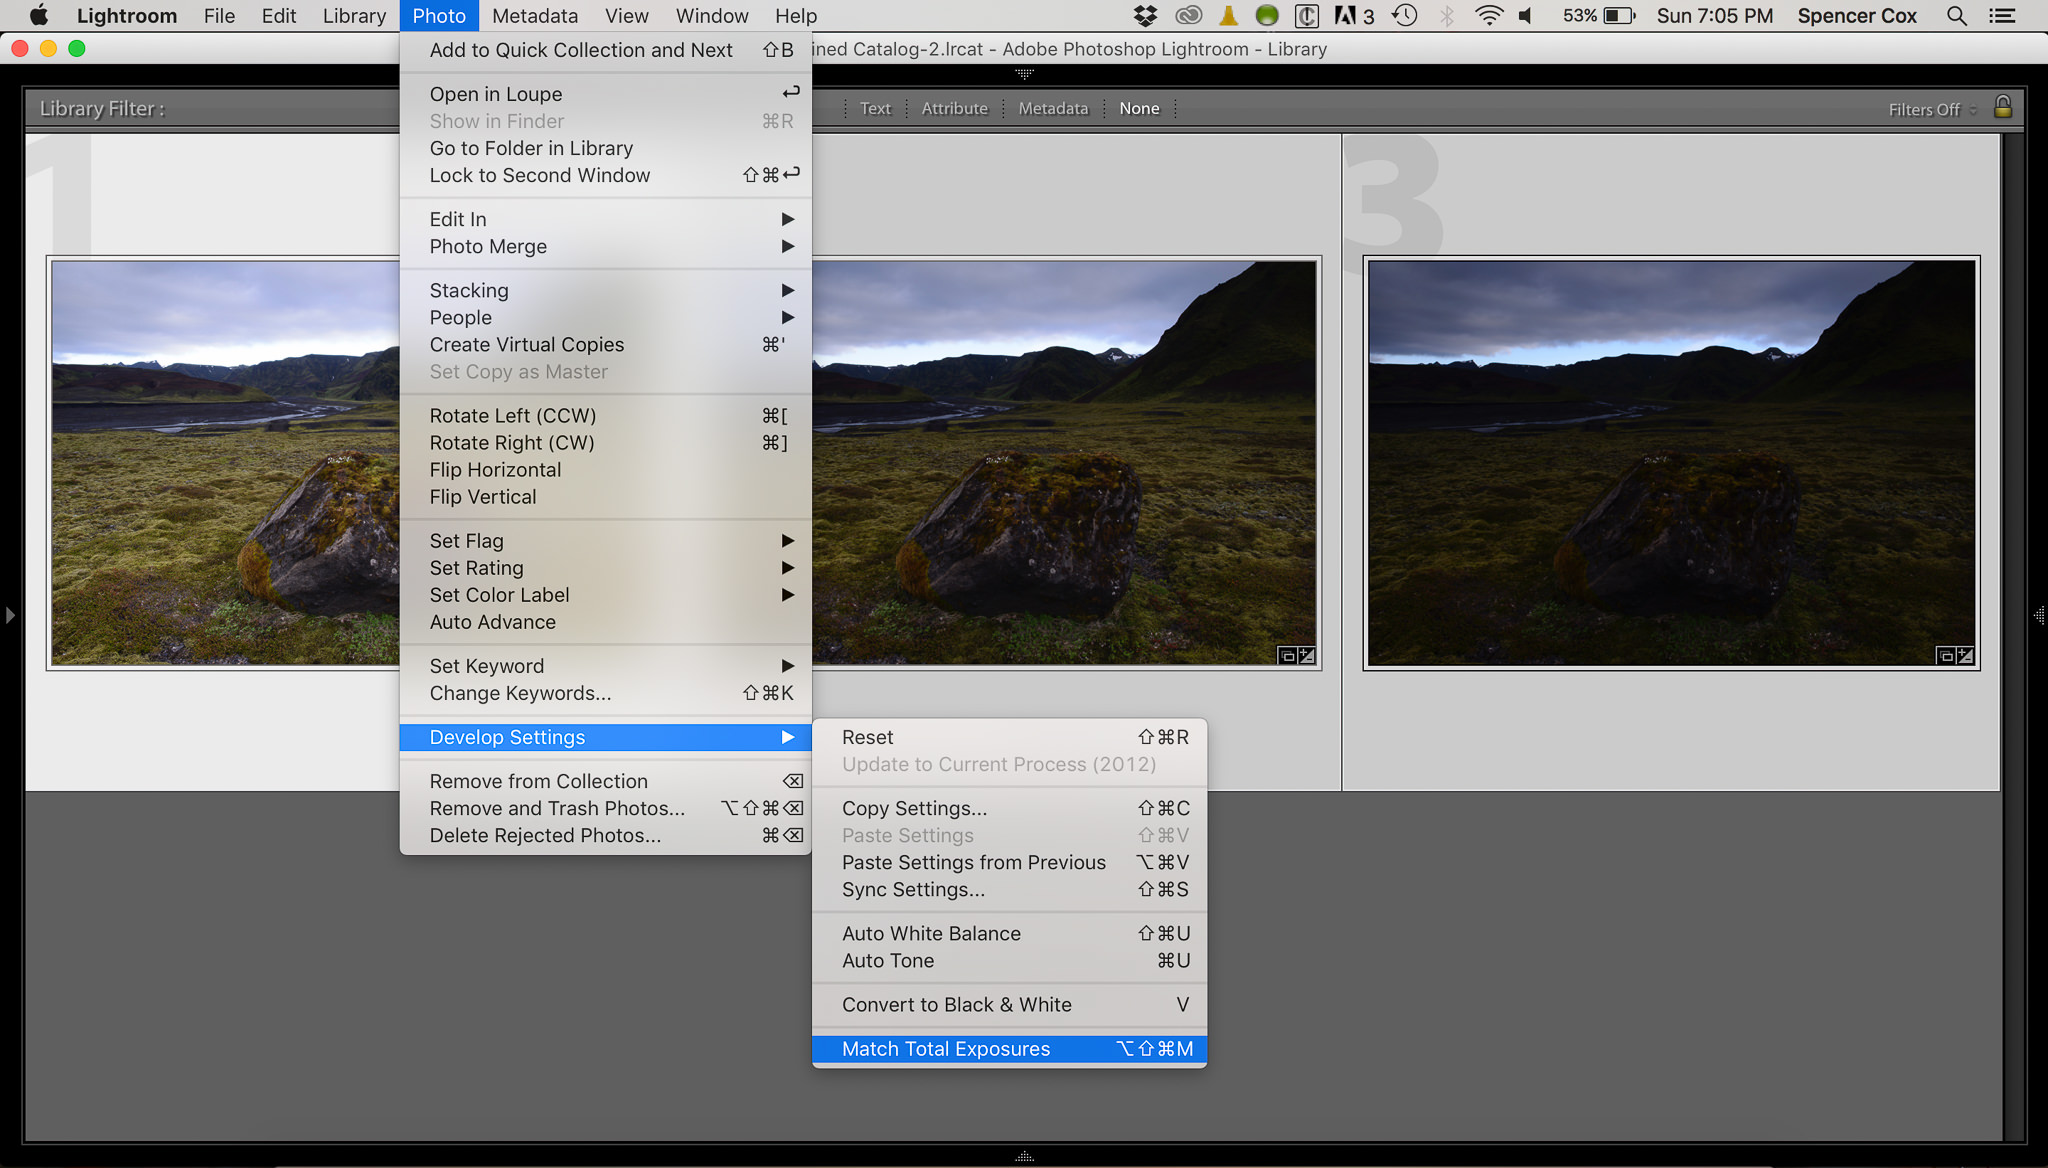
3) Match Total Exposure
Another useful feature of Lightroom is the Match Total Exposure setting. Essentially, this option lets you take a series of photographs – all with different exposures – and then adjust them to match the same level of brightness.
The process is quite simple. First, hold down the Control key (Command on Mac) and click on each photo that you want to be the same brightness. Then, click again on the photograph that you want them all to match. (Every photo should be highlighted now, but the “target” image should be highlighted most prominently.) See below:
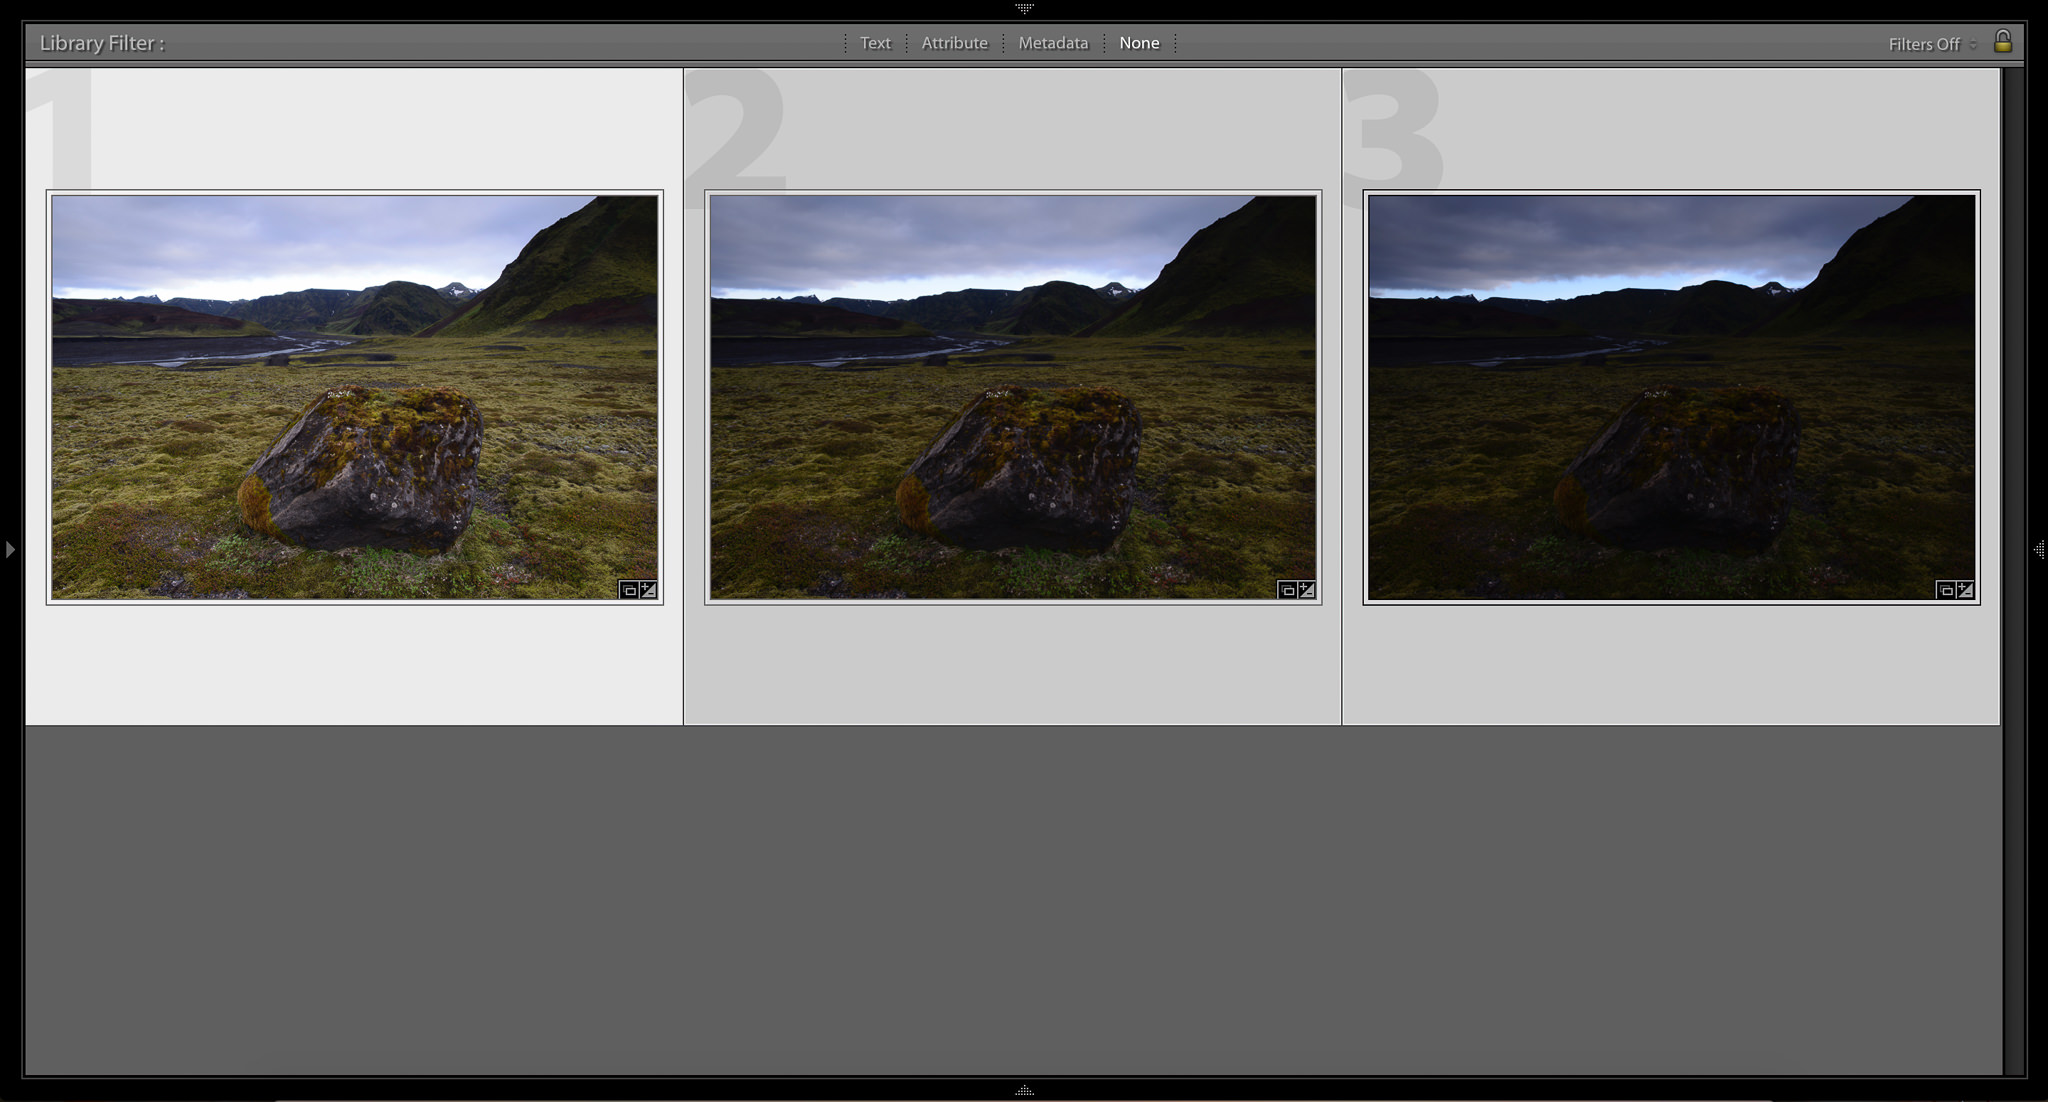
The next step is to click “Photo” at the top of the page, then “Develop Settings” and “Match Total Exposure.” See the photo below:
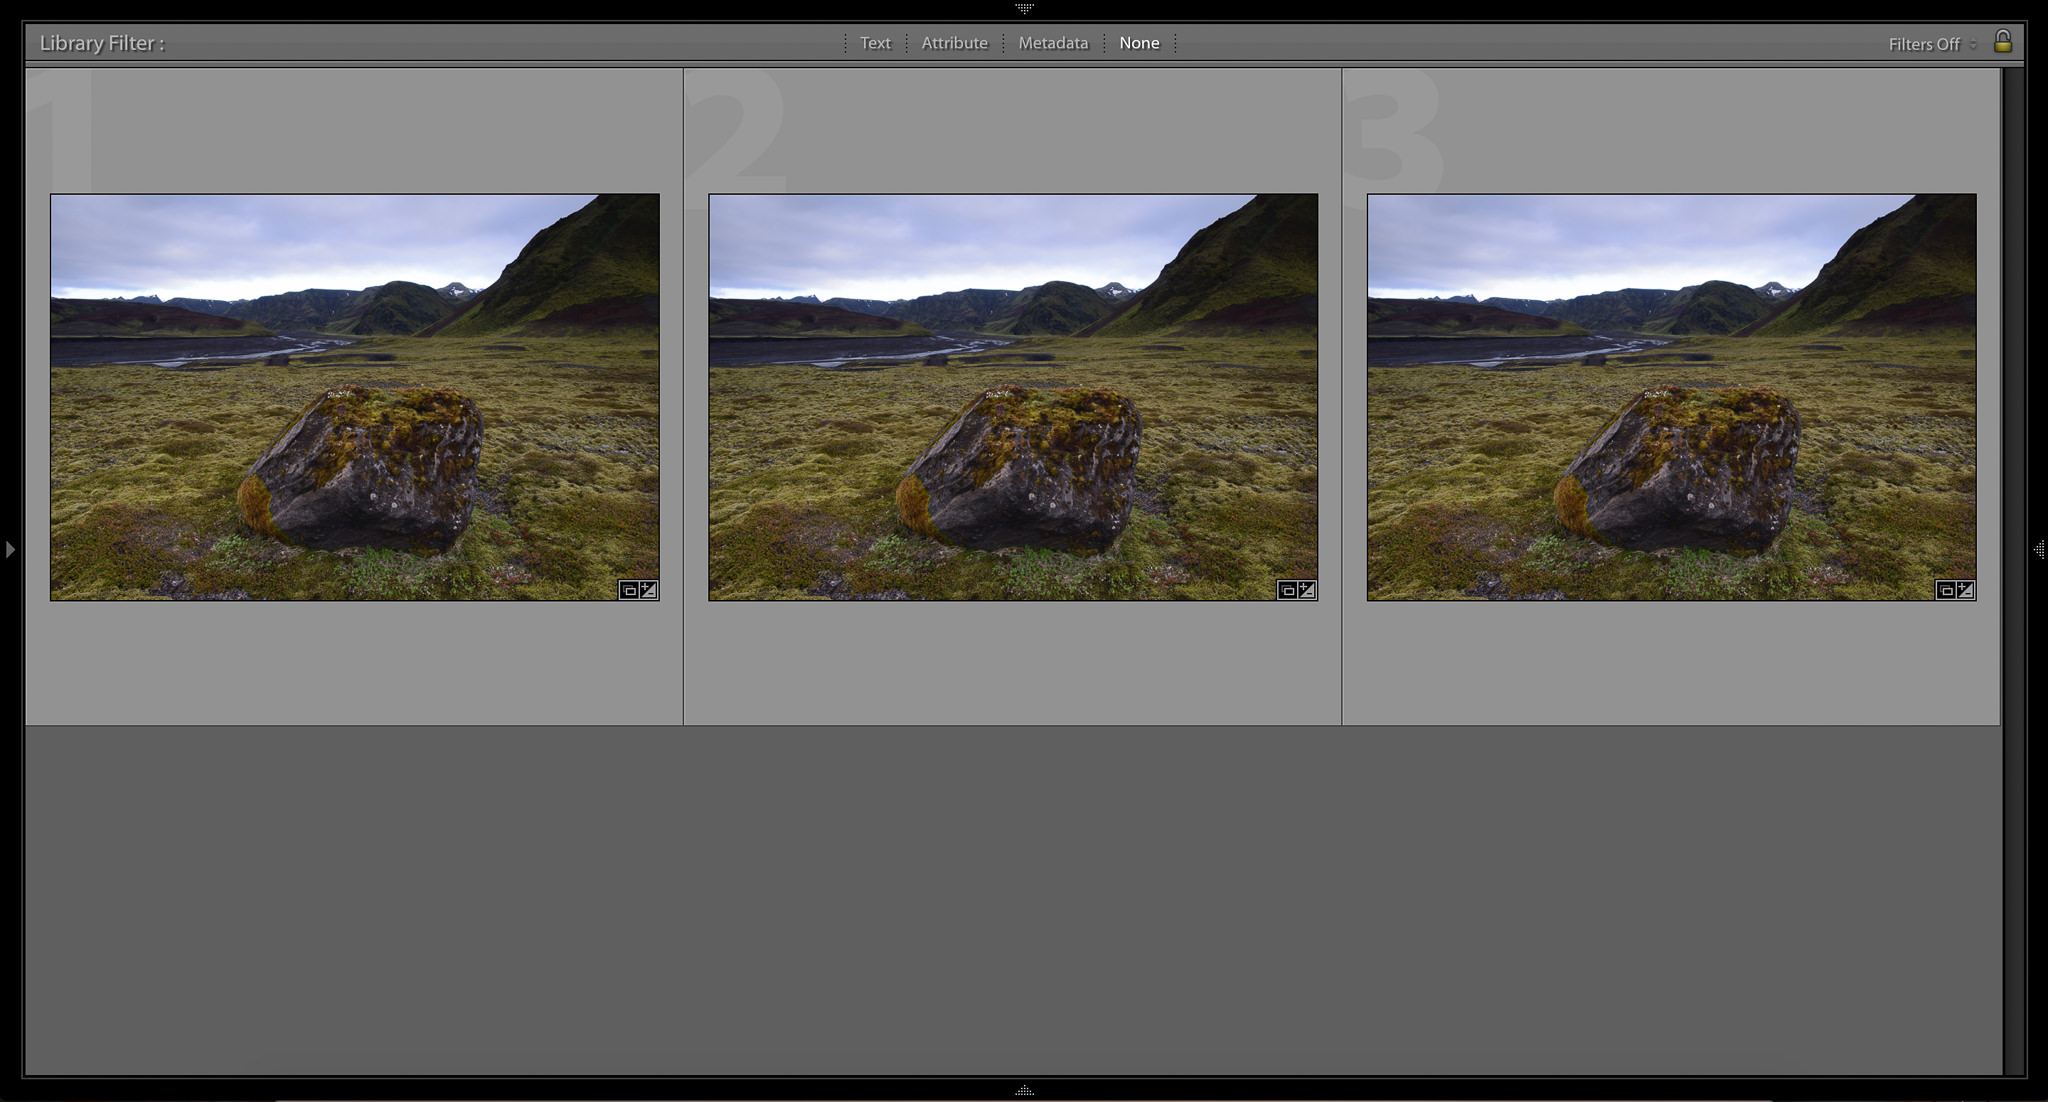
Ultimately, Match Total Exposure gives you a result like this:
I use this setting quite a bit when I expose to the right. I may take a single photograph at the “proper” exposure, then a series of increasingly bright photographs. I can use the Match Total Exposure setting to make all of the photographs look like the first, “correct” image – then compare each subsequent photo to see which ones retain detail in the highlights.
There are other uses, as well. If you want to blend several photos into a panorama, they should be the same brightness; if that is not the case, for whatever reason, you need to equalize their exposures. Doing this manually is a painful task, but the Match Total Exposure option is incredibly easy.
Note that Match Total Exposure works based on your camera settings. If you took a photograph indoors, for example, and then turned on an extra light (without changing your settings), the Equalize Exposure option wouldn’t have any effect – even though your second photo would be brighter.
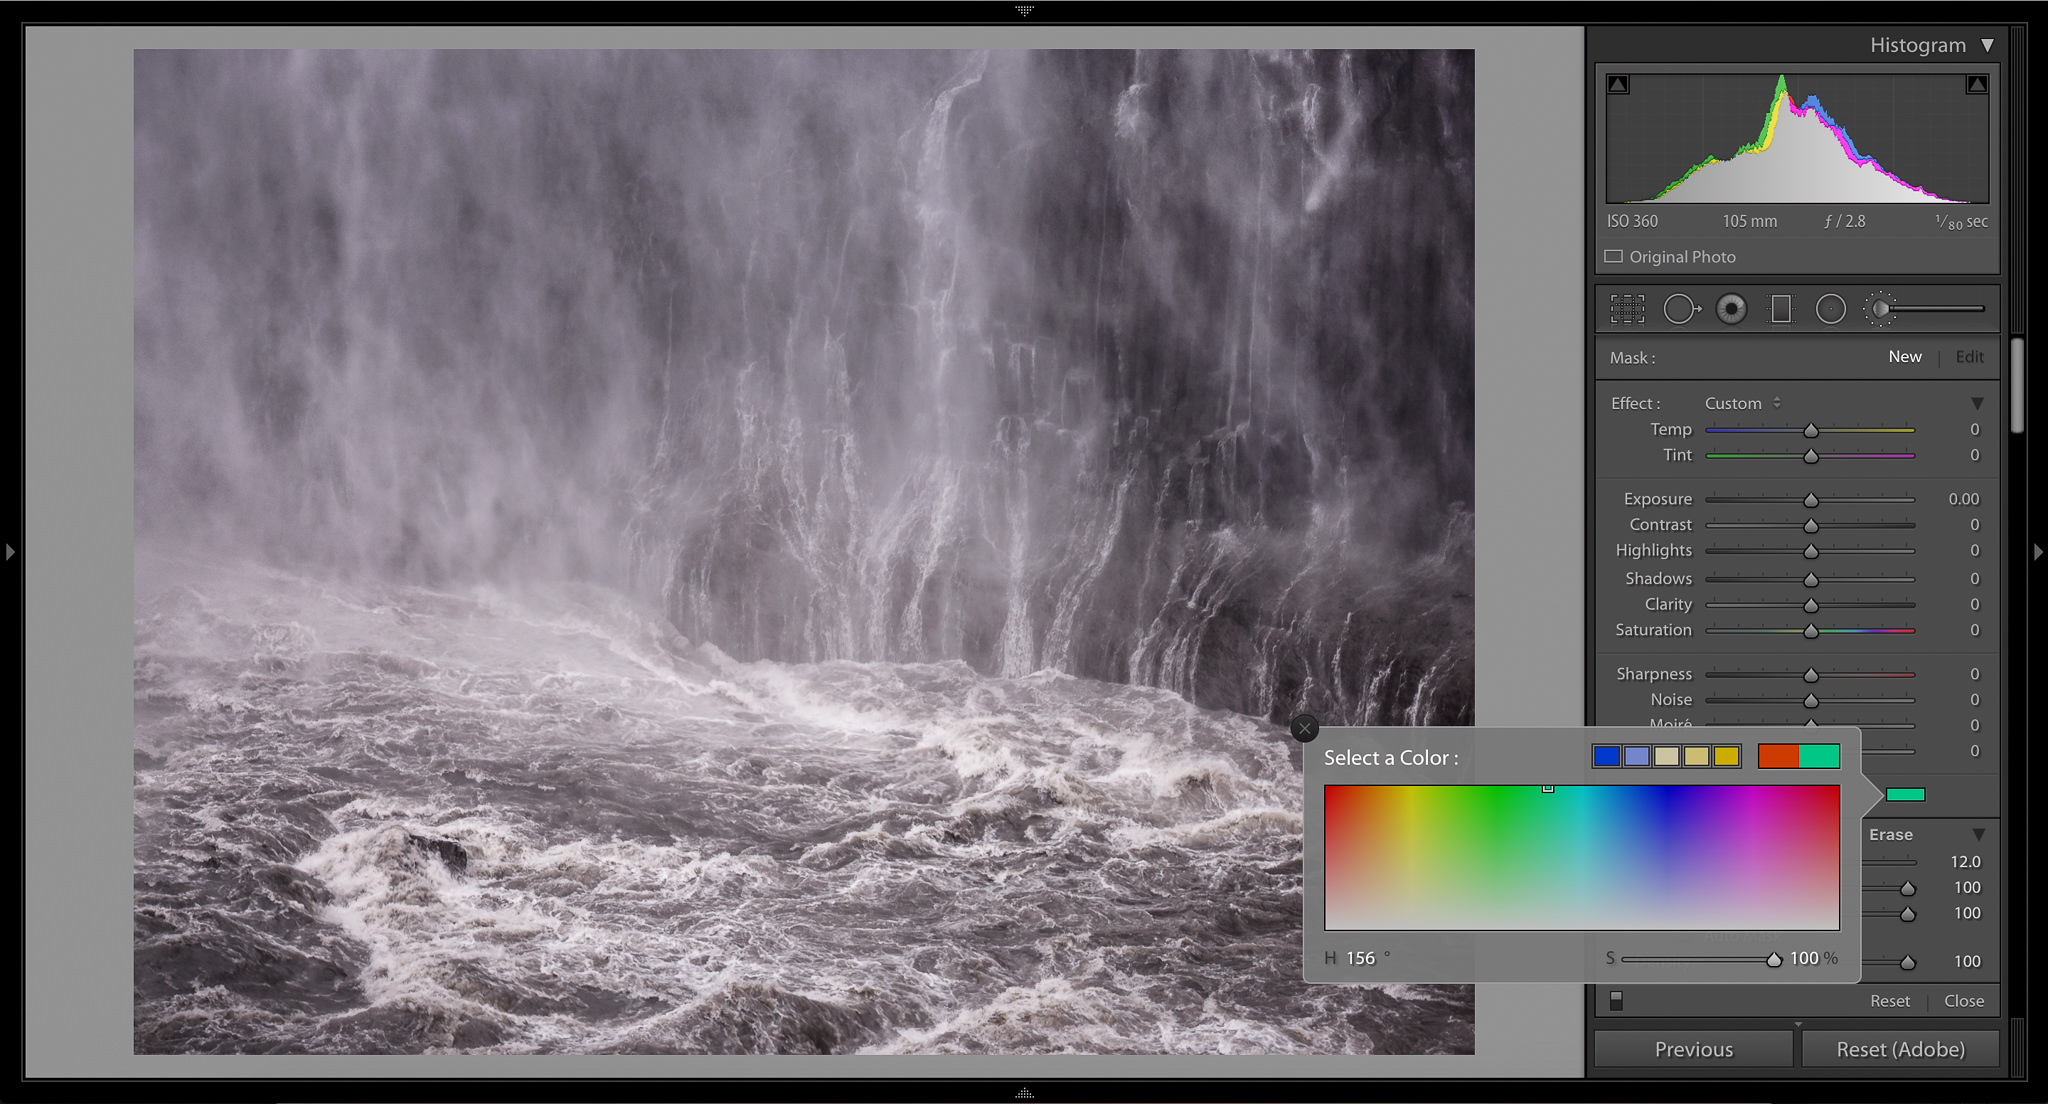
4) Local Color Adjustments
One adjustment that I just recently found – and, honestly, have only used for experimentation at this point – is an interesting local color adjustment tool.
This option is hiding in plain sight under any local adjustment tab. Click on the gradient tool, for example; the lowest slider in the gradient menu is the “Defringe” tool. Below that, though, is another option: Color. By clicking on the gray box to the right of the word color, you open up the local color adjustment tool. See the screenshot below:
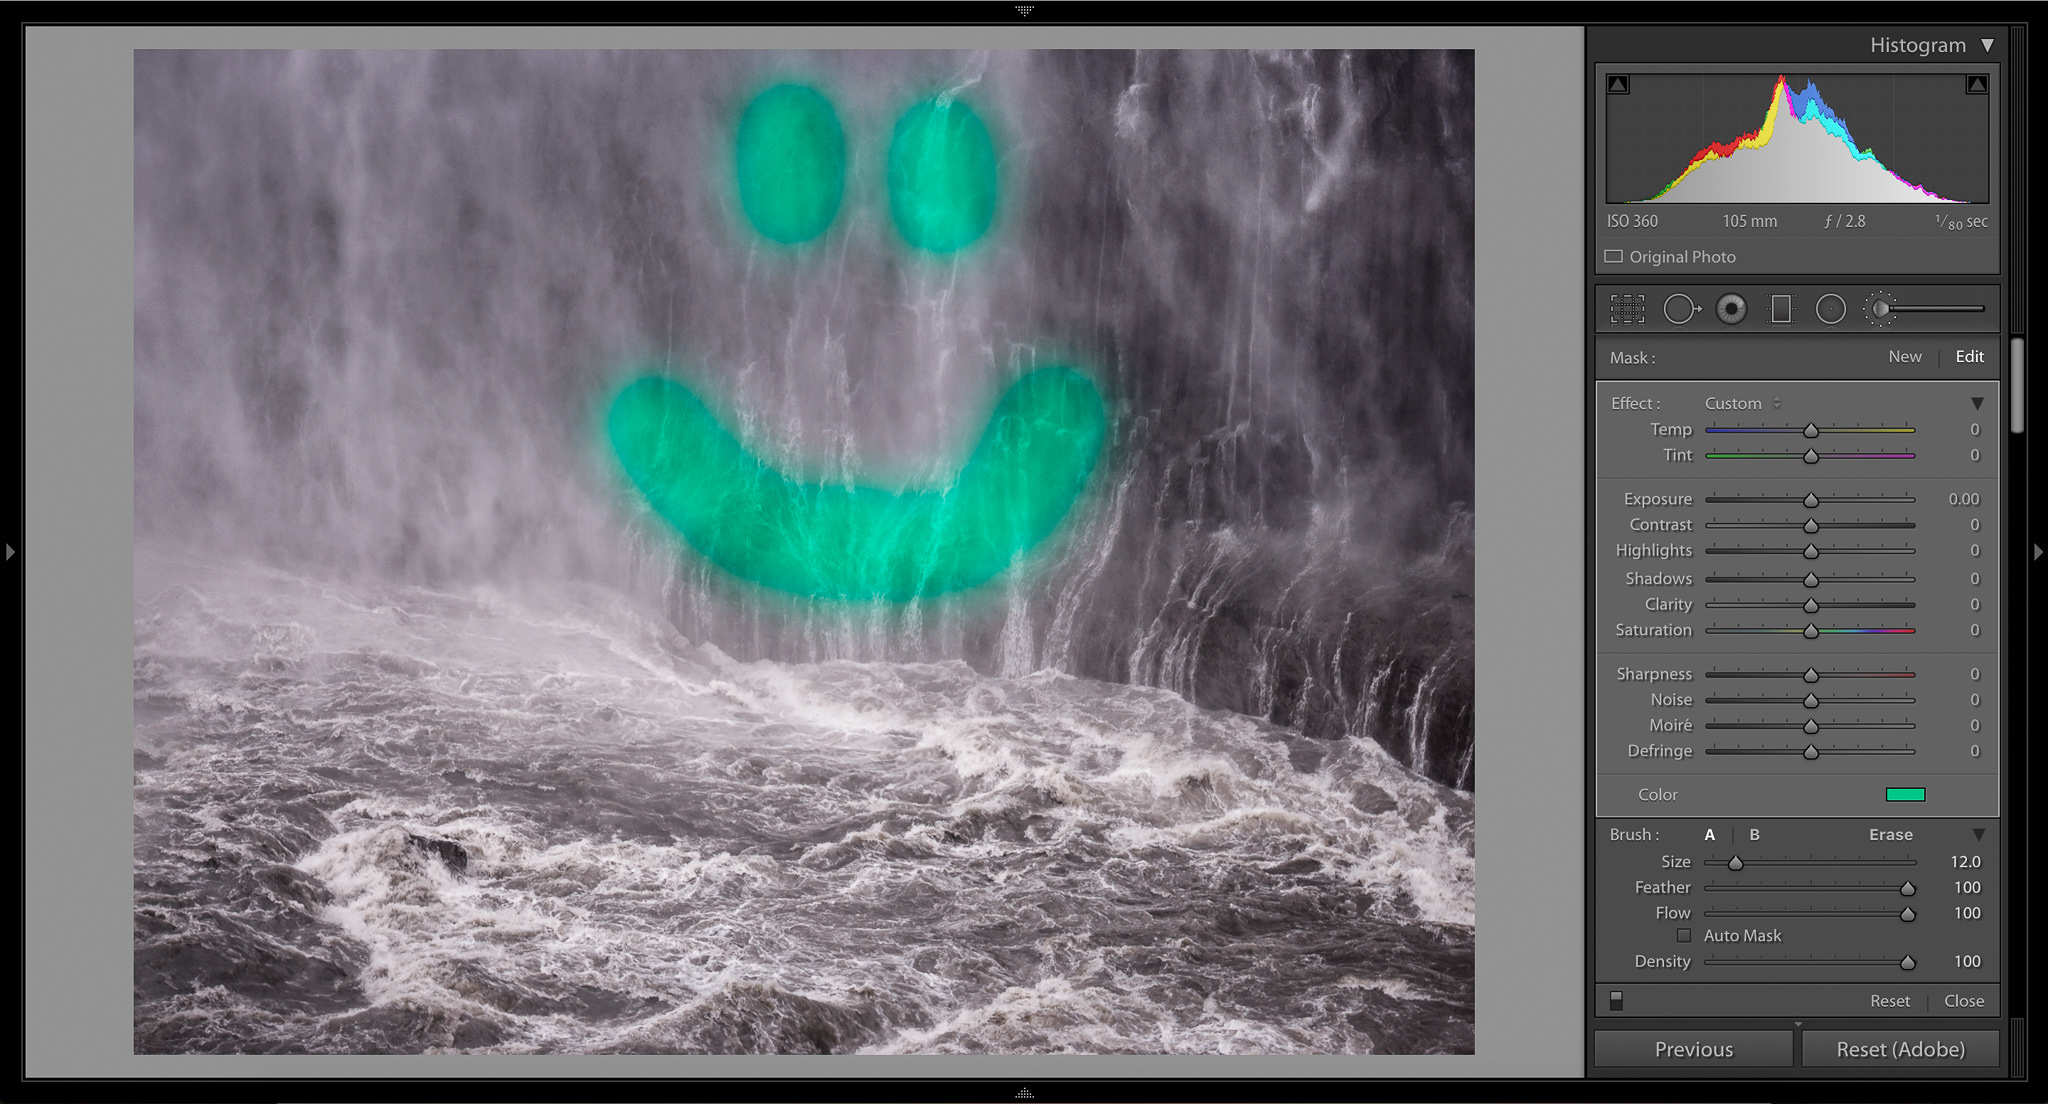
Once you pick a color, you can draw on the photograph like any other local adjustment tool. Do you want to change the color of a photo’s sky? This option was made for you.
Although I haven’t yet used the local color tool extensively, I can see its value. Portrait photographers, for example, might want to enhance the color of their subject’s face – making someone’s eyes look more natural, for instance.
Even a landscape photographer may find this tool useful. I, for one, think that the photo above is too gloomy; the local color adjustment fixes the problem! The improved version is below:
As you can see, the local color adjustment has helped me turn a sad photo into something happy. For me, that’s the real value of post-processing.
5) Conclusions
Lightroom is not an easy program to use, and some of its useful tools are hidden in unexpected places. None of the four features in this article are essential Lightroom adjustments, but each has its uses. Whether you need a more precise crop or a preview of your adjustments, Lightroom’s built-in options have what you need; it just takes some work to find. Hopefully, this article showed you some of those halfway-hidden features, making it easier to process your photographs exactly the way you want.
Maybe this is a well known fact, but I discovered it just recently.
I would also highlight how you can use easily remove noise from backgrounds or areas with few details in a couple of seconds using the luminance and detail slider, in the noise reduction panel. First, set ‘detail’ at maximum (this will avoid noise reduction in areas with at least a minimum of details) and then set ‘luminance’ as high as needed. Of course this isn’t a spot-on solution for every shot, but since the great feature of Lightroom is editing in bulk, this basic setting allows to quikly save those shots on which you don’t want to waste time masking out the background.
Hope this helps.
And thanks for the article, especially the totally exposure match.
Having just Lightroom for me is enough as a wedding photographer, and after reading this article, I think I already have more tools at my disposal in Lightroom. Thx!
Please comment if my understanding is correct in split tone in your article that when I press alt in hi light color I immediately see the image in magenta cast and as move the slider to right the color becomes more natural. Is this the correct procedure to get accurate color?
When you press alt in split-toning, you see a high-saturation version of the color that you are applying. So, if the color you have selected is magenta, you will see a magenta cast. (I assume that the reason the photo begins to look natural is simply because of the color you are adding; for example, a yellow photo will look more natural if you add yellow to it.)
If that is still confusing, I encourage you to read my article on split-toning: photographylife.com/how-t…-lightroom
Nice article Spencer.
I particularly liked the tip for matching total exposure in a bracketed series.
I was not aware of this one, probably because as a wildlife photographer, I rarely have the luxury of bracketing shots.
Obviously the ‘best looking’ exposure will often not be the ‘best exposed’ image.
The best exposure (the one with the most data and the one to use) will initially look too bright.
So, normalising the best (ETTR) exposure to have the appearance of the (initially) best looking exposure is a great shortcut to an optimal result.
By the way, it might have been useful to point out that the term ‘Exposure’ in Lightroom is really a misnomer.
Exposure only happens in the camera.
Changing ‘exposure’ in post processing is simply altering brightness – pushing data up and down the tonal scale.
The data itself remains unchanged.
Thank you, Betty! That’s true, the exposure matching tool generally wouldn’t be as useful for a wildlife photographer.
Good points about “real” exposure. I don’t like mentioning exposure without defining what I really mean — post-processing and even ISO don’t affect your exposure at all. Although Adobe certainly understands what exposure is, I’m sure it confuses beginners to see these terms thrown around in places that they don’t really apply.
Not just Adobe, it is every vendor who provides a control named “Exposure”.
It’s a metaphor. Everyone understands what it does. :*)
“It’s a metaphor. Everyone understands what it does.”
Exposure may be a metaphor for brightness but it’s a misleading one.
As you believe everyone understands what it does, I apologise if the following seems superfluous…
Put simply, Brightness = Exposure x Amplification.
While the end result may superficially look similar on a monitor screen, the underlying processes are fundamentally different and lead to different outcomes. Outcomes are important. People who think they can correct underexposure errors in camera by cranking up the ‘exposure’ in editing software are in for a disappointment.
It’s a (convenient) misnomer which really should have no place in science based software.
Thinking they are interchangeable simply serves to illustrate the level of misunderstanding that prevails and leads to pointless and fruitless arguments simply because one or other participant adopts a dogmatic position while at the same time not understanding the meaning or significance of the terms they are using.
Hi Betty
Can you give me a concrete example where someone could be mislead to the extent where they do not understand the exposure slider functionality and get confused? The exposure slider amounts correlate to camera exposure value adjustments, something intuitive to photographers. Is this just a pet peeve of yours? :*)
What if, instead of “exposure,” the slider was labelled “ISO” instead? That would actually be more accurate than the word exposure, but Adobe would have to be crazy to name the slider like that. Why? It confuses beginners.
It’s not the function of the slider that people wouldn’t understand — it’s the term “exposure” as it should be used. I completely see what you are saying, but — from the perspective of a beginner — the terms “brightness,” “exposure,” “gain,” and “lightness” are confusing enough as they are. And yet, in photography, each has a different and well-defined meaning. If you want to understand a book or article on photography, it is helpful to know the difference. Adobe is just blurring the lines.
I do see what you are saying, though, and I generally agree. This isn’t an egregious error, nor one that will seriously impact most photographers. At the same time, when a more accurate word could have been used, it is worth pointing out for those who haven’t learned enough to know.
Well said, Spencer. I have addressed in detail the misnaming of the “Exposure” control elsewhere on Photography Life. The tl;dr version is extremely simple to understand…
Luminous exposure, Hv = Ev·t, where Ev is the illuminance of the surface (film/sensor), measured in lux; the “·” means the dot product [aka: scalar product; multiplied by]; and t is the exposure duration, measured in seconds. Therefore, the SI unit for Hv is lux seconds (lx·s).
The same applies to radiometric exposure, He = Ee·t, where Ee is the irradiance of the surface (film/sensor), measured in W/m²; and t is the exposure duration, measured in seconds. Therefore, the SI unit for He is joules per square metre (J/m²).
It should be blatantly obvious from the above definitions of the term “exposure” that exposure cannot possibly be changed retrospectively via software, or via the ISO setting on the camera. As Spencer said, an editing control named “Exposure” isn’t an egregious error, but it is scientific nonsense: it most definitely qualifies as pseudoscience; but from the perspective of beginners, it constitutes the promulgation of anti-science.
Now we are two voices crying in the wilderness; well, maybe three.
Thanks for the rigorous scientific hammer blow to substantiate my more pragmatic pinprick!
I am always impressed by your depth of knowledge on these issues — thank you for the valuable comments.
Thank you, Spencer.
Nasim, several members of the team, and some of the readers of Photography Life know full well that I have adopted a zero-tolerance policy towards the promulgation of urban myths, pseudoscience, anti-science, and other forms of bullshit.
Daniel C. Dennett wisely stated: “Ignorance is nothing shameful; *imposing* ignorance is shameful. Most people are not to blame for their own ignorance, but if they wilfully pass it on, they *are* to blame.”
Hi Rory
No, it’s not a pet peeve. I get peeved by inaccurate and sloppy use of scientific terms. It may seem to be just a peeve but it’s actually very important. Loose terminology generally stems from loose understanding and loose understanding leads to confusion, error and those silly arguments we so often see where, after an eternity of to-ing and fro-ing, it becomes clear that one or other of those involved does not understand the terms they are using.
A typical example a while back was a discussion around f-stop(relative aperture) aperture, entrance pupil (virtual aperture) and f-ratio in relation to exposure, total light, EV, brightness, total light collected and sensor size, angle of view, etc.. Phew!
All of these terms are frequently used interchangeably (as metaphors for each other) as if they all meant the same thing. They don’t. The result was an avalanche of hogwash based on the ventilation of dogmatic beliefs grounded in ignorance.
To get to your specific point, yes, the exposure slider amounts do correlate to camera exposure value adjustments, but unless users understand what is actually going on, they frequently assume that in camera exposure error can be easily corrected in LR (et al.) without penalty. They then complain about excessive noise.
Increasing exposure in camera results in an increase in overall quality and a reduction in noise (assuming we stay short of highlight clipping).
Increasing exposure in LR results in a decrease in overall quality and an increase in noise.
I hope you agree that understanding what is going on is important.
If this slider were more accurately labelled ‘Brightness’ or ‘Gain’ a new user might be prompted to question what they were doing and learn something to their advantage.
Win – win.
Always a good thing.
Awesome article. I knew about using the Alt key for exposure but I never thought it works for sharpening as well. Also, exposure matching is such a great tool. I’ve been doing exposure matching manually and because I rarely used the menu I never knew about the tool.
Thanks for sharing!
Glad you liked it! The Alt key is great for sharpening, particularly with the masking slider.
Topaz has the best sharpening tool that I have found. Doesn’t put a bunch of crap on the image. Uses a different method.
If you are getting a bunch of crap on your image when sharpening, may I suggest you learn how to sharpen?
There are lots of ways to sharpen and all of them work well when applied appropriately to an image suited to the chosen technique.
Betty, do you strive to insult everyone or just me? I have tried several methods of sharpening and have found problems with most of them. Some are more complicated than I want to fool with. I was specifically referring to some methods that do a fair job but even if something is not over sharpened, when examined under high magnification show white dots, pixels, added throughout the image. It seems that Topaz Detail uses a different algorithm from other methods of sharpening.
Topaz and Lightroom are both good for sharpening, so long as you use them effectively. The best sharpening technique is a three-pass process: after-capture general sharpening, more aggressive local sharpening, and then output sharpening. When you use Lightroom for general sharpening (0.5 pixel radius, high detail, ~30 sharpening amount, little/no masking), it works just as well as any other program. Photoshop is better for the second step, since Lightroom’s local sharpening tools are lacking. For the final pass, any program works well, and it depends upon your output medium.
If you don’t follow this three-pass method, Topaz Detail is better at “one-step” (general) or “two-step” (general, then output) sharpening than most other programs, including Lightroom. If your technique is ideal, there won’t be that much difference; Topaz may have the slightest edge, but I haven’t used it enough to say for certain. You are right that Topaz Detail uses a different algorithm, and Betty is right that any of these programs work well if you apply “optimal” sharpening techniques.
No, I don’t strive to insult you – or anyone else for that matter.
You do that to yourself when you make nonsense statements like “(LR) puts a bunch of crap on the image”.
If there is “crap” on the image the only one who could have put it there is you and that only because you haven’t taken the trouble to learn or use an effective technique but apparently want to rely on an out of the box, one step, push button solution with little or no understanding.
If you are seeing white dots/pixels at high magnification, then you can be sure you have done something wrong.
Don’t blame the tools.
Typically, digital artefacts caused by incorrect sharpening include noise (there go your white dots), exaggerated texture, light/dark halos, loss of shadow detail and increased saturation.
You say you sharpen as a first step on import into PS. Big mistake. You are sharpening (and therefore exaggerating) all the noise (as well as any other artefacts) at stage one in your workflow. From that point on it can only get worse as every further editing step will further enhance the problems. No wonder you are seeing white dots. A basic rule of editing is deal with noise early in the workflow and, apart from capture sharpening, sharpen as late as possible – that means immediately before, and specifically tailored to, output.
You are apparently also omitting RAW capture sharpening. Big mistake. This step is very important as leaving it out forces more aggressive sharpening later which actually cannot correct the lack of initial demosaicing/anti-aliasing correction – resulting in over sharpening and artefacts.
Finally, one step sharpening is never the best way to sharpen although as you say, some programmes do a ‘passable job’.
Spencer is correct.
The best technique involves three passes – Capture Sharpening to counteract the effect of the anti-aliasing filter and Bayer demosaicing, Creative/Selective Sharpening applied to selectively enhance specific parts of the image and finally Output Sharpening to take account of the output medium (screen size/resolution or paper size, type/dot gain).
Within that there are a number of tried and tested techniques including unsharp mask, smart sharpen, luminance, high pass…each capable of excellent results when appropriately applied to a suitable image.
“Some are more complicated than I want to fool with.”
Well, if you can’t be bothered with ‘fooling’, the more fool you, because if you think there is a one size fits all solution to sharpening, your results will never be more than ‘passable’.
Regarding the color tint tool, I have another use for you to dive into Spencer. You can use this tool to neutralize flare or other unwanted color contamination. With the color tint tool active click-drag the eyedropper from inside the color tint tool to a spot on your image and let go. The color will be selected in the color tint tool (240 degrees for example). The hue is shown on the bottom left part of the tool. Select another hue, 180 degrees from the first hue (60 degrees in this example) and this will neutralize the color. You can combine this with the gradient and radial selection masks as well.
Wow, that is clever — I had been trying to use desaturation/temperature adjustments to get rid of flare, and it wasn’t working very well. I definitely will use the local color tool going forwards!
Keep ’em coming Spencer,
I’m a refugee from Aperture 3, and miss its really elegant interface. I can’t get my head around key strokes that do one thing in one module and something completely different in another.
Think it will take me another life time to learn LR.
Which is a shame as I really want to spend my time behind the camera, meeting the challenges of making great images, not pushing buttons to achieve the simplest things.
Details on the Alt key really appreciated.
Please consider more of these useful photo related tips, we are not all power-users.
Thanks again.
Thank you, David! I know where you’re coming from — even going from Lightroom 4 to Lightroom 6 slowed me down for a couple weeks, since I had to learn new keyboard shortcuts (i.e., “F” instead of “L” to preview on black, if I remember correctly).
I remember how happy I was when I learned your cropping trick at the workshop. It’s so wonderfully simple, but it really works! Great article!
Thanks, John!
Ref cropping. In Photoshop, simply go to 200% then jump to each of the corners. The keystrokes are Ctl-Alt-0 (zoom 100%), ctl-+ (zoom more), Home (upper left), then Alt-Home (upper right, the “alternate home”), End (lower right), and Alt-End (lower left).
In the older version of ACR I tested you can do all of this except Alt-Home and Alt-End.
Of course full screening — getting rid of the sidebars — is always a great help, and not just for cropping.
That’s very useful, thank you!
#2 and #3 will make my life much easier… Never used them… THANK YOU!!! :-)
Very glad you found them helpful, Karen!