A lot of landscape photographers are interested in focus stacking — combining multiple images of the same scene, each focused at different distances, into a single photo. This is a useful tool to have at your disposal, since it lets you take pictures in more situations than you otherwise could. For example, if elements of your photo are very close to your camera, focus stacking may be the only way to get a sharp shot. Although I don’t use this technique for every photo, it’s something that I keep in mind when I’m taking pictures in challenging conditions. This article gives an overview of focus stacking for landscape photography, including step-by-step instructions on how to focus stack photos in Photoshop. All of these tips are also relevant for other types of photography, not just landscapes.
Table of Contents
1) What Is Focus Stacking?
Focus stacking is an interesting development of digital photography, and, more specifically, digital post-processing.
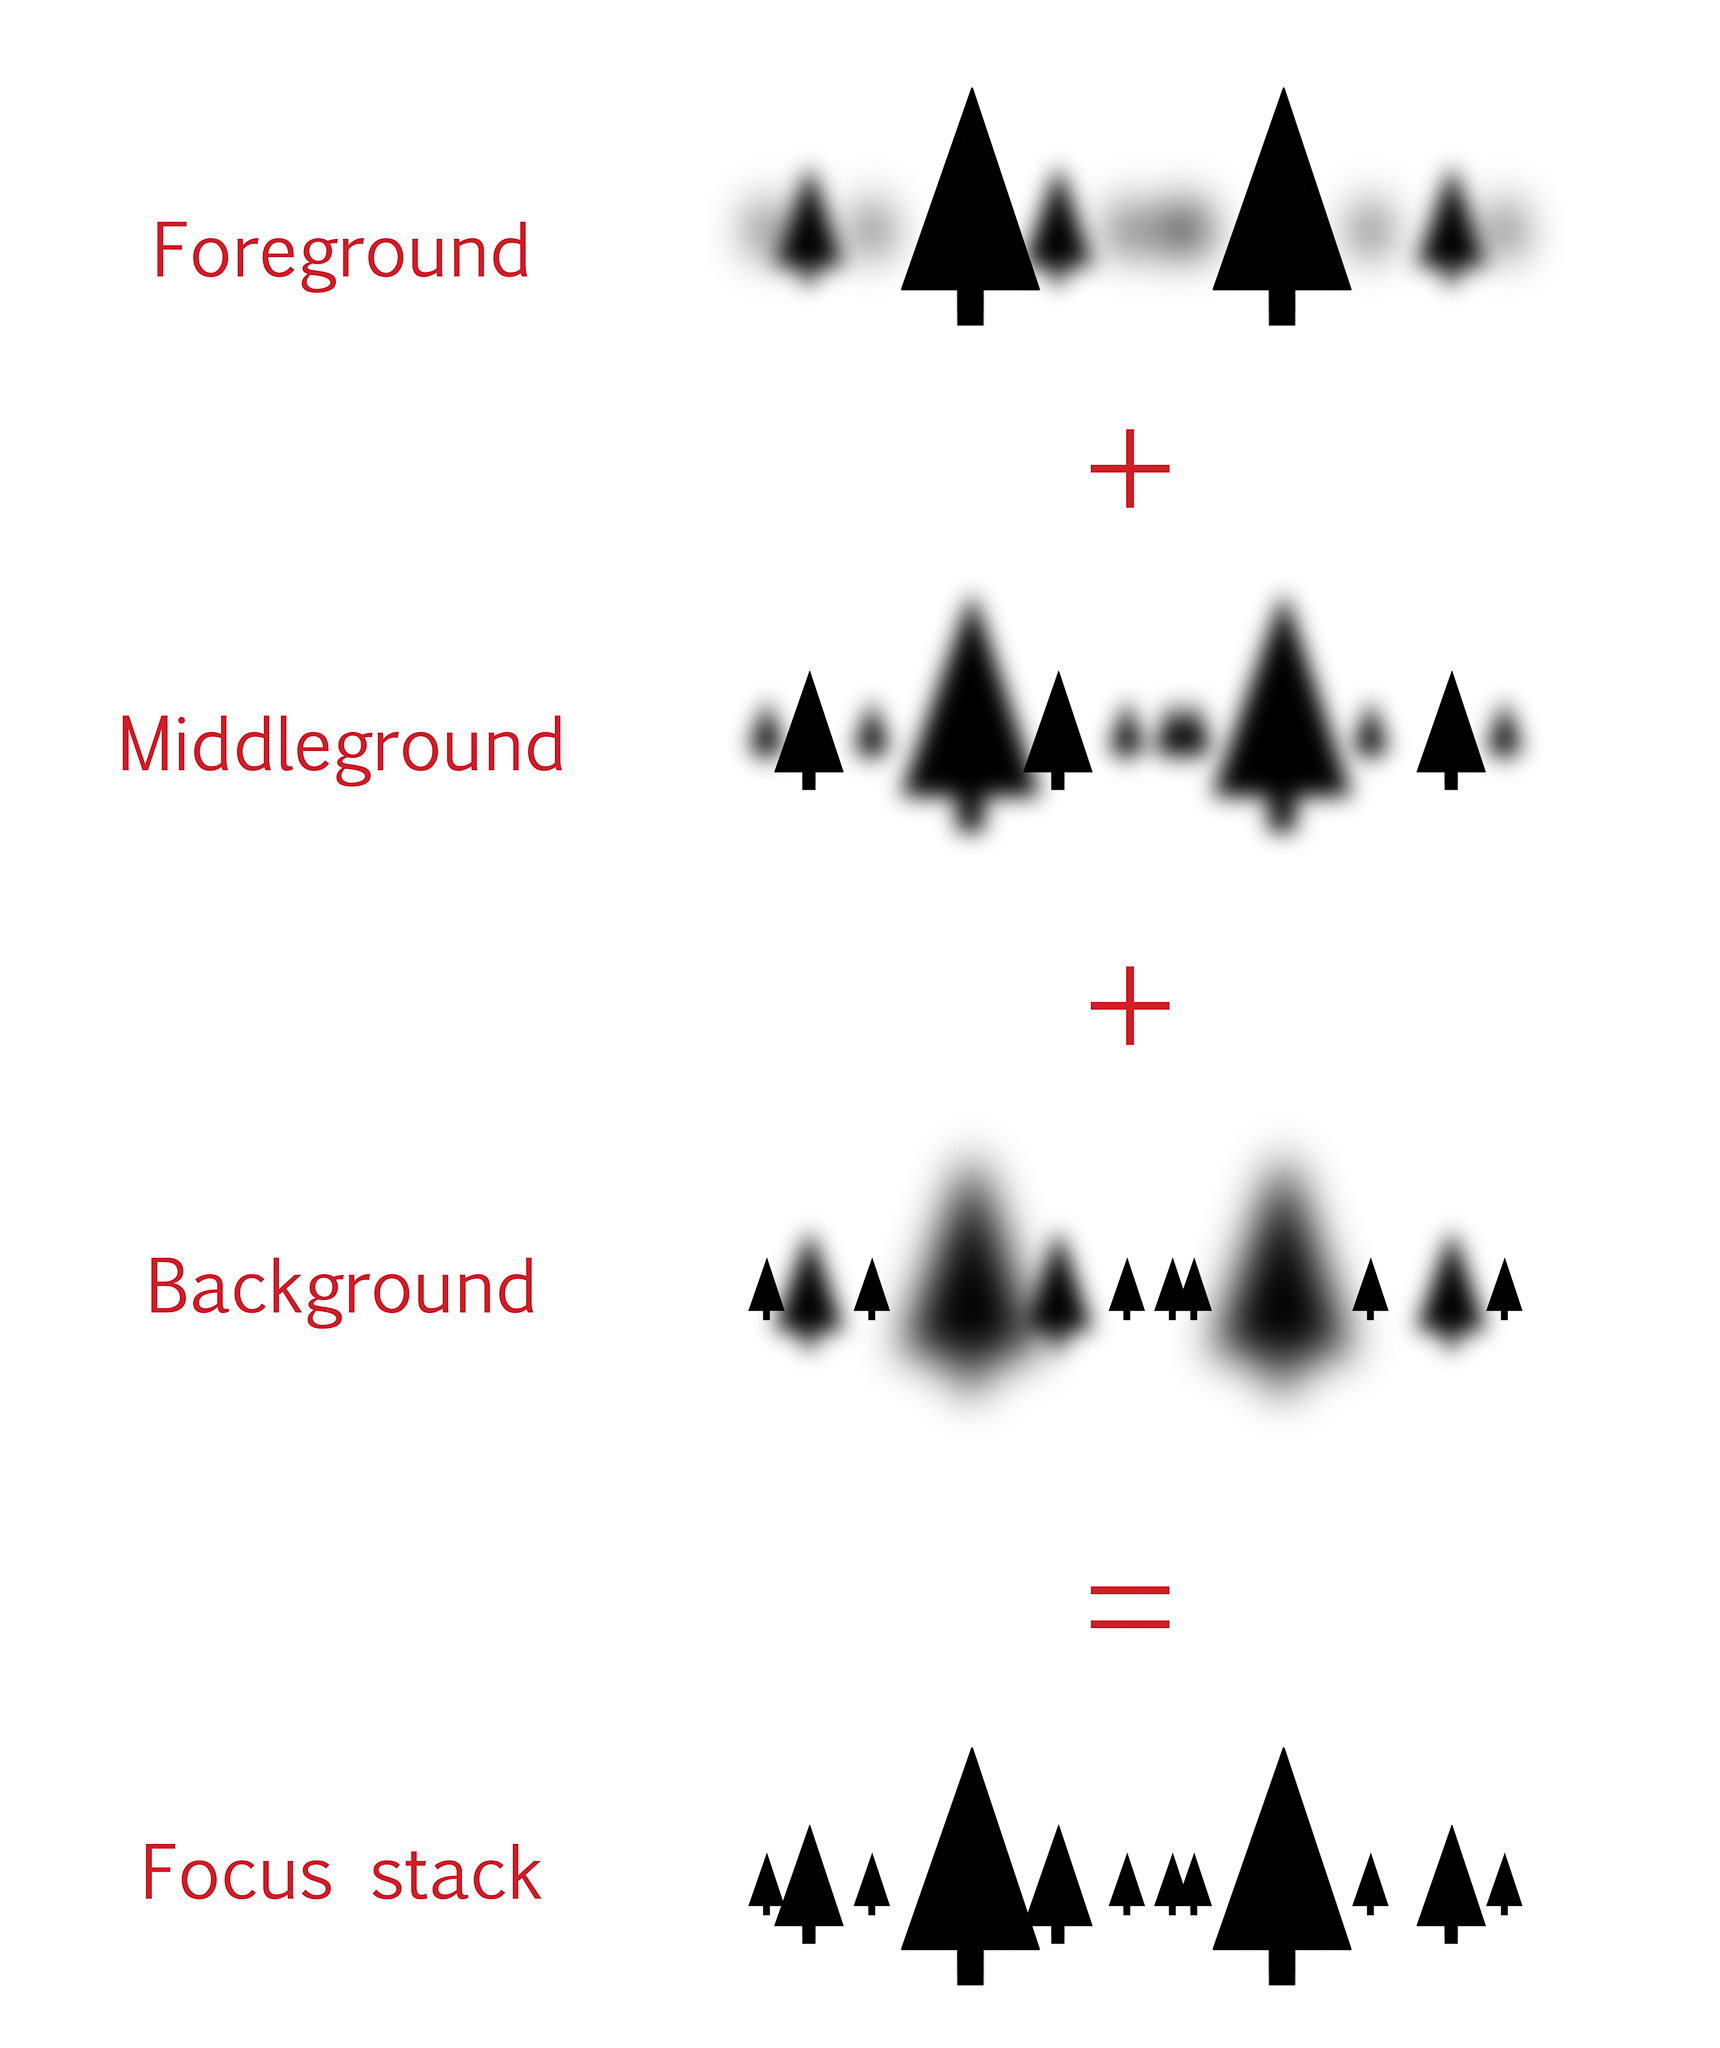
Focus stacking lets you take several photos of a landscape, focused at different points, and combine them together into the sharpest possible image. For example, you may take three photos at a particular scene: one focused on the foreground, another on the middle-ground, and a third on the background. Then, you can take the best parts of each photo and combine them into a fully-focused image.
You can focus stack with any lens and camera, but you need to have the right post-processing software to combine the photos together. I use Photoshop, since that’s what I already own, but there are better programs out there if you do a lot of focus stacking — Helicon Focus and Zerene Stacker being the two main products. However, if you only do occasional focus stacking, Photoshop’s tools should be fine.
2) Why Focus Stack?
There are two main reasons why you might want to focus stack a landscape photo.
First, you could be photographing a landscape that has too much depth. In other words, some parts of the scene are too close to your camera, and they’re out-of-focus if you shoot just a single photo. This can happen if your foreground is very close to your camera — there’s just no way to capture a focused foreground and background in one shot (even at small apertures like f/16).
You’ll also run into sharpness problems when you use telephoto lenses for landscape photography. Because they have such a thin depth of field, telephoto lenses will cause some blurriness in all but the most distant landscapes. Again, even an aperture of f/16 may not give you enough depth of field.
For me, that’s the most common time that I use focus stacking — when there’s no other way to get enough depth of field. In fact, I shoot most of my focus stacks at f/16, since it means that I don’t have to take as many photos (more on that later).
However, there’s also a second reason why some photographers focus stack, and it’s equally valid.
Because all lenses have a sweet spot, there will be an aperture that gives you the sharpest possible photo. For a lot of lenses, this sweet spot will be somewhere from f/4 to f/8. Unfortunately, those apertures don’t always give you enough depth of field, so you have to compromise.
Or not — that’s the other reason to use focus stacking. If you want the absolute highest image quality of a given landscape, you can use your lens’s sharpest aperture and stack together as many shots as you need. The downside, of course, is that you need to take several photos per scene to capture all the depth of field.
In the end, you should only focus stack if you require more detail than the camera can capture in a single photo. You might create huge prints, do a lot of cropping, or work with landscapes that have an unusually large depth of field. Regardless, focus stacking helps you get the last little bit of image quality that you can.
3) When Can You Use Focus Stacking?
Of course, nothing is a free ride. On one hand, compared to a single photo, focus stacking takes up more time and memory card space. Plus, not all landscapes even work for focus stacking.
For example, think about a wave rolling into shore. It’s not a problem to take a single photo, but focus stacking is essentially impossible — the wave will move too much from frame to frame. This is true in many landscapes with fast-moving subjects. The more quickly a scene changes, the harder it is to focus stack.
If the landscape isn’t moving too much, though, you can focus stack most of the time. Of course, this is only true if you’re willing to go through the effort of capturing multiple photos at once. The more often that you focus stack, the longer you need to spend working on every shot you take — both in the field and in post-processing. If you use focus stacking 100% of the time, you’ll run out of space on your memory card much faster than usual.
That said, if you have to use focus stacking, it’s a great tool. Don’t avoid it just because it takes time; in the end, it’s worth the effort for certain scenes. So, how do you focus stack? That’s covered in the next section.
4) How to Focus Stack Landscape Photos
Focus stacking isn’t hard, but it definitely requires more effort than when you take single photos.
To start, you need to employ best practices in the field. What does this mean? Quite simply, you have to take photos in a way that your stacking software can recognize easily.
First, you should use a tripod. Although it’s possible to shoot handheld focus stacks, it will increase the likelihood of difficulties in post-processing.
Second, make sure that you don’t change the focus too much from shot to shot. For example, if you only take two photos — one focused on the foreground, and one on the background — the middle of your photo could be blurry! Even if your post-processing software still blends the shots together, the final image won’t look very good.
When you’re in the field, it’s best to focus on the exact spot in the prior image where sharpness first starts to decrease. You might need to zoom in on live-view in order to do this properly. By doing this, you avoid an unnatural-looking final result.
Now that you’ve taken your photos, it’s time to start blending them! Here, I’ll demonstrate how to focus stack in Photoshop, since that’s the software you’re most likely to have. (If you have Zerene Stacker or Helicon Focus, you’ll have a bit more control over the process.)
Before you open the photos in Photoshop, you need to make sure that they are ready to merge.
Specifically, ensure that the brightness of all your photos is the same — otherwise, they won’t merge properly. Normally, this won’t be a problem, but you might notice a brightness difference if the light was changing quickly from shot to shot.
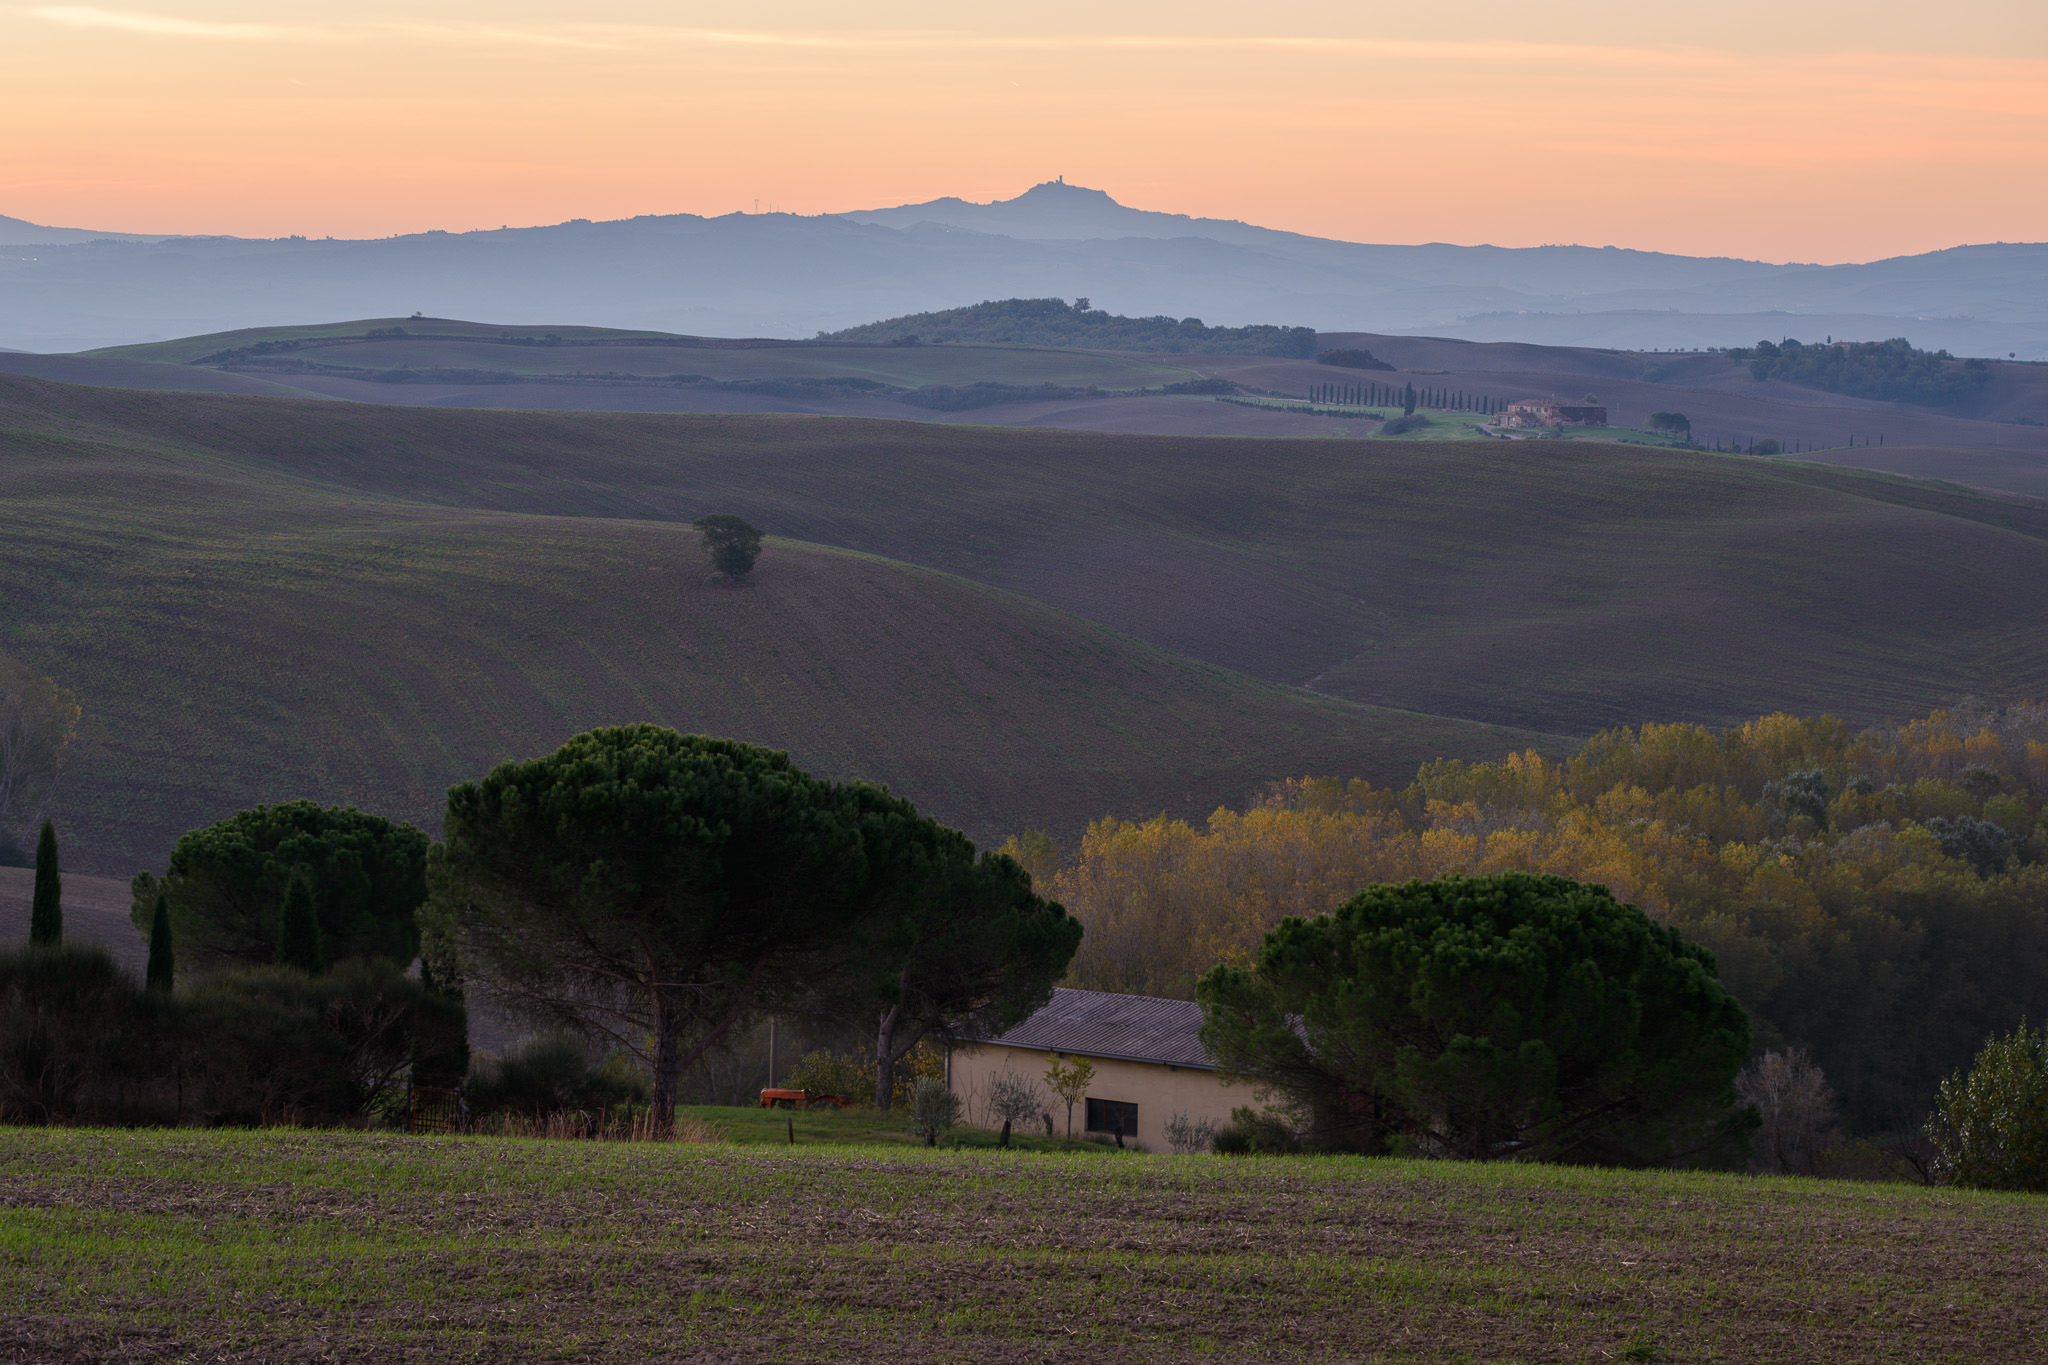
The photo below(along with six other photos focused at different distances) is part of the focus stack that this article covers. I took these images at f/5.6, which makes it easier to see the thin depth of field:

Here’s the focus stacked result (unedited — final version at the bottom of the article), where everything is incredibly sharp:
5) Focus Stacking Checklist
Now that you’ve taken your photos, it’s time to bring them into your post-processing software. Here’s a quick checklist that can help if you use Lightroom and Photoshop:
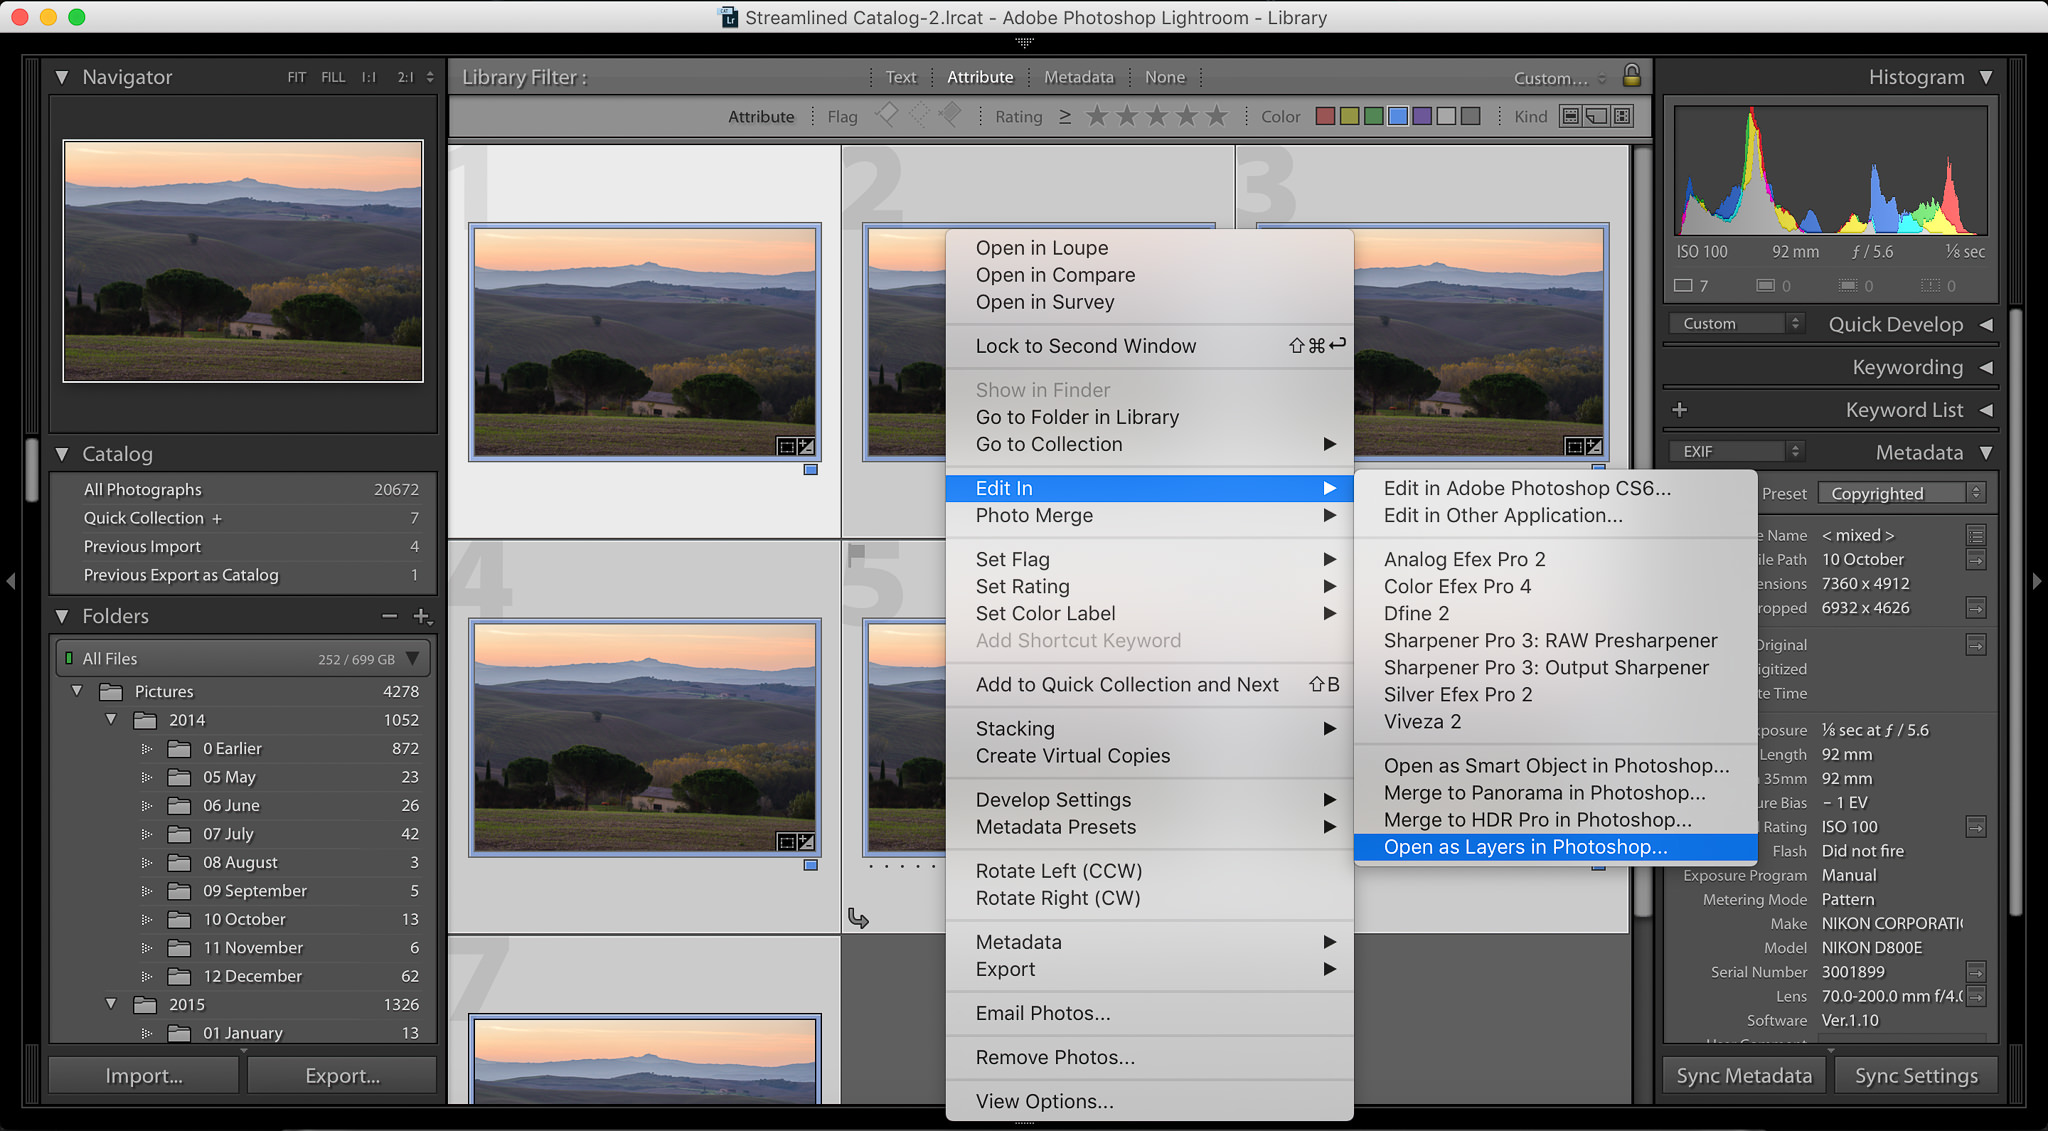
- First, open all of the images in Photoshop. You can do this by entering Lightroom, highlighting every shot, then clicking “Open as layers,” as shown below:
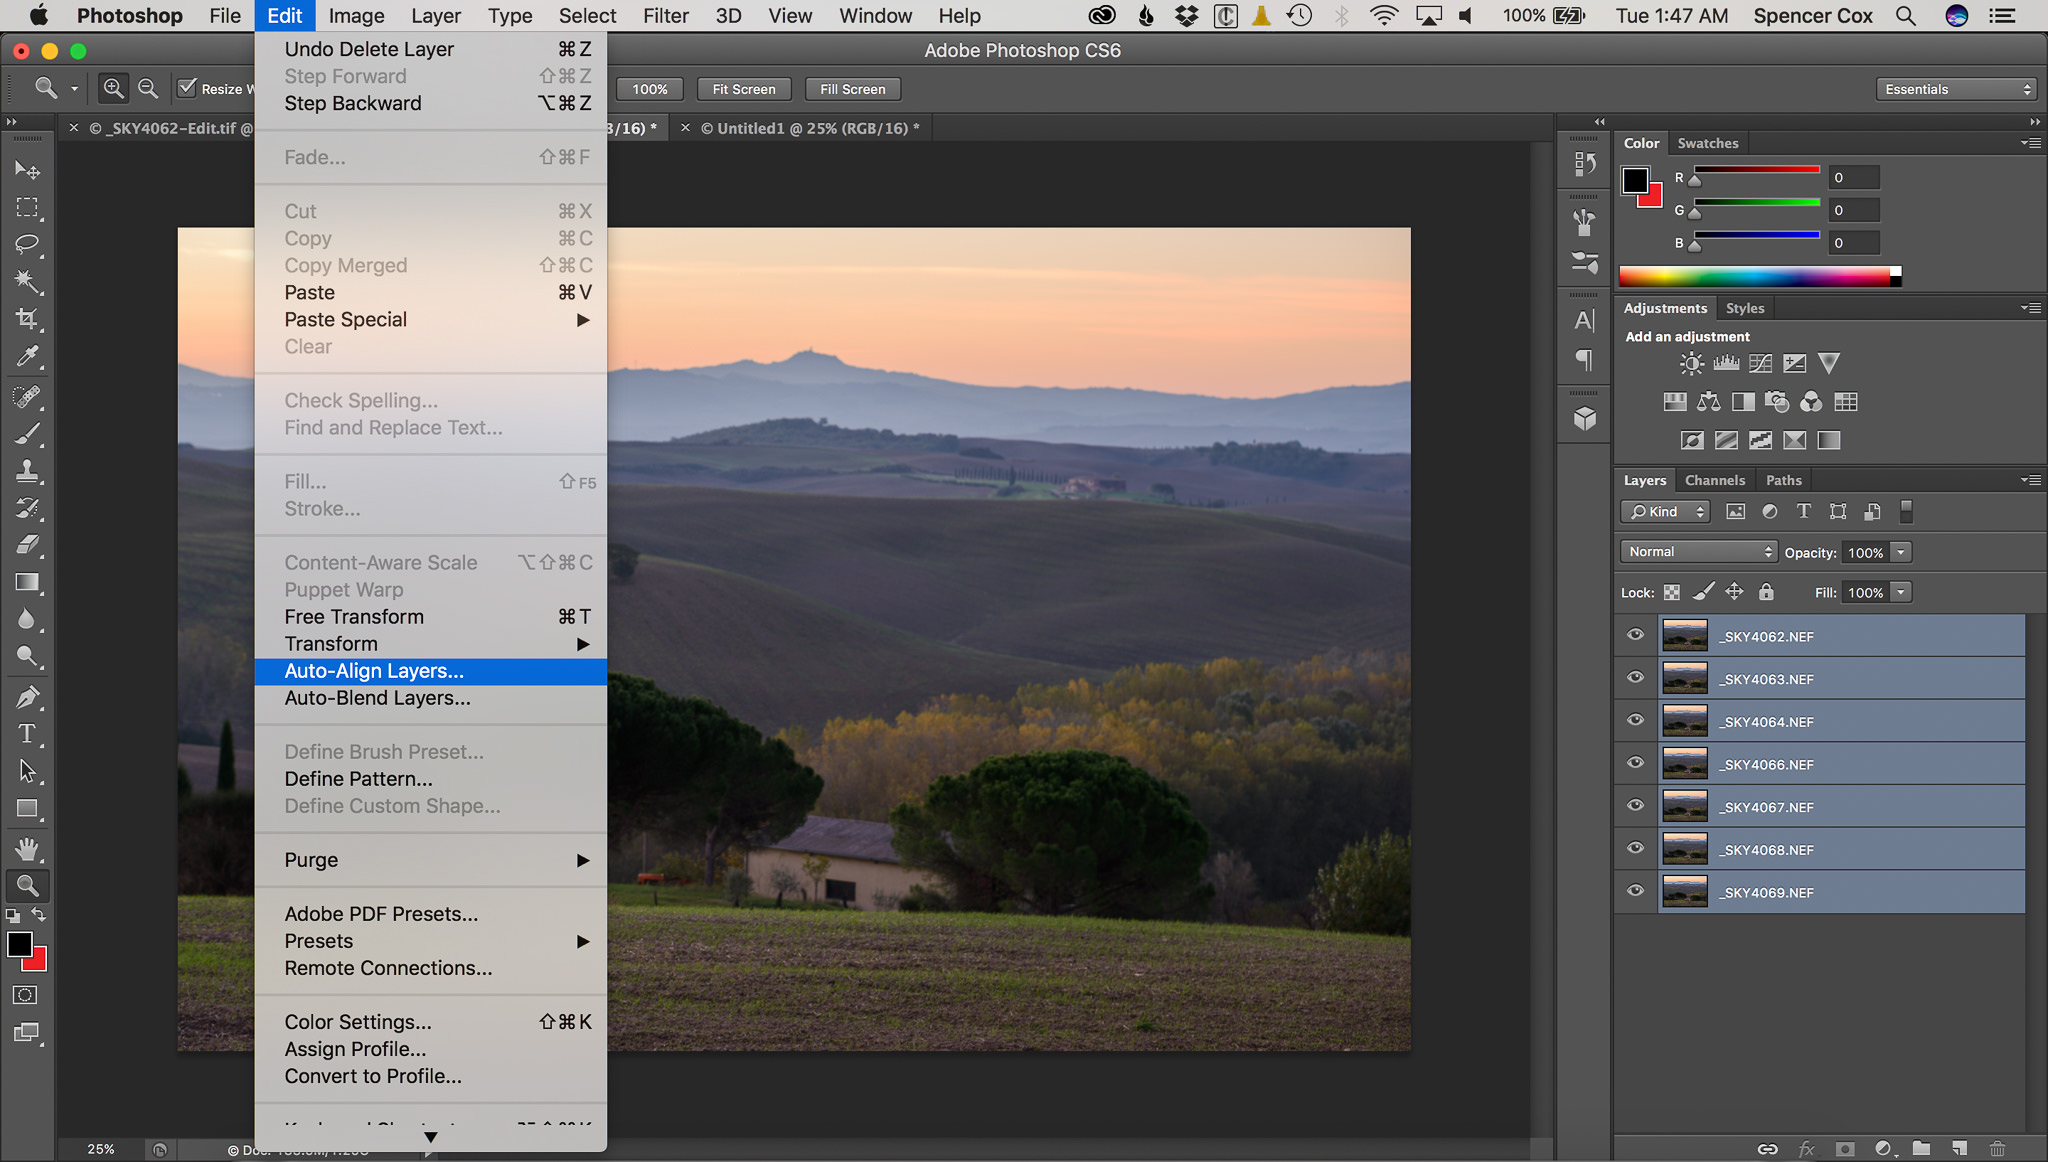
- Once your photos are in Photoshop, select all the layers, and click Edit > Auto-Align Layers. In the next window, you can leave the blend mode to “Auto”:
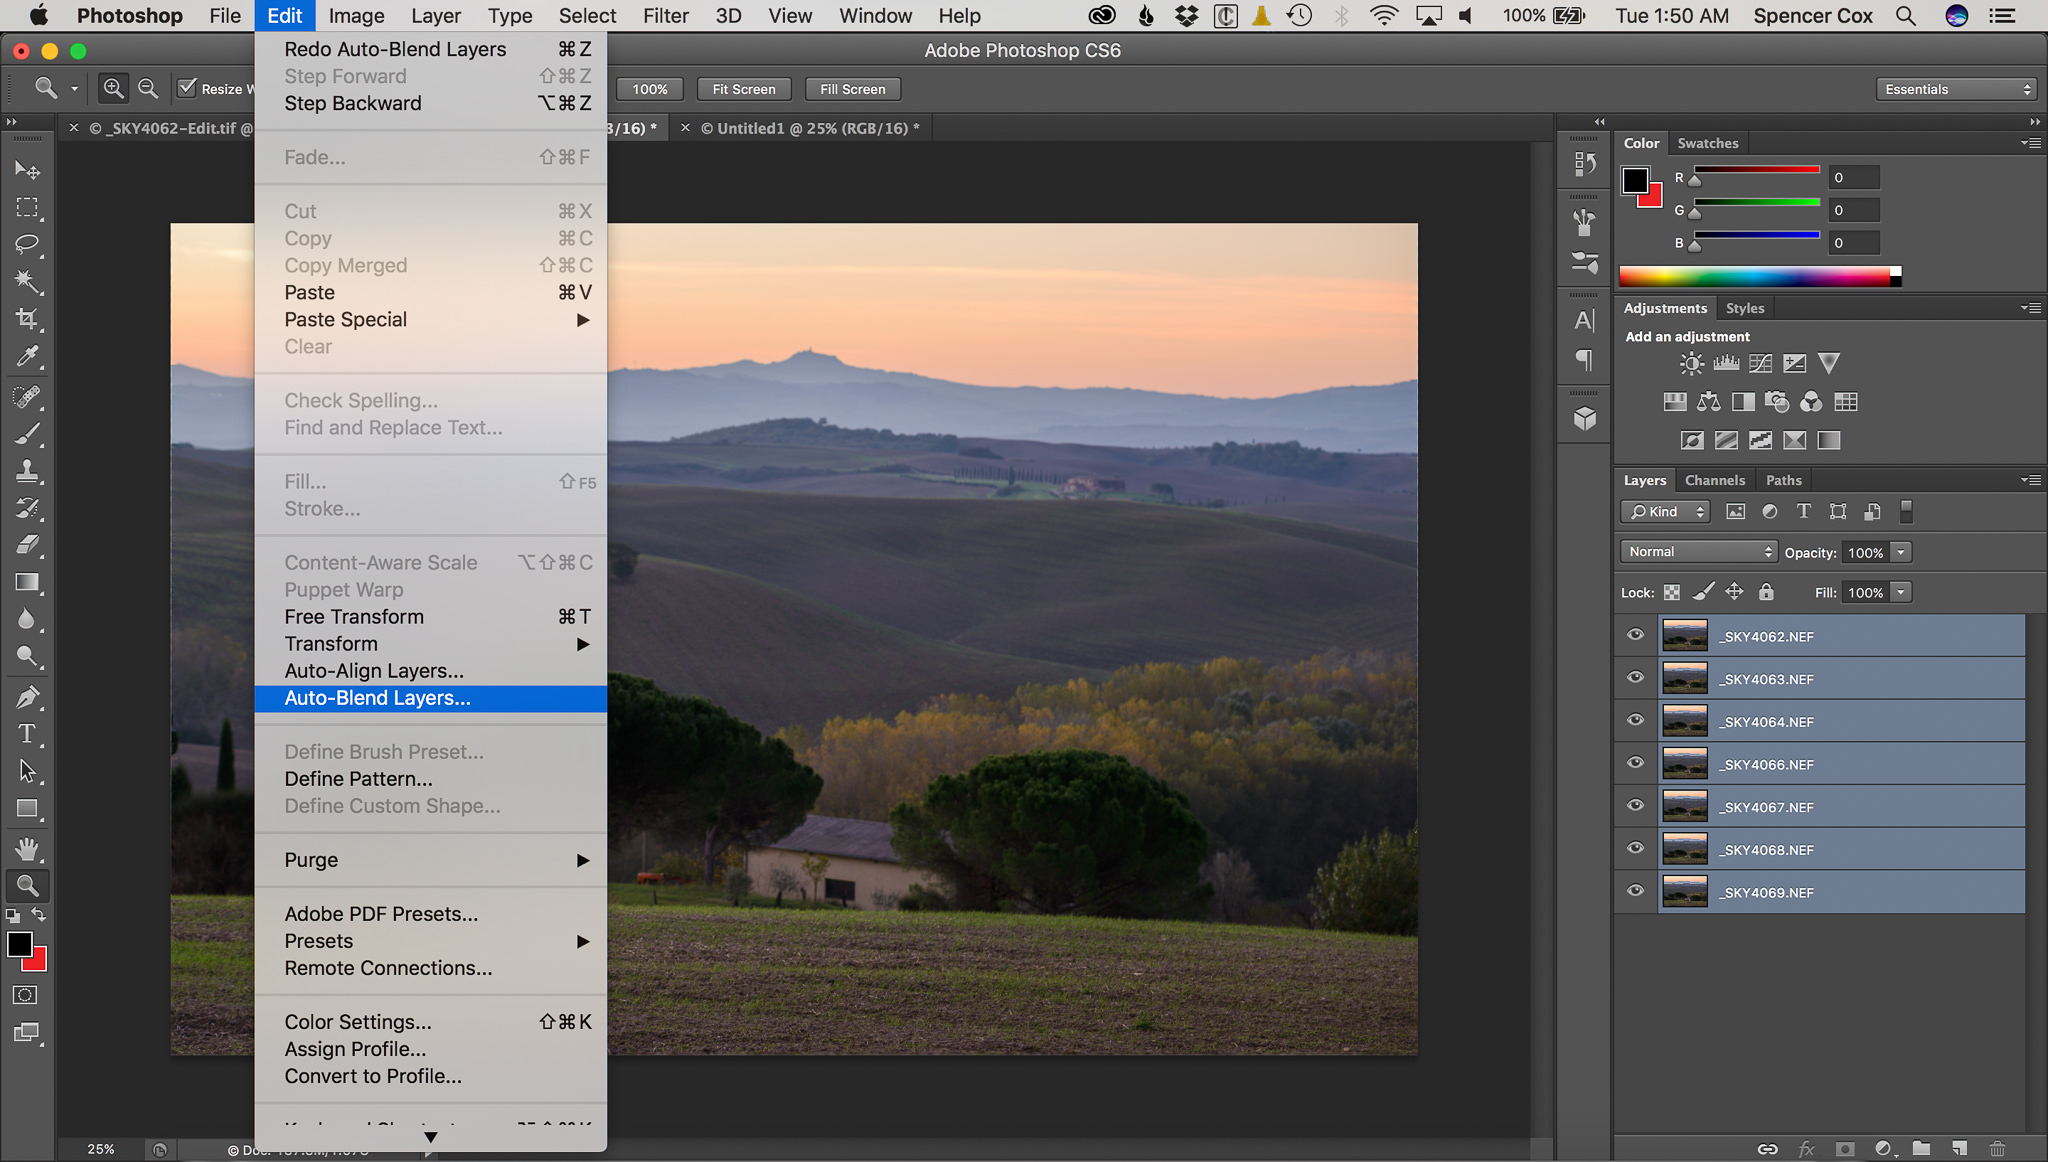
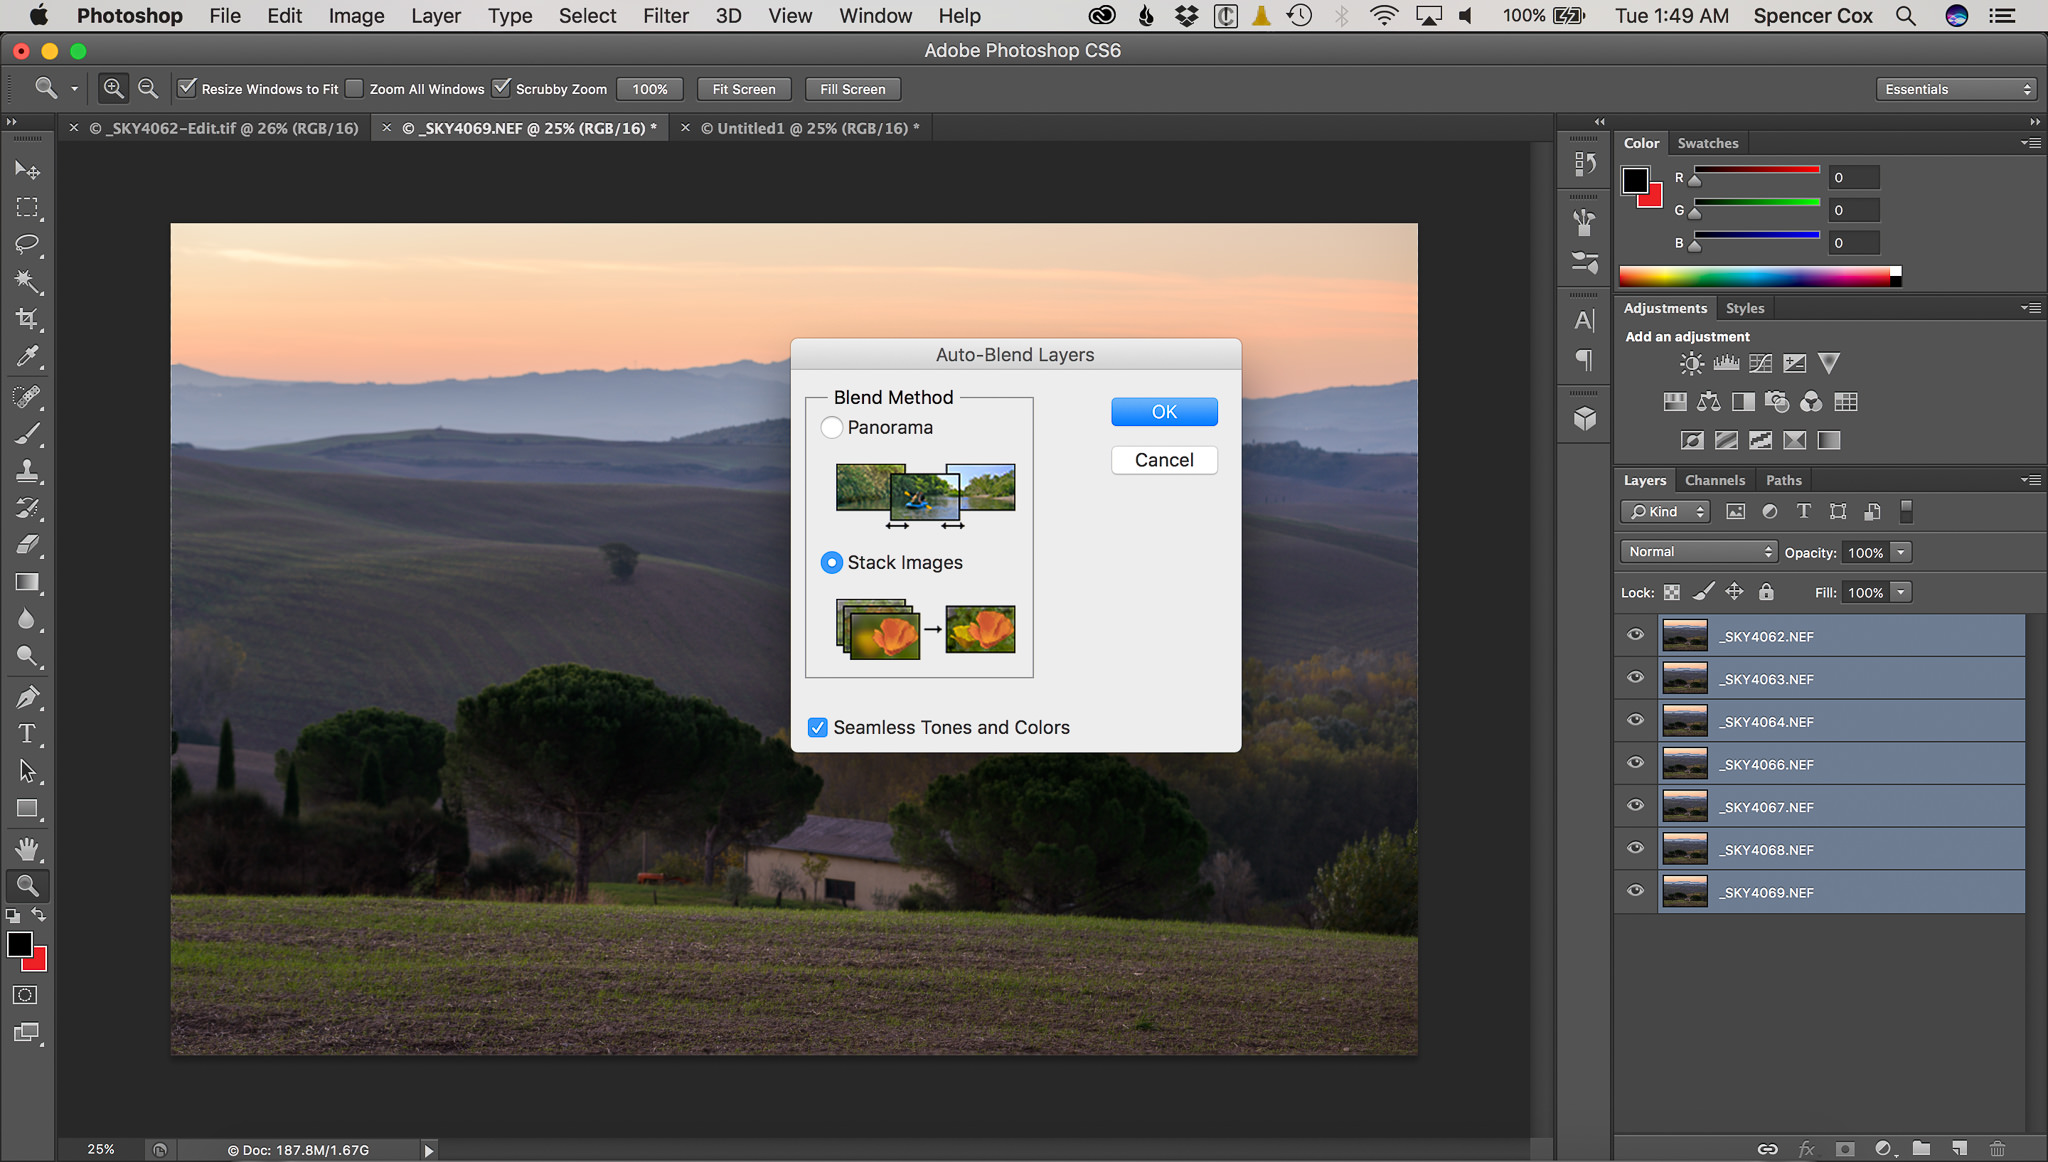
- Now, click Edit > Auto-Blend Layers, and then “Stack Images,” as below:
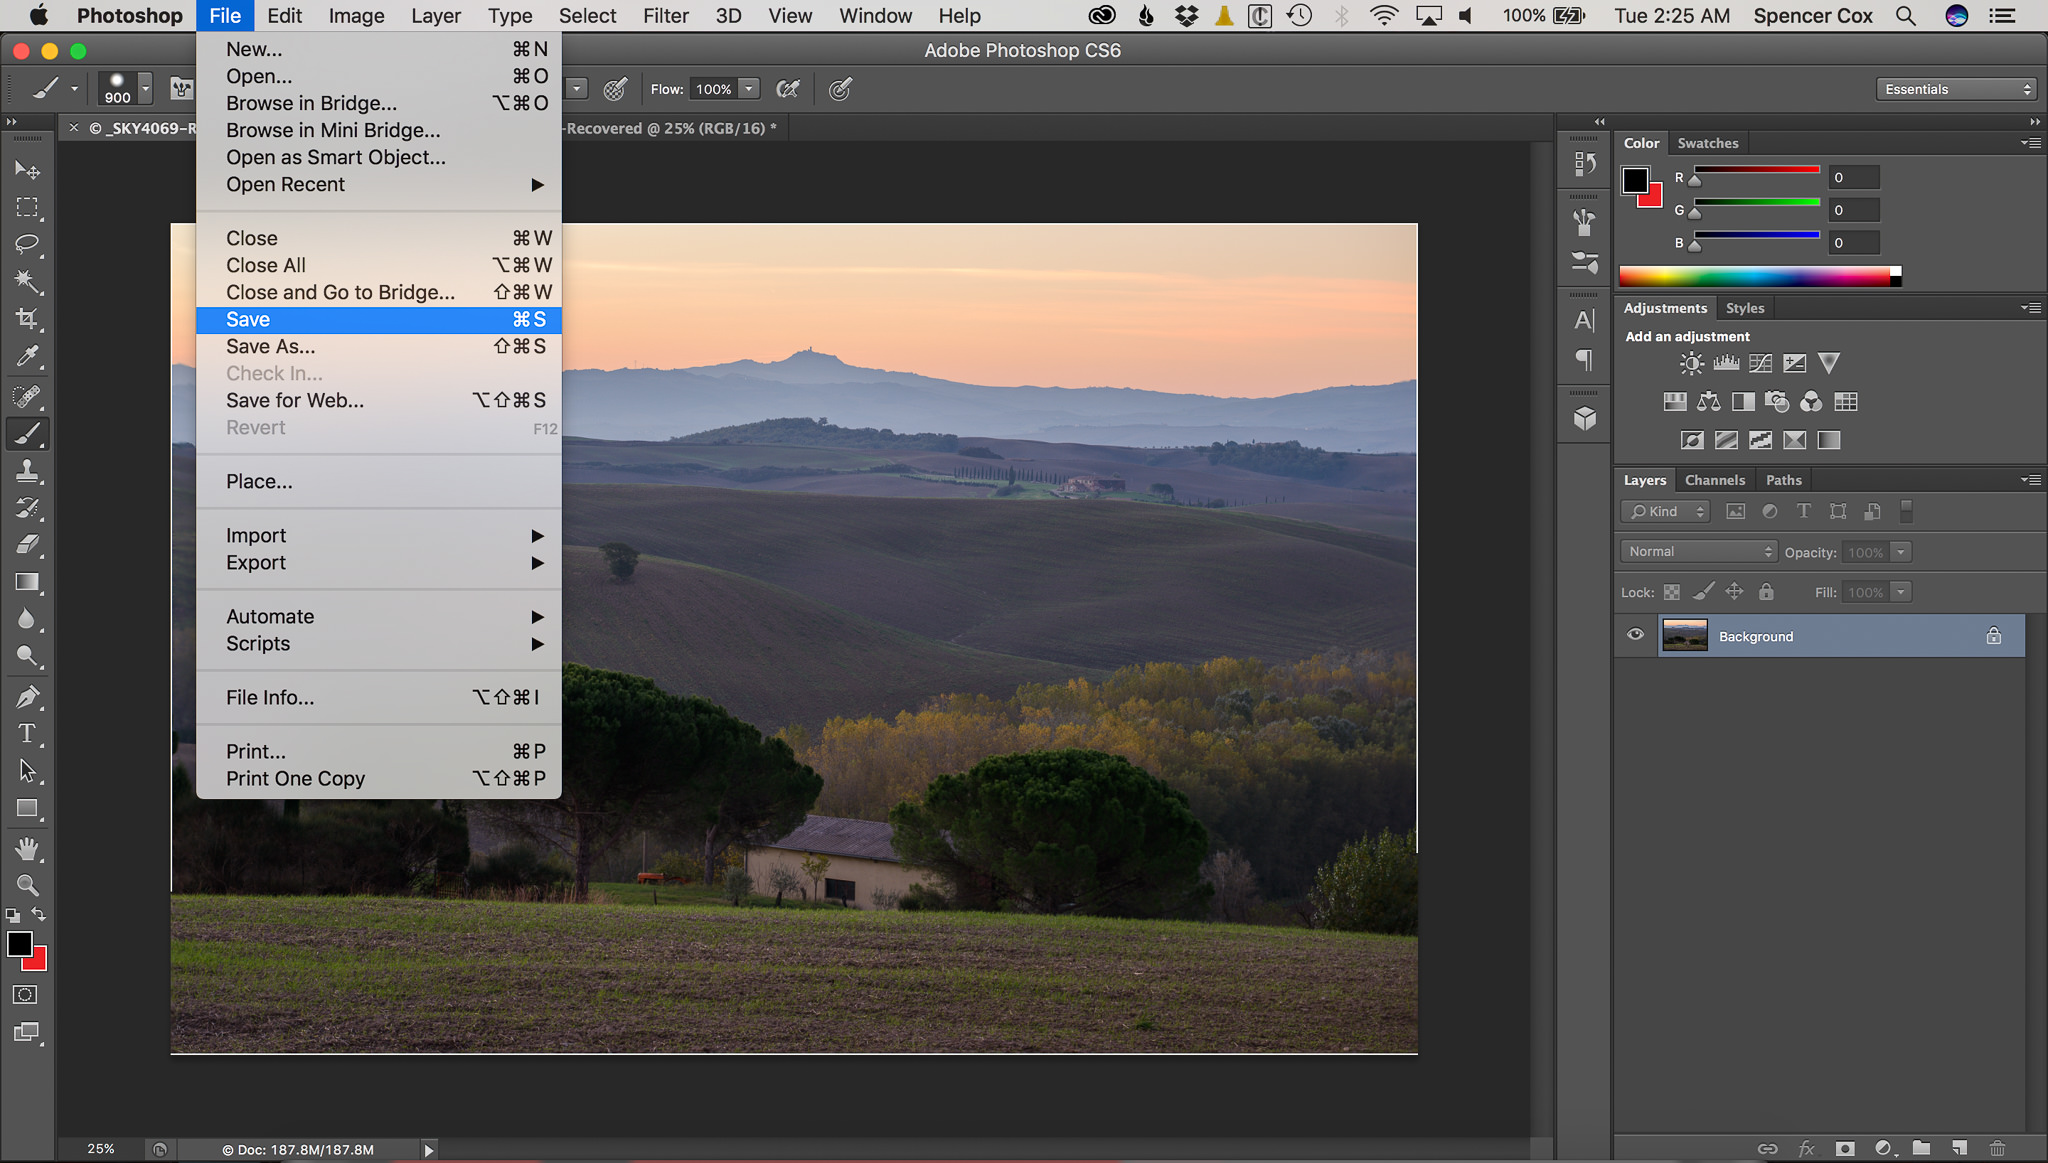
- Click Layer > Flatten Image. Save the photo by clicking Control + S (Windows) or Command +S (Mac), or just File > Save. That sends the completed version back to Lightroom:
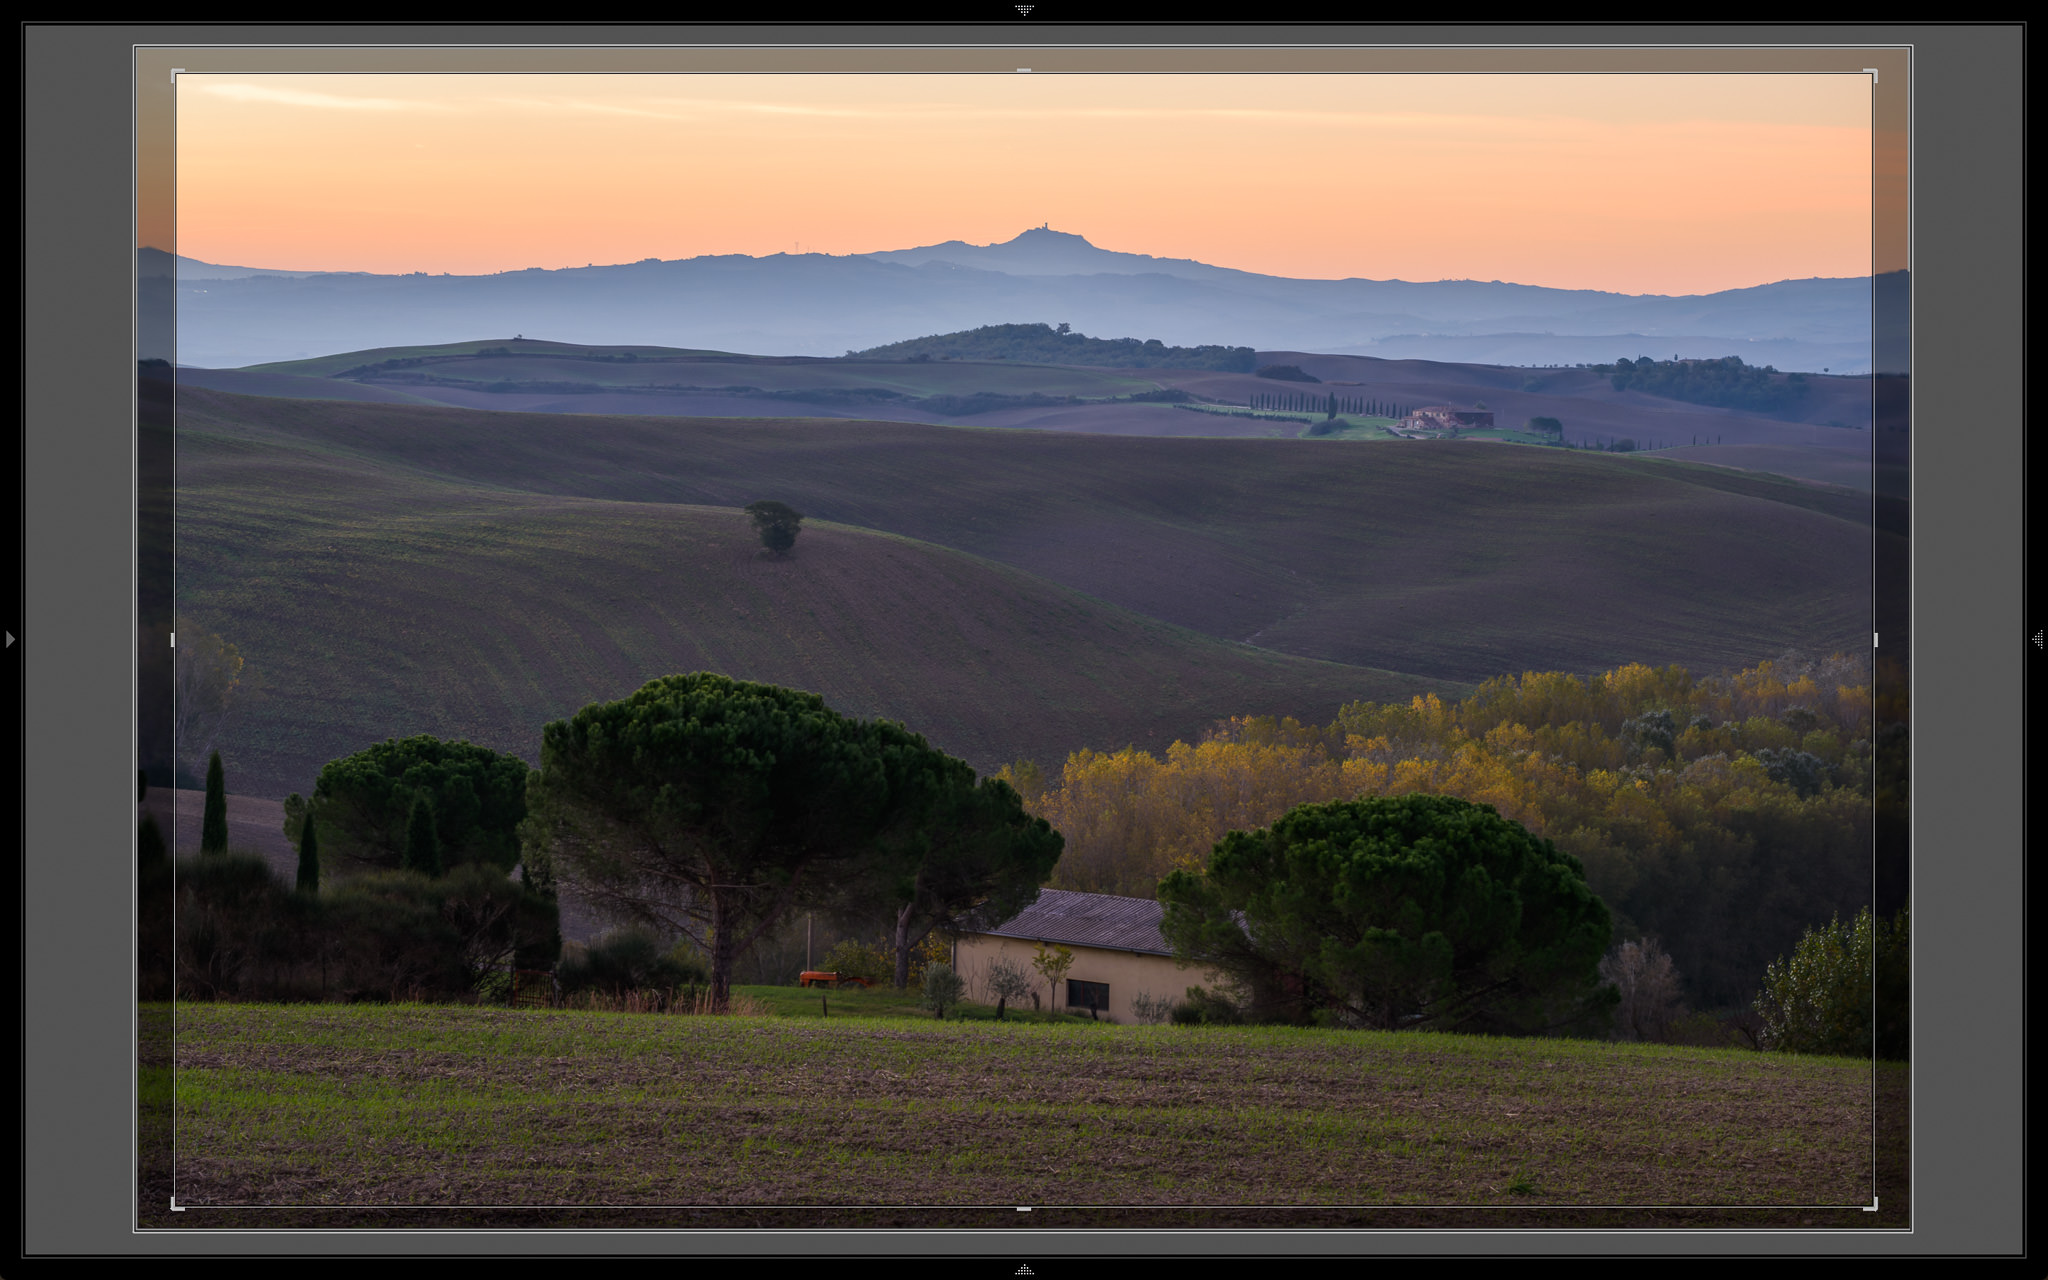
- Open Lightroom again. Now, you need to crop the photo so it looks good. Often, the edges of your image will have large sections that are extremely blurry — you need to crop those out. Here’s how that looked for this particular focus stack:
- Finally, once you’re done cropping, just clean up the image and edit it however you want! There’s no wrong way to proceed from here. You’ve already created a focus-stacked image.
6) Conclusion
Although focus stacking isn’t something you should do all the time, it’s an important tool to have at your disposal.
Sometimes, you may use a telephoto lens and have difficulties getting everything in-focus. Or, you could have a landscape that stretches so far that even f/16 doesn’t have enough depth of field. Finally, if you’re interested in nothing but the top sharpness, you might focus stack a landscape simply to use your lens’s sharpest aperture (like f/5.6 or f/8) rather than a smaller aperture which has diffraction.
There is no right or wrong reason to focus stack, but be aware that you can take this technique to levels that might not be worth the effort. When I first learned about this focus stacking, I tried to use it on every landscape that I shot, simply to get the sharpest photos. Unfortunately, this meant that each photo took five times longer to capture! I ended up with sharp photos, but I didn’t get as much variety in my shots, and my work suffered as a result. Now, I’m more likely to use f/16 than to focus stack at f/5.6. If focus stacking works well for your personal style, though, that’s great — don’t let me discourage you. It just isn’t the case for everyone.
Hopefully, this helped provide a good platform for you to start focus stacking your own shots! If you haven’t tried it before, give it a go. For certain difficult landscapes, focus stacking is an incredible tool.
There is an effect that is well illustrated by your middle ground diagram that I have not seen Photoshop deal well with and wish to find out how to rid myself of this problem. I believe my post-processing with Photoshop is as you describe. If you look at the diagram, you see that you have drawn a fuzzy band around the tree from the foreground that appears in the middle ground and is not covered by the sharp foreground image. When I magnify my merged images to 100%, I see this fuzzy band around the foreground subject. Of course, with three images, matters are more complicated. What am I missing or am I misusing Photoshop? The only solution I see is to magnify the foreground image slightly to cover the fuzziness from the images behind it and cover the fuzzy part of the foreground in the middle ground image. With three depths of focus, three magnifications could be required. If magnification is the solution, should the magnification be done in software or in the field by changing focal lengths slightly?
Excellent article Spencer, well explained, I presume u focus in live view using manual focus and zooming in to check your focus?
Thank you, Gerard, and my apologies for the late response! Yes, that’s exactly what I do – incrementally manual focus the lens from shot to shot, zooming in on live view to magnify things. You certainly can use autofocus if you would like. It’s usually quite accurate in live view. The issue is that you’ll want to magnify things either way so that you can tell exactly where the focus starts to fall off too suddenly, and, once you do that, manual focus is just as fast. It’s also smoother; autofocus can jump in and out before focusing properly, making it simply more challenging to remember where it was focused for the prior image.
The Nikon D850 does focus shift. I takes up to 300 images with one click of the shutter. These images are stacked in PSCC to give one image with everything in focus to infinity.
Yes, what an excellent feature! Hopefully, other cameras in the future will have something similar. For my next camera, I’d certainly be inclined to purchase one that has built-in “focus shift” (bad name, because focus shift means something different in the context of lenses, but that’s how it goes…)
Like many, I eagerly wait for camera manufactures to give us the camera we need, eg RAW histograms, auto ETTR, auto exposure bracketing and focus stacking.
Until then, at least the Canon community has all this thanks to Magic Lantern.
Agreed! You would think the fact of Magic Lantern’s popularity would spurn camera manufacturers to include some of those features standard… but apparently not. That’s certainly a selling point for Canon cameras!
I’m going to assume that to ensure the least amount of variation we need to avoid Auto WB, focus manually and maintain the same exposure? Or, can overexposing the foreground a tad for more detail be beneficial since the stack process from LR to PS doesn’t include any histogram edits? How much latitude is there at this point if you want to open up an area that is in shadow? Seems it would be advantagous prior to dealing with a composite image in LR, or PS for that matter. Or, does the image remain a RAW file throughout all this editing and afford you the opp to edit at that stage? Which approach makes more sense? Excellent primer on the subject – I will be using this soon.
Bstrom
You are right that if focus (or exposure) stacking, you should be at a fixed WB and shooting RAW.
The challenge in landscape focus bracketing, unlike macro where the near and far depths of field are equal and minuscule: in landscape focus bracketing you need to account for the varying DoFs.
If you are a Canon shooter you can make use of my focus bar script, that provides all the feedback you need for focus stacking. You can download the in-camera script from here: photography.grayheron.net
If you are not a Canon shooter, you will need to use an app to calculate the number of brackets and keep your fingers crossed, unless your lens provides focus distance feedback, ie very difficult to read the lens markings.
I am using PS CS3, so can’t use the newer stack feature – the photomerge doesn’t work for stacked images. Instead, I got Enfuse and it does fine.
For a test, I just chose successive focus points – 6 of them – to test a landscape image in my front yard. May not have done enough frames as the closer 2 frames would not ‘come in’ as well as the infinity frames to the finished stacked image.
Just starting with this. Need a few more test images to get the technique down…
Bstorm
One quick way of estimating where to focus in a landscape, is to choose a healthy focus criterion, i.e. a defocus blur (C) of say 15 microns (diffraction blur will add to this of course, so don’t go too narrow in your aperature, say, F/8 or F/12).
Estimate the hyperfocal distance (H) from ((focal_length)^2)/(C*Aperature_Number).
Now simply focus at H/(2n-1), where n is the number of images you wish to take to cover you from infinity to a near depth of field distance at H/(2n).
I would also take one at 2H so that my infinity blur was C/2.
The above bracketing strategy is about the best you can do.
The only downside is know where to focus in tne scene. If your camera reports duistance in LV, you OK; like Magic Lantern does.
Post script
Just to be clear you focus at H/(2n-1) for n = 1 to your last image, i.e. H, H/3, H/5….H/(2n-1).
The number of images is easy to estimate from near dof of nth image is at H/(2n), i.e. number of images to cover from X to infinity is about H/(2X).
Final Post Script
BTW if anyone is interested I wrote about the H-based focus stacking approach here: photography.grayheron.net/2017/…tance.html
wow, wonderful article, thanks for sharin
This is so much to take in for a newbie! thanks for the clear explanation, Im fascinated, and the finished photo is beautiful.
Very interesting article. This was something I was not familiar with, but it looks like something I could make some good use of. Thank you.
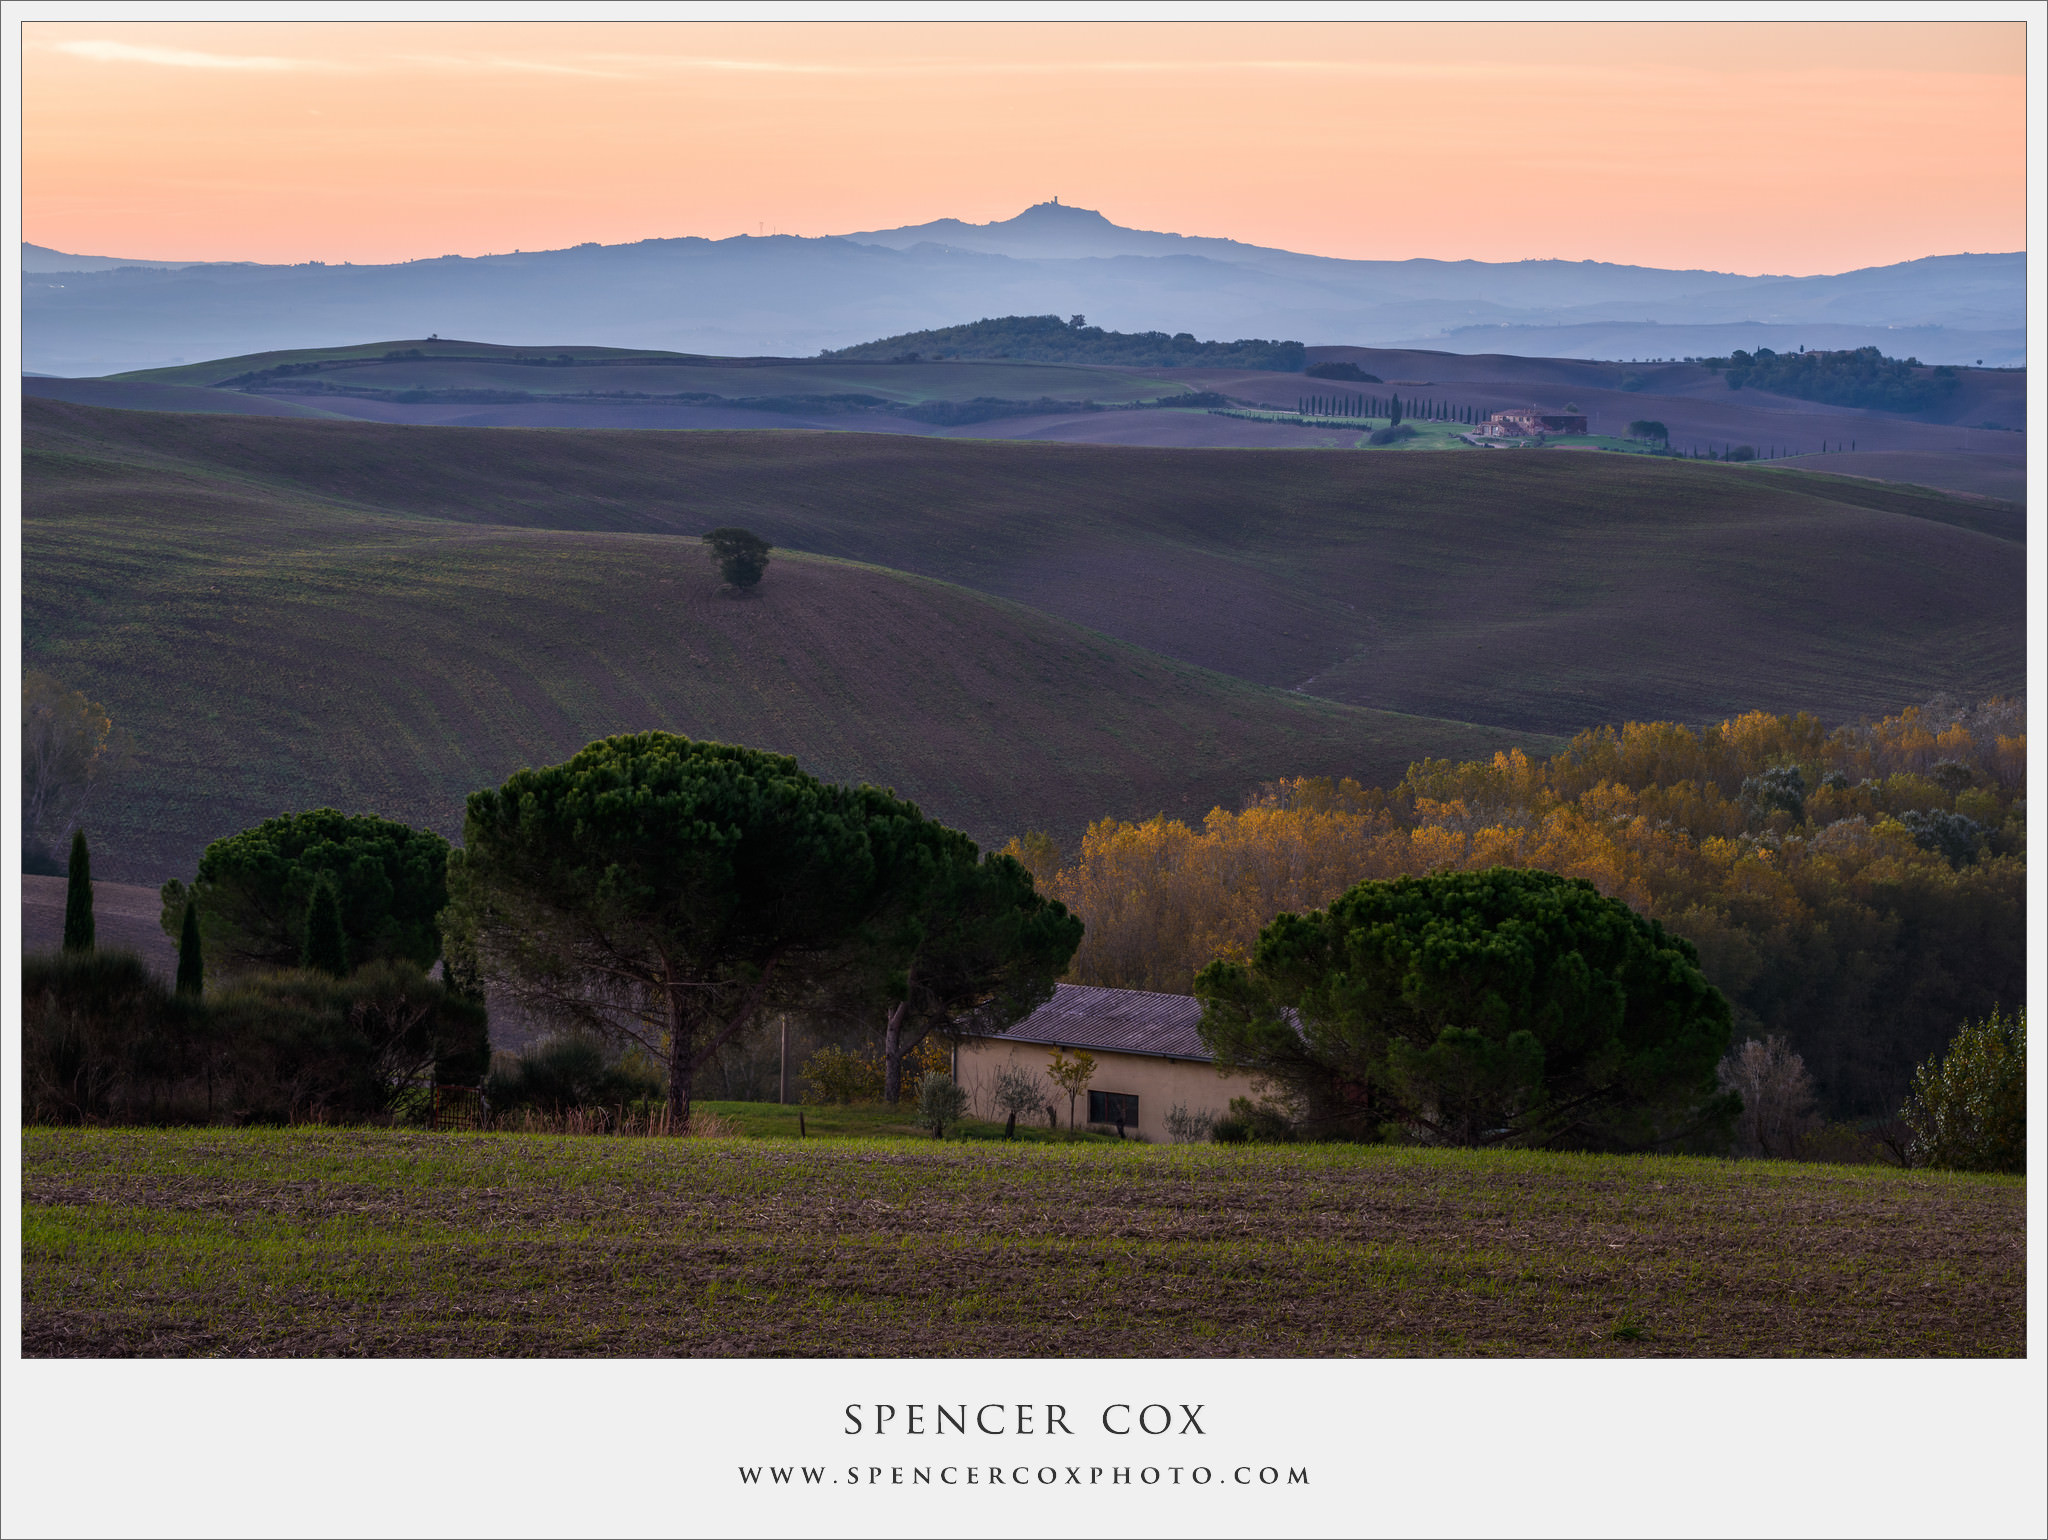
Is this Tuscany, isn’t it?
Thanks for the arctile, it’s pretty interesting.
However, I had a strange problem with this technique. When I focused on different planes, objects of the focused plane grew in size i.e. occupied more space in the frame. So Fotoshop failed to correctly align the frames later. The closest focus plane was about 2 meters and the fartherst was about 1 km, the lens – nikkor 70-200 f/4.
Not sure what was the cause of the problem.
@Boris
I use Photoshop and also others ‘stackers’, such as Zerene etc. All manage to align and correct the frames.
Have you tried non photoshop stackers?
Cheers
Garry
Photography.grayheron.net
It’s not about software, it’s about taking pictures. I’ve checked the frames again, things are much worse than I described in the initial comment.
When I refocused my camera on the closest object from the fartherst object following things happened:
1. the closest object grew in the frame
2. the fartherst objects are shifted up in the frame
3. side objects were moved out of the frame
It looks similar as if I zoomed in while I didn’t. Focus length was 70.
Boris
Sorry, I don’t understand your comments. It is normal for the scene to change slightly and it will be more noticeable at longer focal lengths. The auto align function in PS should correct as will any good piece of stacking software.
You can’t focus stack without software ;-)
Cheers
Garry
Photography.grayheron.net
Didn’t know that this is normal, thought that I do something wrong. Thanks.
Boris
Please don’t hesitate to ask for any help or advise as you explore focus stacking.
From my experience, focus stacking works well for wide lens, i.e. at long FLs you will need to take many stacks. Have you explored the focus stacker app? www.georgedouvos.com/douvo…phy_2.html
Cheers
Garry
Photography.grayheron.net
Hi Spencer- I don’t have Photoshop but I do have Elements 14… do you know if I can focus stack using Elements?
Thanks, Mark
You can do it manually, but it’s not easy. This link has a bit of information on focus stacking in Elements: jtunney.com/focus…-elements/
I believe that GIMP (an open-source Photoshop alternative) also has plugins that can do focus stacking, and they’d be free.
You’ll have to jump through a few hoops to get either of these solutions to work. If you’re planning to do a lot of stacking, you should think about Zerene or Helicon instead.