One of the most frequently asked questions I often get at Photography Life is related to post-processing images. Specifically, our readers want to find out how they can make their images look good without spending too much time post-processing them. After all, not everyone has the skills or the patience to learn how to use the many different tools in different software packages like Lightroom and Photoshop. I thought of things that I normally do to my images when I want to make quick edits and came up with a few steps that I consistently apply to all of my images. In this article, I will provide these steps, so that you can quickly make changes to your images and make them look good without having to go through a lot of learning. I will highlight the steps using Lightroom and Photoshop, but you should be able to imitate similar steps using other post-processing software as well.
Before I show you the exact steps, let’s first highlight the several reasons why many images end up looking unattractive. This will explain the steps I go through further down below. Now keep in mind that if you are looking at a RAW image and wondering why it looks flat and dull, that’s because it has not been processed yet! Remember, each and every RAW image must be post-processed in software to make it look its best.
- Image is Too Dark – modern cameras are designed in a way to preserve as much highlight information as possible, which ends up with images often looking a bit too dark when shooting with a semi-automatic camera mode. In many cases, if it is not the camera, photographers themselves often end up making images darker to preserve those same highlights. Unless it is the photographer’s specific intention to communicate a specific mood in an image by making it darker, photographs typically need to be adjusted in post-processing to look brighter and more lively.
- Image Lacks Contrast – this is a very common issue that I see in many photographs. When an image lacks contrast, it often looks bland and unattractive. In many cases, even a slight boost of contrast can make a huge difference.
- Colors are Over-Saturated – many photographers often make the mistake of over-saturating images in-camera (via camera color profiles / presets) or via post-processing software, which makes colors appear unrealistically rich. While it is tempting to make photographs appear vibrant, one should be very careful about the danger of over-saturation.
- Subject Lacks Clarity – when a subject is smushed into a scene and there is no separation of subjects or tones, the image is probably low on clarity. Adding clarity to a subject helps boost its presence and allows it to clearly stand out from the scene.
- Image Lacks Sharpness – a good amount of sharpness on a subject emphasizes it and makes it stand out, which can be an effective way to draw viewer focus. While sharpening is important, one must know how to properly apply it to images without adding too much noise, artifacts or halos around the subject.
Obviously, the above list does not include many other factors such as light, subject, composition/framing, and camera technique because those are factors one must consider at the time of taking a picture, not afterward. If an image is no good to start with, no amount of post-processing can save it!
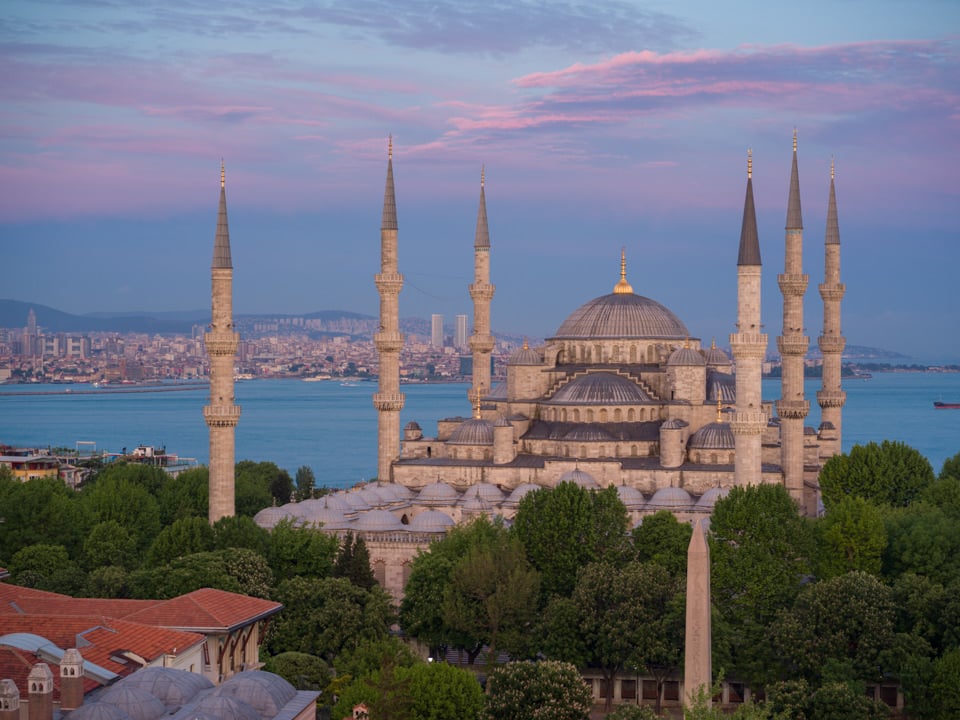
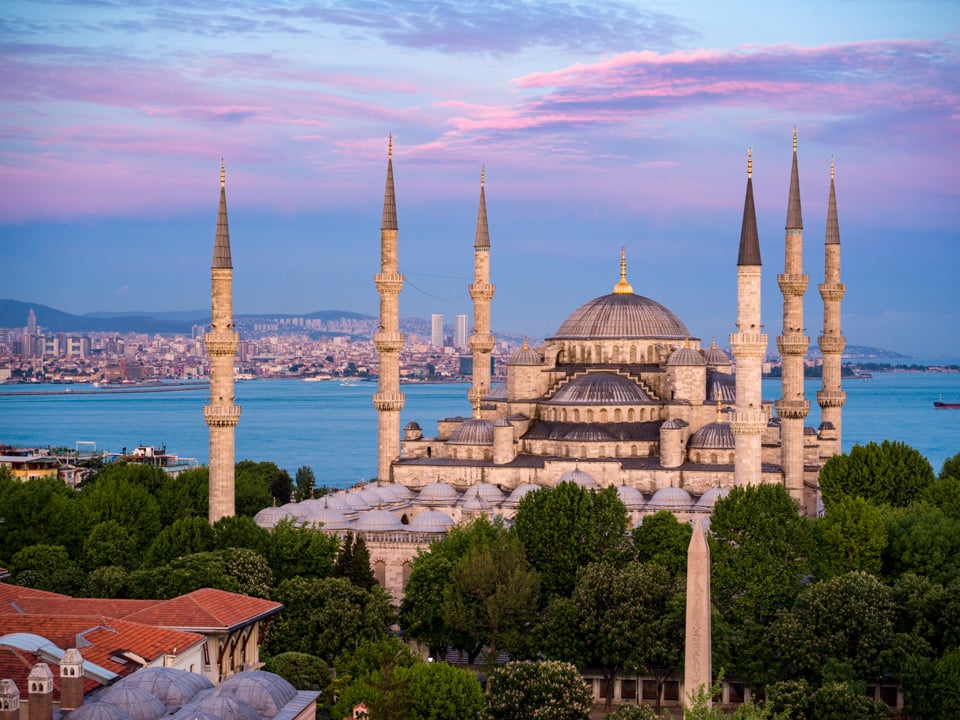
Let’s take a look at a couple of sample images and see what specifically makes them appear attractive when compared to their unprocessed, or camera-processed counterparts. Below is a “Before” and “After” image of the Blue Mosque. The “Before” image is an unprocessed RAW image, whereas the “After” image was processed in Lightroom with a few simple steps that took me no more than a few minutes:
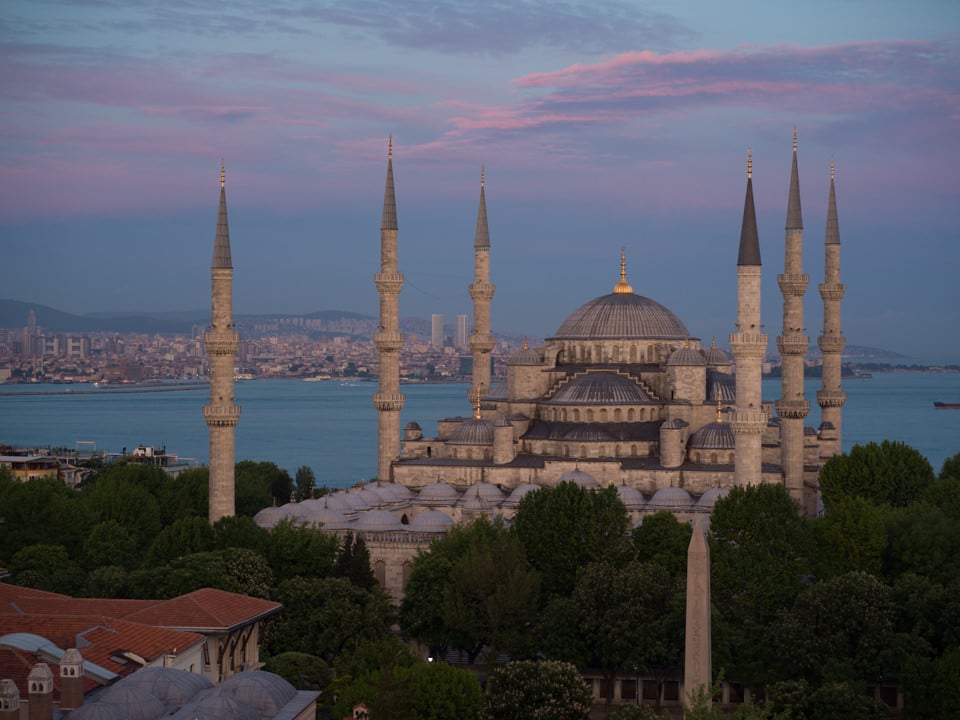
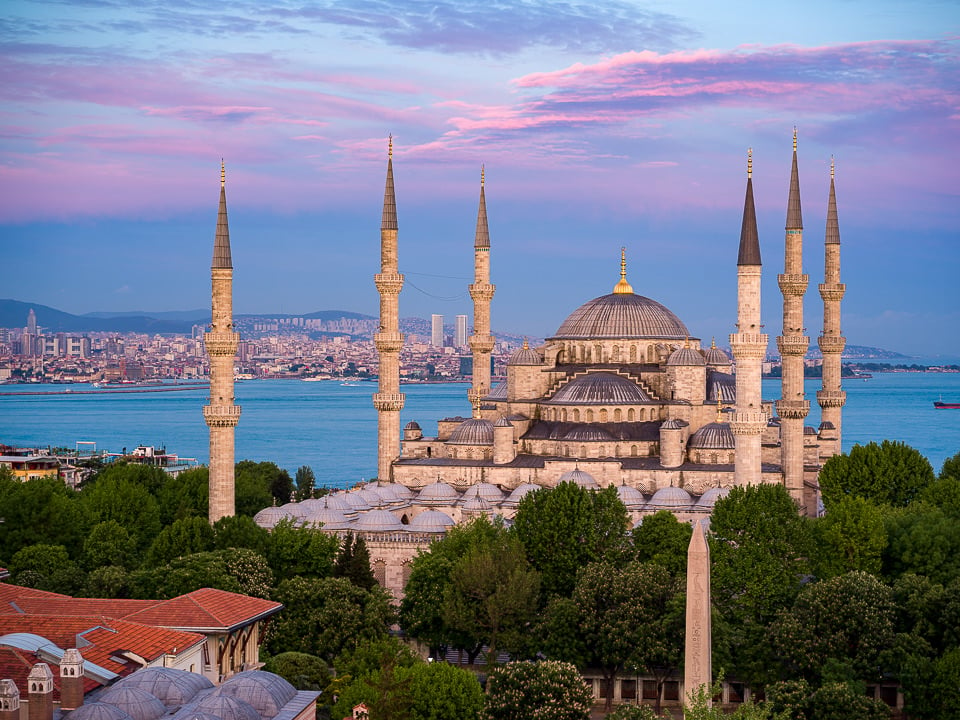
As you can see, the difference is drastic and yet it took me very little time to get this result. By making the image brighter, increasing its contrast, adding some global clarity, selectively sharpening the mosque and its surroundings without messing with color saturation allowed me to really bring out the image.
Let’s take a look at another image, this time a portrait of a carpet maker. The “Before” image is a straight-out-of-camera JPEG image that was resized for web resolution without any extra sharpening applied to it, whereas the “After” image is something I spent at most 5 minutes on, again in Lightroom:
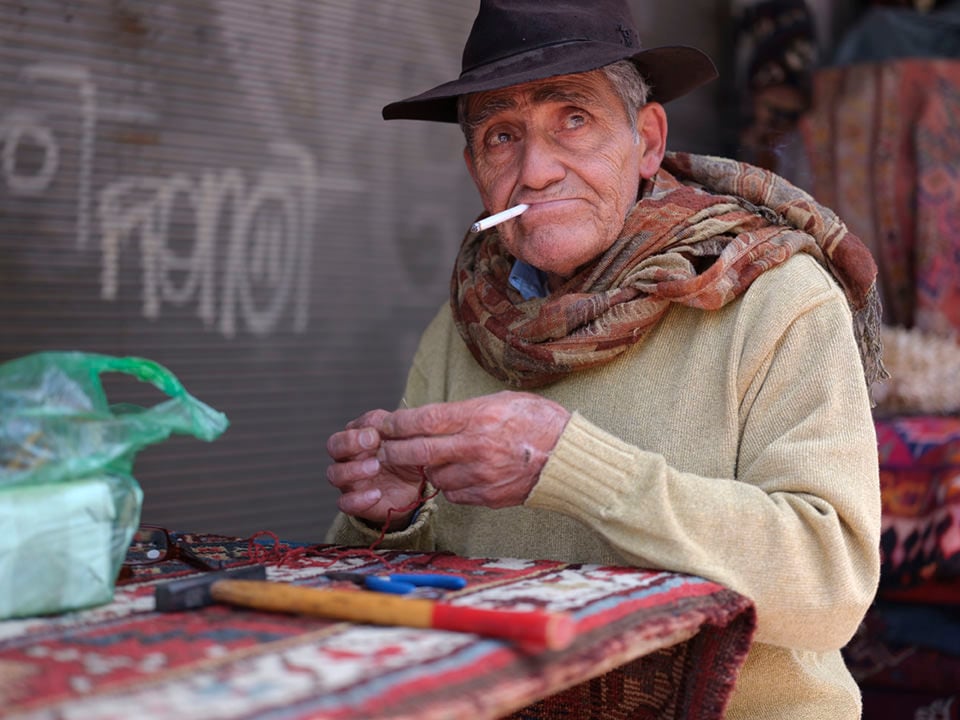
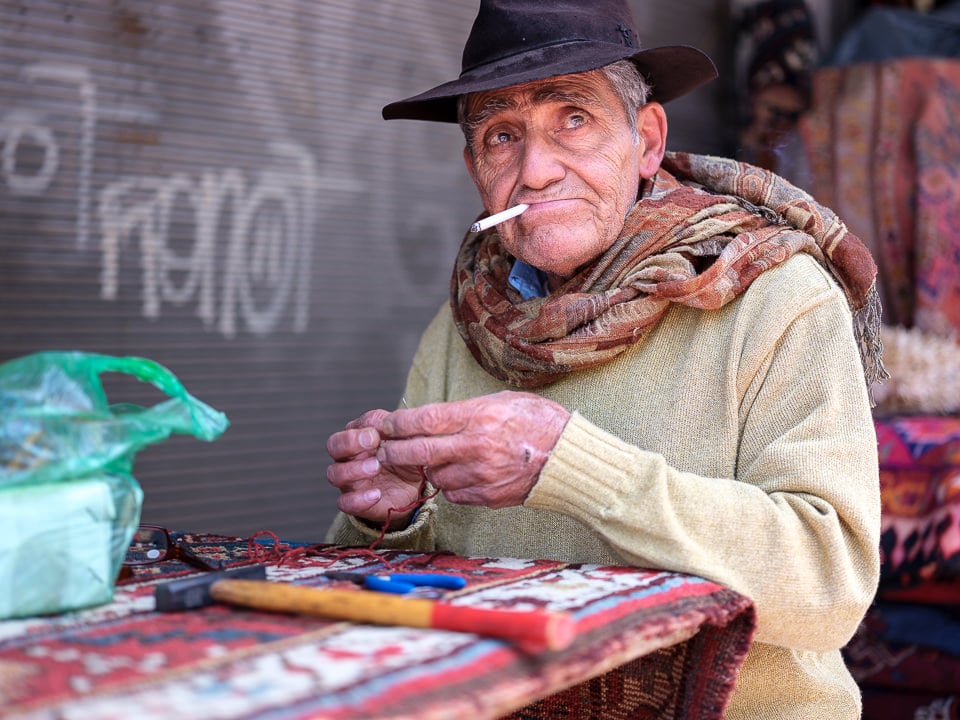
Once again, we can see that if one is willing to invest just a bit of time on their images, it is possible to yield very appealing results out of RAW files that look much better than camera-generated JPEG images. In the above case, I once again brightened up the image, added a bit more contrast, then added a little more clarity to the subject by selectively adding brightness to the subject’s body, so that he stands out from the scene. Sharpening was applied at a lower level, but higher than normal to highlight the subject’s facial features.
So how can you make similar adjustments to your photographs in post-processing software quickly? Let’s go through the steps, one at a time.
A quick note: make sure to have your White Balance and your Camera Calibration profile set correctly before you start working on the image.
Table of Contents
1. Brightening Up the Image
The first step is to make your image as bright as possible, but without losing any valuable information. Unless you are specifically aiming for a darker, more moody image (which is not the scope of this article), you should always brighten up your images, because brighter images will always do a better job of grabbing the attention of the viewer. Obviously, one has to be very careful when brightening images where part of the image can potentially result in a loss of highlight details, so if you are dealing with an image of a sunrise or sunset where one part of the image is much brighter than the other, you might not be able to push global brightness levels further. In those situations, you might need to use other tools such as Graduated Filter or Adjustment Brush in order to selectively brighten up darker parts of the image.
When working with a RAW image, global brightness is adjusted through the “Exposure” slider, which can be found in both Lightroom and Photoshop’s Adobe Camera RAW (ACR) tool:
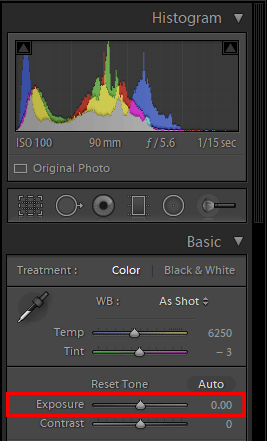
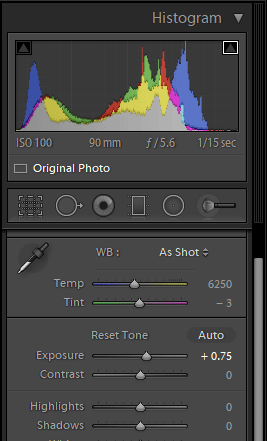
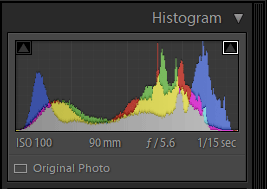
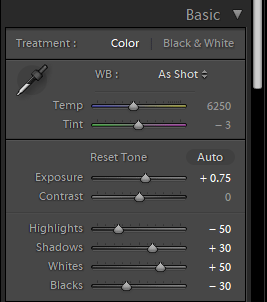
Experiment with this slider by dragging it to the right until the histogram balances out and looks more spread out, possibly even pushing a bit to the right. Make sure that as you do this, the image still looks good in the preview – you do not want the image to look overly bright and you definitely do not want to have anything touching the right side of the histogram, since this means that you are potentially losing data. The goal is to make the image just bright enough so that we have a good starting point. For my image of the blue mosque, I pushed the exposure up +0.75, which made my histogram look like this:
Next, you want to balance this exposure setting with the “Highlights” slider. Since the overall brightness of the image has gone up, the brighter parts of the image might be too bright, so using a negative value in the Highlights slider will allow us to darken them a little. So grab the slider and start moving it to the left until anything that looks overly bright now gets the detail back. In the image of the Blue Mosque, I had to bring highlights down quite a bit by -75, so that the sky details come back.
Lastly, if you have any important shadow areas that are looking too dark, this is the time to bring them back. This is done by dialing a positive number to the “Shadows” slider in Lightroom and ACR. Now that the image is hopefully brighter than before, your shadow detail should already be recovered a bit, but the goal is to bring it out even more and you will see why later. Now, while you most likely want to recover some shadow detail, you do not want to recover too much, or the image will start looking unrealistic/fake. Remember, shadows are a natural part of an image, so the last thing you want to do is destroy them. For my image of the Blue Mosque, brightening up the exposure already made the trees brighter (which is my shadow area), but it was not enough, so I dialed +30 in the Shadows slider to bring them out further.
At this point, the image is probably looking pretty bland, but that’s OK, because that’s what we will address in the next step. Here is what the image of the Blue Mosque looks like with just the +0.75 Exposure, -75 Highlights, and +30 Shadows values:
The next step is to boost global contrast, which is what is going to add some punch to the image.
2. Adding Contrast to the Image
Once you brighten up an image and recover some highlight and shadow details, you should end up with an image that looks pretty bland and lacks contrast, so it is time to start boosting contrast. And you might naturally think that the “Contrast” slider is the best candidate, but you would be wrong! Unfortunately, increasing contrast through the “Contrast” slider very quickly degrades the image in both Lightroom and ACR, especially if you go with higher values. Instead, we will use a different trick to boost global contrast using the “Whites” and “Blacks” sliders. That’s right – we will be making the image even brighter than what we have so far and then work our way to achieve a good balance.
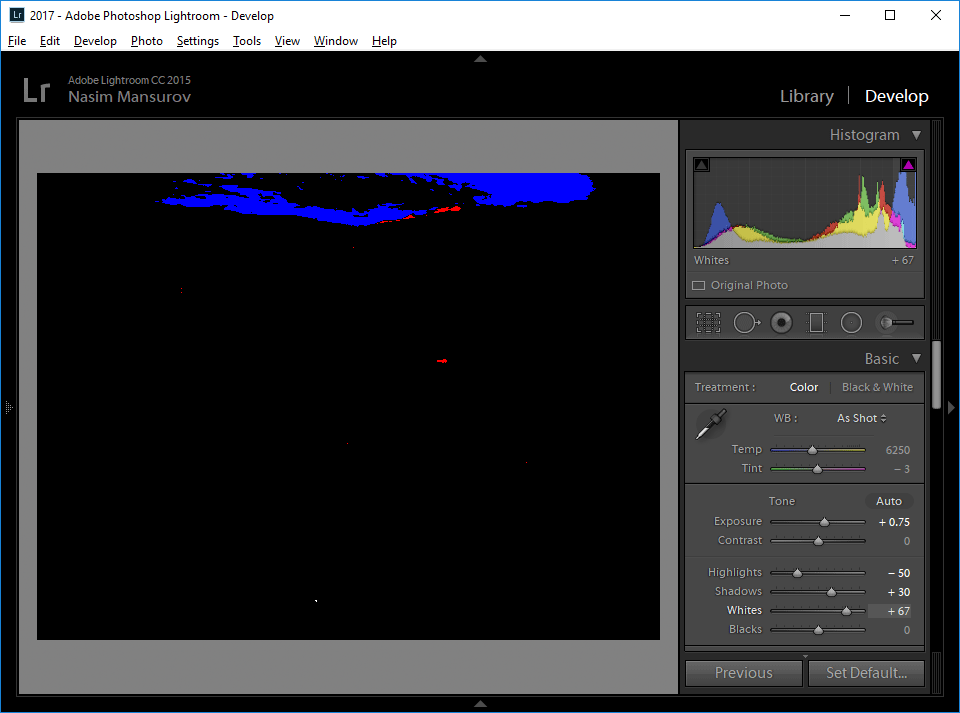
Start out by moving the “Whites” slider to something like +25 – you should see the whole image brighten and the histogram should be shifted further to the right. Start moving it to the right until you start hitting the right side of the histogram. As you do this, hold the “Alt” (“Option” button on Mac) button on your keyboard and the image will switch to a completely black image. As you move your slider, the preview will show any areas that are getting blown out. In my case, if I go higher than +60, I start blowing out the sky and other highlights in the image, as shown below:
Stop as soon as anything important in your scene (such as the sky) starts getting blown out. This is your limit – you should not push it any further. Now, if you are already blowing out some highlights even at +25 value, then your previous “Exposure” slider setting was too aggressive. Go back to the “Exposure” slider and pull it back a little until the histogram is good again and highlights are preserved. At this point, the goal is to make the image as bright as possible, without losing any information, so you will need to go back and forth between Exposure and Whites sliders. For my image, the value of +50 for “Whites” worked out great and I still had a little bit of room to the right of my histogram:
Next, you will need to play with the “Blacks” slider and take it to negative values, which will darken your shadow areas. The goal here is to strike a good balance between the “Whites” and the “Blacks” sliders, so that your highlights are as bright as possible and your shadows look more natural. Doing this will boost global contrast of the image. For my image, dialing -30 in the “Blacks” slider was good enough to make shadows look natural and not too dark, but this setting is not universal – each image will require a different value, so you will need to experiment here. If you are worried about losing shadow detail, press and hold the Alt / Option button on your keyboard again as you move the “Blacks” slider, which will show you all the areas that are losing information. Unlike with highlights, don’t worry too much if you lose some shadow details – that’s normal, since shadows can be pretty dark!
Here is what we’ve got so far in terms of settings:
And here is what the image looks like now:

See the difference? The image should now have brighter highlights and darker shadows, which is what creates contrast! We’ve managed to make the image even brighter than before and yet it already starts looking good.
At this point, we have boosted global contrast, but what if there are areas in the scene that need local contrast adjustments? For example, I am not very happy with the contrast levels in the sky and the distant buildings – how would we be able to boost those? Well, there are several ways to do it. One way would be to work with something like the “Adjustment Brush” or the “Graduated Filter” and start selecting particular areas of the image where contrast needs to be adjusted. Then once the desired area is selected, you could use the “Contrast” or “Whites” and “Blacks” sliders to boost contrast in that part of the scene. While that works for some images, it would be painful to do on this particular image, since the minarets of the Mosque go so high into the sky. The other way is to use the “Dehaze” tool in Lightroom / ACR, which can work really well in such situations. Unfortunately, one must be a Creative Cloud subscriber to be able to see this particular slider in Lightroom’s “Effects” panel. However, even if you use a standalone version of Lightroom 6, you can still get this functionality through presets or a plugin “hack” – see this website for more details.
When using the “Dehaze” slider, you want to be very careful – you do not want to use a value higher than +25 or so. The problem with this tool is that if you push the slider too high, it will apply too much contrast globally, which will not only make your image look unreal, but also over-saturated (see the next step on why you cannot do that). For my image, the value of +15 was sufficient to bring out the sky and the distant buildings and it was low enough of value not to seriously impact my foreground highlights and shadows. Take a look at the before and after of using the “Dehaze” slider:

That’s a pretty big difference! Now one thing to keep in mind, is that the “Dehaze” slider can make your image appear too blue. If that’s the case, you might need to re-adjust your White Balance.
Some people also like using the Tone Curve sub-module in Lightroom to change contrast, but I personally find the above tools quicker and easier to use when going through many images. The “Dehaze” tool is particularly useful, because you cannot just replicate it with the Whites / Blacks sliders or the Tone Curve, since those only affect global contrast.
If you prefer using Photoshop for adjusting contrast, the quickest way to boost contrast with great results is to use Google Nik‘s (now discontinued, but still functional) Color Efex Pro. I personally love this tool and when I need to really fine-tune contrast in Photoshop, I typically end up using the “Pro Contrast” tool within Color Efex Pro instead of Lightroom’s Whites / Blacks sliders, Tone Curve or the Dehaze tool.
A quick way to judge if you have done a good job with adjusting contrast is to check out Photoshop’s “Auto Contrast” feature (Image -> Auto Contrast), which works surprisingly well for most images. If you open up an image in Photoshop and use “Auto Contrast” and the image changes significantly, it means that you didn’t push your Whites, Blacks, and your Dehaze far enough to make much difference. The algorithm simply checks your image histogram and makes a quick change to your tone curve, so that it is distributed more evenly in both shadows and highlights. Keep in mind that since it is an automated tool based on your histogram, it might get fooled by some images and do a poor job.
3. Controlling Color Saturation
As you adjust your contrast via the Whites, Blacks, and Dehaze sliders, you will see that your image is going to get a global boost of colors – that’s very normal. In most cases, you do not want to go back and add more colors to your images through Vibrance, Saturation or the various Camera Calibration sliders. Be very careful with those, especially the Saturation slider, since it can quickly make your images appear very unrealistic due to color over-saturation. If you feel that you must add more colors to your image, I would recommend adding them selectively using the HSL sub-module in Lightroom. And if you absolutely have the urge to boost overall colors, start out with the Vibrance slider, as, unlike the Saturation slider, it tries not to touch the already over-saturated colors. See Vibrance vs Saturation article for more details on how these work. Do not go overboard with the Vibrance slider either!
For the above image, I did not touch Vibrance or Saturation sliders in Lightroom.
4. Adding Clarity to the Image
Adding clarity to your subject in an image can make it stand out and there are several ways to do it. The first method is to use the “Clarity” slider in Lightroom. Now just like color saturation, you must be very careful with this particular tool, because if you overdo it, your images will look very fake and your subjects will be surrounded by ugly halos. The “Clarity” slider works by boosting mid-tones in an image, which can work particularly well when you have clouds in a scene because it will make them stand out.
In the image of the Blue Mosque, there are some clouds in the sky that could be great to bring out further, so the slider tool could work really well for this. The nice thing about the “Clarity” slider, is that you can use it globally so that it applies to the whole image, or you can use tools like Adjustment Brush and Graduated Filter to apply clarity only to selected parts of the image. I am not going to go into details about how to do this, since I just want to make quick image adjustments, so I went ahead and dialed +15 Clarity to the whole image. Here are the Before and After:
As you can see, the change is definitely visible all across the image, not just in the clouds – mid-tones have gotten visibly darker. That’s why you want to be very careful when using this tool. I personally find that anything above +15 or so is often damaging and you should definitely stay away from using crazy high values, unless you really know what you are doing.
Obviously the term “clarity” is not just reserved for the Clarity slider in Lightroom. If your goal is to make your subject stand out from the environment, you can also use other tools to do that. For example, in Lightroom, you can use a soft Adjustment Brush or the Radial Filter to add brightness to your subject or a particular part of the scene, which would somewhat resemble using the Dodge and Burn tools in Photoshop. The idea is to bring out what’s important to your viewer’s attention. So if you have a primary subject in your image, making the subject brighter is often a good idea. In the case of the portrait of a carpet maker above, that’s exactly what I did – I used the Adjustment Brush with a large feather to select the subject, then I added 0.2 brightness to make the subject stand out a bit more. You can use this trick in any type of photography, but be very careful. If you make a bad selection and dial too much positive or negative exposure, you will end up with very ugly transitions that will not look natural.
5. Sharpening the Image
The last step is to sharpen your images. Unfortunately, many photographers get confused at this stage, because they only sharpen their image in the Detail sub-module and completely forget about the importance of output sharpening. The thing is, if you are exporting a full-resolution image for print, then the sharpening settings you apply to images in the Detail panel are very important. However, if you are exporting a down-sampled / resized version of your image, then the Detail sub-module becomes far less relevant. Remember, you always want to sharpen your images after they are resized, not before.
I have already written a detailed article on how to properly sharpen images in Lightroom for beginners, so you should give that article a read. Remember, that Detail sub-panel is very important for full-size exported images!
If you are exporting a smaller version of your image for web, social media or any other use, the sharpening setting you define at the time of Export in Lightroom, or the way you sharpen your image in Photoshop after the image is resized to your desired resolution is going to be critical. When working in Lightroom, I personally sharpen images in two places because I want to be able to export both full-sized and resized versions of images at any time. This means that I go through the Detail sub-module first, then when exporting resized images, I also select particular output sharpening. When working with resized images in Photoshop, I often follow the three-step sharpening technique.
For the sample image I have been working on, here are the settings I used in the Detail sub-module:
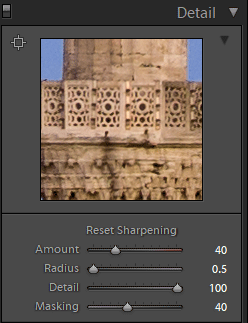
Please make sure that you understand how these work – see the above-referenced articles for more details. With these settings, I can export a full-size JPEG image and it will look pretty good when viewed at 100% view. If the image is going to be printed, the sharpening settings will have to be adjusted depending on what type of paper is going to be used.
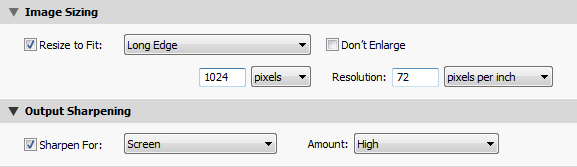
If I need to export an image for the web, output sharpening at the time of image export is going to be very important. When exporting an image out of Lightroom, I typically stick with “Sharpen For: Screen” and “Amount: High” when exporting landscape images. When exporting photographs of people, the “High” setting can be too much and I will usually switch to either “Low” or “Standard”. Here is how I defined output sharpening for my sample image:
And here is the before / after result:
As you can see, the difference is night and day! Always keep this in mind when exporting images – you always want to perform output sharpening in Lightroom when down-sampling / resizing images. If you work in Photoshop, always make sure to resize the image to your desired resolution first, then perform sharpening afterward.
Conclusion
Let’s recap some of the basic tweaks you can apply to your images so that they always look more presentable. First, make sure that the image is as bright as possible. Second, add global contrast and potentially even local contrast to parts of your image in order to make it appear less dull. Third, assess the colors of your image and try not to over-saturate any of them. Fourth, add clarity to your images and your subjects, so that they pop from the scene. And lastly, always make sure to properly sharpen your images, especially after they are resized.
Hope you found the above article useful. If you have any questions regarding post-processing, please let me know in the comments section below!
Hi Nasim, thank you so much for this great and easy understanding tutorial! I also read your article “Landscape Photography Post-Processing Tutorial in Lightroom” which I find usefull, too.
But, how does these techniques (especially the tips regarding white balance and camera calibration) work together? Would you suggest to use only one of this technique or do you think a combination of both is recommendable? What would you recommend?
Really great article, thanks for sharing! I will replicate the process in my software (DxO Lab).
Thanks a lot for sharing this information with us.
Thank you sir. I was very helpful for me
This guide is very clear and easy to follow up. Thanks for sharing.
Well I’ve read the first paragraph on Image Sharpening three times now & it is still meaningless jargon. Any chance of re-doing the section in plain English (American, or British, will do), please?
Dear Nasim. Thank you for this great article. Very compact and informative! I was wondering if you could help me in indentifying the corresponding “tools” in Photoshop CS6: highlights and shadows, whites and blacks, clarity. Thank you so much in advance! All the best, Mirco
Just curious – you don’t mention noise reduction in your process. Do you usually do this?
Thanks for your article and for sharing the knowledge. Very detailed explanation and you made it very simple even for beginners like me.
Best Regards!
An outstanding read and the before/after pictures together with the slider make a real difference to see the impact of post processing.