When I submitted my photos of Acadia National Park as a guest submission on Photography Life, I was amazed at the response, especially on the fact that the majority of photos were shot using a Nikon F100 with Fuji Velvia 50. Nasim contacted me to do an article on film considerations for landscape photography as a follow up. So this is my stab at it.
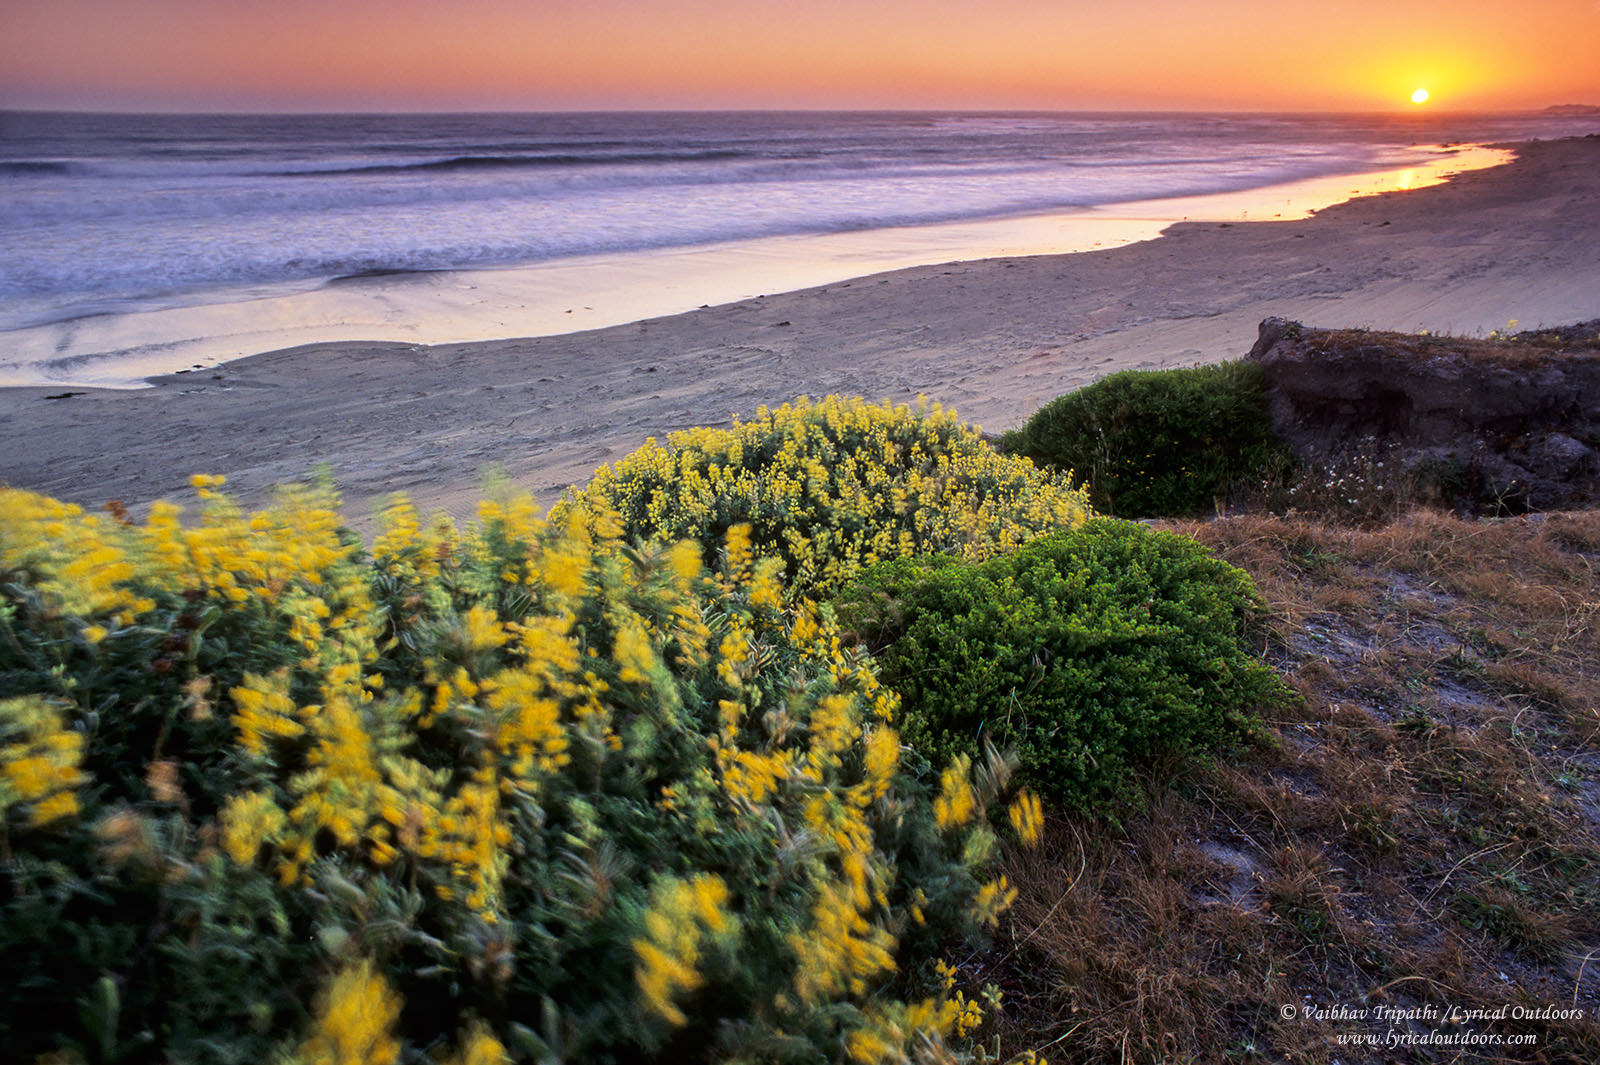
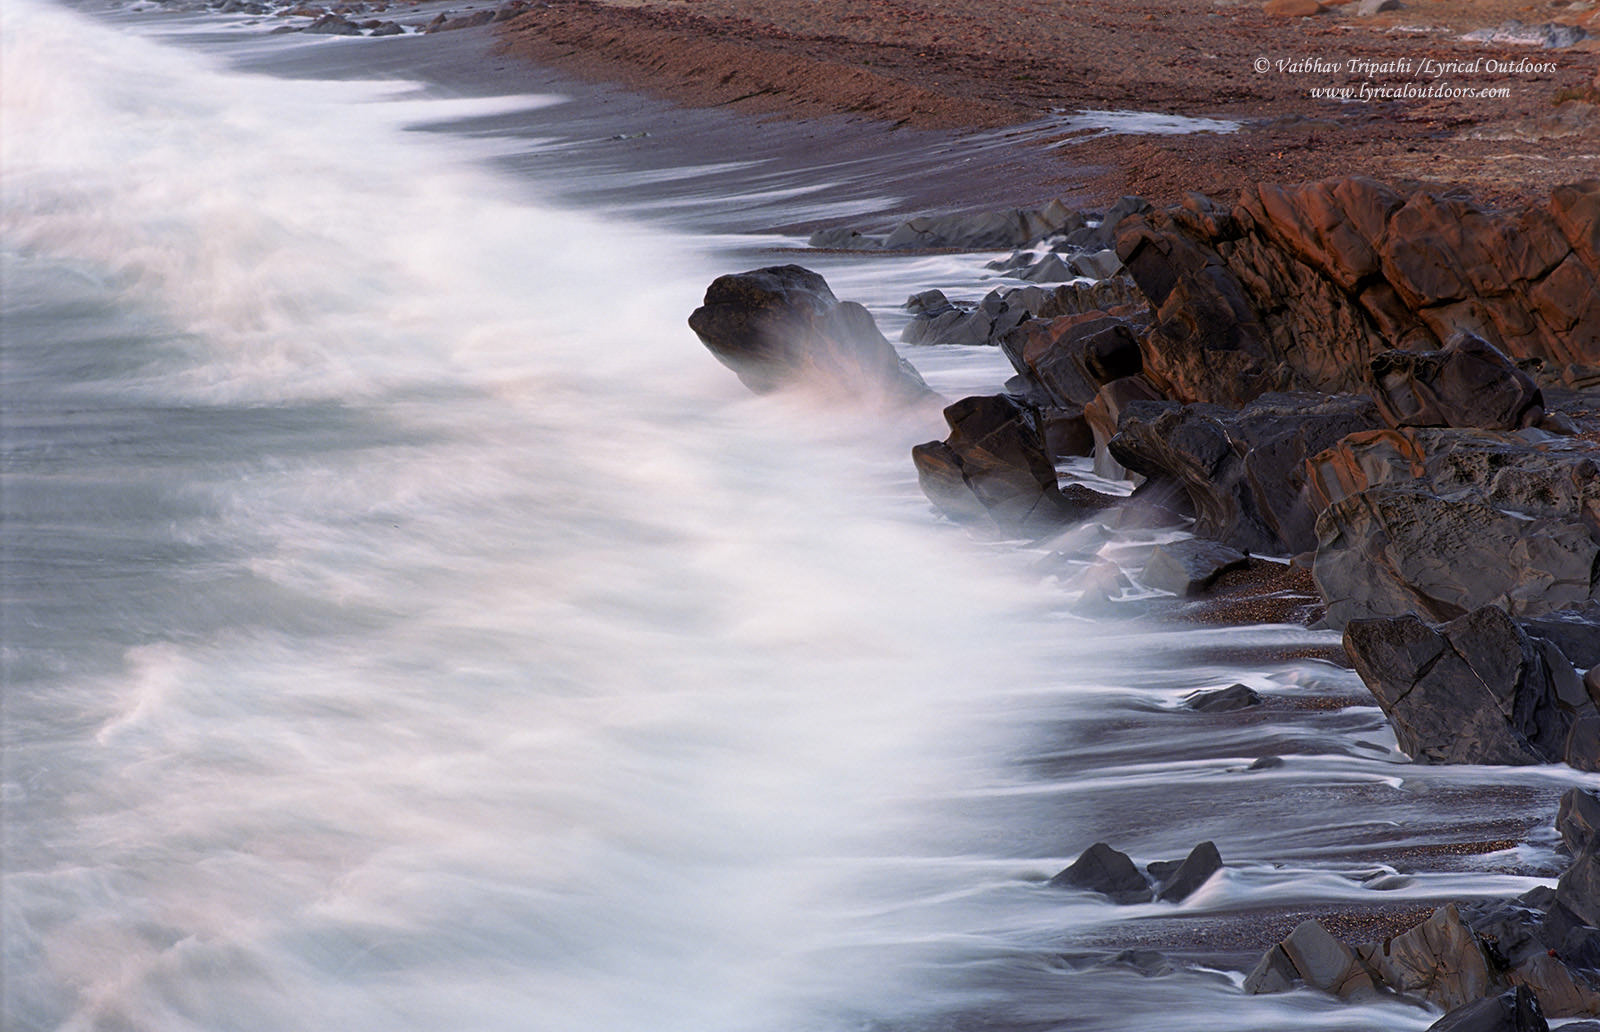
Nikon FE with 20 mm f/4 ai lens @ f/16 for DOF and sunstar, slow shutter speed to capture motion.
I first shot Velvia 50 (just Velvia henceforth in this article) in April 2012 using a Nikon FE and 24mm f/2.8 Ai lens. This was my super lightweight walk around system during my trip to visit family in India. Since, I was already using manual focus primes on my Nikon D700, understood exposure and zone system well, so it was not too hard for me to shoot using a Nikon FE. I shot two rolls in India (bracketing almost all exposures), got them developed at Foto Express in San Jose and then looked at the slides on a light table. The color, the tonality, the highlight roll off and rich shadows of the well exposed slides were really amazing and took my breath away. Then, I scanned few slides using a Nikon Coolscan IV, which I had access to at Stanford University. The scans were not that great (especially the color) and for me this was a serious limitation as I wanted to have the flexibility to scan my slides and share my work. As a result, I shot few rolls for the next two years but every time I reviewed the newly developed slides on a light table, I realized that the limited dynamic range had forced me to look for compositions I would usually overlook when shooting digital. By placing bounds, it was compelling me to pre-visualize more often as well as be more selective and disciplined in shooting. I really appreciated all these aspects but the limitation of not being able to create good quality scans on my own (using the scanner available then) kept me away from shooting film more often.
Earlier this year, I finally got a Nikon Coolscan 5000 off Ebay. After the initial learning curve, it produced scans of 35mm Velvia with relative ease that were really sharp, had a fine non-obtrusive grain and more importantly, the colors were close to that on a light table. With this scanner, I get a 16-bit tiff with a native print size of approximately 12 x 18 inches at 300 dpi (for comparison, Nikon D610 has a native print size of 13.5 x 20 at 300 dpi). This file prints beautifully up to 20×30 or even 24×36 (inches) and I may opt for a drum scan to pull out more even more details, especially if bigger prints are requested.
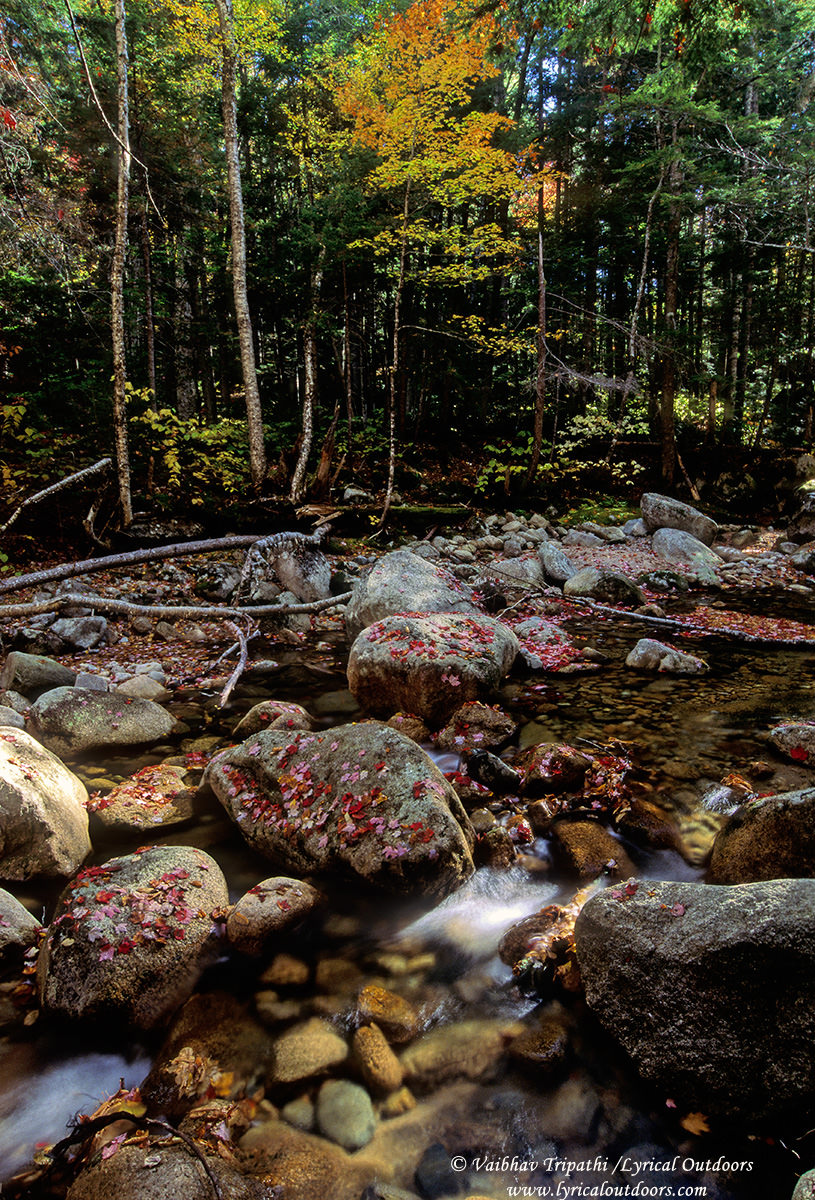
At this point, I feel apt to present a couple of my favorite images from my first few rolls of Velvia.
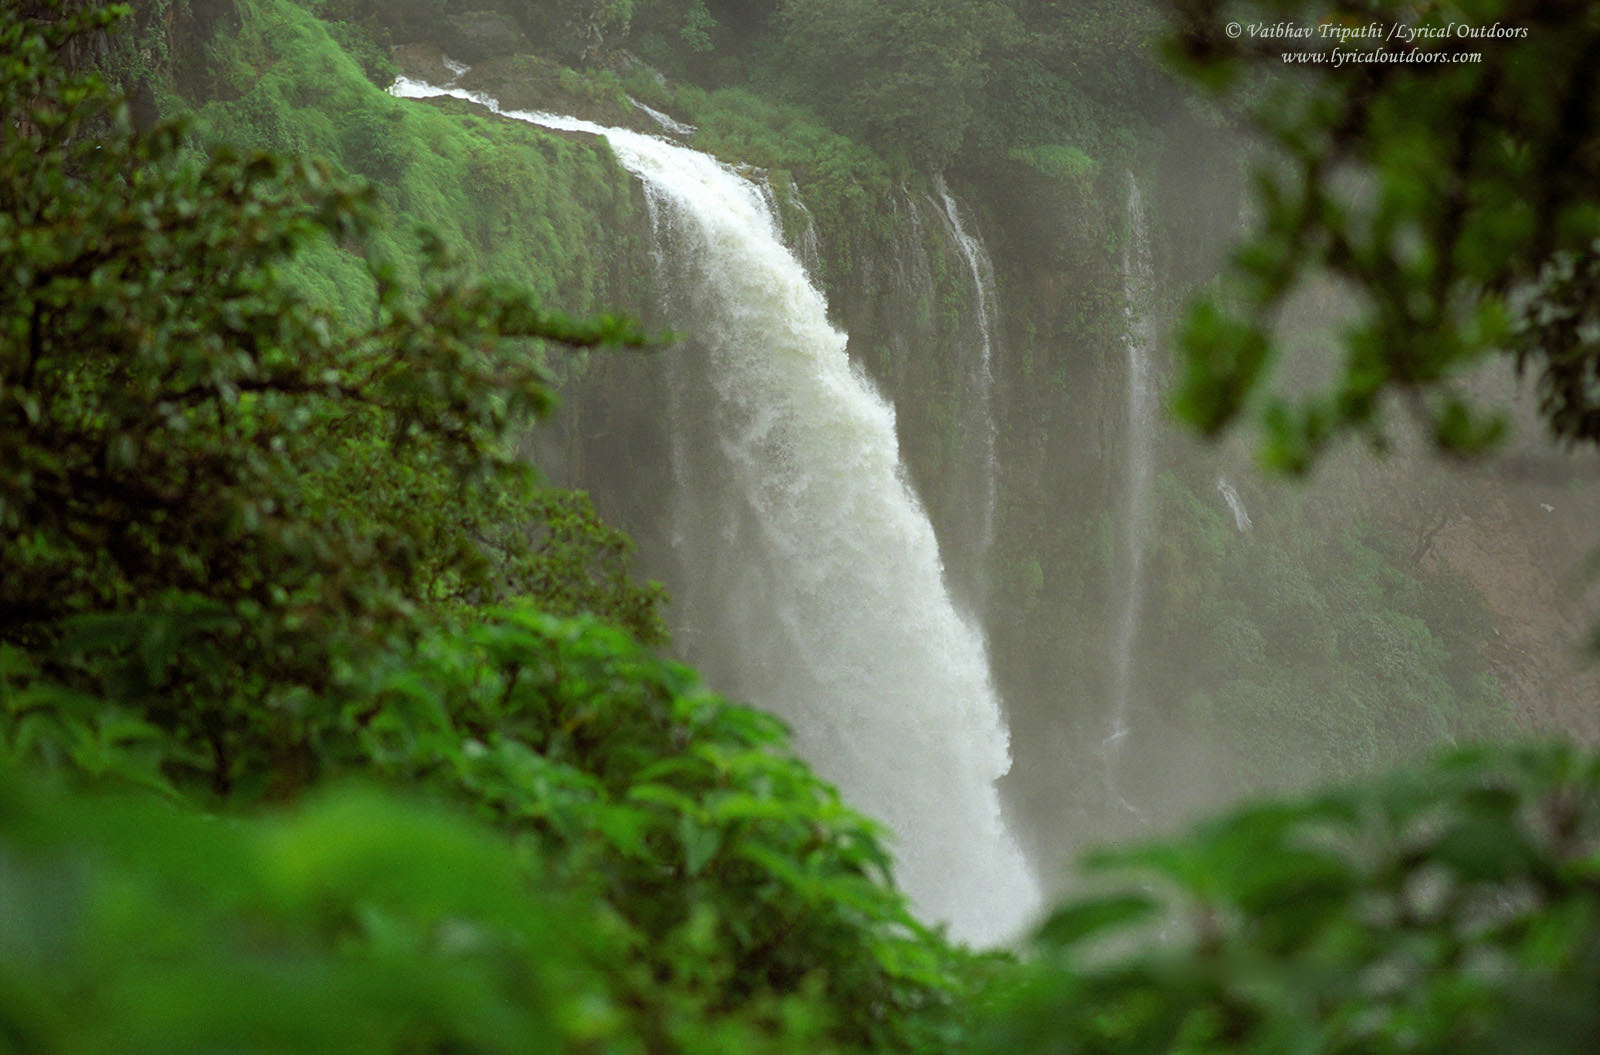
Nikon FE with Velvia 50. Nikkor 24 mm f/2.8 ai lens @ f/16 for DOF, circular polarizer.
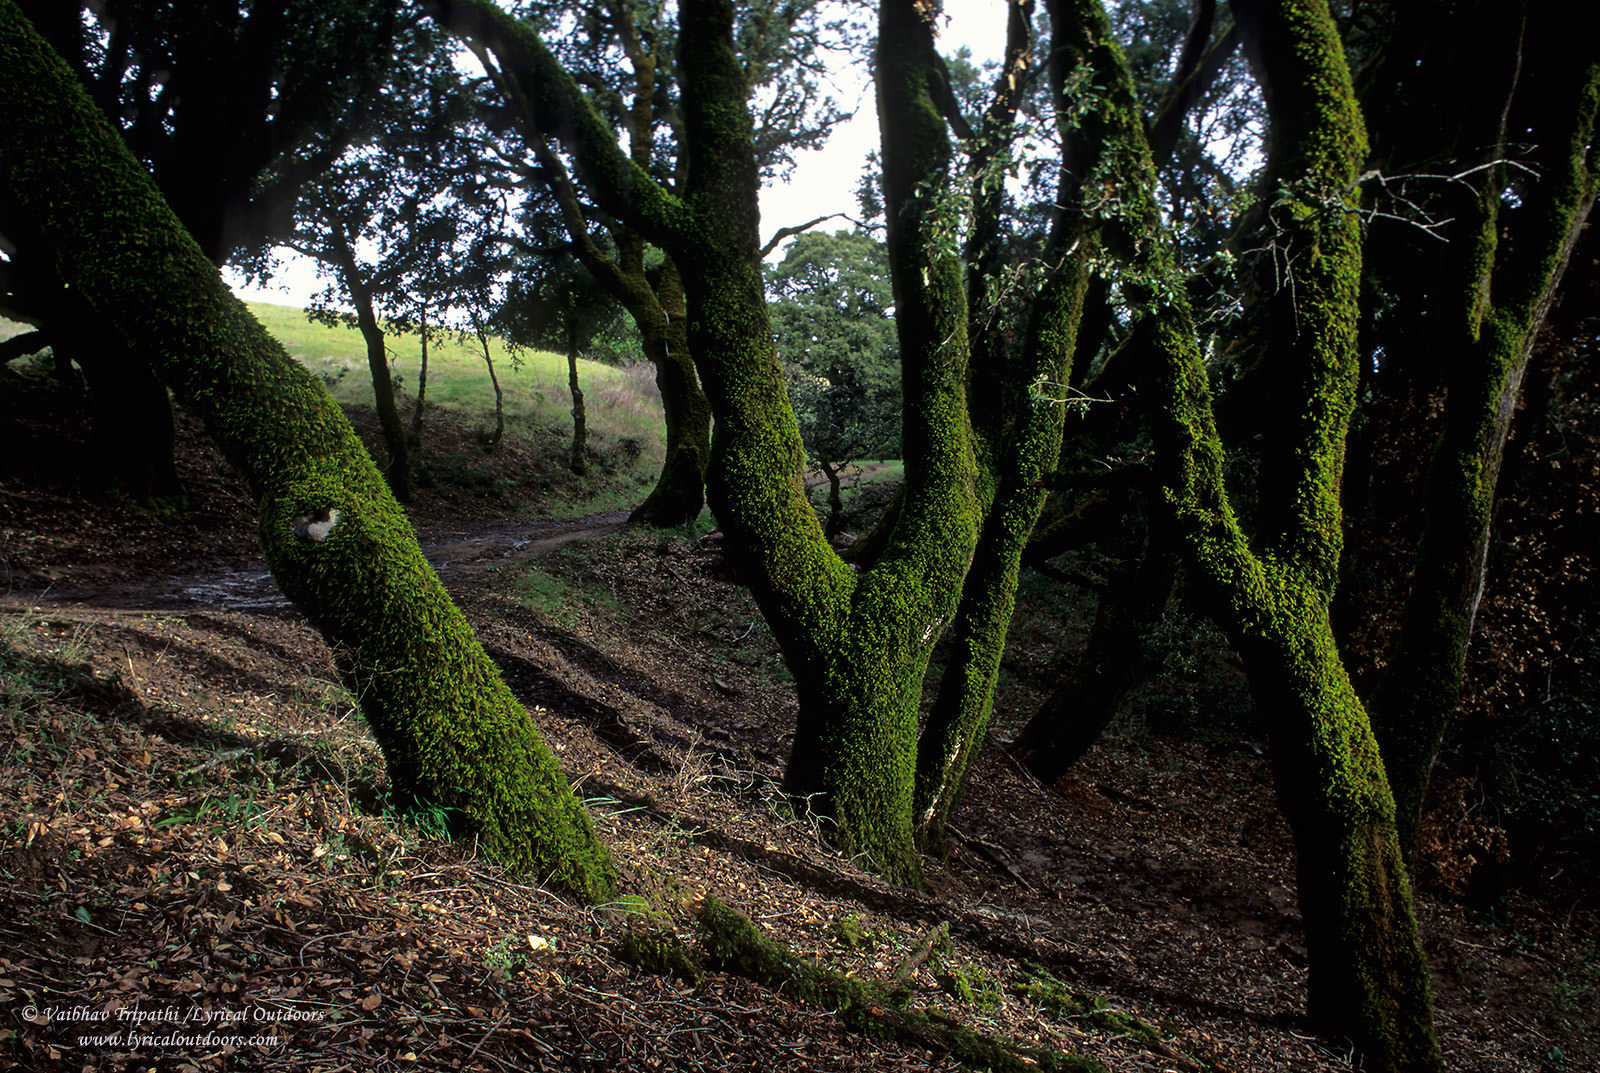
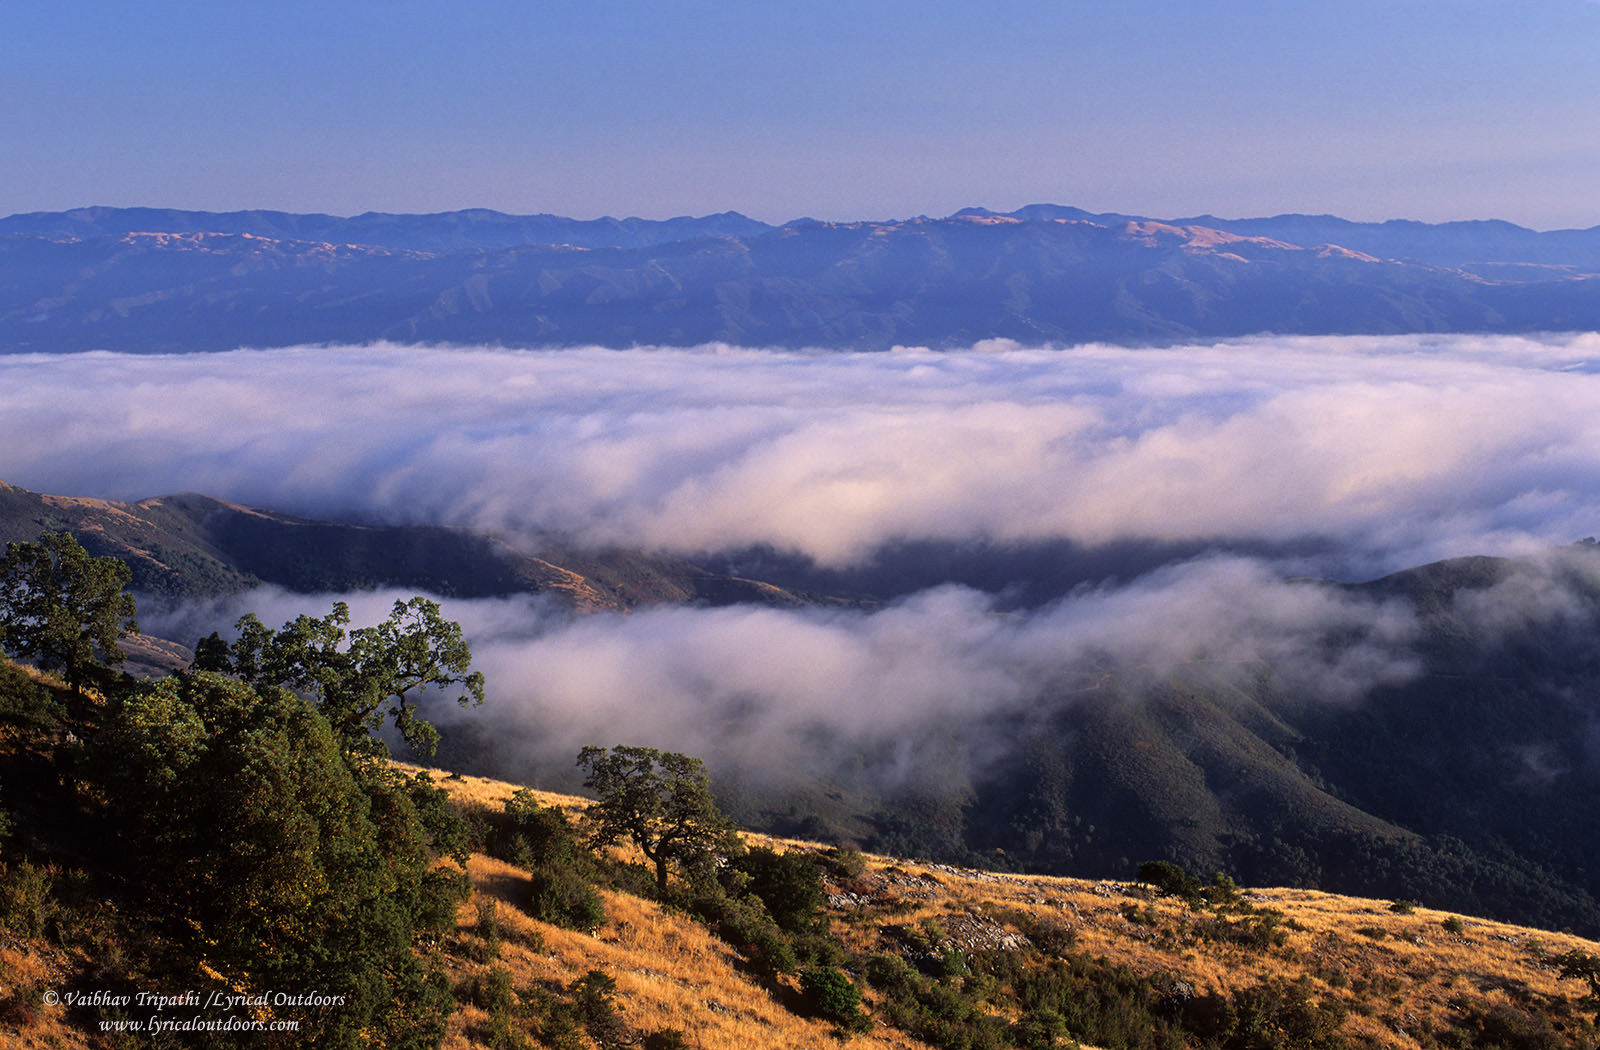
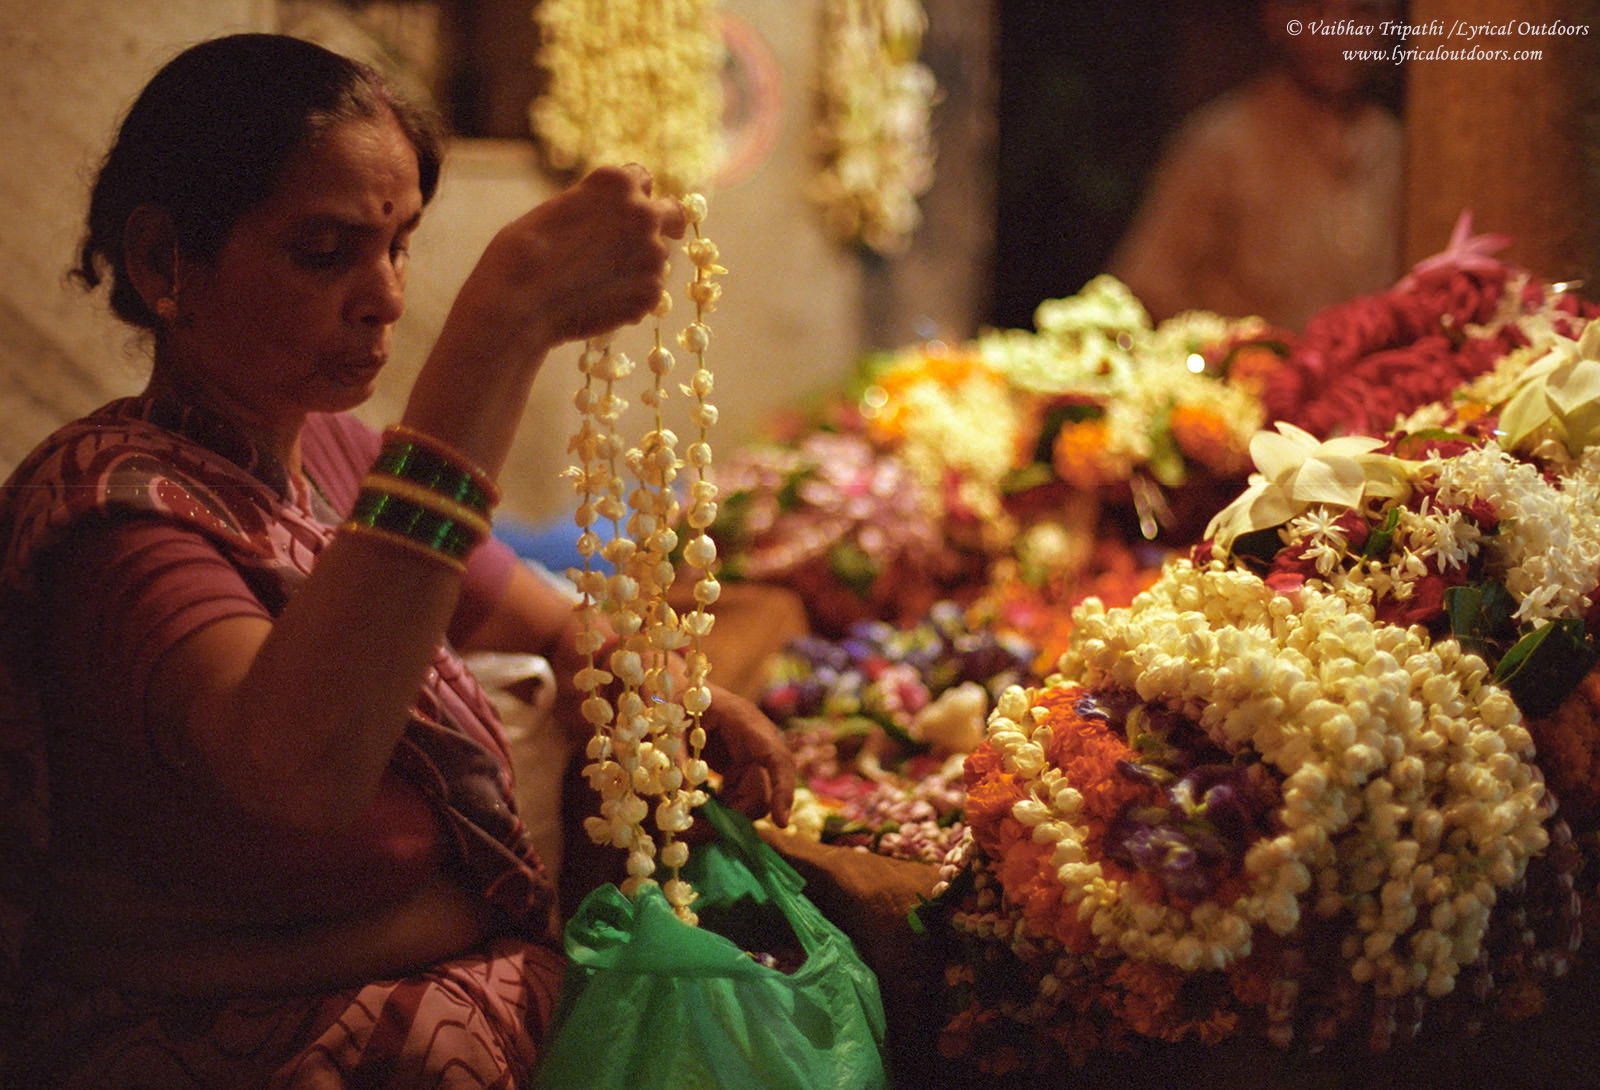
Nikon FE with Velvia 50. Nikkor 24 mm f/2.8 ai. Small aperture of f/11 for DOF, circular polarizer.
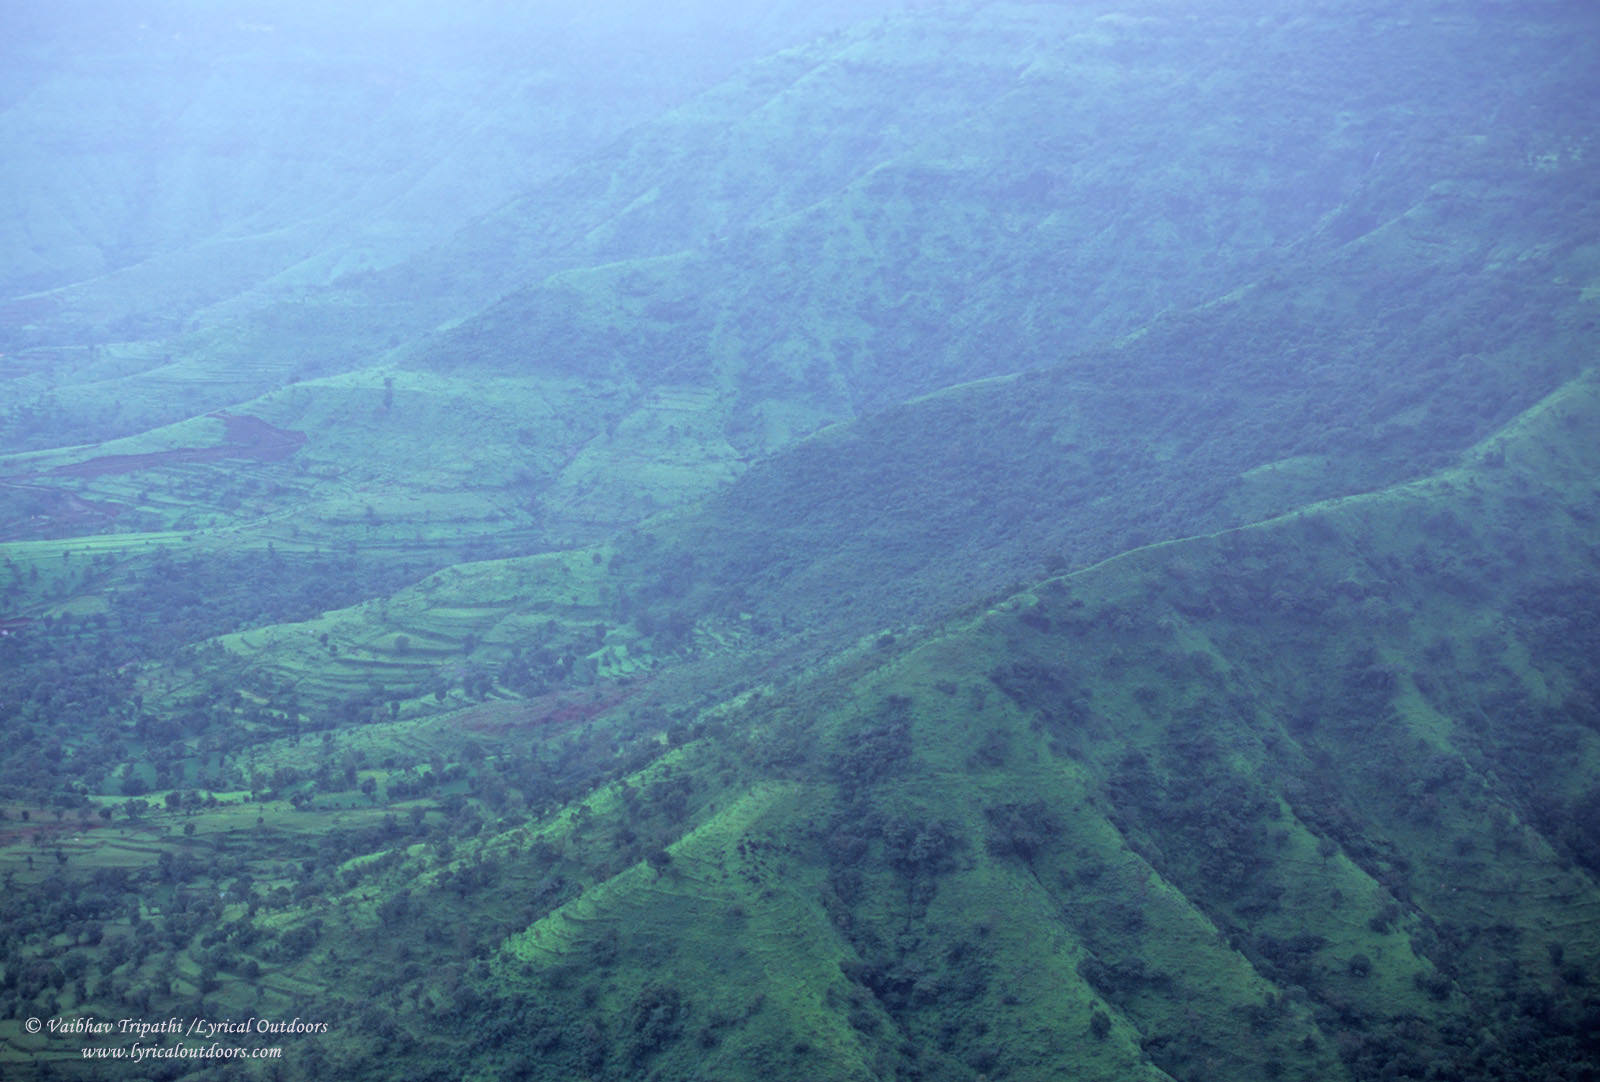
Nikon FE with Velvia 50. Nikkor 75-150 mm f/3.5 @ 105 mm. f/11 for DOF, circular polarizer.
After acquiring the new scanner, I started to shoot film regularly and really liked the results. It became a habit to carry a 35mm film SLR along with a D610 and shoot interchangeably. Especially, after picking up a used F100, it is now very convenient as I can share the newer ‘G’ Nikkor lenses with vibration reduction between the two. I also prefer 35mm format (film or digital) for its flexibility and ease of capturing quality light, which is what I strive for in photography.
At this juncture, it is quite natural to ask how I decide when to shoot film or digital. After shooting both interchangeably for some time, I have the following mantra: If a location is unfamiliar and I am not sure about how fast light will move/change, I reach for the digital SLR. This also holds for moon lit landscapes, star fields and Milky Way shots, and wildlife. In addition, I shoot with my D610 when I consciously want all the dynamic range of my D610 and the composition is unsuitable for using graduated neutral density filters. On the contrary, if I am familiar with a location, can guess light confidently or can use graduated neutral density filters, I reach for my 35mm film camera; slow down and envisage that every click is sacred. On such occasions, I usually do some good work.
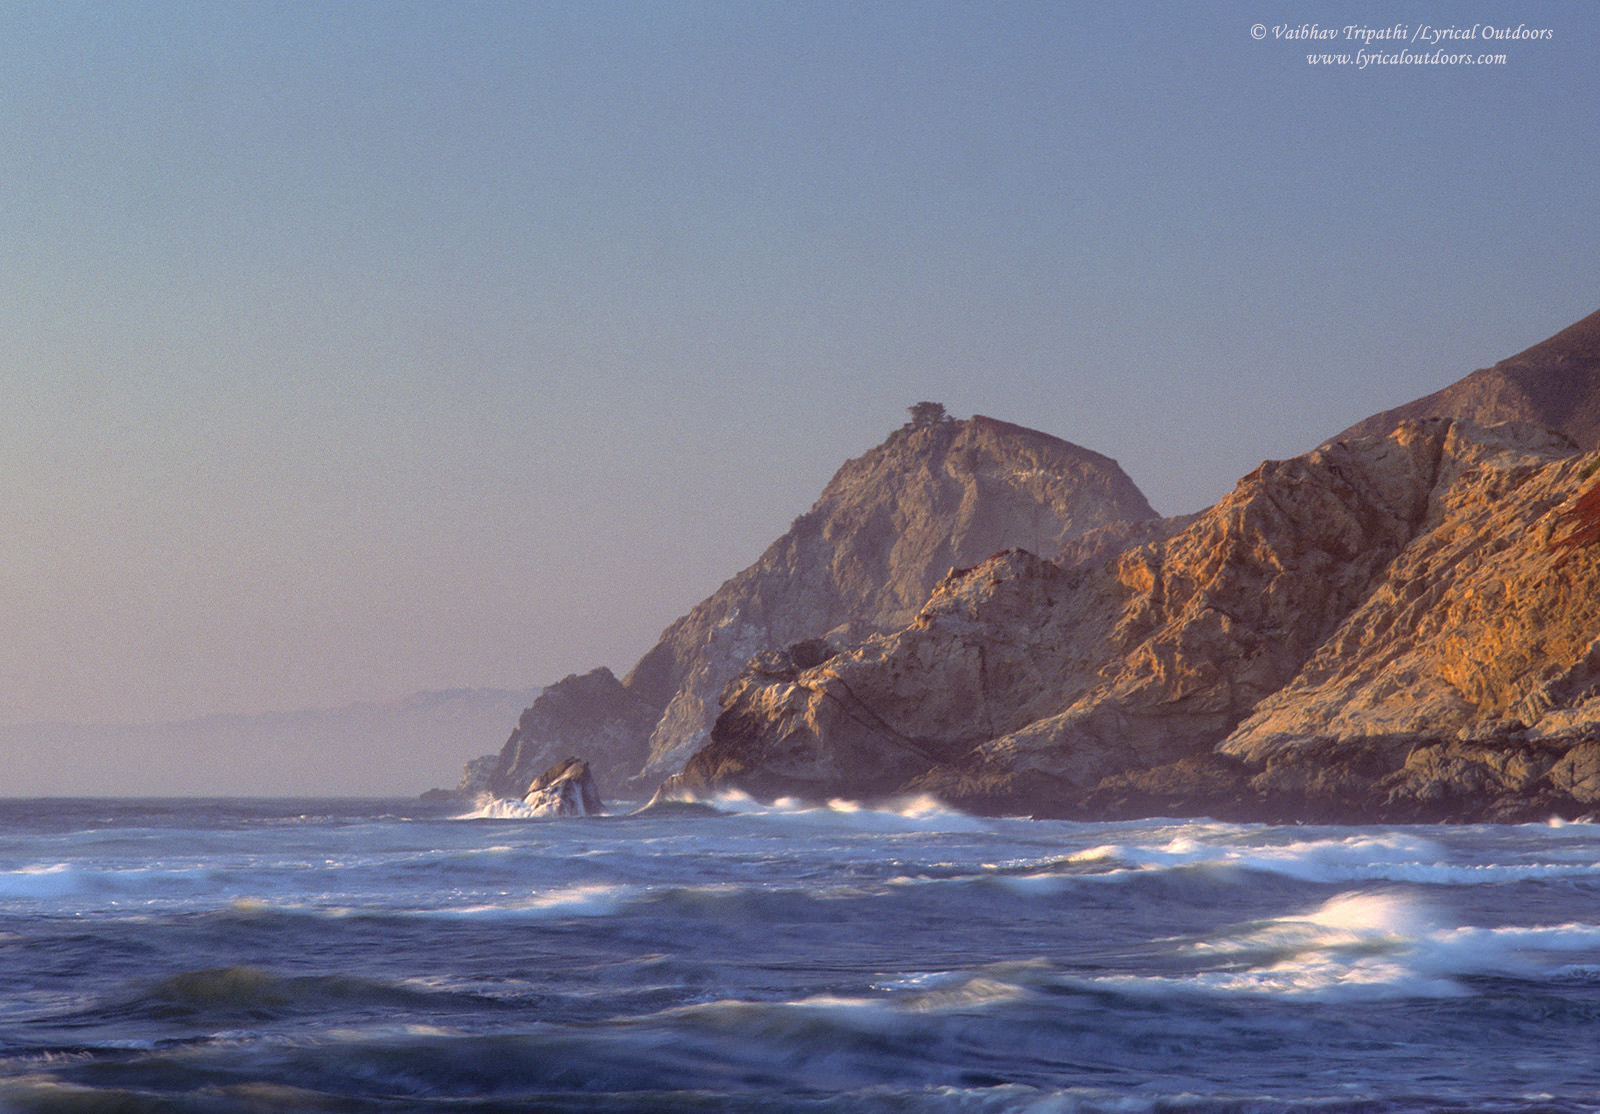
Nikon F100 with Velvia 50. Nikkor 18-35 mm G lens @ f/11 for DOF, circular polarizer.
Nikon FE with Velvia 50, Nikkor 75-150 mm f/3.5 ai @ f/11 for DOF, circular polarizer.
Fuji Velvia 50 is famed (even criticized) for its color saturation but for me that is not the motivation to use film because if it was about creating saturated colors, I can just abuse the saturation slider in either Lightroom or Photoshop to my liking. Instead, I like Velvia for its overall color palette (esp. its blues and greens) and more importantly for its color separation. The way this slide film pumps out the yellows and blues independently is rather unique. This is important for me as at the fringes of a day (times when landscape photographers are most active), different parts of a landscape are lit by skylight (cool), and low angled sunlight (golden-yellow), which creates a striking contrast. I find Velvia very good at highlighting these edges in light. For example, in the above photograph (Afternoon clouds…) the blue tones in clouds have been separated from the yellows without compromising either. While making this particular image, I remember observing this color contrast in the clouds for it was something I thought made the light unique.
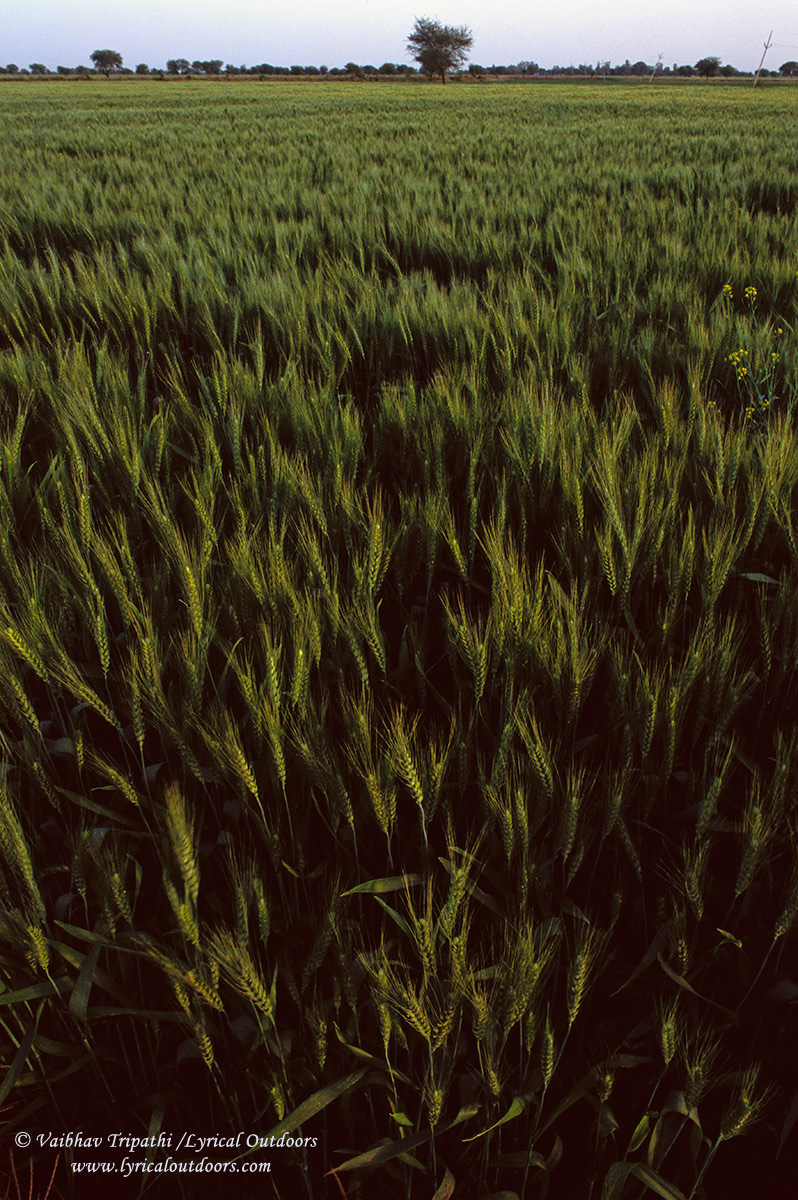
In general, I like the way film renders the highlights in an image, while maintaining rich blacks. Also, the roll off from whites to neutrals to blacks is natural and closer to what I perceive. That said, it is important to not blow off the highlights when shooting Velvia. I have found that it has more latitude in shadows and this information can be pulled out by high quality scanners. I rate Velvia at ISO 50 and meter the deep shadow details I am interested in at -2 EV. If at this exposure setting, the highlights are blown, I will use a graduated neutral density filter to hold them. For example, in the next image, I metered the burnt grass at mid tone and then used a combination of 3 stop and 2 stop soft graduated neutral density filters to hold color in the sky.
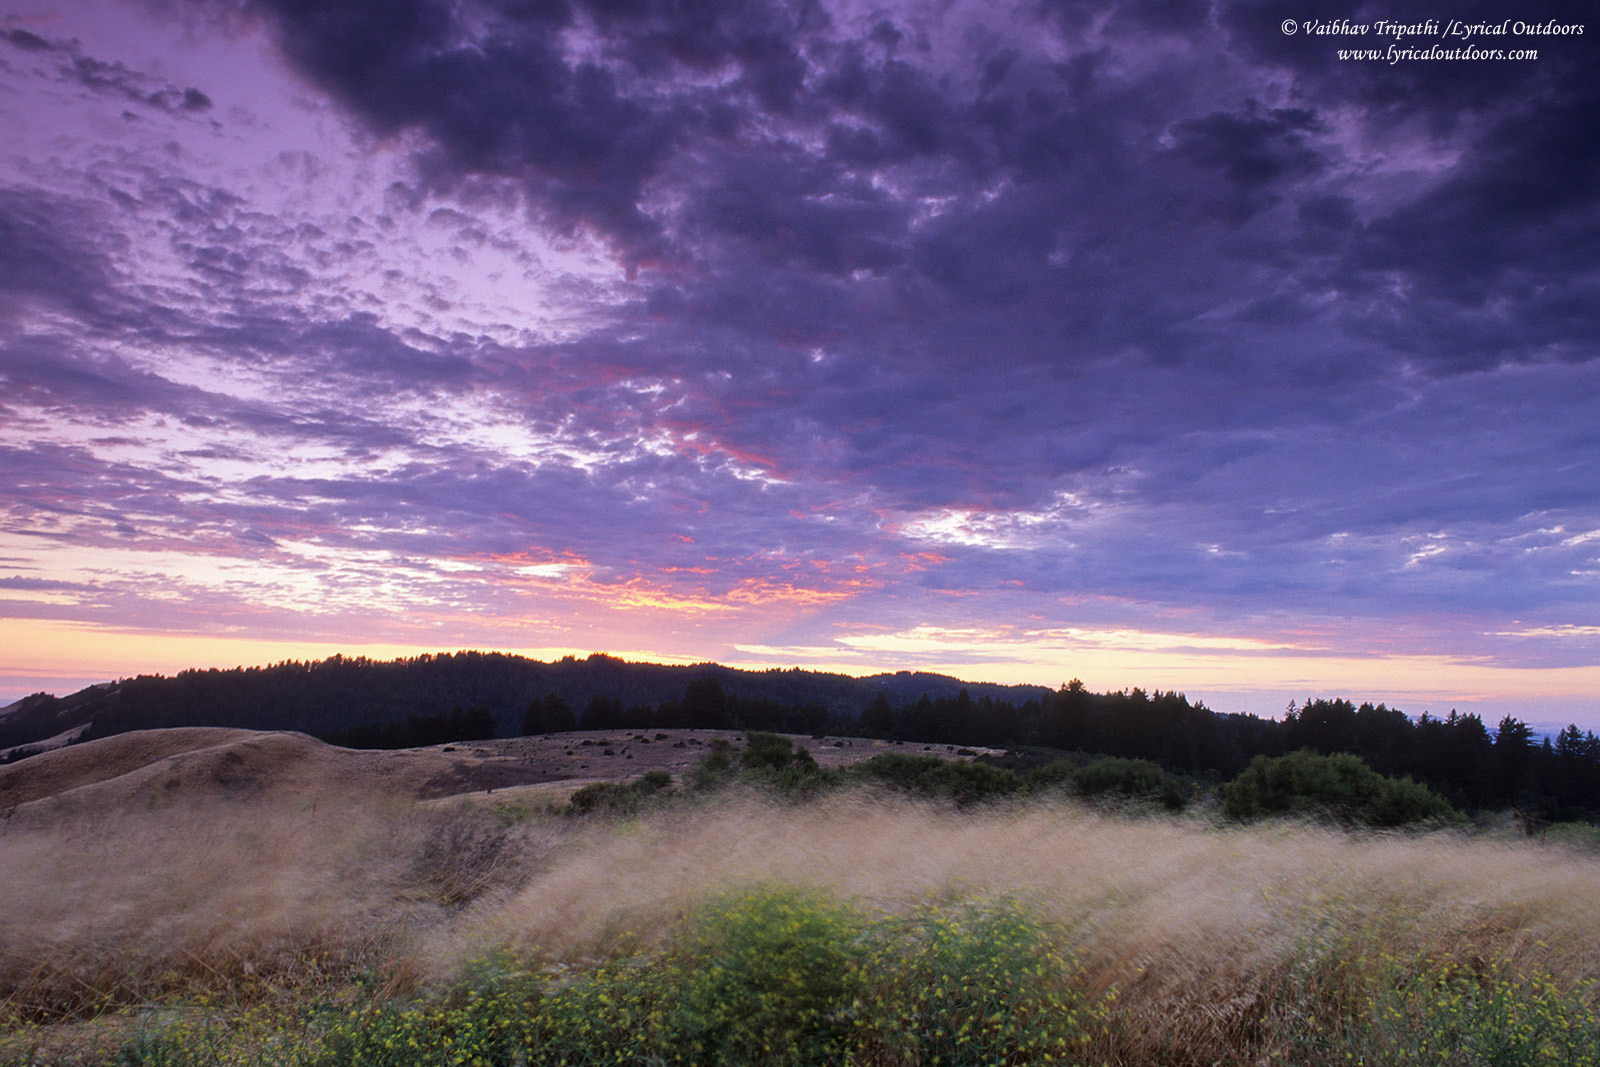
Nikon FE with Velvia 50, Nikkor 24 mm f/2.8 ai lens @ f/11 for DOF and slow shutter speed, circular polarizer.
Another example of beautiful highlight rendering in Velvia is shown in the following photograph. I really like the manner in which the dusk sky has been rendered here. The gradation from blue of the earth shadow (left) to pink/purple hues of band of Venus and then to the warm colors of post-sunset sky is very smooth and natural. Also, the glow on sand with its texture has been rendered almost perfectly.
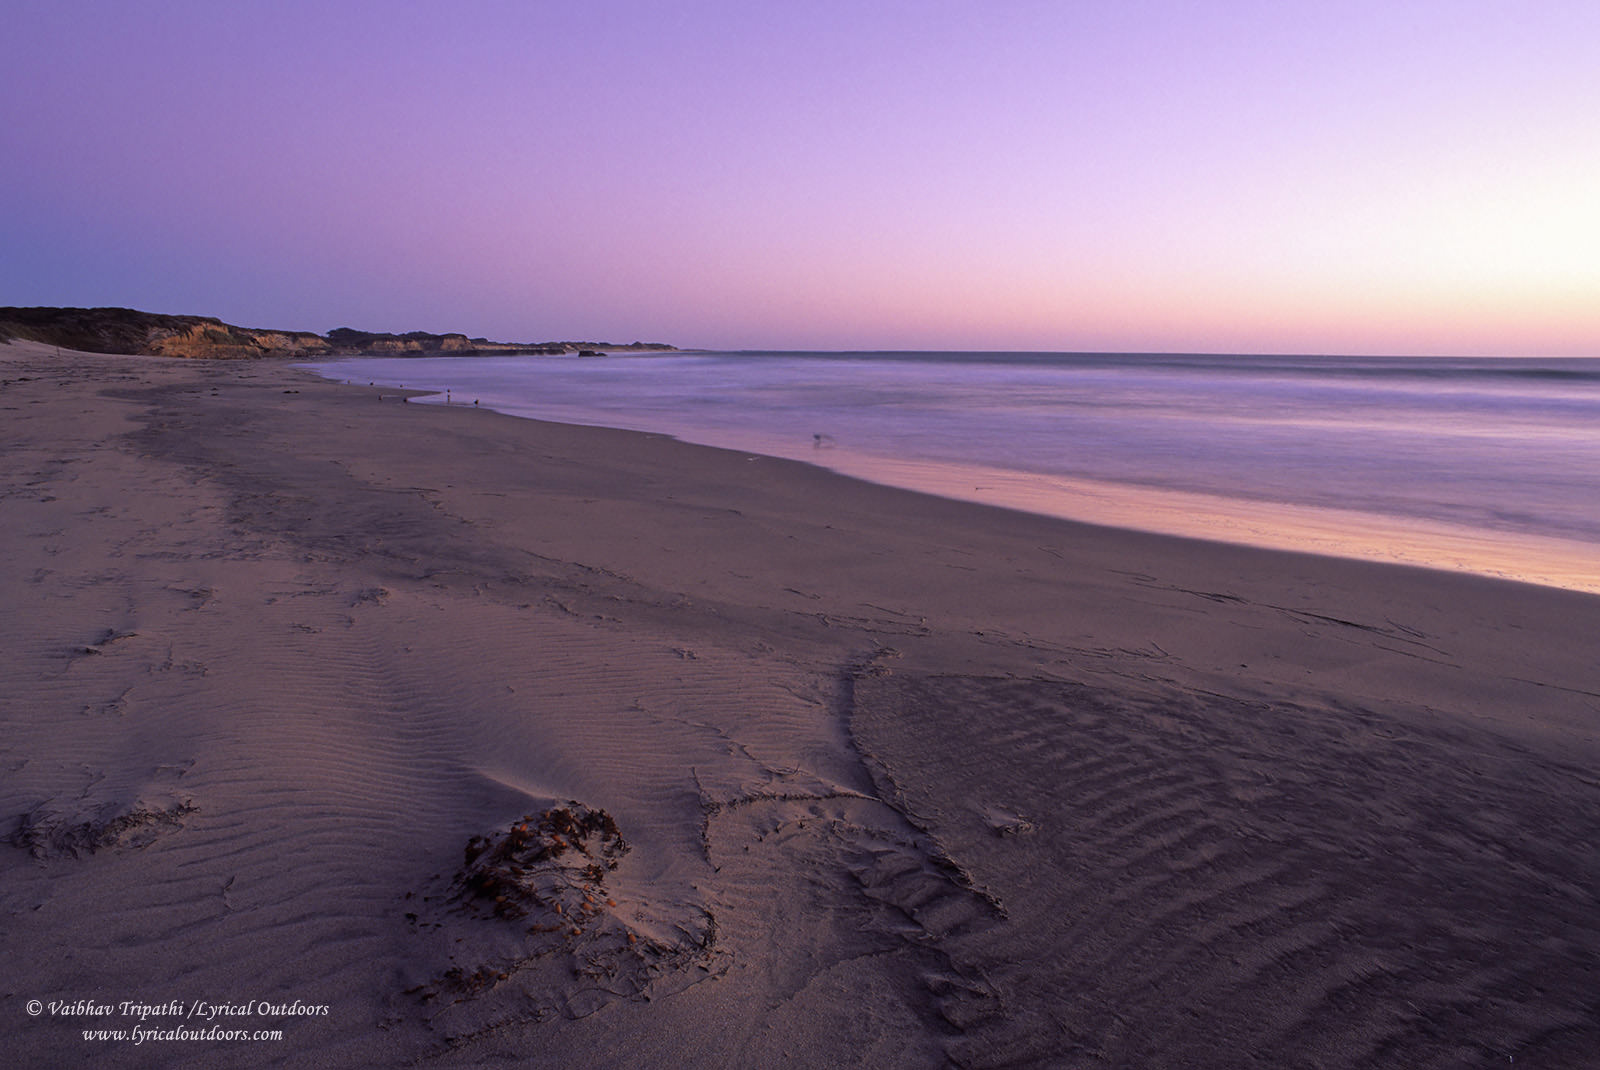
Nikon FE with Velvia 50. Nikon 24 mm f/2.8 ai lens @ f/11 for DOF.
Besides shooting Velvia 50, recently I also experimented with Kodak Ektar 100, Kodak Portra 160 and Kodak Portra 400. Ektar 100 is a nice color negative film with good color saturation and sharpness but I did not really like its overall color palette. Also the scans had a cyan color cast, which I had to correct in Photoshop. Nevertheless, I made few good images with it (e.g. the following image). Again, look at subtle highlight details in water.
Nikon F100 with Ektar 100. Nikkor 85 mm f/1.8G
During my recent trip to Varanasi, India, I shot Kodak Portra 160 and 400 exclusively for portraits using a Nikon F100. Portra 160 is very sharp with a fine grain and works well for landscapes too. Being a negative film, it has a wide exposure latitude and is much more forgiving in case of incorrect exposures (compared to Velvia). Portra 400 has a more prominent grain (being a fast film) and I used it to photograph some low light scenes by shooting at ISO 1600 and pushing the film by full 2 stops in development. Overall, this experiment went very well.
Nikon F100 with Portra 160. Nikkor 85 mm f/1.8 G @ f/2.8, circular polarizer.
Nikon F100 with Portra 400, shot at 1SO 1600 and pushed 2 stops. Nikkor 50 mm f/1.2 ais @ f/2.
I get my film developed either at Foto Express in San Jose, CA or use a mail order form from the Slideprinter in Denver, CO or the Fuji mailer offered by Dwayne’s Lab in Parsons, KS (sold by B&H). All three places have given me excellent results with very reliable service. Since in my day job I spend significant amount of time working on a computer, I find it refreshing that
after a weekend of photography with a film camera, I can choose not to spend time in front of a digital screen, developing raw files and fiddling with color profiles. I just send the film for development, fully confident about the captured colors and tonality. Then, it feels like Christmas when the developed slides come back in mail and I put those on a light table to relive the moments.
Nikon FE with Velvia 100. Nikkor 75-150 mm f/3.5 @ f/8 for DOF and sharpness.
Hi there. I would like to say that the photographers that you guys have on your website is breach taking.
The why you guys have cached the light is will timed.
You cheese the wright time of day as well as the wright wreath conditions.
I am 46 years old and have being looking 4 employment every since I completed high school in 89.
I all sow to part in the Pretoria school’s speech festival. (Pretoria is a city in South Africa).
I pasted all my normally subjects with on problems.
Besides doing the normally subjects I was all sow taught how to do cooking and dressmaking.
I pasted both those subjects with on problems.
The high school that I went to only went up to grand 11.
Why I have being looking 4 employment I had to take career of matters 4 my dad why he was undergoing 12 emergence eye ops
in odder to save his eye site.
Intec college is a correspondences college they have beaches all over South Africa.
On the 23 TH of October 94 I stared studding Fitness and Nutrition.
I went as fore as Intec College ruing with the course @ the time.
I completed part one of the course on the 22 ND of January 95.
I would like to go back one day and completed my Fitness and Nutrition studies.
On the 23 TH of January I stared studding photography.
I went as fore as Intec College ruing with the course @ the time.
I completed part one of the course on the 25 TH of August 96.
I know that I have along why to go before I can call my self a professional freelancer photography.
I am looking 4 some one to spanner me sow that I can final go and completed my studies.
I know that you guys are in USA.
The reasons why I am looking 4 a spanner is because in 2000 my family and I loosed all our money that we had in vested.
Some of that money that was loosed was left to me to use to pay 4 my studies.
I am a heard work and get on with every one and that in clouds the members of the public.
One of marry areas that I am execrably in trusted in is doing photo shoots on landscaping.
Wains a gaining your photographers of the landscaping on your website is out standding.
Will don’e from
Great pics. I’d really enjoy seeing them projected.
Good comments to on velvia.
I’ve always had better luck with velvia 100 than 50. Not sure why. I must be doing something wrong with the 50.
How do you find they compare?
I basically caved to digital simply because revisiting pictures later is so much easier. Still there is nothing like bringing home slides and viewing them on the light table/sorter. Heck, I was sneaking peeks on the way home at stop lights!
Hi
Is anybody try to use the DXo filmpak 3 or 4,5 software to simulate film ?
I like this technique where people photograph a subject while looking though an opening, like through a bush or between trees or between decorations in a wedding ceremony. Verm took a photo of a bird in his article about the d750 through a small opening using manual focus. it brings a very nice attention to your main subject like the photo of a waterfall in mahabhaleshwar in this article. Tom stirr wrote about creating eye flow and exits in a photo as a composition technique. Wonder what this is called.
I shoot multiple cameras; a Chamonix 45-N1, Nikon F6 and Nikon D800. I prefer film, but will shoot most new locations with digital, then go back later with film. I’ve been a Velvia shooter for many years.
Vaibhav, thanks for this wonderful article and congratulations for the colorful images you presented! Despite the success of sensor technology in the last decade there is still something with films like Velvia, Portra and Ektar which gives us unique colors, contrast and grain. As a hybride shooter using Nikon DSLRs (D810, D5300) and SLRs (F6, F100, FM3A, FG) I´m still looking for software solutions simulating the results of film by digital RAWs. Nevertheless, the results from VSCO, Replichrome etc. are still rather disappointing. What is your oppinion for the different solutions? Ever tried the Mastin Labs profiles, which should give better results? Moreover, I´m mostly struggling with the limitations of my scanning and processing capabilities of film. It would be interesting to have more informations on your procedures during the scan process and the software adjustments to tweak the files after digitalization, e.g. what noise reduction, sharpening etc. adjustments your are using? I would highly appreciate a follow-up article focusing on such details.
Hi Tom,
I have never given a try to replicate the colors of Velvia 50 in Lightroom/Photoshop using custom profiles. I will see if I can get Mastin Labs profiles but I am not too excited about doing this. However, I may give a try to make my own color profile for my D610. Also, I hope that Nikon shares the profile information with Adobe and we get better color profiles for Lightroom/ACR. Scanning is something I have played with though not for too long. I will try to write an article describing my film workflow.
– Vaibhav
Great post and outstanding pictures. It is nice to read, that film photography is not only “nostalgy” or something similar.
I “was born” as photographer in the strange days of cohabitation of Film and Digital. I learnt my basics with a Nikon F65. I was reluctant and therefore I needed some time to change to digital (2005) and well, I was not convinced…and needed around 4 hard transition years to enjoy photography again.
But something was still missed, even with my Nikon D600 (and after the oil Spot affaire, the free D610). This year I started again with film photography…and well, I felt in love. I am still taking most of my pictures with digital cameras but every day I am using more and more my film cameras.
I totally agree with the statement “nothing is best”. For my digital and Film have different purposes and let me feel very different with the camera and the pictures I am taking. In my case, I shot mostly B&W film. The results, specially chemically processed, are simply something different…I something I really like a lot of.
Personally, the shooting experience is very different…film ist get out of your comfort zone.. is uncertainity, is concentration, is shooting discipline, is patience, is seeing an image with other eyes…and at last, it has a little bit of magic, specially when you get the results.
This year I was taking pictures with my F100 in the wedding of one of my best friends. He wanted something different and when he saw the chemically processed copies was really pleased. Probably some of my best pics of the year.
And If I have to pick my best 10 pictures of 2014, probably 3 are done with film, although perhaps 90% of my pictures were done with digital cameras.
One of my projects in 2015 is to develop my self the B&W film and scanning them. Now a question: are the differences between the Coolscan IV and the Coolscan V so big? My plan was to get a Coolscan IV, since I have ridden very good opinions on it, but your comments make me a little bit unsure
Hi Ruben,
Thanks for your comment. I really appreciate it. When you put a well developed slide on a light table that’s the time when real magic of film unfolds.
In my article, I did not talk about Coolscan V (I mentioned Coolscan 5000). I guess, you can try yourself and see if you like Coolscan IV. They are going pretty cheap on ebay and you can always sell it back without loosing much value. Another fellow commenter, actually likes Coolscan IV.
– Vaibhav
Hi Ruben, Hi Vaibhav,
in my opinion the biggest limitation for a broader basis of analog film users today is the availability of a cost-effective, high quality 35mm scanner. The high-end Nikon Coolscans are fine instruments, nevertheless they are old and have to be adapted to newer operation systems. A few months ago Pacific Image presented a new series of scanners, which might be more interesting for amateur and hobby film photographers: The PI Primefilm XE and XA (in Europe designated as Reflecta Proscan 10t) deliver ca. 4100 dpi (measured by independent sources; ca. 23 mpix for a 35mm negative or slide) and Dmax of 3.9 to 4.0 starting at ca. $300. These scanners can be used with current Gen software from Vuescan and Silverfast and show comparable results than the expensive Coolscan 5000 models. I´m pretty sure that you will obtain better results with a PI Primefilm XE compared to the cheaper Coolscans like the Coolscan IV.
I have bought a XE several weeks ago and are highly satisfied with the first results. I´m still struggling with the apearance of some strong looking grain, may be because of the high resolution of this scanner type and the 35mm format. I´m experimenting with several software solutions to optimize grain, noise and sharpness. As a digital shooter it is a pretty new field for me and I have to adapt my software workflow for processing the analog film.
Thank you for your comment.
The Reflecta (I live in Europe) are a very good option but here the price is little bit higher (around 500 euros / 750 € the 10t)
What I do not like from the reflecta is, that the resolution theoric is 10000×5000 dpi but at the end of the day, it is raather 4100dpi. Taht means, you get huge archives of 50Mpx that are in reality only “half” useful und you need to resize.
Compatibility is something important. THe old nikons get pluggins with Vuescan… the big problem is to repair them if you have something working wrong.
Anyway, I am going to watch carefully these 10t, they are more or less in the limit of my expendigns for a scanner!
I use an Epson v700 Pro (flatbed). I’ve gotten good results from it, although I haven’t tried wet bed scanning on it yet.
You NEED to try Provia 100! After Astia disappeared, Fuji slightly modified it for even less contrast and approach Astia as much as possible. It also scans beautifully. It’s a pity that Nikon decided to drop their scanner line. My 9000 is a precious thing I hope to keep for a looong time. My new Opticfilm120 from Plustek is almost as good for colour negatives, but it doesn’t get anywhere near it for slides.
I will try Provia for sure…that’s one recommendation I have got repeatedly. But I agree, scanners are precious…maybe Nikon will update those in later years. There is always hope :)
– Vaibhav
Provia 100 (Sensia II) handles with less contrast than Velvia 50 (for highlights);
Normally Provia are for general purpose (i.e people) and velvia for
landscape / nature, etc. I am still in love with films and always have
film camera side by side with digital when go out.
Hello Vaibhav,
Thank you (and Nasim) very much for sharing this splendid article on the approach to color film in landscape photography. I greatly appreciate it. As vast a topic that color film is within the realm of landscape photography and film photography in general, you did a wonderful job with your articulate, comprehensive, and competent introduction to this topic. Bravo!
Vaibhav, it is difficult for me to express in words what a joy it is for me to read how a young and gifted photographer such as yourself
is discovering the visual and artistic wonders of Velvia 50 and is manipulating it in a masterful way to create beautiful works of art. Your approach to photography is admirable. Your technique is superb. And your photographs are magnificent! This is how I got started with film photography – with Velvia, as opposed to experimenting with print film, as the majority of amateurs photographers wisely do. In retrospect, I would not have had it any other way. Interestingly, like you, I also used both digital (a D800) and film formats (35mm, Mamiya 7II, Mamiya 645) in parallel for stills and landscapes for just over a year, until it became blatantly and consistently obvious to me which format best suited my needs and goals…By the way, I love your Nikon FE! I own one myself; it is a great 35mm camera!
Before I comment on Velvia, please allow me to say first that in terms of switching formats depending on the conditions (i.e., changing light quality), I can tell you from experience that that is a brilliant strategy that pays big dividends. Currently, I am employing the same strategy: a view camera for near-static subjects (no wind, or minimal wind, moving water is OK) and light that is not changing rapidly, versus a medium format camera (and an occasional 35mm) for the other end of the spectrum. In my humble opinion, it is a mark of a good photographer to use any and all formats to his/her advantage to take command and control of the prevailing conditions. Really, though, there is no one ideal format, but that is surely a topic for another discussion… ;-)
Vaibhav, I wholeheartedly endorse your review and the results that you have brilliantly achieved with Fujichrome Velvia 50, as well
as your brief commentary on the color negative film choices that we have in our camera bag. Again, your approach and your work serve as a stunning reminder of why we shoot film, why we shoot color film, and in particular why we shoot Velvia 50 – for technical
and aesthetic image quality that stand in a class by itself. As your work demonstrates, the natural color rendition, sharpness, dynamic range, and 3-D with this film are out of this world. Further, as you wisely pointed out, the highlight rendition with film is just beautiful.
If I may, I would like to add a few points to your already beautiful presentation. For 35mm, I agree with your rating of Velvia 50
at ISO 50. It is an excellent rating, and it has enabled me (and countless other photographers, no doubt) to achieve excellent exposures, too. Currently, I am using Velvia 50 strictly in medium format (6 x 7 and 6 x 4.5), where I find I can pull out 1/3 more stops in both shadows and highlights compared to 35mm, which is why I rate Velvia 50 at ISO 40 in medium format. I understand that you a 35mm photographer at the present time; but if you do decide to make the jump to a larger format for landscape photography – and I hope that you do, because that is where the ultimate in image quality lies – you will pleasantly discover (as I did) that the dynamic range of Velvia 50 (and with print film) is more generous than 35 mm, provided of course, the photographer is in command and control of the light. Of course, the high resolution and detail that are possible with bigger formats (hundreds of megapixels) provide another powerful tool for the landscape and fine art photographer.
Sadly, Velvia 50 in the large format went out of production a little over a year ago; it breaks my heart that I missed the boat on that. Not to be deterred, I have *just* started using Velvia 100 in the 4 x 5 format; although I already know it will not match the quality of Velvia 50, I look forward to seeing the results on the light table very soon.
Vaibhav, you write of your joy at viewing the natural and vibrant golds, blues, and reds that Velvia 50 produces, and I could not agree or
rejoice with you more. I would invite your readers to have a look at this photograph, which illustrates some of the magnificent golds on Velvia 50: ilovetheoutdoors.zenfolio.com/p4486…#h2ca4f678.
As far as color separation is concerned, Vaibhav, believe it or not you are the first writer whom I have come across who has
mentioned this brilliant aspect of Velvia 50. I can personally vouch for this color separation, which can be jaw-dropping, depending on the light, of course. To illustrate, I would also invite your readers to have a look at this photograph, which I think faithfully represents the rich colors, color separation, and dynamic range that can be had with Velvia 50. ilovetheoutdoors.zenfolio.com/p4486…#h1e1a556f
And for fun, to prove to your readers that Velvia 50 actually does produce this color rendition, please have a look at this photograph, which shows the above slide on a light box. Again, this is why we shoot Velvia 50. ilovetheoutdoors.zenfolio.com/p6395…#h2274c78f
Finally, Vaibhav you write that you are also experimenting with various color print films for landscapes as well as portraits, in particular
Kodak Ektar 100 – excellent choice! I *love* Ektar. As you mention, the color and sharpness of Ektar are amazing. Although it is nowhere near as vibrant as Velvia 50, Ektar is nonetheless an outstanding choice for color landscape photography, in particular in high contrast scenes where the photographer desires to extract as much shadow detail as possible without over-exposing the highlights, which is a feat that is technically difficult to achieve with slide film.
Here are a couple of examples of the rich colors, contrast, and 3-dimensionality of Ektar:
on 35 mm: ilovetheoutdoors.zenfolio.com/p4486…#h3f702465
and on 4×5” (I actually made this photograph earlier this month) ilovetheoutdoors.zenfolio.com/p4486…#h3b317d49
Vaibhav (and Nasim), thank you again for a marvelous discussion. I look forward to reading more about and seeing more of your film photography work here on Photography Life.
Cheers!
– Rick
Hi Rick,
I am glad you liked the article. It took a while to take this form. As you point out, not many people talk about the color separation of Velvia 50 but that was the first thing I noticed. In any case, may be one day I will shoot medium format and enjoy a bit more latitude and plenty more resolution of Velvia. And thanks a lot for your links, I really like the aspens image.
Have a great week!
– Vaibhav
Hi Rick,
there are some really nice images on your site and I highly enjoyed your comment to this article! I´m shooting only 35mm analog film up to now. Any recommendation from your site on a system for medium format beginners? What about the risk of dying medium format films (like Velvia 50) after investing in such a system? I expect that there is a much broader customer basis of 35mm users out there and the risk of the end of 35mm Ektar and Portra films might be much lower…
Hello Tom,
Thank you. I’m happy that you enjoyed those photographs. :-)
Regarding a recommendation for a medium format system for beginners, that’s a great question. Before I made my own medium format camera purchases (not that long ago, really), I heavily researched the offerings available and made the best choices for me in terms of the usual considerations: the subject(s) of interest, budget, costs, size/weight, portability, format, choice of lenses, manual focus vs autofocus, interchangeable film backs, prisms, warranty, repair service, available accessories, parts, etc. Restricting the recommendation for landscape photography, there are many great choices out there, both used (predominantly) and occasionally new.
For the landscape photographer moving from 35mm to medium format, first I would recommend purchasing used gear (body and lenses) to keep costs down. Of the four medium format cameras that I own (two Mamiya 7II bodies, one Mamiya 645 AF, and one Mamiya RZ 67), all but one are used. And of the plethora of medium format lenses that I own, all but one are used. The condition of medium format gear on the used market can range anywhere from excellent to very good to fair and function just as well as new gear. Personally, I would recommend purchasing camera bodies at least in fair condition and upward and lenses starting from very good and upward, but that will depend on your own personal preferences and budget.
Cutting to the chase, though, I would recommend a Mamiya 645 E body, which is 6 x 4.5 format, SLR, manual focus, includes a prism, has a meter, auto/manual exposure, other basics functions (timer, mirror lock up), and interchangeable film inserts (but not interchaneagable film magazines like other advanced models. This is a good starter body that can be had at a reasonable price. In fact, KEH.com, where I obtain much of my camera gear, has a few bodies in stock from $182.00 to $257.00. A bargain!
www.keh.com/shop/…67177.html
Another reason for recommending the 645E is that is compatible with all of the Mamiya/ Mamiya-Sekor lenses, which are some of the best medium format glass on the market. I ended up opting for a Mamiya 645AF, a more advanced model (at $500), only because at the time I could not find a 645E body in at least good condition; now, KEH has two 645E models in (EX) condition. Ahh, just my luck, heh heh. On the other hand, I am glad that I opted for the 645AF; not only does this model have all of the features as the 645E, but it has interchangeable film *magazines* (not just the insert), enabling the photographer to easily and quickly change films mid-roll as desired.
Regarding the risk of films like Velvia being discontinued, that is a fair and valid concern. Based on the recent trends, out of all the film stocks that are at risk for being discontinued, Fuji Velvia slide film (50, 100) would probably top the list. The print films (color negative, black-and-white) from Kodak and Ilford appear to be safe – for now. You can be certain that Fuji will continue to jack up the costs of Velvia over the next year or two. But, who knows?
Because the money that one invests in used medium format gear is a small fraction of the obscene dollars that amateurs waste on digital equipment (every 6 months, it seems) from Nikon, Canon, and certainly the digital medium format companies, the cost-benefit analysis is very favorable and the overall risk in making the leap to a medium format film system is very small. Trust me, you have vastly much more to gain. Of course, in time If you find that you desire/need additional image quality from a bigger format (i.e., 6 x 7), there are are also good and affordable choices on the used market.
Tom, I hope you find my thoughts helpful. If you need additional guidance and advice, please let me know. I am always willing to help and was in your shoes not that long ago.
Cheers!
– Rick
Hi Rick, thank you so much for these detailed informations! I will come back to you if I have further questions.