If you are a Nikon DSLR shooter, you most likely came across a camera setting called “Exposure Delay Mode”, which can be very useful in eliminating camera shake from the camera’s mirror mechanism. While Exposure Delay Mode is a wonderful feature, many photographers often misunderstand it and end up either misusing it in the field, or not using it at all. In this article, we will look into Exposure Delay Mode in detail and go through different case scenarios where it can be very helpful in reducing camera shake and yielding sharp images.
Table of Contents
1) What is Exposure Delay Mode?
Most modern Nikon DSLRs come with a feature called “Exposure Delay Mode”, which is designed to help reduce camera shake that comes from the DSLR mirror mechanism (also known as “mirror slap”). Since the mirror mechanism is rather large and bulky, when it swings up to let light on to the sensor, it can send vibrations through the whole camera, which can make images look blurry, especially when using short shutter speeds and long focal lengths. In order to reduce these vibrations, one can turn on the “Exposure Delay Mode” (EDM) feature and set up a timer from 0.2 to 3 seconds (depending on camera model). Once the camera shutter is released, the mirror will be raised and the camera will wait until the EDM timer expires, after which the image will be captured. Below is what will happen with EDM set to 3 seconds once the shutter release is engaged:
- Mirror is raised
- Camera waits for 3 seconds, which allows mirror-induced vibrations to calm down. Shutter remains closed.
- The camera shutter is engaged (front and rear shutter curtains come down) to let light reach the sensor and capture the image.
- Mirror comes down
- Front and rear shutter curtains return back to their initial positions.
EDM can help reduce mirror slap significantly, especially when shooting at slower shutter speeds. If you experience blurry images when taking photos on a tripod, it is always a good idea to use either EDM or Mirror Up mode to reduce mirror-induced camera shake.
What’s great about EDM, is that it can be used in combination with different camera modes. For example, you can use EDM in combination with a Self-Timer, and it even works when using Live View – see below for more information on camera behavior when using different camera modes.
2) How to Enable Exposure Delay Mode
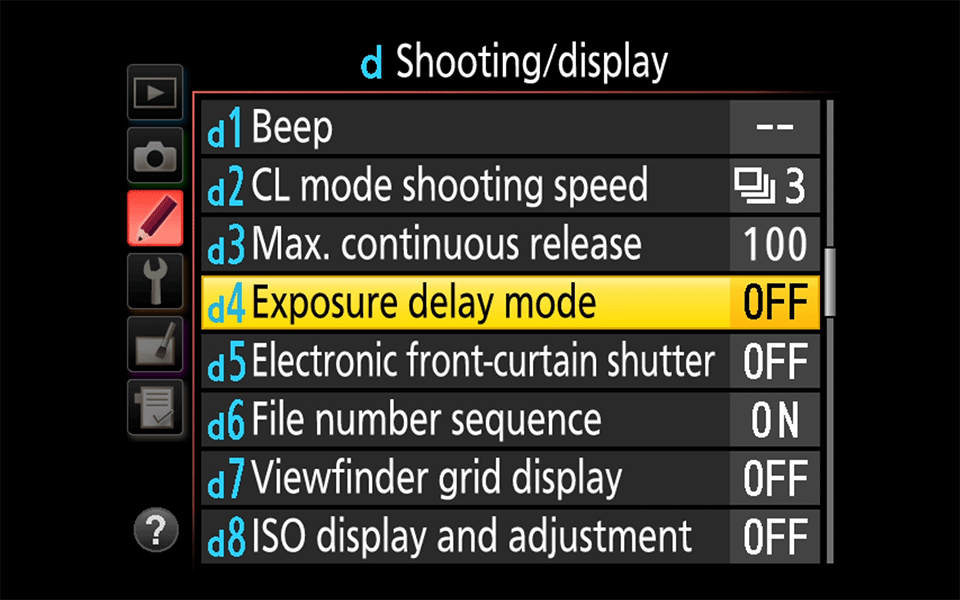
EDM can be enabled via the Custom Setting Menu on Nikon DSLRs. It is typically located under Menu -> Custom Setting Menu -> Shooting / Display -> Exposure Delay Mode, as shown below:
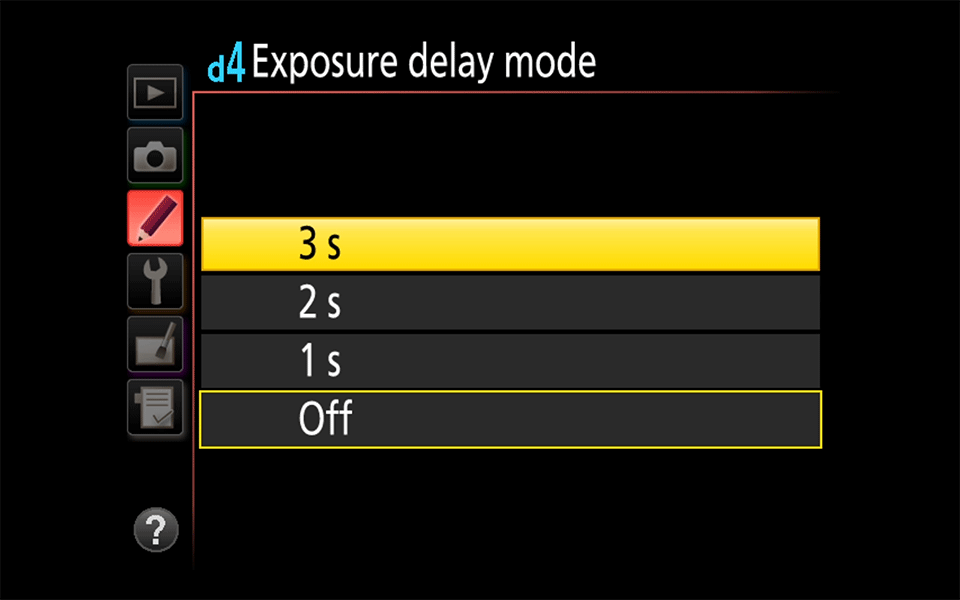
Once you get into the sub-menu, you will be presented with a choice of a timer ranging from 0.2 to 3 seconds (depending on camera model), as seen below:
3) Programming Exposure Delay Mode to a Button
Many photographers, including myself, prefer to program a button on our cameras to easily access EDM. For example, on cameras such as the Nikon D7500, D500 and D810, it is possible to assign either the Function button or the Preview button to trigger EDM when used in combination with the rear button, as seen below:
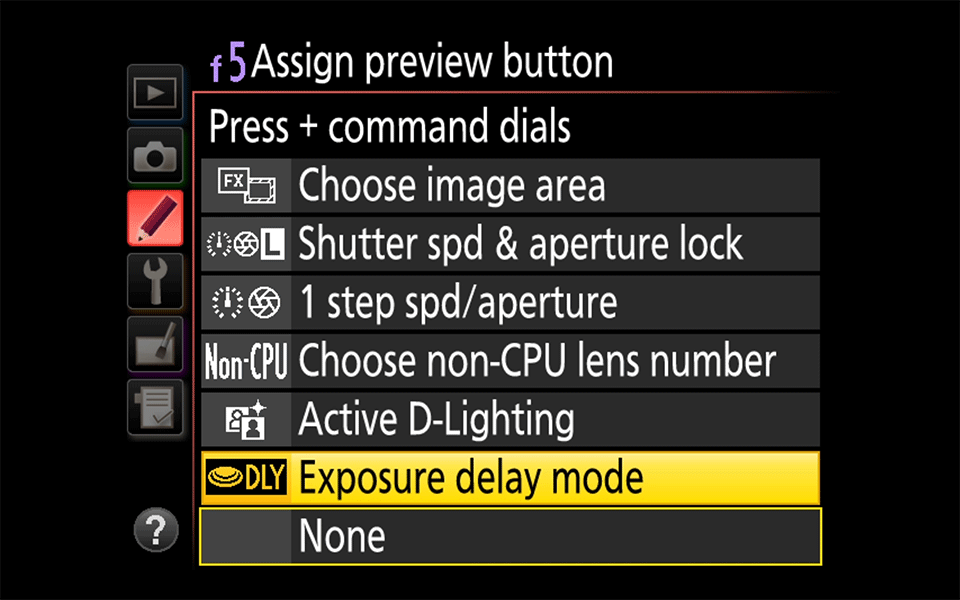
All you have to do is visit Menu -> Custom Setting Menu -> Assign Fn Button / Assign Preview Button -> Press + Command Dials -> Exposure Delay Mode. Once you assign EDM to a button, you have to press and hold the button, then use the rear dial to toggle between different timers, or to turn the feature off.
Doing this will allow for quick changes to EDM in the field. Another way to make it easier to access EDM is to add it to the camera’s “My Menu” section, then assign a button to get to “My Menu” with a single press of the button. Personally, I prefer the former method instead of going through the camera menu, because I can keep my gloves on when working in cold environments.
4) Exposure Delay Mode vs Electronic Front-Curtain Shutter
It is important to point out that EDM works very differently compared to Electronic Front-Curtain Shutter (EFCS). EDM is basically a timer that can be effective in reducing mirror slap vibrations, whereas EFCS is only good for shutter shock vibrations. This means that ideally, you should be using the combination of the two in order to reduce or even eliminate camera shake from both the camera mirror and the shutter on a DSLR camera.
5) Exposure Delay Mode vs Mirror Up
While both EDM and Mirror Up can do the same thing by raising the mirror and letting it stay in that position until vibrations are reduced or eliminated, the main difference between the two, is that one can use EDM in combination with pretty much any camera mode, including Mirror Up. In essence, EDM is a timer before image capture. For example, when using Live View, EDM does not raise the mirror, since the mirror is already up – instead, it works as a timer before an image is captured.
If one uses Mirror Up without EDM, the shutter release has to be engaged twice: the first release raises the mirror and locks it in that position, whereas the second release captures the image and brings the mirror down. However, the main benefit of using EDM in combination with Mirror Up mode, is that it allows one to take pictures without needing a remote shutter release cable / trigger. When EDM is enabled and Mirror Up mode is selected, you can use your fingers to trigger the camera shutter. When triggering the shutter release the first time, the mirror is raised (if EFCS is enabled, the front curtain shutter is also raised at the same time), then triggering the shutter release the second time will engage the EDM timer. The camera will wait until the timer expires, then it will capture the image, after which the mirror comes down. That delay between you squeezing the shutter release for the second time and the actual image capture is what allows vibrations to calm down, resulting in sharp images. See below for more information about the different combinations of EDM and camera modes.
6) Exposure Delay Mode vs Remote Shutter Release
Since EDM is such a powerful feature to reduce camera shake, I pretty much stopped using a remote shutter release in the field. Now I only carry a remote shutter release for one reason – in order to take exposures longer than 30 seconds. In fact, with such cameras as the Nikon D810 and D850, there is not even a need for a remote shutter release for long exposures anymore. If I forget the remote shutter release cable or don’t feel like plugging it in, I simply set the camera to “Time” mode (Manual Mode, one click past “Bulb”, appears as two dashes “–“), then fire up my phone’s timer to measure exposure length. Pressing the shutter release one more time stops the exposure and I can do this for any length of time, provided that my camera battery lasts.
Let’s take a look at different combinations of EDM and camera modes and see which ones work best in the field.
6.1) Exposure Delay Mode + Single / Continuous / Quiet Release Modes
Even if you choose not to use the Mirror Up mode, EDM can be very useful when shooting in other camera modes such as Single, Continuous, Quiet and Self-Timer. When shooting from a tripod, it is best to use EDM with at least 1 second timer in order to dramatically reduce camera shake. So if you are in Single, Continuous or Quiet modes, EDM with 1 second or longer will help reduce mirror slap significantly. However, it is important to note that if your camera is equipped with EFCS, it is best to avoid using EDM + Single Release, EDM + Continuous Release modes or EDM + Quiet Release modes (D7500, D500, D810 and D5 only), because EFCS does not work in those modes.
Camera Behavior: Mirror is raised as soon as the shutter release button is pressed (front curtain shutter is closed, since EFCS is disengaged). Camera waits until EDM timer expires, then captures the image. Mirror comes down.
6.2) Exposure Delay Mode + Self-Timer
My personal favorite is EDM + Self-Timer mode on older Nikon DSLRs, because it reduces initial vibrations from my hand even before the mirror is raised. That’s what I default to when shooting with the Nikon D800 / D800E. However, on newer cameras with EFCS (such as D7500, D500, D810, D850 and D5), it is best to avoid EDM + Self Timer, because EFCS is not engaged. On the Nikon D850, EDM + EFCS work in three different camera modes: Quiet (Q), Quiet Continuous (Qc) and Mirror Up (Mup).
Camera Behavior: Self-timer is engaged as soon as the shutter release button is pressed. After the timer expires, the mirror is raised (front curtain shutter is closed, since EFCS is disengaged). The camera waits until the EDM timer expires, then captures the image. Mirror comes down.
6.3) Exposure Delay Mode + Mirror Up + EFCS Off
Not an ideal combination when EFCS is available, because only vibrations from the mirror are reduced, while vibrations from the shutter mechanism are still present.
Camera Behavior: First shutter release raises the mirror immediately, but the front curtain shutter remains closed, since EFCS is turned off. The camera stays put and waits for the second shutter release. Upon second shutter release, the camera waits until the EDM timer expires, after which the image is captured and the mirror comes down.
6.4) Exposure Delay Mode + Mirror Up + EFCS On
An ideal combination for all Nikon DSLRs that have EFCS. On newer Nikon DSLRs like D850, it is also possible to use EDM + Quiet / Quiet Continuous Release Modes + EFCS On to completely eliminate camera shake from the camera mirror, as well as the shutter mechanism.
Camera Behavior: First shutter release raises both the mirror and the front curtain shutter, since EFCS is turned on. The camera stays put and waits for the second shutter release. Upon second shutter release, the camera waits until the EDM timer expires, after which the image is captured and both rear curtain shutter and the mirror come down.
Note:
The behavior of EDM + Mirror Up on the Nikon D850 is different when using Live View. In Live View mode, one has to only press the shutter release once to take a picture, whereas older cameras like the Nikon D810 require engaging the shutter release twice.
6.5) Live View + Silent Shutter Mode + Self-Timer
The Silent Shutter Mode (also known as “Electronic Shutter”) is only available on the Nikon D850. One must be in Live View mode and set up the camera by pressing the “i” button, navigating to “Silent live view photography”, then picking “Mode 1”. Once turned on, the camera will not engage its shutter mechanism at all and there won’t be a need for either Mirror Up or EFCS, since the mirror is already raised and the shutter mechanism is disabled. When using this feature, it is best to use it in combination with Self-Timer, but one can also use it in combination with EDM timer.
7) Ideal Settings on Different Nikon DSLRs When Shooting From a Tripod
Based on the above, what are the ideal settings when shooting on different Nikon DSLRs? Let’s take a look:
Older cameras with EDM and no EFCS (D7000-D7300, D600-D800/D800E, D3-D4S):
Exposure Delay Mode (1-3 seconds) + Self-Timer, or Live View + Exposure Delay Mode (1-3 seconds).
Newer cameras with EDM and EFCS (D7500, D500, D810, D5):
Exposure Delay Mode (1-3 seconds) + EFCS On + Mirror Up, or Live View + EFCS On + Mirror Up.
Nikon D850:
Exposure Delay Mode (1-3 seconds) + EFCS On + Quiet / Quiet Continuous / Mirror Up, or Live View + EFCS On + Mirror Up, or Live View + Silent Shutter Mode + Self-Timer (when subject is not moving).
Very helpful article, thank you! One follow up question re the paragraph below: does this mean it is better NOT to also use EDM when shooting in Live View with EFCS On and Mirror Up? I use all four together for landscapes etc to avoid using a remote trigger. (With a D7500).
“Newer cameras with EDM and EFCS (D7500, D500, D810, D5):
Exposure Delay Mode (1-3 seconds) + EFCS On + Mirror Up, or Live View + EFCS On + Mirror Up.”
Using Nikon D810, isn’t the EDM+MuP redundant anyway? Because EDM raised mirror up anyway as soon as the shutter is engaged once and wait a specific time before taking the expores? I’m asking because with D810 there is no way to take MuP and self timer at the same time
Thank You! I had somehow accidentally set my D7100 to 2 second delay and I couldn’t figure out what was going on. I thought it was broken and nearly sent ti to Nikon for a repair. I turned the setting off and all is good again – Thanks! And I learned something new and useful.
Hi Nasim
Very useful as I come back to your resourceful site again and again.
As you say, use Exposure Delay Mode (1-3 seconds). What specific value you recommend for still subject?
Say, I am using Q mode on D850 with EFCS on
or, Single mode on D750 (no EFCS) ? Is 0.5 good enough for still subjects like landscape etc (while not on tripod)
Can I use say 0.3s(minm value) on D850 for a perched bird or a still insect also ?
thanks in anticipation
Wow Nasim, this is one of the most useful articles I’ve read so far to improve my photos! Most of the time i’m using my D810 on a tripod with Live View. After reading your article about EFSC, I started using that function. I wanted to know more about this topic and ended up in this article. Before, I was using the Self-Timer (5 sec.) to reduce vibrations. Compared to the Self-Timer, the Mup mode takes more time to take a photo. Is there a benefit of using Mup in stead of the Self-Timer? Because the mirror is already up when using Live View, right? Please correct me if I’m wrong!
Thanks for all the effort, it helps me a lot!!
By the way, I’m using Back Button Focus. Not sure if that has any kind of influence as well :-)
Thanks Nasim for many of your articles that are most useful in my journey to enjoy my photography more and to shoot better and meaningful shots.
I have a D7100 and plan to buy a D3200 to D3400 or D5200 to D5600. Question is whether these cameras have EDM and if not I believe activating Live View and timer would suffice ?
Many thanks.
Man this site is like having an instructor at your side 24/7 you guys and girls are great. The perfect answer for my sleep abnea too.? Thanks Nasim Mansurov this site is this bomb.
Man this site is like having an instructor at your side 24/7 you guys and girls are great. The perfect answer for my sleep abnea too.? Thanks Nasim Mansurov this site is the bomb! And agin thanks for the information.
Great Reading Guys,
Can I ask somthing completely different. I’m off to China, South Korea, Vietnam and ohers for three weeks. I want to travel light and have opted for the Nikon 28-30 on my D750. I’m guessing I will need more reach and am considering a 2x teleconvertor to give equvilant 0f a 600mm lens, I have a 150-600 Sigma sport but its big and heavy. Ive tried a couple of Nikon Fit Sigmas, 1.44 and 2.00 but they do not fit this or any other Nikon lenes. Even Nikon teleconvertors are not recomended by Nikon. Ine also looked at Kenco convertors but they do not get good reviews. Am I detined to carry my 150-600 or do you have any solutions to help keep thigs light.
Nasim, another outstanding article. Quick question. When using the 850 + LV + Silent Shutter mode, you suggest using the self-timer rather than EDM. Can you explain why? Is there some difference in the interaction of the various features? Thanks so much for all that you do.