This is a simple tutorial on how you can utilize Lightroom tools to Dodge and Burn selective areas of a photograph to your liking without using Photoshop. During the process I will also go through some simple steps to show how you can enhance an image directly in Lightroom. I chose a sample portrait to show the process, because I often rely on Lightroom to do most of my post-processing work.
So, what is dodge and burn and where did these terms come from? Here is what Wikipedia says about it:
Dodging and burning are terms used in photography for a technique used during the printing process to manipulate the exposure of a selected area(s) on a photographic print, deviating from the rest of the image’s exposure. In a darkroom print from a film negative, dodging decreases the exposure for areas of the print that the photographer wishes to be lighter, while burning increases the exposure to areas of the print that should be darker.
The same technique can be used in digital photography to achieve similar results, although in Lightroom you can take the process even further by opening up shadows delicately and manipulating the exposure of certain parts of a photograph without ruining any details or colors. It goes without saying that working with RAW images gives a lot more opportunities to recover lots of details, as explained by Nasim in his RAW vs JPEG article.
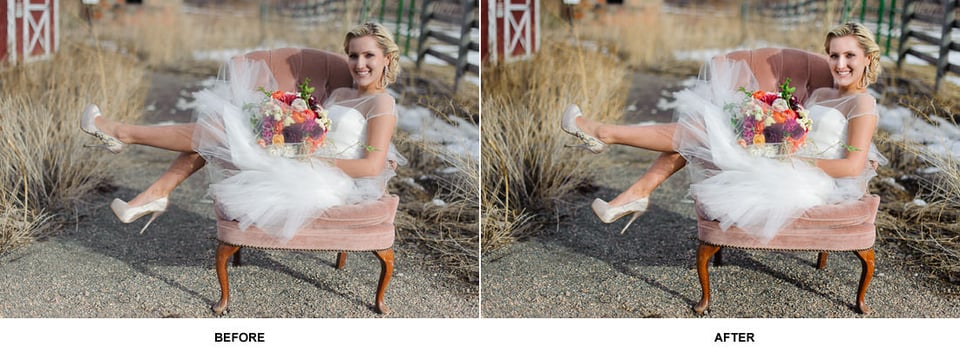
Here is the before and after comparison of what I have done to demonstrate the Dodge and Burn capability of Lightroom:
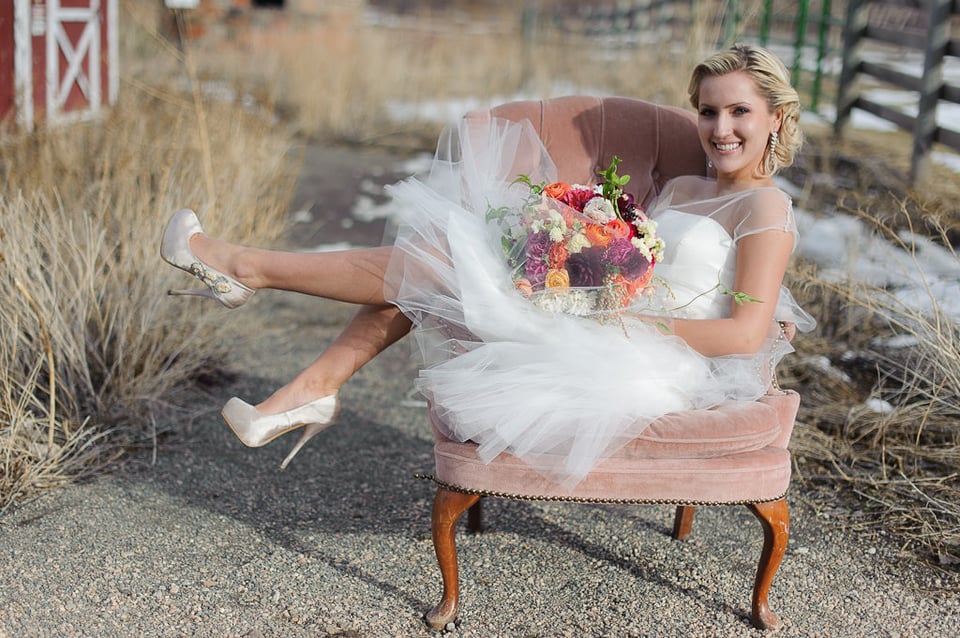
The before image is straight out of the camera with no adjustments:
First, I started off with identifying what needs to be done with this photograph and made sketches directly on the image. This method may not be practical while doing batch editing in Lightroom, but could be a good practice when doing selective editing for publishing. Some editing can be done to your personal taste and liking, while some photographs need more careful technical editing. Either way, knowing what you want from a photograph is very important and generally you will develop this skill overtime. Experienced photographers and post-processing gurus typically know right away what needs to be fixed in a photograph, while inexperienced ones generally overlook even important problems. Here is the image with my sketches identifying areas that need to be addressed to my liking:
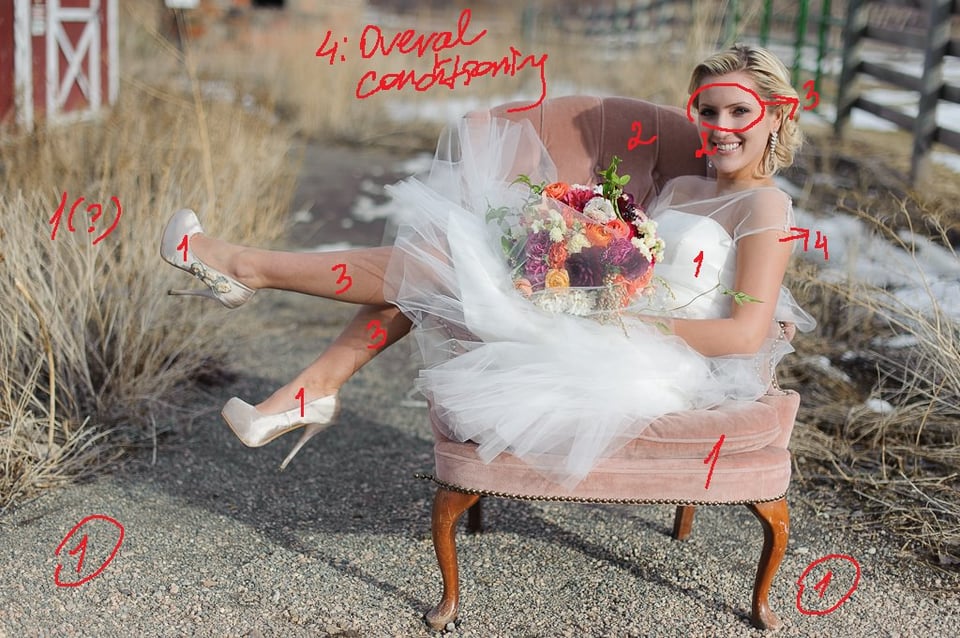
And here is what each step stands for:
- Areas where darkening/burning is needed.
- Areas where lightening/dodging is needed.
- Areas where dodging/opening up shadows is needed to be performed separately using a new brush. The reason why I took this extra step is due to the way brushes work in Lightroom. In Photoshop you can set different strength for each stroke of a brush, while Lightroom cannot do that. Once you brush an area in Lightroom, you can only set a single value for the strength/opacity of a brush. If you need to set different opacity, you must add a new brush.
- Finalize/condition the overall look of the photograph.
To selectively dodge and burn the image, I used the Adjustment Brush:
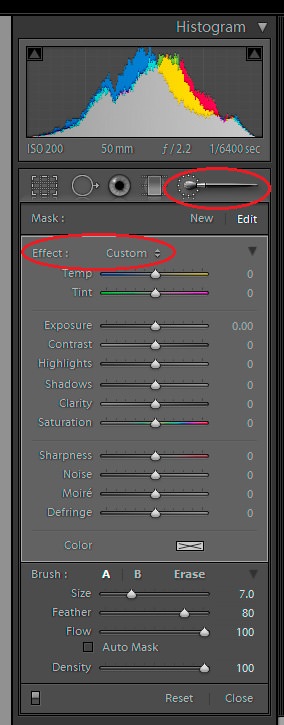
Adjustment Brush has an “Effect” drop down. When selected, it will show the below menu, from which you can locate the Dodge (Lighten) and Burn (Darken) functions for your use:
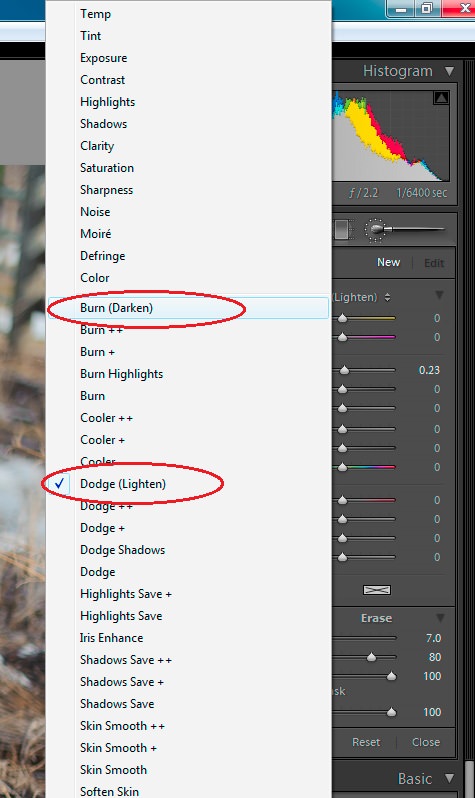
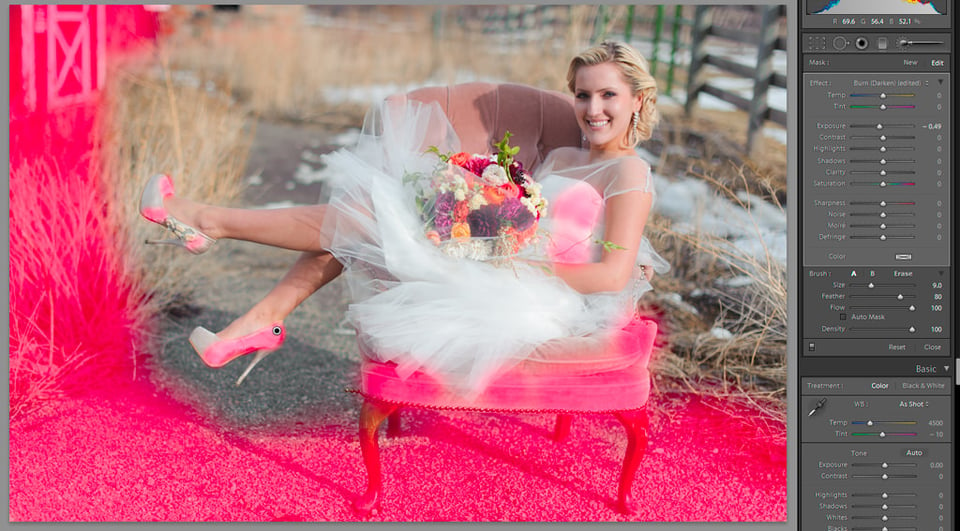
First, I am going to use the Burn function and highlight where burning is needed. Brush tool marks the stroked area in red (masking), and in Develop Mode preview you can see the results of this action. I set “Exposure” to -0.49 and “Brush Feather” to 80. The size of the brush can be changed depending on the size of the area that you need to select.
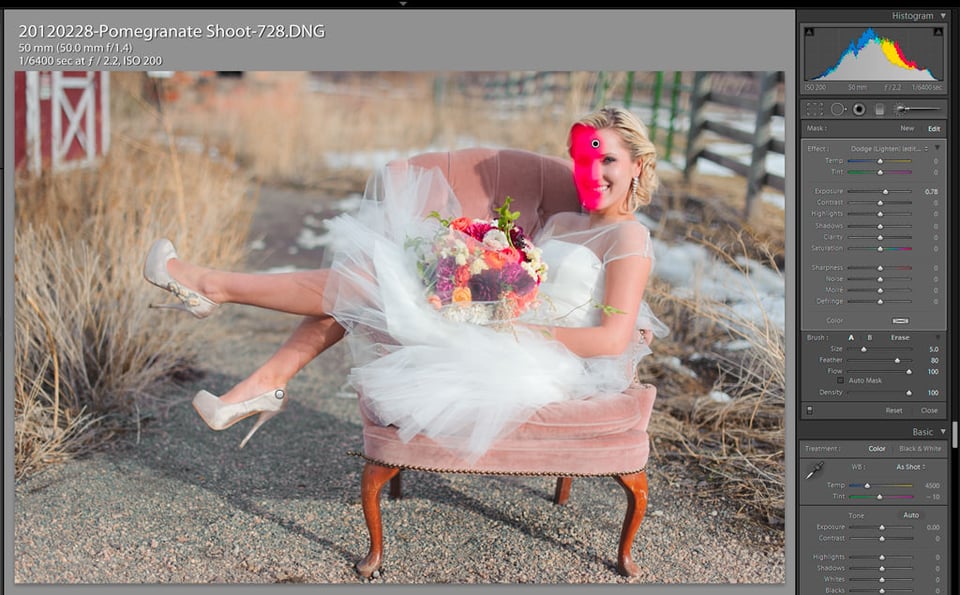
Once the above step is done to my liking, I hit Enter on my keyboard and click Adjustment Brush to Dodge the face of my model. Here, “Exposure” is set to 0.78:
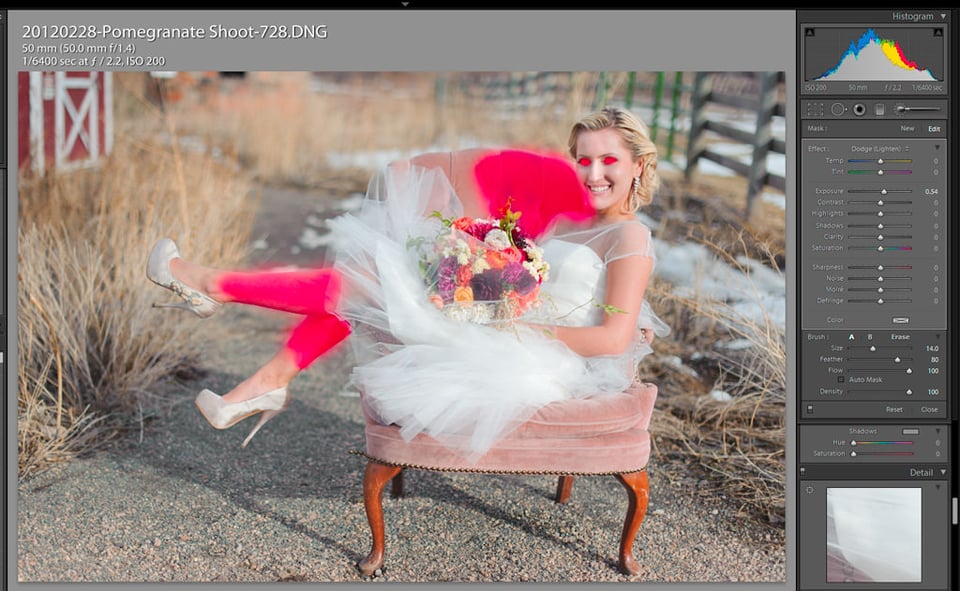
The next step is to work on the eyes, legs and deep shadow on the chair by using the same Dodging method as above. The only difference is, this time I set “Exposure” to 0.54:
As soon as I am done with Dodging and Burning the photograph I set the following values:
- Contrast: +10
- Blacks: -5
- Clarity: +5
- Vibrance: +10
- Saturation: +5
- Tone Curve: Medium Contrast
- Green: Hue +24, Saturation -17
- Image Sharpening: 30%

Obviously, these values are what I picked to my liking for this particular image. Play around in Lightroom and choose what works best for your photograph.
And here is Before and After in full size:

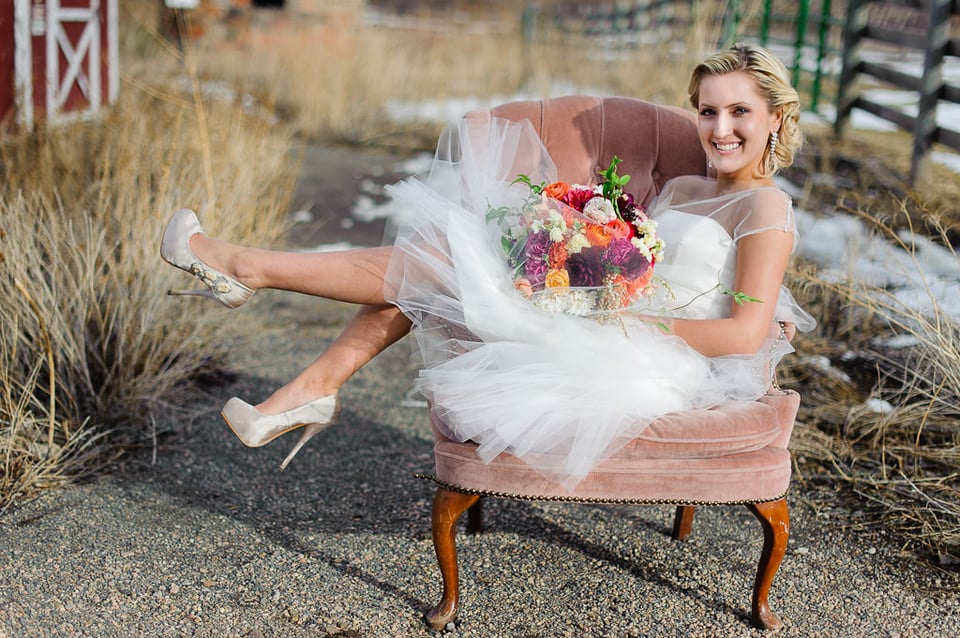
Simple changes make huge differences, and that’s without leaving Lightroom!
See the next tutorial on how to fix the above model’s face color.
Please let me know if you have any questions.
The average Joe is not cognizant on how to fix or maintain their car.
It will be better if you go for a reputed, well know car
maintenance service center. For the “Ordinance” called for the establishment of quality assurance
back system, many shopkeepers are scanty, and even some shop owners said they also do not know the new “Regulations” implementation.
It is merely coincidental that the majority of car battery
problems happen when it is raining or when you are somewhere
without a set of jumper cables and another car to work with.
The sealed lead-acid battery is one type of rechargeable
battery, also known as the valve regulated lead-acid (VRLA).
Over time their performance will decrease, until ultimately they no longer hold enough charge to be useful.
The check engine light may or may not come on when this is going on.
“Car report” Summary raise MG6 is very cheap Own brand in the SAIC and MG
booth Roewe, Shanghai Automotive to “Integration and Innovation, ATA will be reached” as the theme, to bring two brand Roewe and MG models,
a total of 9 full product appearance Beijing camp.
This is because they can undergo a lot of wear and tear in a professional
shop. After all, your vehicle is just a machine and it needs proper maintenance services from time
to time.
Great article- very helpful!!
When I originally commented I clicked the “Notify me when new comments are added” checkbox and now each time a comment is added I
get several e-mails with the same comment. Is there any way you can remove me from that service?
Thanks a lot!
Great tutorial on the “HOW TO” But the final product looks awful. For some reason it already looks like her face is painted white compared to the rest of her, but after the effect it looks even worse, it literally looks like someone did a bad Photoshop face transplant. I love the extra punchy contrast and darkening of the other areas but i cannot, no matter how hard i try just get away from the face. I don’t know what it is, if its the makeup or too much dodging and burning but something just isn’t right. I think a properly placed reflector would do wonders for the image.
Thanks for this great tutorial! I find that I am using Lightroom almost exclusively now. Would you please consider doing a tutorial on how to blur foreground or background using Lightroom 4? Thank you
Good tutorial.
Is it just me or does it appear to others that her head has been pasted onto her body?
Hi Lola,
Thank you for your great tutorial !! I must ask you when you shoot with d700 and D3S what initial Raw profile do you set for both in Lightroom?, Is it adobe standard or one of the camera profiles ? I ask because I shoot portraits of my kids and family and would love to get the same look overall look and skin tone you get with your brilliant wedding work.
Thanks again
Barry
If you want to find out how intricate and detailed Dodging and Burning can become have a look at this Richard Avedon test print from 1981, with Avedon’s instructions to his printer
The good thing about the digital darkroom is that you can easilly fix any mistakes with the undo button and layers, in a normal darkroom it meant throwing the print in the bin and starting over…something I did on many occasions, lol.
Hi Lola,
This is very informative.
are you aware of “Dragan style portrait effect (Lazlo effect)”.
I found some some articles on Dragan style portrait effect (Lazlo effect):
wegraphics.net/blog/…n-5-steps/
I found the information scattered and also not comprehensive and easy to understand.
Can you/Nasim please write an article on Dragan style portrait effect (Lazlo effect) as all the articles at mansurovs are simple and easy to understand. I think the article would be really helpful for us in retouching of our portraits.
Cheers,
Kumar
I think you can probably do most of this in Lightroom (either 3 or 4). I went through the article on wegraphics.net/blog/…n-5-steps/ and saw that most of the effects have Lightroom equivalents.
The Dragan/Lazlo “effect” appears to me to be massive amounts of contrast applied then a smidge of correction for areas that are too bright or dark (just as this tutorial on Mansurovs goes over).
There are probably 5 or more different ways to get this effect in Lightroom, but these would be my “off-the-cuff” choice of tools:
Increase contrast (many different ways): Blacks, Contrast slider, Curves adjustments, Clarity slider
Reduce saturation: Vibrance slider, Saturation slider
Sharpening: Lots of options for selective sharpening of edges are available in LR3 & 4
Burn & Dodge: Adjustments brushes in LR3 & 4
It should be pretty easy, once you figure it out maybe you can write a tutorial for us! :)
Thank you for a great tutorial!
I too try to make everything in Lightroom.
I got a tip about colour adjustment: Instead of increasing saturation, I should try to reduce the gray. But I can’t figure out how to do it in Lightroom. (I did it in Photofiltre where it’s dead easy to do). It gives a very natural colour and clearness in the picture. Is it not possible to do in Lightroom? And could there be a reason for Adobe to leave it out of Lightroom?
I believe you can find also that “Dragan Effect” can give you different perspective and be more eye pleasing. Check here if you like more info www.photokiakotos.com/the-p…gan-effect