• Skip to primary navigation
  • Skip to content
  • Skip to primary sidebar
  • Skip to footer

Photography Life

PL provides various digital photography news, reviews, articles, tips, tutorials and guides to photographers of all levels

  • Reviews
    • Camera Reviews
    • Lens Reviews
    • Other Gear Reviews
  • Learn
    • Tips for Beginners
    • Landscape Photography
    • Wildlife Photography
    • Portraiture
    • Post-Processing
    • Advanced Tutorials
  • Forum
  • Photo Spots
    • Photo Spots Index
    • Submit a Photo Spot
  • Lenses
    • Lens Index
  • About Us
    • Contact Us
    • Workshops
    • Subscribe
    • Submit Content
  • Shop
    • Cart
    • Support Us
  • Search
  • Log In
  • Sign Up
Home » Photography Techniques » DIY: Reliable and Cheap Universal White Balance Reference Device
  • Click to share on Facebook (Opens in new window)
  • Click to share on Google+ (Opens in new window)
  • Click to share on Twitter (Opens in new window)
  • Click to share on Reddit (Opens in new window)
  • Click to share on Pinterest (Opens in new window)

DIY: Reliable and Cheap Universal White Balance Reference Device

Last Updated On April 6, 2018 By Iliah Borg 44 Comments

DIY projects are always popular, so we’ve decided to throw another one into the mix. This particular little idea comes from a problem that many photographers have – where do you get a good, small, white/gray surface to use for white balancing your RAW shots in conversion?

The obvious answer here is “just get a grey card!” But…

  1. Problem number one – a good gray card comes with a price tag from around $20 up to potentially as much as $100. Not to mention that for some shots (like it is in a studio with multiple lights/reflectors) you may need several references for white balance placed in the scene.
  2. Problem number two – gray cards require delicate handling (no bending, no fingerprints, no dirt, no scratches, some can’t withstand moisture, etc.). What if you dropped your gray card into dirt in the middle of nowhere?
  3. Problem number three is that you have to actually set up a grey card, and that might be a hard thing to do – uneven surfaces, wind, anything that makes it difficult to put the grey card down or stand it up will make it difficult to use.

We’re proposing an alternative that will save you time and money, as well as make you feel good for not buying into some inefficient, overpriced product of limited usability.

So, welcome to LibRaw’s Wacky Cheap 5-Dollar DIY White Balance Reference Project.

Step 1. Go to whatever store you have nearby that sells office supplies. Get a white/light gray rectangular eraser.
Got it? Good. You’re ready for the next step.

Step 2. Go to any hardware/home improvement store and get a roll of Polytetrafluoroethylene (known most commonly as Teflon/PTFE) white matte thread seal tape. This stuff is indispensable when it comes to plumbing, you can find it everywhere in the world.

Step 3. Tightly wrap the PTFE around the eraser several times – 4-5 times ought to do it, it won’t let through any light after that.
That’s it. Your cheap, portable, easily-replaceable universal white balance reference device is done.

WhiteBalance Reference DIY PTFE Tape plus Eraser
Figure 1. Ingredients and ready-to-use White Balance Reference

For a demonstration of its use and effectiveness we’ve chosen a scene that will become (after a re-arrangement) a postcard for a friend – autumnal colors, fairy dolls, and our favorite brick wall. Consider 5 shots of the same scene taken under 5 very different color temperatures, ranging from warm incandescent, to very cool high in the mountains. The left part of each picture is the RAW, opened in FastRawViewer with the white balance set to “As Shot.” The right part is the same RAW, with a custom white balance established by clicking on our improvised white balance reference. The mouse cursor shows where exactly the white balance was taken from.

Pict2-FastRawViewer_White-balance-Demo_06_asShot_and_Custom
Figure 2. Df_WB_Demo006.NEF. Color Temperature / Tint – 5205K / 8
Pict3-FastRawViewer_White-balance_Demo_07_asShot_and_Custom
Figure 3. Df_WB_Demo007.NEF Color Temperature / Tint – 3635K / -12
Pict4-FastRawViewer_White-balance_Demo_08_asShot_and_custom
Figure 4. Df_WB_Demo008.NEF. Color Temperature / Tint – 3127K / 0
Pict5-FastRawViewer_White-balance_Demo_09_asShot_and_custom
Figure 5. Df_WB_Demo009.NEF Color Temperature / Tint – 9096K / 14
Pict6-FastRawViewer_White-balance_Demo_10_asShot_and_custom
Figure 6. Df_WB_Demo010.NEF Color Temperature /Tint – 16469K / 22

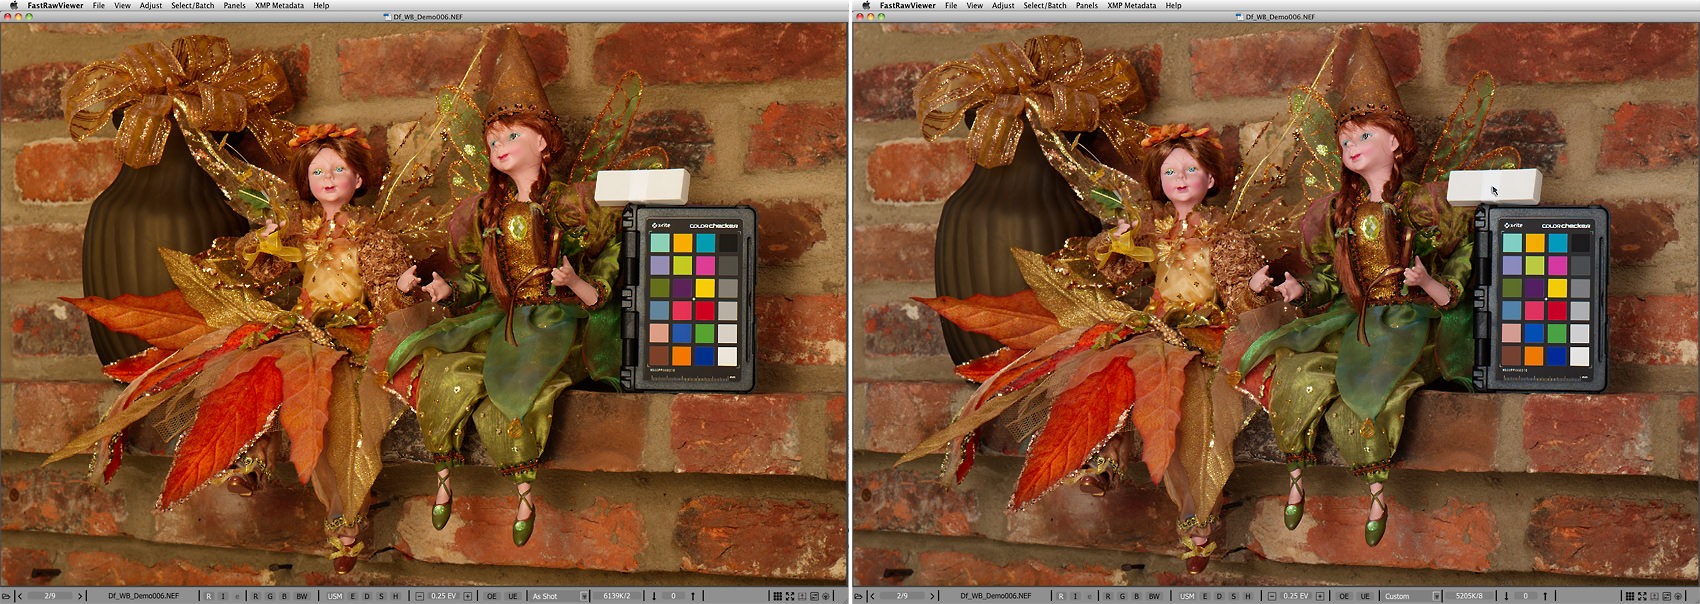
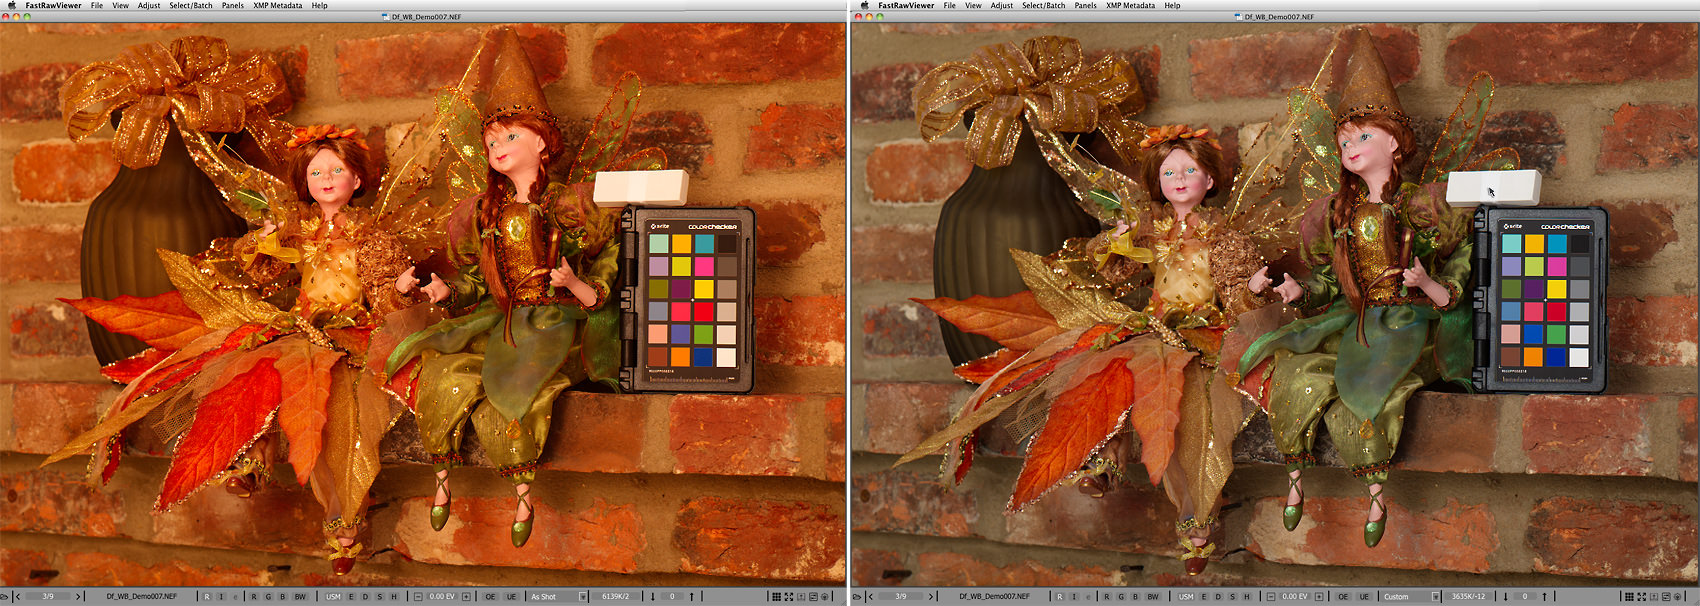
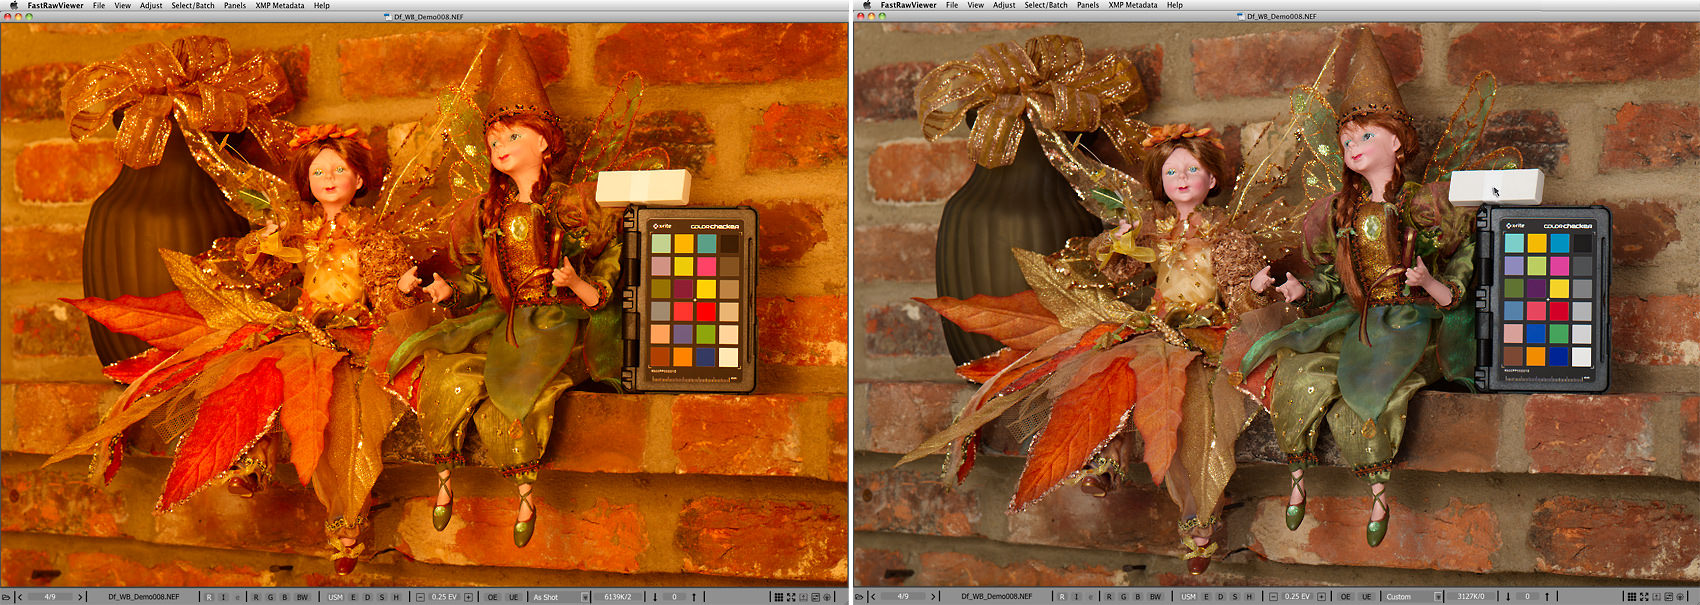
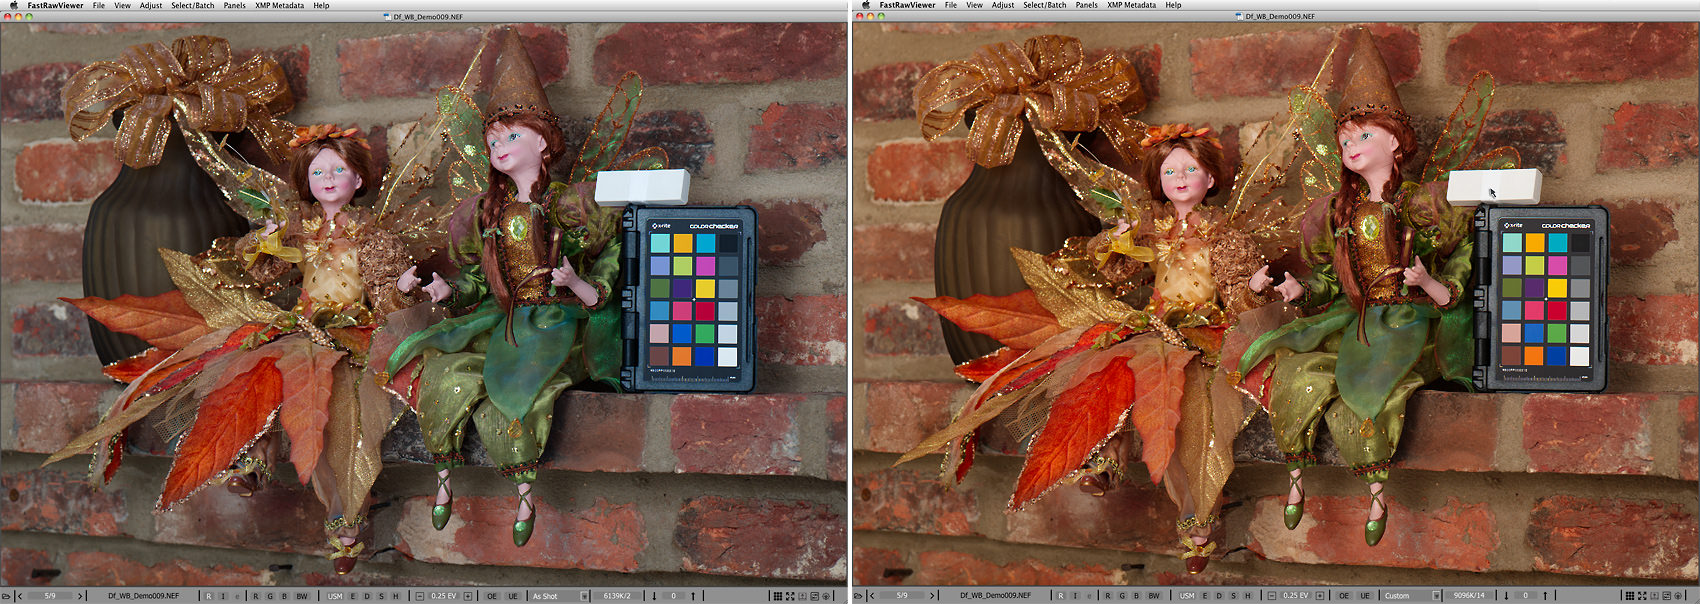
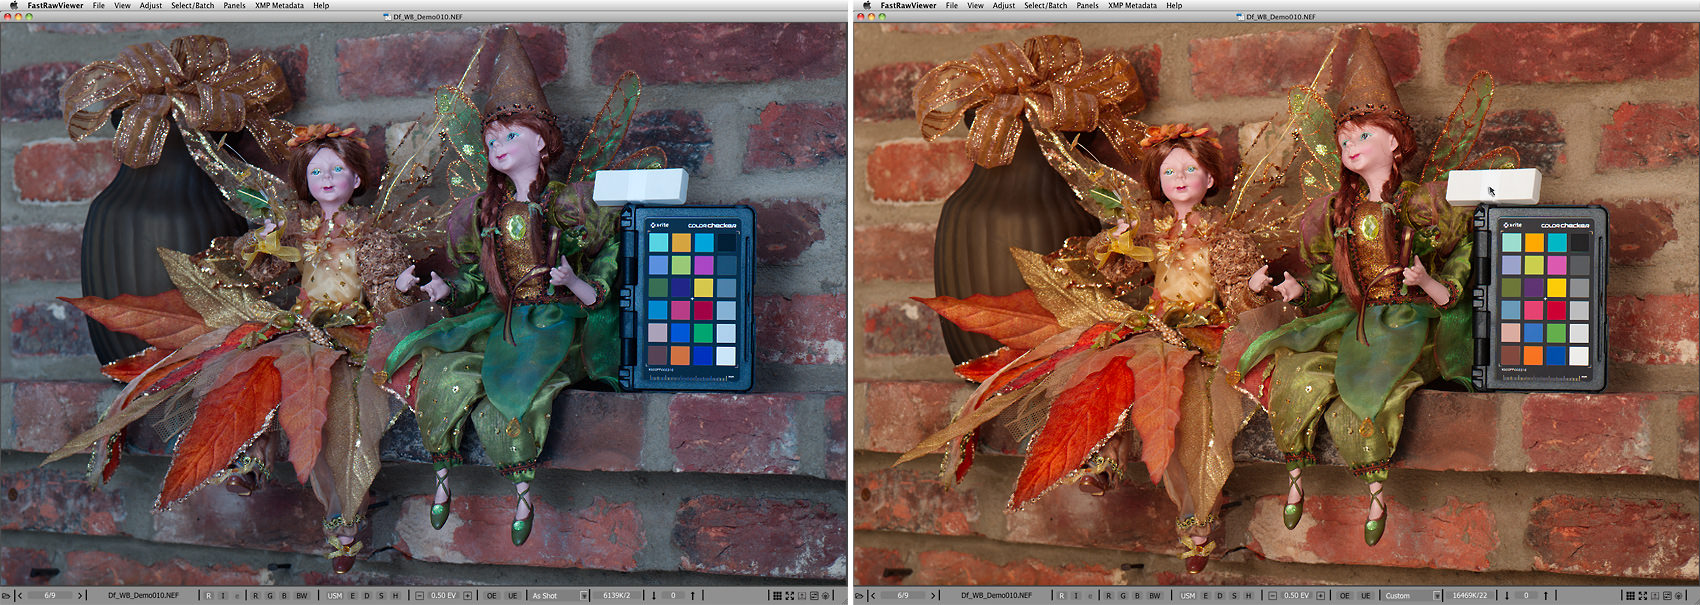
As you can see, the scene contains an X-Rite ColorChecker Passport target. If in doubt, you can install FastRawViewer or use your favorite RAW converter, download the respective RAW files, and check for yourself that the white balance taken from the Passport gray patch is virtually equivalent to what we got from our eraser-Teflon tape setup, as can be seen from the comparing color temperatures, tints, or whatever other white balance readings your software provides.

Incidentally, it’s not by accident that we’re suggesting using this particular material – sintered PTFE has been known to have high spectral purity, low opacity (that’s why 4 layers is enough), and a very diffused reflection with close-to-1 factor for many years. However, for obvious reasons, this has not been disseminated as public knowledge.

To be pedantic, a little bit of technical information about this. We measured the Teflon tape, after it was already wound around the eraser, with a spectrophotometer. We used Robin D. Myers measurements, made with a same type of the spectrophotometer, for:

  • A white balance reference page as recommended by X-Rite
  • A commonly-used gray patch
  • A white patch

The picture below shows the results of said measurements as processed by SpectraShop.

Pict7-Results-fromSpectroShop
Figure 7. White Balance references spectral measurements processes by SpectroShop

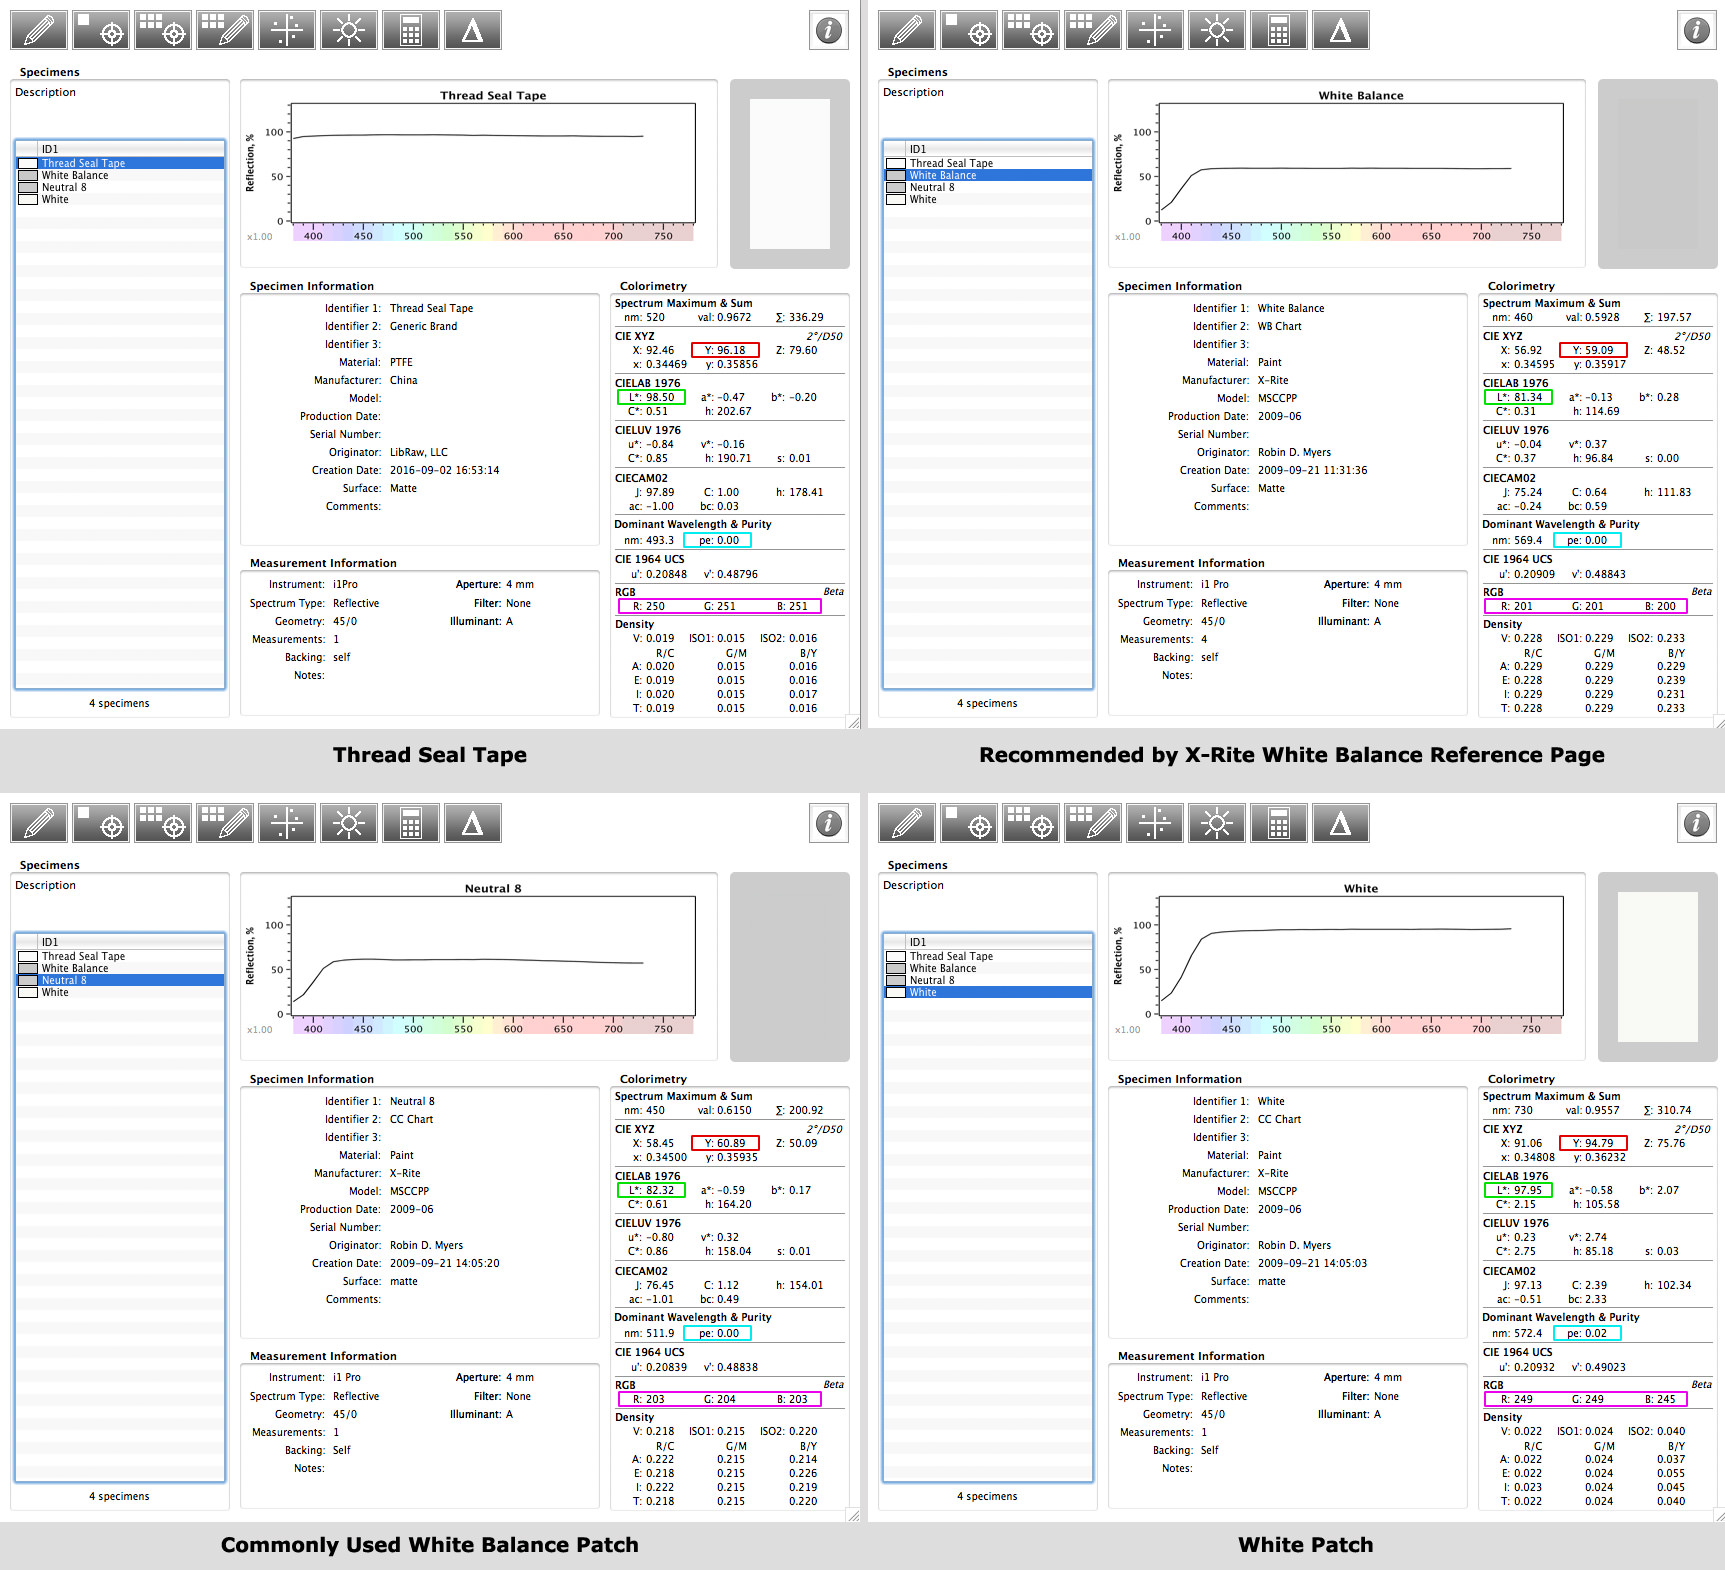
The most telling features are:

  • The spectral graph at the top, which needs to be as flat as possible, that makes for a good neutral reference for white balance;
  • Y, the reflectivity of the material (the red rectangular mark), the maximum possible being 100; for 18% gray, Y=18;
  • L*, lightness, (the green rectangular mark); for 18% gray, L*=50;
  • pe, spectral purity (the cyan rectangular mark), pe=0 is “ideal”;
  • RGB values (the purple rectangular mark), demonstrating the neutrality in familiar units.

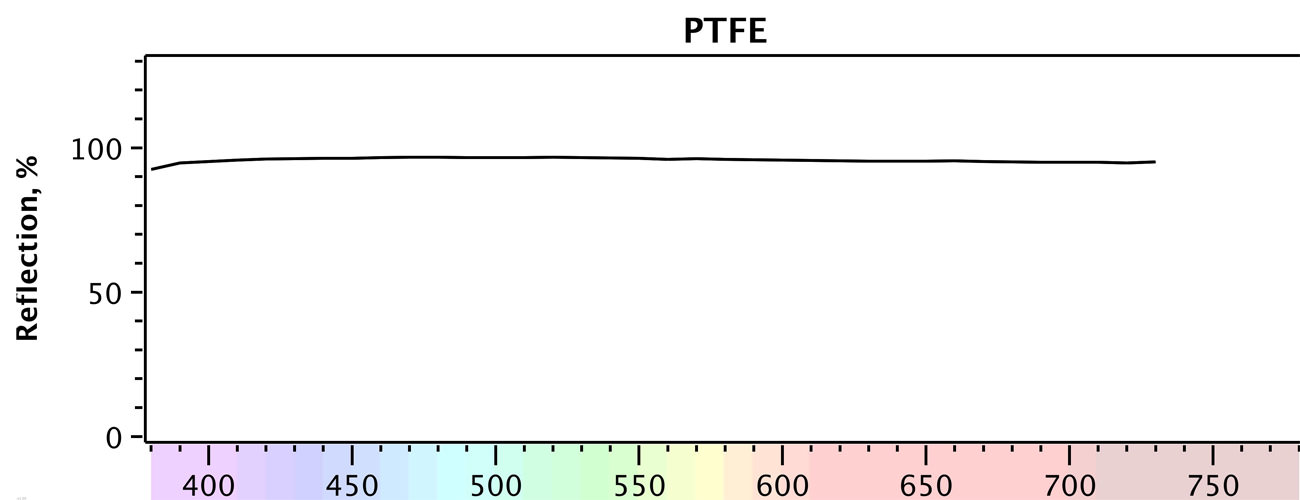
As you can see, our Teflon tape has a reflectivity factor of Y=96.18%, that is the highest of all materials checked, L* = 98.5, a spectral purity equal to 0, and RGB values almost identical to one another (250, 251, 251). As you can see on the graph below, the spectral response of our DIY target is extremely flat.

Pict8-SealTape_PTFE_graph_only
Figure 8. White Teflon tape spectral response

Aside from its cheapness and ease of use, Teflon tape has two more very important qualities:

  1. In most cases, the only things that are going to be brighter than the Teflon tape are a specular highlight or a light source, because the Teflon tape has a close-to-maximum achievable diffuse reflection. This helps when establishing exposure and maximum brightness in RAW conversion.
  2. The higher the values in the digital capture are, the lower the noise is. That’s why having a target with a higher diffuse reflection factor as a white balance reference ensures that the readings used by the click-on-neutral method are less contaminated by noise, less skewed, and generally more accurate.

Links to the RAW files:
Df_WB_Demo006.NEF
Df_WB_Demo007.NEF
Df_WB_Demo008.NEF
Df_WB_Demo009.NEF
Df_WB_Demo010.NEF

Related articles:

Disclosures, Terms and Conditions and Support Options
Filed Under: Photography Techniques Tagged With: Photography Tips, White Balance, DIY, Do It Yourself

About Iliah Borg

Iliah Borg has been involved in photography since the age of 6. His Father and his grandfather were professional photographers. He is the co-author of the RawDigger software, a RAW image analysis tool.

Reader Interactions

Comments

  1. 1) Yandoodan
    September 10, 2016 at 2:03 pm

    I own a gray card and have never had satisfactory results in the field. It’s technique rather than technical. With the camera on a tripod I try to hold the card in front with my arm outstreched. My arm shakes and I bump the camera. I can’t stand in front as I frequently hold it out of the picture altogether. And it is very hard to hold the dang thing perfectly parallel to the film plane.

    Can your eraser method solve this? Or is there a technique I am missing? The camera’s automatic white balance typically misses the right WB by a very large amount, even under perfectly ordinary conditions. Then I spend much time hand-compensating in ACR, by eye.

    Reply
    • 1.1) Iliah Borg
      September 10, 2016 at 4:41 pm

      Dear Sir:

      If you are shooting raw, you can just set the target somewhere in the frame, and use click-on-neutral white balance tool in a raw converter to establish white balance.

      Reply
      • 1.1.1) Yandoodan
        September 10, 2016 at 6:42 pm

        Well, that’s the problem. There is never, ever, any place within the picture where I can set anything. Scenics are generally shot at f5.6 – f11, and you can’t do that and have anything much like a foreground.

        Reply
        • 1.1.1.1) Iliah Borg
          September 10, 2016 at 7:00 pm

          Dear Sir:

          I place a target, zoom in (or get closer), shoot it, and then compose the scene.

          Reply
          • 1.1.1.1.1) Betty
            September 11, 2016 at 5:20 am

            ?

            Reply
  2. 2) Merlin Marquardt
    September 10, 2016 at 2:04 pm

    Pretty technical, but interesting.

    Reply
  3. 3) Jay
    September 10, 2016 at 2:26 pm

    I think one of these will do the trick just fine:

    www.bhphotovideo.com/c/pro…ndard.html

    Reply
    • 3.1) SolB
      September 10, 2016 at 4:05 pm

      Forget about the fact that I don’t know the optical characteristics of DGK product but why would I want to spend $16 + tax + shipping when I can get a roll of the tape for 0.79 and build as many units as I want.

      Reply
    • 3.2) BlueBomberTurbo
      September 11, 2016 at 4:07 am

      Not sure about that particular brand, but I got one that looked the same, and it was useless. The WB from the gray card didn’t match what I read from my ColorChecker, and they were more of a satin finish, which made ithem slightly reflective. This made the readings for exposure in video too unpredictable in bright lighting. Amusingly, I got better WB readings off of the black card than the gray. :p

      Reply
      • 3.2.1) Iliah Borg
        September 11, 2016 at 8:57 am

        Dear Sir:

        Please try with the tape, and if it does not work for you, can you upload a raw file with the tape included in the frame? Based on your last sentence either your gray card is no good, or you are doing something wrong. Black works better than gray mostly when the reference target is not positioned correctly, that is it is lit not by the direct light shining onto the scene.

        Reply
  4. 4) Daniel Benn
    September 10, 2016 at 2:49 pm

    Perfect! Small, portable and costs next to nothing. McGiver lives.

    Reply
    • 4.1) Iliah Borg
      September 10, 2016 at 4:36 pm

      He will be back on CBS Sept. 23 ;)

      Reply
  5. 5) George
    September 10, 2016 at 4:04 pm

    If this works (and it looks like it does!) it will be simply amazing.

    If I understand correctly though, the Teflon tape does all the work. Why was an eraser of a particular colour suggested? Would another item create any issues????

    Reply
    • 5.1) Iliah Borg
      September 10, 2016 at 4:32 pm

      Dear George,

      Coloured substartes may need more turns of the tape, but most importantly they can cast colour reflexes onto the tape.

      Reply
      • 5.1.1) Daniel
        September 25, 2016 at 7:43 am

        Wouldn’t black eraser be even better then? As it would not reflect any light and with that introduce possible color casts.

        Reply
        • 5.1.1.1) Daniel
          September 25, 2016 at 7:45 am

          Obvious cons, though, would be that you would need more turns of the tape.

          Anyway, very cool article!

          Reply
  6. 6) David L.
    September 10, 2016 at 5:29 pm

    Thank you very much for this hack, I will try it for sure.
    Great to have to get the technical explanation too.

    Reply
  7. 7) Mike Canant
    September 10, 2016 at 5:34 pm

    I have sucsessluly used a white styrofoam coffee cup for the same purpose. The cheapo cups are usually on hand somewhere and they bring the color in nicely.

    Reply
    • 7.1) Iliah Borg
      September 10, 2016 at 6:59 pm

      Dear Mike,

      Yes, styrofoam has a rather flat reflection spectrum, with minor bumps that can cause confusion under light sources with spiky spectrum; but it is a rather transparent (to the point you can use it instead of ExpoDisc; or, if hot-pressed, as a dome to put on a lens to use a camera as an incident light meter), can be easily gone with the wind if empty (and if not, transparency can become an issue), and takes more space in a bag. But when you can use it, it does work pretty well.

      Reply
  8. 8) Yandoodan
    September 10, 2016 at 6:40 pm

    I like that. I’ll experiment. After all, it doesn’t have to be perfect to be better.

    Reply
  9. 9) Motti Bembaron
    September 10, 2016 at 8:41 pm

    Great idea!

    Reply
  10. 10) Antonio Mario
    September 11, 2016 at 9:14 am

    Dear Iliah,

    Thanks for a nice, informative article! More than the motivation for building one such ‘card’, I enjoyed knowing about the spectral reflectance data for the various materials/items. I’ll give it a shot in the field one of these days. If we could heat up teflon w/o melting it we’d have a nice black body spectral curve! ;-) . Maybe we’d already have that at room temperatures in the infrared but I don’t know about the absorptivity of teflon around 10 microns or so.

    Back to photography, one question: I’d suspect the teflon surface would still work if your contraption is not normal to camera but at an angle (say, 45deg), but only the reflectance might be lower. Is that correct?

    Thanks.

    Reply
    • 10.1) Iliah Borg
      September 11, 2016 at 10:23 am

      Dear Antonio,

      Yes, you can place it at an angle (and it is placed at an angle on the shots here). As to reflected light, it depends on the angle to the main source of light and to the camera, but generally, with the diffused nature of reflections from sintered PTFE, it remains pretty high within the reasonable range of angles.

      Reply
  11. 11) Jim
    September 11, 2016 at 10:17 am

    More amazing to me than the device is that this was an article by Iliah that I can actually understand:)

    Seriously, I always look forward to Iliah’s insights on this and other forums.

    Reply
  12. 12) George
    September 11, 2016 at 11:48 am

    @Iliah Borg something is not making sense to me. I am not quite familiar with the x-rite target, but why is it that clicking on different grey patches produces different white balance results?

    Are not all the patches neutral? Which one is the “correct” one?

    Also, I have seen in photos that the passport has another card with patches, specifically for setting the white balance, in different warmth tones. Perhaps, that card should be used instead of this one?

    Reply
    • 12.1) Iliah Borg
      September 11, 2016 at 12:04 pm

      Dear George,

      Neutrality is different, as it is plotted in the article. In this classic CC24 layout, the recommended one for white balance is N8, the one to the right from the green. It is a rather solid reference, based on 40 years it exists.

      When you say “different”, by how much is it different? If it is less than 10..20 mired, it is not a real difference.

      The layout with different gray patches include two practically neutral patches, Landscape Neutral, and Light Clipping 2, both with about 60% reflection. The separate gray page of Passport has the same properties.

      Reply
      • 12.1.1) George
        September 11, 2016 at 12:18 pm

        Using image Df_WB_Demo008.NEF

        Results clicking on grey patches (far right column), moving from white to black (bottom to top)

        Patch 01: Temp 3050 / Tint +1
        Patch 02: Temp 3100 / Tint -1
        Patch 03: Temp 3150 / Tint 0
        Patch 04: Temp 3150 / Tint +2
        Patch 05: Temp 3050 / Tint -2

        Teflon Tape: Temp 3100 / Tint 0

        If you say that N8 is the “correct” one (patch 02 in my list), then indeed it is almost identical to the teflon tape and really close to the rest to make any visual difference. The problem was with the extremes, which had 100 units difference that was obvious on screen.

        Do you think that a Delta of 50 in the Temp is unusual?

        Reply
        • 12.1.1.1) Iliah Borg
          September 11, 2016 at 12:39 pm

          Dear George,

          It’s not me saying N8 is the one to be used for white balance, it is so by design. They say “take the eye dropper and select the second patch from the white patch on the ColorChecker. This will render the file neutral.”

          It is 10 mired between 3050K and 3150K (en.wikipedia.org/wiki/Mired or www.leefilters.com/light…lator.html ), while the smallest step in light filtering even in cinema-making is larger, 15 mired. 50K difference at this temperature range is only 5 mired, negligible, except when shooting for cataloguing art and artifacts, and such. In a real scene there is normally no chance that 2 references being put in different parts of the scene will show such small variation of white balance. That is one of the reasons why I use teflon, I can make the reference small, place multiple references, and equalize white balance across the scene using masks if the customer demands so.

          More, if you use an eyedropper in Nikon Capture NX2 in “single point” mode, selecting the 5×5 sample size, you will see the same variation equivalent to ±50K clicking on different areas of the same N8 patch.

          Reply
          • 12.1.1.1.1) George
            September 11, 2016 at 12:50 pm

            @Iliah Borg you really do not know how much I appreciate your effort to clarify all this info for me. Apparently, I have still a lot to learn regarding white balance.

            So apparently, the targets work as designed and so does your magic teflon tape. I am off to the hardware store, first thing in the morning!!!

            Thank you for all the info. I hope you will create more posts regarding the matter or even showcase you multiple references workflow. I know that I would be thrilled to read them!

            Reply
  13. 13) Rauck
    September 11, 2016 at 8:19 pm

    Excellent, just excellent stuff.

    Reply
  14. 14) C J Nappoly
    September 12, 2016 at 2:52 am

    My novice question please.
    I understand that this piece of rubber+teflon can be placed within the frame as reference to be used as a WB picker while shooting in RAW.
    The method could be used as long as your subject is limited in distance or indoor photography etc.

    How do i employ this method while shooting outdoors, where the subject is far, shooting landscapes or shooting birds or wildlife.

    Thanks

    C J Nappoly

    Reply
    • 14.1) Iliah Borg
      September 12, 2016 at 6:55 am

      Dear Sir:

      White balance is recorded for the light, not for a particular scene. If you can ensure that the target is lit by the same light as the final scene is, you can take a shot of the target, and while converting raw files simply copy the white balance from that shot to actual scene shots.

      Alternatively, you can put a styrofoam cup onto the lens, point it to the light source, and set white balance that way. You can use ExpoDisc instead of a styrofoam cup if you wish, accuracy will be somewhat better.

      Reply
  15. 15) Andrew Z
    September 12, 2016 at 4:39 am

    So here’s another idea I’ve been toying with. What about using lego blocks as a colour passport of sorts. Lego makes sure their colours are precicely controlled and one should be able to pick them up anywhere in the world for much less than an x-rite passport. Would also be easy to create a database of shots from many camera’s, lenses etc from all over the world as a result.

    Reply
    • 15.1) Iliah Borg
      September 12, 2016 at 7:12 am

      Dear Andrew,

      First of all, profiling targets are not just about different colours, they are also about a variety of pigments used, each with its own spectrum, to increase the diversity in the target. Second, the target should pose no metameric issues. Third, having glossy surfaces complicates accurate shooting to a point of impossibility. One can try using dulling spray or polarizing filter here, but those vary in their spectra.

      If one has a spectrophotometer ($300 DIY project currently), the pigments for the target can be sourced from a home improvement store. Those also have tightly controlled spectra, by the way.

      Reply
  16. 16) Jean Pierre Simonetta
    September 12, 2016 at 9:41 am

    Hi Iliah,
    Once again a great idea of you. Over 1 year I tested to find out, how to become an easy way for “correct” white-balance. I have color-checker passport, Spyder checkr24, gray cards and from lastolite xpobalance and ezybalance 12%! Hm, all of them not works really correct.

    Today, I tested your advie with the PTFE-seal-tape for sanitary. And, it works great!!

    And it works also for WB-setting! I use the tape-roll directly in the image and with the click-cape it is always protected! And after a short time, I will remove some inches of the tape and cut it away! So, it is always clean!! Great.

    Another advantage that the roll is curved. So you can easier find the WB-point with the eye-dropper (ACR) 50% indication or have a look at the histogram (for other Raw-converter) , till the pick-point is about in the half of the histogramm (127).

    I find out, that the reflection ot the PTFE-tape is very high. If your digicam has Zebra, you can see, that first the PTFE-Tape beginns to blink, when the hightlight is blown away. But, it doesn’t matter, because the tape on the roll is curved and one part will not be overcast.

    Many many many thanks Iliah,

    Best, Jean Pierre

    Reply
    • 16.1) Iliah Borg
      September 12, 2016 at 3:03 pm

      Dear Jean Pierre,

      You are very welcome.

      Mind, however, that if the roll is on a coloured bobbin, it may cast colour onto the tape.

      Reply
      • 16.1.1) Jean Pierre Simonetta
        September 13, 2016 at 1:41 am

        Sorry, I haven’t forgotten to mention, that the bobbin has to be white or black. Mines is white. Thanks for reply.

        Reply
  17. 17) Joshua Boldt
    September 12, 2016 at 12:32 pm

    This is why I love this website. :)

    Reply
  18. 18) Sebastiano
    September 14, 2016 at 9:34 am

    Hi Iliah,

    is the white tape you mentioned like this one?
    uk.rs-online.com/large…433-01.jpg

    It’s a tape used to insulate electric wires, I just have at home ..

    Reply
    • 18.1) Iliah Borg
      September 14, 2016 at 9:49 am

      Dear Sebastiano,

      This is a different one, made from Vinyl. But you can try it too, of course.

      Reply
  19. 19) Lee
    September 19, 2016 at 3:35 am

    Great idea!

    I will find some old credit cards, clean up the surfaces and generously wrap them with plumber’s teflon tape, much like how gaffer tapes are “rolled” onto the cards.

    My thinking is prior to actual shooting the scene, meter everything as per the final shot, place the teflon card into scene, take a reference shot, take another subsequent shot (with same exposure settings) without the card. Import both raw images into raw editor, use eyedropper to click onto the teflon card and sync the resulting WB with the final shot. Right? :)

    Reply
    • 19.1) Jean Pierre
      September 19, 2016 at 6:18 am

      Be careful, because the reflexion of the Teflon(PTFE) is very high!! The eyedropper from Lightroom/ACR (Lr) cannot catch the WB, if the point is overexposed!
      To avoid this, it is better to place the role on the scene. So, you have a curved surface and you can find the best point with the eyedropper from Lr.

      The tip with the creditcard is great. I suggest to use this for manual-WB with the digicam!!

      The last 5 days, I made so many test with the Teflon(PTFE). Here the link from my role: www.tesa.com/consu…-tape.html

      I tested it with daylight, ambientlight and with LED-light. And it works great. Great color accuracy, indeed.
      What I want to test is SKIN. Skin-tone is very difficult to have it correct. But, I think it will works with the PTFE.

      Have someone test-result with skin?

      Reply
    • 19.2) Lee
      September 19, 2016 at 7:18 am

      Have tried stretch-wrapping the teflon tape, but it is not that easy to achieve wrinkle-free surfaces due to the extreme thinness of the tape. So will clicking the eyedropper on the uneven/overlapped/wrinkled parts cause any inaccuracies?

      Also, given the ideal texture of the teflon tape, can we cut out those white iphone package boxes and still achieve the same WB accuracy as teflon (since the surfaces of the package box is very smooth and matte white)?

      Reply
  20. 20) SMG
    September 19, 2016 at 11:58 am

    Getting harder to find real teflon tape. But the white plastic imitation stuff probably works just as well.

    Reply

Comment Policy: Although our team at Photography Life encourages all readers to actively participate in discussions, we reserve the right to delete / modify any content that does not comply with our Code of Conduct, or do not meet the high editorial standards of the published material.

Leave a Comment Cancel reply

Your email address will not be published. Required fields are marked *

Primary Sidebar

Categories

  • Composition and Art
  • Essays and Inspiration
  • Photography Techniques
  • Photography Tutorials
  • Post-Processing
  • News
  • Reviews

Subscribe via Email

Enter your email address to subscribe to this site and receive notifications of new posts by email.

Please wait...

Thank you for signing up!

Recent Forum Topics

  • D750 + af-d f4 300mm over-exposure at higher apertures
  • Comparing 50mm AF lenses
  • Pop ups
  • RAW Viewers
  • Candian Rockies – Feedback Please
  • The sun rises …
  • Difference in appearance between LR modules
  • Need Advice on ND Filters (NISI)

Footer

Site Menu

  • Photography Tips
  • Forum
  • Lens Database
  • Photo Spots
  • Search
  • Submit Content
  • Subscribe

Reviews

  • Camera Reviews
  • Lens Reviews
  • Other Gear Reviews
Copyright © 2018 Photography Life