This is the second part of a series in which I share my favorite photos from 2015 with the Photography Life community. These articles include the preparation that went behind creating each image, the thought process that led to the final composition, post processing technique, etc. Continued from Part I.
II. Milky Way and Night Sky over Mt. Katahdin and Chimney Pond, Baxter State Park, Maine
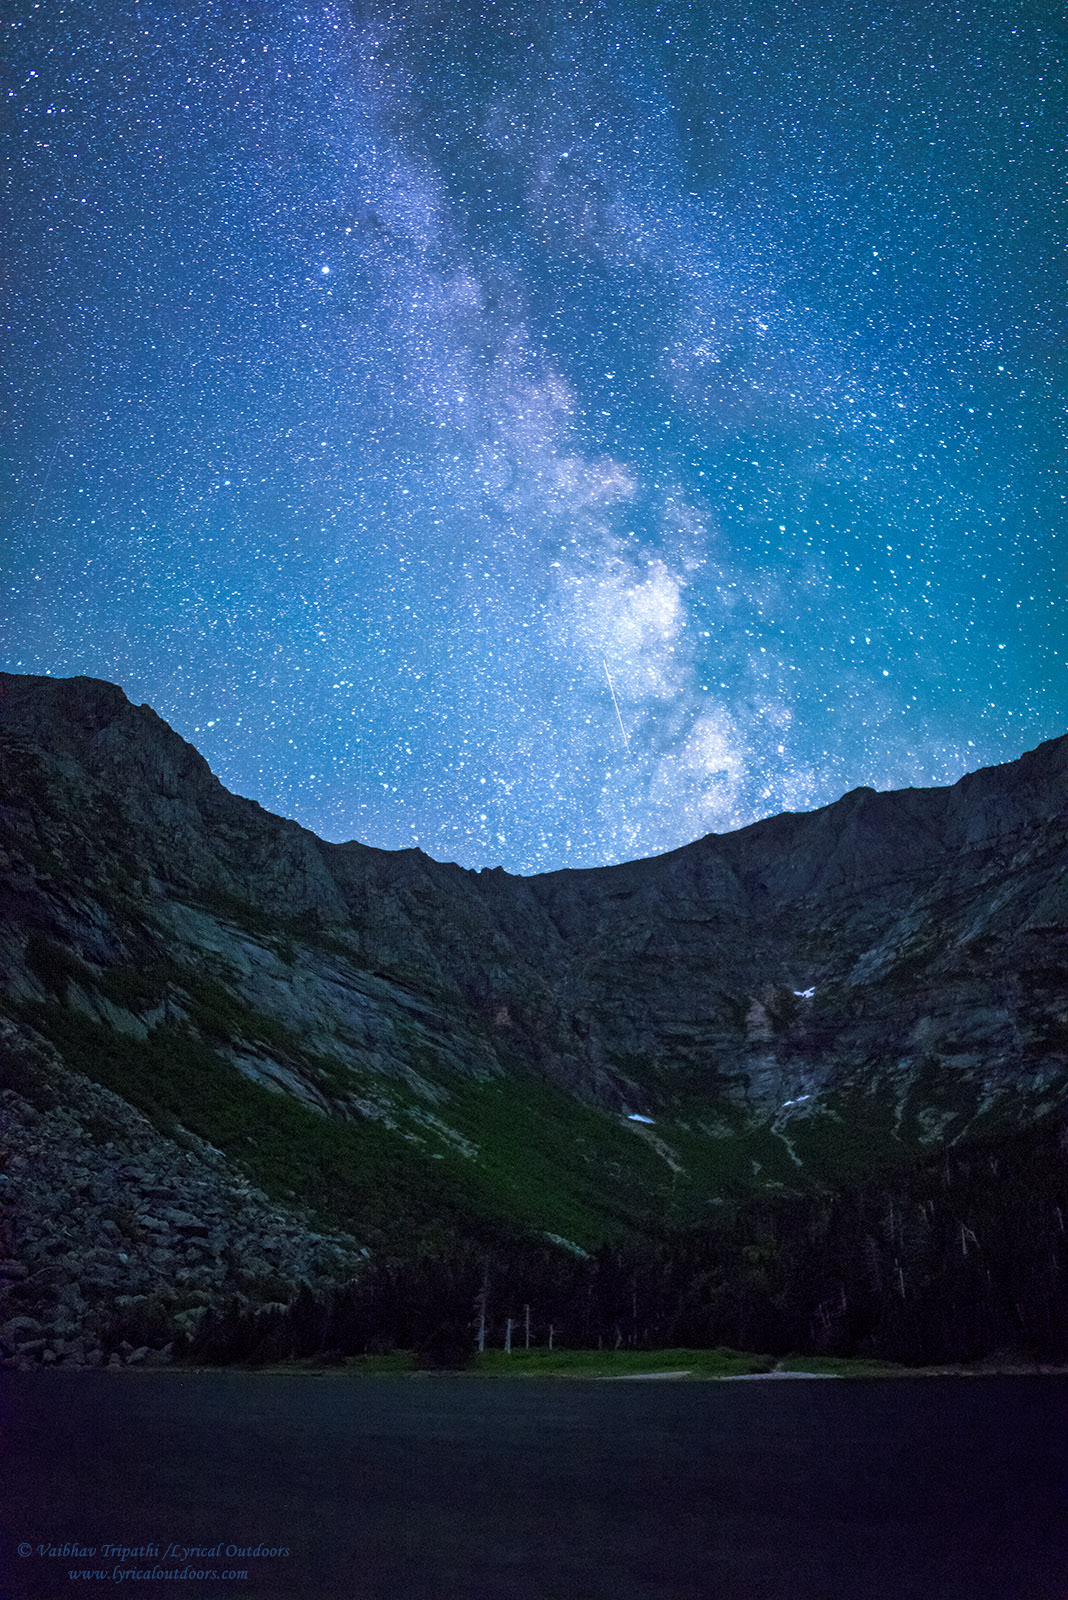
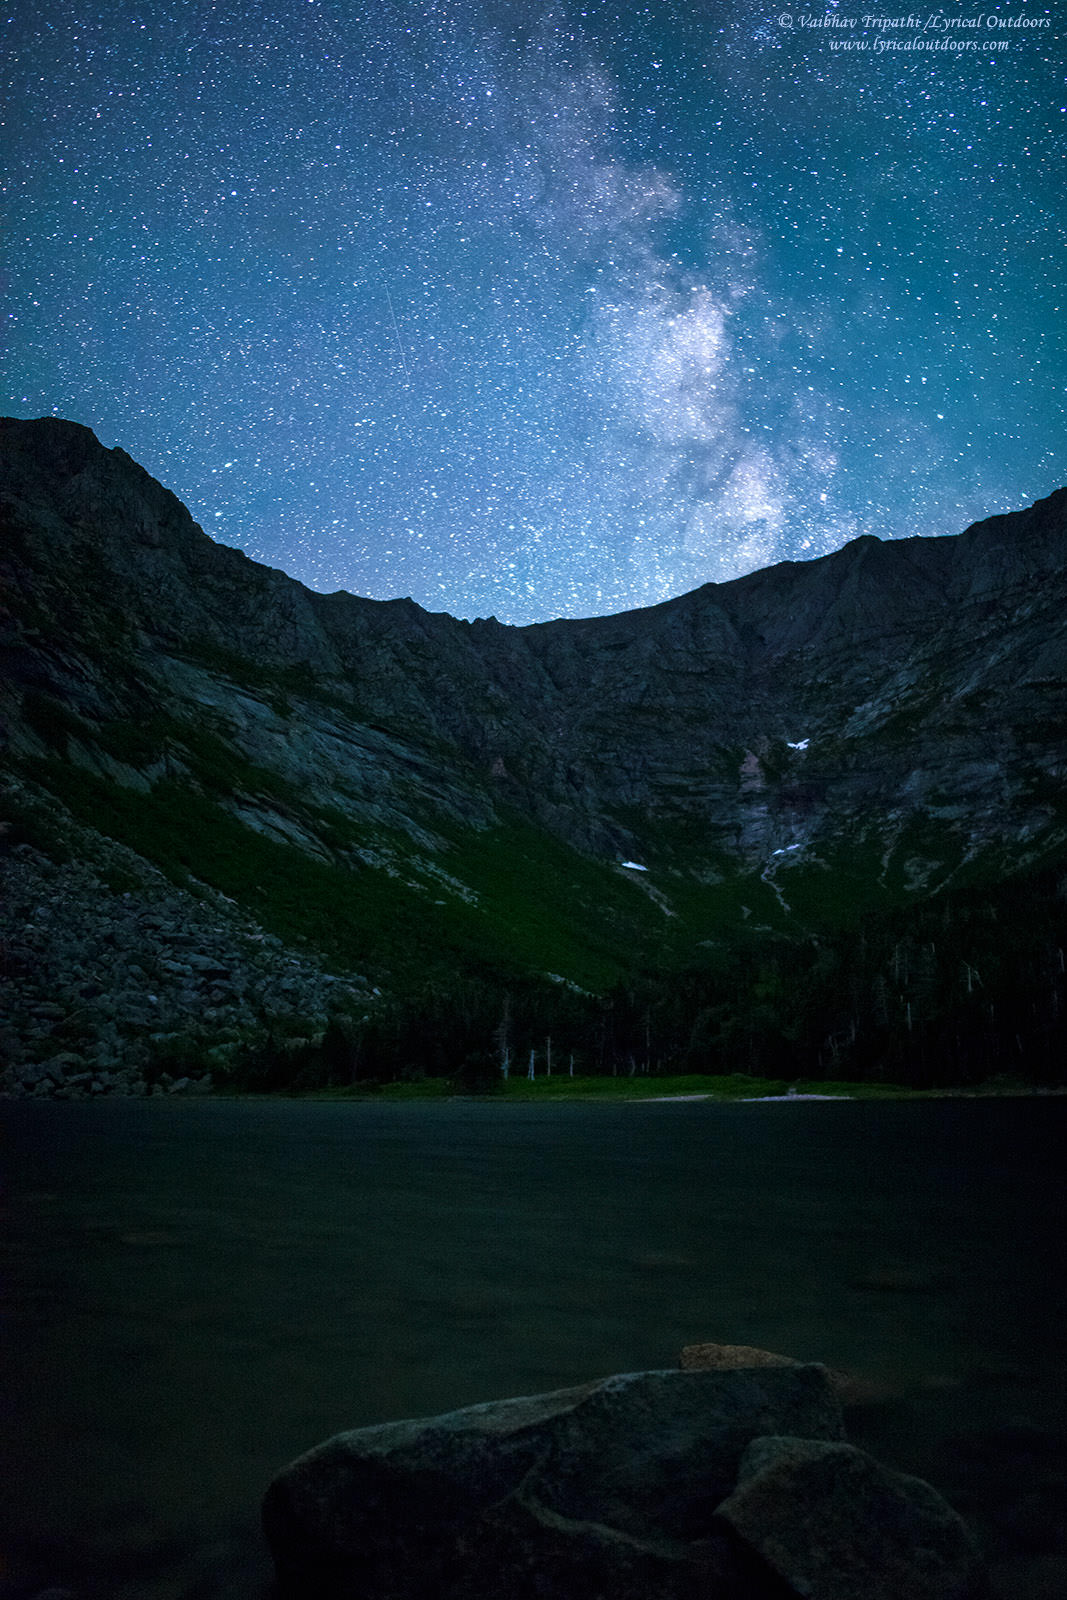
Several things had to come together in order for me to create this image of Milky Way over Mt. Katahdin. A photograph that I had already imagined in my mind’s eye several days before I pressed the shutter at 2:24 am on June 14, 2015. Here is a detailed account.
Table of Contents
Background
During my visit to Baxter State Park last year, we were really fortunate to get a reservation for a ‘lean-to’ at Chimney Pond for our first night there. Chimney Pond is a very popular backcountry campground and it is usually hard to reserve it just a couple of couple of weeks in advance but we got lucky. Standing at Chimney Pond, you are fairly close to the peaks and really perceive the height of Mt. Katahdin. The apparent horizon looking west-south-west is about 60 degrees!
Planning
Having secured the campground reservation, I used The Photographer’s Ephemeris to understand the sunrise/set directions for the Chimney Pond area. It was apparent that in mid-June, at this north a latitude, the sun will be rising from almost north-east and setting in the north-west. This meant that part of the peaks will catch early morning light but it will not be a great sunset location. At that moment, someone whispered to me- “what if the sky is clear, can you get the Milky Way aligned with the peaks? Great idea, I thought!”
I then used a freely available software ‘Stellarium’ to simulate the night sky. This tool works as follows:
- You need to provide the location’s latitude/longitude as an input, which in my case were for ‘Chimney Pond’. The software will then show the simulated sky at those coordinates.
- Then you can select a date/time as well as direction. I chose around sunset for 13th June 2015 and south-south-west direction.
- Next, you can use the time lapse function to simulate the rise/set of stars, planets etc. and visualize it on the mock sky depicted by the tool. After a couple of trial and errors, I could finally discern that the Milky Way (or part of it) should be aligning with Mt. Katahdin around 2 am.
The Early Morning
Tired from our all day hiking, we called it an early night. I made sure to set an alarm and was fast asleep by 10 pm. When the alarm nudged me at 2 am, I took couple of minutes to get off my warm sleeping bag and walk to the Chimney Pond shoreline. As expected, my only companion during that hour was my camera + lens and a tripod (more on the lens in the technical section). I was sleepy and lazy but my drowsiness vanished as soon as I looked up- here was the Milky Way aligned with Mt. Katahdin. My calculations had worked and feeling elated, I got to work.
Shooting
Using, my head lamp, I turned the focus ring to infinity and a quick random exposure of the sky confirmed that I had nailed infinity focus (I will highly recommend to verify the accuracy of infinity marking during the day light by shooting distant subjects). Since, it was pitch dark and the viewfinder provided almost no help, I ended up having several iterations for the desired composition. It was something like- guess the frame, press the shutter, view the image on the LCD screen, and then move the tripod head by a bit to improve the image; repeat until satisfied.
Dissecting the Composition
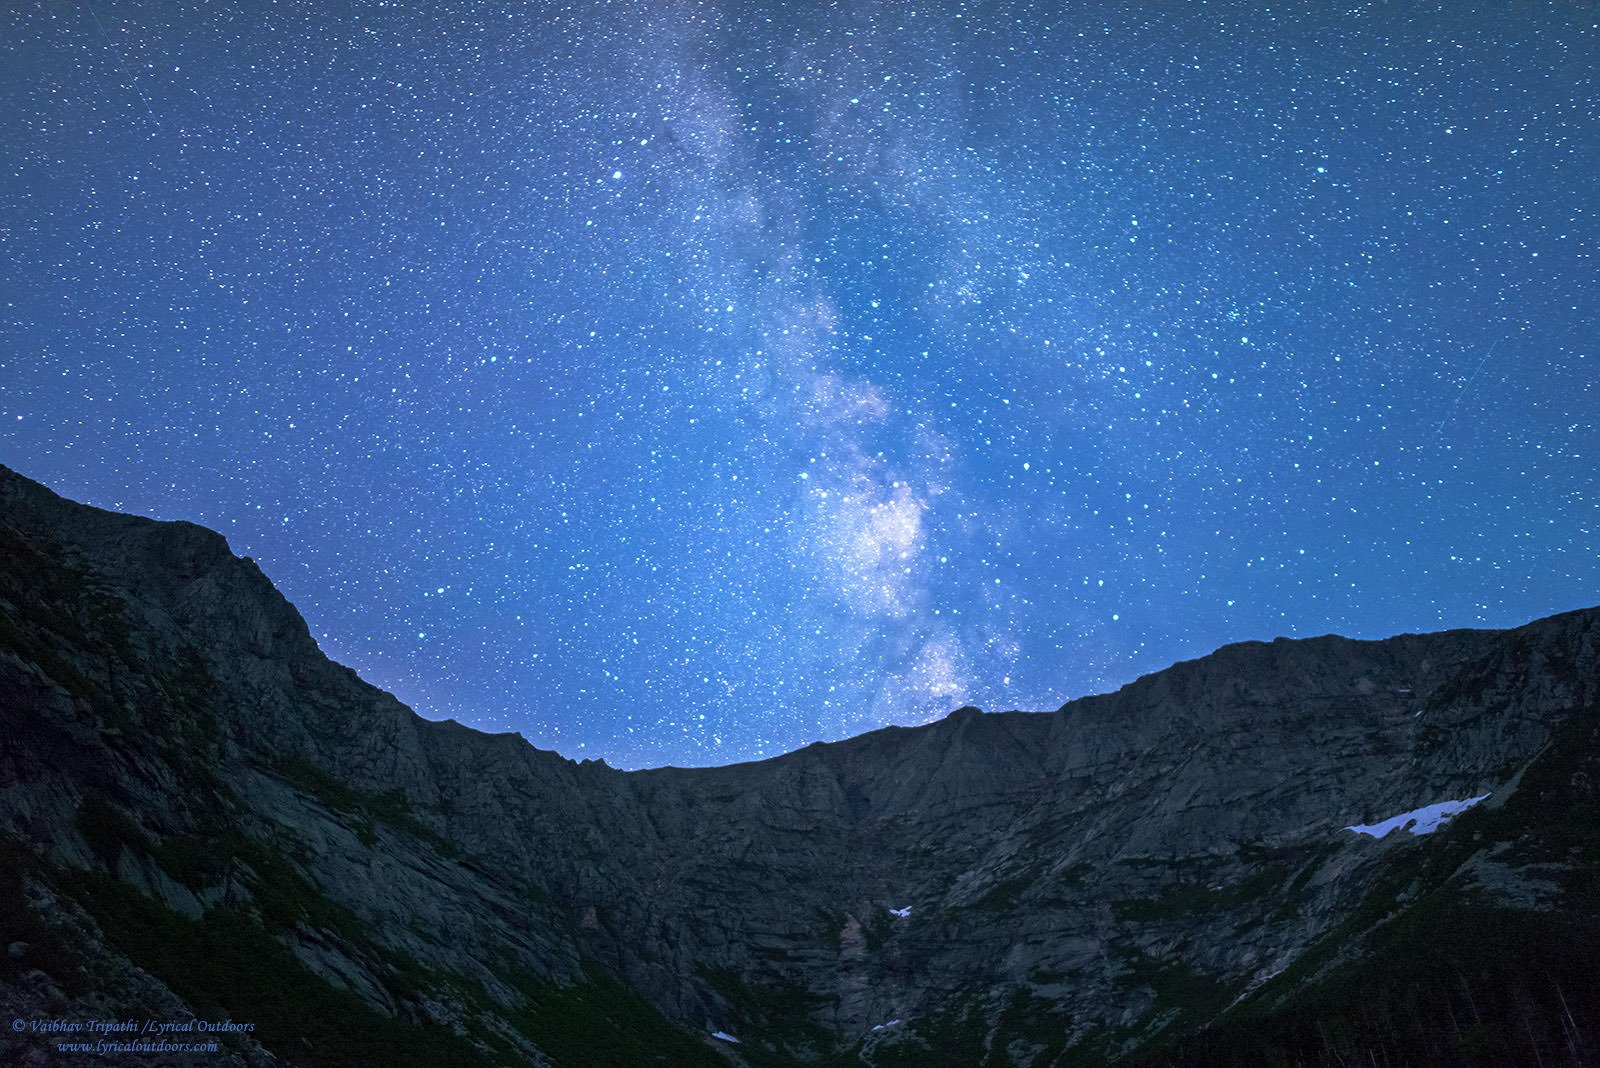
It was a very windy morning and the choppy water offered no reflections. I thought of cutting out the pond but decided against it as it provided a context to the scene as well as the bare trees on the opposite shore added a sense of scale. Shooting vertical, and tilting the camera up towards the sky, I was able to get most of the Milky Way aligned with Mt. Katahdin. As a rule, I bracketed compositions (am sharing a few below) and in the end liked the one in which there is no prominent foreground and the viewer’s eye is immediately caught by the bright starry sky. I remember missing a 14mm lens at that moment for it will let me shoot a much wider FOV, which may turn out good as well. In the hindsight, I could have shot a panorama, and stitched the photos later- well something to remember for future shoots.
Technical details
The image was made using a Nikon D610 and Rokinon/Samyang 24 mm lens at an aperture of f/1.4. The shutter speed was 20 seconds at ISO 6400 and as stated above, I focused the lens at infinity. This $500 lens works great for astrophotography- it has a well-marked infinity stop, has decent sharpness wide open for star-light shots such as this (I recommend stopping to f/2.8 if there is enough sky light to get more details and also to alleviate vignetting); is wide enough that when shooting at f/1.4, you can choose a shutter speed of 20 seconds to get (almost) pin-pointed stars (rule of thumb: shutter speed * focal length < 500) and above all this lens is very well corrected for coma even wide open. The stars in the above photo are rendered as pin-points even in the extreme corners. The last fact alone makes it a no-brainer to have lens in your night-sky shooting bag.
The raw file was processed in Adobe Lightroom 5.6 and exported as a 16 bit TIFF. I opened this tiff file in Photoshop CS4 and used curves to darken the sky and bring out the stars. Next, I used Nik Dfine to selectively reduce noise, especially in the shadows and then selectively sharpened the image using Nik’s Sharpener Pro 3 (these are now freely available plugins from Google). Lastly, I resized the photo and converted it to jpeg for sharing.
Hopefully you all enjoyed this second installment and I will look forward to comments and feedback.
Yaa really beautiful photographs. I really like your work……….
Thank Jessica, I am glad you liked the image.
Gee, it’s been some years since I’ve been at Chimney Pond and climbed Katahdin, and this is just about exactly what memory reminds me that it looks like in the middle of the night. Good work. Evokes great memories. Thanks for sharing.
BTW, in those older days, one didn’t need a reservation if staying there in a backpacking tent … might be still true.
I am glad that my image could evoke great memories for you. Chimney Pond is a special place but now you need to have a reservation to camp there. They only allow camping in designated areas there.
Wonderful images! My god. I wish I wish that talent.
Thanks for the appreciation and your kind comment. I am glad you liked the photo.
Wonderful shot Vaibhav. Reminds me of a youtube video of Galen Rowell. He shot himself on a mountain with the sun behind him illuminating him from all sides like a spotlight. He explained how he waited for the perfect time of day to do it. Great work, that one and this photo.
Galen Rowell made some really amazing images. I am glad you like this photo as well.
For composition I like to bring a big hand held spot light. Shine the spot light on the fore ground to get a decent composition.
For focusing I open the live view and zoom in as far as I can on the brightest star. Focus until the star is as small as you can get it.
Hi Jonathan,
Thanks for the tip. I have tried this method before too. It works great!
On the web page, the mountain and lake in the photos have really dead colors and the contrast is messed up. Somehow (?) clicking on the image brings up a pop-up with a much improved rendering of the image.
Alex, what is the resolution of your monitor and what browser are you using?
Hi Nasim.
I echo what Alex said. I am viewing it on a Surface Pro 4 using the Edge browser. Opening it in the pop up is literally night and day.
Congrats to Vaibhav for a tremendous capture. Also, his explanation is inspiring. Really great series!
Thanks for the kind comment. I am glad you are enjoying the series.
I’ve been seeing this too lately on my computer, running Chrome Version 50.0.2661.102 m (64-bit) on Windows 10, 100% zoom, no scaling, and 1920×1200 monitor, no DPI changes (like 150%). The sharpening article with the three birds had really bad sharpening artifacts all around them and the moon, but was perfectly sharp and clear once clicked on and opened up.
I am also using Chrome ver. 50 default settings on a calibrated 24″ monitor at 1920×1200. I suspect that the blog site code generator is not converting color space, resolution or sharpening correctly. Technicalities aside, thanks for posting this series on planning ahead to capture a pre-conceived photo.
Using the Safari browser on both a desktop machine and an iPad, the Web page images display correctly. I used both a screen grab and Safari’s Web Inspector to confirm that the Web page images are just scaled version of the original files — no detectable change in contrast, brightness, or colour.
On the iPad, it is very easy to demonstrate that the apparent loss of colour and shadow detail of the Web page images is caused by the simultaneous contrast effect between the 100% white page that surrounds each image, and the image itself, which I mentioned in comment number 15 on Part I of Vaibhav’s series:
en.wikipedia.org/wiki/…fect#Types
The only way to avoid this effect is by using pages that have white text on a black page background — not something that I would ever recommend because such pages are more difficult to read (readability is a W3C mandate).
Update: I’ve managed to find the example I was looking for. The horizontal grey bar is a constant grey, but it’s apparent brightness depends entirely on the luminosity of its surroundings:
en.m.wikipedia.org/wiki/…lusion.svg