While photographing famous landmarks and photo spots is usually a safe way to obtain a beautiful photograph, being able to scout and find own subject to photograph is a skill that many of us have to acquire at some point. Identifying good light, finding the right angle for proper framing and composition, pre-visualizing the end result and using the right tool for the job in order to create a unique and compelling image takes years of practice in the field. This is the area that many of us, including myself, struggle with the most.
Despite the difficulties and the challenges, it is important to keep on advancing the “photographer’s eye”. Sometimes we look at a beautiful image and really like it, but have a hard time understanding exactly what in particular attracts us to it. Is it the beautiful light, the composition or the subject itself? An untrained eye often sees certain elements of an image, while neglecting to see other, equally important elements that make an image successful.
Being able to see and visualize all the minute details in order to properly execute a photograph is something we all need to continuously work on, because those details really do matter. Personally, I find great help in “dissecting” a solid photograph, to try to understand what kind of thought process and work went into making it. During this process, I pay close attention to everything from light, framing, composition, colors, subject, area of focus and other details, so that I can apply that knowledge in the field. In this article, I would like to present a landscape image that I recently captured in Joshua Tree National Park and go through the process of unveiling everything that went into making this image.
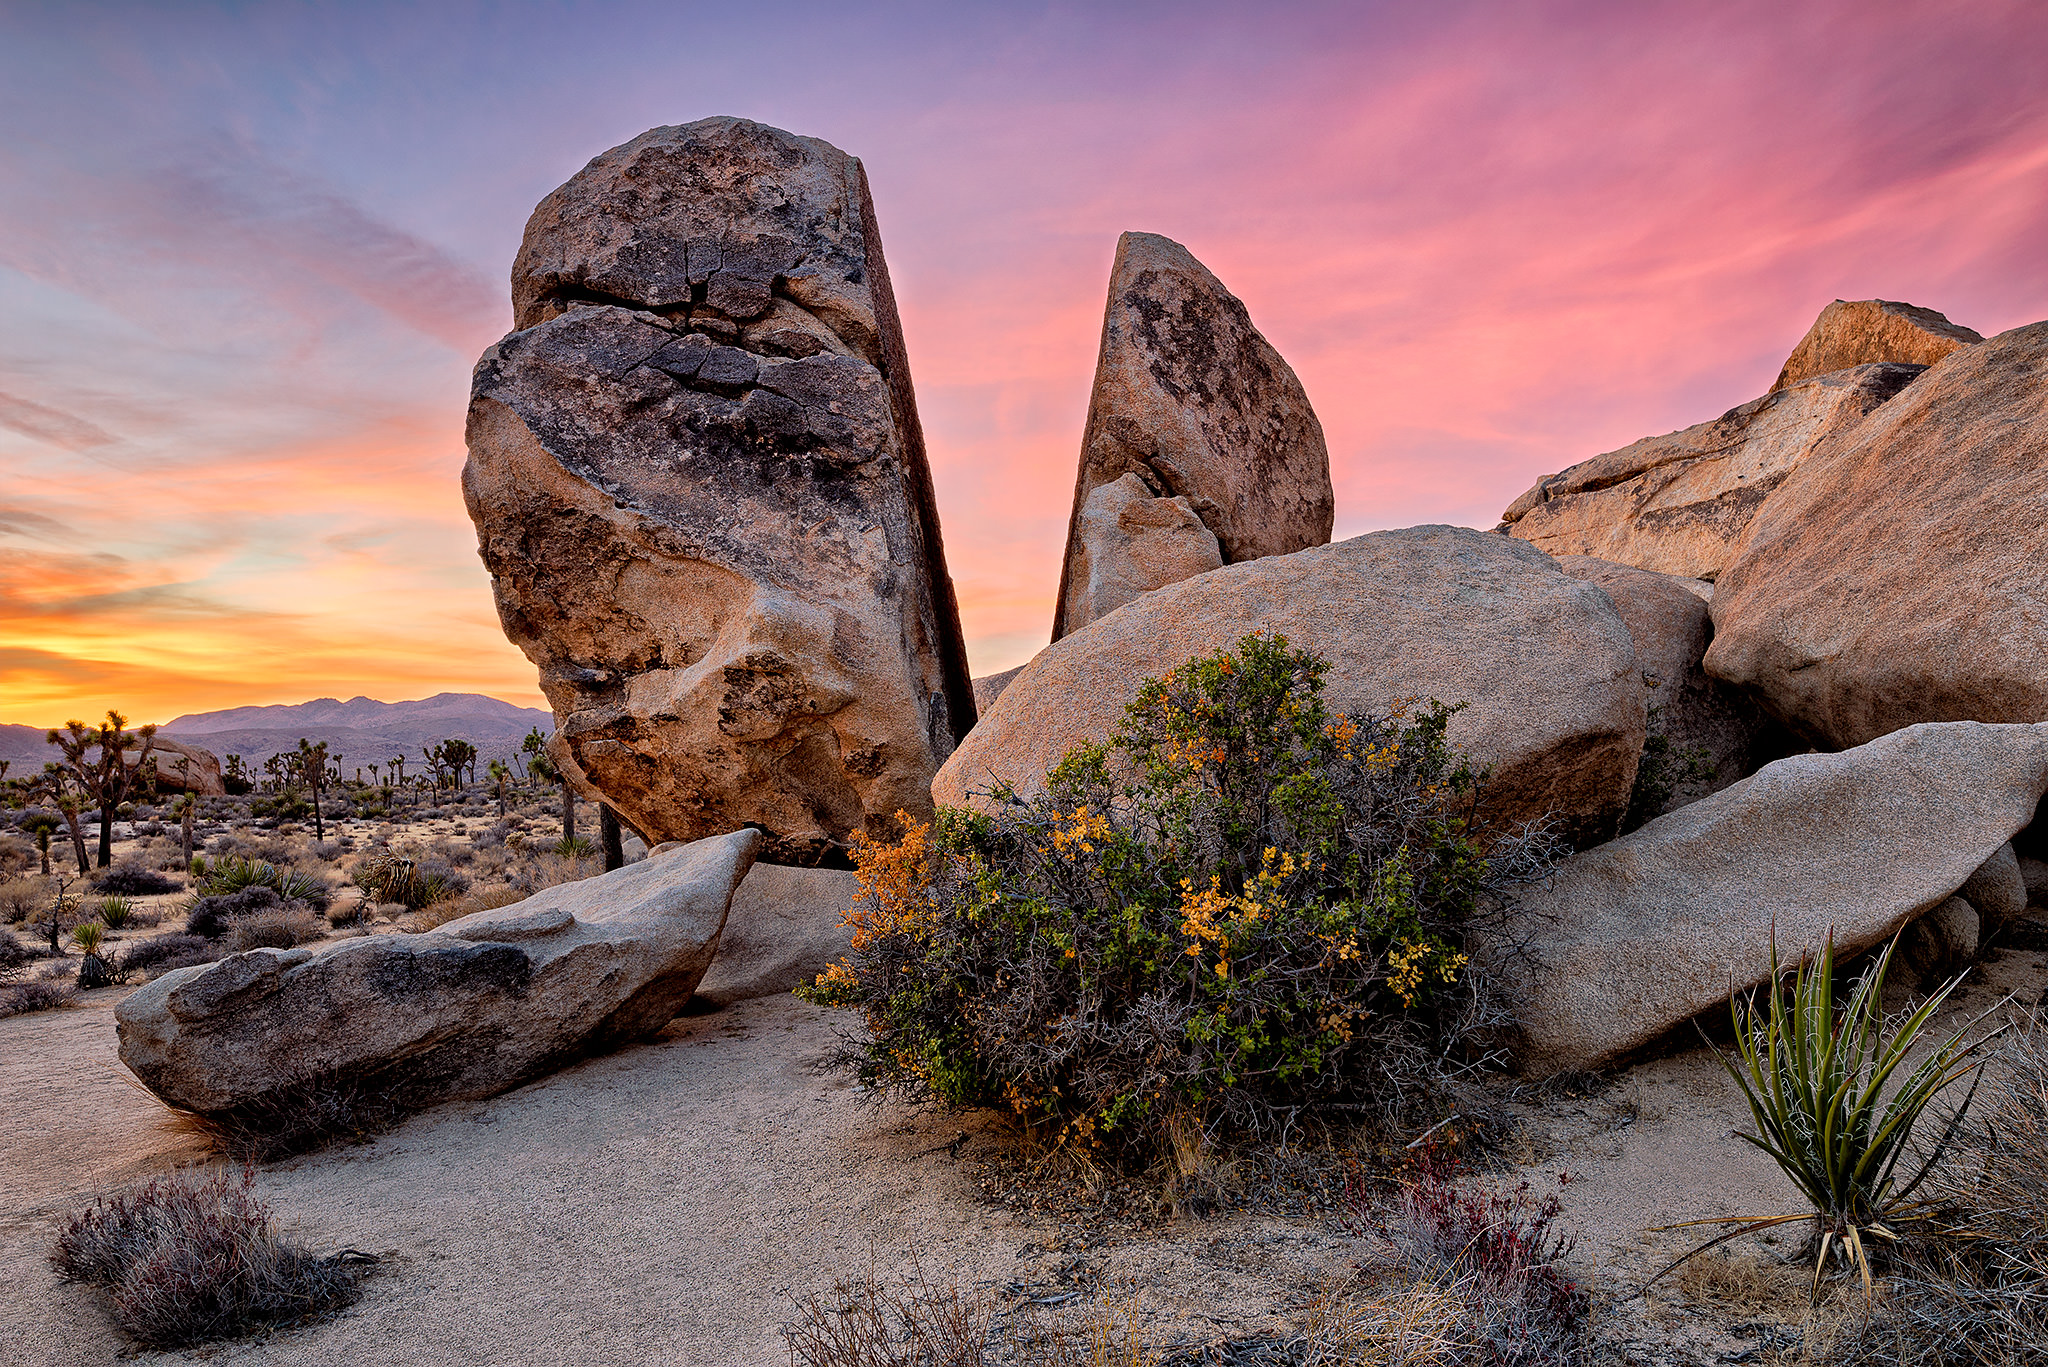
NIKON D810 @ 24mm, ISO 100, 2.5 sec, f/11.0
Table of Contents
1) Seeking the Unique
When starting out, many of us often prefer visiting popular landmarks and photo spots, because they serve as a good way to practice our photography skills and provide more or less guaranteed results. These are the “safe shots”, because we already know where to go, when to show up, how to shoot, how to frame and what type of light we can anticipate based on research, or feedback from others. Sometimes we see a picture of something stunningly beautiful and we want to know where and how that particular photo was taken, because we are naturally drawn into wanting a similar one of our own. There is absolutely nothing wrong with that, because many of us don’t have the time, patience or skills to find unique subjects every time we decide to take a picture. Plus, with so many people with cameras out there, chances of finding a truly unique subject and perspective are getting smaller every day. Even when we think that we have captured something for the first time, chances are, it was probably already done before by someone else. Does that mean that we should be discouraged from seeking the unique? Of course not! In fact, the best way to flex your creative muscles is by scouting and searching for something you have personally never seen or done before. Whether someone else has already done it or not is irrelevant at that point, since it is your subject, your planning, your framing, your composition, your gear and your post-processing. It is your photo in its entirety.
Interestingly, when we do manage to find a unique subject or a perspective for a photograph, we often take pride in those images. We feel a special connection, because we know that the image came out as a result of our own creative vision.
How do we seek the unique then? In landscape photography, it is all about scouting – one must be ready to put a lot of effort into searching for the right subject, identifying the time to photograph it and decide on what equipment and technique to utilize to get the job done.
2) The Scouting Process
During my last trip, I made the decision to drive to Death Valley NP through the southern route, spending a couple of days at the Joshua Tree NP. I had never been to this park before, so aside from seeing a lot of Joshua trees, I had no idea what to expect. With my good buddy Tunc, who accompanied me from New Mexico all the way to Death Valley, we entered the Joshua Tree NP from its southern gate late at night. It was a pretty long and tiring drive, so by the time we found a camping spot, we only had a few hours left to get some sleep. Waking up in the morning was a challenge, but we had about 25 minutes left before sunrise. As we drove out, we saw a stunningly beautiful formation of clouds and the sun rays were already reaching them, painting them in deep red colors. We drove no more than a mile, desperately searching for something to shoot. We were in a “panic mode”, because both of us did not want to miss that beautiful and rare blood-red sky. After a week of no colors, it was the first time we were greeted with such beauty and we were about to miss it!
And that’s what I hate about those “panic mode” moments. With nothing interesting to put in the frame, we kept on roaming around, looking for an interesting foreground subject to complement the sky. I snapped a few photos here and there as I walked around in a field of rocks and random desert plants, but none of the images were working out. With zero time investing in prior scouting and putting some thought into a solid composition, figuring out something that works in such a short period of time was quite difficult for me personally. Within a few minutes, the light was gone. Although it was frustrating, I kept on scouting – I figured if I found an interesting subject, I could come back the next day or some other time to photograph it. Only after slowing down and putting some thought into what I was doing, was I able to finally come up with a more interesting composition. The sun was already up on the horizon, spreading some golden light on the scenery in front of me. It was a very short period of time before it got blocked by the clouds. I set up my tripod, slowed down my breathing and captured the below image:

It was a good lesson learned. Instead of rushing through the panic of losing light, if I had slowed down and focused on my subject and composition in the first place, I would have probably done better to begin with. So keep this in mind when you face a similar situation: slow down, breathe and put some thought into what you are doing, instead of desperately trying to find anything interesting to photograph. Still, that was not really the problem – I was simply unprepared. So I decided to spend the rest of the day scouting for good photo spots that I could come back to.
Joshua Tree NP is a huge park and there is a lot to see, but given how little time I had (1 sunset and 1 sunrise opportunity), I knew that it would be difficult to find something solid to photograph. While Joshua trees are the obvious highlight of the park, I really fell in love with the beautiful rock formations that can be found all over the place. Millions of years of flash floods, strong winds and natural erosion really shaped out rocks in this area, which for me quickly became them the main attraction.
After a long day of scouting, we decided to stop by an area called “Hall of Horrors” and hike it for additional photo opportunities. The area had lots of Joshua trees and rock formations, so we figured it would be a good area to check out. Plus, with only a few cars in the parking lot, it was not as busy as some other areas of the park. We had about an hour left until sunset, so we had a bit more time on our hands than in the morning. In my mind, the worst case scenario involved photographing Joshua trees by themselves at sunset, so it was a “safer” area to spend the evening at, given the circumstances.
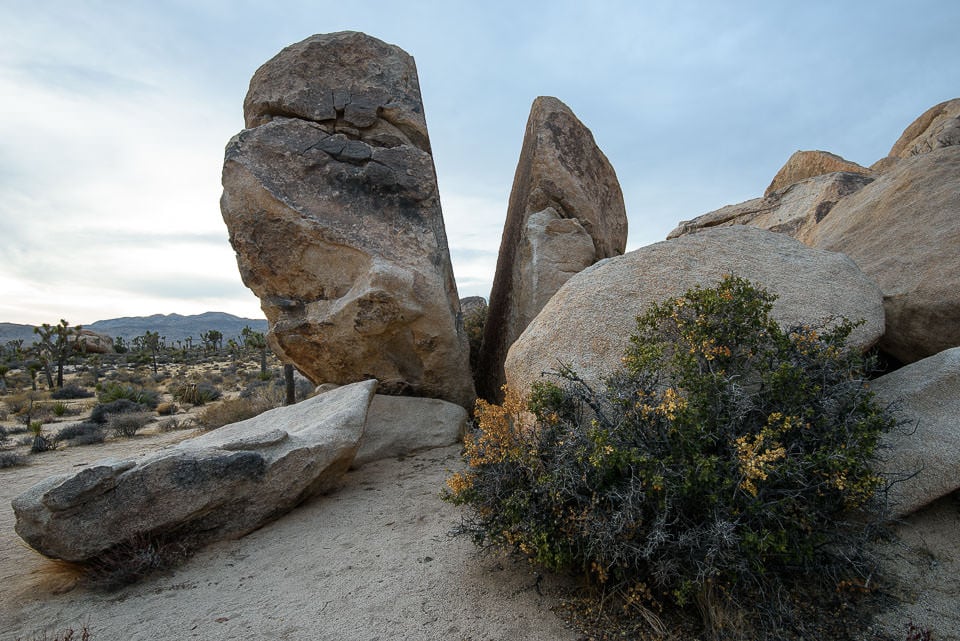
We moved to the right of the Hall of Horrors area and headed towards the second set of rock formations on its back, located less than a mile away. Upon arrival, I started looking around at the rocks and climbing them, to see if I could find an interesting vantage point and composition. Shortly after I came across a round rock that was split in half, forming a “V” shape. I looked at it and I knew right away that I finally found what I was looking for! After spending some time composing the shot and framing it with my camera, I set up my tripod and waited for the light. Sadly, no colors showed up at sunset, so it was not meant to be that day. Oh well… I snapped a quick photo of the rock with my camera and my phone, so that I could remember the framing and had the GPS location:
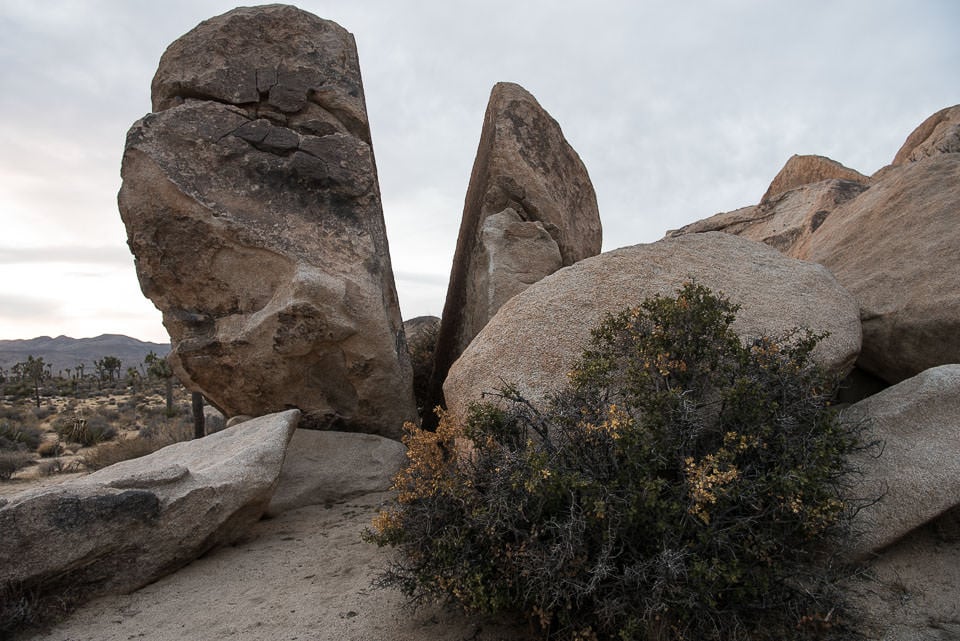
NIKON D810 + 24-70mm f/2.8E VR @ 24mm, ISO 100, 6/10, f/8.0
The spot was clearly a sunset spot, because the other side of the area where the sun comes up during winter months is completely blocked by huge formations of rocks. It meant that we would not have an opportunity to photograph it again the next day, since our schedule was to head to Death Valley the next morning.
After spending 10 days in Death Valley, I decided to take exactly the same southern route home. I really wanted to re-capture the same split rock in good light and I was determined to do it. The weather forecast called for some clouds and I was not about to miss another opportunity. I arrived at the spot right at sunset and now it was all about the light.
3) Light
Photography is all about light – there is no photograph without light. And you cannot take a great photograph without great light, because that’s what shapes it up – light and the correct use of it, is the “secret ingredient” behind every successful photograph. Whether you are looking at a scene with a breathtaking sky filled with colorful clouds, or a dark, gloomy scene with black stormy clouds, it is the light that makes it all possible. For this reason, we put a lot of emphasis on the importance of light in both our basics course and the very first chapter of our upcoming landscape eBook.
Sadly, despite the promising weather forecast, the sky at Joshua Tree NP was pretty clear at sunset. Not a single cloud in the sky in the direction I was facing! I took some other photos of the surrounding areas where there was a little bit of cloud coverage and decided to stay one more day, in my final attempt before departure. Since I was only fixated on one particular composition, I did not bother driving around to other places. I woke up early and decided to see if it was worth coming to the spot at the blue hour. Sometimes, the blue hour can be very rewarding, because if the horizon is clear and there are clouds in the sky, it will cause beautiful light to spread all over the sky way before sunrise, thanks to clouds reflecting light on each other.
No luck. Again, I was treated with a very clear and bland sky that morning. I stayed there for about an hour, waiting to see how long it would take for the sun rays to light up the area. With the sun being blocked by the terrain behind me, I only saw a glimpse of light reach the distant hills to the left side of the frame:
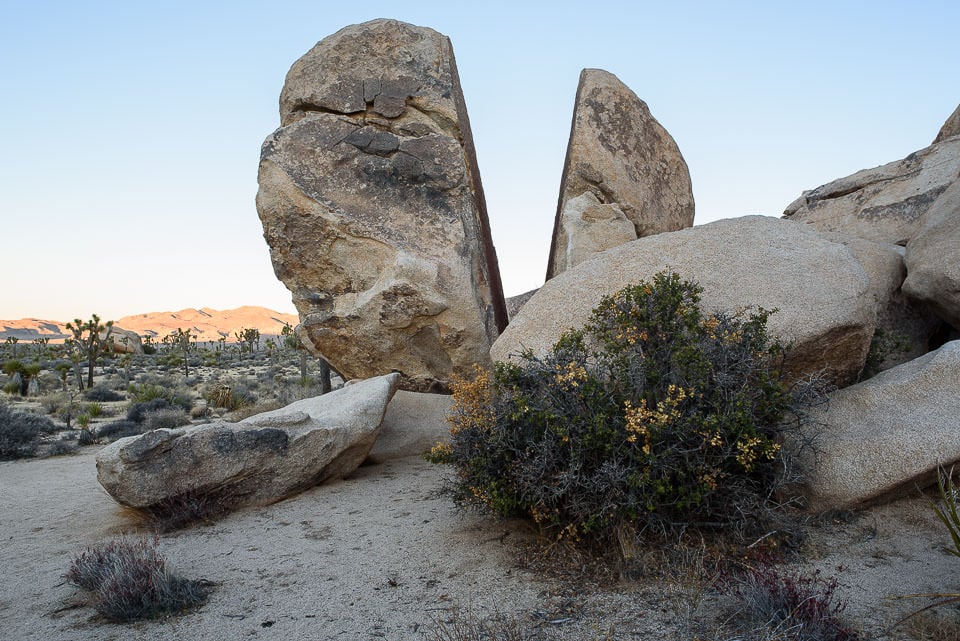
NIKON D750 + 24mm f/1.8 @ 24mm, ISO 100, 1/15, f/8.0
I knew it was time to go, because by the time the sun rays would reach the rock, the light would have been too harsh to work with. Plus, without any clouds in the sky, there was really nothing to complement the scene. It was time to go…my last chance was at the sunset.
By then, it was my fourth time coming back to the same spot. It can be a frustrating experience, going back to the same place over and over again, but that’s what you get with landscape photography – you are always in the mercy of light. But my patience did pay off at the end, because I was able to capture exactly the image I originally envisioned in my head that one evening. Right after sunset, I was lucky to get beautiful pink and yellow colors in the sky.
Before I captured the shot, however, I went through a number of considerations and that’s what I want to talk about next.
4) Subject
So what attracted me to this particular rock? Why was it something I wanted to come back to and capture in good light in the first place? Let’s talk about the image now and go over some of the thought process that went through my head. While light is extremely important, the subject of your image is next in line in terms of significance. When assessing a scene, one must pay close attention in identifying the primary subject, because that’s where viewers will be focusing their attention on. In every photograph, there is always a primary subject. In most cases it is usually a single subject, but there are cases when the primary subject is comprised of a group of subjects. For example, if you photograph a forest, the primary subject can be the trees of the forest. However, if one of the subjects from the group is overwhelmingly large in comparison, then it automatically takes on the role of the primary subject. In the case of a forest, if one of the trees is massive in comparison to all other trees, it becomes the primary subject, because it will automatically shift the attention to itself. Why is it important to identify the primary subject? Because the composition needs to be framed to accommodate the primary subject. In landscape photography, it is rarely a good idea to cut into the primary subject, block it by secondary subjects or move it too far off towards the edges of the frame, because the primary subject is too important. Composition usually gets heavily influenced by the primary subject.
Now here is something I always highlight in my articles and workshops when talking about composition – the sky and the clouds in the sky can almost never be the primary subjects in landscape photography. The sky could be stunningly beautiful, with colorful clouds all over it, but it cannot be the primary subject of the photograph. That’s why photographing the sky by itself is usually pointless. Now notice that I used the word “almost” in front of “never”: there are obviously exceptions to this rule. There are cases when the sky can contain a dominating element in the scene. An example of a dominating element in the sky could be the Milky Way, or a large, stormy cloud formation with a very distinct shape. In such cases, it can be acceptable to build up other subjects and elements around the dominating primary subject in the sky.
Next are secondary subjects. They can be represented by other important elements of the scene. Smaller rocks, trees, clouds with defined shapes, plants and other larger vegetation can all serve as secondary subjects. Ideally, one should not cut into them or block them either, as they are the supporting elements for the primary subject. However, when there is no choice, it is acceptable to do it, as long as the primary subject dominates the scene so much that the secondary subjects become more or less insignificant.
Images can also contain tertiary subjects. These are smaller, less significant subjects in the scene than the first two, but also serve a purpose to complement the primary and the secondary subjects. While ideally one should strive to include them in the frame for a more “complete” composition, it is often acceptable to cut them or put them close to the edge of the frame.
Lastly, there can also be supporting elements. These are usually “fillers” to complete the composition and they can take pretty much any form. Water, snow, sand, clouds and the sky are usually supporting elements. They can be cut into or blocked by other subjects in the scene, because they are not as significant as the main subjects.
When identifying subjects, it is important to highlight that primary subjects rarely look appealing by themselves, without the supporting secondary or tertiary ones. Secondary subjects are extremely powerful, because they can give a sense of scale or help balance the primary subject in the scene. Tertiary subjects can act as other smaller, less significant elements in the scene to provide additional support for the first two. However, one must take caution when introducing too many subjects – if a scene contains too many elements, they can potentially compete with the primary subject and overwhelm it.
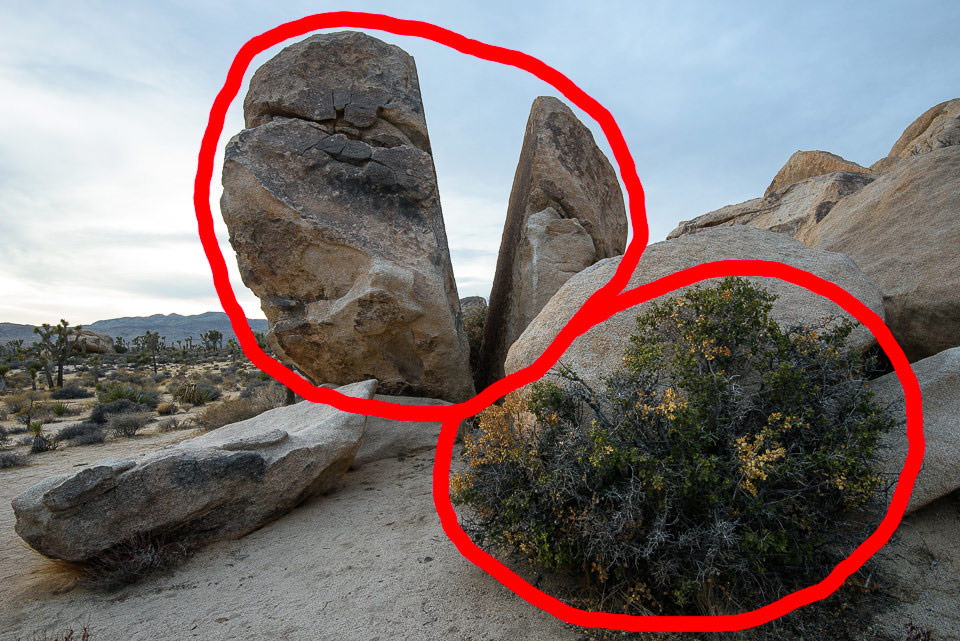
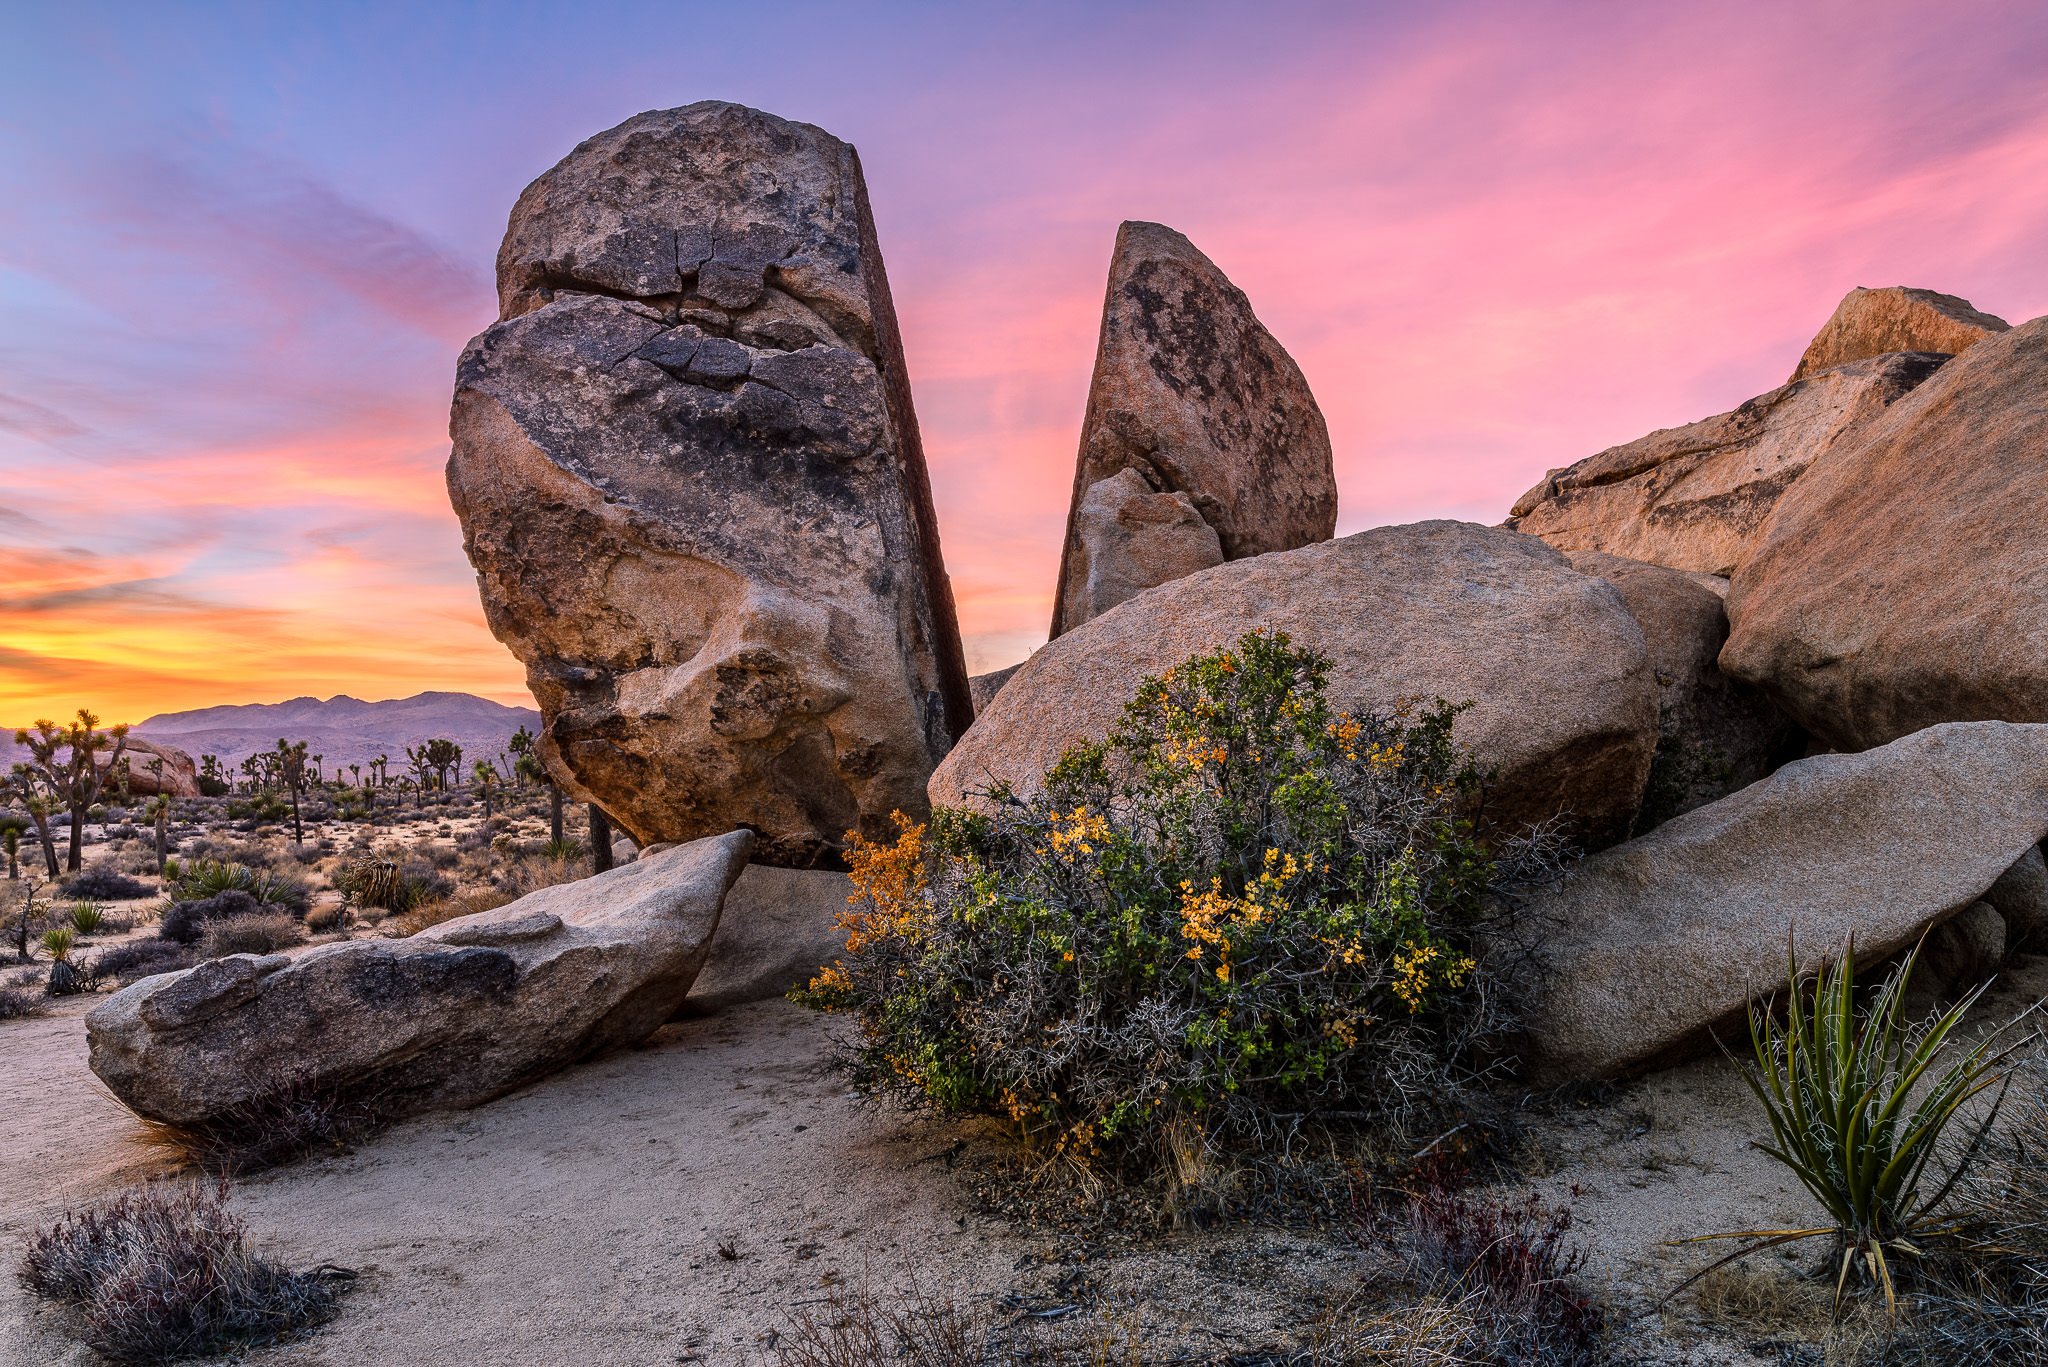
Let’s go ahead and take a look at the photo of the scene I photographed and identify the primary, secondary and tertiary subjects, as well as all the supporting elements. The primary subject of this photograph is obvious – it is the large rock in the middle of the scene:
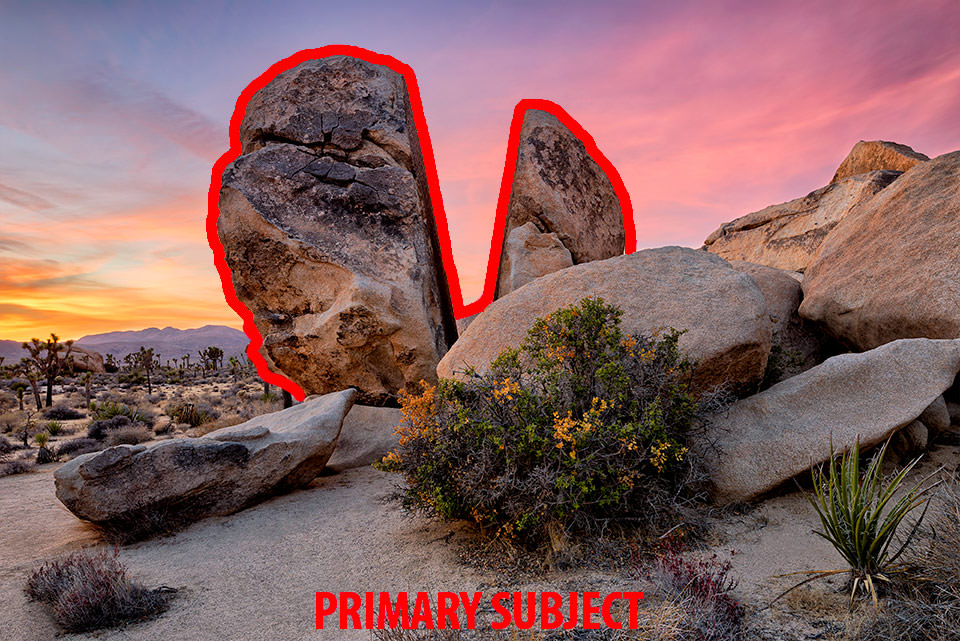
The dominance of the primary subject is clear. It is the center of attention, thanks to its large round shape and the straight cut that makes an interesting “V” shape. It takes up a large portion of the sky, rising above everything else in the scene. What about the secondary subject? There is only one here and it is the large bush underneath the rock:
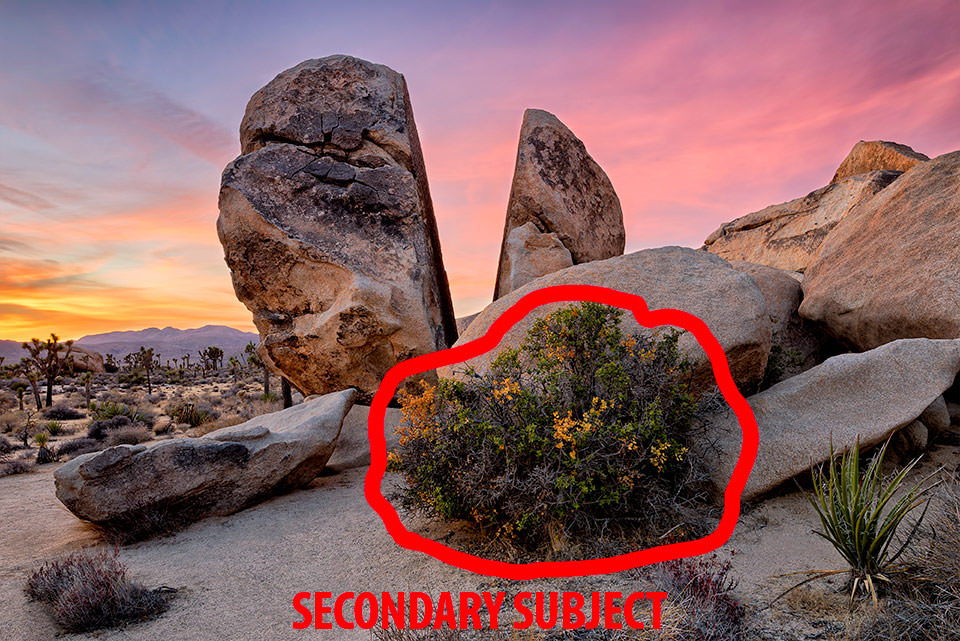
Although it is not the second largest subject in the scene, it stands in front of the large rock, basically overtaking it. The secondary subject has a very important role here – it helps balance the primary subject (more on balance below). It has a similar circular shape as the primary subject and it also has different colors than everything else in the scene, making it stand out from the rest of the group.
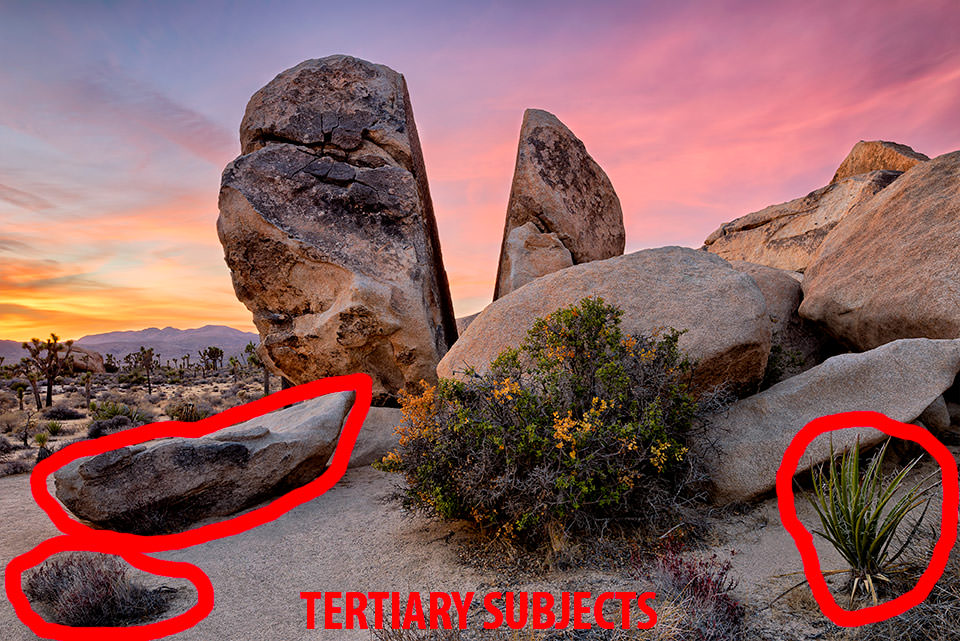
We also have a few tertiary subjects in the scene. Those are: the fallen rock on the bottom left side, a bush on the lower side of it and the dark green yucca on the bottom right side of the frame. These subjects provide support on the bottom half of the frame for both primary and secondary subjects:
Lastly, everything else in the scene, such as the remaining rocks to the right of the frame, the Joshua trees and the mountains in the distance, as well as the colorful sky are all in the supporting elements group:
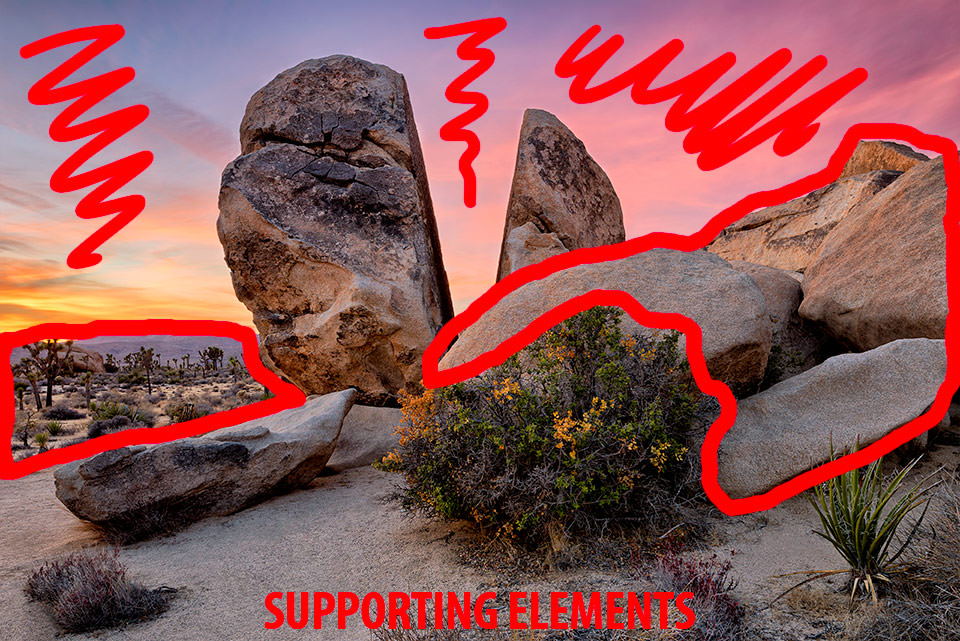
From this group, the sky and the clouds are the main supporting elements, because they dominate most of the framing in the image.
Now that we have identified all the subjects in the scene, let’s move on to composition.
5) Composition and Visual Balance
Without a doubt, composition is one of the most critical aspects of landscape photography. A scene can contain beautiful light and a very appealing subject, but without solid composition, it will not have the visual appeal. In fact, weak composition is capable of reducing the overall impact both light and subject can play in the eyes of the viewer. In contrast, solid composition has a reverse effect of enhancing and boosting otherwise less appealing subjects – in some cases, composition alone is capable of making an image successful, even when the light and the subject(s) aren’t as visually strong.
When I scouted the location and found the subject I wanted to photograph, I had to carefully decide how I would compose the image. Many considerations went through my head as I moved around the rock. I had to think about where in the frame to place the rock, what elements to include or exclude as part of my composition, how large to make the rock appear in the frame relative to other objects, how much of the sky to include, what part of the frame to anticipate the sun or the clouds to be in, so on and so forth. Keep in mind that although we already went through the process of identifying secondary and tertiary subjects, along with the supporting elements of the scene, composition and framing both played a huge role in shaping up all of those.
As I framed the shot, the first thing I had to decide was the placement of my primary subject, the sliced rock. After a quick evaluation of the area and the various angles, I quickly made the decision that it was going to be center composition, with the sliced rock being in the center area of the frame. My first composition was the following:
NIKON D810 + 16-35mm f/4 @ 20mm, ISO 100, 4/1, f/8.0
I liked this composition and at first thought that it would be the exact one I would use when the light conditions were good. What makes this composition appealing? Let’s take a quick look at the visual representation of what’s going on here:

This composition works for a number of reasons. First, the “V” slices right through the middle of the frame, forming a beautiful reverse triangle. The rock on the left bottom of the frame creates another line that leads the viewer from the left bottom of the frame to the primary subject. Another imaginary line from the right side of the frame can be drawn to the center, making this a proportional composition. The larger side of the sliced rock on the left works out perfectly, because it helps balance the right side of the frame that feels heavier in comparison. Also, this composition allowed me to frame the image in a way that resulted in the least amount of damage to the “V” area of my primary subject, without cutting into it. I really liked this composition and thought that I would settle with it.
However, there were a few problems. First of all, although I was not cutting into the “V”, there was a large rock right behind the primary subject, which was already cutting into the shape I was attempting to save. Second, due to my use of an ultra wide-angle lens, which forced me to get closer to the subjects, it made the bush appear massive in comparison to the rock:
This presented a problem for me, because the bush was essentially heavily competing with my primary subject, making it appear too dominant. I did not like that, because the bush was supposed to complement the rock to bring a good balance, rather than overtake it. Lastly, I wanted to show equal amount of the inner sides of the rock on both slices. The only solution was to walk back a bit, use a longer focal length and slightly change the perspective. When I did that, I ran into a new problem – I was now including additional foreground, which now contained more subjects in the scene:
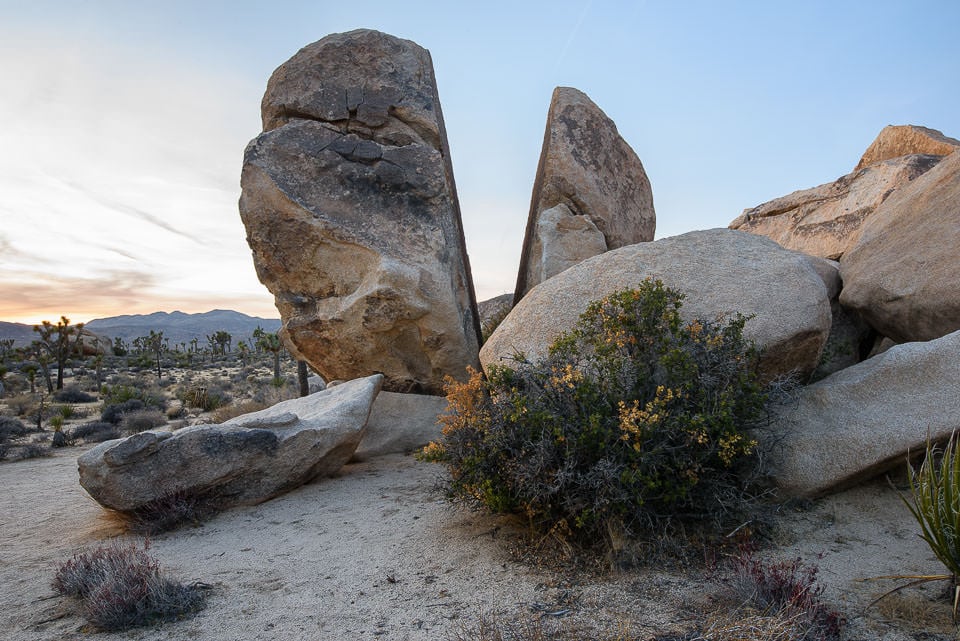
NIKON D810 + 24mm f/1.4 @ 24mm, ISO 100, 13/10, f/11.0
With the “V” still in the center of the frame, I faced a problem with the yucca on the right bottom side of the frame. At first I naturally thought about Photoshopping it out later in post, but then it was cutting too much into the rock behind it and occupied quite a bit of space. If I were to remove it from that area, there would be nothing to counter-balance the bush on the left bottom side of the frame. There was not a lot of room to move around either – there was a large log on the ground right under my feet and a very large yucca to my left. Trying to exclude the yucca on the bottom right frame by framing the shot a bit to the left would not work either, because the image got too “right heavy”:
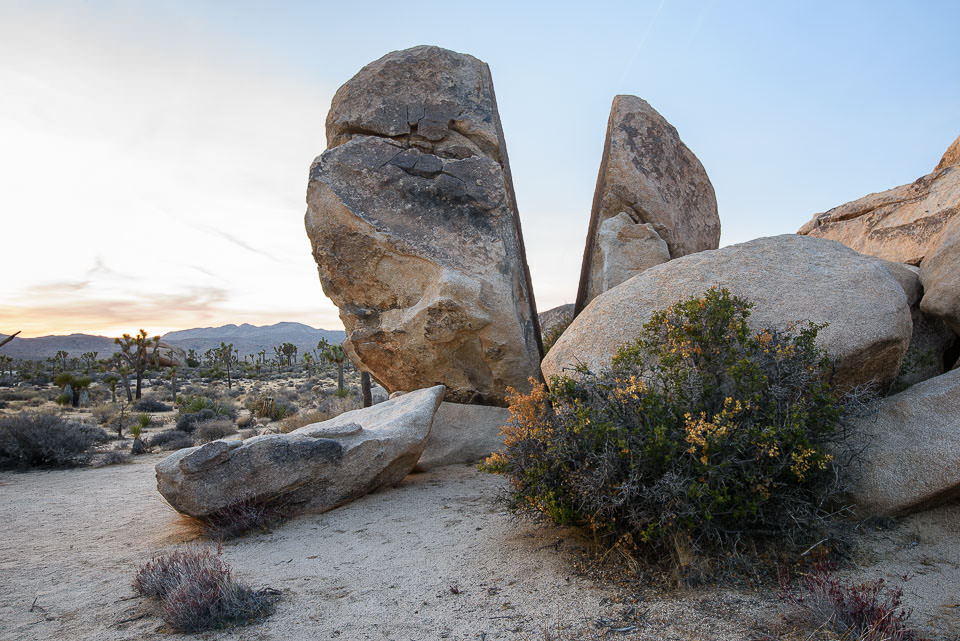
My solution was to include both plants on the opposite sides of the frame, while keeping the V in the center of the frame. This helped even more with the drawing of the imaginary triangle from the bottom corners of the frame to the center, where the V forms a reverse triangle:

To me, this looked like a better composition, because my primary subject was dominant, the secondary subject nicely balanced its left side without competing with the primary subject and all the other subjects were complete, nicely complementing the split rock and the foreground. However, I did end up sacrificing in some areas. Mainly, I was cutting into the sliced rock, which is something I wanted to avoid. Unfortunately, without moving up to a higher vantage point, there was no way around that. And if I did that, I would have cut into the “V” even more through the rock behind it anyway, potentially making it look worse. Lastly, I wanted to show an equal amount of the inner side of the sliced rock as in the compositions above. Unfortunately, that also turned out to be an impossible task – as soon as I moved a little to the left to adjust the perspective, I ran into the problem of chopping off a portion of the yucca on the bottom right.
Despite these sacrifices and compositional deficiencies, I decided to keep this particular framing. I wish things were situated a little differently, but when you deal with the nature, you have to often deal with such challenges. When photographing landscapes, I try leaving as little footprint as possible and for me, cutting down things and moving them around is not an option.
When discussing composition so far, I have used the word “balance” quite a bit. That’s because visual balance is an extremely important part of composition and it does not just apply to landscape photography – visual balance is something we should seek in every photograph. For this particular photograph, what represents balance? Let’s take a look:
NIKON D810 @ 24mm, ISO 100, 2.5 sec, f/11.0
- Choice of center composition, by placing the “V” shape that separates the two parts of the primary subject into the center of the frame, allows for division of the image into two equal parts, which creates visual balance.
- The alignment of the rock on the left bottom side of the frame, along with the framing of the foreground creaute another invisible triangle that leads the eye from the bottom sides of the frame into the center, adding to visual balance.
- The secondary subject, i.e. the large bush in front of the rocks helps counter-balance the left side of the frame both in terms of colors (yellow colors of the sky) and the left side of the sliced rock.
- The bush on the left bottom frame helps counter-balance the yucca on the right bottom frame.
However, things are not balanced perfectly. The image still feels a bit right-heavy, because of the large rocks on the right side of the frame. It would have been perfect if those rocks were not as overwhelming and if the rock on the bottom right side of the frame was not as long and pointy – I would have preferred not to cut it.
Still, given the circumstances, I believe I achieved the best possible balance in this shot.
6) The Capture Process
Once the hard work with identifying the subjects, setting up composition and framing were done, it was all about waiting for the good light to finally capture the image. That evening I was blessed with some beautiful colors in the sky, which allowed me to capture the beauty in its glory. However, shooting proved to be a rather difficult task. With the sun setting to the left side of the frame, I had a very difficult sky to work with – it was excessively bright on the left side of the frame. I excluded the option of using a graduated neutral density filter, because I would have ended up darkening the sliced rock and the bottom left side of the frame. My solution was to fire 3 bracketed shots 1 EV apart, with the left bracket exposing for the sky on the left side of the frame and the right bracket exposing for the shadows in the foreground. I figured I would either recover details using HDR in Lightroom, or manually blend the exposures in Photoshop.
In terms of camera settings, I used ISO 100 on my Nikon D810. I started out as ISO 64, but due to my use of bracketing and the cloud movements, I decided to keep my shutter speed a bit faster. I quickly calculated the hyper focal distance (which I did by estimating the distance to the nearest bush, then doubling that distance), set my focus on that area (which was approximately around the laying rock on the bottom left side of the frame), then stopped down the lens between f/8 and f/11 for best sharpness and maximum depth of field. Everything was set up on a stable travel tripod – I used my Gitzo Traveler with the RRS BH-25 head for the job.
7) Post-Processing
The last important element was obviously post-processing the image and making sure that I recover as much information as possible, particularly in the sky. Here is what one of the images looked like when I imported it into Lightroom:
The first step was to try out HDR and see how Lightroom manages it. I selected the three bracketed images, then picked Photo Merge -> HDR. At first, I thought that the HDR would not work, but Lightroom actually did a pretty decent job. Here are the sliders I adjusted after HDR was done:
- Exposure: +0.50
- Highlights: -90
- Shadows: +70
- Whites: +15
- Blacks: -15
- Clarity: +10
I also set Camera Calibration to “Camera Standard”.
Here is what the image looked like with the above adjustments:

Not bad! From there, I moved my editing into Adobe Photoshop and ran further tweaks:
- Adjusted contrast selectively in parts of the image and globally
- Used Google Nik’s Viveza and Color Efex to selectively boost colors
- Cleaned up some footprints and distractions in the foreground
- Applied selective noise reduction
- A little bit of dodging and burning on the split rock
Overall, it took me about 15-20 minutes to edit the image. Here is the before and after the changes in Photoshop:
I could have made similar changes in Lightroom, but it would have probably taken me more time, since spot healing and adjustment brushes are frustratingly slow to work with.
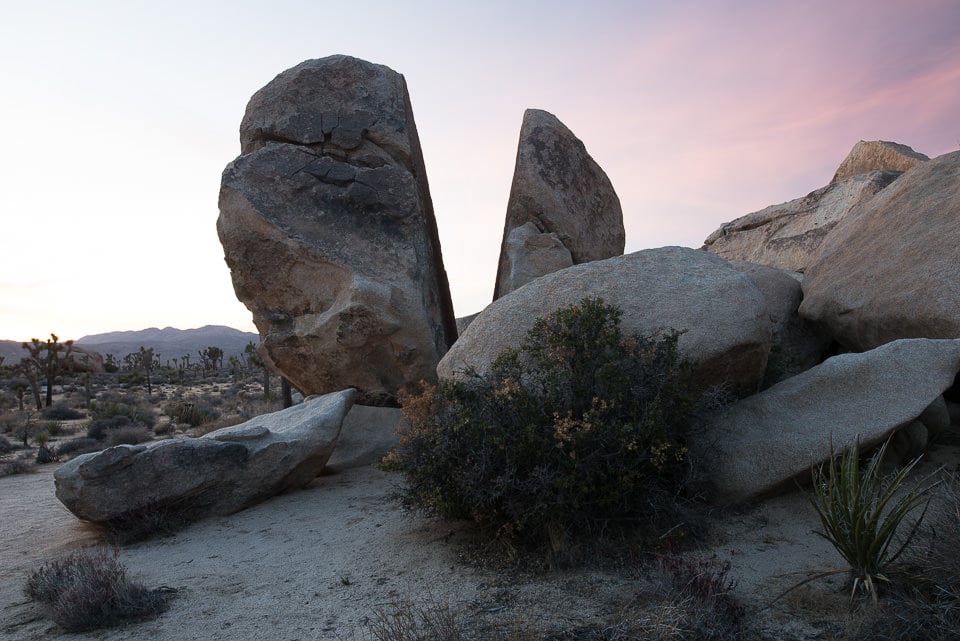
UPDATE: After my initial attempt at HDR, I decided to give another try for exposure blending in Photoshop. This one took me longer than the HDR version above, because I had to start with multiple layers (one with the shadows, one with the highlights), then use specific techniques like Luminosity Masking to blend the layers. I ran Google Nik’s Color Efect and Viveza on top of the adjustments to boost contrast and colors and came up with the following result:
NIKON D810 @ 24mm, ISO 100, 2.5 sec, f/11.0
I like this version much better, so I decided to keep it as the main image in this article instead. Here is the before and after exposure blending in Photoshop:

8) Dissect These Images
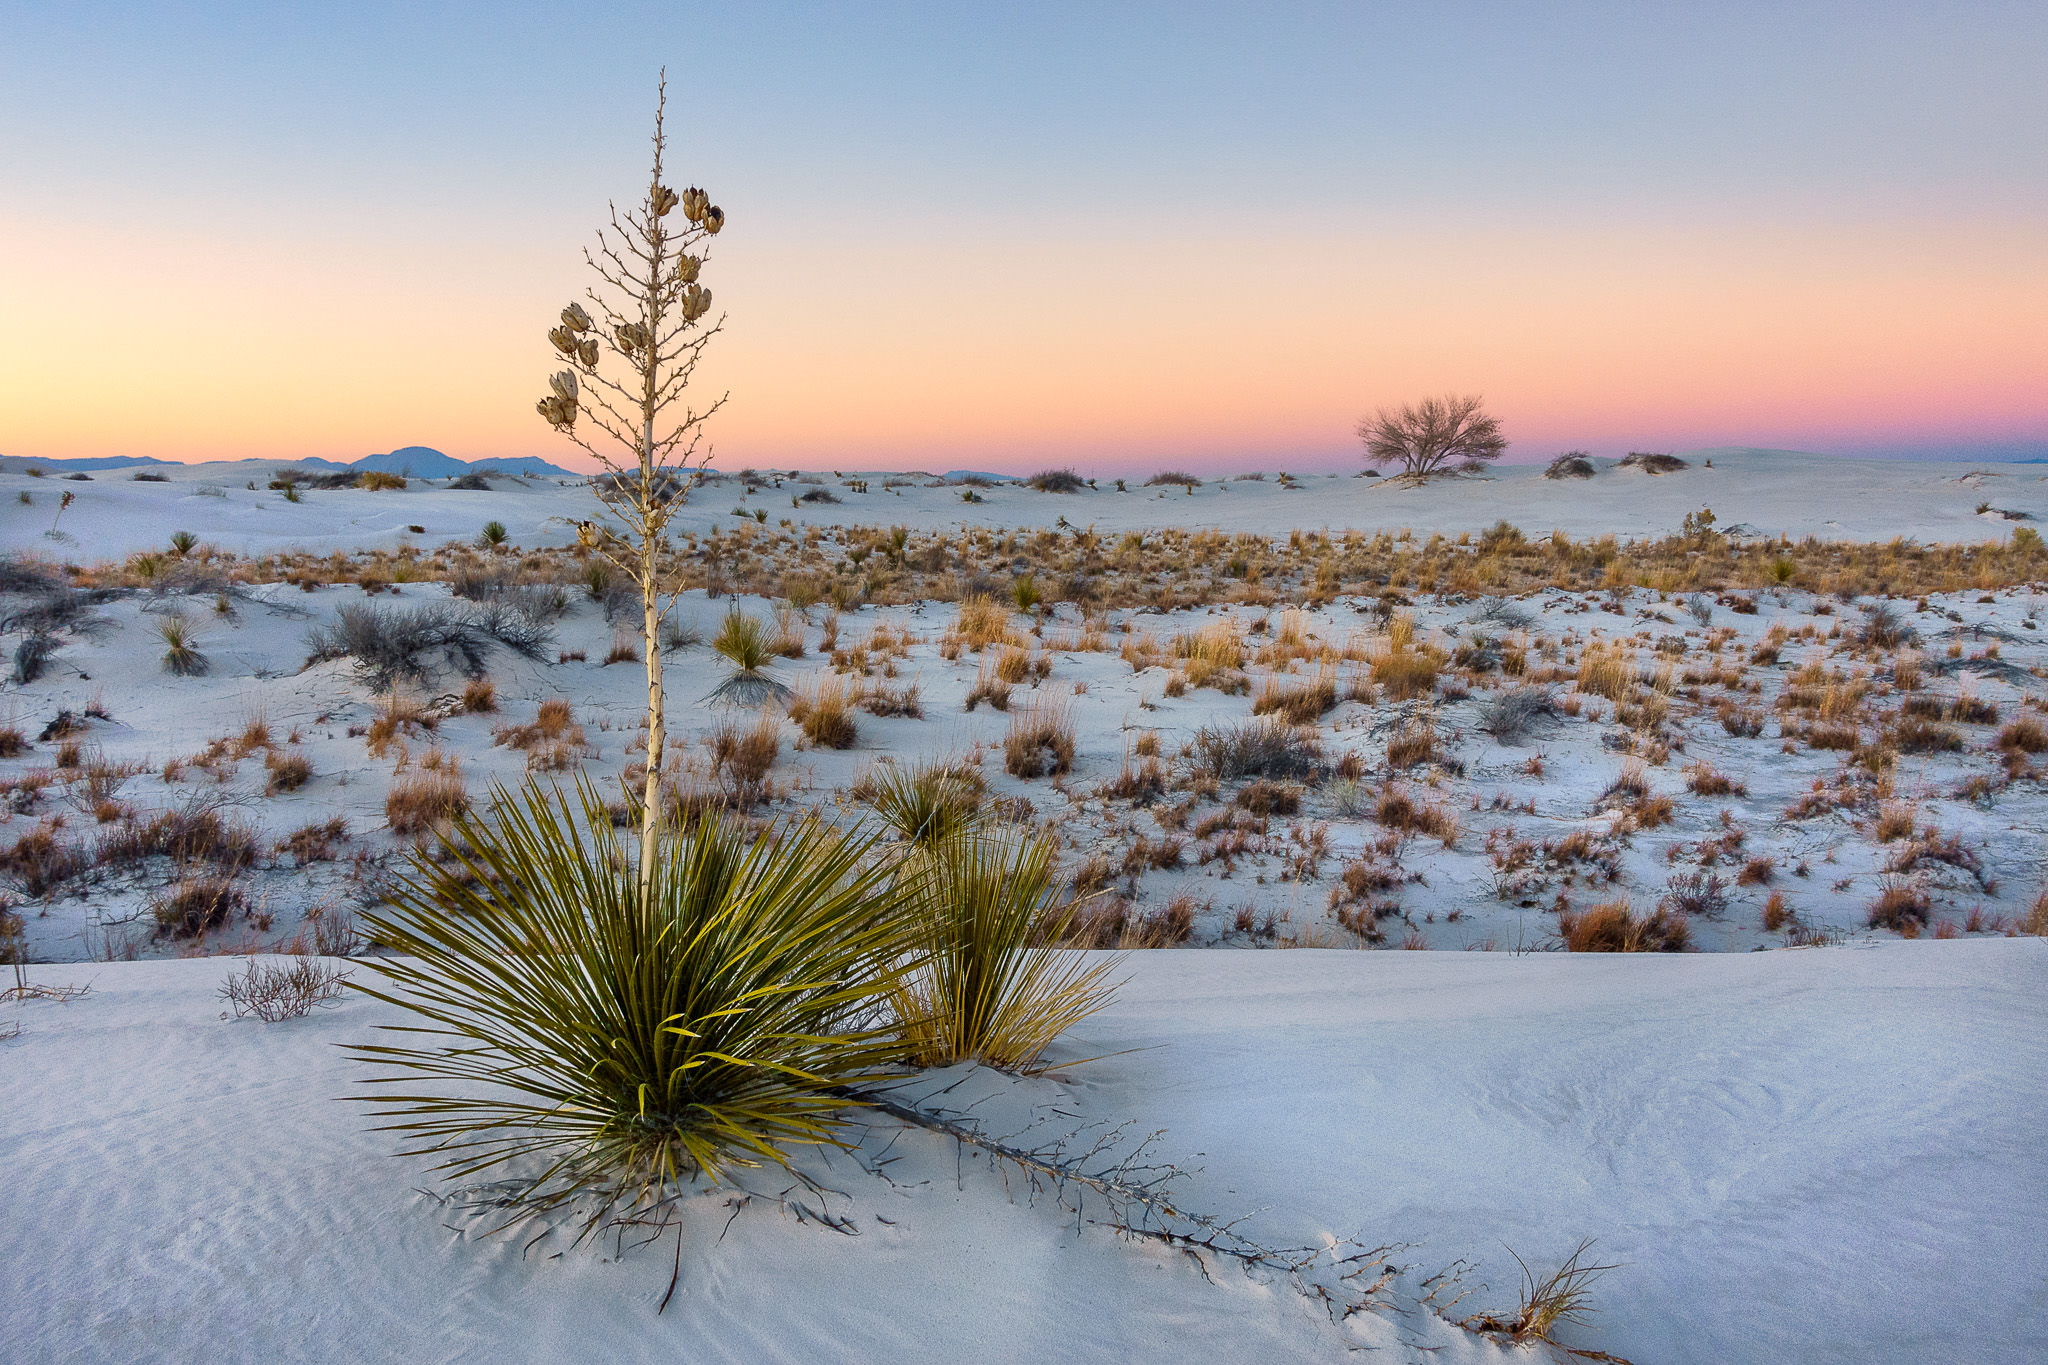
Now that I have gone through the process of dissecting the above image and explaining everything that went through my head in terms of subject, composition and framing, I would like to invite you, our dear readers, to dissect a couple of more images:
NIKON D750 + 24mm f/1.8 @ 24mm, ISO 100, 1/15, f/16.0
DSC-RX100M4 + 24-70mm F1.8-2.8 @ 10.15mm, ISO 200, 1/13, f/11.0
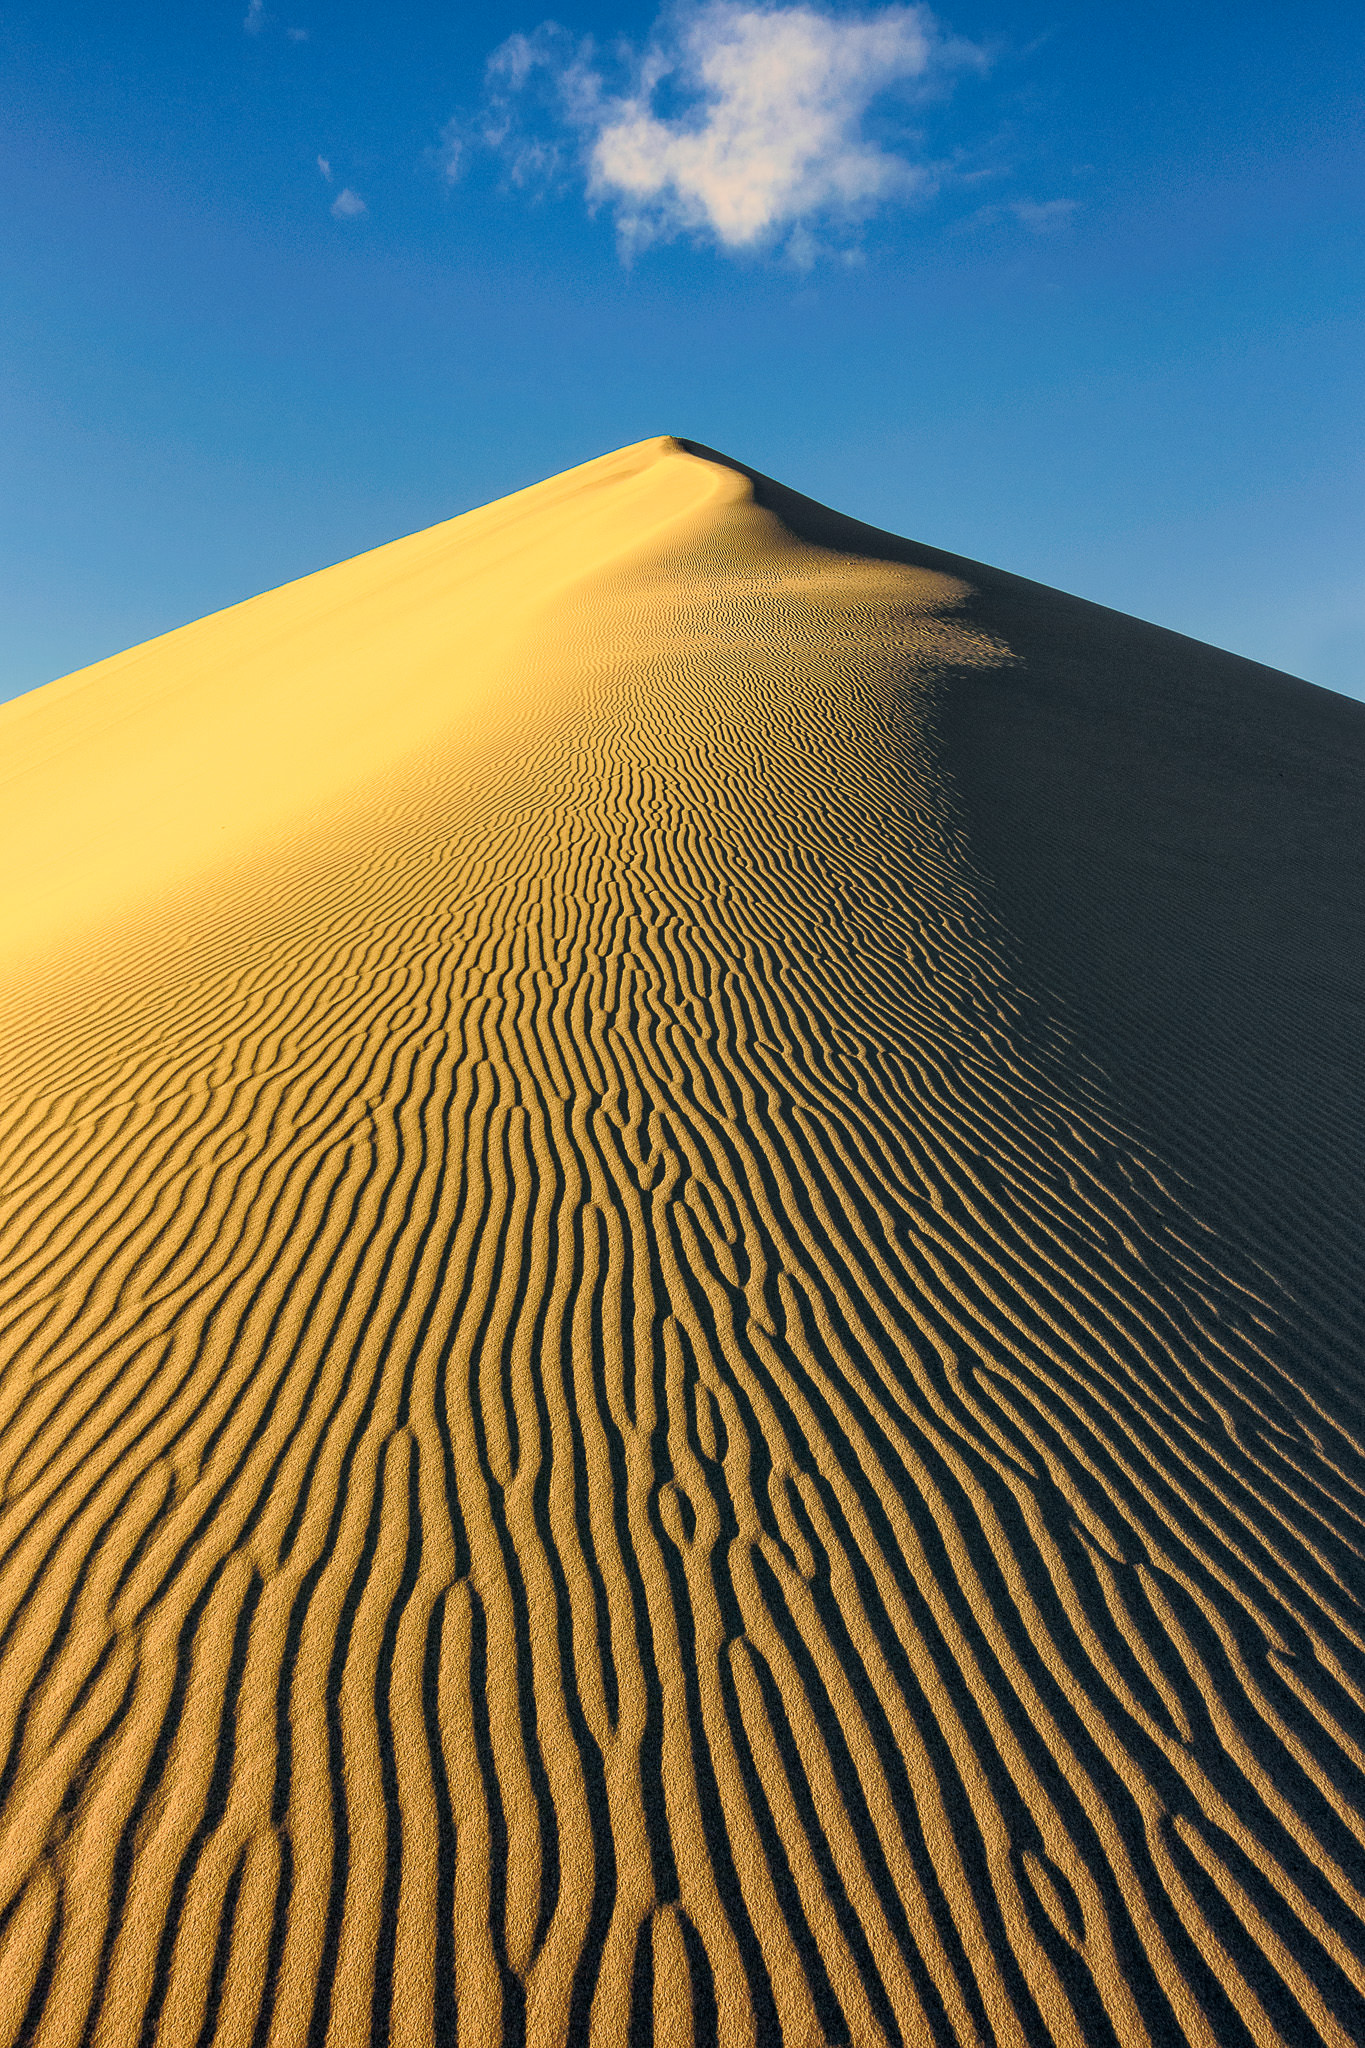
DSC-RX100M4 + 24-70mm F1.8-2.8 @ 8.8mm, ISO 125, 1/200, f/8.0
For each of the three images labeled Image #1, Image #2 and Image #3, do the following:
- Identify the primary, secondary (if any) and tertiary (if any) subjects, as well as the supporting elements (if any)
- Identify the type of composition used.
- Do the images balance? Identify the balancing elements, as well as potential elements that might be breaking the balance.
Have fun!
Very clear, nicely detailed, and full of practical tips. Best articles I have read especially on the elements of composition
I love the way you take us throughout the whole process, encountering problems and solving them.
I would love to see you do something similar on post processing where you would show how you spot and diagnose problems and then how you correct them.
Great work and a great website!
Thanks
Can you give me a more detailed instruction on how to fine the location of the split rock in your photo in Joshua tree NP? We will be there soon.
Hi Nasim,
I don’t often comment but just wanted to add my thanks to that of the others here. As an engineer I’m great at digesting the “technical craft” of photography, but I have to spend a lot more time working on the “creative art”. This article is a beautiful breakdown of how to select and balance a composition that I know will help my photography immeasurably.
Thanks for going to the effort to pull it together. There’s a lot of work in there, must have taken you ages!!
– Andrew
The best article on composition I have read in a long time, looking forward to your ebook.. :)
Excellent article. Your emphasis on scouting is extremely important, and often overlooked. This week I’ve been using maps to scout the places I want to scout!
I would suggest that this subject, and particularly the photos you use to illustrate it, depend on your purpose — that is, your target audience:
1. The pictures you took are the sort that do well with single image sales to a single, high paying customer, perhaps yourself. The large amounts of time required means you must sell at very high prices, or else “pay” the equivalent in your own time. When you have a day job you know exactly what this is; it’s losing vacation days you earned by hard work.
2. I expect the pictures in this article would do well with decorators who buy large quantities of art for placement in hotels and offices. The problem here is accumulating the very high volume this market requires.
3. “Editorial” (non-advertising) purchasers — magazines, books, textbooks and websites — want sun-drenched scenics with saturated colors, particularly reds. They also want people with faces showing, which means model releases. (The exception here is media aimed at photographers, such as Photography Life.)
For those interested in the last market you might want to run a series on shooting in bright sunlight and still getting compelling colors.
Very exciting reading, an adventure you take us on.
On composition: one thing I noticed immediately was the diagonal formed by the supporting rocks, from upper right to left below. As you never mentioned this I guess diagonals aren’t as important as I have learned (from books) in the past.
One other thing is that Camera Standard doesn’t work for me at all, it produces nasty blue and orange stripes at the border of light and dark on e.g. an arm of the model. When I choose Adobe standard all is well. I wonder why this is, maybe it is because D610 isn’t supported? Picture control is on STD.
Hans, diagonals also work great for composition, but in this particular case, there is only one diagonal, which does not bring much balance, as stated in the article. If there were more rocks to the left of the “V”, it would be a great example of two diagonals.
As for Camera Standard, that all depends on what you shoot and what you shoot with (Camera Standard works differently with each camera model). It does not work for me when shooting portraits, but for landscapes, it is a good place to start.
Because of this type of quality article, I come back to your PL again and again and do recommend to fellow friends on flickr/FB/Instagram
fantastic one !
Thank you for your feedback! Glad you enjoyed the article.
Very helpful!
Also these are great shots!
Thank you Zac, appreciate the feedback!
Beautiful photographs and very interesting and practical lessons to be taken away. Please let us know more details about the book that you and Spencer Cox are drafting when it becomes available. As always, thank you for the great work provided by you and your team.
You are most welcome Benji! We will post updates as we get closer to getting it published.
I really love this blog because or articles like this. I really enjoyed reading your thought process. We always love hearing others validate your own methodical process and you definitely gave me more confidence. Also, I believe I could learn alot about landscape photography from you. Here is why. I generally follow your process but I run into trouble often in one particular area and it’s detrimental to my results. It goes wrong for me often when deciding what elements to include, taking away from the overall impact of the image. It is all about balance for me and I know I could dramatically improve my landscape photography if I could further refine my decision making in this regard. It proves that no matter how long you do something (and you know you do it mostly well) there is more to learn. I do a much better job with portraits and wildlife, but have a great desire to improve my landscapes. Finally, I know improving in that area will improve my compositional skills in general.
I am interested in your upcoming course on landscape photography.
Sceptical, glad you’ve enjoyed the article, thank you for your thoughts and your feedback. As always, great to hear from you.