The Lightroom import dialog is one of the most essential components of the software, not just because that’s how one gets images into Lightroom, but also because with the proper use of the import dialog, it is possible to properly organize images and apply specific presets that can potentially save quite a bit of time when post-processing images. In this article, I will go over the import dialog and cover its settings to hopefully help our readers in understanding its use and advantages.
To bring up the import screen, you can either click on File->Import Photos, or press CTRL + SHIFT + I (CMD + SHIFT + I on Mac) on your keyboard. Once the import screen comes up, it will look like the following:
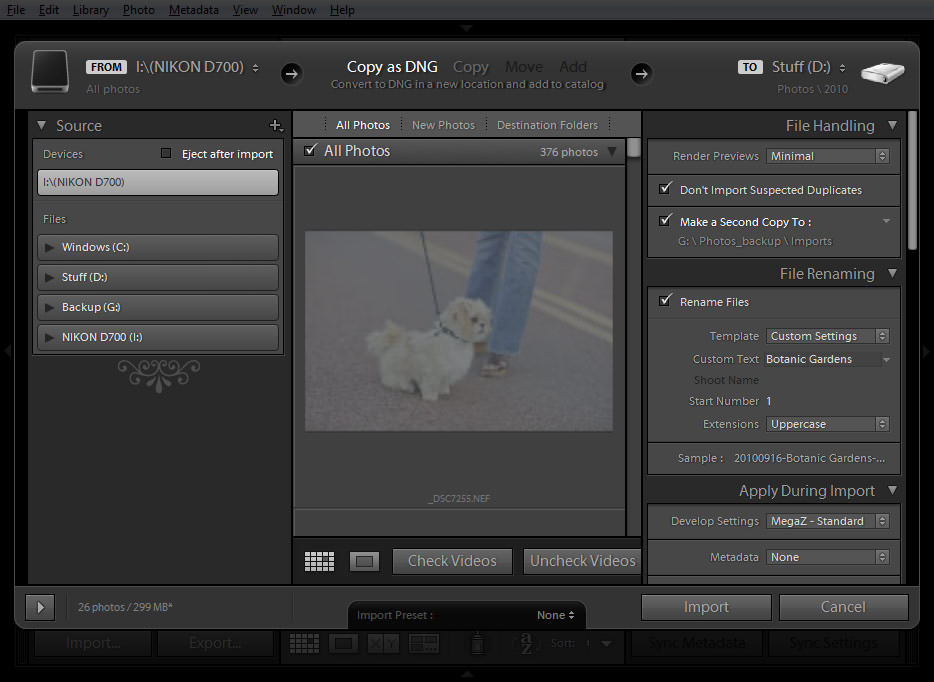
The top panel with “From” and “To” sections allow you to choose the source and destination of the photographs you will be importing. The entire import screen is organized very similarly to Lightroom itself, the left side being the location where you will be grabbing the files from, while the right side serves as the destination side, along with import settings. The middle section shows images to be imported. Lightroom is able to differentiate between permanent storage, your camera or card reader, and if you happen to plug in your camera or insert a memory card, the screen will refresh and show it under “Devices”.
The right menu consists of several sections: File Handling, File Renaming, Apply During Import and Destination. Let’s take a look at the first two sections – File Handling and File Renaming:
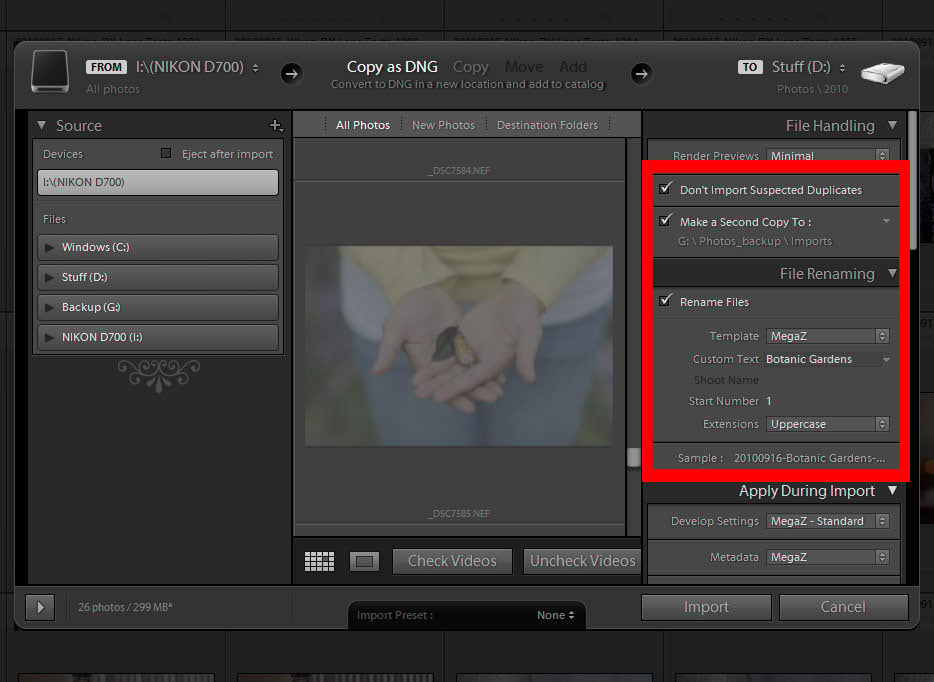
Table of Contents
File Handling Section
The File Handling section consists of three choices – “Render Previews”, “Don’t Import Suspected Duplicates” and “Make a Second Copy To”. Unless I need to work on images right away, I typically leave the render previews on “Minimal”, but always keep “Don’t Import Suspected Duplicates” checked to make sure that I don’t accidentally import the same images into my catalog. Although the “Make a Second Copy” field can be useful for making the exact copy of the memory card contents, I personally never have it checked. Since I use the import dialog to properly organize images and rename them on import, I do not want to duplicate unorganized memory card images in my storage. Ideally, you want to back up your images as part of your post-processing workflow anyway – and I prefer to do it after I am done organizing and editing images. It is important to note, however, that I do not format my memory cards after the first backup is complete.
File Renaming Section
The File Renaming section consists of variables that are used for renaming you files. I always rename my files to the following format: “YYYYMMDD-Custom Text-Sequence Number.EXT”. The first part is the file date, for example “20100916”, which stands for September 16, 2010. Then a dash is followed with a custom text that I type during each import, which is then followed by an incremented sequence number. I like renaming my photos, because I do not like to keep photo names like “DSC_1000.NEF” that mean nothing and get duplicated over time. By renaming the photos, I know that I could simply take all images from all folders and put them all into a single folder without running into duplicate file names. I highly recommend taking the same or a similar approach and uniquely identify every image you import.
If you have not already created a rename template, take a look at the following:
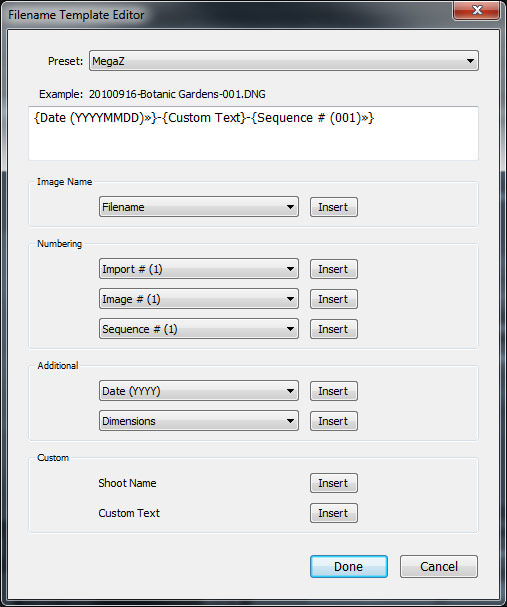
Create a similar template, then save it as a Preset and click “Done”. Then simply select your preset under the “Template” dropdown.
The next field under “File Renaming” is Custom Text – the text you can type to identify images. For this example, I used “Botanic Gardens” as custom text, which means that my first file will be named like “20100916-Botanic Gardens-001.DNG”. The “Start Number” field lets you type the first number that the system will use, so if you type “500”, your first file name will have a sequence number of 500 and all consecutive numbers will be incremented by one. This is very useful during multiple imports into the same folder structure – I simply look at the total number of photographs in my memory card and put the number in that field. I always leave the extension in Uppercase.
Apply During Import Section
This section is another important one, since it lets you choose an import preset with your Lightroom settings, write Metadata and Keywords into each image as it gets imported. I have already made some changes to the way I import files and being able to choose what you want before the import process starts is a great idea, because it saves tons of time for me during the image editing process. Once you make changes to an image and save the preset, it will immediately show up on this screen.
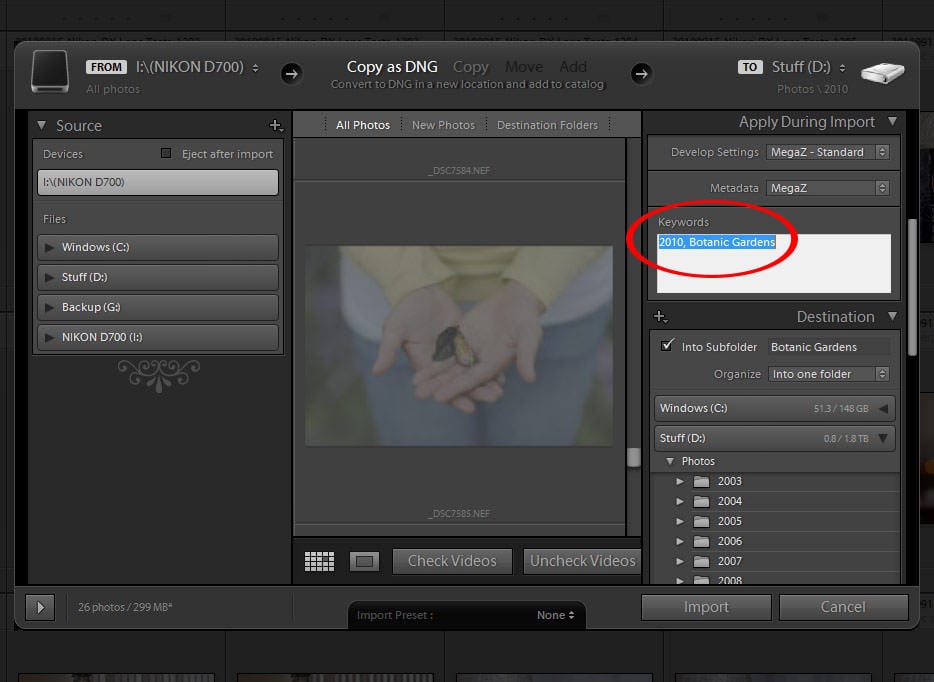
The next field is called “Metadata” and it is used for writing additional data into each imported file. For example, if I wanted to include my copyright text in every image (do not confuse this with a watermark), I would need to create a new Metadata preset and make some changes:
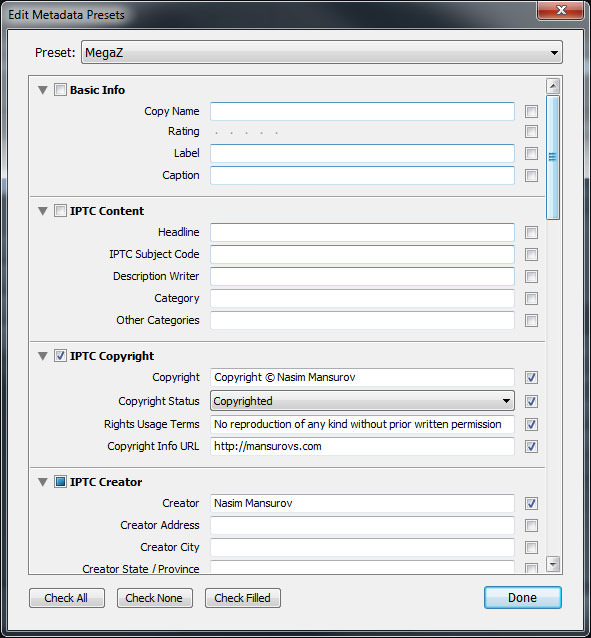
I wouldn’t waste time by filling out every single field and only pay closer attention to IPTC Copyright and IPTC Creator fields, where you can provide your name and contact information.
The last field is Keywords and I always type two keywords on every import – the year when the image was taken and the name of the event (for sorting purposes). For example, for the above example I used “2010, Botanic Gardens”, which adds these keywords to each file and Lightroom database.
Destination Section
The last section identifies the location of where the import process will store files. The first field is called “Into Subfolder”, which I always leave checked, since I do want Lightroom to create subfolders for me. The next field is a drop-down with two options: Organize by Date and Organize Into one Folder. If you select “Organize by Date”, you will get an additional field called “Date Format”, where you can specify the format of the subfolders that will be created by Lightroom. Since I already have a folder for each year and my file names already contain the full date, I do not feel the need to create subfolders for year, month and day. Instead, I like to keep everything simple and organized, instead of having many different subfolders in the system. Therefore, I always choose “Organize Into one Folder” and then type the name of the subfolder:
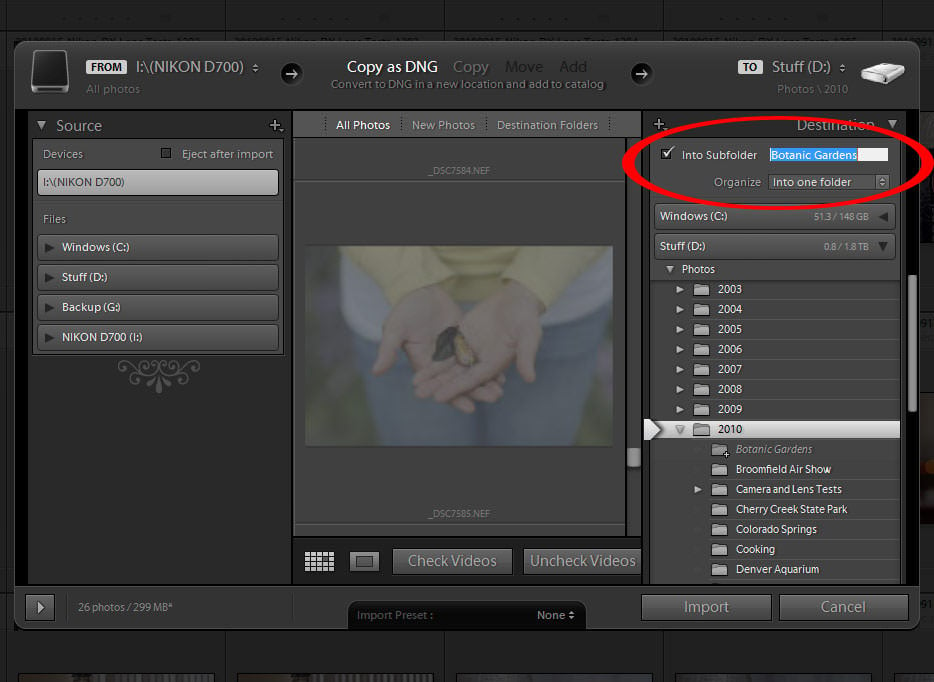
Since I store all of my images in a master folder called “Photos” and then subfolders by year, I simply select the year under “Photos”, as shown below:
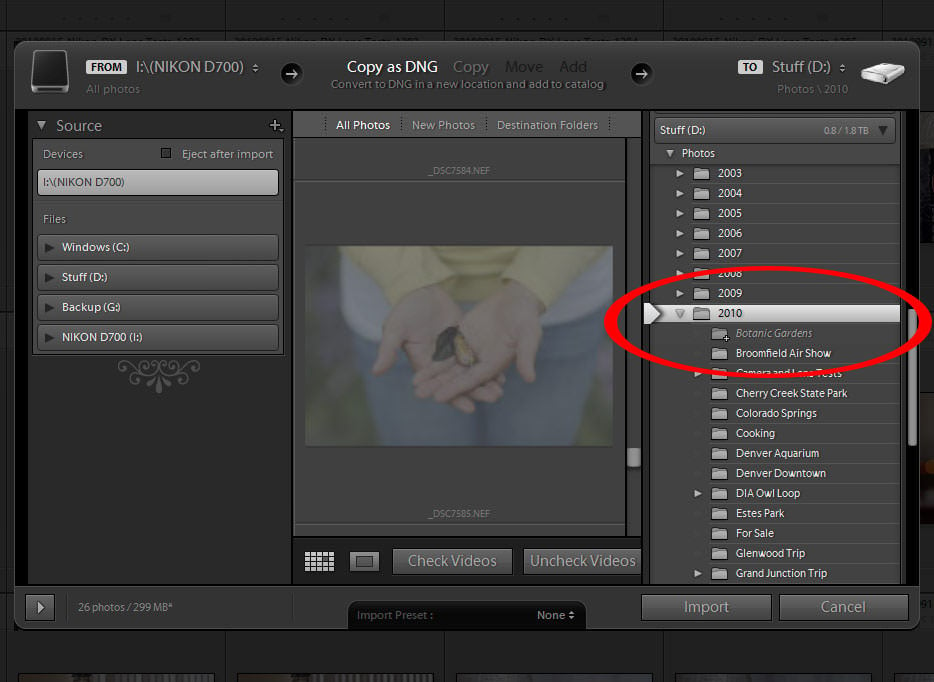
As you can see, the system is set to create a folder under “D:\Photos2010” called “Botanic Gardens”, where I store all images related to Botanic Gardens. If I pay another visit to Botanic Gardens, I will choose the same folder and the system will create files with a different date, so I won’t ever run into any problems with duplicate file names.
Once you choose the destination folder, simply click the “Import” button to start importing your images! As for sorting selected images, I always sort by “Capture Time”.
Hello, I purchased LR4 several years back but never used it. Now I am trying to learn it but when I import photos I lose my file number (image number) ……it just says untitled. I have searched and searched on the internet for a solution and everywhere I look it tells me it is an easy fix…..to just go into the “file renaming tab” on the right side of my import dialog box. However there is no tab named that there. There are only 2 tabs…….”file handling” and “apply during import”. Do you have any suggestions to help me?? Thank you!
Hi Nasim,
Thanx for the wonderful article & i tried it today as i’m brand new to lightroom. I was trying to import my old fotos. While trying to do so i noticed that lightroom is recognizing NEF files & not the jpg files as i’ve shooting RAW & JPG together.
Can you please tell me why is it so & how to rectify it?
Nasim,
Great article. I currently use Capture NX2 to edit my NEF files. It seems as though you use Lightroom and Photoshop. What’s your insight to Capture NX2? Can NEF files be edited in Lightroom?
Thanks,
Derrick
Nasim, Is it possible to specify the default sharpness to 50 instead of 25?
Hi Nasim,
Another great article! I have a question for you however, as I am new to Lightroom. I got LIghtroom 1 from a photographer friend, and ended up importing improperly, hitting pause and everything got all screwed up. Ended up with OS crashes, reinstall of OS, and a solid staet systems drive along with my SATAs (1 Tb ea, and one for default). ANyway I upgraded to LIghtroom 3, now 3.4…etc without ever leraning how to use LIghtroom 1. Is there anything I need to know or anyplace I shold go or books you can recommend before I start to reload my photo banks fro all pcs into LIghtroom 3? I don’t want to make anothe rmistake and I know nothign about it; all tutorials and articles on the web haven;t gone into the very basics that I need.
I reinstalled Adobe PCS2 but some of teh softwraew is so old it doesn;t run, have never even used that but am reading up and planning to. Do not have toe money to upgrade it and don;t know f CS2 is any good anymore as supost it gone etc. Maybe will jsut use Lightroom. I use Picasa now but it is not suficient as I want to become more porfessional. I have many different softwraews on my pcs that I;ve not tried yet. I’m chronically ill and do not have alot of time that is needed for manay of these tihngs, bbut I am trying. I need to find the best web sitse host, and one that is economical and can help with buildign of it if you know of one? I use Yahoo Sm Bus Sites for my avian site and it never got finished as it is not my forte.
Its ther for years and I pay for it ea year although financially devastaed. I need someplace to host both sites. I also need to have a site where I can sell, but it must be low prices. (I know., but this is the rality of it) Thanks so much for your help to us all!! Bless you all. Cher PS I don’t even know what the DNG file you spoke of is. I have no money for school (My hands were cripped in pain for ten yrs during which I could nto hold my camerass; I am better in that single respect so want to pursue as much as possible)
Hello Nasim,
Thanks for the concise article, direct is best for these processes. As a recent transplant to Lightroom3 (and happier all the time) I have heard speak of Lightroom ‘stripping’ metadata from image files, but quite frankly haven’t understood why or how. Is setting up a broad metadata template for use at import a sure way to avoid this ‘stripping’? I do write copyright info to each file at capture etc. on my D3, thus the concern…
Thanks for your insight!
Lincoln Phillips
Lincoln, the stripping of metadata occurs when you have “Minimize Embedded Metadata” checked during the export process (see my “How to remove EXIF Data in Lightroom” article). Lightroom will remove all EXIF data, including copyright. If you want to retain just the copyright and remove everything else, you will have to play with external tools as shown in the article to only leave what you need.
Thanks…..I learnt a lot from this post….. I always use the default options in the lightroom during import and never went deep into the options.. :)
You are most welcome!
Agree. very informative
Yeah, I didn’t want to split my stuff, and that’s just going to be a temporary situation. I have a new drive coming in and I’ll consolidate everything then.
I’m also paranoid enough to back up all my images to two separate external drives.
Matt, I see! I’m getting dangerously close to 2 TB now…will soon need to split up photos. Planning to split up by year.
Tim,
I just split my stuff across two drives. It was as simple as could be. When I restarted Lightroom it couldn’t find some of the images at their old location. I just pointed to the new location and that was it.
Matt, yes, Lightroom makes it easy to move files! I do not like the idea of splitting files across drives though…I would much rather store everything in one volume and backup to another external drive instead. If you have more than 2 TB of photos, then I would archive the older ones and only use the images from 2010. I doubt photographers shoot more than 2 TB in one year :)
Nasim, another solid and very useful article. As photographers we sometimes overlook such important steps so thank you for providing the details.
I do want to run something by you. My local HDD on my system is getting pretty full so I am thinking about moving all my lightroom photos and catalogs to a new drive. I currently store everything on my internal drive and do my backup to two different external drives. Any tips or thoughts before I move all my photos and catalogs? My plan is to move the entire directory structure to the new drive and then change the preferences in Lightroom 3. Let me know what you think. I post it here because I assume other photographers will likely run into the same issue at some point.
Thanks,
Tim
Tim, thank you!
I’m assuming your new drive is another internal one? Moving the files should be very simple and straightforward. Instead of moving the files, I would highly recommend to copy them to your other drive first, then rename your old folder to a different folder name and relaunch Lightroom. You will then need to simply right click on the main folder and click “Locate Folder” and point it to the new drive.
Everything should work as expected and once you make sure that all photos are in fact copied and good to go, then backup and delete your old folder from the previous location.
Let me know how it works out!