As photographers we all do our best to really think about the composition of our images and construct them to achieve a sense of balance. When we do this well we are able to control eye flow and create a pleasant viewing experience for people looking at our photographs. To accomplish that we often use the Rule of Thirds in our compositions. Obviously this is much easier to utilize when photographing static subjects such as landscapes and much more difficult to achieve when our subjects are moving.

Birds-in-flight can pose an interesting challenge. Some images of birds with their wings in standard flying positions are pretty straightforward in terms of deciding how we want to crop them. If we have a bit of luck we may be able to capture the odd one so that it doesn’t even need to be cropped.
Many image subjects end up in centre frame, with a bit of ‘head room’ to create a sense of motion and to accentuate the direction in which the bird is flying. It is the details in the image that draw our viewers in and hold them.
Cropping decisions can become more artistic in nature when we are dealing with images of birds-in-flight in which usual or dramatic wing positions are present. These types of images tend to project more emotion and often a feeling of anticipation of where the bird is heading or what it is going to do. These factors can make cropping decisions more difficult, especially when our favourite captures may not have the subject in the best position in the frame.
Lately I’ve been using the Rule of Thirds a lot more as a tool to help me with these cropping decisions and I thought some readers may find this topic of interest. I have a series of five images to share. These were all taken with my Nikon 1 V2 and Nikon 1 CX 70-300 f/4.5-5.6 on a very dull, overcast day so I apologize in advance for the quality of the images (especially the out-of-camera jpegs). Many amateur bird photographers, like me, do shoot in less-than-optimal conditions so if nothing else these images are likely representative of the files with which many of us have to work.
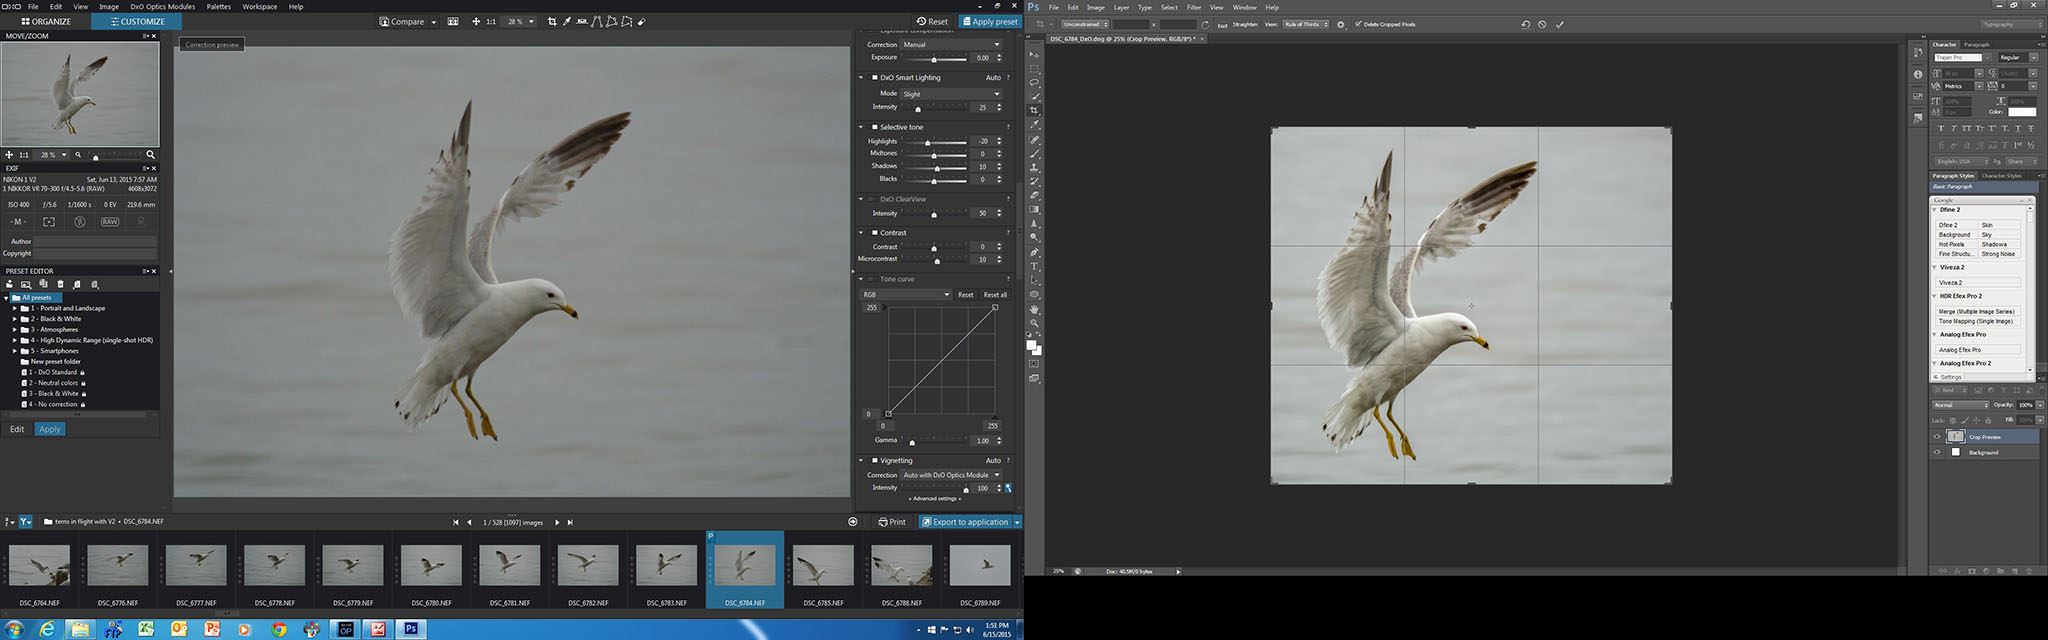
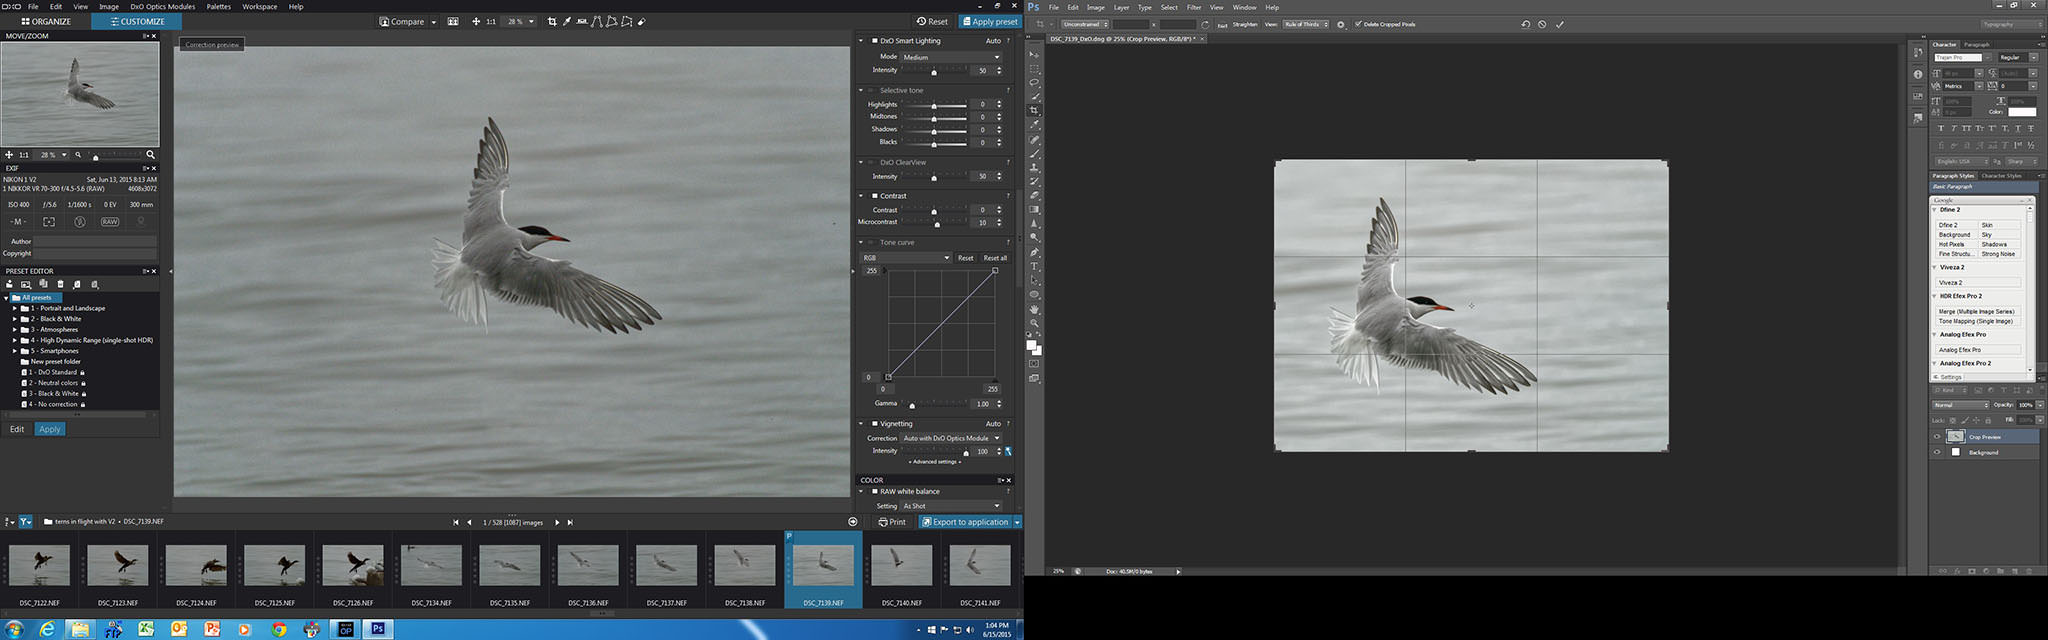
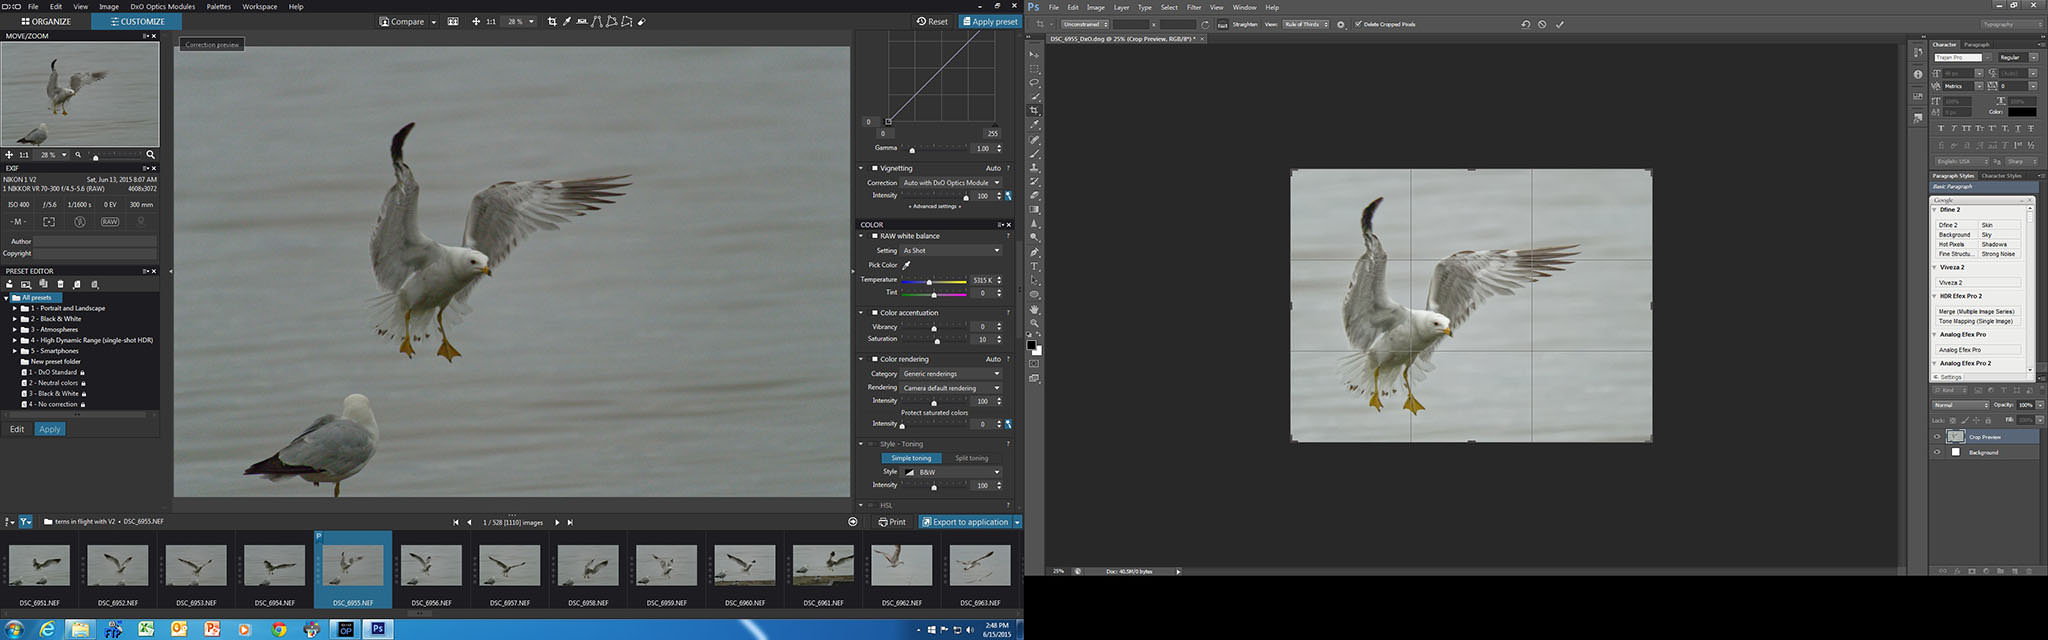
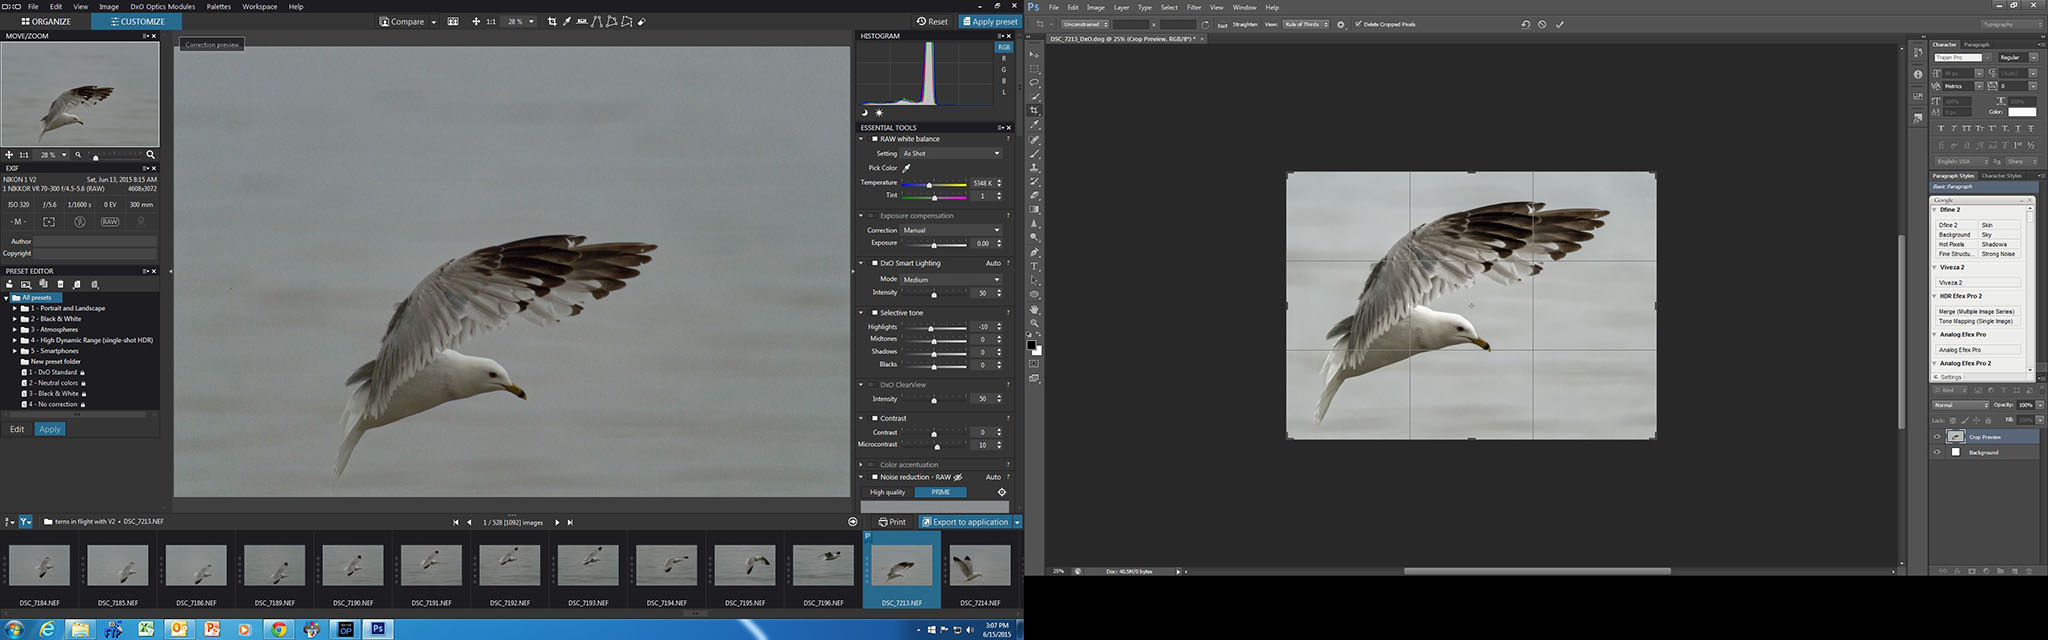
With each image set we’ll first look at an out-of-camera jpeg. Then we’ll look at a screen capture showing the original RAW file opened up in OpticsPro 10 on the left hand side. On the right side you’ll see the image after adjustments have been made to it in CS6 and a Rule of Thirds cropping grid applied. The final photograph in each set will be a completed, cropped image.
Since photography is subjective by nature you may, or may not, like the images in the article. And, you may not agree with my cropping rationale. If this is the case I ask that we keep our focus on the intent of the article which is simply to demonstrate how the Rule of Thirds can be used as a cropping tool.

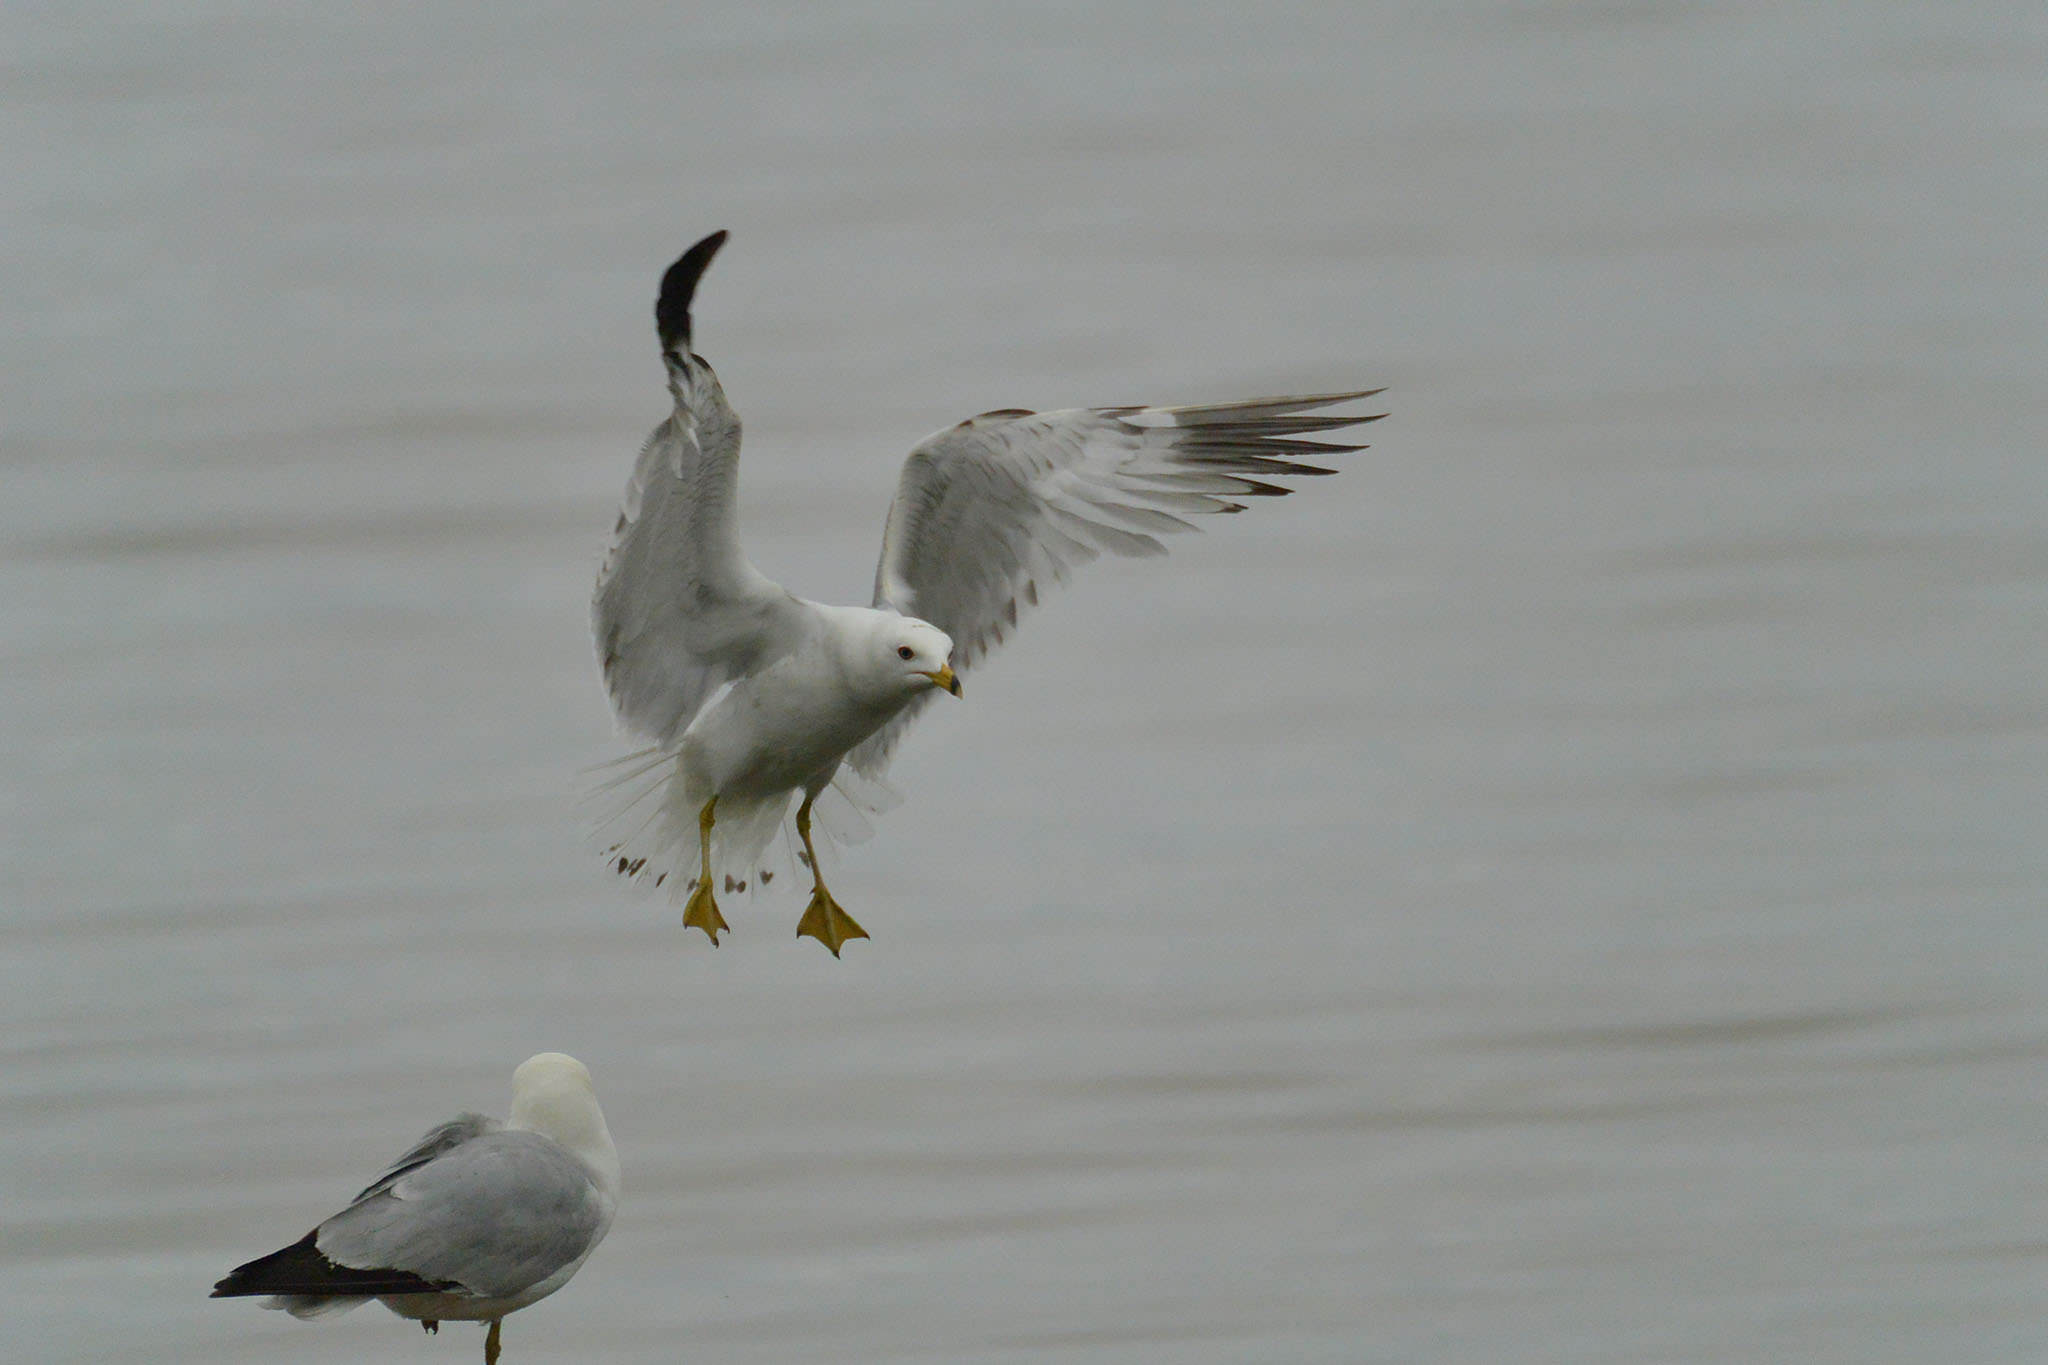
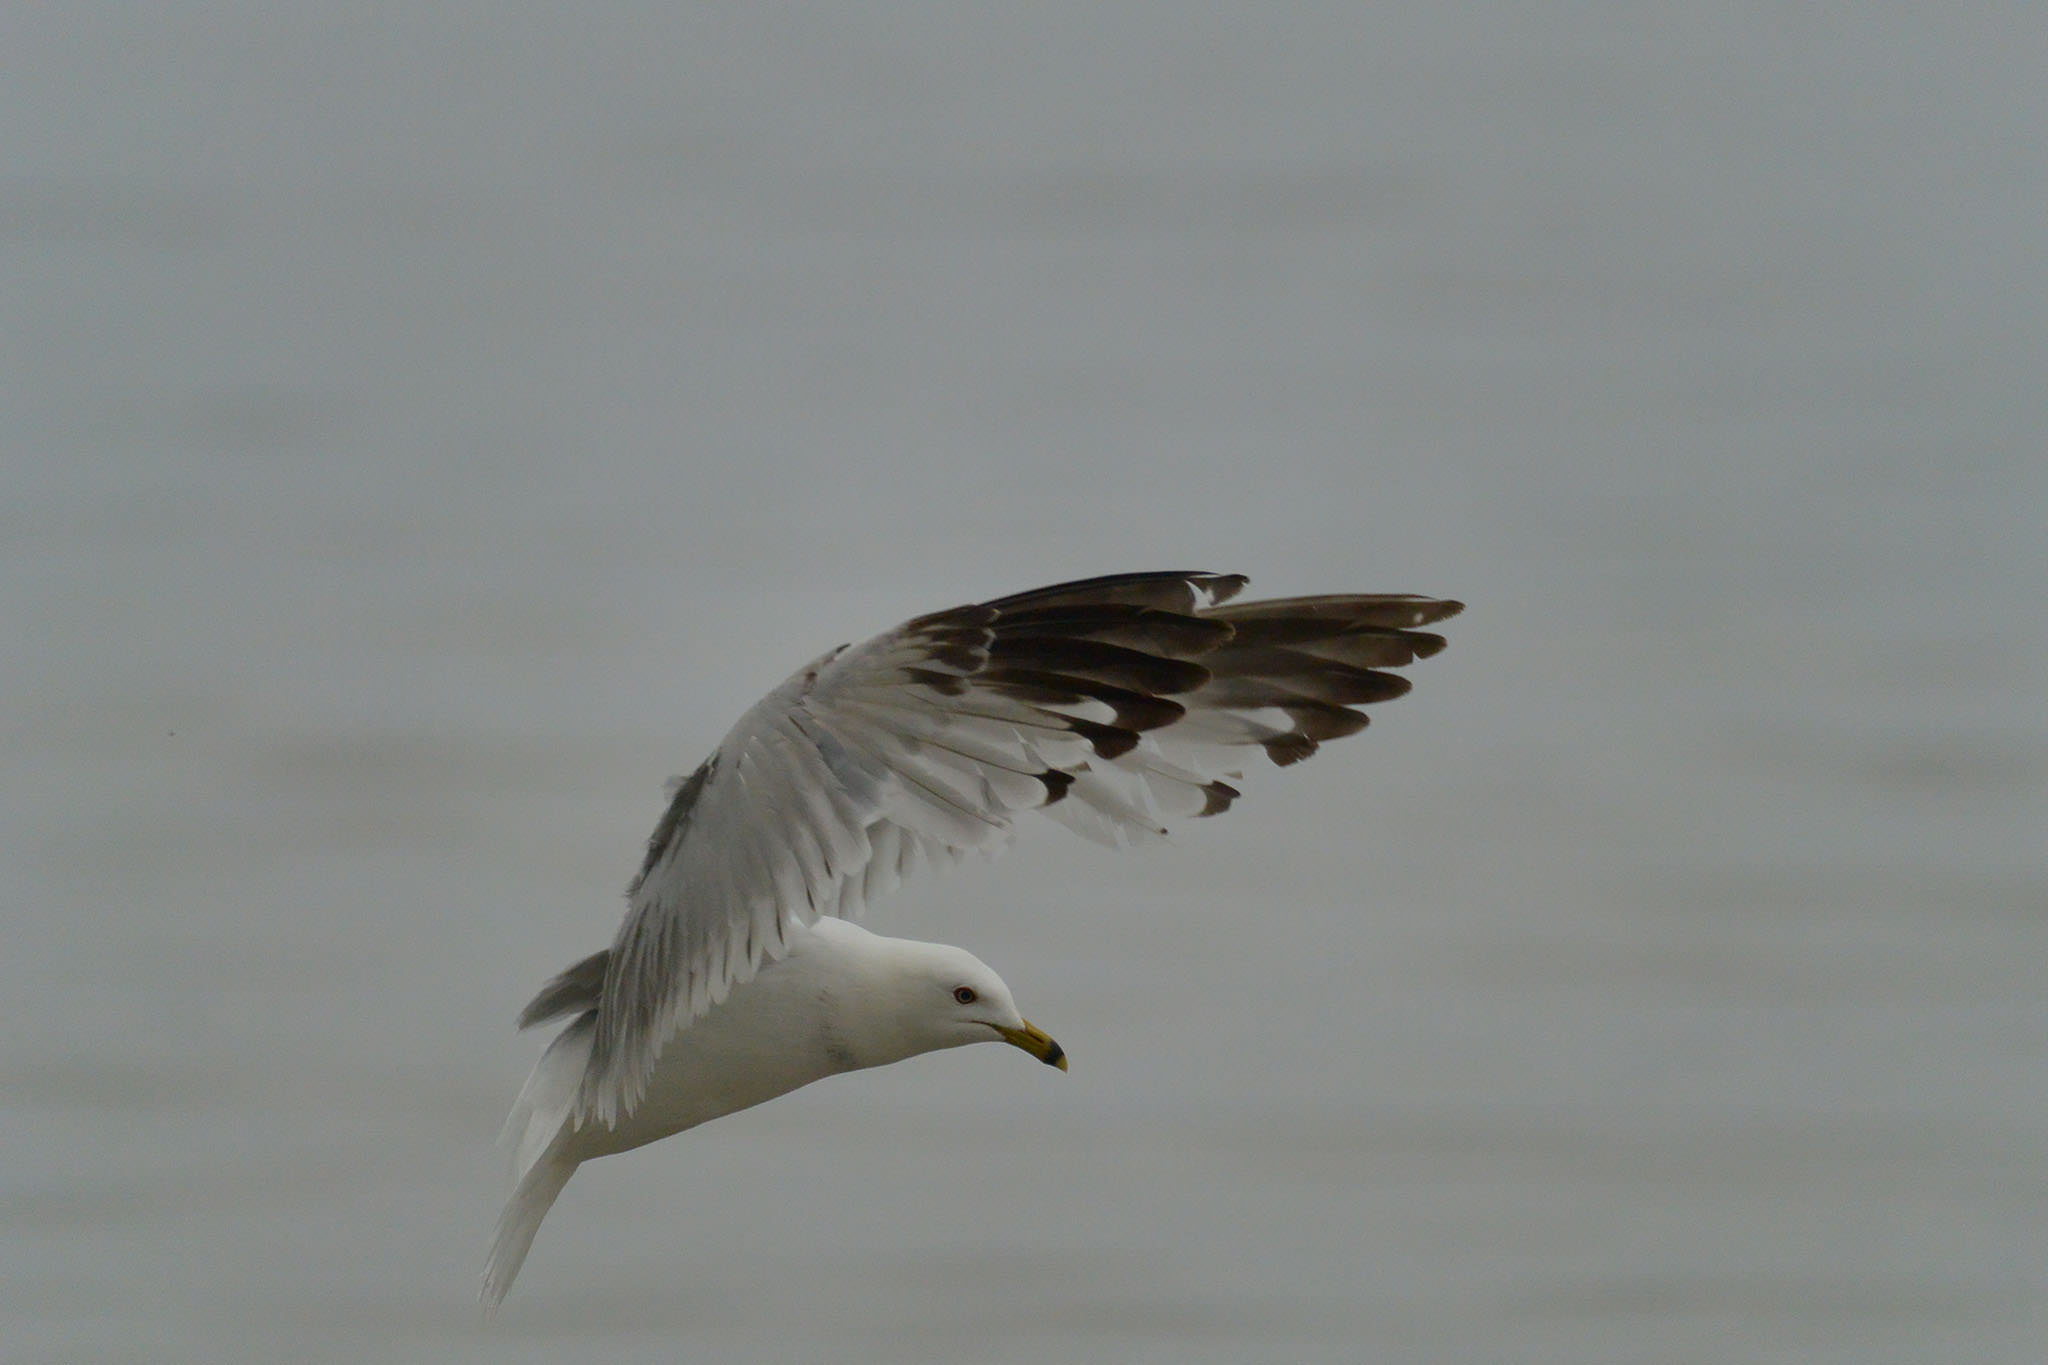
The photo above is very typical of what we often have to work with, i.e. a bird in the process of landing with its wings in a decent position. We often capture these in centre frame, as part of an AF-C run.
As you can see in the screen capture above, the challenge with this type of image is to try to give it some sense of anticipation about what will happen next. In this regard the background on the left hand side of the image is ‘dead space’ which is not adding anything to the image.
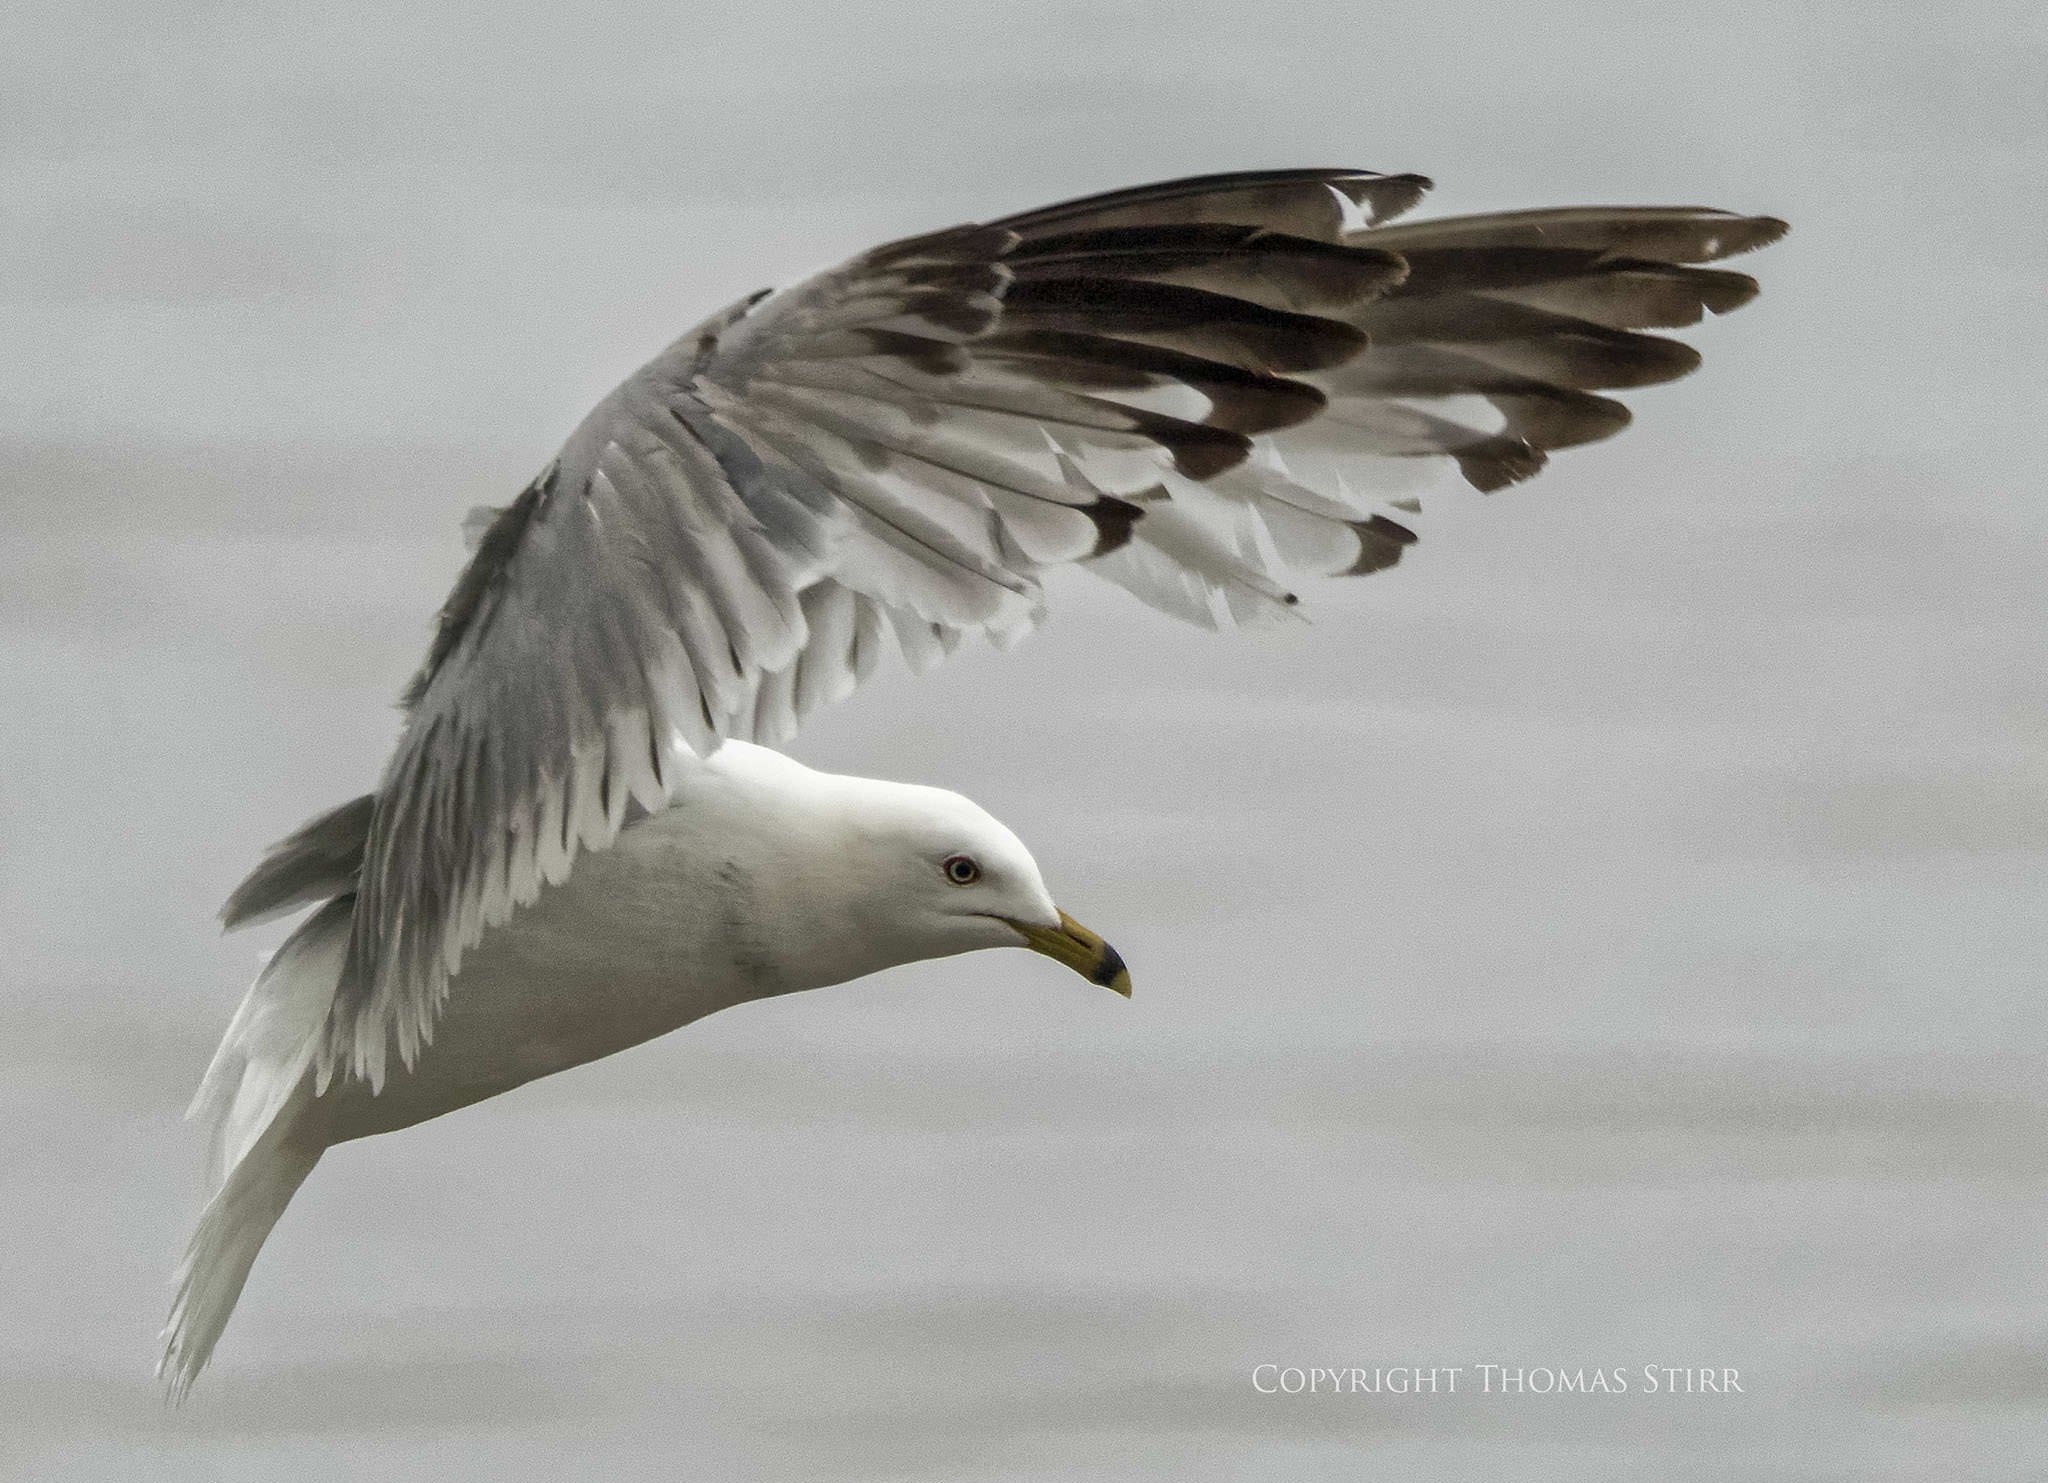
Looking at the right hand side of the screen capture we can see how I pulled the left border and the top and bottom in tighter, trying to make them equidistant to the bird to form a nice framing around it. Using the Rule of Thirds grid, I had the bird’s left wing touch one cropping line, and its left foot intersect another one. This allowed 1/3 of the right hand side of the image to stay open giving the image some balance. It also allowed the bird’s gaze and beak to be directed at the bottom right-hand corner to help direct potential viewers in terms of where the bird is headed. This forms a subtle ‘corner exit’ for the image.
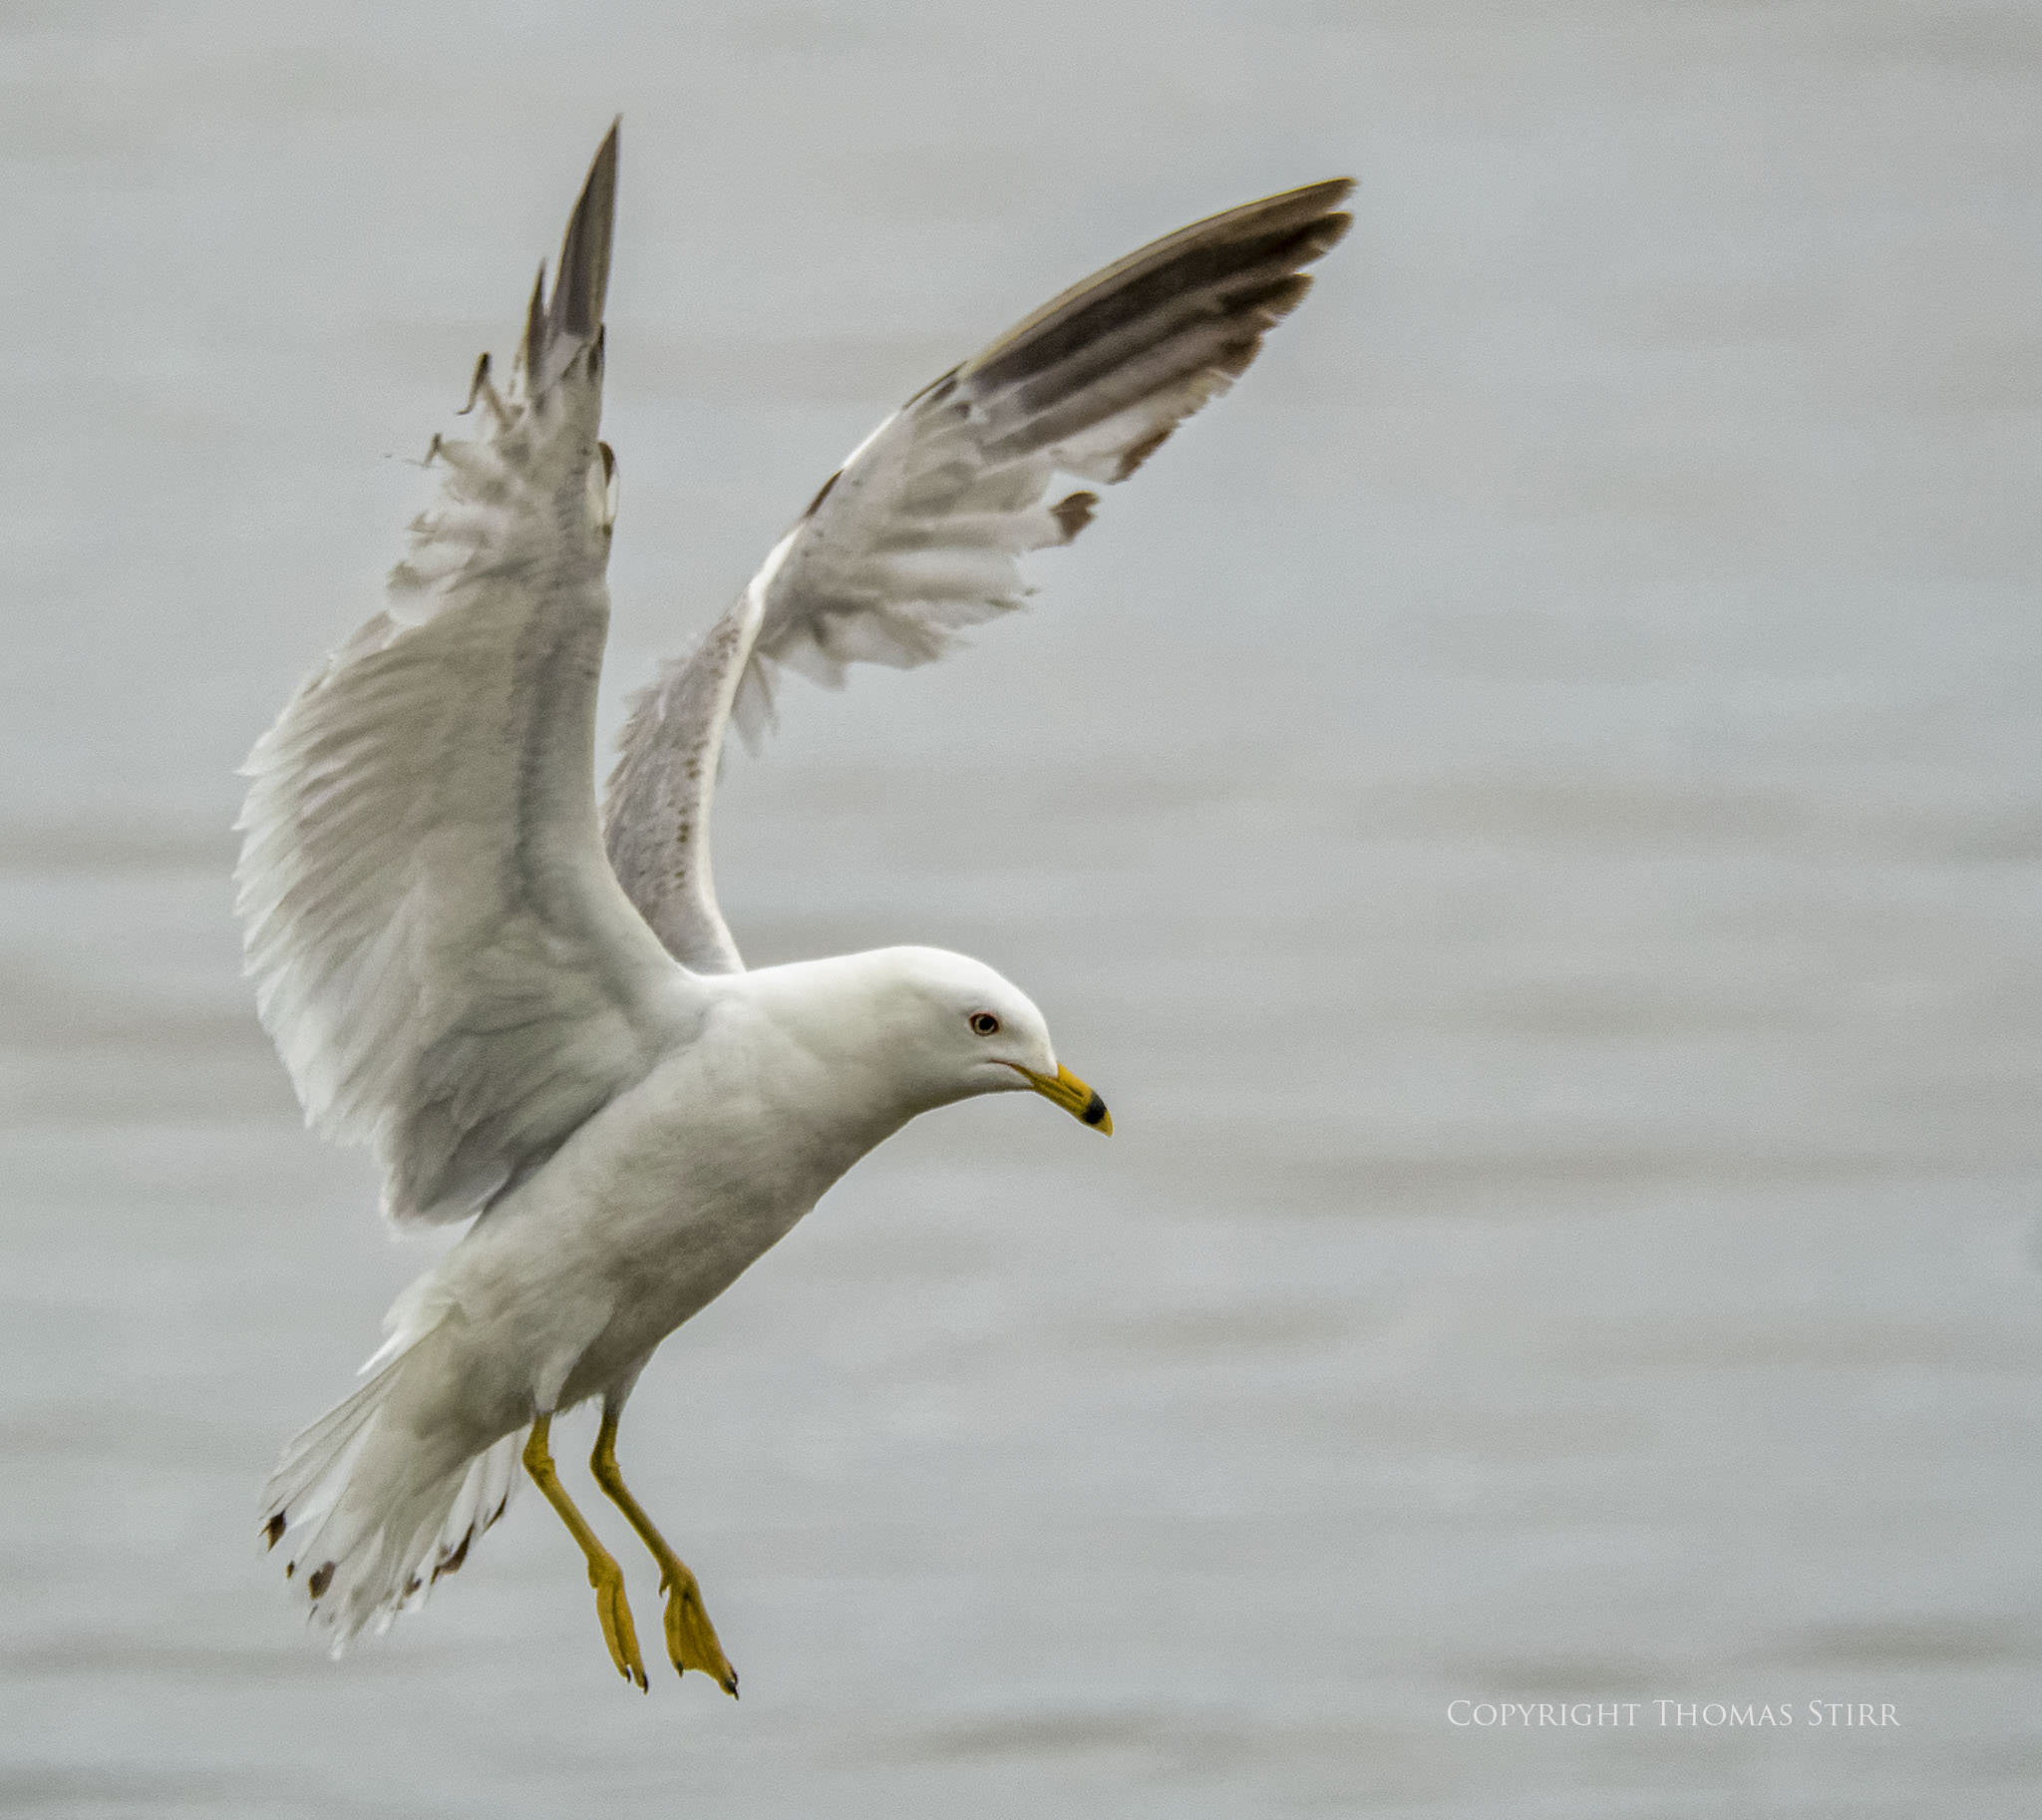
If you look carefully at the completed image above and compare it with the original jpeg you’ll notice that I used the dodging tool in CS6 to improve the definition of the bird’s eye. This isn’t always possible, but when it is I take the time to make this finicky adjustment. I also used the hue adjustment in CS6 to add a bit more yellow saturation.
The image above is another very typical capture. This time the bird is higher up in the frame and the image has very strong left to right flow. There is a stronger feeling of movement with this image than with the first one we examined and we need to consider this when deciding on our final crop.
Looking at the right hand side of the screen capture we can see that I created equidistant framing on the left side, top and bottom of the image. Since the bird was in flight and moving faster in the image I left more open area on the right hand side of the image to accentuate this feeling. The bird’s right wing tip just touches a Rule of Thirds grid line to help ensure image balance.
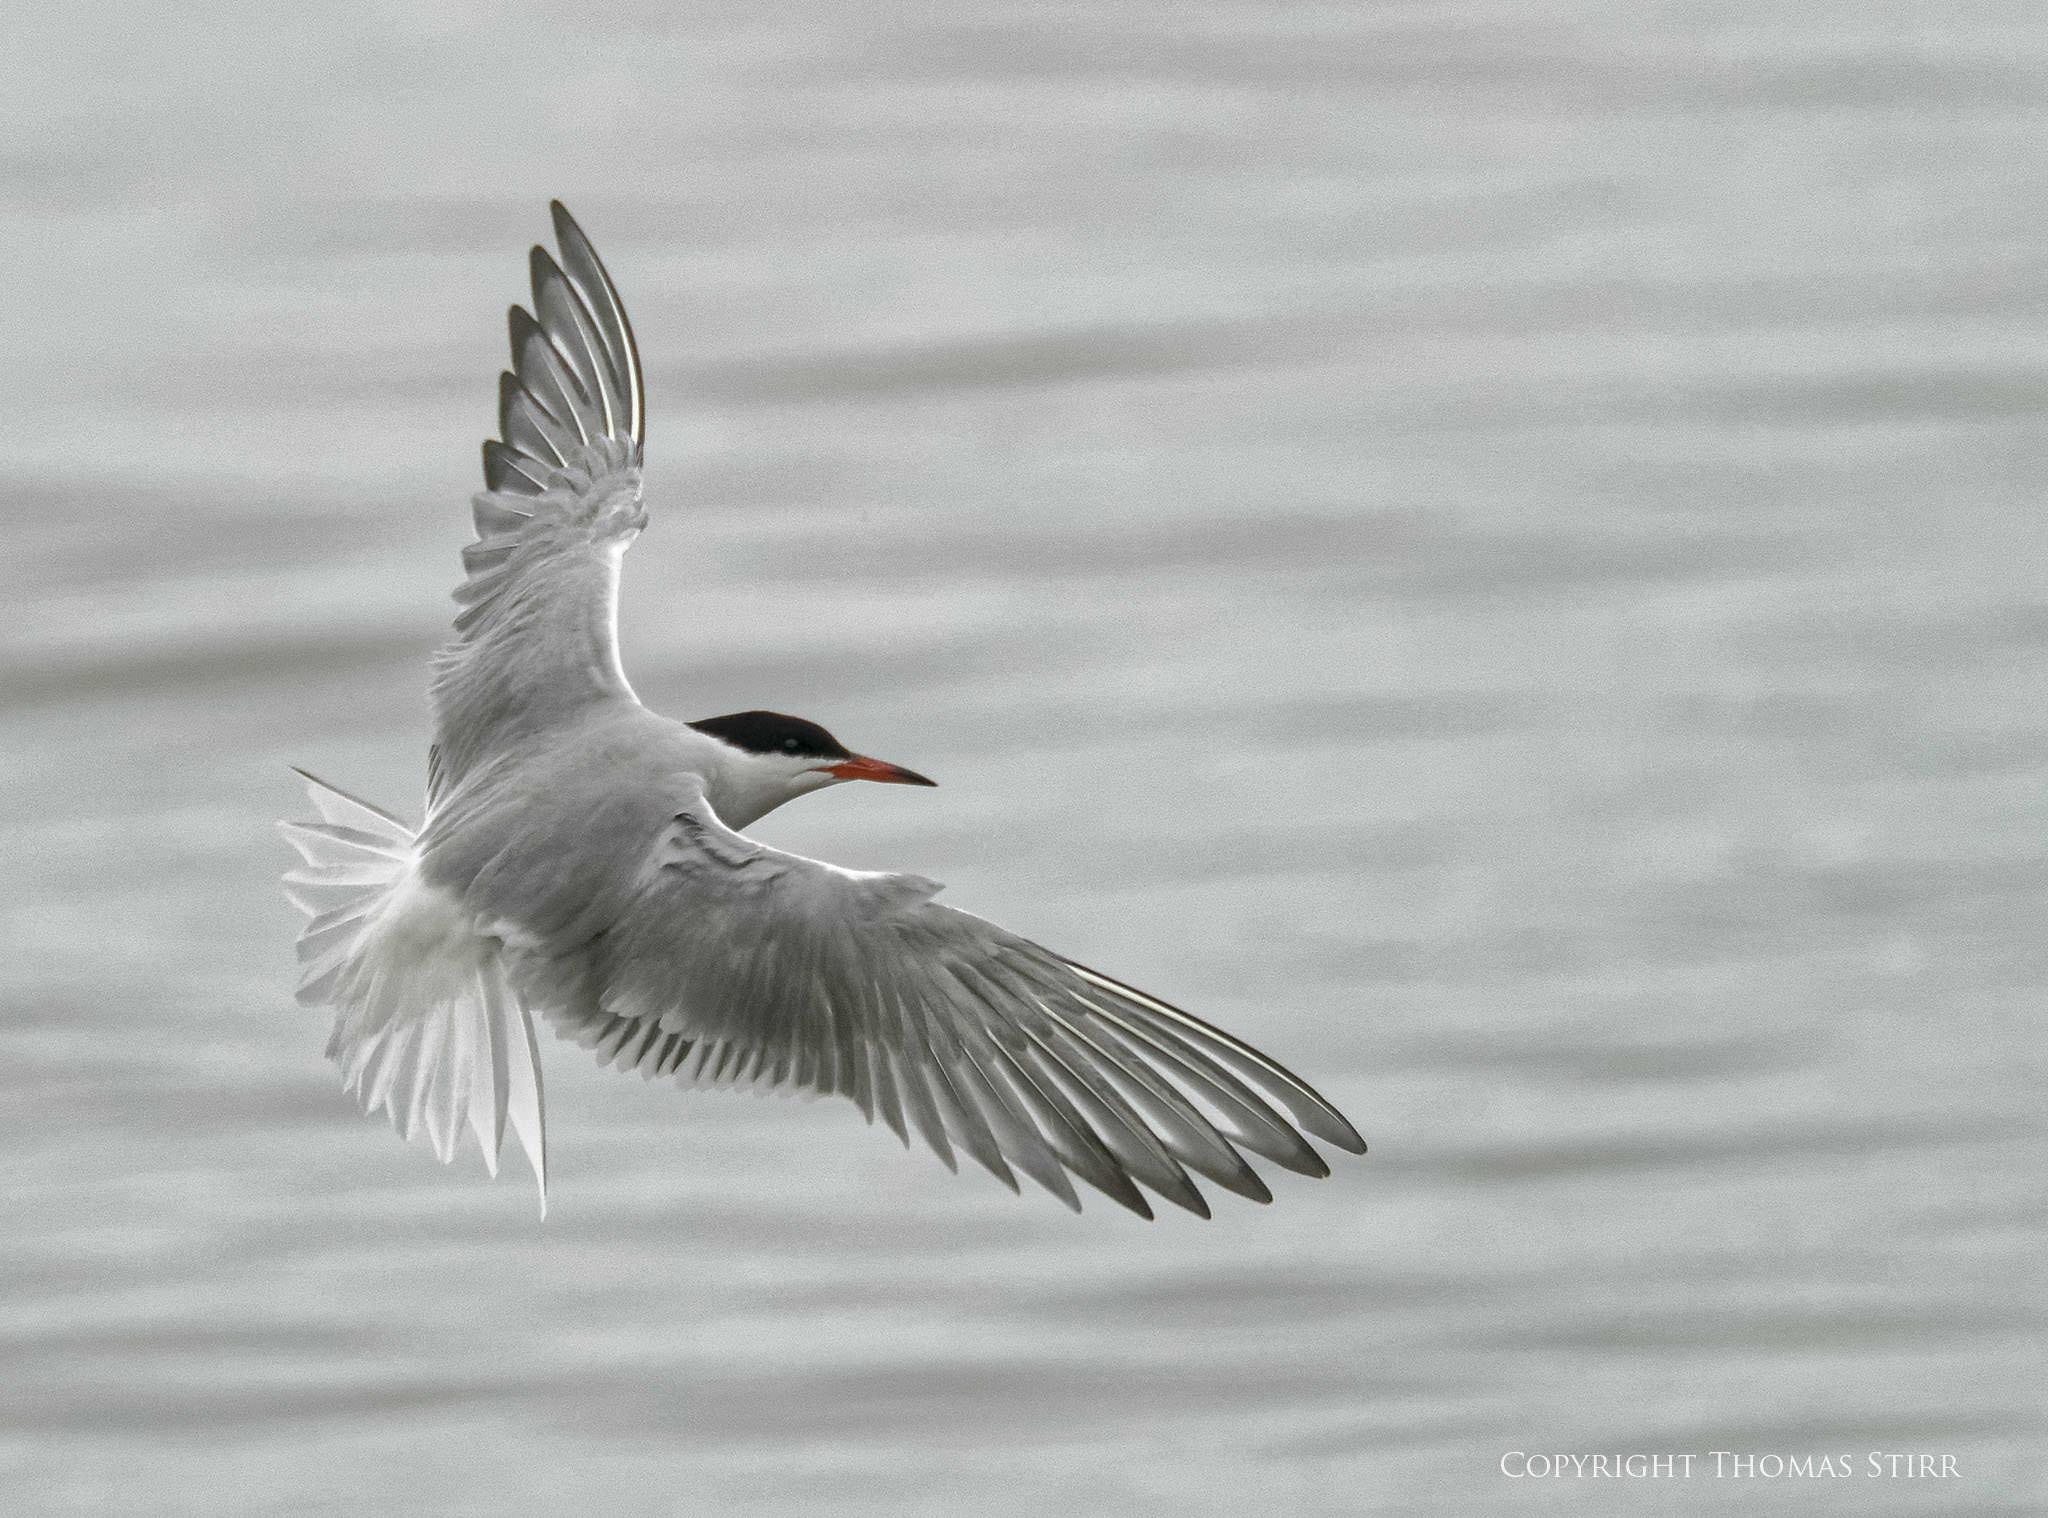
The finished image is cropped tight enough to reveal wing, back and tail detail but is still open enough to give it an ‘airy’ feel to help create strong motion in the image. If you examine the bird’s head you’ll see that I had to create some highlights to better define the bird’s eye with the CS6 dodging tool.
The image above is quite typical and is a bit trickier because we have another unwanted bird in the frame. This often happens when we try to photograph birds landing.
Examining the right hand side of the screen capture we again see the use of equidistant framing. This time I used the head of the unwanted gull as my minimum distance. I used the Rule of Thirds grid to position the bird’s left wing and left foot. I didn’t want to bring the bird any further into the middle of the cropped image as it caused a loss of image flow. The cropping I chose enabled the bird’s gaze to exit in the bottom right corner and its left wing points nicely towards the top right corner adding to overall image flow.

As in the previous finished image samples you’ll see that I made adjustments to the bird’s eye and added some yellow saturation.
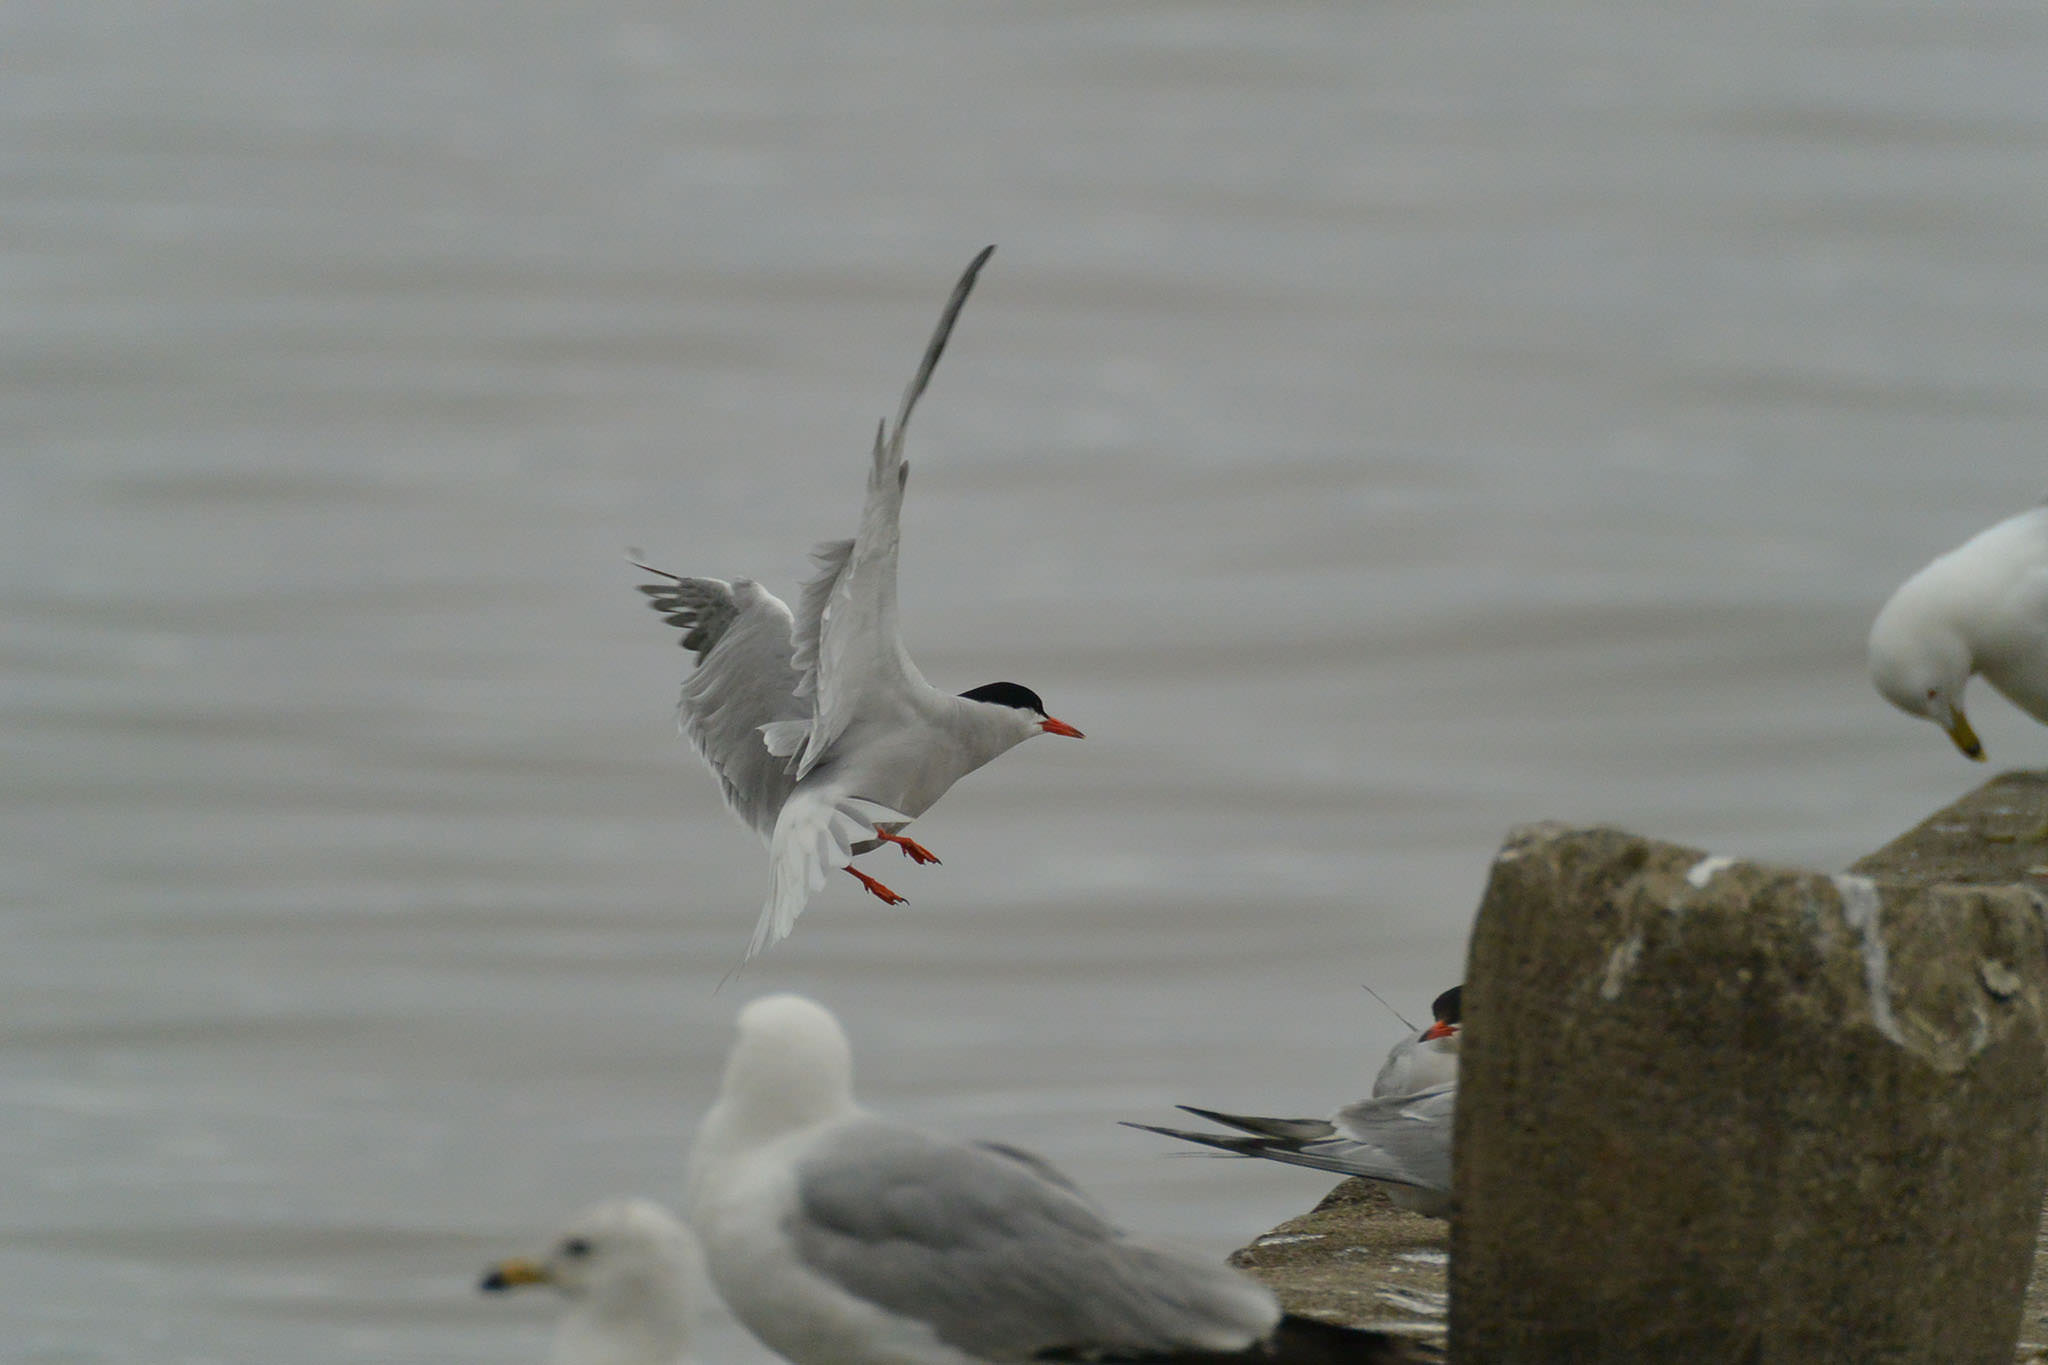
The next sample image above is one that we would often discard because on first blush it is a bit of a jumbled mess with out of focus birds and an ugly cement structure in the corner. I like the wing positions of the bird in this one and the strong sense of motion.
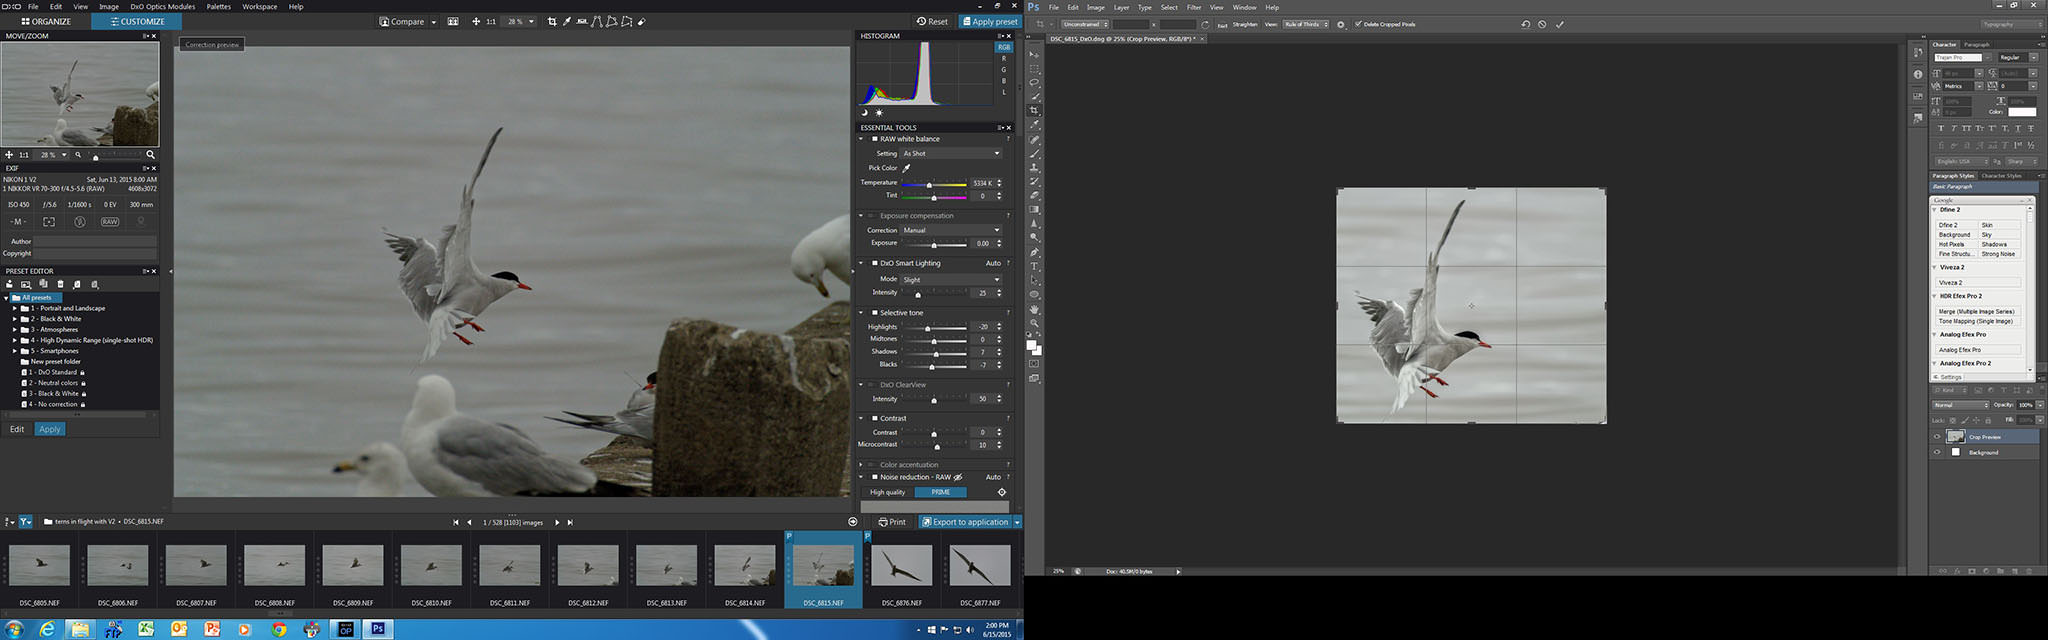
The right hand side of the screen capture shows a very tight crop. I also had to remove a little bit of the cement structure and a tiny bit of an unwanted bird’s head to make the crop work. To ensure a feeling of speed I purposely left almost half of the frame with ‘open space’. This also allowed me to crop the image so that the body of the bird is very strongly pointing towards the top right corner, creating an exit point for the image. You’ll also notice that the bird’s right wing and beak are positioned on Rule of Thirds’ grid lines.

Given the small size of my Nikon 1 V2 sensor this crop was a bit too aggressive as you can see in the finished image. You’ll also notice some work done to try to define the bird’s eye.
Our last image is another typical challenge we face with our captures. Nice wing position and symmetry but a terrible position in the frame that really restricts our cropping potential.
In the right hand side of the screen capture we can see that I used the tight bottom framing as is but did try to give the image a little more breathing room on the left side and top. The key was not to allow too much and cause the image to look unbalanced. I felt that the image had a very strong geometric line running from the tail in the bottom left to the wing tips in the top right. I used the ‘rule of thirds’ grid to keep three segments open in the bottom right hand portion of the image. I did this to try to create strong contrast with the crop and thus accentuate the strong visual flow of the image from the bird’s tail up to its wing tips.
Given the unfortunate position of the bird in the original frame I felt this final image ended up working well. You’ll notice, once again, that I spent time making adjustments to the bird’s eye to help the image ‘pop’. I chose not to add any yellow saturation as the bird’s feet are not displayed, and I did not want to detract from the strong contrast in the bird’s wingtips.
I hope this article has adequately demonstrated that the ‘rule of thirds’ can serve as a useful cropping tool for bird-in-flight images.
Article and images Copyright Thomas Stirr. All rights reserved. No use, duplication of any kind, or adaptation is allowed without written consent.
I thought it was interesting that in addition to the rule of thirds you also use a common technique that let the viewer “read” the pictures from left to right as is natural for most (western?) readers.
Hi Mark,
The left to right orientation of the bird images in the article was a function of lighting rather than any conscious thought on my part regarding typical eye flow. Even though it was an overcast day the lighting on the birds was slightly better when they were flying into the east.
Tom
gfhgfhgf
I have never used the rule of thirds in any of my subjects, whether it be for corporate use, editorial/photojournalism, architectural, portraiture, street photography or even wildlife (yes – including birds.) I have been photographing since the 1960s and professionally since the mid 1970s. If the image works, then that is all that matters. The rule of thirds is anal and has no real place in art nor composition. Look through the lens. Compose. Then fire the shutter. Forget the rule of thirds. Composition is in the eye of the photographer and the viewer – not to be determined by some rules. The beauty about art is that it is rule breaking in of itself.
If the subject in the image is powerful, then your eye will automatically go to it and then move around the image and discover certain aspects of the photo, including those subtleties. Eyes do not always travel from left to right or from top to bottom.
Place the subjects where they fit best according to your eye.
Thanks for sharing your perspectives.
Tom
Hi Scott,
Thanks for adding to the discussion and sharing the image – very nice! I think your suggestion about adjusting the framing based on where the bird is looking is a good one.
Tom
I’ve decided I’m just not much of a follower of rules, and crop the way it’s pleasing to my eyes. Even if there’s science behind it, the next article I read will state how artistic it is to not follow those rules:-) I will just shift horizons and crop several times, put them next to each other and see what I like. Of course for now I’m happy if I even see a bird on my photos;-)
There is no science as such in the Rule of Thirds or the Golden Mean etc. It’s just that these proportions create a balance which the human eye often finds harmonious and pleasing.
They are just a guide or starting point for a personal view and your way is as good as any other!
I know, but this is kind of scientifically proven, isn’t it:-) Like that the human eye tends to look to the right first. Except maybe like left handed, there might be left lookers too, who knows;-)
This is just one way of looking at cropping photos…it certainly isn’t the ‘gospel’…its just a tool that can be used. If following your eye and personal sense of balance is delivering images that you like and enjoy, then keep doing what you’re doing!
Tom
Hi Thomas, nice and helpful article, as every time. When I try to photograph BiF, I move the focus sensor fields to that position in the viewfinder, where I presume the direction of the flight is. So, I avoid some heavy cropping to assure the rule of thirds and, mostly, I can preserve the aspect ratio. I don’t like squarish aspect ratio. But the disadvantage is, to miss some good opportunities to shot in respect of having the focus field at the wrong position…
Hi Peuqui,
Glad you found the article helpful! Moving the focus point to try to anticipate the movement of the bird is also something that I like to do. Thanks for noting this important aspect of technique in your comment. As you know, moving the focus point can be tricky depending on the species and flight pattern of the bird being photographed. Some birds, like swallows, are very erratic and being able to capture them at all is a feat unto itself! For larger, more predictable birds like geese, cormorants and such the technique works well. I also do this regularly when taking images of aircraft in flight, especially at an air show where the most dramatic portion of an image may not be the airplane itself, but rather the smoke trail it is leaving behind.
Tom
I presume you meant to say you position the active focusing point on where you would like the bird to be in the frame, not where the bird is heading? Focussing on where the bird is heading will result in focussing on the background and/or creating a dead space behind the bird rather than in front.
With this technique the animal or bird also has to be somewhat smaller in the frame or bits will likely get cut off.
As Thomas rightly points out, this is only really feasible with big, slow-flying birds travelling in a fairly predictable direction. If you can do this with fast and erratic fliers, I will sign up for some lessons.
Personally, I find with fast fliers that if you first give them both barrels from a 12 bore, it not only slows them down, but creates a very nice smoke trail as they head towards the ground.
Hi Betty,
Thanks for adding to the discussion re: placing the focusing point based on where you want the main subject to be positioned in the frame. This is an important point of clarification.
Tom
Betty, you are too funny.
Yes, I meant this for sure. Another interpretation is nonsense as you stated above. Thanks for clarifying that.
Edith: I would like to see you shooting that birds and switching fast to your camera to catch them with a smoke trail… If you can do this with fast and erratic fliers, I will sign up for some lessons.
I have my camera and 500mm mounted to the twelve bore with an Arca Swiss quick release. That way I can pan and shoot in classic style.
My hourly rates for lessons are very reasonable.
As always, great work… :)
Thanks for the positive comment Jacek!
Tom
Thanks for a useful and instructive article. My primary photographic interest is birds, especially birds in flight, often with more than one bird in a shot. I’ve tried to use the rule of thirds where it applies, and regularly alter crop ratios to get more pleasing compositions. Your article has added two tools to my repertoire: minimizing dead space and lining up either bird’s gaze or direction of flight or pose with one of the thirds meeting points. The photo examples are very helpful and beautiful.
You’re welcome Wings_42 – and thank you for the feedback!
Tom