Recently, as part of a photography class at my university, I had an assignment to shoot two rolls of film with the theme “Point of View.” This topic was open to interpretation, but I was encouraged to try something out of my comfort zone. I puzzled over the assignment for a few days – and I almost decided to shoot a roll of typical abstract photographs – but one other possibility began to interest me: With enough effort, could I take realistic landscape photographs from my kitchen table?
I recalled seeing some photographers create elaborate tabletop dioramas, requiring studio lighting and several days of work. Unfortunately, I had just a few hours to spare, and I didn’t know which items would look interesting in such an image. I bought a few products at a nearby grocery store, including a pound of flour; this ultimately became the subject of all three photographs. I also used a few objects that were lying around my room, and a total list of materials is as follows:
- A lamp
- My phone’s flashlight
- A black shirt
- A mirror
- A cardboard box
- Spoons, knives, and forks
- The pound of flour
I decided to start with the simplest concept that I had in mind: a mountain lit from the side. This photograph was quite easy to take, in the end. After deciding on a lamp to light the scene, I poured the flour onto the front portion of a sheet of paper. I lifted the other end of the paper and taped it to a cardboard box, forming a miniature backdrop.
The hard part was shaping the flour. At first, I had no idea if the shot would look convincing, and I spent quite a while just moving around and reshaping the flour on my table. With some practice, it became clear that the most realistic way to shape the flour was to let gravity do the work; after all, the same process occurs in the real world. After forming the flour into a small pyramid, I simply used my spoon to carve a smoother shape. This process wasn’t particularly quick, but it was fairly easy; after a handful of tries, the flour was starting to look a bit more like a mountain.
Since I had to shoot the assignment on film, I first tested a variety of setups using a digital camera. With these trial photographs, I got a good idea of how to make the mountain look as realistic as possible; more than anything, I narrowed in on a lighting setup. In this case, a single desk lamp didn’t provide enough depth to the photographs, and they didn’t look much like a real landscape. I tried a few different setups, and I ultimately settled on light painting. With the flashlight on my phone, I lit the mountain of flour from the lower-right, casting shadows that looked somewhat realistic. The final result (shot on film) is below:
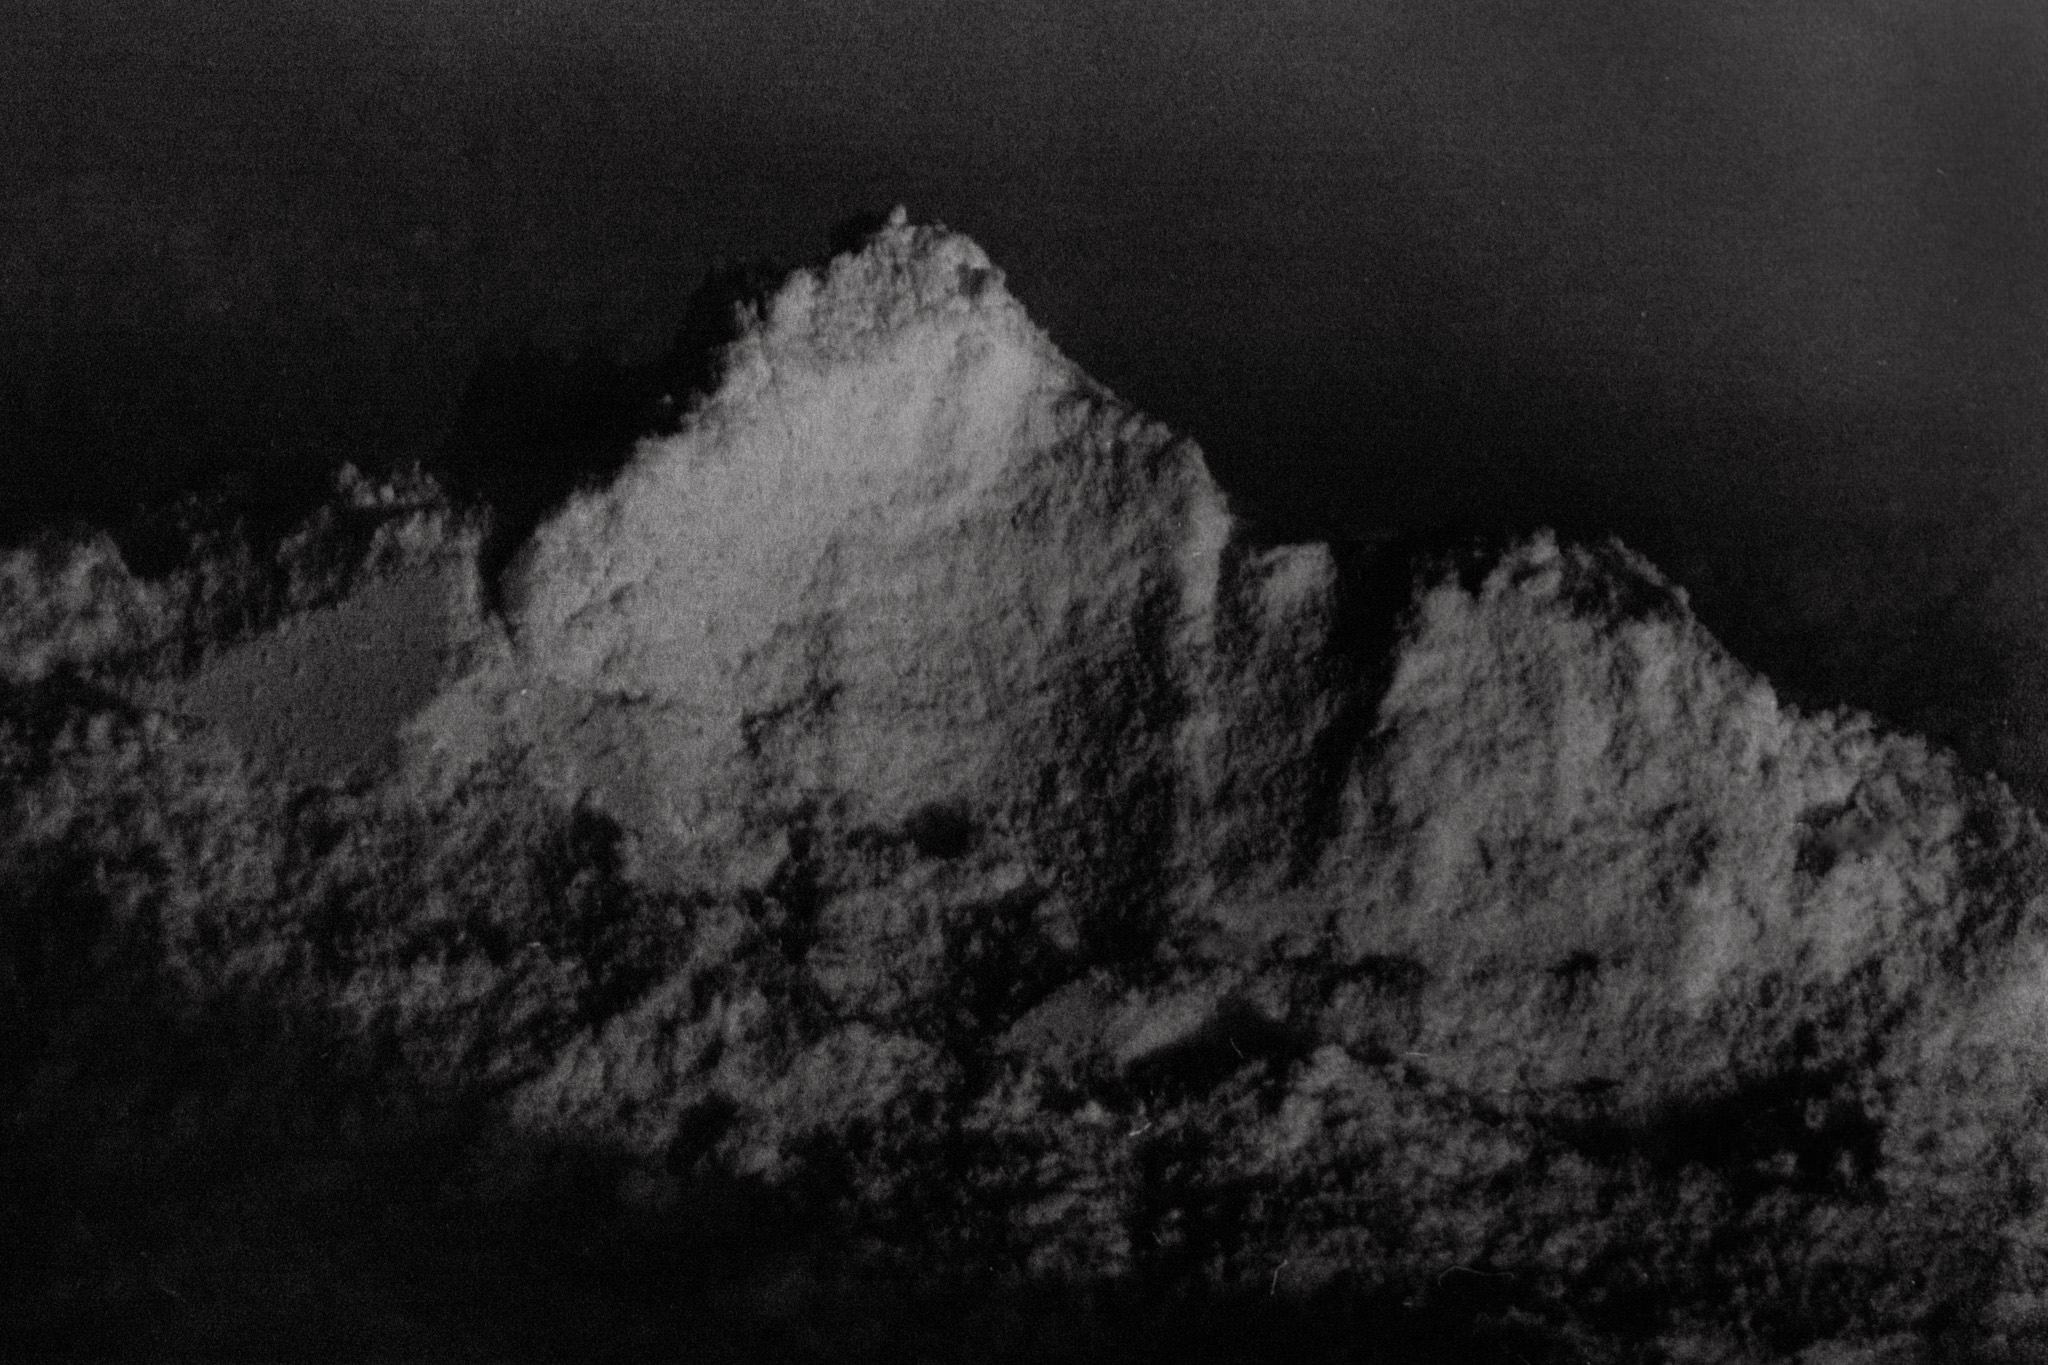
For a first effort, I was encouraged. It doesn’t look particularly convincing, but a quick glance suggests “mountain” as well as “flour.” I was helped by the lack of color – and the graininess of ASA 400 film – in making the image seem more realistic. Still, I had a ways to go.
For my second photograph, I decided to play to a natural advantage of flour: at close distances, it looks like sand. I had in mind a photograph with sweeping dunes across the foreground, as well as a setting sun in the sky. This setup certainly seemed more complex than the first, but even I was surprised by how long it took to create. Take a look at the behind-the-scenes photograph below:
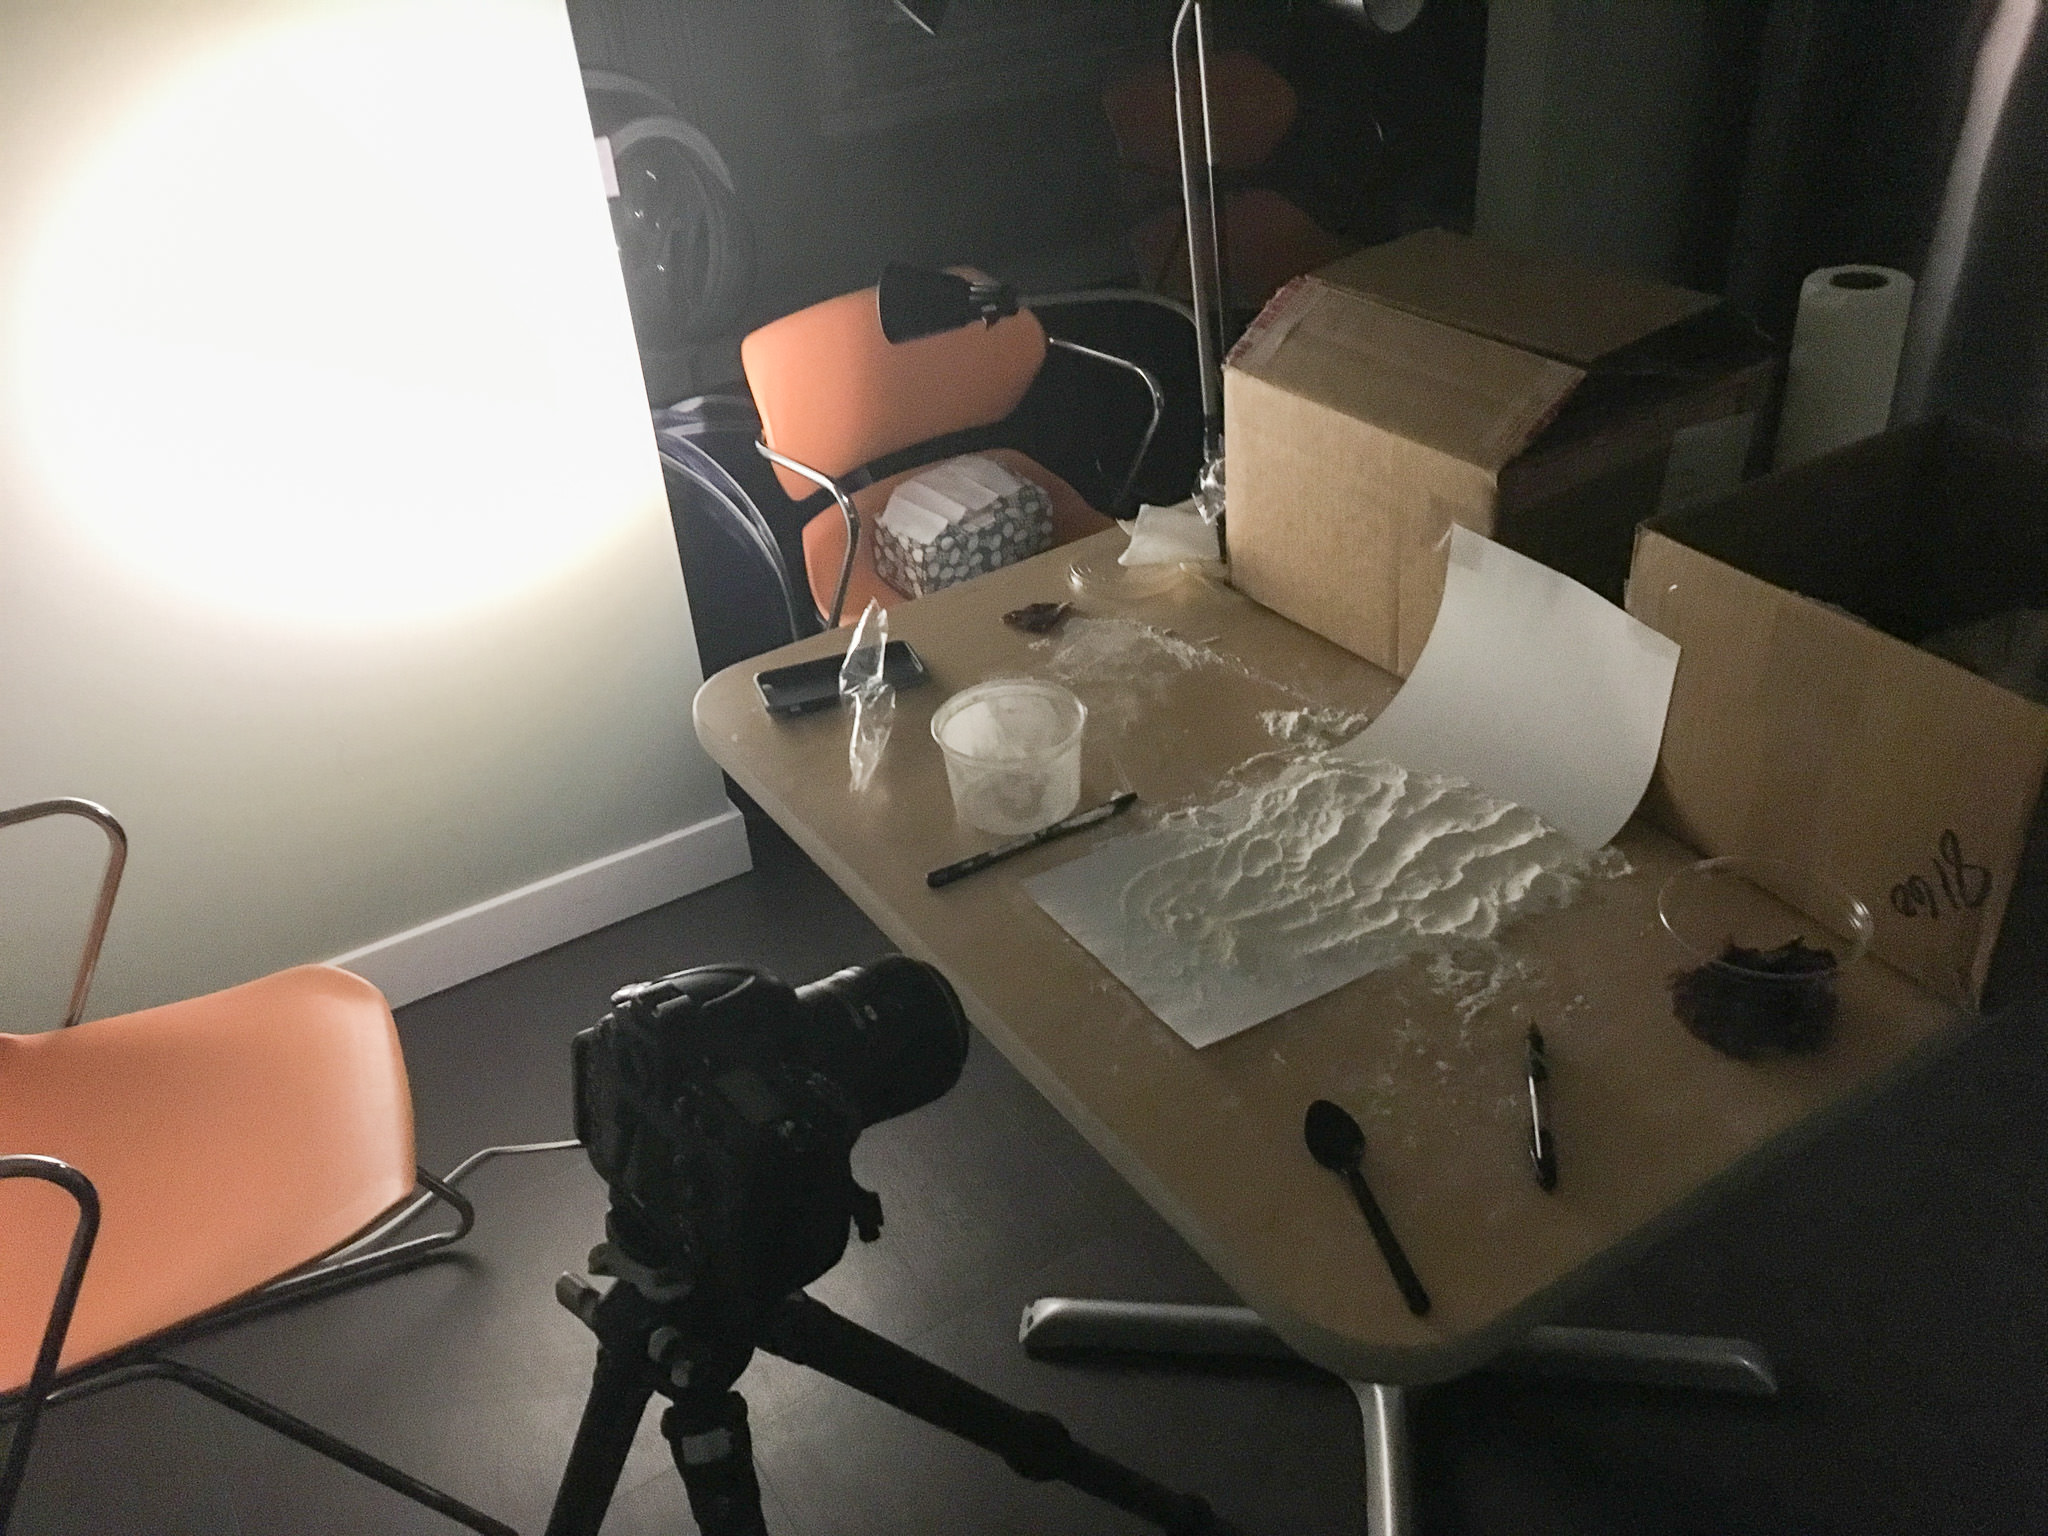
As you can see in this photo, I shaped the flour to look like a desert landscape. Underneath and behind the flour is a sheet of paper, through which I shined my phone’s flashlight to create a fake sun. The majority of the lighting in this photograph comes from the lamp at the top of the image, which I shined at a wall to soften the light.
I spent a couple hours to shape the flour like this! It may look simple, but it was quite a time-consuming process. Ultimately, though, I felt that the dunes were starting to look realistic. I began taking digital photographs to test my setup, and then I moved on to film.
I learned that part of the difficulty was in positioning the sun properly. Since most of the light was from the left-hand side of the image, the sun had to be angled similarly. I also had to be at a low angle, allowing the sand dunes to block and cover one another as if I had been standing in the landscape. My final result is below:
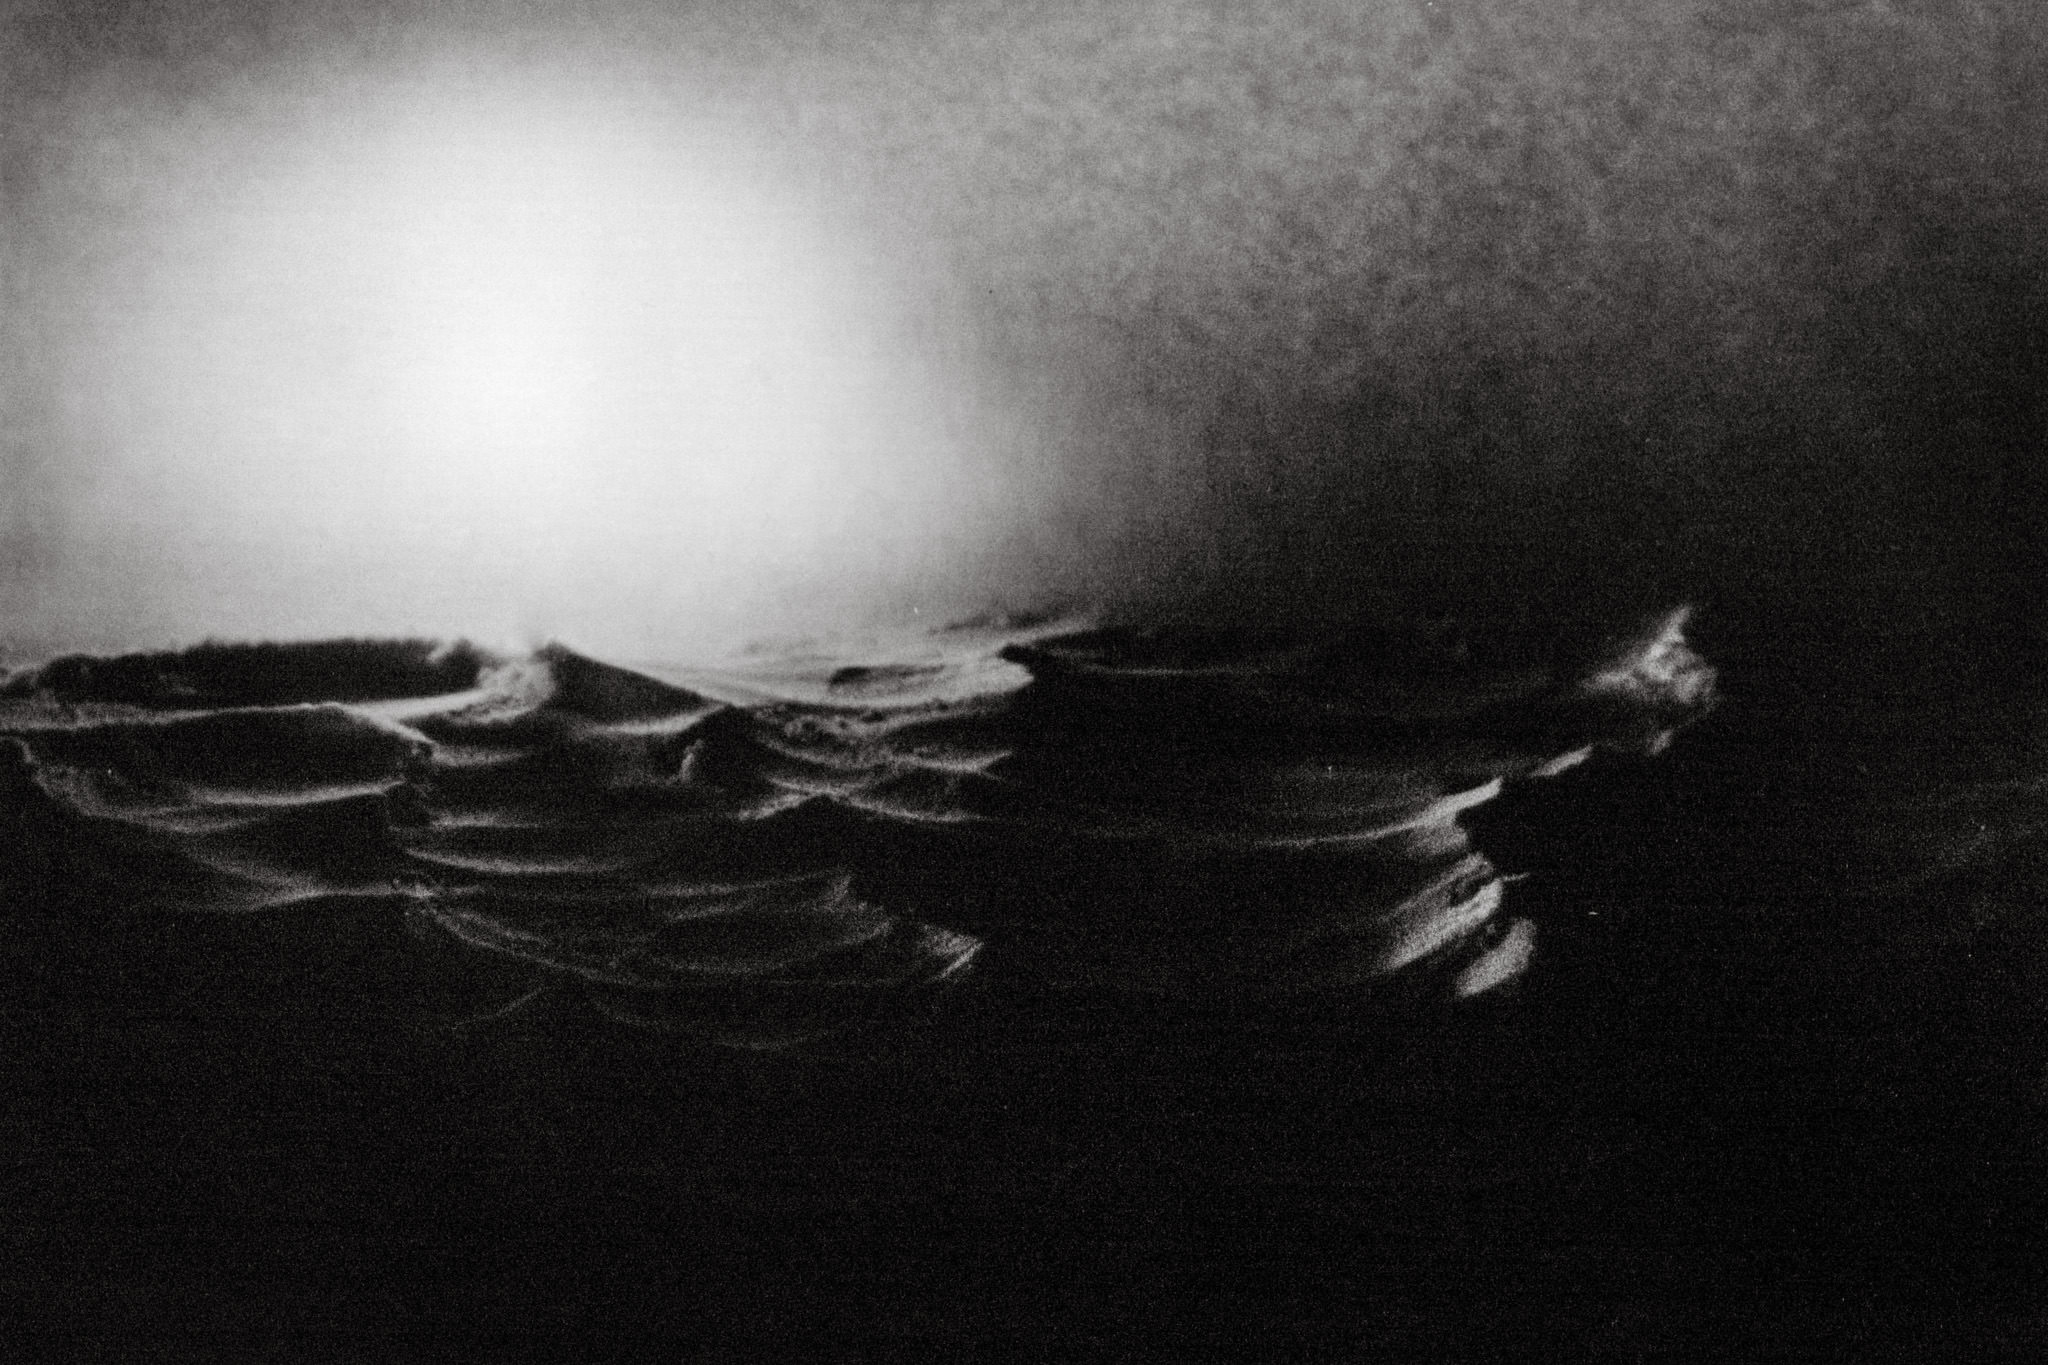
In my mind, this was a clear improvement over the first photograph. The sand dunes – particularly along the right-hand side of the image – looked fairly realistic, and the scene’s imperfections reminded me of the early days of photography. The sky, unfortunately, picked up some texture from the sheet of paper; it didn’t look as realistic as I had wanted. Similarly, the left-hand dunes looked more chaotic than those on the right, since they were lit by two strong light sources (the desk lamp and the fake sun). After spending so much time on this shot, though, it was time to move on to the next.
For my third and final image, I wanted to photograph a scene at night. I began brainstorming possibilities, and I thought about reflecting the Milky Way into a miniature “pond” made from a mirror. I couldn’t find a good material for the stars, though, so I thought about doing the moon’s reflection instead. This proved more fruitful, since I could create a realistic moon by shining my flashlight through a black t-shirt that I owned.
I now had my main concept, but I still needed a foreground to anchor the composition. I began to shape the flour to look like a shoreline, trying to create a beach scene at moonrise. In the process, though, I noticed that the flour was starting to look like an iceberg; in fact, the resemblance was fairly pronounced. I discarded the beach idea and began to concentrate on creating an Arctic landscape.
This one was much quicker than the other photographs, since the flour already had the proper shape. I tried a few different camera positions, deciding on one that allowed the fake moon to have the most realistic reflection. The final photograph is below:
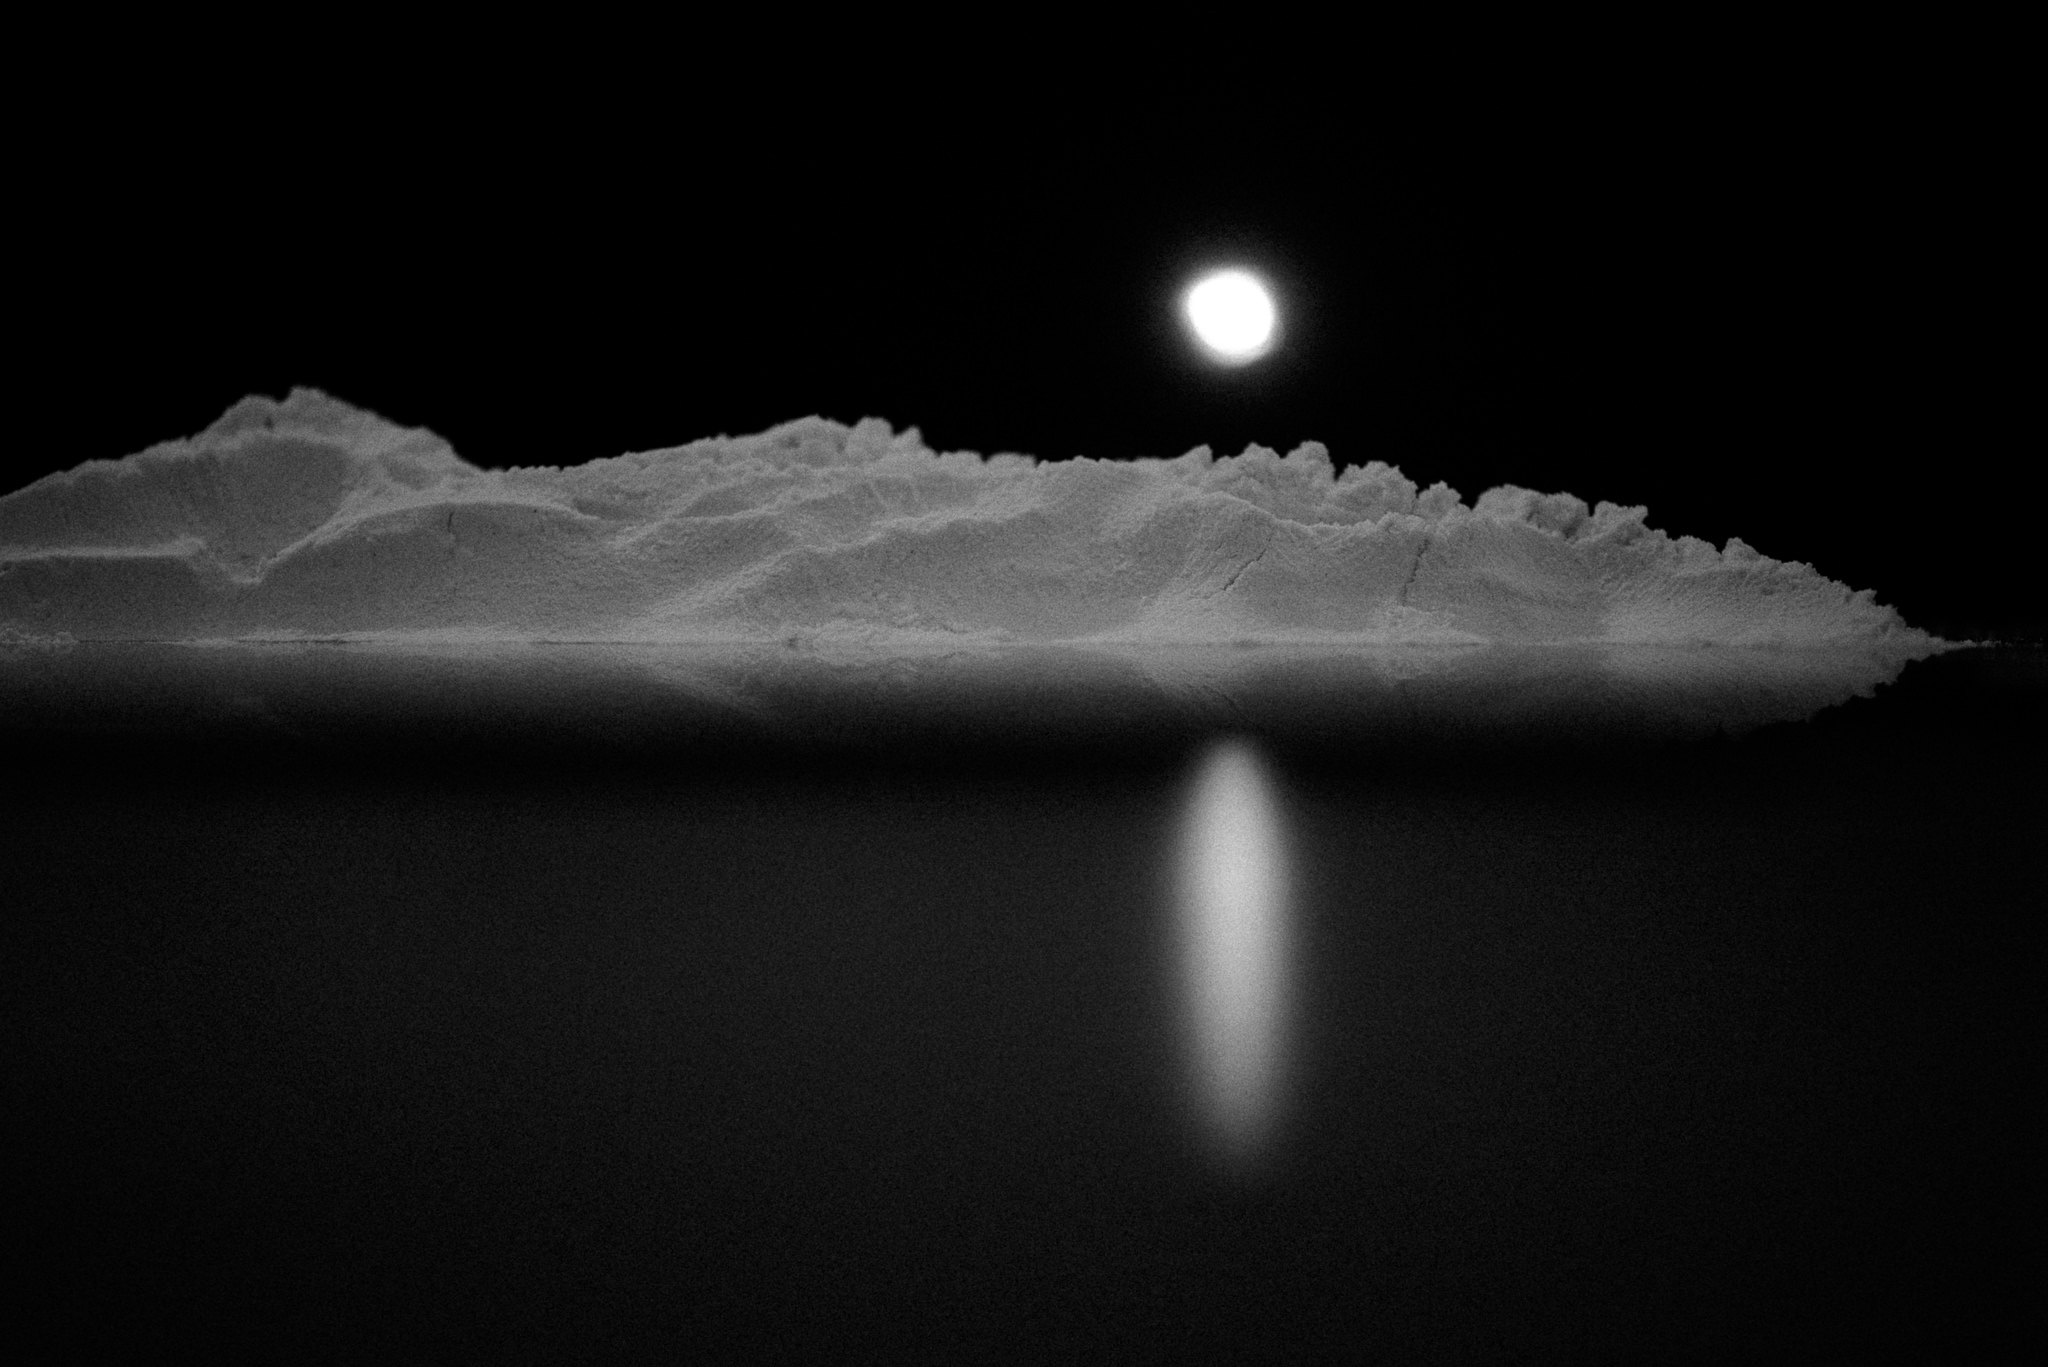
This image, I believe, is the most successful of the three. The flour has the same shapes and forms as ice, and the moon in the background makes for the most convincing sky out of all three images. Even the reflection is somewhat convincing, harkening to long-exposure photographs of the night sea. It is worth noting that the photograph above is actually my digital image of the scene, since the film version did not scan as accurately as the first two.
In the end, what do I think of these photographs? On one hand, I certainly won’t be putting them in my portfolio or displaying them on my website; I still need a lot of practice before I can create something that looks perfectly realistic. On the other hand, I had tremendous fun trying to take these images. This entire process helped me think about real-world lighting conditions, and it showed me some of the ways that photography can be deceiving without the use of Photoshop. More than anything, though, I just enjoyed the process. Sometimes, the best way to maintain your excitement for photography is to try something new.
The ideas were brilliant and showcase your creativity… Every single photo was equally amazing. All of the “imperfections” you seem to have found in the pictures, in my opinion, add to them, making the photos so much more interesting with a “old-photography” twist! Love it!! thank you for sharing.
Thank you for the kind words! I am happy that you liked the photos. They certainly were fun to take :)
Great article! Number 3 is so cool and without looking too closely, pretty convincing. Honestly though, I don’t need to be “convinced,” I like it regardless!
Thank you! Glad you enjoyed it.
That was really creative Spencer. You’ve inspired me to look at things differently. Thank you.
I’m glad you enjoyed the article! Thanks for the kind words.
Nice creative work Spencer! :)
Thanks, Sharif!
Dear Spencer,
It is indeed a great work with simple elements which most people may not be aware of. Enjoyed it.
The moon in the background appears to be slightly bulged on two sides.
We from Telangana Photographic Society will try to catch up with your innovative ideas.
Would like to see more such ideas.
Thank you for the kind words!
I see what you mean about the moon. I think the bulge comes from the way I lit that photo — I shined my phone’s flashlight through a black shirt, and then I focused on the iceberg so that the moon was out of focus. It took a lot of practice and experimentation!
-Spencer
I like the moon picture . need to try this too. Gonna see if I can do mountains too with flour.
Good luck, it’s a lot of fun!
Yeah, those are great. We did similar exercises during my own undergraduate studies.
Thank you, Stephen! I like these assignments — I never would have thought to take this type of photo otherwise. It’s an out-of-the-box atmosphere.
If you must know, that all looks quite Plutonian.
Viewing images from the New Horizons explorer which has been sending back hundreds of images of the surface of that dwarf planet, we see that the almost entire surface is encased in ice and some kind of snow (probably methane snow), and that there are ice mountains and hills and ice deserts.
That makes it easy to imagine your photos as images from the surface, with maybe Charon or Hydra or Cerberos overhead, shining on a methane lake. The dunes with a hazy sun could be a methane storm. In that environment, everything would be black and white, anyway, so there is no need for any color.
Now, Titan’s surface would be different, since Titan is not only the same size as Earth, but is enveloped in a methane atmosphere, with lakes and seas of methane, and the rain on Titan is methane.
Nice work.
and you rememinded me of the pale blue dot recently photographed by cassini from behind saturn rings, stunning perspective…
Such an awesome interpretation! They really do look more like alien landscapes than places on Earth. Thanks for sharing your perspective :)
More and more I am thinking photographers are way too serious. Thanks for the inspiration to have a bit of fun with our acquired skills and accumulated gear.
Thank you, glad you enjoyed it! Get out and have fun :)
It would be interesting to make two renditions of the same stillife one realistic as you stated you wanted to do and the other one abstract.
Ooh, that’s clever! Interestingly, an abstract photo could be a more “realistic” way to shoot these photos, since it would blur some of the flour’s features.