When you go through camera menu options, you might come across a number of different options that are related to the way your Raw images are saved. One of those options is typically the type of compression that is applied to Raw files. There are several reasons why camera manufacturers provide Raw file compression options, but the most basic one is to save space. Let’s take a look at file compression options and explore differences between compressed, uncompressed and lossless compressed Raw files in more detail.
Table of Contents
Why Compress Raw Files?
So why is there a need for Raw file compression? Isn’t compression for JPEG files only? Well, any file has a chance of having duplicates of information, and it does not matter if it is a JPEG or a Raw file in terms of compression potential. That’s why it is beneficial to have the option to compress Raw images in every camera, as there is direct potential in reduction of file sizes. And depending on whether you want to preserve all data (lossless), or parts of it (lossy), those space savings could be very significant. Below are the main reasons why manufacturers provide options for Raw compression:
- To Save Space – this is the main reason, as the primary benefit of any type of compression is, first and foremost, space savings. Since compression allows Raw images to be smaller in size, more images can fit into the same memory card. Keep in mind that reduction in space affects the whole photography workflow, because you will end up with smaller files on your computer and your photo storage, which in turn, also makes your backup workflow more efficient.
- To Write and Transfer Files Faster – when Raw images are physically smaller due to compression, your camera can write them faster to memory cards. In addition, the amount of time it takes to transfer those same images to your computer or your storage is also cut, sometimes significantly.
- To Increase Continuous Shooting Time – when files are smaller, they also take up less space in your camera’s buffer, which can potentially increase the length of time you can shoot continuously. However, this is not always the case. For example, on older cameras with slower processors, applying Raw compression actually slowed down the camera’s continuous shooting speed, because Raw compression is a processor-intensive task.
- To Reduce Resolution – some cameras have options to reduce the actual resolution of Raw images either through sensor cropping, or through image resizing / down-sampling (which is known as “Small Raw” or simple “sRAW”). While the former is not related to Raw compression, the latter is done with Raw compression in mind. In fact, as detailed in our sRAW Format Explained article, such compression levels can be rather extreme, resulting in significant losses of valuable data.
Compressed vs Lossless Compressed vs Uncompressed
Let’s take a look at a number of different Raw file compression options in detail. Depending on your camera’s make and model, you might have different options, but these are the most common choices available:
- Lossy Compressed means that some of the data in the Raw image is thrown away to make compression very efficient. With lossy compression, you might lose some valuable data that will limit your post-processing capabilities. For example, Sony cameras by default apply lossy compression to Raw images, which can result in artifacts appearing around objects, as seen below:
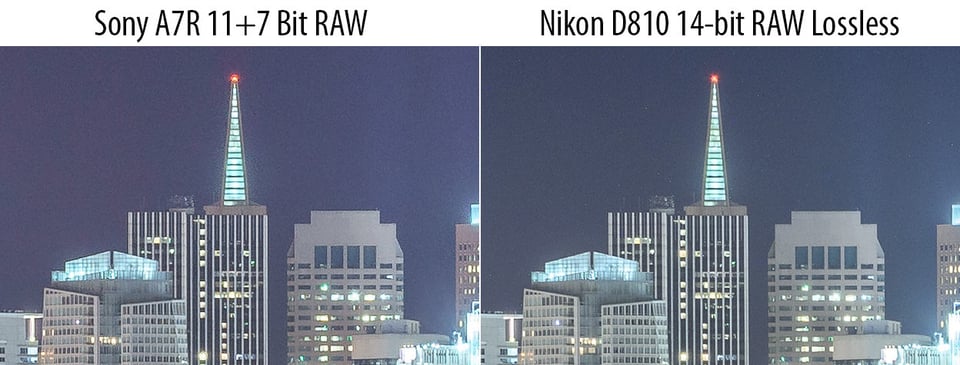 Unless you don’t mind losing some of the data in your images, it is often best to avoid lossy compression.
 - Lossless Compressed means that a Raw file is compressed like an ZIP archive file without any loss of data. Once a losslessly compressed image is processed by post-processing software, the data is first decompressed, and you work with the data as if there had never been any compression at all. Lossless compression is the ideal choice, because all the data is fully preserved and yet the image takes up much less space.
- Uncompressed – an uncompressed Raw file contains all the data, but without any sort of compression algorithm applied to it. Unless you do not have the Lossless Compressed option, you should always avoid selecting the Uncompressed option, as it results in huge image sizes.
On every camera I shoot with, I always default to Lossless Compression, because it is the most efficient way to store Raw images. There is no benefit of shooting Uncompressed Raw and Lossy Compression results in loss of potentially valuable data, which I might need to recover shadow / highlight details in images.
12-bit vs 14-bit vs 16-bit Raw
Along with different compression levels, Raw images have the potential to store varying levels of tones per channel, per pixel, which is known as “bit depth”. By default, most cameras shoot in 14-bit Raw, which translates to 16,384 tones per channel (red, green and blue) per pixel. If you do the math (16,384^3), this equals roughly 4.39 trillion tones per pixel. Older cameras sometimes shoot in 12-bit Raw.
Only a few cameras shoot in 16-bit Raw such as the Fujifilm GFX100 medium format camera. With this format, you would be pushing over 281 trillion tones per pixel. That’s a heck of a lot of data to work with – you can only imagine how big those Raw images would get without any compression!
Raw Compression: File Size Comparisons
Talking about file size, let’s take a look at a common Raw image shot with the Nikon D810 and see how big files get relative to bit depth and file compression options. Below is a table showing differences in file sizes:
| Compression Level | File Size (12-bit) | Decrease in %1 | File Size (14-bit) | Difference in %1 |
|---|---|---|---|---|
| 1Decrease in % is based on the Uncompressed 14-bit Raw file (76.982 MB) | ||||
| Compressed | 30.066 MB | 60.9% | 37.055 MB | 51.9% |
| Lossless Compressed | 32.820 MB | 57.4% | 41.829 MB | 45.7% |
| Uncompressed | 58.795 MB | 23.6% | 76.982 MB | 0% |
As you can see, there can be a pretty dramatic difference in file sizes when choosing between 12-bit and 14-bit, as well as different compression levels. And these differences add up quickly when you take tens of thousands of images into consideration. With a 60.9% decrease in file size when shooting 12-bit compressed Raw, one might think that it is a good option to pick. However, it all depends on your shooting technique, what you shoot and how much information you typically recover from highlights and shadows when post-processing images.
For example, if I consistently exposed well when shooting portraits and my post-processing was very minimal, I would probably be just fine shooting 12-bit compressed Raw. However, if I wanted to maximize my highlight and shadow recovery options when doing landscapes or astrophotography, I would feel safer shooting 14-bit lossless compressed, since it would let me take a full advantage of my camera sensor and still produce files that are practically half in size. That extra 15% of file size reduction isn’t worth it in this case, especially if it limits any of my recovery options in post-processing. Keep this in mind when considering bit depth and different Raw compression levels!
Also, it is important to point out that some cameras don’t even give you the option to choose between different bit-depths and compression levels, typically defaulting to either 12-bit lossy compressed Raw (on most beginner-level cameras) or 14-bit losslessly compressed Raw (on more advanced camera models).
Let’s now go over some of the options when going through different camera brands.
Nikon Raw File Options
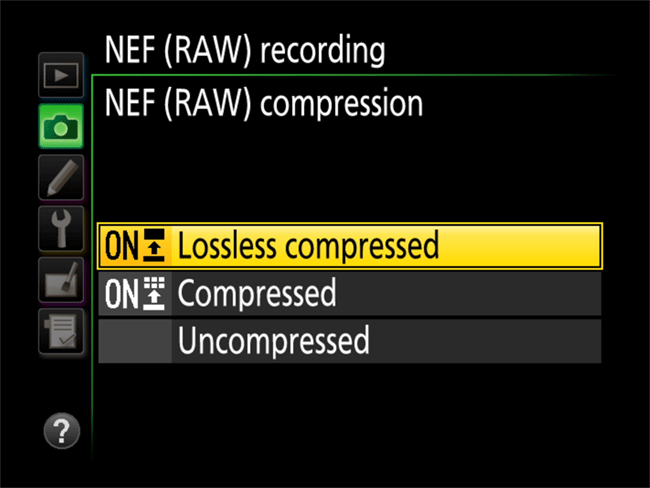
If you shoot a Nikon DSLR, bit depth and Raw compression options will vary depending on camera model. On most entry-level and enthusiast-level cameras, you will only have the option to choose between 12-bit and 14-bit depth with no Raw compression options. This means that these cameras always default to lossy compression. On high-end cameras, Nikon typically provides three options for Raw compression: Compressed, Lossless Compressed and Uncompressed, as seen below:
Nikon Z cameras have the option of 12-bit and 14-bit Raw, along with the three compression options as well.
Canon Raw File Options: Raw vs cRaw
Canon’s Raw file menus are a bit different. On Canon’s more recent cameras, you will find a menu that looks something like this:
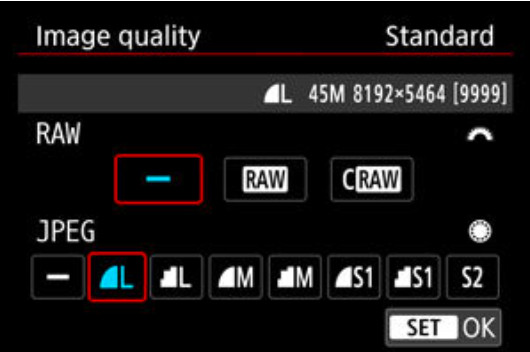
Here, you cannot select the bit depth: all Raws are 14-bits. However, there are two options for the Raw format: Raw and cRaw format. The Raw format is what you’d expect: a 14-bit lossless compressed Raw file. The cRaw file is Canon’s latest lossly compression format that replaces some older formats like sRaw, and it results in a 25%-50% reduction in file size. Unlike some older compression algorithms, the cRaw format is a very good lossy compression format, and in the majority of real-world use cases, the cRaw format works very well.
Still, you may notice a slight amount of detail loss in extreme shadows, so for landscape photographers it is still better to shoot in Raw format, which will at the very least be more psychologically peaceful.
Fuji Raw File Options
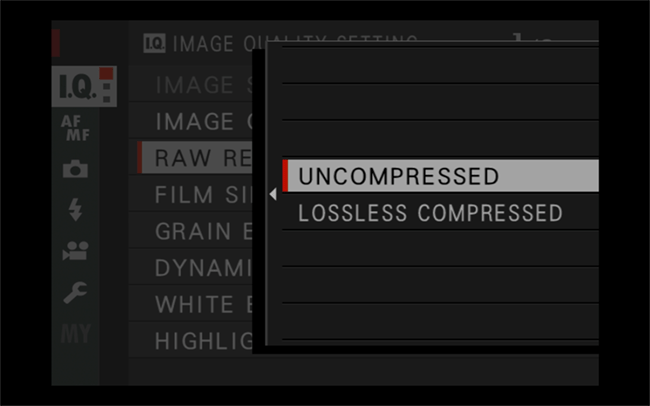
While the first generation Fuji X-series cameras were limited to 12-bit, all modern X-trans cameras shoot in 14-bit by default. Fuji does not allow changing bit depth through the camera menu, but a lossless compressed option is provided on some camera models:
Sony Raw File Options
Unfortunately, many older Sony digital cameras are limited to lossy 11 + 7 bit delta compression by default. After many customer complaints, Sony added an option for Uncompressed Raw on some of its cameras such as the Sony A7R II, but that obviously results in huge Raw files, as explained above.
On the latest Sony cameras such as the Sony a7 IV and later, there is an option for lossless compressed Raw.
Conclusion
Even if you decide to shoot Raw, and you should, there are still a few different options for them. For most cameras, 14-bit lossless compressed Raw is an ideal option, but for some who don’t push their files to the edge, lossy compressed Raw is still much better than JPEG.
I shot in RAW lossless compressed and when I opened the file with Lightroom the image was very grainy.
A normal sensor after DXO has up to 26-bit color debt… And now you need 14-bit x 3 = 42-bit Color bits. And afterward, you reduce the colors to 24 bits for JPG and most monitors can only 24 bits… Sorry, I am an engineer, I have worked in that area, 10 Bits are far enough and 12 bits are generous. Still, for yellow, you need fewer bits and for red, you need more bits. But it is even more insane, normal people cannot see the difference … but even worse, I give you 2 pictures done with a good and a bad camera and you should decide within 10 seconds which picture is done from which camera… 99% of the people will fail! With fewer color pixels the images look often better because the colors are more punchy… How many different color bits has the most expensive picture Mona Lisa? Guess 1000 different colors?
The extra bit depth is about adjusting a picture in post-production. In a well exposed picture you won’t see the difference between 8 bits or 12 or 16, but the lower bit depth image has fewer steps between colors and shades. If your picture was under or over exposed, you can compress the histogram in half and then the 16 bit image becomes effectively an 8 bit image, and still has a well-defined color space, where a lower bit depth would start to show banding between shades. This assumes that the sensor is actually capturing usable sensor data in those extra bits.
You have a major misconception about RAW files of bayer matrix sensors. Those RAW files DON’T record one 12/14/16bit value per channel – they store one value per pixel! Each pixel on that sensor has a dedicated color through its color filter before it (R, G or B). So a 24MP sensor with 16 bit only results in just ~11MB more data compared to a 12 bit sensor.
When is it best to use compressed files? When is it better to use uncompressed files? *
@Nasim Mansurov
I don’t know if you usually read the comments to your articles, but if you read this, let me tell you that you need to fix something in your article. You’ve got a fact wrong in your article. In the section where you talk about 12, 14, and 16 bits per sample in the picture, you say:
“And although most digital cameras today don’t even have an option for 16-bit RAW files, if it became available, you would be pushing over 281 trillion tones per pixel. That’s a heck of a lot of data to work with – you can only imagine how big those RAW images would get without any compression!”
That last sentence there is wrong, because it assumees that an uncompressed 16bits-per-sample picture would be larger than a 12 or 14bits-per-sample. That is not the case though. This would only be the case if each sample started exactly where the last sample ended for 12 or 14bits-per-sample, such that the last bit of one sample was immediately followed by the first bit of the next sample. However, that’s not the way uncompressed raw pictures are stored. That technique is known as bit-packing, or being bit-aligned data, and I’ve never heard of any camera that saves uncompressed raws this way. Instead, cameras store uncompressed data being byte-aligned. That is, each sample is stored in a multiple of 8 bits. 8 bits = 1 byte. If a sample contains more than 8 bits of data, but less than 17 bits of data, then the entire sample will use 16 bits. If it’s a 12bit sample, then those 12 bits are stored at the start of the 16bit sample, and the remaining 4 bits are 0 (zero). The reason this is done is that computers, and even the micro controller in the camera, process data 1 byte (8 bits) at a time, instead of 1 bit at a time. Therefore, packing the data to its exact bit size (such as 12 bits) requires additional code in the software for shifting bits, and this makes the code bigger and take longer to execute. This is inefficient. Therefore, unpacked data is the way it’s stored, and each sample of 12bit or 14bit size actually occupies 16 bits in memory and on disk (or memory card). A 12bit uncompressed raw will take exactly the same amount of space as a 16bit uncompressed raw.
In fact, only a compressed (either lossy or lossless) raw image will suffer for larger bit-depth images. This is simply because there are more possible values with larger bit-depth samples, and so it is less likely that there will be repeated values (redundancy) in the image. Data compression algorithms depend on redundancy to compress the data, so a larger bit-depth image will not be compressed as much, and thus the file size will be larger.
Great article thank you! Shooting a Nikon D7200 on an important shoot noticed my RAW files were “milky” and post production a task to bring up to correct definition & colour. The adjustment from 12Bit to 14Bit & the difference between Lossless and Compressed a real eye-opener!
it was very important to Realize my Questions. Now i know the best way to choice my shooting format. Thank you Very Much Sir.
Hi Nasim,
I try to understand something;
If the compressed raw format is OK, why is the uncompressed raw option still present?
What do you need it for?
Regards
Read answer No. 27. CPU eats power… relieving it from work delivers more battery power.
Hi guys, did anybody notice if the lossless compressed RAW on a Fuji XT-2 is actually draining the battery much faster than with uncompressed RAW? I’ve been using 2 Fuji XT-2 for 1 year now, but i only started using the losses compressed RAW some 3 months ago. Funny how, just in the same period i started noticing that the batteries life has become much shorter: 3 batteries (1 in the body plus 2 inside the vertical grip-booster) used to last kinda the whole working day, while now i’m lucky if they last 2/3 hours or so.
No difference from each of the 2 bodies, regardless of the combination of batteries (i have 4 Fuji and 4 Patona)
For a complete information, i shoot LOSSLESS COMPRESSED RAW +MEDIUM SIZE/NORMAL QUALITY JPG, in order to have a proper JPG preview to work on while reviewing a shooting, since the embedded JPG preview of Fuji is too much too small.
Any thoughts or suggestions..?
Carlo.
What about Pentax?
Did you forget about Pentax or was avoided on purpose?
DNG or PEF, which is better?
This article needs an update.