Modern drones can produce excellent image quality, but they’re still limited by physics. With smaller sensors and difficulty using multi-second exposures, images from drones can be noisy or low in dynamic range. Fortunately, there are plenty of ways to fix these drone image quality issues. In this guide, I’ll show some of my favorite image quality tricks for drone photography that take just a few post-processing steps. As a bonus, these same strategies work for images from any camera!
Table of Contents
Start with a Clean File
Just like with any digital camera, the best way to fix image quality issues is not to have them in the first place. Good shooting technique is key. In particular, picking the right shutter speed, focus point, and aperture is crucial.
Starting with shutter speed, you not only have to consider the motion of your subject, but also the motion of your drone itself. What helps the most is to ensure your drone is hovering, rather than moving, while you’re taking a picture. Likewise, waiting for a lull in the wind can help a lot, too. When there’s no wind and your drone is hovering in place, shutter speeds longer than one second can be feasible on some drones.
Focus is a bit easier. For most drone photography, you’ll be sufficiently far away from the nearest object in the foreground, and you can focus anywhere in the scene without issues. Only for more unusual drone photos, where you’re close to your subject, do you need to worry much about where to focus. If that’s the case, either focus on the subject if that’s what you want to be the sharpest, or focus at the double-the-distance point in order to maximize depth of field.
The best aperture – or even the ability to set the aperture at all – will vary by drone. Most drones have pretty small sensors, so you’ll running into diffraction issues with your lens pretty quickly. For instance, with a one-inch type sensor (2.7x crop factor) drone like the DJI Air 2S, an aperture of f/5.6 already has about as much diffraction as a full-frame sensor at f/16 (given the same print size). So, you may want to do some tests to determine the sharpest aperture on your drone. It will likely be around the f/4 mark.
Shoot RAW
If your drone offers it, shooting RAW files is key to getting the best image quality. Unlike JPEG files, RAW files contain much more information about color and exposure, as well as allow for greater control over things like vignetting and distortion correction.
With a RAW file, you’re able to recover shadows, change white balance, and make sharpening/noise reduction edits more easily. To make the most of the techniques in this article, shooting RAW is the way to go.
Note: If this is your first time shooting raw files, the downside to keep in mind is that you will have to edit them in dedicated post-processing software to get the right look. The most common RAW processor is Adobe Lightroom.
Exposure Bracketing
One of the most effective techniques for improving drone image quality is to shoot exposure brackets and merge the photos into an HDR.
In other words, you take multiple photos of the same scene, but at different exposures. These brighter and darker exposures help capture more information from the shadow and highlight areas. They also come in handy if your initial, metered exposure was wrong.
On most drones, shooting these bracketed exposures is basically effortless. With DJI drones, for example, all current models except for the Mini SE support this function automatically, via the AEB shooting mode. You can also get the effect manually with any drone that provides controls for exposure or exposure compensation, by manually taking darker and brighter photos.
For most purposes, a 2/3 stop or 2/3 EV difference between frames should be good. In general, a three-photo HDR is perfectly fine, but for some scenes (like when the sun is in your frame) you may be happier with a five-photo HDR.
How do you blend the photos once you’ve taken them? You can either manually blend the exposures or use an HDR tool in your post-processing software. I’ll go through the process in Lightroom next.
1. Lightroom HDR
One of the easiest ways to merge an HDR is with Lightroom’s built-in tool. Unlike the mid-2000s HDR, with crunchy gray skies, Lightroom’s HDR implementation is far more subtle. It blends the images together with simply more shadow and highlight recovery than a single image.
To merge the images to an HDR in Lightroom, select each image, then right click and choose Photomerge > HDR (or just press Control/Command+H for the HDR shortcut). In this dialog, you should leave “Auto Align” on in case your drone shifted slightly between shots. I turn off “Auto Settings” and adjust the settings manually after the merge is done.

“Deghosting” removes blur from objects in the photo that were moving. For drone shots, this will be things like cars, pedestrians, flowing water, or trees blowing in the breeze. I think there’s little harm to leaving it set to low or medium, with the overlay turned on. The overlay will show in red the areas that have ghosting detected – a lot of red may indicate a poor quality merge, as there’s too much movement.
After those options are set up, you just need to click merge. Within a few seconds, Lightroom should add a file labeled -HDR to your catalog, alongside the original images. Make sure to edit the HDR version of the photo. You can process it like any other RAW file, including bringing it into Photoshop for more in-depth editing.
2. Manually Blending Exposures
For some situations, just using an automated HDR process isn’t enough. Whether you’re looking to create a special effect, like a day to night transition, or are just dealing with a composition that has a ton of subject movement, simple HDR processing may not be able to handle it. Instead, you’ll want to consider manually merging your exposures later.
This can be a particularly useful technique for drones with long battery life, as you could potentially capture a foreground lit by the sunset, then wait into twilight to capture just the right sky or ambient lights, blending the best parts of those frames together.
There are a variety of approaches to blending exposures manually, including luminosity masking, blend modes in Photoshop, or manually masking with layer masks. Each comes with its own set of advantages and drawbacks. For more information on those techniques, check out our linked guides above.
Image Averaging to Reduce Noise
Closely related to exposure bracketing is the concept of image averaging. In essence, you are taking multiple identical photos of the same scene, then averaging them together to reduce noise and increase dynamic range. For drones, this can make shooting under very dark conditions far more feasible, and it’s also quite easy to implement.
Unlike exposure bracketing, you don’t need to change any settings for image averaging. All you need to do is take several pictures in a row of your subject. Since most image noise is random, in editing, you can combine these multiple frames to see the “average” pixel for each location, thereby reducing noise. (The same technique can replace HDR if you want to use it that way, as we detailed here.)
The best way to capture a set of images to average is to use the burst mode found on most drones. I recommend a 5-image burst. On my drone, I choose burst mode, and then get five images in a row that are all very close in composition.
The more images you average together, the better noise reduction you’ll get, but it’s also a case of diminishing returns. Each time you double the number of photos in a burst, you cut the amount of noise in half. I stick to a 5 image burst, except in very dark situations, where I take a second set of images, for a total of 10.
Editing is also quite easy. We’ve explained all the steps in the past, but essentially you just let Photoshop align the images, then blend them via a smart object.
Alternate Debayering for Fewer Artifacts
Drones, like most other digital cameras, rely on an array of small colored lenses over the individual pixels to help create a final color image. One important step post-capture is debayering, where, to simplify, software has to “fill in” the information that isn’t fully captured by those color filters. Whether you let the drone perform this step when outputting a JPEG, or you debayer in your RAW processing software, the debayering process can have a big impact on the look and quality of the final file.
Choosing an alternate debayering approach, like Lightroom’s Enhance Details mode or DxO’s PureRAW software can result in fewer artifacts and better pixel level detail (PureRAW also offers more deliberate lens corrections and noise reduction).
Note: This is particularly important for some drones with unusual sensors. Drones like the Mavic Air 2 and Mini 3 Pro use a “Quad Bayer” layout to help get that 48MP spec. This quad layout is just a different implementation of the traditional sensor setup, but does make a big difference in the look of the final file. I find it particularly noticeable on trees, where the fine green details take on an unusual texture when debayered with normal approaches. While all drones can benefit from more deliberate debayering, drones with a quad bayer sensor get an outsized bump to image quality.
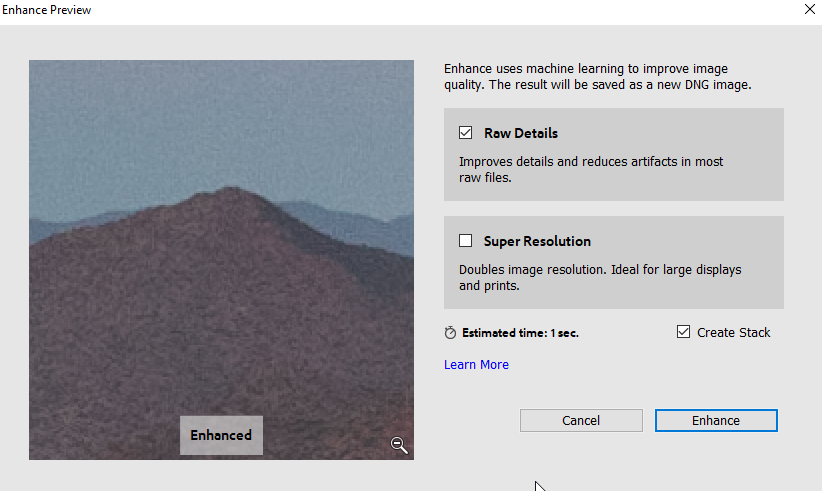
1. Enhance Details via Adobe Camera Raw
To use Enhance Details, just right click the image in Lightroom, then select Enhance. The “Raw Details” checkbox will make use of Lightroom’s alternate debayering method, creating a file of the same dimensions, but which should have reduced artifacts. (The other box, “Super Resolution,” also upscales the image to double the original resolution.)
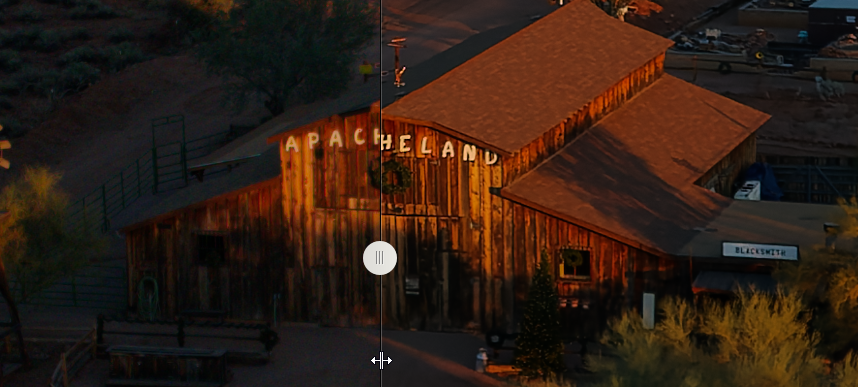
2. Alternative Debayering with DxO PureRAW
Another of the popular tools for alternative debayering is DxO PureRAW, which also has noise reduction and lens correction components. As you can see in the screenshot below, the difference in drone photos can be huge with these corrections and alternative debayering method.
Conclusion
Whatever image quality issues you face with your drone images, these techniques will help to remedy them. Although most of the techniques above can help for mirrorless or DSLR photos, too, I particularly like them for drone photography. Unlike with a mirrorless or DSLR camera, the improvements can be significant even at regular viewing distances for drone photos, due to the smaller sensors typically found on drones.
Let me know below if you have any questions or image quality improvement techniques of your own!
i use a z908 max drone which is also called the clone of dji mini drone. And the camera is laggy , photos are blurry its worse i was looking on how to fix the camera but i couldn’t find any tutorials on how to do it and i a still stuck with this !
Huh, is Lightroom’s enhance details an alternate debayer algorithm? I never knew – I assumed (blindly) it’s just some AI-based method designed to enhance local contrast or such (so fake detail, basically).
Thank you, will have to look in more detail!
It’s tough to pin Adobe’s documentation down, as they use a lot of buzzwords like AI, but I believe it is a debayering-specific process, as Adobe only enables it on Bayer and X-Trans mosaic raw files.