So you want to get your flash off camera? If you want to improve your flash lit portraits you need to get your flash off the camera. A great way to start is to use Nikon’s own CLS (Creative Lighting System). Since a lot of people will own one of the Nikon Speedlights, getting it off camera and triggered remotely is a very straightforward and relatively inexpensive task. In this article, we will explore the basics of Nikon’s Creative Lighting System and set things up to photograph an image like this:
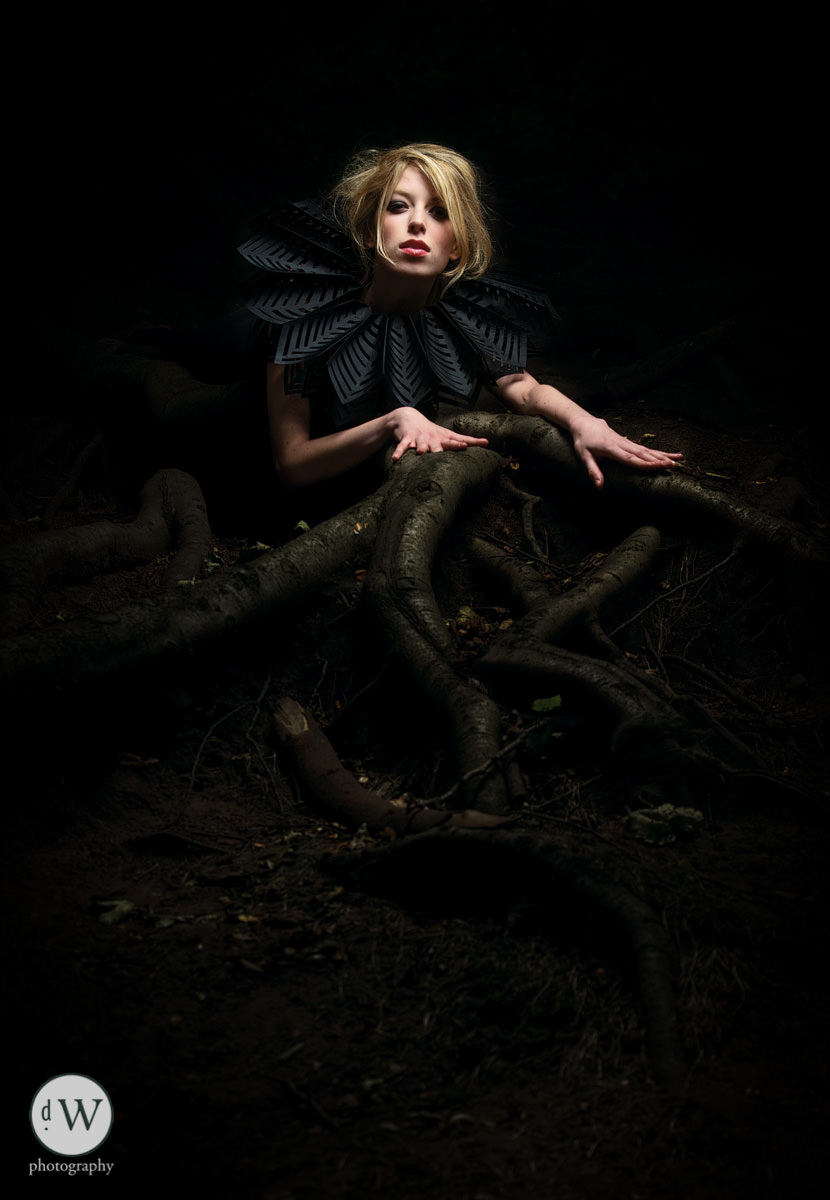
Lit with just one Nikon SB-600 mounted on a shoot-through umbrella above and to the right of the model.
To get started, you will need the following kit
- Nikon DSLR
- Nikon Speedlight capable of being triggered remotely (SB-600, SB-700, SB-800, SB-900 or SB-910). Please see our Nikon Speedlight Comparison article to see differences between all Nikon Speedlights.
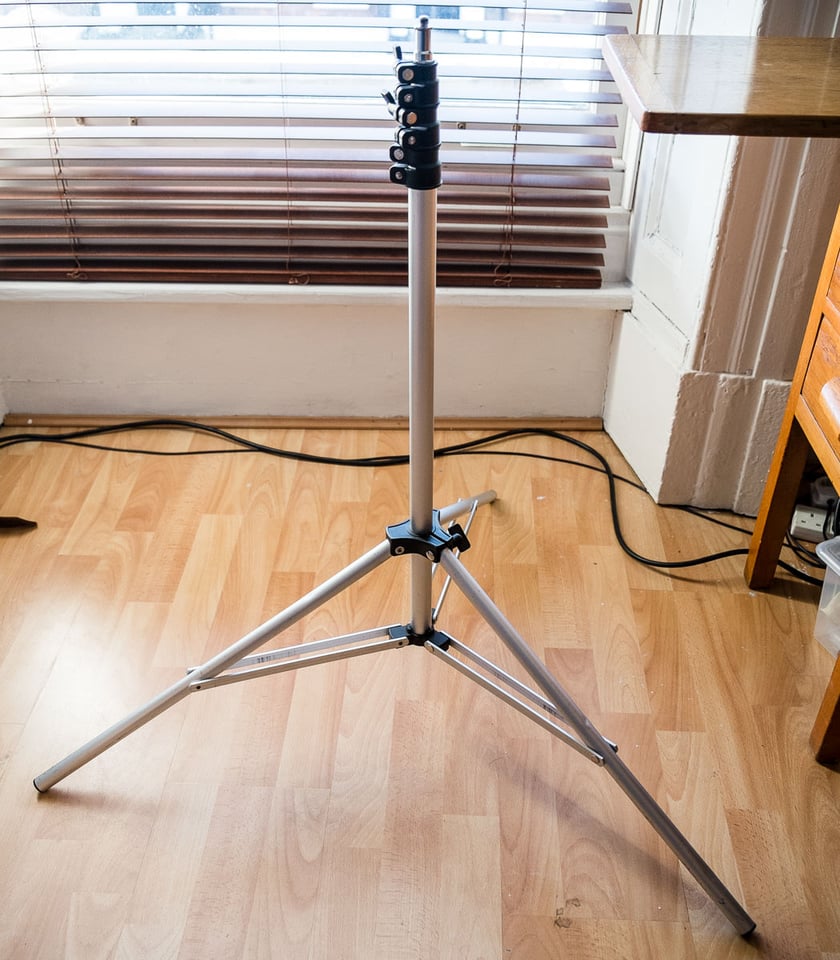
- Light Stand (lots of cheap stands on eBay – eBay Partner Program Affiliate link. We may earn a commission through purchases made via this link):
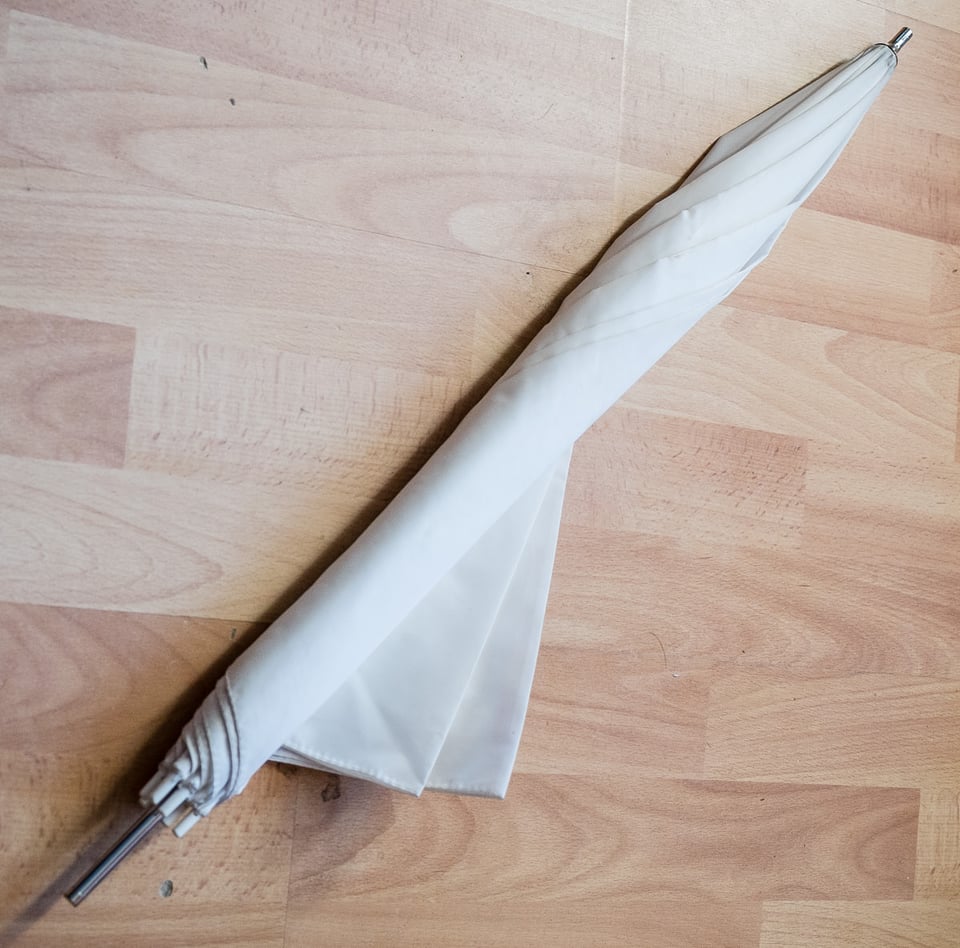
- Shoot-through Umbrella (cheap on eBay – eBay Partner Program Affiliate link.):
- Umbrella Bracket (you guessed it, eBay – eBay Partner Program Affiliate link.):
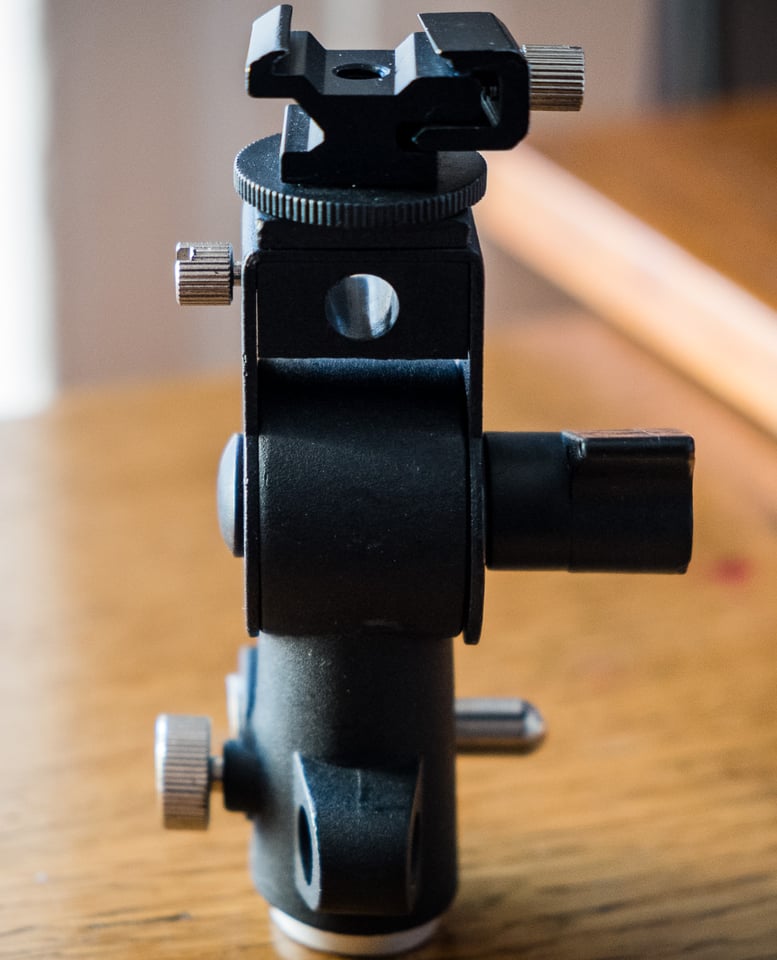
Table of Contents
Putting It Together
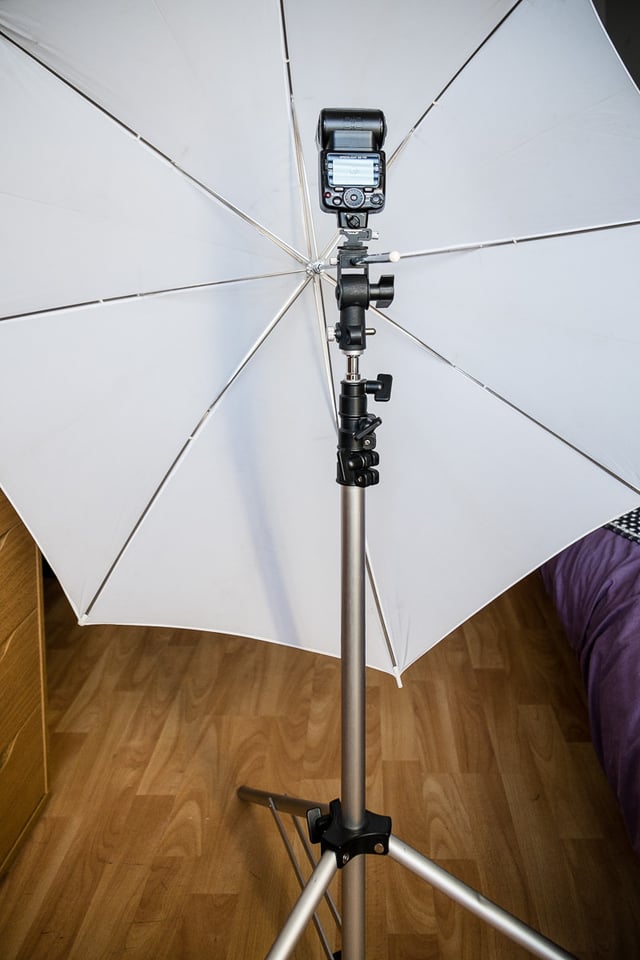
Put it all together is super simple – set up the light stand, mount the umbrella bracket on the light stand, then mount your Speedlight on the bracket like this:

Next, put the shoot-through umbrella into the designated hole and secure it. The end result is something like this:
Why The Nikon CLS System is Great for Beginners
The main feature of the Nikon CLS system is the ability to use TTL metering with the remote flash. This is called i-TTL balanced fill flash. The Speedlight sends out pre-flashes before the main flash, which are then picked up by the flash units TTL flash sensor. This information coupled with the matrix metering system in your camera and lens enables the flash to choose the best output for the flash to balance the foreground/background.
Its like you have a lighting technician working with you holding your hand!
Below is the list of Nikon Cameras that have the ability of using the pop-up flash as a remote commander to Nikon’s range of Speedlights. The custom setting where you will find the “flash cntrl for built in flash” is to the right.
Camera Custom Setting:
- Nikon D800(E) / D810: e3
- Nikon D700: e3
- Nikon D600/D610: e3
- Nikon D300(S): e3
- Nikon D200: e3
- Nikon D7000 / D7100 / D7200: e3
- Nikon D90: e2
- Nikon D80: e3
Setting Up Your Camera
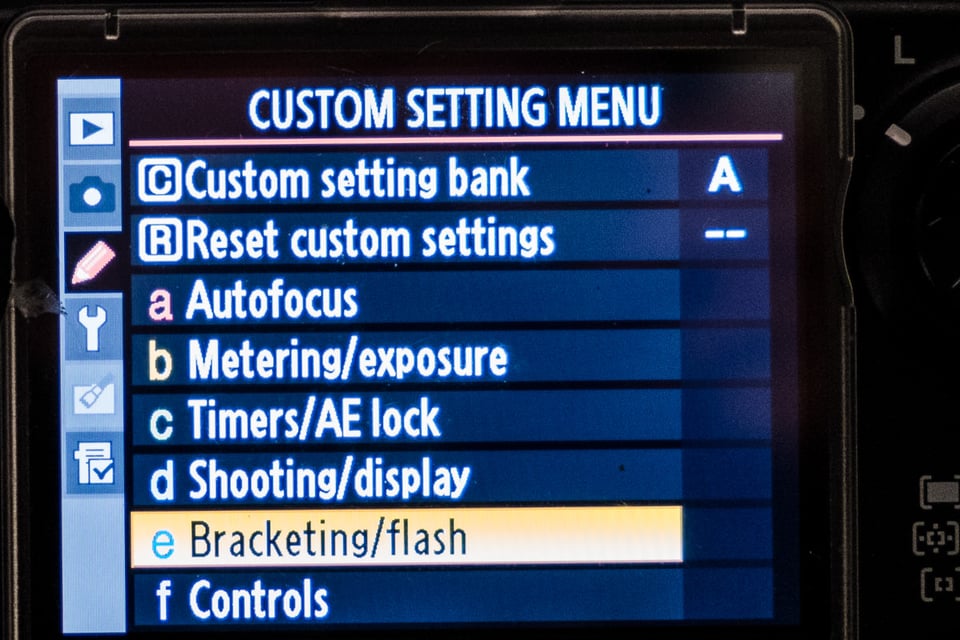
The images show the menu system of the Nikon D700, although other Nikon cameras will be very similar:
- Go to “CUSTOM MENU” and “e Bracketing/flash”:
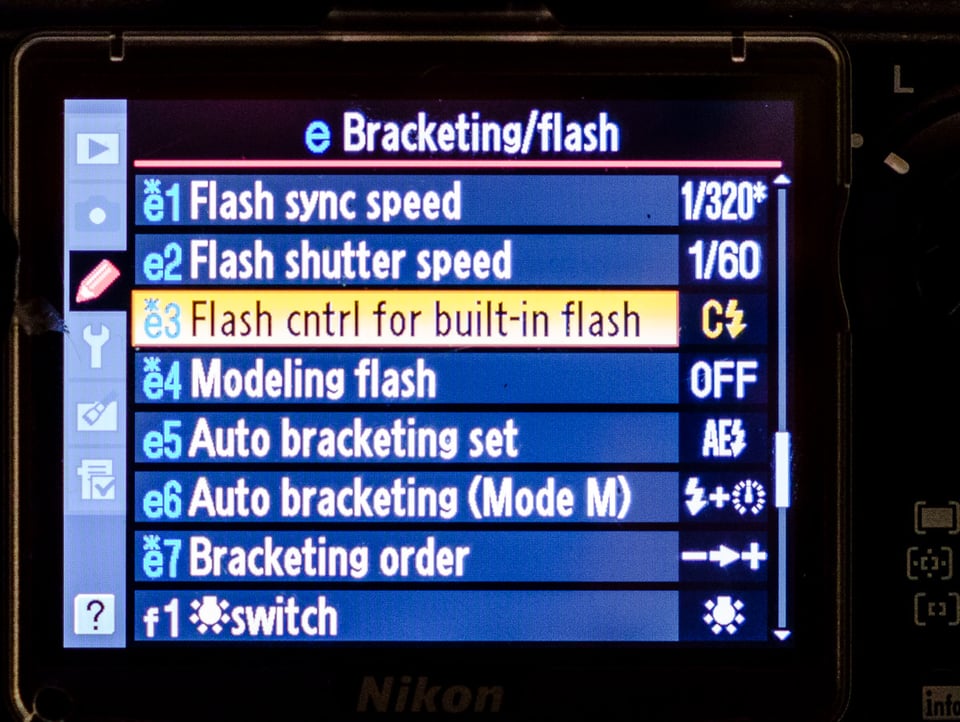
- Go to the appropriate custom setting for your camera (from the chart above). It should be called “Flash cntrl for built-in flash”:
- Go to “COMMANDER MODE”:
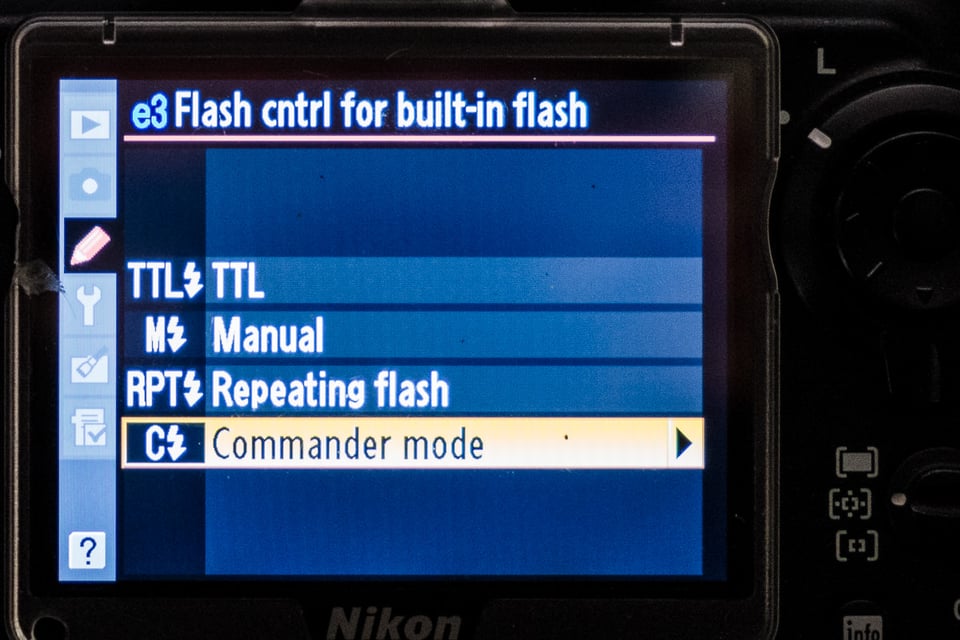
- You should now see settings for the built in flash and two groups of external flashes Group A and Group B:
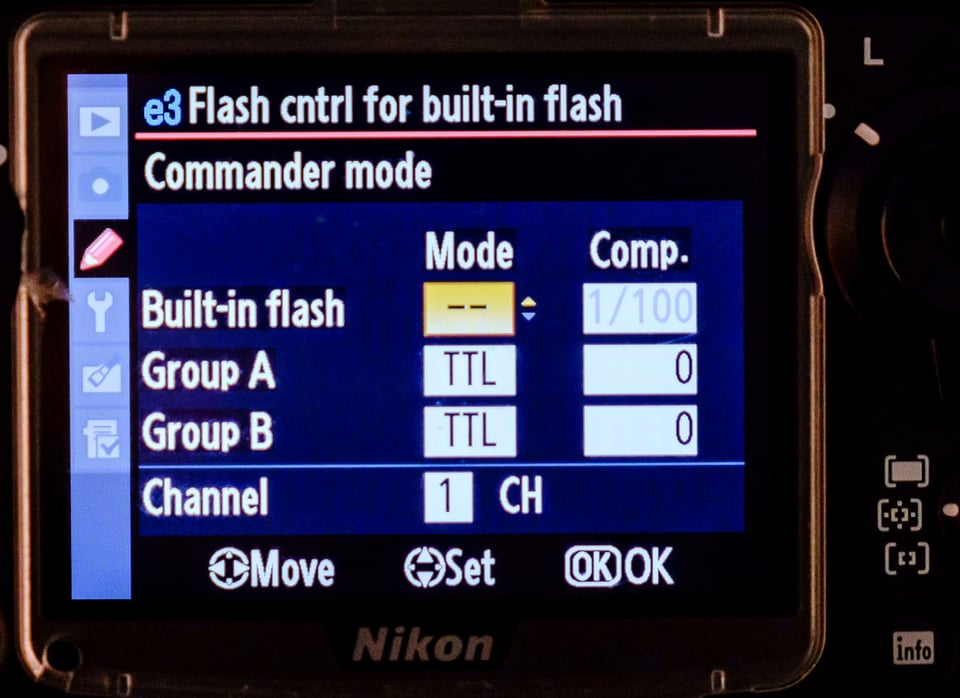
We can control the power of the built in flash and I prefer to have no output other than the trigger signal coming from the pop-up flash, so cycle the mode until it shows to dotted lines like this “- -“. This means the pop up flash is not firing other than to trigger your off camera Speedlight. Although in practice there is a little power still coming from the pop-up flash.
Underneath the built-in flash are two groups “A” and “B”, so we only need to adjust group A until it reads TTL.
To the right is the exposure compensation of the flash, which can be adjusted from -3 to +3 stops of compensation. We will keep it at 0 for now:

Underneath Group B should be “CHANNEL” it should already be in channel 1, if not, set it to channel 1. Once you are in TTL you are set to go with the camera.
Setting up your Speedlight
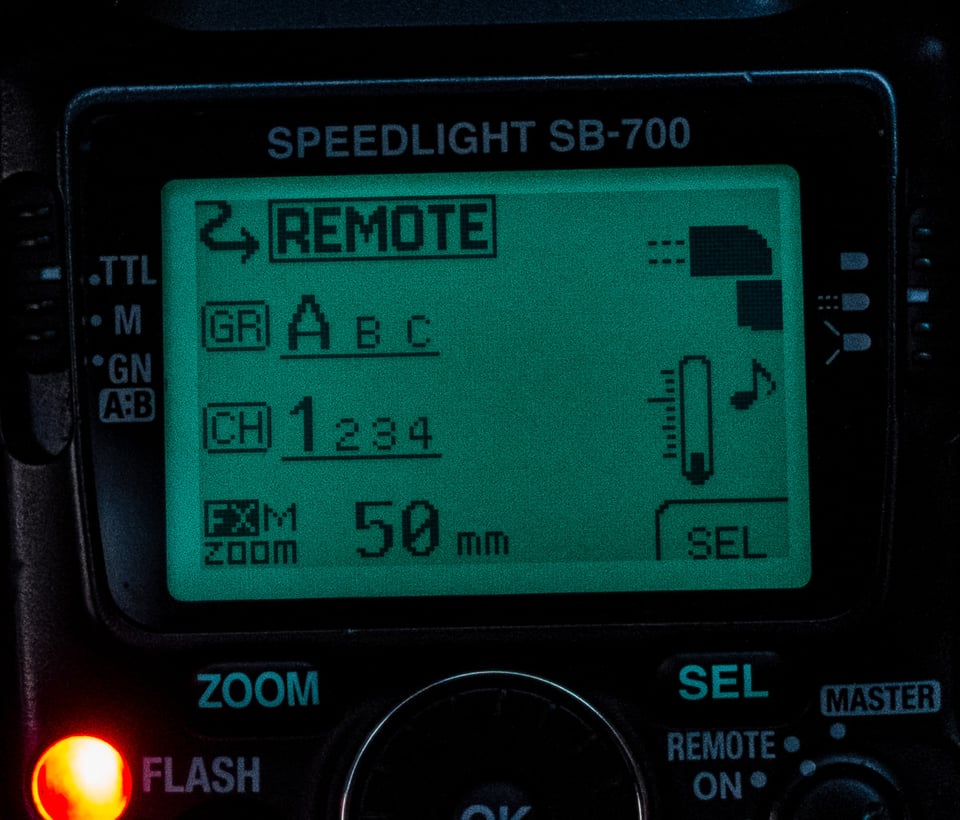
The images shown are from an SB-700, although the menu system in the SB-900 and SB-910 are almost identical.
You need to set your Speedlight to “REMOTE”
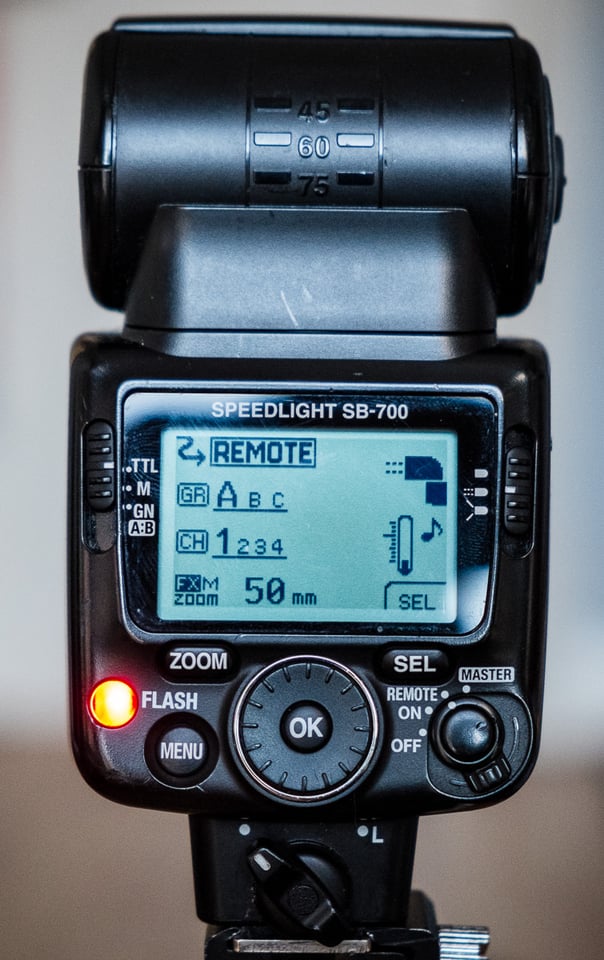
- Set the group to A
- Make sure the Channel is 1
- Keep the flash in TTL mode
Now all you have to do is position your flash and take your picture. If you need to adjust the power of the flash you can set it to +3 or -3 stops of flash power in the camera. This is more than enough to give you pretty good control over the subject/background illumination. The only downside is, since it is an automated process, there can be variance in exposure levels, because sometimes machines do get it wrong!
As a “no-brainer” way to start exploring proper lighting, the Nikon system is great. As long as you get it right in camera, the flash will do the rest for you. If needed, you can adjust the flash compensation in camera.
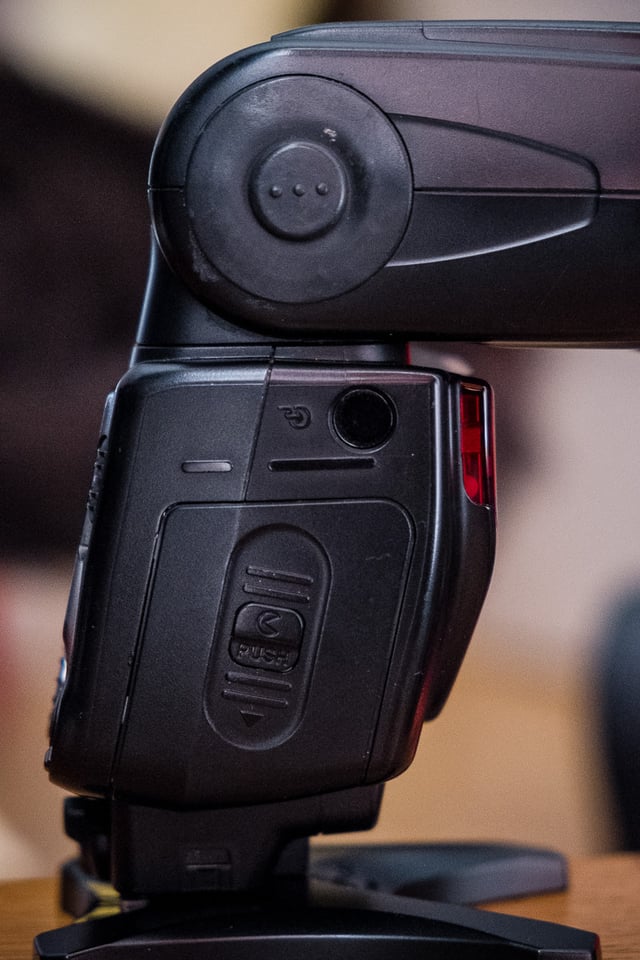
The biggest downside to the CLS system, is it is a ‘line of sight’ infrared system, and as such you might need to make sure the flash IR receiver is visible to the pop-up flash. The IR receiver is the small circle at the top right of the flash body:
You can forget about hiding the flash behind walls – it won’t work. It can also struggle a on a very bright day. I used this system for a couple of years as a wedding photographer and it works great 99% of the time. As a beginner system, you can’t beat the ease of use with the CLS system in TTL mode. So get out there and have fun!
This article has been submitted by David Walters, a wedding photographer from Liverpool, England. You can explore his photography via his website.
I’ve unsuccessfully tried to find an answer to this online and sorry if it’s a dumb question but can I use the SMDV RFN-4 in a similar way to a Pocket Wizard or is it limited to shutter release only? I haven’t purchased one as yet and I’m no sure if they’ve been superseded but I was rather hoping for one solution to two different challenges. I have an SB900 which I bought used and I’m keen to explore off camera lighting. Would you suggest an additional couple (or more) less powerful units to be used in conjunction with the SB900? I have used the Nikon CLS on a few occasions with mixed results especially under the bright Queensland sun. Perhaps one of the generic alternatives to Pocket Wizards would be the way to go? Any assistance gratefully received.
Hi Christopher,
I don’t really keep track of this article comment section as it is a bit old now, so sorry for the lateness of reply.
The unit you mention is actually a wireless shutter release which activates the camera shutter remotely, without being next to the camera.
It is a totally different thing to a wireless flash trigger.
I would imagine you are struggling with the pop up flash in the sunshine, although a SB-900 will have limited effect in direct sunlight anyway?
These type of flashes work better on overcast days, indoors or dusk, darkness, they have limited light output and are far less effective in the open on a sunny day.
here is a link to the kit I have been using as a professional wedding photographer for a few years and they are as reliable as any out there.
The commander has taken a drop on a number of occasions too!
www.amazon.com/YN622…olife0c-20
They work with my Nikon SB-900, SB-700 and a Yongnou 868.
There might be better kit out there now, if you want to do some research and get more up- to date kit.
Although I can whole heartedly recommend this very good and very cheap kit.
Can I also recommend a guy called Joe Mcnally, a fabulous photographer who is a Nikon ambassador for Nikon flash. Get any of his books or videos and you will learn a lot!
Good luck in your journey with off camera flash.
David
I tried this and it worked! Thank you so much for sharing! I am looking into buying the right equipment but my question is. I have a Nikon sb700 flash. How do I know which umbrella bracket to buy? How do I know it will fit my flash? Is there a certain size I should be looking for?
Thanks in advance!
Luckily, umbrella brackets and hot shoe adapters are all the same size. I just looked at the ebay link, and the only thing you need to make sure of is to get both the bracket and the hot shoe adapter. I looks like on that page some of the listings only have the bracket without the hot shoe adapter.
I find Nikon CLS 100% reliable in my small studio, which is not a surprise I suppose. I use SB700 and SB5000, triggered by built-in flash of D750 and D810. I tried experimenting with Yongnuo thinking it would expand my capability but I find them unreliable (even in my small studio) and also extremely cryptic in control structure. I shoot manual setting BTW, not TTL, when using off camera strobe in my studio.
Hy,
That looks like what I’m trying to do to start knowing about flash off-camera.
You listed in the article various speedlight.
Will I be able to do that kind of set with a SB-26 either? The speedlight must be put o remote, so does the SB-26 have this feature?
I read that mixing new speedlight with old ones can be little tricky, but just using one SB-26 with ths kind of set and a D700 will be possible?
Thanks a ot guys.
Roberto
The SB-26 can easily be triggered remotely, but not in the same manner as a CLS flash like the SB-600, SB-800, or SB-900-series speedlight.
The SB-26 does have a built-in optical slave, but it’s not compatible with the CLS system, if you’re looking for TTL exposure.
My understanding if you attach an SU-4 slave unit to an older flash like the SB-26 it can be triggered in a semi-TTL mode if you use connect an SB-800 or SB-900-series flash unit that’s set to SU-4 mode directly to the camera’s hot shoe or with an off-camera TTL cord like the SC-17, SC-28 or SC-29.
In this type of setup, the main flash that’s attached to the camera can be used in TTL mode and will trigger the SB-26 via the SU-4 slave unit. The remote flash will turn off when it sees the main light turn off, mirroring the output of the main flash. The SU-4 can also be used in manual mode as a traditional optical slave, but since the SB-26 has it’s own built-in optical slave, it would be somewhat of a waste to buy an additional piece of equipment to trigger the flash in this manner.
I haven’t tried this method of triggering and have only read about it in the Magic Lantern guide to the Nikon flash system, so I can’t vouch for how well it works. As with all optical slaves, the receiver on the remote SB-26 must be pointed so that it can see the light of the main flash, and its range will be very limited compared to radio-based systems when there is a lot of ambient light.
Nikon discontinued the SU-4 many years ago, so you’d have to turn to alternative sources like eBay to find them.
If you’re just looking for an inexpensive way of triggering your SB-26 without wires and don’t mind foregoing TTL, IMHO, an inexpensive wireless system would be more versatile, have longer range and be less expensive than going with an SU-4-based system for off-camera flash triggering, especially if you plan on using more than one remote flash.
There are a number of inexpensive wireless trigger systems on the market some of which start under $10 on eBay. I can’t say I’ve used any of them — I’m using Pocket Wizard X transceivers for my long-range wireless needs — but if you check check out what some of the people on the various Strobist forums are doing, I’m sure that you can find some good information there.
Hey Kenneth many thanks for the explanation. Yes, I’m actually looking for a way to trigger that could be good to go for a beginner. I mean without spending lot of money. Actually It’s not a main issue not having TTL in a beginning cause I’m concerned in learning more about light. So it will be ok flashing them in manual too.
Thanks again.
Cheers.
Good article. People say cls is unreliable or doesn’t work in daylight etc. I found the more you used cls the better it got ie practice makes perfect. Sure it has its limitations but they are easily overcome. The best addition is an su800 controller unit which makes adjustments much faster and avoids blinking subjects which is a negative of using the inbuilt flash or an on camera sb unit
I’m really happy with my V860, which i purchased here .
Godox is very affordable i think
With careful shopping and/or just good luck I have an SU-880 for $80. and 3 SB-600’s at $100 each.
I combined this setup with Aokatec radio triggers which turn the SU-800’s infrared signal into radio.
A complete Aokatec 3 flash setup ran me around $120.
CLS without the line of sight limitations, 3 flash’s for a total of about $500.
Hi Sir,
I’m so eager to learned about photography i have D3100 which i purchased 2 years ago..But i have read some blogs says that d3100 is not good enough.For a beginners like me, will am i going to have the benefits from D3100 or do i have to upgrade new one.
Please advice,
Thanks,
Hajilen
For general photography, you’re only limited by your own creativity, because cameras don’t take pictures, people do.
In other words, the pictures you produce have nothing to do with the camera you use, but how YOU, the photographer uses the camera.
That said, there are some types of specialized photography that can benefit from having a more advanced and capable camera.
Although I have never used one, the D3100 your purchased should be more than adequate for your needs. It’s actually far more advanced than what I started with over 30 years ago, and a lot better than the first digital cameras I used over 15 years ago.
Hi everyone, thanks for all the helpful comments and further great information on more advanced lighting set ups. Like sceptical1 says the next step is to get some radio triggers. I have been using 2x 622n and 622n-tx with 2x sb700 for about a year now. Before I upgraded to the Yongnou I was using the pop up flash with the two sb700’s very effectively, even in daylight outdoors. It gets a bit tricky with the line of sight, but it works 95% of the time. It all depends on your budget how you are going to upgrade from the basic set up. As other people have commented you need to switch the setting in camera to manual and then you can totally control the output of the flash independent of the camera. The image at the beginning of the article was shot using the pop up flash of the D300s with an SB600 using manual control and a shoot through umbrella. As long as you have the commander flash in the – – position and you are a few feet away you wont get any light spill from the pop up flash. The image was shot in the daylight under cover of trees so I closed the aperture to 5.6 at 125th second and without using a light meter dialled in the required flash. Usually start around 1/8th power and then its just a case of looking at your camera rear screen. Not a perfect way of doing things but a lot more intuitive and faster than using a light meter.
I wrote this for the total newbie so I hope it helps beginners raise their confidence with what they can do with a camera.
Hi David,
Thanks for writing a nice introduction to CLS.
Adding a Speedlight (or two) with some type of light source like an umbrella or softbox is the best way to improve any type of portrait photography. Of course, it can be used for many other types of photography as well.. I use lights all the time for fill flash or to add drama to pet pictures – and not just pet portraits but for some action shots as well. If you aren’t taking advantage of this you are really missing on one of the key advantages of more advanced camaras.
David explained how to use the built in optical triggering very well. That said, adding radio transceivers adds versatility by providing more reliable triggering in bright light and removes the line of sight requirement. The great part is you can get very inexpensive radio systems that provide full TTL control including useful features like high speed sync (HSS). The Yongnuo system is very inexpensive and you get all the TTL features. Further, you can use them with less expensive Speedlghts from other vendors so you are not limited to Nikon (note that I do suggest having at least one powerful high end flash. I really like the Nikon SB-910.Get one used if money is an issue) Of coure these Yongnuo’s work with Nikon and Yongnuo flashes, but also other brands like Metz work perfectly.
Trust me when I say rhis – learning to use flash (eventually you want to master both CLS / TTL and manual) is the least expensive way to improve your photography. Forget spending more on higher end camera bodies – keep your existing likely very capable DSLR and get some lighting gear. It will make you happy!