Happy Sunday everyone! New week is about to start so I thought I’d run this Lightroom Question & Answer session. For the next few days (depending on how active you are) you are welcome to ask any question you like about Lightroom and I will do my best to answer them! Each time a question is posted by you in the comments section below, I will update the article as soon as I come up with the answer. If there are any questions very specific to a certain case, I may answer them in the comments section. Specific, to-the-point questions will be answered in this article, while questions requiring more extensive explanation will be covered in separate articles in the future. I know many of our readers know a lot about Lightroom and you are most welcome to participate. If you are new to Adobe’s Lightroom and find it difficult learning what’s what, this is the time and place to ask for help!

Questions about Adobe Photoshop Lightroom
Here are some of the questions I have been asked already in no particular order. I will update this list with new questions as soon as I find an answer to them.
- Can you rename photographs within Lightroom?Yes! Lightroom is not just a post-processing tool, it is also a very powerful photo manager. Even so, this particular function isn’t as apparent as one might hope. To rename source photograph, go to your Library Module and choose “Rename Photo…” from Library menu (or hit the F2 key).
- How to cancel color toning with adjustment brush and gradient tool?Resetting color effect or virtually any other effect or slider in Lightroom is very easy. All you have to do is double-click on the name of the effect or adjustment slider. Alternatively, you can cancel the color effect by dragging color marker to the very bottom of the color selection box. This has the same effect as setting Saturation of that color effect to 0.
- Can you hide Edit Pins in Adjustment Brush, Spot Removal and other tools?Hitting the H key with the tool engaged will toggle between visible and hidden Pins. This is especially helpful if you want to see the effect on small areas that would be otherwise covered by Pins. Alternatively, you can hit “T” key to toggle tool panel and choose from there.
- Can you change font size?Font size on high-resolution monitors and especially for those who have eye problems may be a bit too small in Lightroom. Fortunately, there’s a way to increase the font size. To do that, go to “Preferences…” in “Edit” menu and select “Interface” tab at the top of the window. There you will find font size setting (second drop-down menu at the top of the window). You have the option of letting Lightroom decide on the size automatically (based on screen resolution) or setting it manually to small, medium, large and largest. Interestingly, increasing font size will effectively increase the size of everything, so be careful with the largest setting! I changed font size to largest just to test the effect and ended up with side panels taking up half the screen on my 1080p Dell monitor… New font size takes effect after you restart Lightroom.
- Does it matter which adjustments you do first?No, it does not. You can first adjust Sharpening and then Noise Reduction, or start with Noise Reduction and then move to Sharpening. It doesn’t matter which way you do it. This also means you can first set Vignetting and then crop your images, or crop first and then do the Vignetting – in both cases the result will be the same. You can also cancel any adjustment at any time and in any order you like, they are independent of one another.
- Difference between sync, auto sync and copy settings. How do you apply settings from one image to selected images?All of these settings are used to apply adjustments to several images. Copy Settings option lets you choose which adjustments to paste on a new image (or several of them). This means you can copy and paste just the Sharpening, Vignetting and Tone Curve adjustment from one photograph to another, for example. These settings will also be saved in Lightroom’s clipboard, so you can paste them again anytime.
Sync lets you apply all the selected adjustments from one images to a number of others the same way Copy Settings does, but bypasses the paste step and doesn’t store these settings in Lightroom’s clipboard. You select which setting you want synchronized by clicking on the Sync button at the bottom of the right-side panel. From there, you choose the settings you want to be copied to selected images. Remember to highlight the image you want setting copied from before you sync.
Auto Sync will synchronize adjustments among selected images in real-time, so what you do to one image will be done to all selected images as you go.
- How to quickly reset tool or tab settings?To reset specific tool settings, double-click on the title next to the slider. You will notice that some Tabs have different sections. For example, the Basic Tab has WB, Tone and Presence sections. To reset the whole section, double-click on its title or hold down Alt key and click once. To reset all settings, click on Reset button at the bottom of the right-side panel. Some tools, such as Local Adjustment Brush, will have a reset option at the bottom of the tab which will reset all the adjustments of that particular tool to default values.
- How to view additional image information such as lens aperture, focal length, etc?If you want to see more information about a specific image in Loupe view (which shows a single enlarged image), cycle through view options by hitting “I” key. To display information about each photograph in Grid view mode, hit “J” key. To set up what sort of information is shown in either mode, right-click on any image while in Library module and select “View Options…” (or hit Ctrl+J). There, select what information you want to be shown. There are tabs at the top of the window for both Loupe and Grid view modes.
- How do you compare post-processed image with the original?If you want to compare before/after versions side by side, hit “Y” while in Develop Module. If you want to switch from one to another, hit “\” key instead. Engaging split view mode can be done using tool bar (hit “T”). At the left side of the tool bar, you will find Loupe and Before/After view modes. You can cycle through left/right, top/bottom and split by clicking on the view modes icon or choosing the setting you like from a drop-down menu next to it.
- How to compare before/after effect of a specific adjustment?Every Tab on the right-side panel has a small switch at the top left corner. Switching it on and off will either show or hide the effect of that Tab on the image. Some tools, such as Local Adjustment Brush, have this switch at the bottom left of the tab.
- Can you zoom in the same way you can in Photoshop (Alt+Mouse Scroll Wheel Up or Down)?Unfortunately, no. Hopefully Lightroom will implement this zoom option, but for now the easiest way is by hitting Space Bar (will zoom in to last position) or left-clicking directly on the image/Navigator. Unfortunately, there is no way to zoom in to a variable level, meaning you can only enlarge to a pre-set magnification. You can select how far you want to zoom in (2:1, 1:1, 1:2, etc.) by selecting appropriate setting above the Navigator on the left-side panel.
- What is a Catalog?Simply put, a Catalog is a Lightroom-specific database file. Employing a database system means Lightroom does not work with the original files directly. Instead, it stores information about them – along with rendered previews – in a set of files that make up a Catalog. To learn more about Catalogs, read our “Lightroom Catalogs Explained” article.
- Can you convert camera manufacturer-specific RAW image files to DNG that have already been imported?Yes, and there are several ways to do that. Firstly, you can right-click on the image and select “Export to DNG” from the “Export” menu. This will save selected images as DNG in chosen directory. You can also convert images to DNG in Lightroom’s Catalog by choosing “Convert Photo to DNG…” from “Library” menu while in Library Module. This will not overwrite the original RAW file, but create a new one in DNG format and replace the original RAW in Lightroom’s database with it. Again, the original RAW will remain intact on your hard drive. Finally, you can export files as DNG through Export window (hit Ctrl+Shift+E) by choosing DNG format in the “File Settings” section. You can automatically add exported files to Catalog by selecting “Add to This Catalog” checkbox in the “Export Location” section of the Export window.
- How do you stack photographs/Virtual Copies?Virtual Copies are stacked by default. Each Virtual Copy will have a sequence (x of y) displayed at the top left corner of the thumbnail in Filmstrip. Click once on the sequence number to collapse the stack, click again to expand it (or just hit “S” key if in Library Module). You can stack separate images as well. All the stacking controls can be found in “Stacking” section of the “Photo” menu in Library Module.
- Can Lightroom be used without cataloging photographs? (Thanks, Carol!)Simple answer – no. Whether that’s good or bad is, of course, subjective. Lightroom is intended to be a photo manager as much as post-processing tool, and in both regards is very capable. You cannot, however, bypass importing your images into database before you start editing images. However, once you do that, you can just go on straight to Develop Module and post-process. Importing from hard drive is a very quick process. Once you’ve exported the final work, you can delete the files from Catalog if you like. In any case, you don’t have to deal with actual image managing part except for the import if you don’t want to.
- Is it possible to display text on just some of the images when setting up a slideshow? (Thank you, Anthony and Piettro!)Previously, I thought this was impossible. Thanks to our reader, Piettro, for pointing out a solution! You can display custom text on each photograph by filling in specific information in Library’s Metadata tab. Look for a text field called “Title” and input information you want shown on the slide. Then, go back to Slidewho Module and, after clicking ABC on the tool panel right above the Filstrip, chage setting from “Custom Text” to “Title”. You can use other options, too.
Having said that, Slideshow Module isn’t particularly powerful for more sophisticated work. If you need that, best look at something dedicated to the task, like Photodex ProShow Producer.
- Where can I store “physical” image files when using Lightroom’s Catalogs? (Thank you, Kathleen!)Anywhere you like. You can let Lightroom affect where your images are stored on the hard drive to any degree you like. For example, you can use it to “physically” move the files to specific folders according to whichever photo organizing model you choose, or you can just throw the image files into one single folder and manage photographs inside Lightroom environment only (with Collections, for example). It doesn’t matter how many Catalogs you use, either.
- Is it possible to create collages in Lightroom? (Thank you, Faz!)There is no dedicated collage function in Lightroom as far as I know. But you can do it using Print Module. Select “Custom Package” from Layout Style tab on the right-side panel and drag-and-drop images from the Filmstrip onto the page. You can place them anyway you like. Don’t forget to set up page size and resolution. Also, you will want to set “Print to JPEG” in the “Print Job” tab. Not the best solution, but if you must do a collage using Lightroom, this is probably the way to do it.
- Can you add borders/frames with Lightroom? (Thanks again, Faz!)Again, there is no dedicated feature, but a workaround does exist. The border/frame will be very simple. You can also have it in black or white only. Mind you, you’ll have to choose between Post-Crop Vignetting effect or the border, because both are done using the same tool. To add a border, go to Effects tab in Develop Module. There, set Post-Crop Vignetting Amount to either +100 (for a white border) or -100 (for a black border), Midpoint to -100, Roundness to -100 and Feather to -100. There you go, a basic image frame! You can play with its shape and color/transparency using Amount, Midpoint, Roundness and Feather sliders. Changing Style and adjusting Highlights slider will also have a slight effect on the tone of the border. Here’s an image sample with me grinning at you:

- Can one post-process a photograph using Lightroom and External Editor multiple times by switching back and forth? (Thank you, Ken!)Yes! However, that would mean ending up with several versions of the image on your hard drive and in your Catalog, as each time you use an External Editor Lightroom exports the file as TIFF or PSD and then imports it back again. Read more in out “How to Use External Editors” article.
- Can Lightroom overlay photographs with camera focus points? (Thank you, Jim!)Though that would undoubtedly be a useful feature, I’m sad to say Lightroom does not support it out-of-the-box (there might be plug-ins available). Correct me if I’m wrong about this, but focus point information is embedded in metadata and some RAW converters, such as Aperture, can display them. Perhaps Lightroom will support focus point overlay in the future. You can suggest Adobe implementing such feature using their Feature Suggest/Bug Report form.
- Can you reuse a brush on the same photograph by copying it to amplify effect? (Thanks, Arnold!)Unfortunately, you cannot copy and paste individual brushes to multiply them and strengthen effect. Lightroom can only replace brushes with new ones using Copy Settings function. If you want to add a stronger effect than possible with a single brush (for example, reduce exposure by 8 stops instead of default 4 stops a single brush allows), you will need to manually create a new brush and paint over the desired area.
- Does Lightroom have photo album templates? (Thank you for your question, Joshua!)Lightroom has Auto Layout presets that you can use for your books. You can either start working with an available preset and customize it to fit your needs, or you can create your own preset from scratch. To do that, engage Auto Layout tab on the right-side panel of Book Module. Then, click on the drop-down “Preset” menu and choose “Edit Auto Layout Preset…” to open Auto Layout Preset Editor. Once you apply a preset, Lightroom will place selected images into necessary amount of pages. You can customize the look of each page individually and decide how and where an image should be placed, as well as text amount and location. You will not find a half-ready book with flowers and butterflies, though. Lightroom Book Module will be covered in extensive detail in a separate article.
- Is it possible to change Camera Profile to Camera Standard on Import? (Thank you, Paul!)Yes, it is. There are at least two ways to do it. First of, you can create a Develop Preset that will change Profile to Camera Standard and apply it on Import. Read more about Importing in our “How to Import Photographs in Lightroom” article. You can also choose to change Adobe’s default settings. To do that, select an image in Develop Module and engage Camera Profile tab on the right-side panel. Change Camera Profile to Camera Standard (model-specific). Then, hit and hold Alt key. You will notice Reset button at the bottom of the right-side panel change to Set Default. With this option, you can alter default settings. Alternatively you can select “Change Default Settings…” from Develop menu. Do note Lightroom will set all settings as default, so if there are any other adjustments but Camera Profile applied to an image file, they will also be set as the new default (for example, exposure adjustment). Adobe’s default settings are specific to a particular camera model.
- Can Lightroom reject images I wouldn’t like for me? (I read that with a smile, Chelli, thanks!)Fortunately or not, Lightroom can’t decide which of your photographs to keep and which not to. I know there are camera models that will take several photographs and choose those where subjects have their eyes open or smile the broadest. Lightroom, on the other hand, assumes you know you need the photographs you are Importing. It is probably a good idea to do the rejecting on your own and shoot in slower bursts if not necessary.
- What sorting options are there in Lightroom? (Thank you again, Chelli!)The usual options are available – you can sort by time of capture, added order, edit time, edit count, rating, label text, label color, pick flag, file name, extension, type and image aspect ratio. To choose sorting options, go to your Library module and hit “T” key to open the toolbar. There you will find sort criteria. You can use custom sorting in Collections.
- Can I delete old, unused versions of Lightroom from my computer? (Thank you, Rob!)Of course, and you should. Why keep software you don’t use? Uninstalling old Lightroom versions will not affect current one you use in any way and will free up disk space. You can even delete old version Catalogs if you no longer need them and have latest version conversions.
- How do I convert Catalog from an older version of Lightroom? (Thank you, Phillip!)All you need to do is open that Catalog with the latest version of Lightroom you own. Either double-click on the Catalog file on your hard drive, or open it through Lightroom. To do that, choose “Open Catalog…” from File menu of hit Ctrl+O on your keyboard. Once you locate the old Catalog and choose to open it, Lightroom will prompt you to update the Catalog to a current version and save it as a copy in default location.
- For this question, I will quote our reader’s comment: Say I have the folder “myshots” with raw photos inside. I typically export my postprocessed photos into a subfolder called “pp” within the “myshots” folder. If I add new raw photos to “myshots” and synchronize the folder in order to import the new raw files, Lightroom will also add the jpeg photos I exported previously. It’s super annoying: how can I tell Lightroom to ONLY import and consider raw file types? (Thank you, Flo!)It is a good idea to remember that Lightroom is not just a RAW converter, but also a photo manager. It works with lots of different file formats. With that in mind there are two ways you can solve this problem, Flo. Firstly, you can have Lightroom sort images by Media Type in Import dialog. Sorting options are located at the bottom of the window right next to thumbnail size slider. Sorting by Media Type will separate files of different formats allowing you to easily choose just the RAW image files. The second way you can solve this depends whether you use different folders for your post-processed, exported JPEG files. Since you do (the “pp” folder that is located inside “myshots” folder), you can have Lightroom disregard subfolders and only allow you to select images from root folder for Import. In other words, if you disable “Include Subfolders” setting (located in the Source tab on the left-side panel in Import window), Lightroom will only display image files you have in “myshots” folder and not those in “pp” folder, too.
- Which video file formats are supported by Lightroom? (Thank you, Raj!)I was unable to find a complete list. From my experience, video support in Lightroom is pretty basic. It is, first of all, a tool for photographers. Even so, it should be compatible with most popular file formats.
- How can I move existing Catalogs to an external drive and create a new Catalog there? (Thank you for your question, Jim!)All you need to do to relocate your Catalogs to a new destination is simply move them. Lightroom Catalogs are located in C:\Users\USER_NAME\Pictures\Lightroom by default (Windows). Move them to an external drive and open (double-click on *.lrcat file). Lightroom will remember their location. Creating a new Catalog on an external drive is just as simple. Specify your external drive as the location when creating a new Catalog through Lightroom (“New Catalog…” from File menu).
- Is it possible to have Collections placed inside other Collections? (Thanks, Robert!)You can place individual Collections inside a Collection Set. To create a Collection Set, click on the “+” symbol in the Collections tab and choose “Create Collection Set…” (as shown in the screenshot).
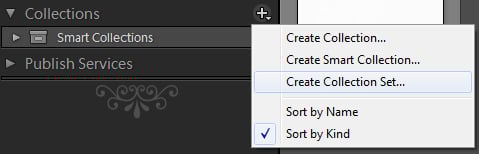
You can place Collection Sets inside other Collection Sets. To do that, choose “Inside a Collection Set” as Placement option in Create Collection Set dialog. Alternatively, you can simply drag-and-drop a Collection Set into another Set. Both ways work equally well with placing simple Collections inside Sets. You cannot have images added to a Collection Set – they only hold other Sets or Collections.
If you have any additional questions, feel free to ask them in the comments section below and I will do my best to answer them. I will update this article with several answers at a time, so check back!
i cant figure out what has happened , every time i put my photos in the develop mode all my slidders are already set and the photos are totaly washed out and yellow, i can press shift and press the adobe reset at the bottom of develop slidders but that only works on one photo at a time, i just cant get the slidders to reset to zero, can anyone help , desperate.
In LR Q&A (5) I was reading ….. You can also cancel any adjustment at any time and in any order you like, they are independent of one another. so… If i do 10 adjustments and want to cancel number 5 how do i do that and keep all the other adjustments after that. I can’t seem to figure this one out. Thank you for your site and help i do appreciate it.
Kathleen Barth
Kathleen,
just go ahead and set that adjustment to its original value (in most cases, it is zero). For example, if you’ve upped the exposure to +0.3, set white balance to 5750, sharpening amount to 60 and then added a little bit of post-crop vignetting, then decided the exposure was good to start with, you can just change it back to 0 at any time.
I’m using Leica X2 and shoot DNG+JPEG, since X2 can’t only DNG.
When I import to LR catalog, both file type will be imported. Please advise how to import just the DNG file.
Thanks in advance.
Bought the upgrade to LR4 since I had LR3 installed. When I right click on a picture and tell it to open in LR it opens in LR3. If I delete LR3 from my system, will that mess anything up since I ‘upgraded’ to LR4 vice buying the ‘full version’ which may be the exact same thing as far as I know! ;-)
Hi
I have photo shop CS5.1 and have Know idea how to use it. Are you able to help at all.
Thanks for making so much useful information available! Just a sterling job ~ being a new Fuji Xpro – 1 user and LR5 ~ could you please comment on “getting” camera and lens profiles such as those that are available for the likes of Nikon and various lenses?
Great thread and please keep up the good work! Your website is a treasure trove for amateurs like me.
Is there a simple way to review images in fullscreen in edit mode?
Hitting T to get rid of the panels and L to off the lights does not quite make it fullscreen.
The impromptu slideshow is also not truly fullscreen.
After importing new photos from a card, I like to quickly skim them, hitting X along the way. I’d like to see the photos in fullscreen mode when I do this.
I am using LR3 :-(
Great thread and thank you so much for doing this. :)
When creating a default preset for importing images if I tick the “enable profile corrections” box in the Lens corrections section, is LR clever enough to work out which lens is being used or does it just use the profile of the lens that I happened to be using when I set up the default preset?
I know Im late, but anyway. I have a few quite old lenses (part manual, part AF lenses) that I user quite often. Somehow my Camera does not recognize sose lenses and Lightroom keeps reeding “K or M lens” (for old manual k-mount lenses) or “Sigma/Tamron lens” (newer AF lenses) instead of the correct lens id. As this is partly due to the old lenses it’s notjing I could (or would) blame lightroom for. Anyway, here comes the question:
How do I modify those EXIF information within Adobe Lightroom? Is there a way to do so at all?
Thanks and cheers,
David
Well, I found the answer by myself. There is a Plugin called LensTagger für all major lightroom verisons: www.lenstagger.com/
This need ExifTool (of course, what else) to run but once instaled (and renamed for that matter) all is fine. Gives me so much more options with my old lenses :)
Alo one might want to note that this tool includes an option to note all settings (like film used and so on) if you are working analog!
In terms of PP and specifically achieving contrast, is making adjustments to the white and black points a recommended approach? I found instructions that suggested that if you option click the white point screen turns black and then one should move the slider until some white begins to show, same for setting the black point, option click, screen turns white and then move the slider until some white begins to show at that point you have set the contrast for the image. I have tried this method and contrast shows but I notice that the image does not look very good. Any thoughts on this approach? Sorry for the long post and thanks for the feedback you are providing.
Alberto again, on my question and where it says – in setting the black point – it should read; screen turns white and then move slider until some “black” begins to show. Sorry.