My name is Ori Cohen, I am a semi-serious photographer, and a computer science PhD student. Last year my wife and I traveled to Switzerland, so I packed a Sony NEX-7, a Sony 16mm f/2.8, a Minolta 24mm f/2.8 attached to an LA-EA4, and a Haida ND1000 filter.
I am sure everyone will have taken a vacation to a new country at some point in their life. I usually prepare a very tight schedule of the places we would like to visit each day, and we usually run from place to place in order to see them all. There is a big downside to that, you don’t have enough time for ‘controlled’ landscape photography, i.e., setting up with a tripod at the optimum time of day in order to capture the best light at the best moment, and to get the best possible image. It’s actually quite the opposite from what a professional landscape photographer would do. There is also that small issue of weight, carrying the lowest weight possible. So I decided to leave my tripod at home and get a Joby Gorillapod with a ball-head, the upside is that it weighs around 390 grams and I will barely feel it. The downside is that I may not find a high enough place to put it and that if it is placed on a railing it is somewhat sensitive to wind vibration.
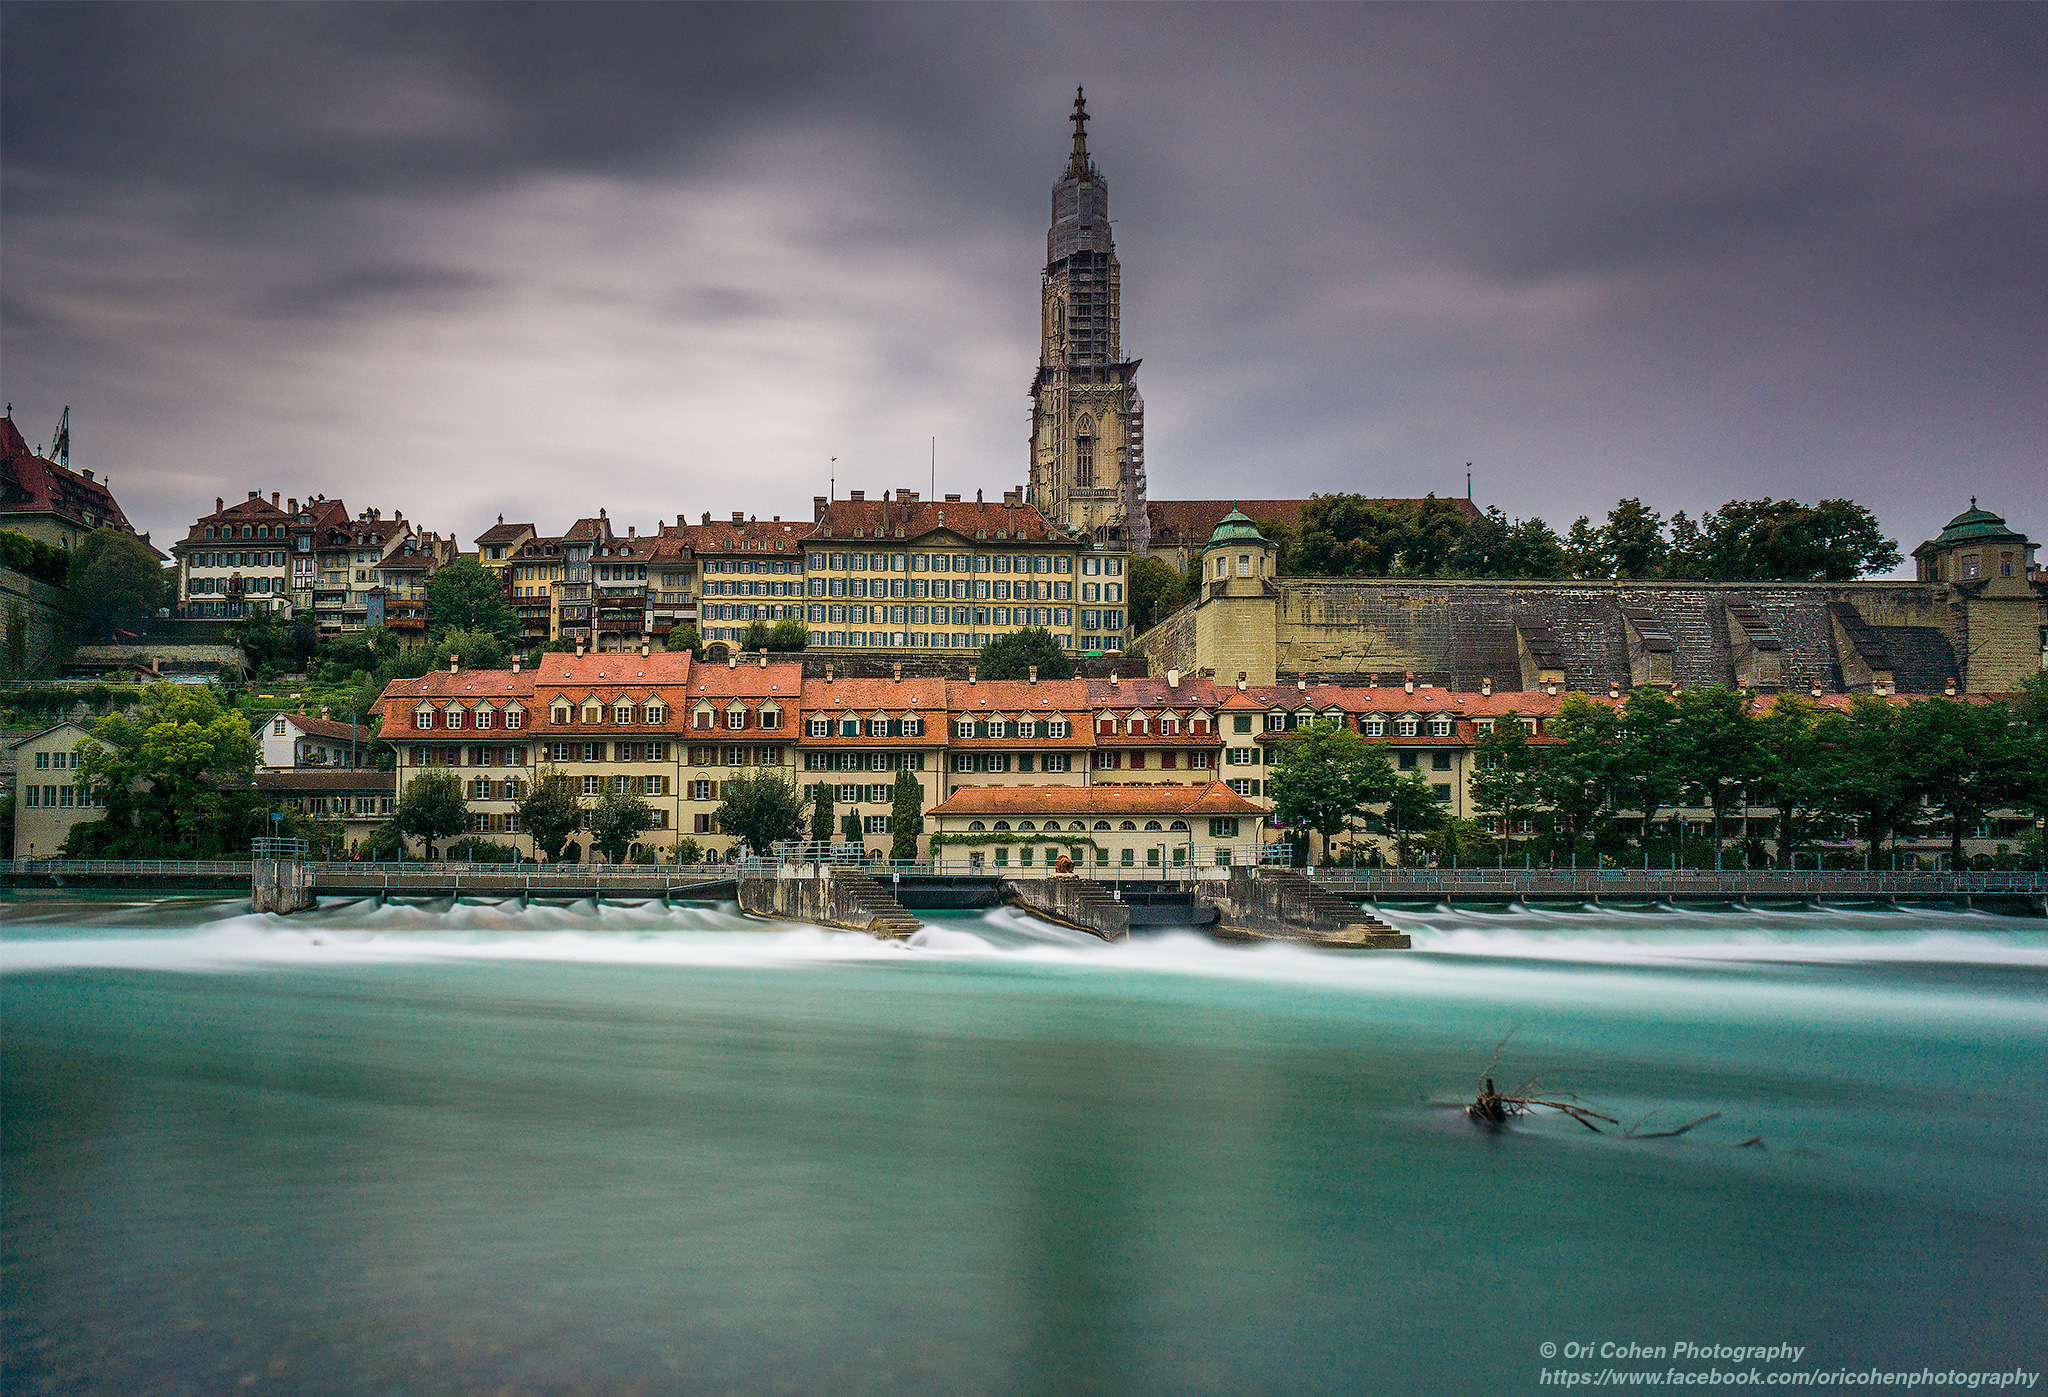
For the following image, taken in Bern, I have used the 16mm lens with the ND filter attached to it, the camera was attached to the Gorillapod which was placed on a river-side railing. It was relatively windy and the rain had just started and my wife was walking away searching for a shelter. I shielded the camera and took a few trial shots until I settled for a 30 second exposure, and this is where the Gorillapod comes in handy, you can quickly detach it and run for cover. I am honestly surprised that the wind did not affect the image and it came without motion blur, the railing must have been sturdy and the Gorillapod firmly attached. The image has had basic LR editing (exposure, contrast, clarity, shadows, highlights), and Photoshop editing; in PS I added sharpness in various forms, corrected the lens’ notorious distortion and enhanced the colours (Image shot at f/11 ISO 100 30s).
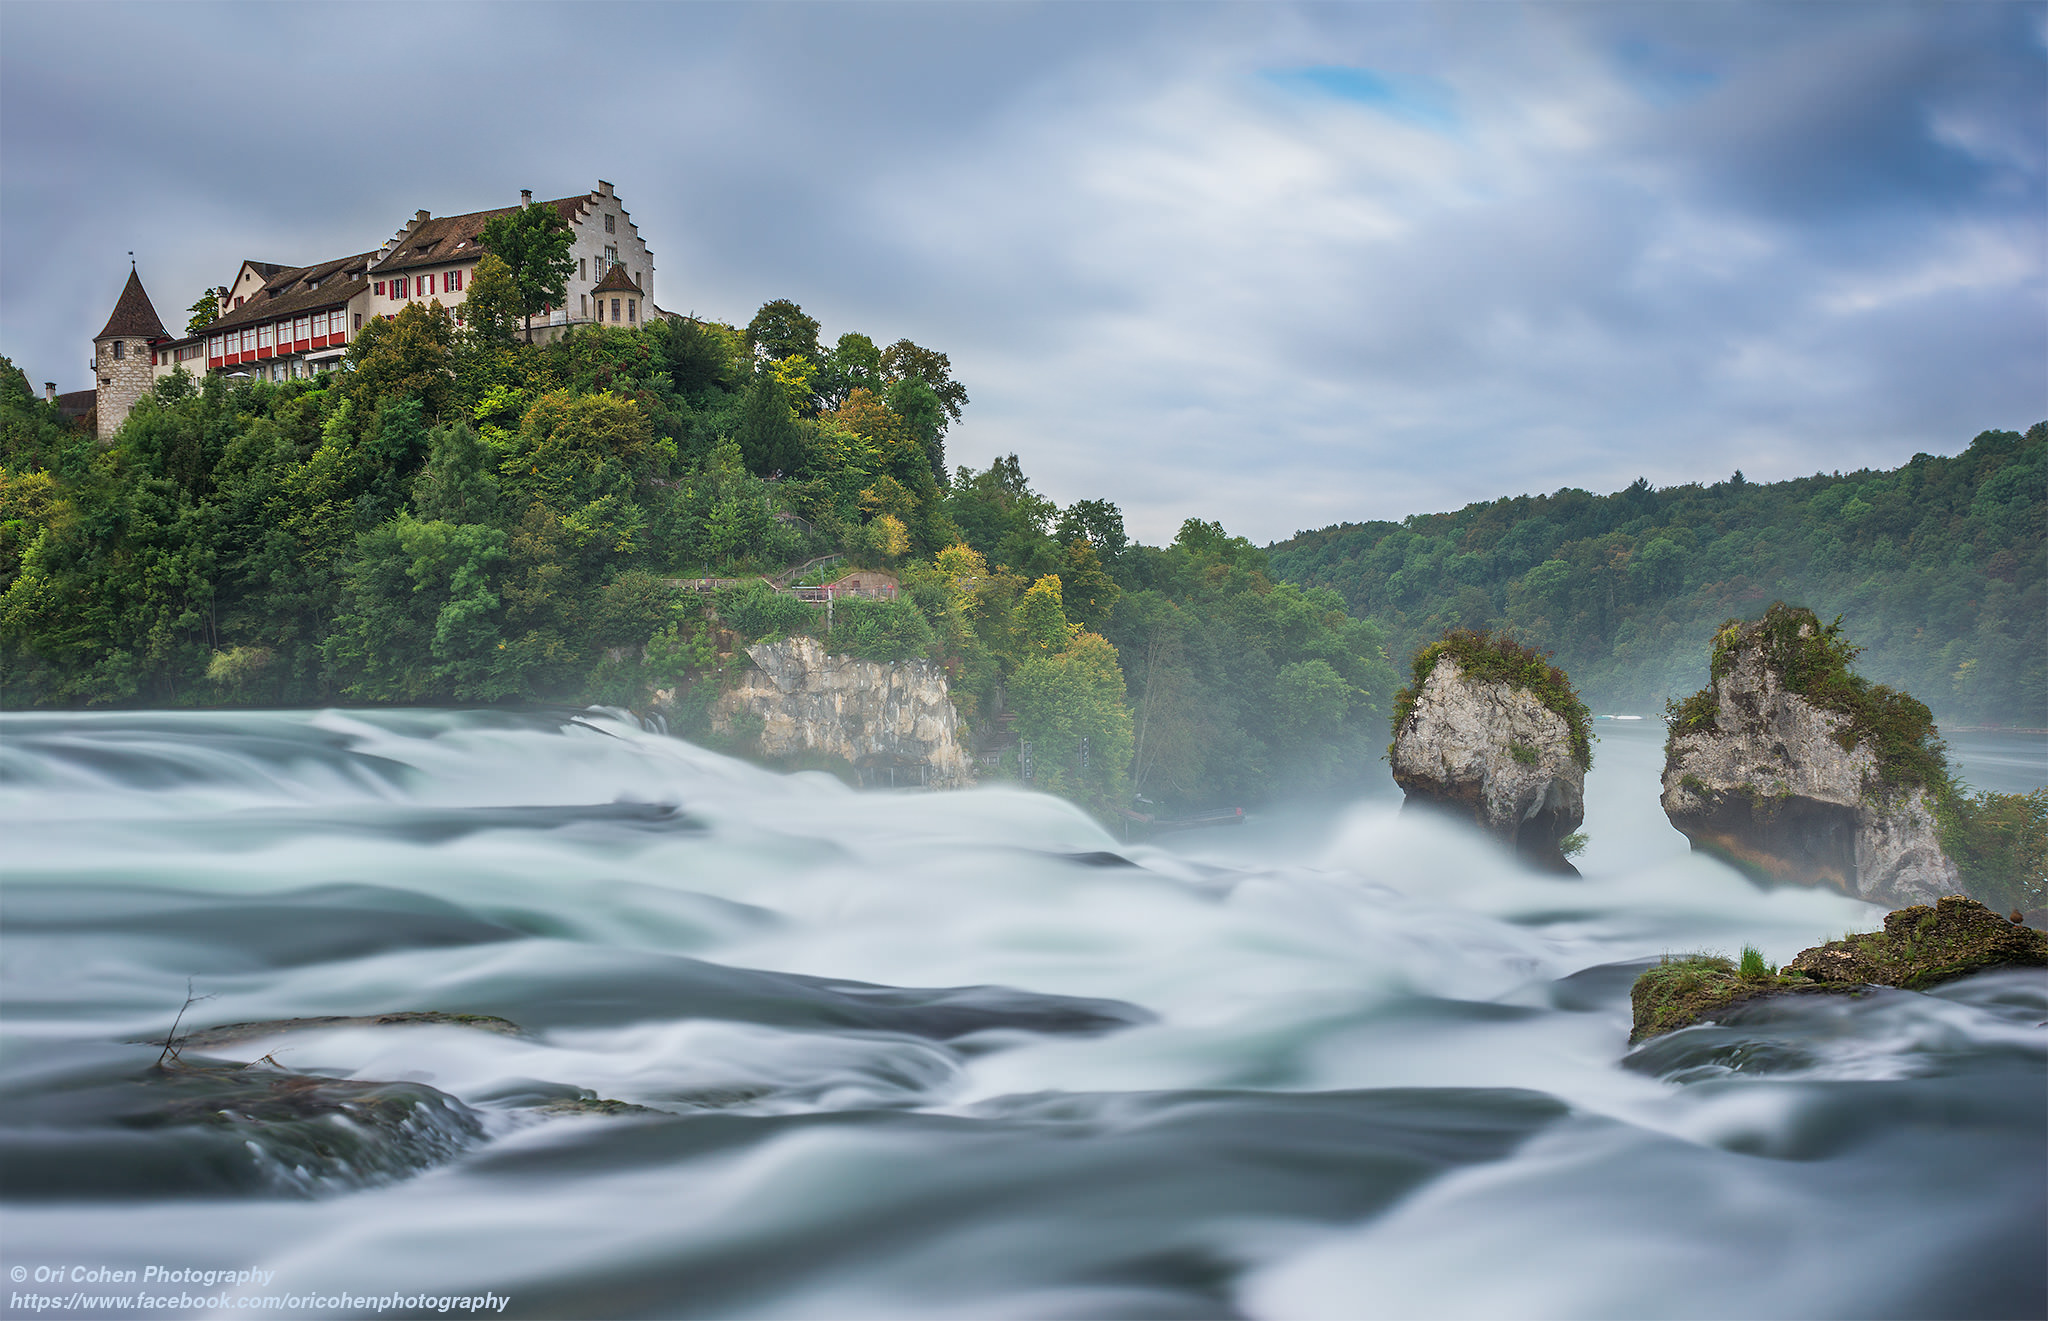
For the next image, taken across Laufen Castle on the banks of the Rhine falls (Rheinfall), I used the Minolta 24mm, and again the ND filter and Gorillapod. The camera was attached to yet another riverside railing, although this time it was not as windy. The same basic LR and PS editing methods were applied although this time I had to clean up the image from stray “people” that decided to travel on the farthest edge and on the rock.
However, there are times when you want to shoot landscape, even an HDR landscape, but can’t use the Gorillapod, have less than a minute to shoot, or that you need to consider your travelling partners patience. For these stressful times of (almost) snap-shooting I had adapted the following technique:
- I set the camera in manual mode
- I set the camera to bracket for shutter, 3 exposures, in 1 or 2-EV increments according to the DR in the location I am at
- I calculate the minimal shutter speed that will allow me to freeze the scene while the camera is hand-held, this will make sure that the under-exposed shot is frozen and not blurred. The formula is 1/(focal length * crop multiplier), i.e. for the NEX-7 and 16mm lens its 1/(16*1.5) = 1/24, and I make it a little bit faster (1/40 – 1/60) to accommodate for wind vibration or body motion, let’s say I decided its 1/40
- If my shutter-bracket is set for 2EV and the calculated shutter speed is 1/40, I increase it by 2 stops to 1/160, and set it in the camera
- I set the aperture accordingly. Usually between f/8-f/16, in order to get optimal aperture setting that will allow sharpness throughout the frame, from near distance to infinity
- I adjust the ISO to satisfy the exposure at 0EV
- I choose my composition, focus my shot on a point 1/3 from the bottom of the frame, I recompose, stand firm, and push the shutter release until all 3 exposures are finished
- The end result is 3 frozen frames, one is under-exposed, one is at metered exposure and one is over-exposed
Steps 1-4 are set in advance, and steps 5-7 takes me 10-15 seconds to complete. The following images were shot using this method, opened in Photomatix and composited with “Exposure Fusion” (default settings) then exported to PS and edited further for sharpness, contrast, detail enhancement, artefact cleaning, ACR filter, cropping, lens distortion correction, colour editing, luminosity masks, dodge burn, frequency separation, etc. I strongly suggest not to use the “Tone Mapping” algorithm in Photomatix as it introduces unnatural artefacts. When you actually control every aspect of your editing, the images tend to look more natural looking and less artificial.
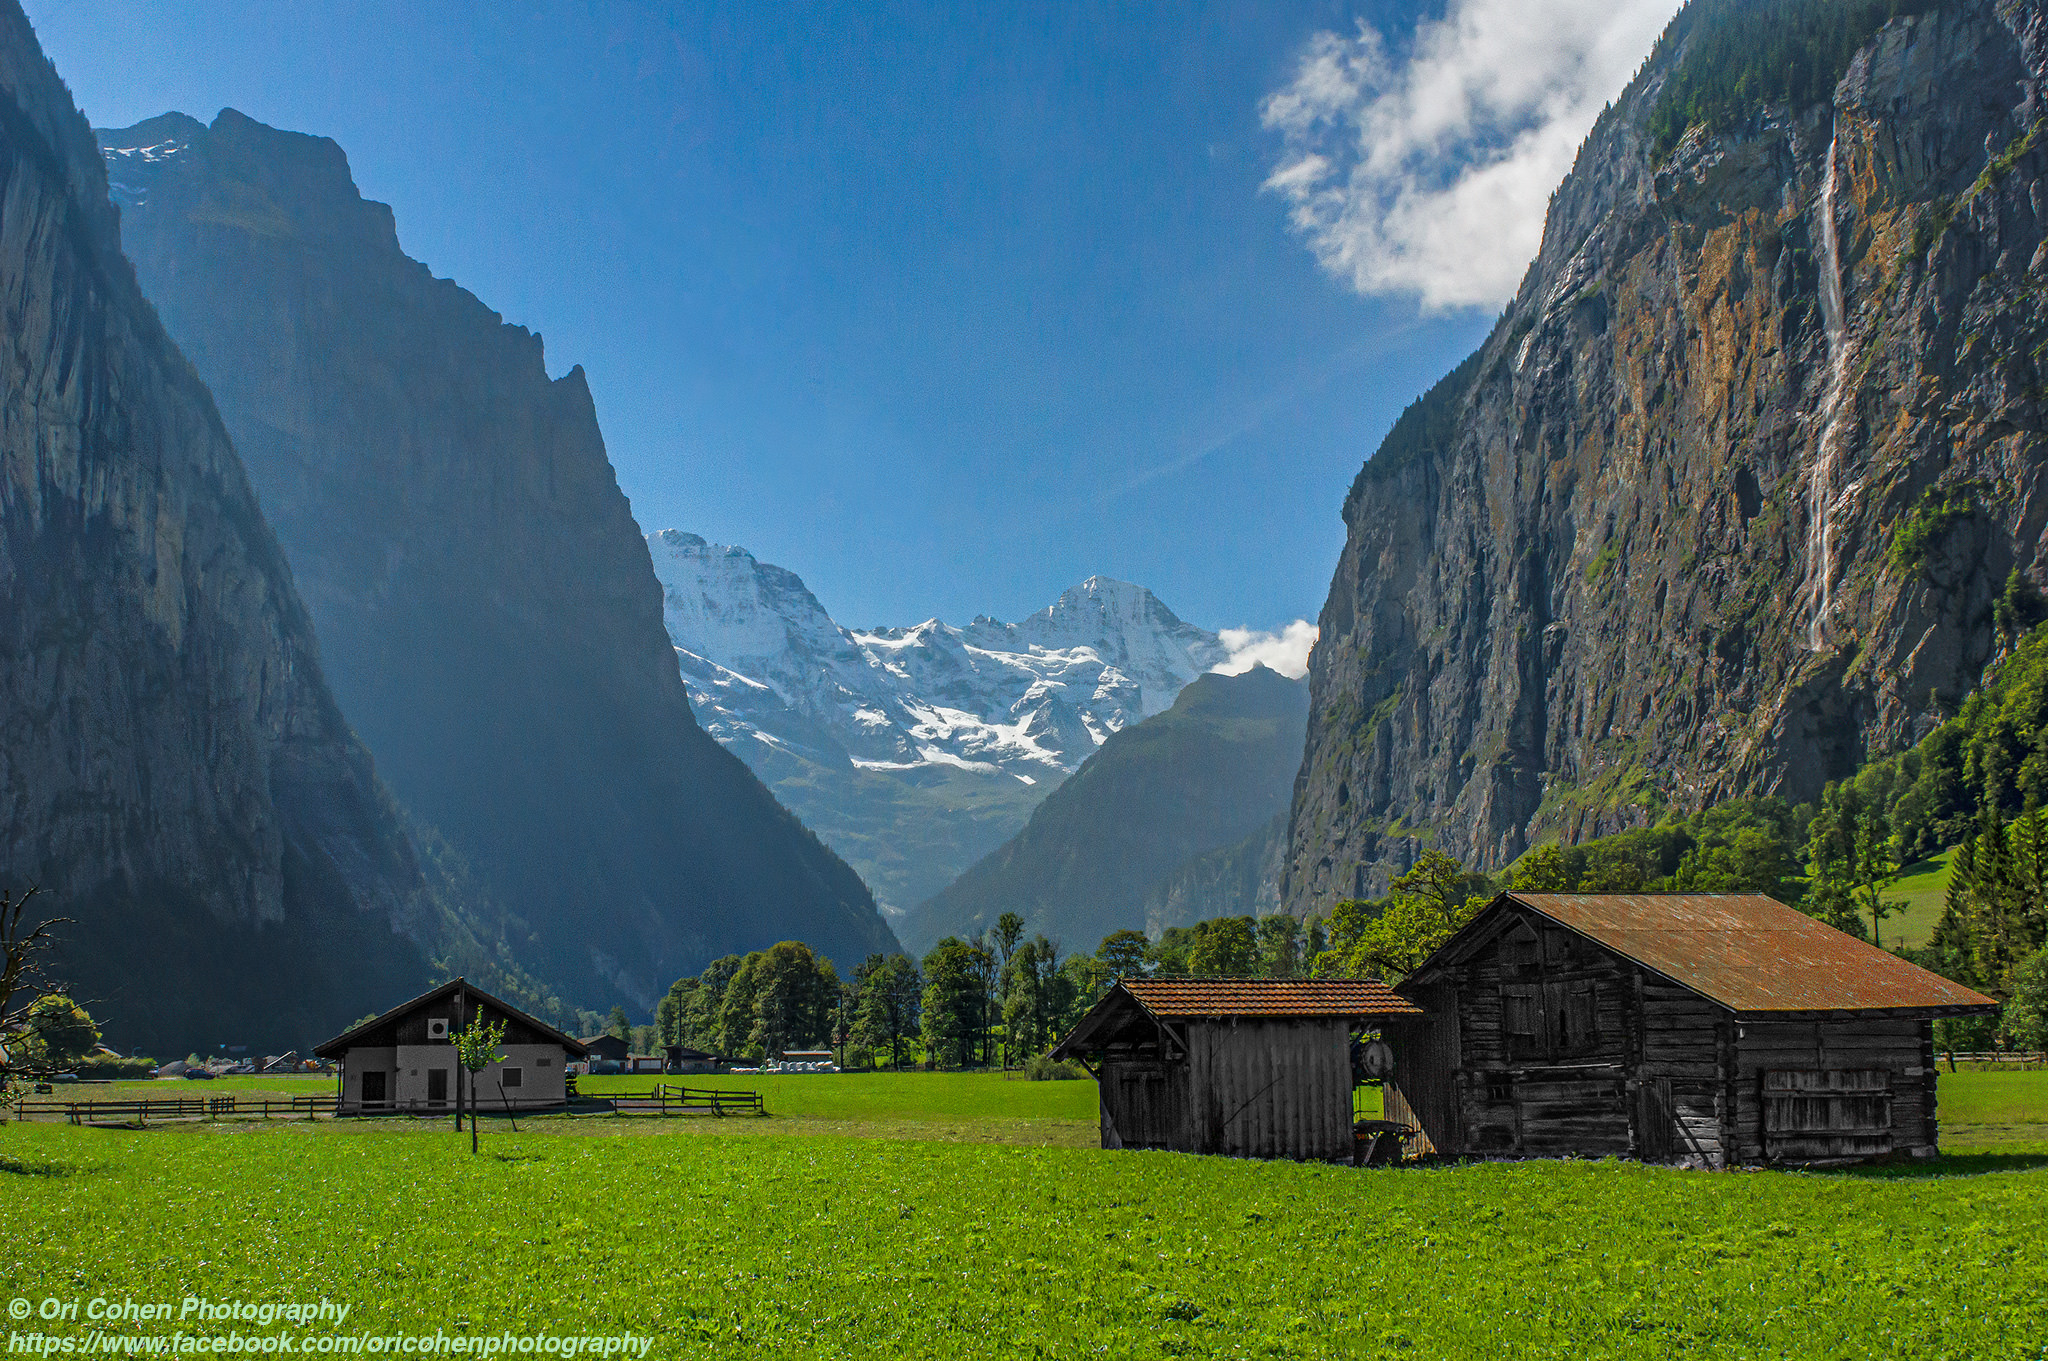
The first image was taken in Lauterbrunnen with the 24mm lens, at f/16, ISO 1600, bracketed at 2EV with shutter speeds of 1/50 1/200 1/800. As you can see the ISO is high, with a tripod I would have used ISO 100, but since I chose to shoot hand-held I had to compromise by choosing a higher ISO.
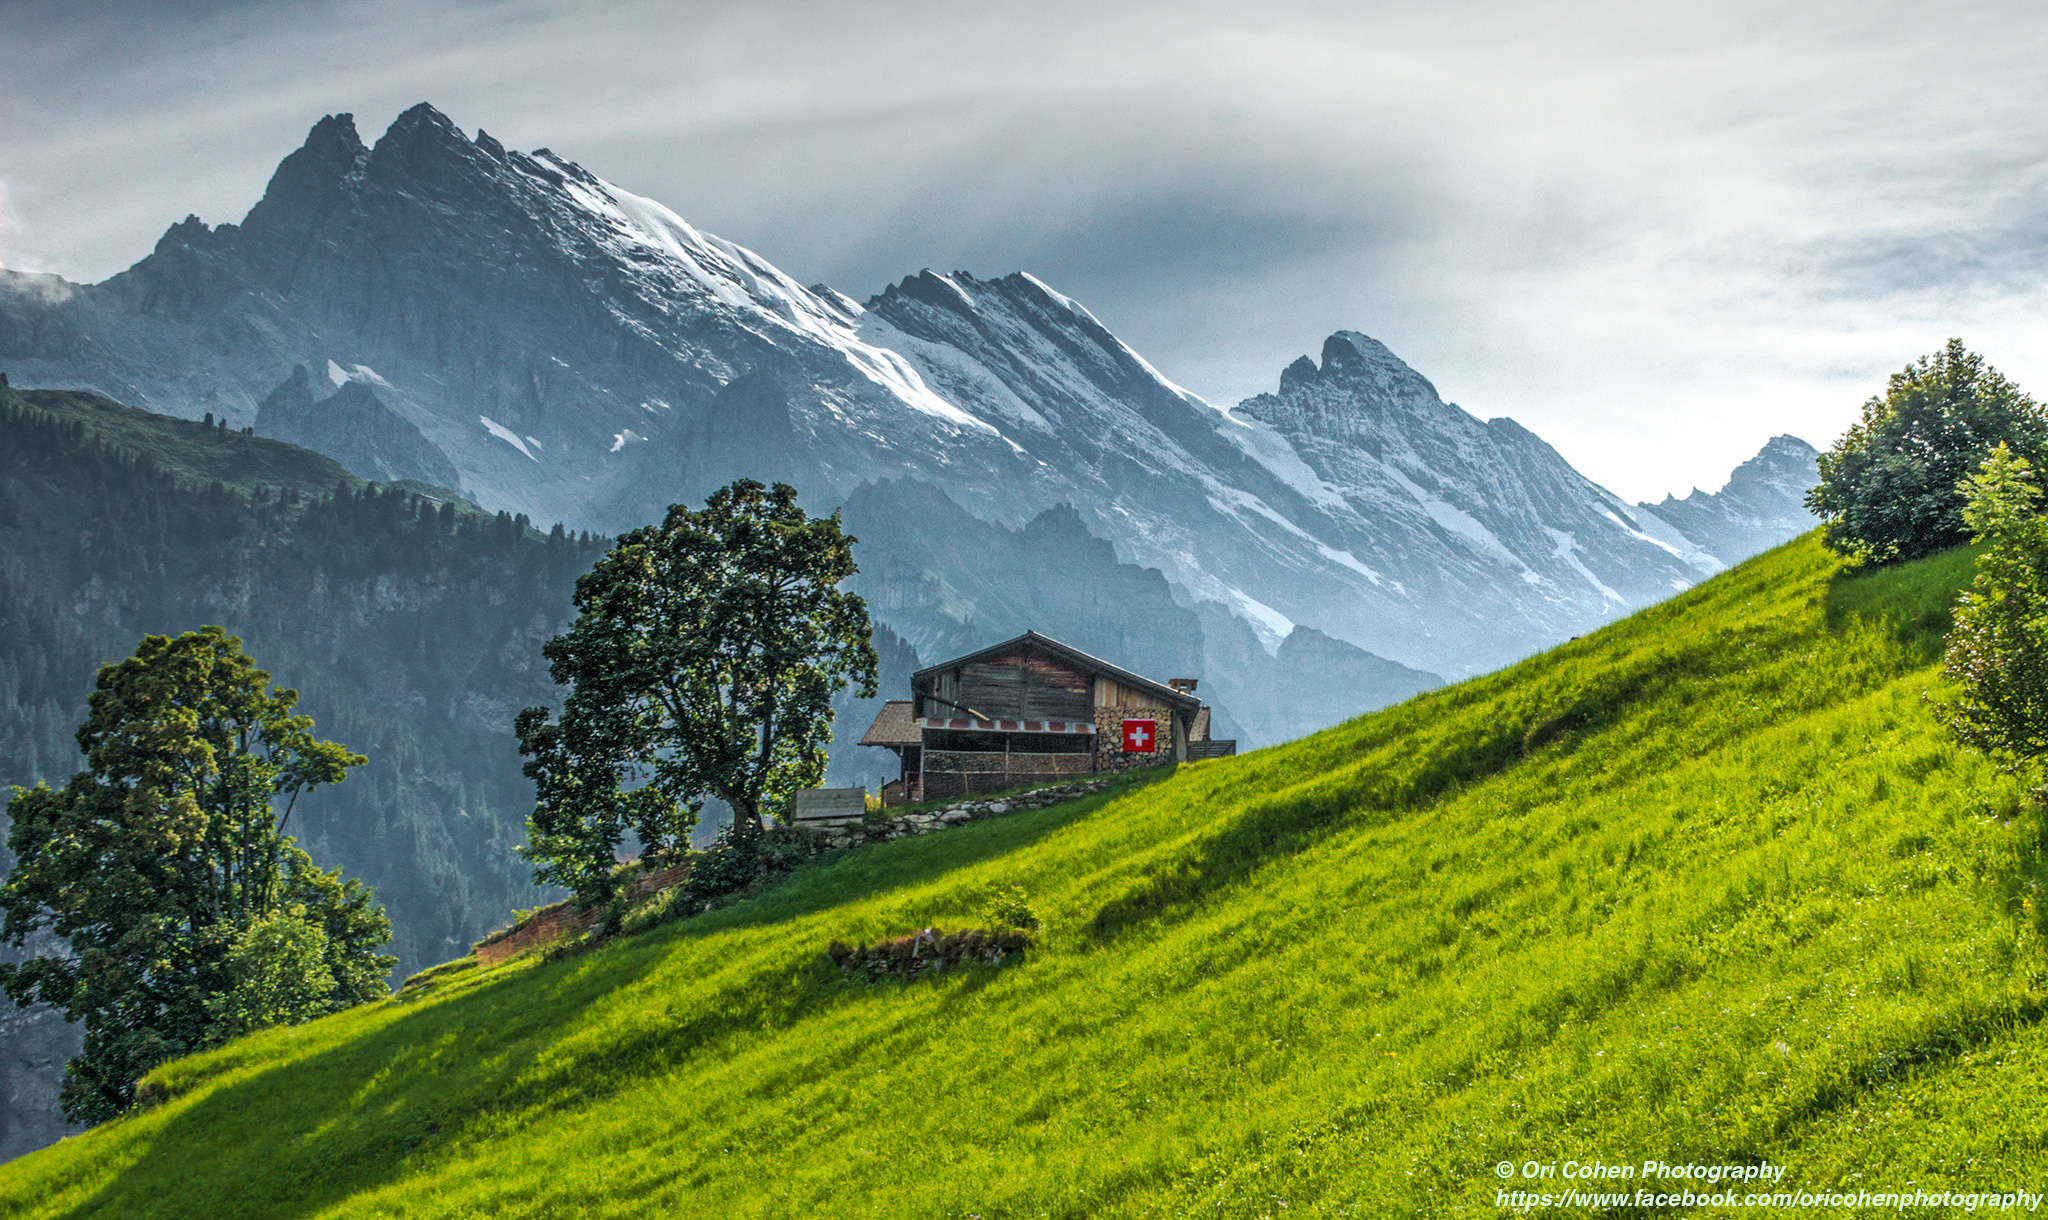
The second image was taken in Gimmelwald overlooking the Alps with the same 24mm lens at f/16, ISO 400, bracketed at 2EV with shutter speeds of 1/40 1/160 and 1/640.
The bottom line is that with this method you use high ISO settings, which adds noise to your image, but if you shoot in daylight, remove noise, or edit it out in PS, it’s really a non-issue, at least for me. The end result is a more enjoyable vacation and visually pleasing images.
Thank you for reading this, and if you have any questions please feel free to ask in the comments section below and I will do my best to answer.
This guest post was contributed by Ori Cohen. You can visit his Facebook blog to see more of his work.
All the pictures are nice, but I dislike the 3rd one, the lightning is not as good as the other ones.
Anyway, in daylight, I prefer to shoot in ISO100 without a tripod (you can align images in post), using two brackets if needed (sometimes you don’t have time to fold out your tripod).
And my question is f/16 too much? f/11 (for APS sensors) is enough for almost all kind of situations in 24mm….check the DOF calculator please (near limmit 1.3m).
Keep shooting! Thanks for posting.
Sorry you dont like it, nothing i can do about the light at 12pm. you can definitely wake up and go to places earlier in the morning, but not always you can plan :).
regarding f11 vs f16, i’ll play with the calculators and see if that works out, keep in mind that your focus point also has an influence on DOF.
I agree with you, it happens to everyone, sometimes you can’t do nothing about lightning.
and regarding DOF, that’s why some lenses have the focus distance scale….maximize your hyperfocal all the way :D
I need to check, I may have done some bracketing at that point and chose F16.
okay so I calculated it. i focused somewhere between 15-20meters away from me. here is the problem, since you cant calculate how far in meters you actually focused on: 1. with F/8 you need to be focused on 19 meters and above, 2. with F11 you need to be above 14 meters.
so with F16 you need to be above 9 meters to get near to infinity sharp focus, its the safest bet when you dont have time to calculate or bracket fstops.
Nice photos, I like the last one specially! Hope you had a great vacation!
We did, the memories will last us a lifetime :)
Lauterbrunnen and Gimmelwald! My favorite place in Switzerland, and the only place I went back to twice during my summer abroad 15 years ago. Beautiful images!
Thank you very much!
I have a question outside the scope of this article. Is there a specific reason why HDR exposures are bracketed using the shutter speed and not aperture or ISO?
If you bracket with aperture your depth of field (DOF) will change and you will get one that is blurred in the “near” and in “infinity”. another that is set at your chosen DOF, and a third one that has a greater DOF. You need the consistency of the DOF.
with ISO you will get one exposure with less noise (i guess thats good), another in your chosen “noise” level (iso) and a third one with a higher noise level, which would introduce artefacts and a reduced dynamic field. The last option is the shutter :)
Thanks! This makes sense, I forgot the aperture will affect the DOF although at wide focal lengths it might not be that noticeable. It also affects the sharpness of the lens so you are right, each frame will have different level of sharpness. Bracketing with ISO might be an interesting experiment, I think blending the frames together will average out some of the noise.
Seems a bit ironic, High ISO Bracketing to recover Dynamic Range. Doesn’t High ISO reduce dynamic range to begin with?
I’m certainly not criticizing the choices of the photographer, just the strange world we live in that HDR is used with High ISO.
If it works, work it.
It does, but as you can see in daylight and up to 1600 ISO on a modern sensor, I did not have a problem. The real problem may be visible in low light situations, but on vacation you usually hike in daylight.
That reminds me of my last two trips. I was always trying to do some photos while we’re visiting some site or landmark. Since we were not in a tight schedule, I even managed to visit some sites just with the intent of doing some landscape shooting.
I loved the article, and I love the pictures, too. It was very nice to see a different aproach to landscape photography. Thanks for sharing.
The Sony NEX-7 is no longer available. What would be a comparable Sony sold today that would provide EV bracketing, interchangeable lenses and other features discussed in this article?
I believe the Sony NEX-7 may be available in some places, price was reduced to 599 a few weeks ago, in any case the Sony A6000 is a fantastic camera. or wait a few weeks (according to rumors) to see the NEX-7 replacement being released.
Thanks, the two major US online photo equip retailers show the NEX-7 as “discontinued” right now. Amazon only has an Sony NEX-7 available in a “older model”. BTW, your article was great…
found it for you on bhphoto, but i cant paste the link here. just google “b&h photo nex 7” you will get it for $499 with stabilized zoom lens. its a great deal..
I received two emails today. One from Ori C. and one from Spencer C. Ori C. talks about minimization of gear to be taken for holiday and Spencer C. is talking about …..big bags, or what a bag to use to pack MORE gear for our holiday.
I do prefer Ori C. advise to take as little as possible and to enjoy smart shooting in lieu of working as donkey to carry all these great but heavy equipment.
Thank you for the above post.
Great article ! lovely photos with unique landscape approach !
Excellent photographs! On the second one, it almost looks like the house on the cliff is standing in the clouds rather than in the river. The third and fourth have great tonal separation of the foreground and background. Did your wife take pictures too?
Thank you. I was lucky to be there and to experience that lovely weather, and the separation is 100% natural :). My wife holds the GoPro cam and documents our trip :)