
When you’re photographing the night sky, it can be a serious challenge to pick the right camera settings. Shutter speed in particular is a difficult one, forcing you to fight between capturing enough light or capturing sharp stars. Two popular rules aim to help – the 500 rule and NPF rule – but how do they work in practice? Is one better than the other? This article explains everything you need to know.
Table of Contents
Balancing Star Movement and Noise
Let me start by explaining the problem at hand, and why it’s not as easy to solve as it may seem.
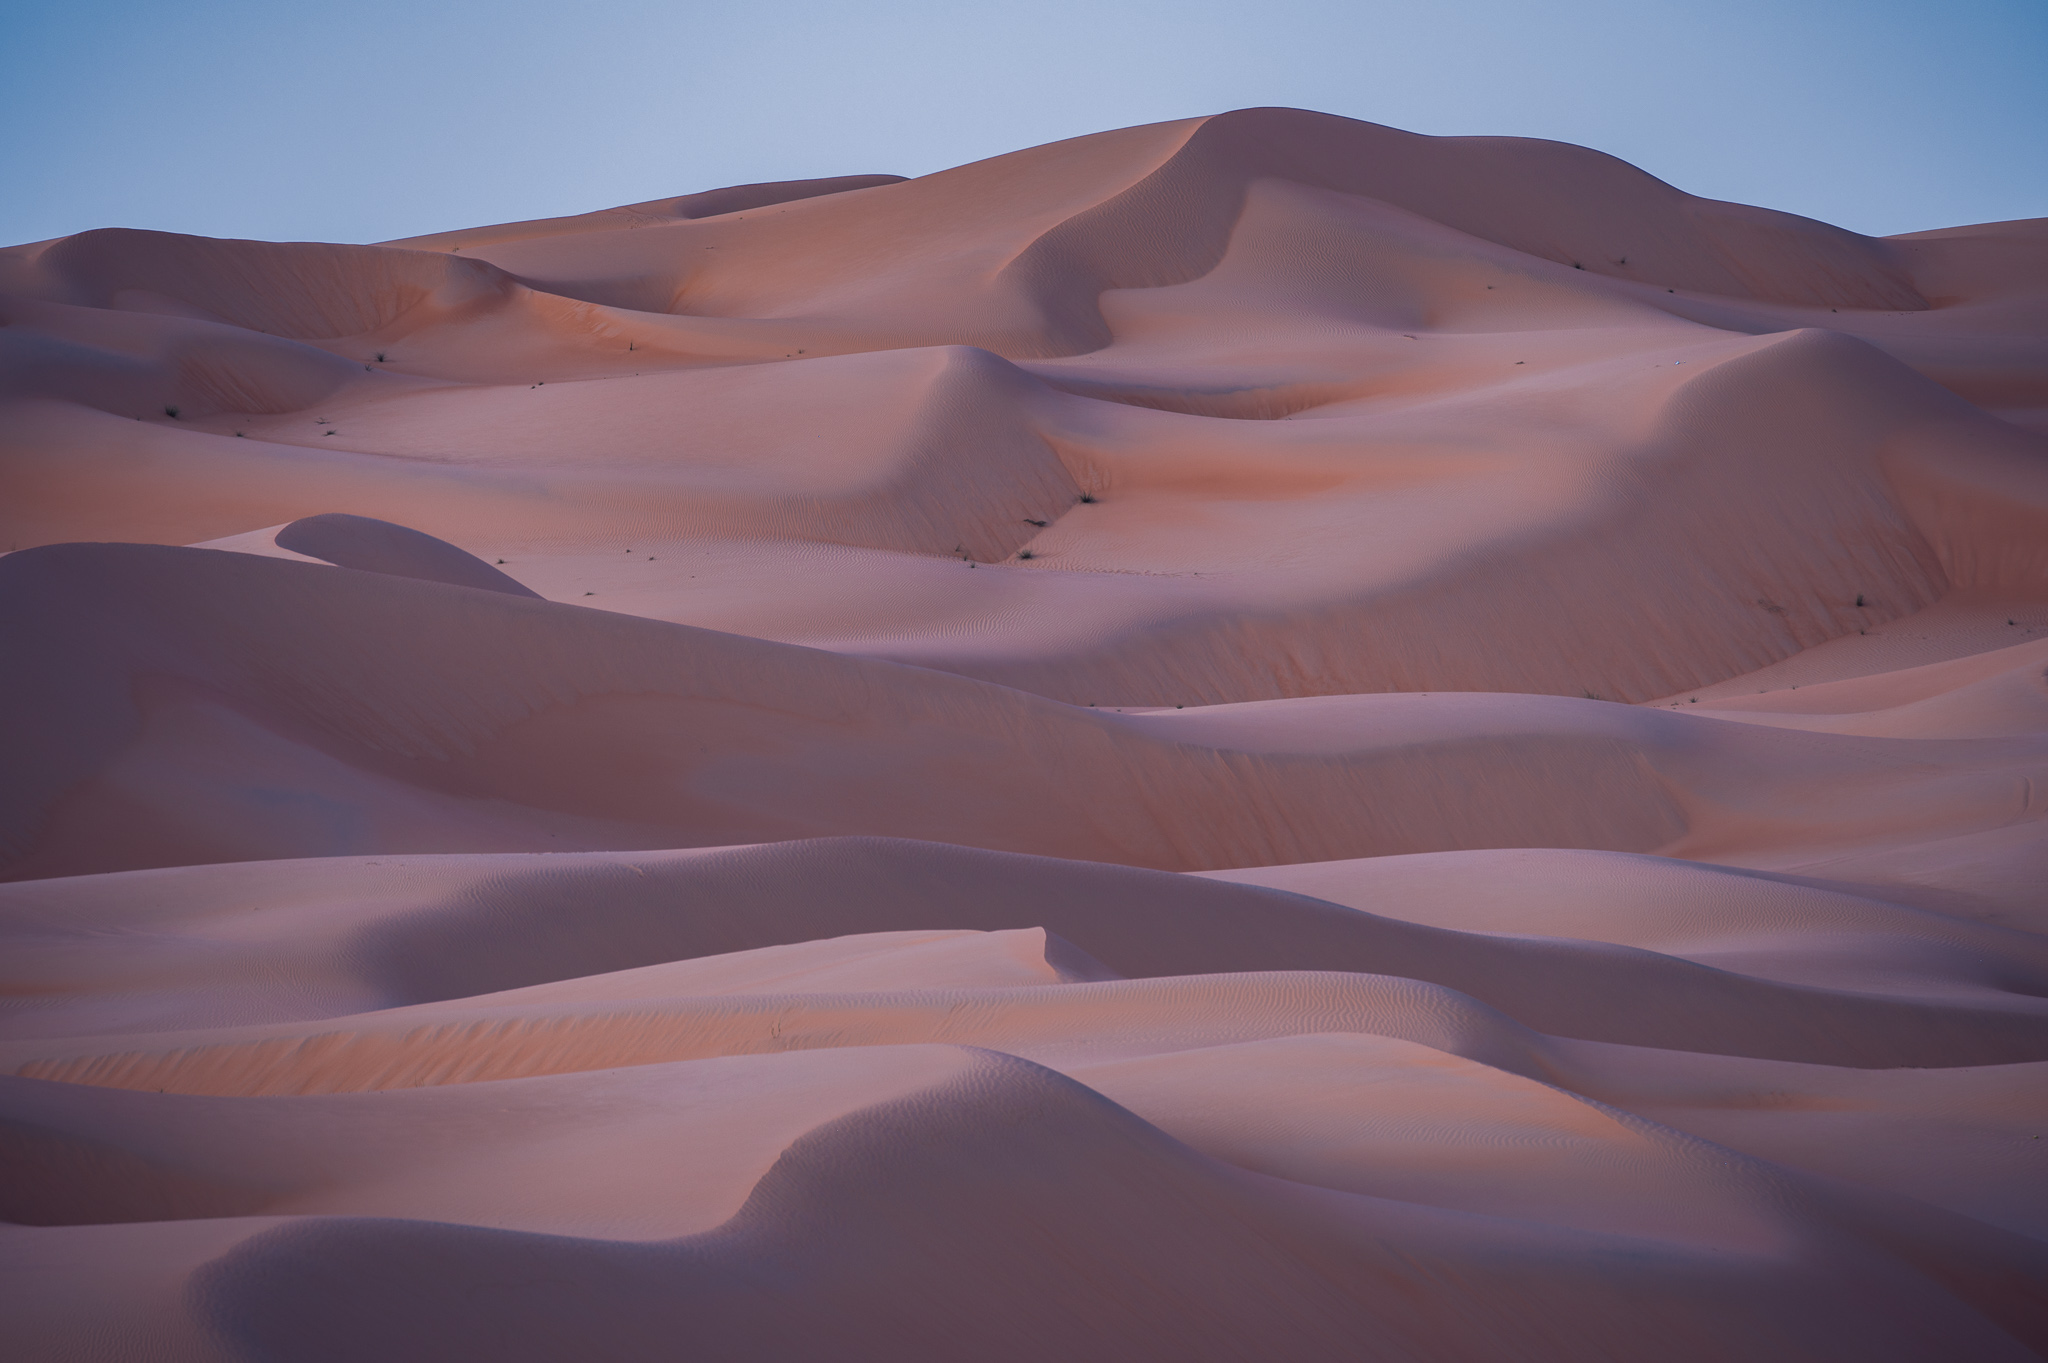
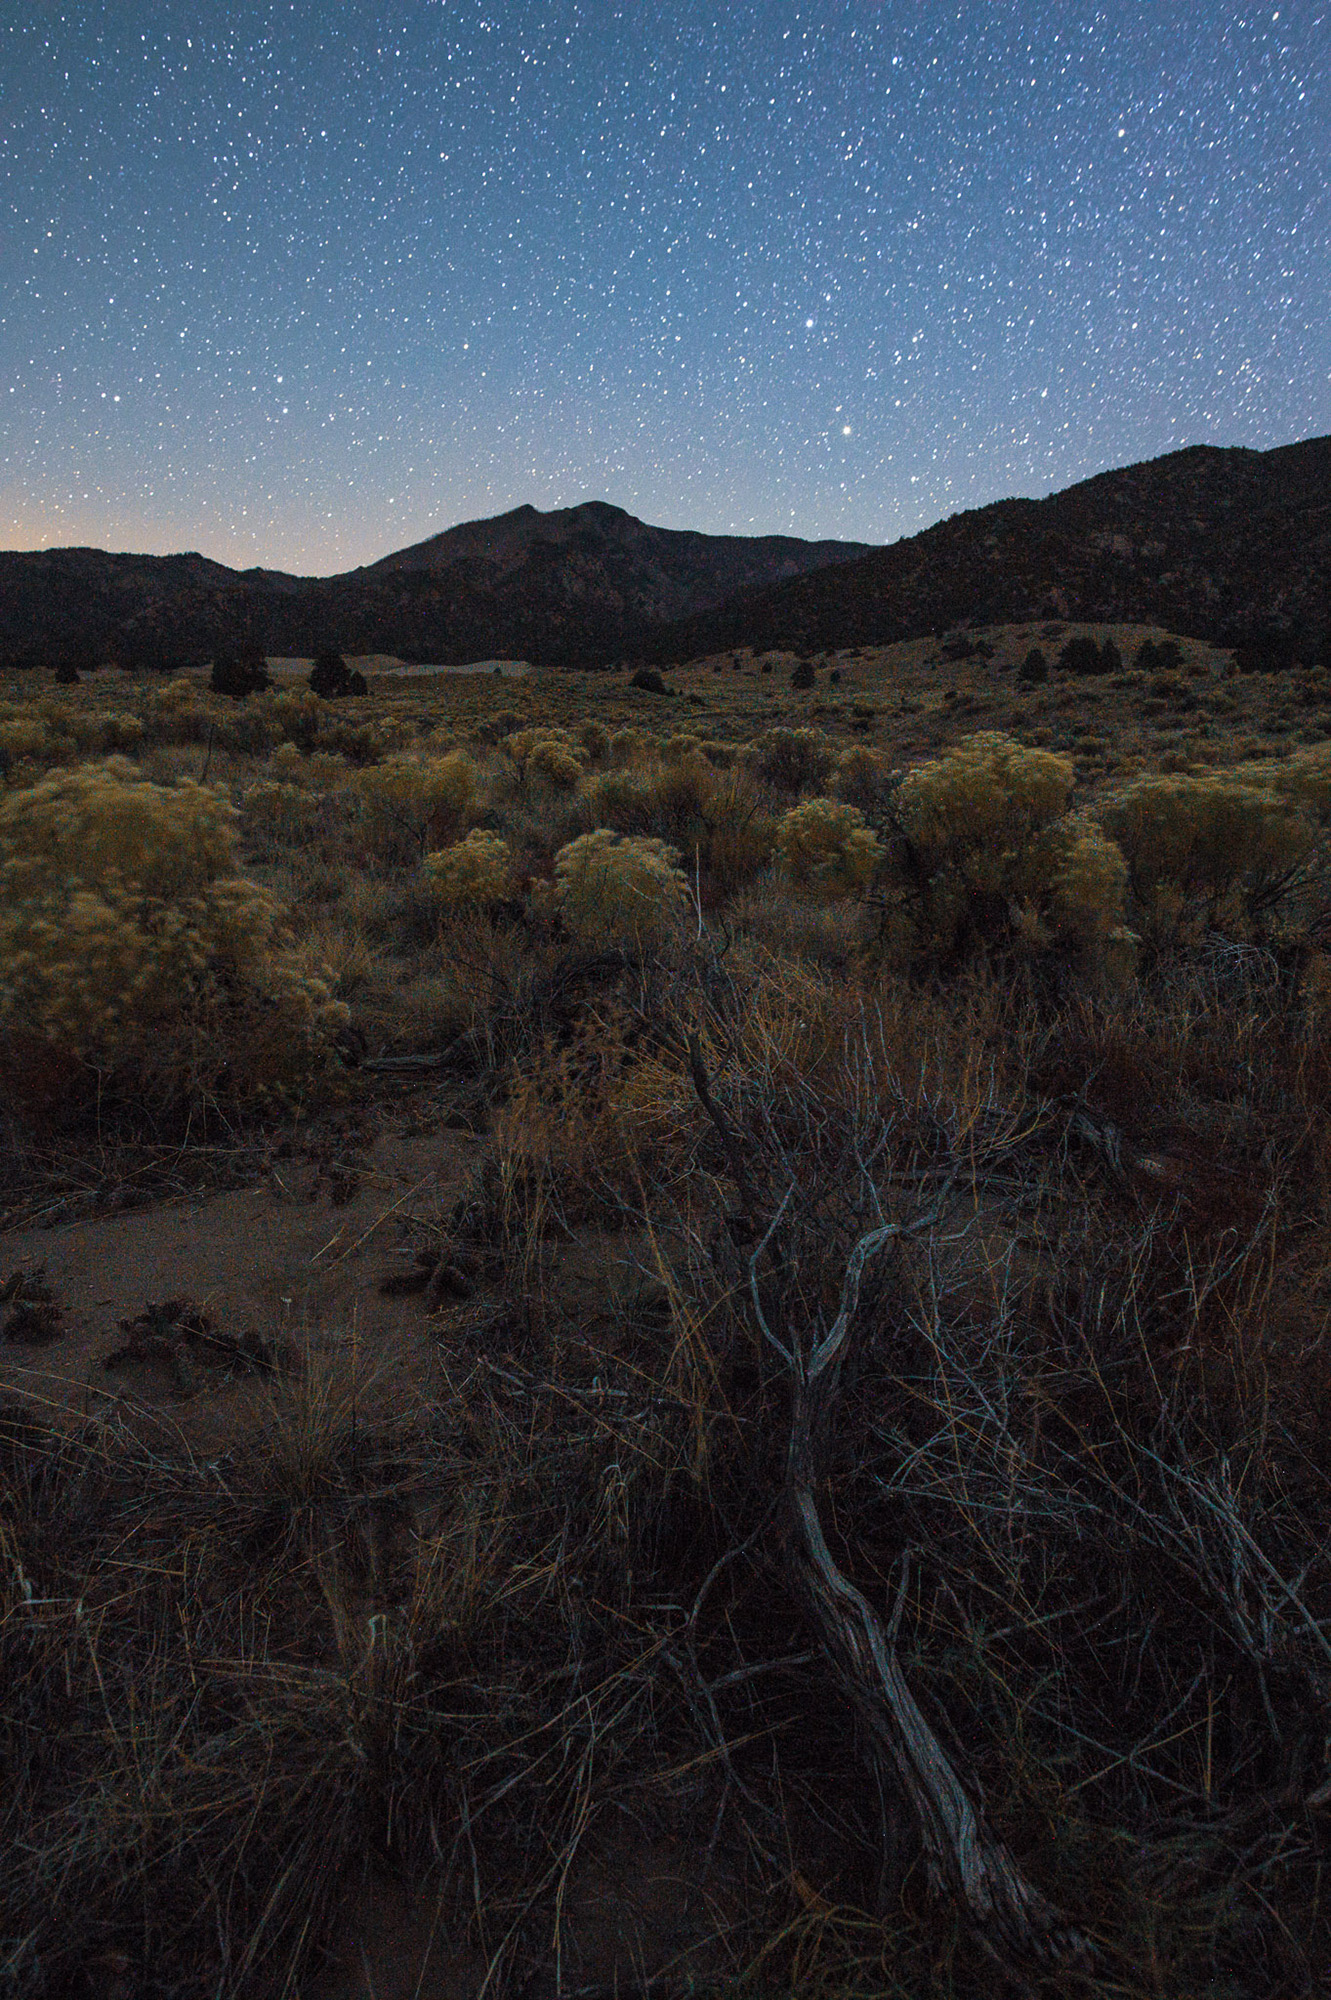
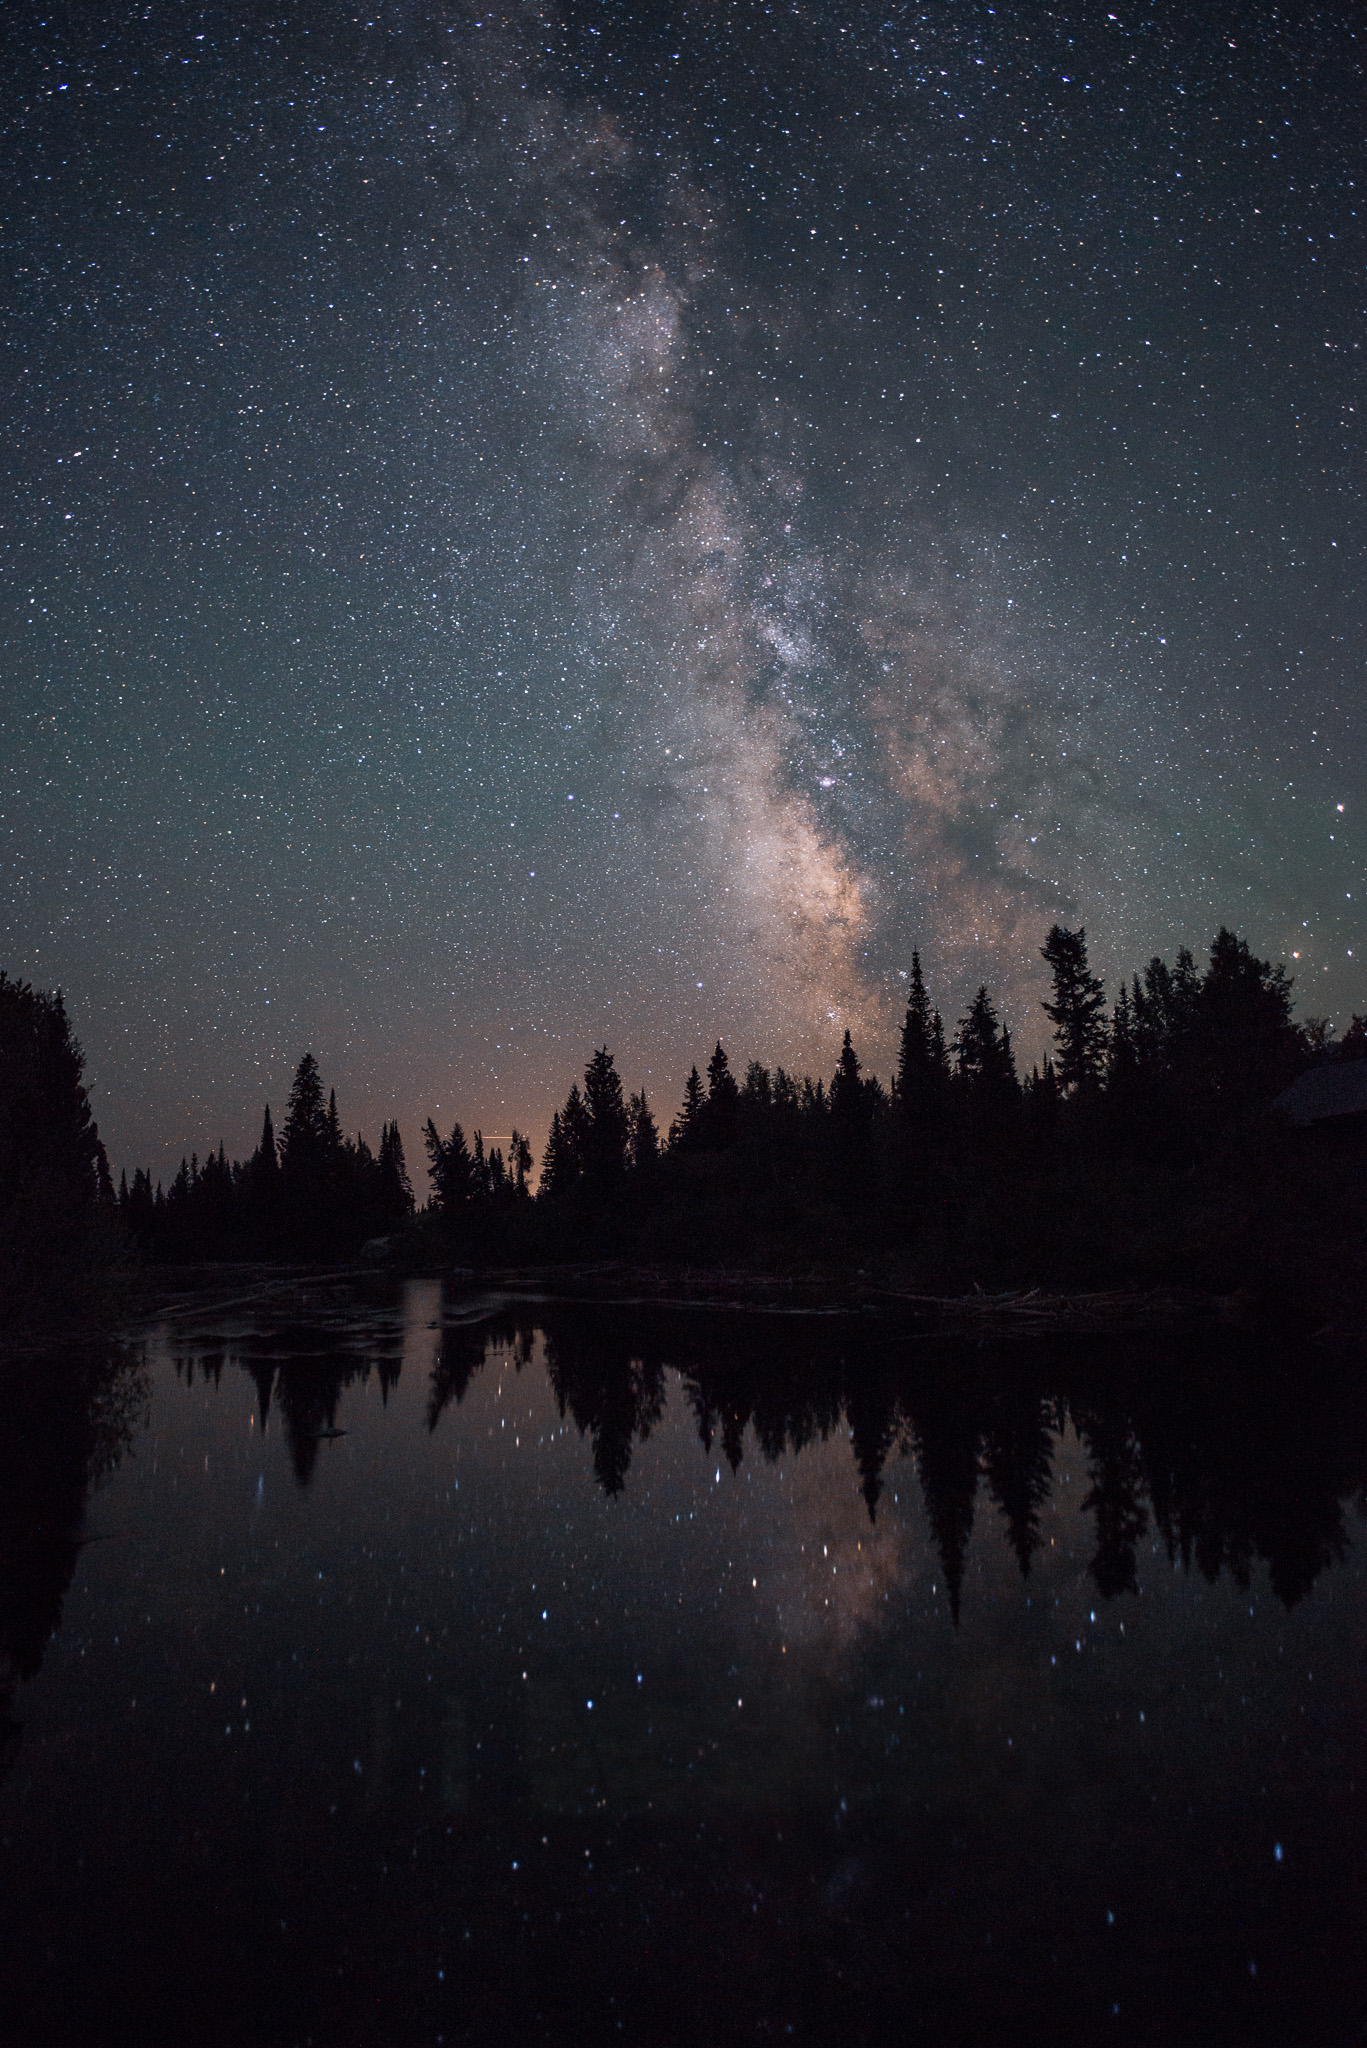
With ordinary (daytime) landscape photography, you generally can use any shutter speed you want and get sharp pictures, assuming you’re on a stable tripod and nothing in the scene is moving. For example, the landscape photo below is shot at 60 seconds and is plenty sharp:
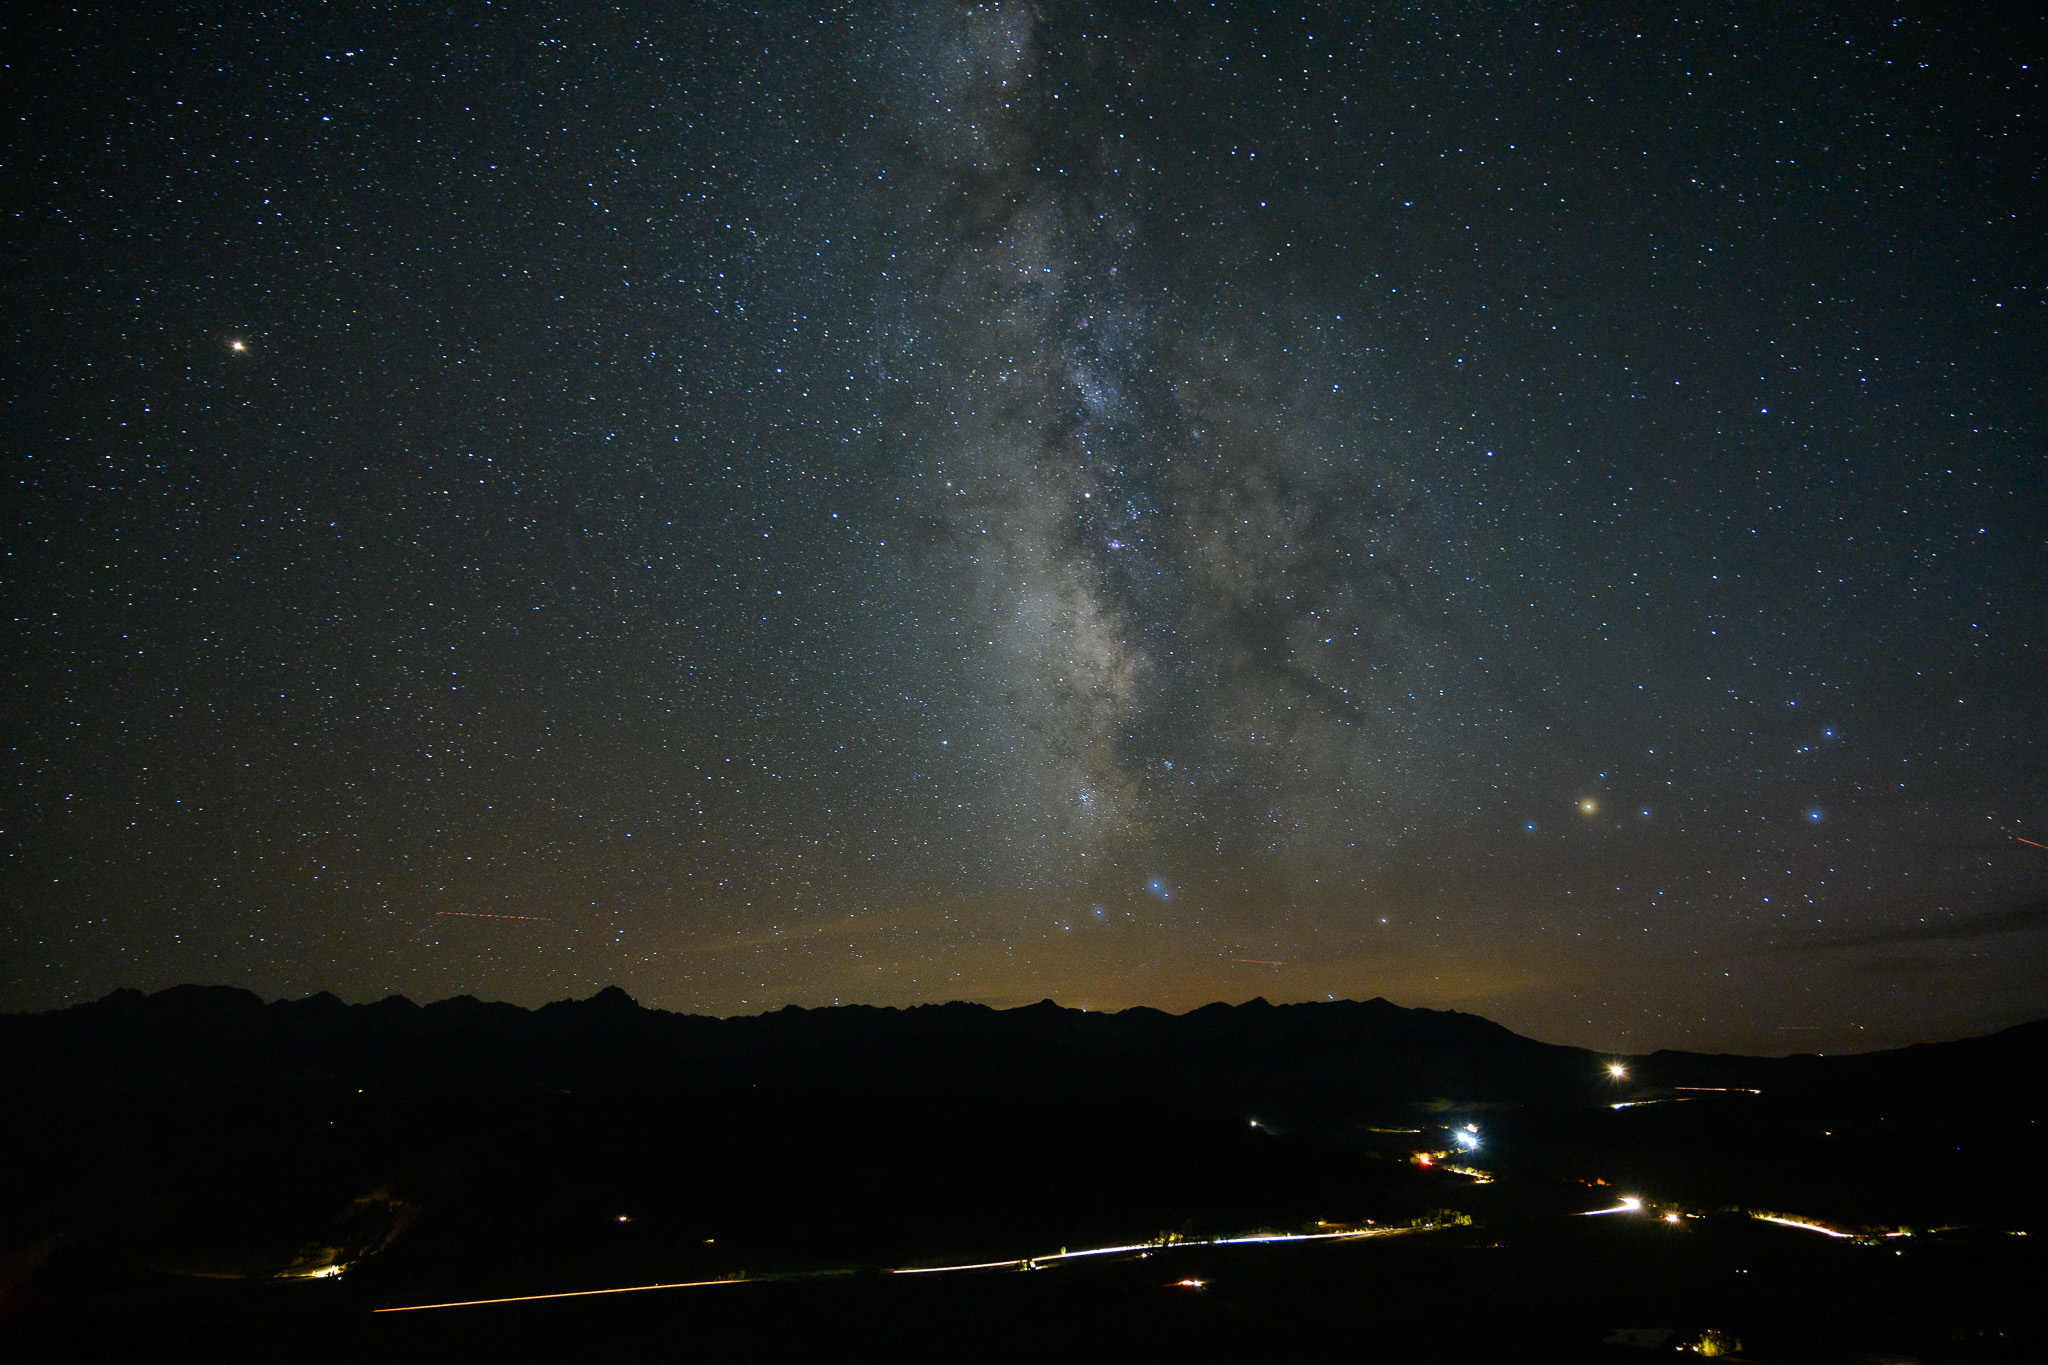
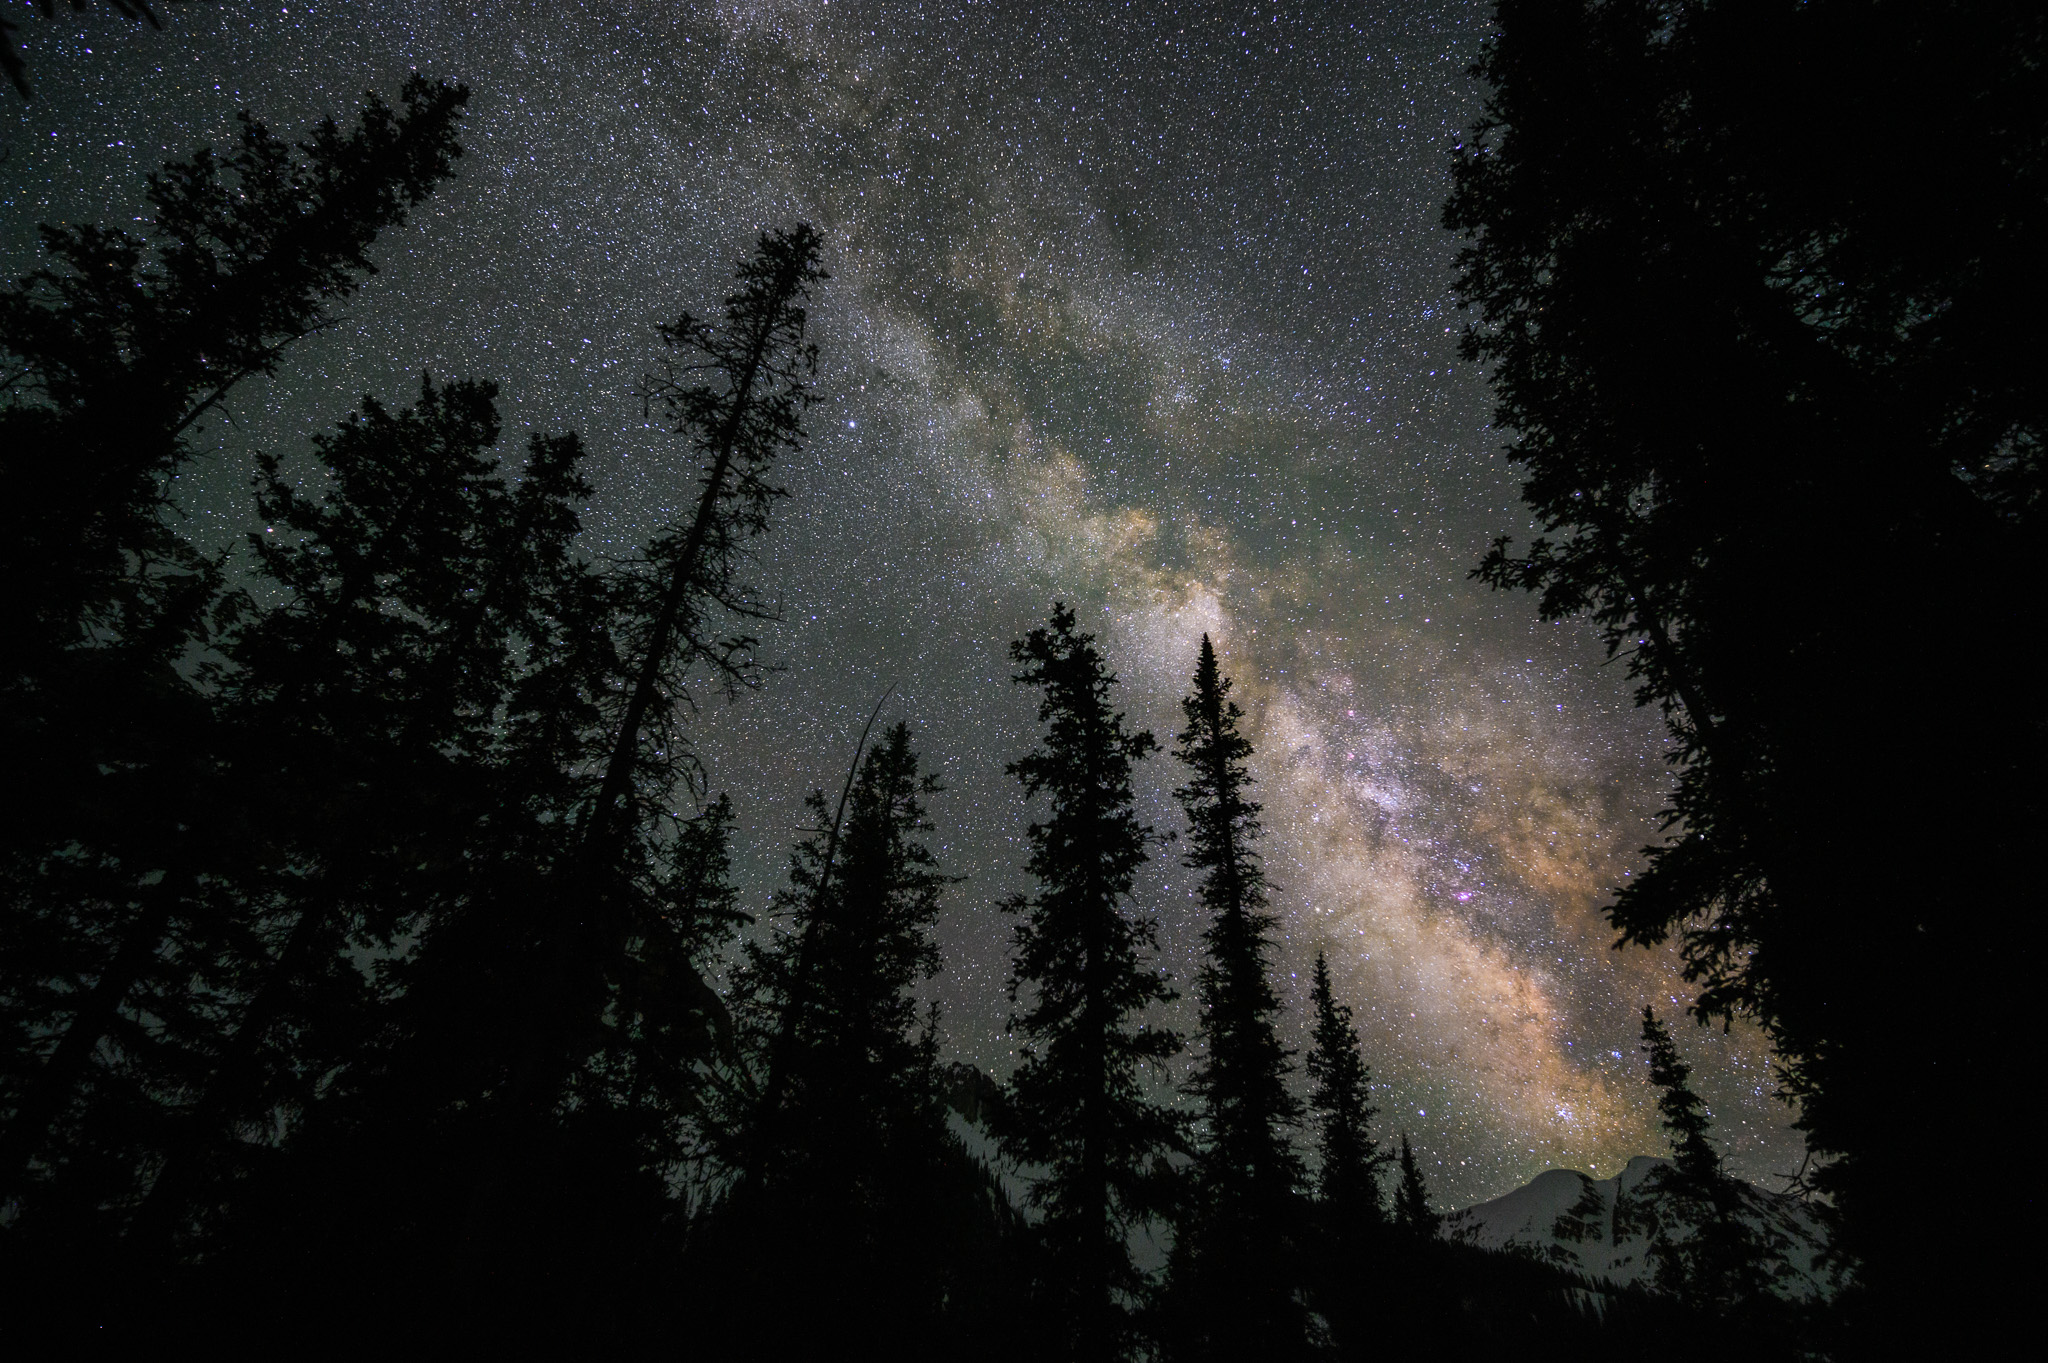
However, that’s not possible with Milky Way photography. Because of the Earth’s rotation, the stars move surprisingly fast across the night sky. It can be tough to see that movement with your eyes, but your camera will pick it up. Beyond about 30 seconds of exposure, you’ll get noticeable blur in the stars, even with an ultra-wide lens.
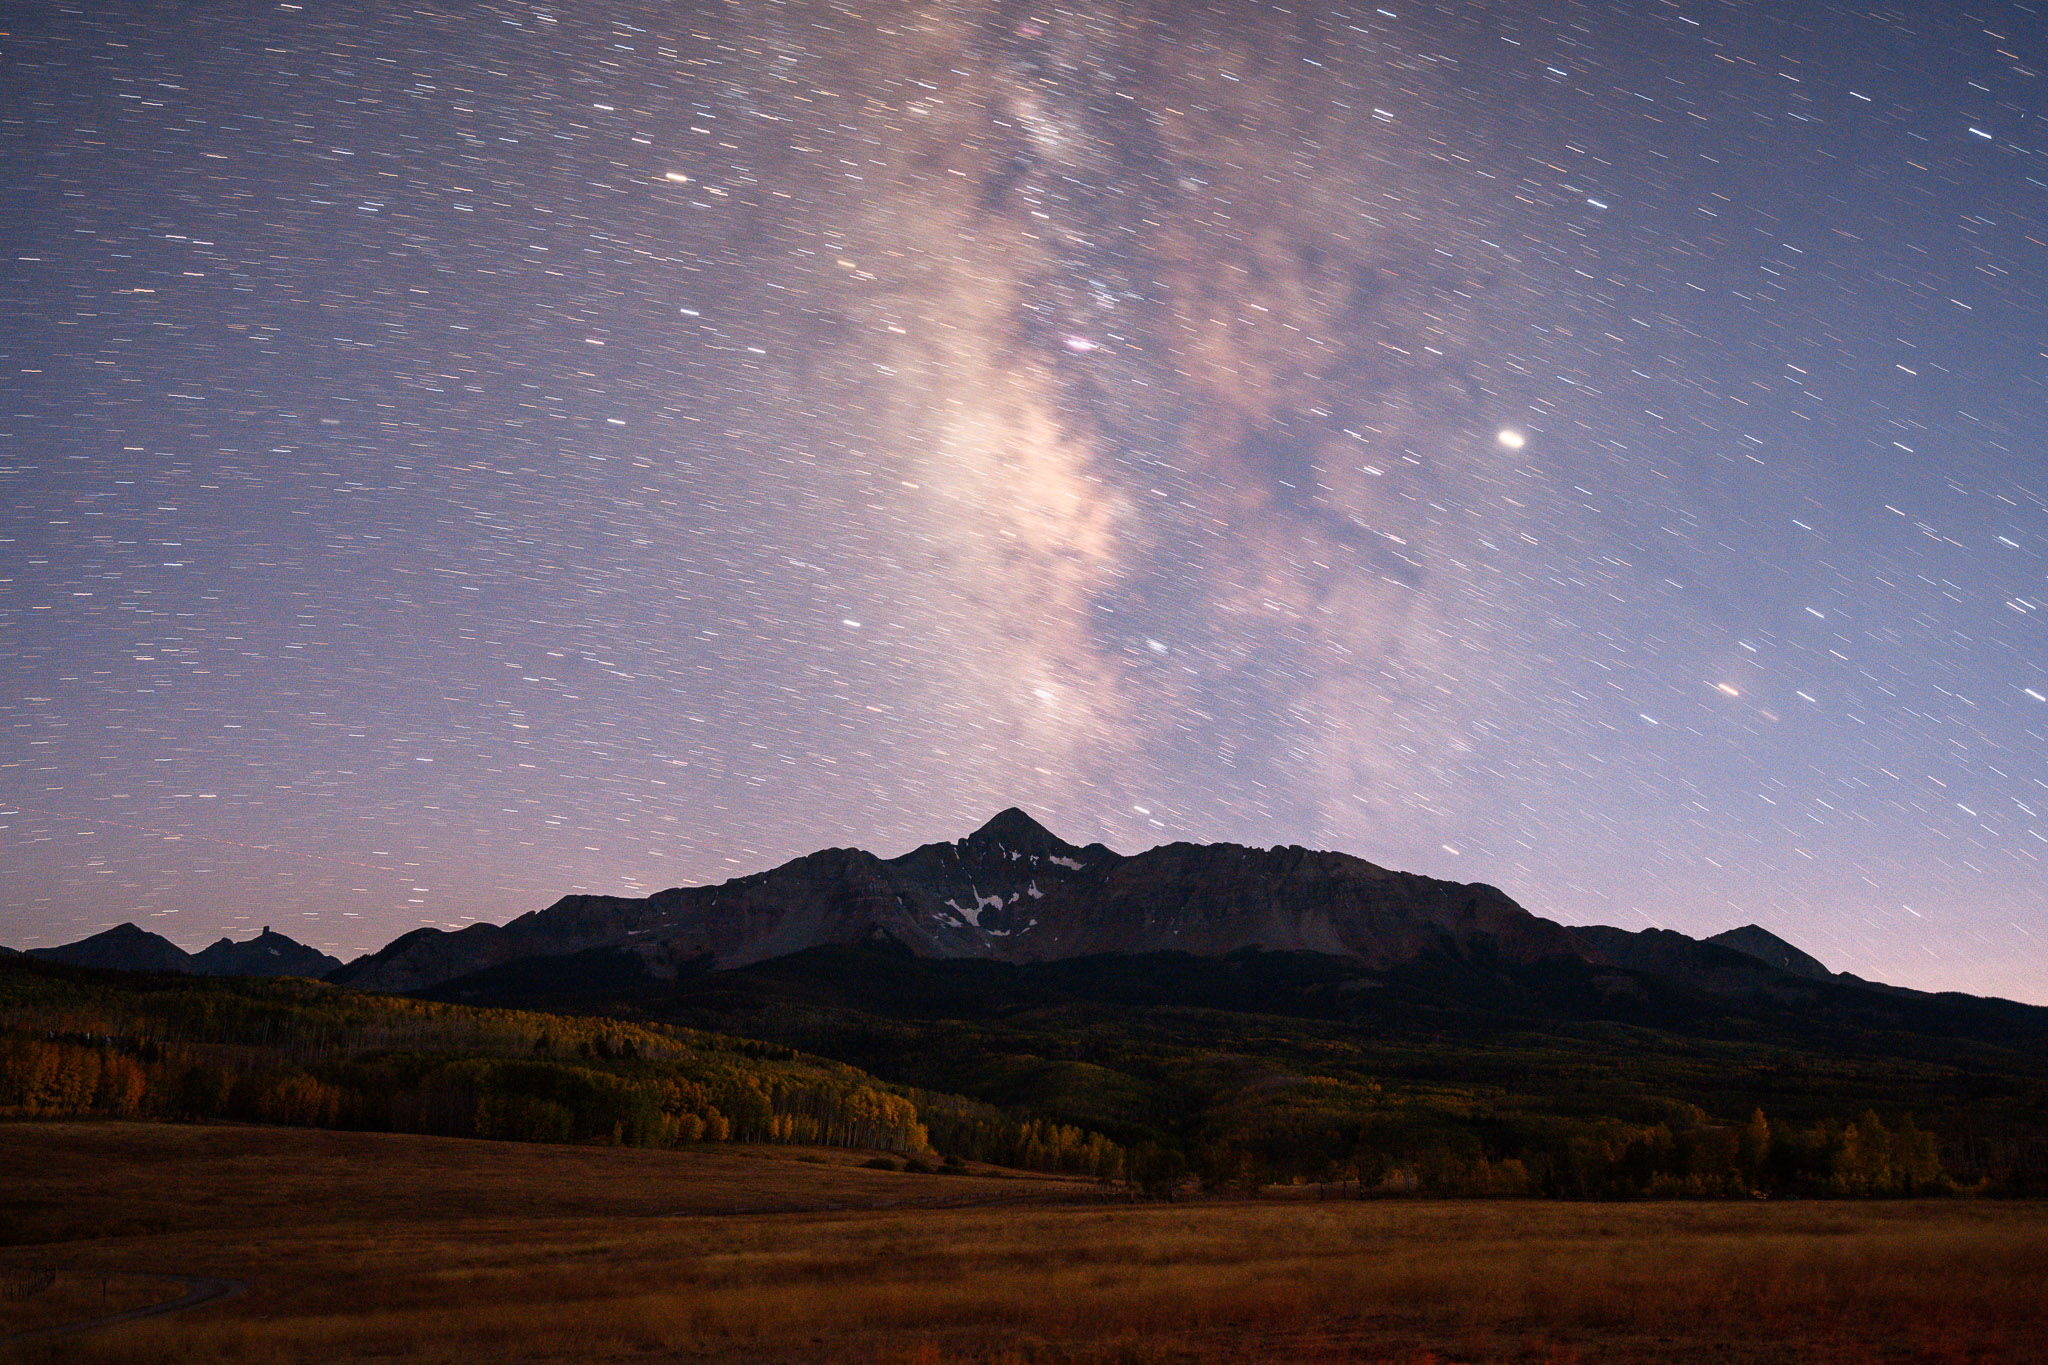
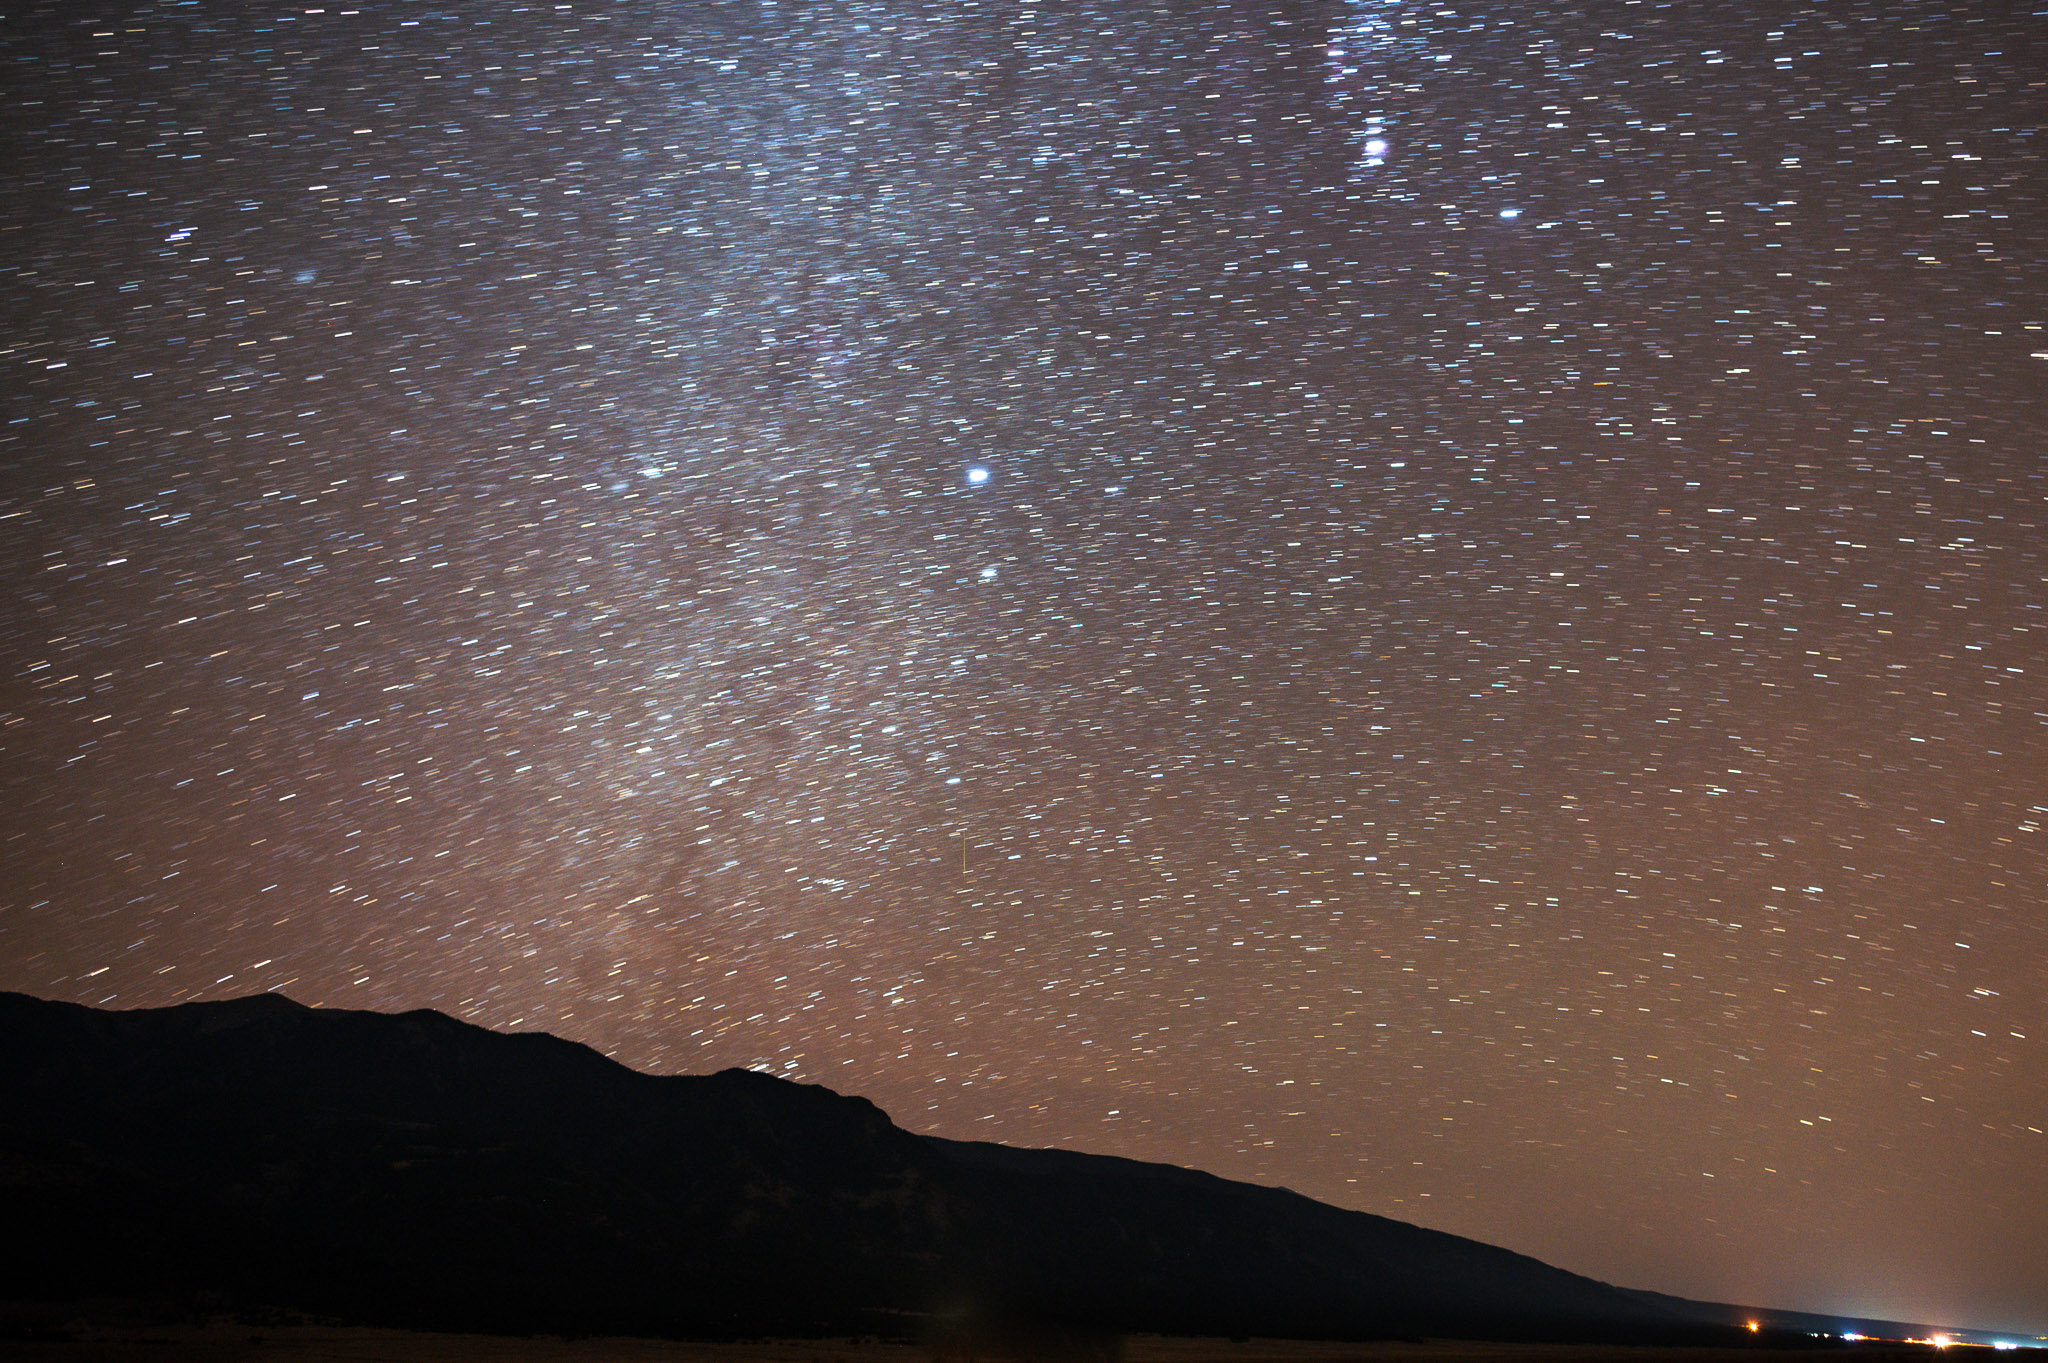
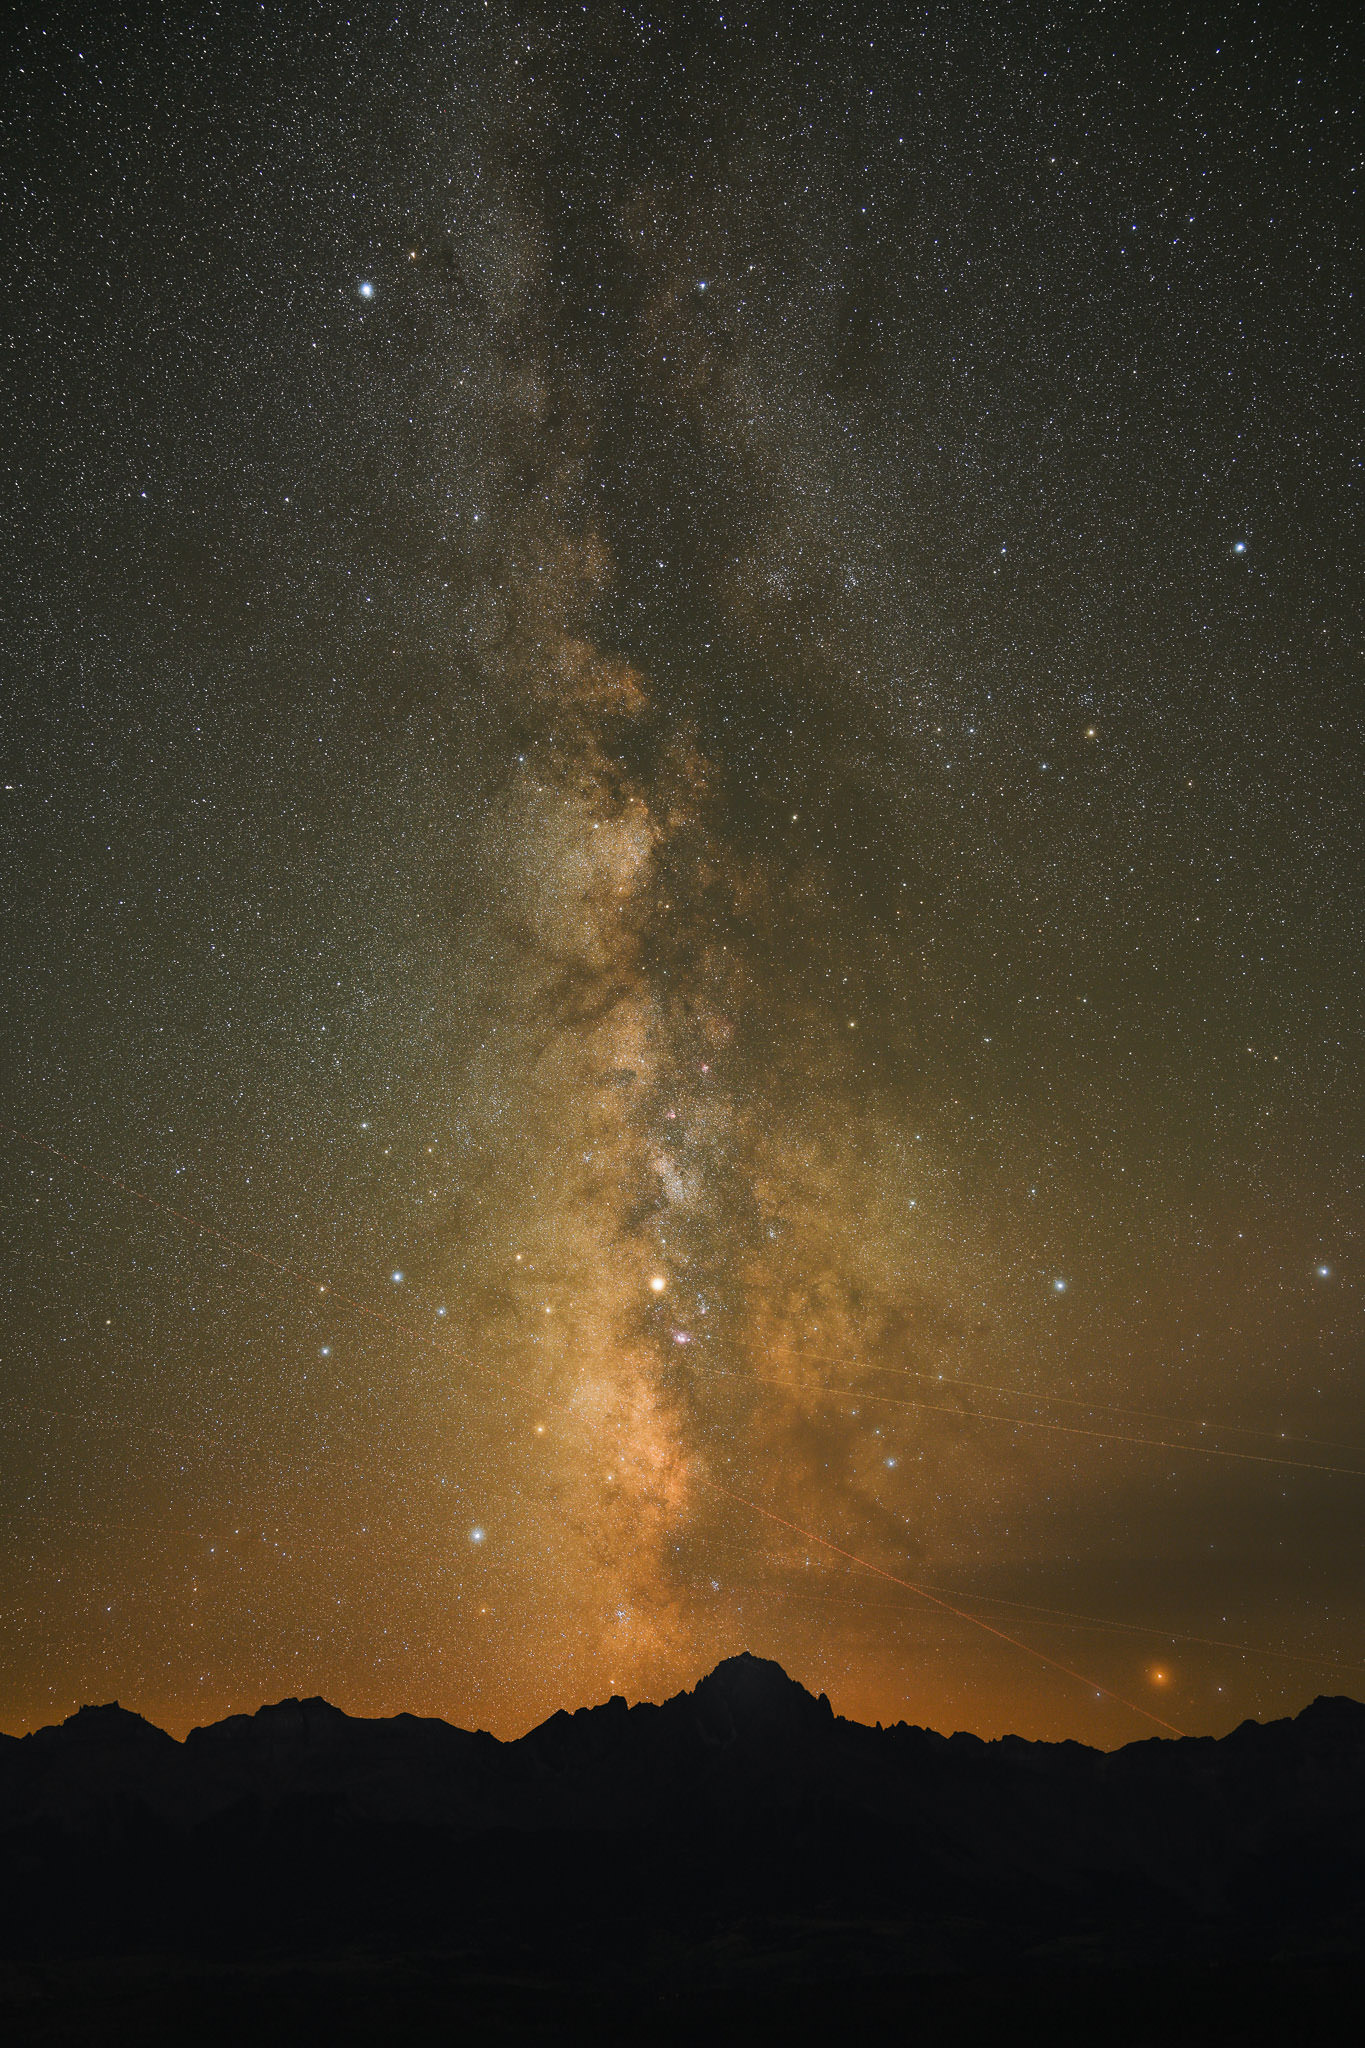
The image below, shot at 133 seconds, shows how this blur can get out of control:
Even at seemingly safe shutter speeds such as 20 or 25 seconds, there will be some blur when you zoom into the photo. In fact, with a typical wide-angle lens, you won’t completely eliminate star movement until you’re at shutter speeds as short as 5 or 10 seconds!
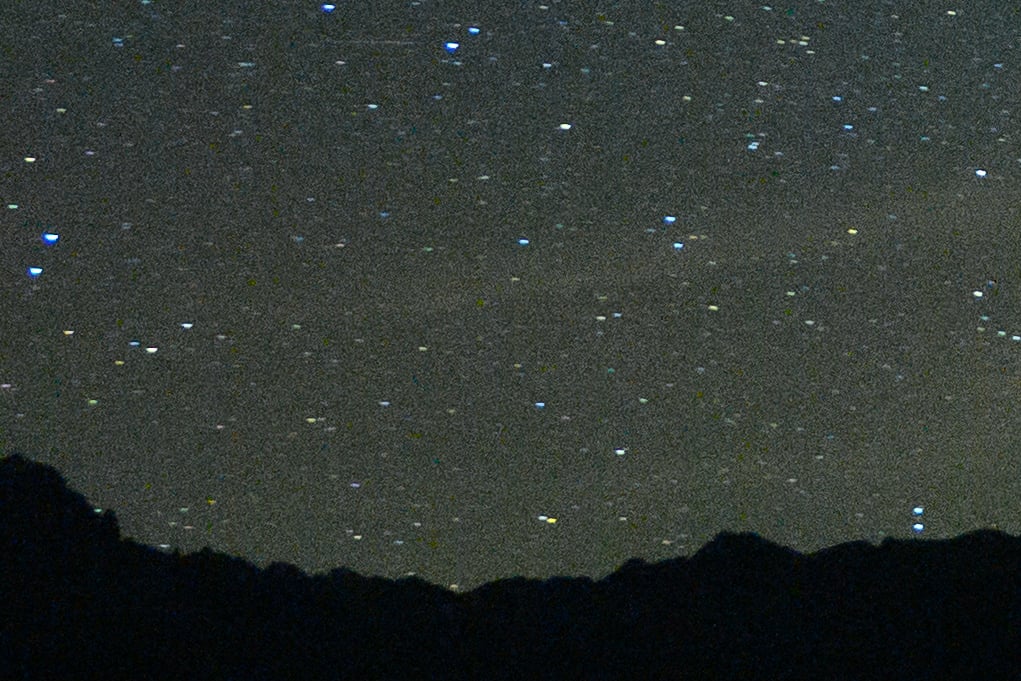
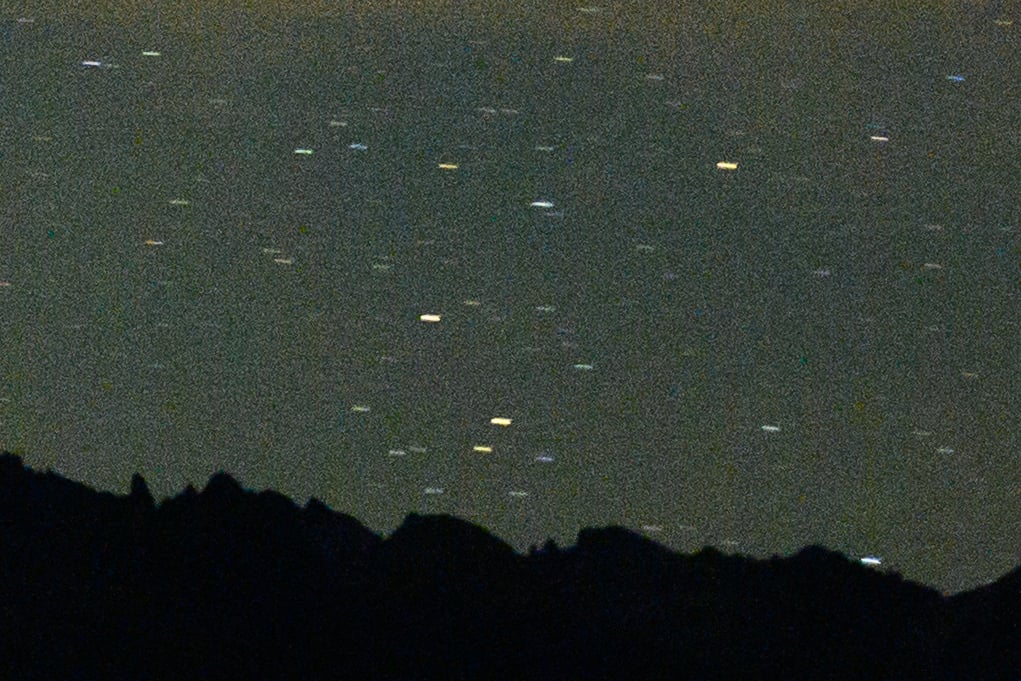
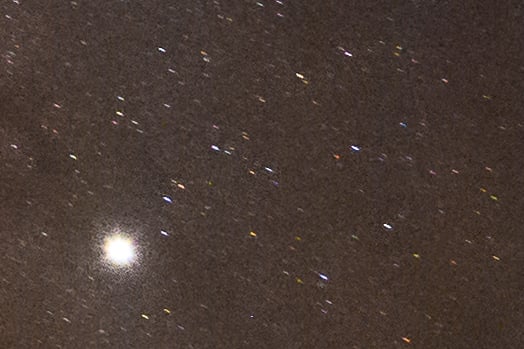
Here’s a demonstration of that. The images below are extreme crops of astrophotography images – the first one captured at 8 seconds, and the second at 20 seconds. I used a 14mm ultra-wide lens in both cases:
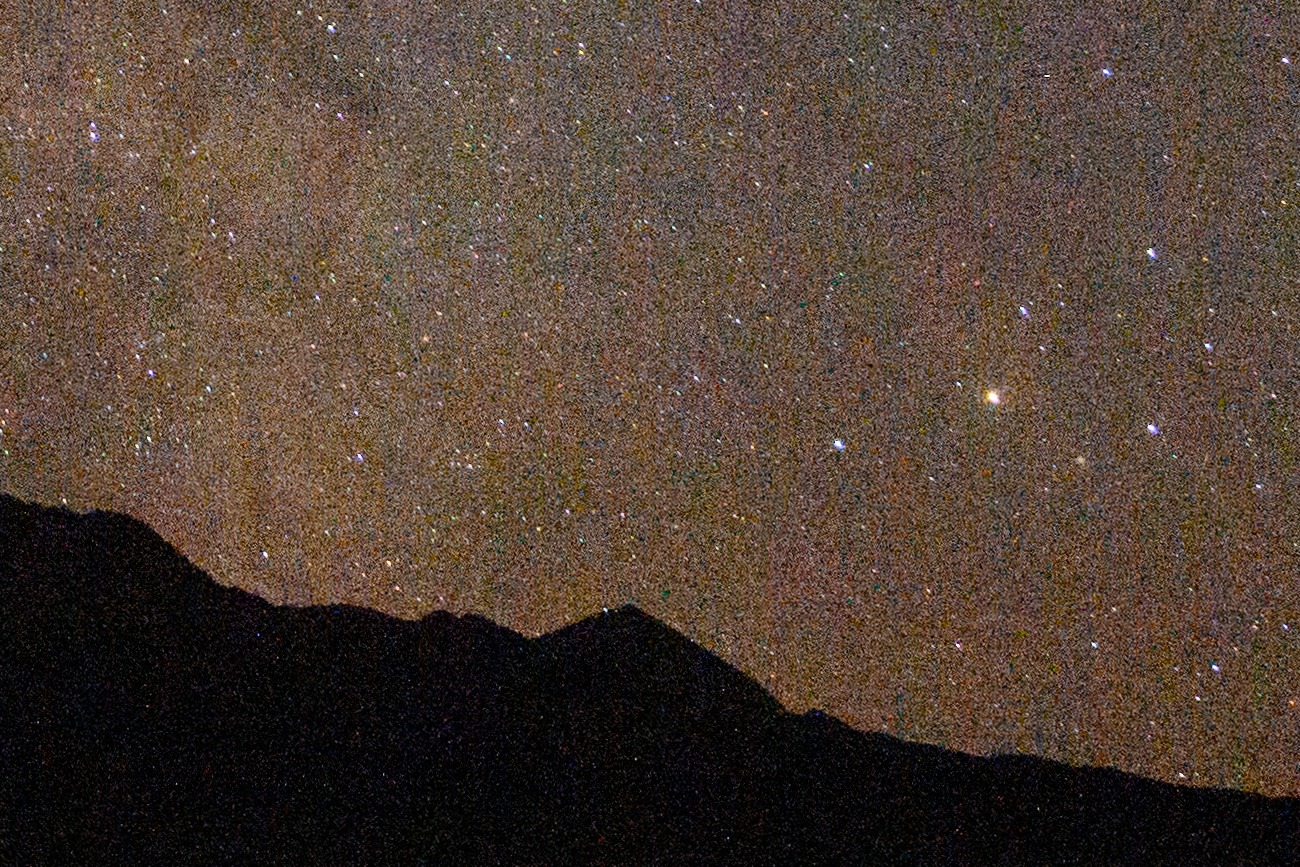
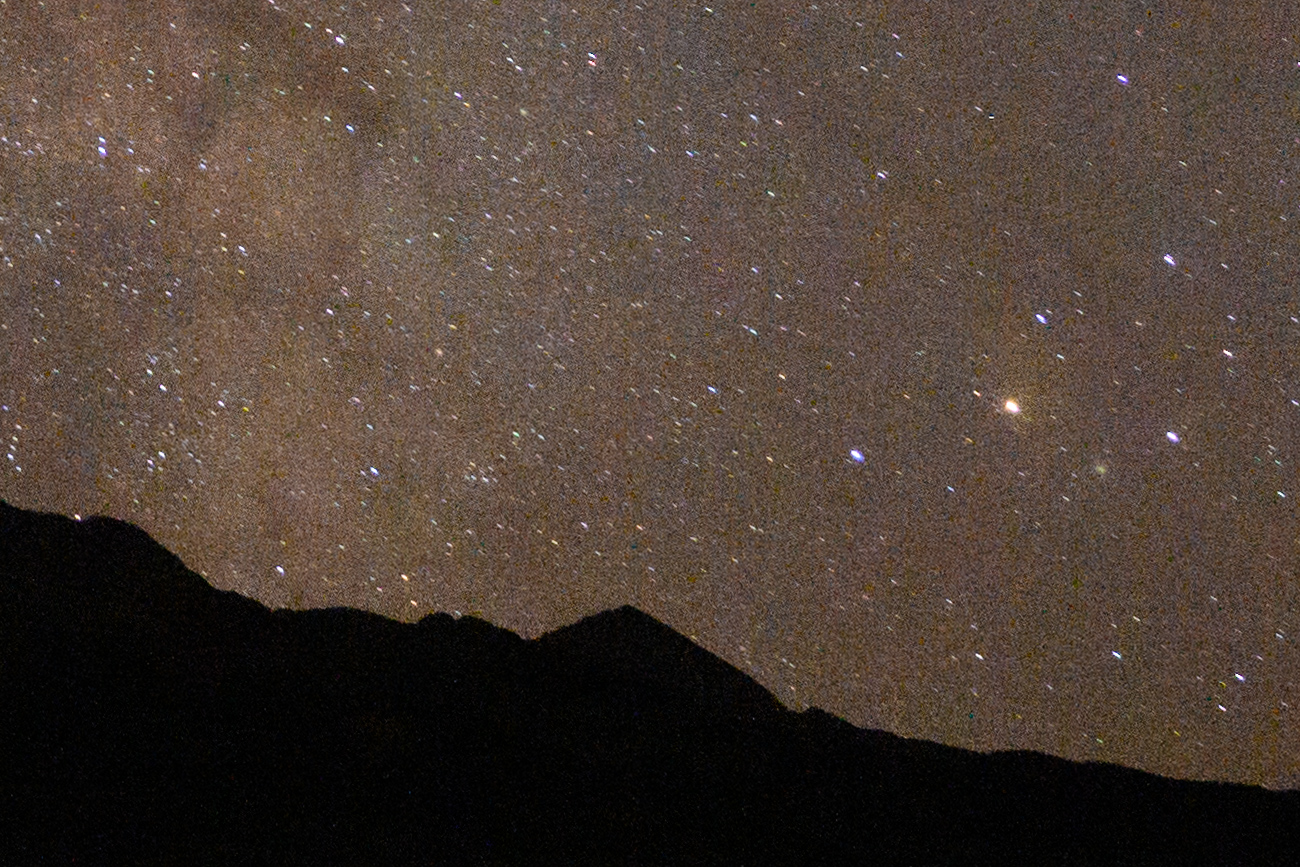
If you look closely (or click to see larger), you can tell that there’s more star movement in the image taken at 20 seconds, while the image at 8 seconds has essentially no motion blur. However, that’s not the biggest difference between the two images. More importantly, the photo taken at 20 seconds captures more than twice as much light as the other photo, resulting in a better signal-to-noise ratio. As a result, it looks cleaner overall, with less noise and fewer discolored pixels.
So, what would you say is the optimal balance between motion blur and noise? Is it better to get pinpoint stars even at the expense of noise, or is a longer shutter speed preferable – maybe even longer than in the demonstration above? It’s a dilemma.
My perspective is this: Every photographer should make a decision about their “preferred balance” between noise and star movement – and I’ll explain more about this decision below. However, once you’ve figured out your own preferred balance, it’s possible to recreate it perfectly every time you take a Milky Way photo, no matter the other factors at hand (like your focal length or the direction you’re facing).
That’s where the 500 rule and NPF rule come into play. In theory, these rules make it easy to achieve the same preferred balance every time you take a Milky Way photo. However, in practice, both rules have their own flaws.
To make it easier to understand those flaws, let’s take a look at the different factors that influence motion blur in astrophotography.
Factors Influencing Motion Blur
There are three major factors that affect how much motion blur you’ll capture when photographing the stars (assuming a stable tripod and no tracking head). Those are your shutter speed, focal length, and the direction you’re facing.
I’ve already demonstrated how shutter speed can affect the motion blur in your stars, so let’s take a look at the other two factors: focal length and the direction you’re facing.
Focal length matters for an obvious reason: As you zoom in, you magnify everything in your photo, including motion blur. (Using a crop sensor camera – or cropping your photo in post-processing – does the same thing.) For example, the following photo is taken at 24mm and 20 seconds, and while it has some star movement, it’s difficult to notice at web resolution:
By comparison, I took the following photo on the same evening at 67mm, all other settings identical:
If you’re on a desktop, I recommend clicking on either of these photos to view them larger and scroll between them. It should be pretty clear that the second image has larger star trails. If it’s not clear, or you’re viewing it on a smaller screen, here’s a 100% crop from both photos (the “before” at 24mm and the “after” at 67mm):
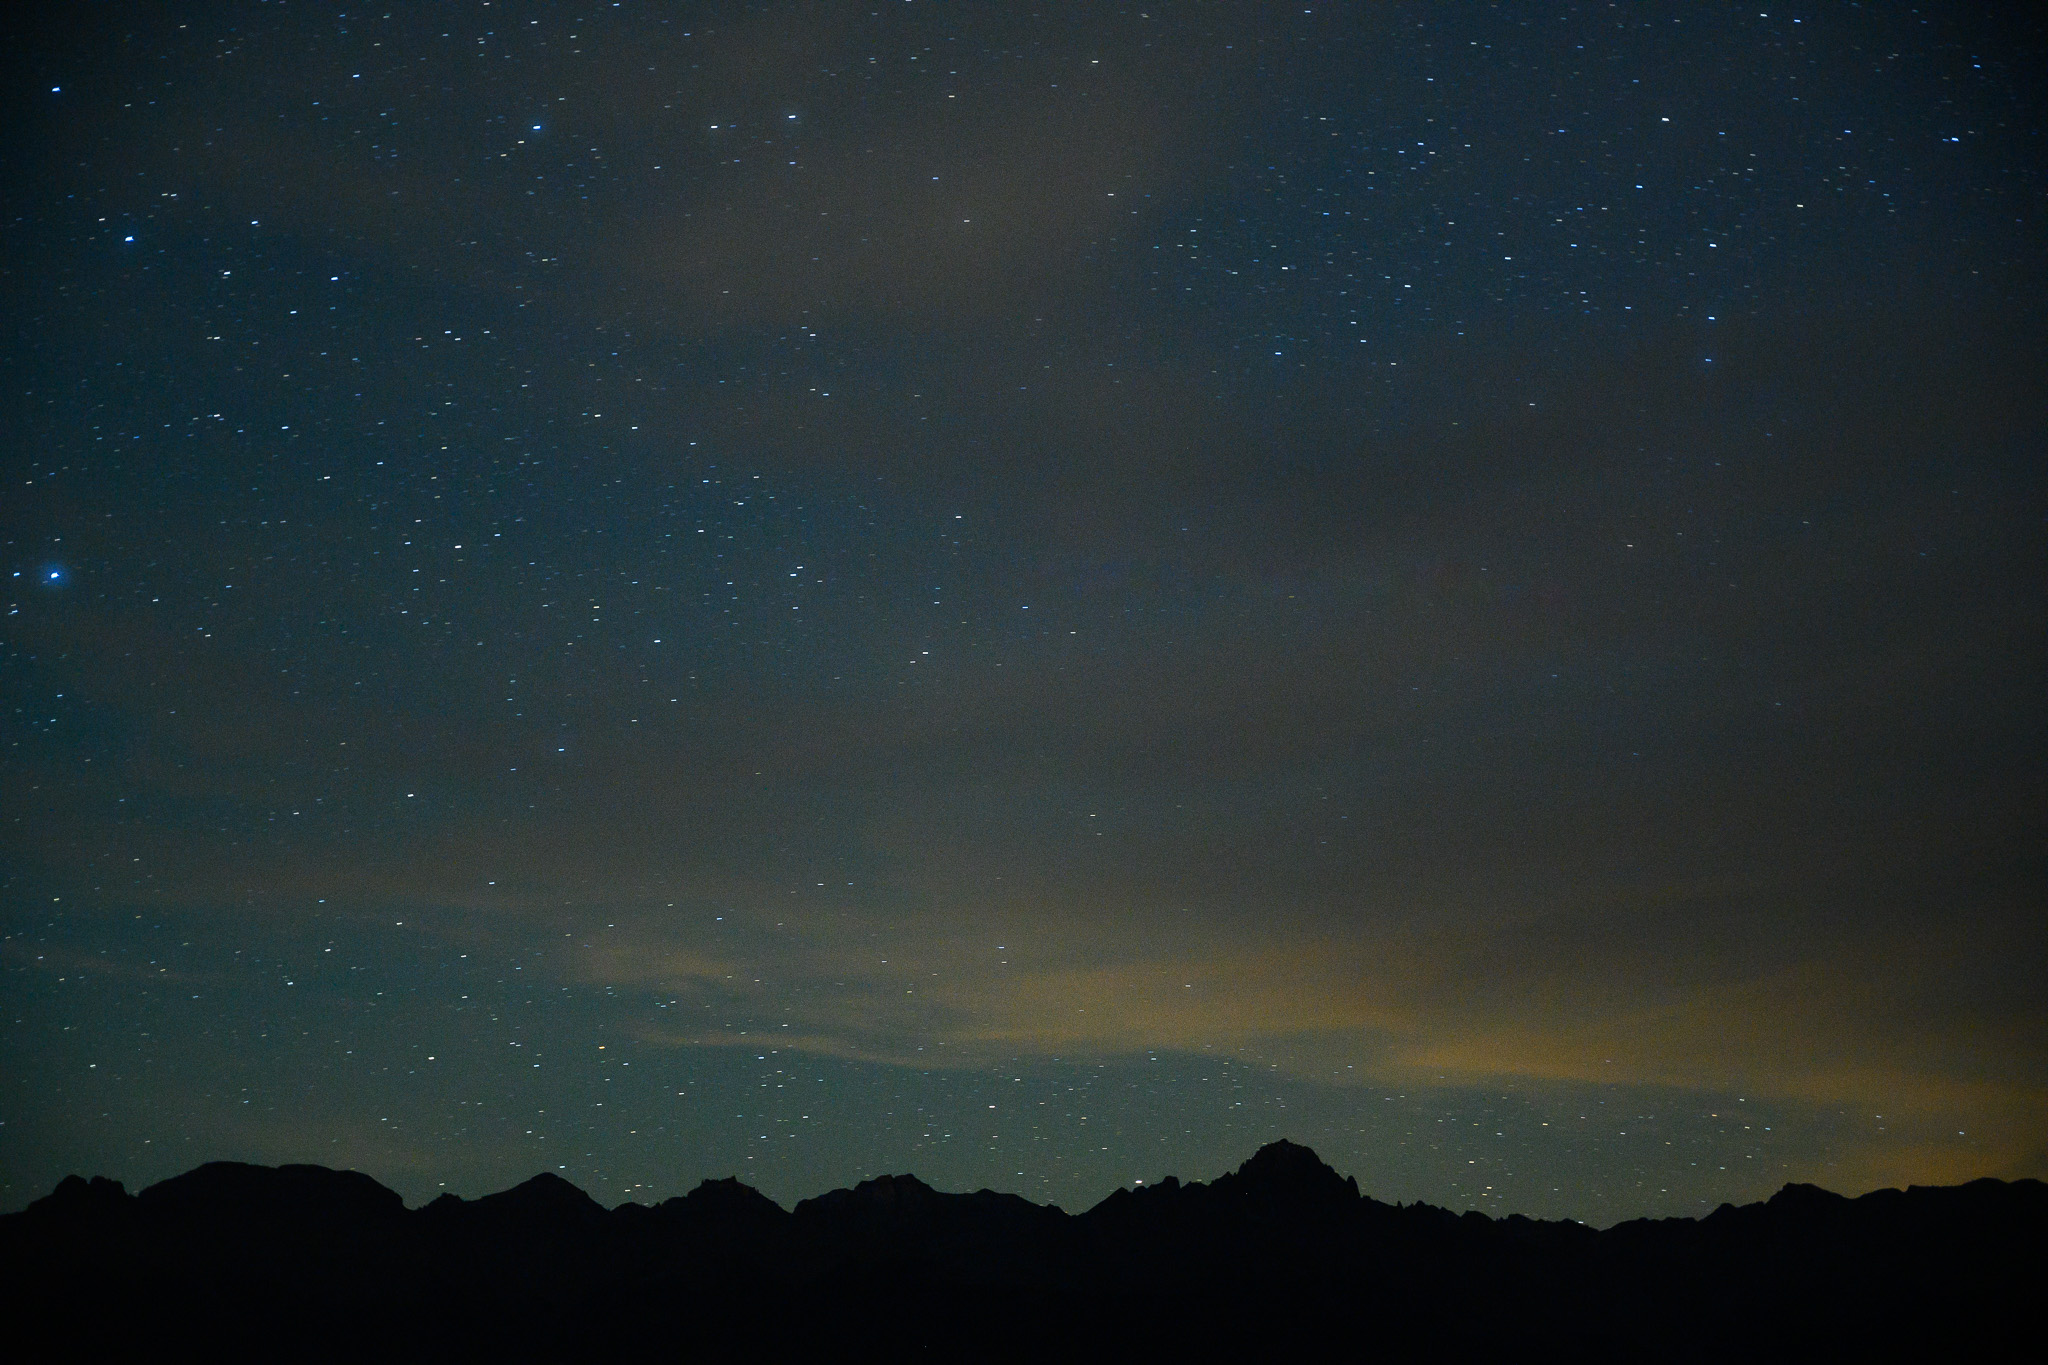
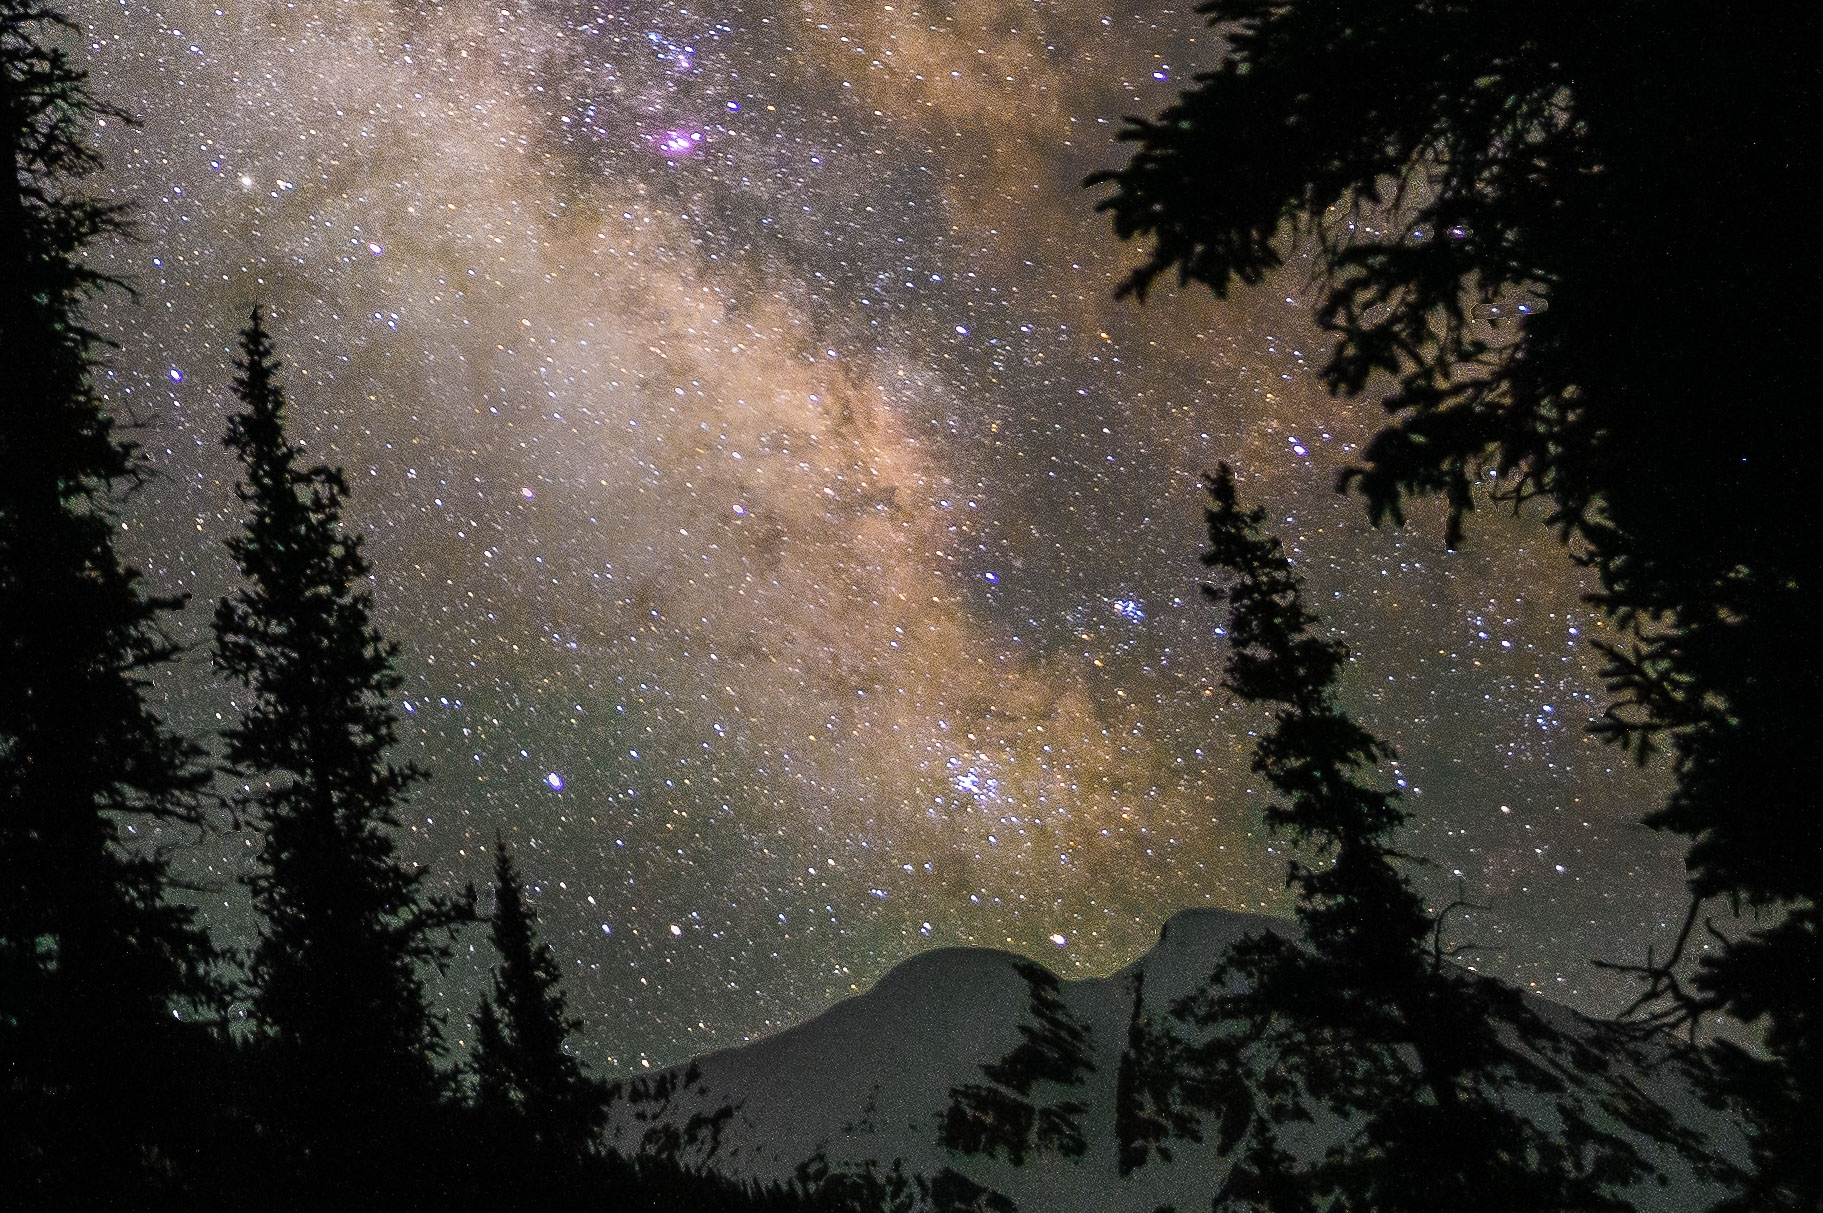
Along with your focal length, another important factor is the direction you face. Most photographers know that the stars are rotating more slowly around the North Star (or the equivalent “South celestial pole” area if you’re in the Southern Hemisphere). And, in turn, the fastest stars moving across the night sky are those along the celestial equator, which is the region directly between the North and South celestial poles.
Here’s a comparison between a photo taken toward the North Star, and then closer toward the celestial equator, to demonstrate how star movement changes depending on your composition. Both of these are 120 second exposures:

The best shutter speed is going to be shorter when your stars are close to the celestial equator. The technical term for a star’s distance from the celestial equator is its “declination,” which is measured in degrees.
Along with those three factors, there are a few other variables that aren’t quite as important, but still matter: your camera’s pixel size, lens quality, diffraction at your chosen aperture, and focus precision. These can all be lumped into a variable I call “smallest theoretical star prior to everything else.” I’m proud of this name because it really rolls off the tongue.
A good way to imagine the smallest theoretical star variable is this: If you miss focus slightly, the stars are all going to be a bit larger in your image. As a result, if they move a few micrometers during your exposure, it’s not going to give you quite as obvious of a star trail, compared to a smaller star moving the same distance. Basically, like this:
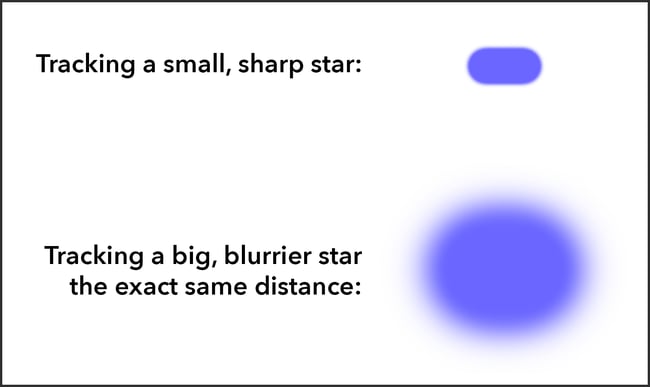
So, a bit ironically, if your stars are bigger/blurrier in the first place, you can get away with a longer shutter speed before you notice the motion. Not that I’m suggesting you miss focus or use a low resolution camera sensor just because of this effect. You’ll lose more sharpness and image quality than you gain from doing so. However, if you’re already using a lower quality imaging system, it’s going to cause enough blur that it could hide some of the star movement, meaning it’s best to use a slightly longer shutter speed. So, the “smallest theoretical star” variable still matters (and even factors into the NPF rule’s equation).
That’s enough background information. Let’s compare the 500 rule and NPF rule to see how well they work for Milky Way photography, and which shutter speed you should actually use.
The 500 Rule
By far the simpler of the two popular rules for astrophotography is the 500 rule. It recommends that your shutter speed is equal to 500 ÷ Equivalent Focal Length.
So, if your full-frame equivalent focal length is 20mm, the 500 rule would suggest that you use a shutter speed of 500 ÷ 20 = 25 seconds. If you’re using a 50mm lens instead, it would recommend using a 10 second shutter speed (500 ÷ 50).
The benefit of the 500 rule is that it’s easy to remember, and it’ll get you in the right ballpark for your Milky Way shutter speed. That’s likely why it’s become such a popular tool among photographers who are first learning astrophotography.
The biggest drawback with the 500 rule is that it doesn’t take into account the direction you’re facing (nor any of the other factors like pixel pitch or blur from diffraction). The formula only ever spits out a different shutter speed when you change focal length, which doesn’t account for all the real-world factors that apply.
The other major drawback of the 500 rule is that it’s too lenient. In almost every case, regardless of your composition, you’ll get more blur than ideal when using the 500 rule. This particular issue is easy to fix by using the “400 rule” or “300 rule” instead (the same formula, but with 400 or 300 rather than 500). However, this doesn’t fix the issue of the direction you’re facing, so it’s a bit like putting a bandaid on a garden hose.
That said, if you like the idea of simplicity, this rule isn’t worthless. I personally use the “300 rule” version when I know that my composition includes stars along the celestial equator (again, the fastest-moving stars in the night sky). This means I’m at 20 seconds of exposure with my 14mm lens and 15 seconds with my 20mm lens when those fastest-moving stars are in my composition.
Of course, the stars along the celestial equator won’t be in all your astrophotography images, but it’s actually quite common that they will, especially if you’re using an ultra-wide lens. Case in point: The constellation Orion directly intersects with the celestial equator, and Orion is not terribly far from the core of the Milky Way (it’s a bit “up and to the right” of the core if you’re in the Northern Hemisphere). So, the 500 rule – or, at least, the 300 rule version of it – still has some value.
The NPF Rule
A more complex formula for calculating shutter speed at night is called the NPF rule. Here’s the formula:
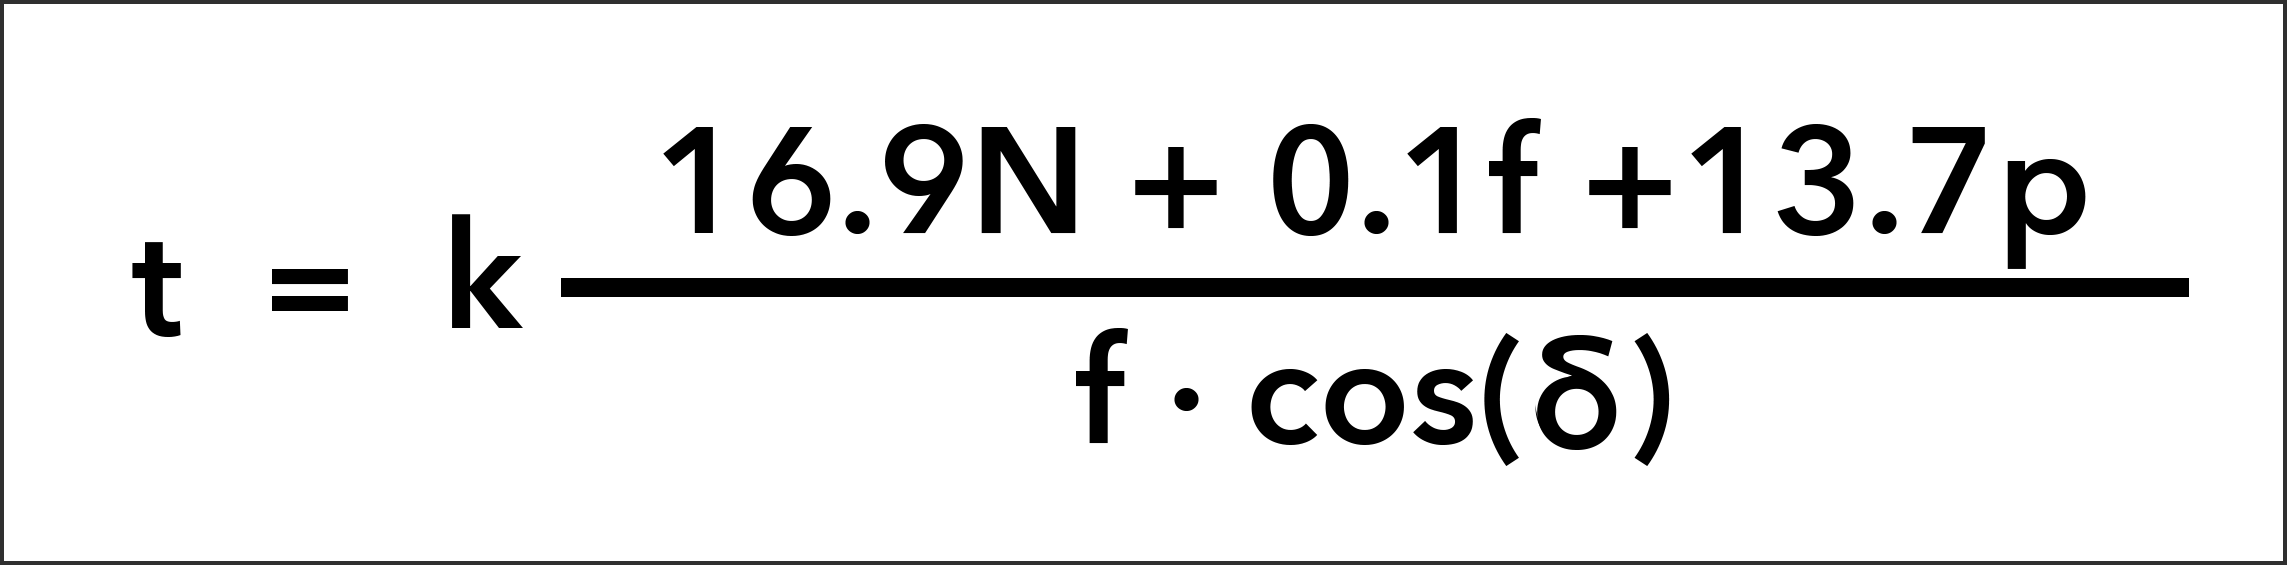
- t = Recommended shutter speed
- k = Multiplication factor
- N = F-number
- f = Lens focal length (millimeters)
- p = Pixel pitch (micrometers)
- δ = Minimum declination
The key is to memorize this as soon as possible. Once you do, it just takes some quick mental math to get sharp photos every time.
Ok, I’m kidding! This calculation is built into a number of astrophotography apps directly, like PhotoPills, Pin Point Stars, and a few others. You’ll need to input some of the variables on your own, but once you do, the app will tell you the optimal shutter speed without any calculations required on your end.
Here’s how it looks in PhotoPills, for example:
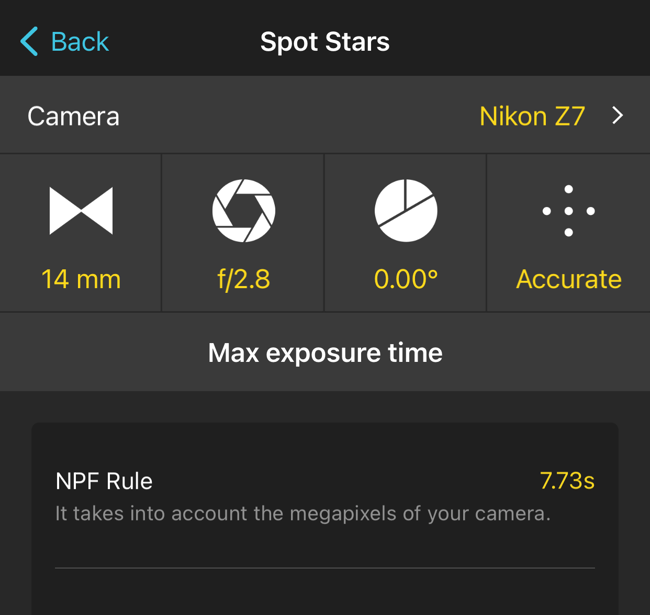
Unlike the 500 rule, the NPF rule takes into account the direction you’re facing (AKA “minimum declination” in the formula), as well as your pixel pitch and the diffraction from your chosen aperture.
Except… something seems wrong. In the screenshot above, the NPF rule says to use roughly an 8 second shutter speed with the Nikon Z7 and a 14mm lens. If you recall the demonstration from the start of this article, that’s exactly what I did – and it was clear that the 20 second shutter speed had a better balance of image quality by comparison.
The thing we’re missing here is the multiplication factor “k” at the start of the NPF equation. The 8 second recommendation is what happens when k is set to 1, but that’s not always what you’ll want. In fact, the photographer who created the NPF rule, Frédéric Michaud, recommended a multiplication factor anywhere from K = 1 to K = 3. A value of 1 gives you total pinpoint stars at the expense of noise; a value of 3 means you’re tripling the shutter speed (thus using 24 rather than 8 seconds in this case), giving you more motion blur but substantially less noise.
This is what I was talking about when I mentioned finding your own “preferred balance.” I personally prefer a K value of about 2.5 or 3, meaning that the dimmest stars in my photos are going to be no more than three times as long as they are tall (and the larger, brighter stars in my photos will have even less blur than that). By comparison, PhotoPills has a “Barely noticeable trails” option (click the button that says “accurate” to switch it) which sets K equal to 2, another perfectly reasonable preference.
It’s not a massive difference – PhotoPills’ 2× setting recommends a shutter speed of about 15 seconds, while my 2.5× preference leads to 20 seconds instead – but it’s still important to figure out what balance you like best. Then, you can replicate this balance 100% of the time in the future simply by multiplying the standard NPF rule by your preferred factor.
However, the NPF rule also isn’t perfect, even if you’re doubling or tripling its recommendation. Aside from the mild annoyance of opening an app every time you do Milky Way photography, the calculation doesn’t take into account another variable that matters here: blur from lens quality. In other words, the NPF rule uses a hypothetical “perfect” lens which is sharper at f/1.4 than, say, f/4 (because of increasing diffraction at f/4). But very few lenses, if any, are like this in the real world. The result is that you can skew the calculation by inputting an ultra-large aperture like f/1.4, especially with a camera that has very small pixels. For example, with the 61-megapixel Sony A7r IV at 20mm and f/1.4, the NPF rule suggests a shutter speed of just 3.85 seconds! Even multiplying by my preferred “k factor” of 2.5× still gives you less than 10 seconds, when real-world conditions easily allow 12 or 15 seconds instead.
So, despite the NPF rule’s clever inclusion of the direction you face and the size of your pixels, it still has some flaws. If you use it as a guide rather than as a guarantee, you’ll have better luck in the field.
What Shutter Speed Should You Use?
Given the drawbacks of both the 500 rule and the NPF rule, it can be tempting to just ignore both of them and use trial and error instead. And, frankly, that’s not a bad option.
To me, the end goal is to get the dimmer stars in your photo to be two or three times as long as they are tall (with the exact factor being your “preferred balance” I keep talking about; for me, it’s a bit more than 2.5×). At that point, the larger, brighter stars in your photo will only be slightly elongated, and you’ll get an excellent balance of noise versus star trailing.
The extreme crop below is an example of what I personally aim for. Note how the dimmer stars are about 2.5× as long as they are tall, while the brightest star looks pretty circular:
The 500 rule and NPF rule can guide you to the shutter speeds that give you this result, but they may still recommend something that’s a bit off from optimal. So, no matter which rule you use, I recommend zooming in on your Milky Way photos when you’re in the field and making sure that they look something like the image above.
I personally use 20 seconds by default with my 14mm lens, and sometimes up to 25 seconds. With my 20mm lens, that’s 15 and 20 seconds instead. I typically don’t change this shutter speed based on my camera or aperture, but I do try to figure out which direction I’m facing relative to the celestial equator to help make my decision. However, I’m also a bit more aggressive in general about using longer shutter speeds than some astrophotographers are, so I encourage you to test it yourself before using these exact values.
Eliminating Star Trails Completely
There are two ways to get zero star trailing whatsoever in your photos, without an extreme amount of noise: star trackers and image stacking.
The first method requires you to get a specialized tracking head that follows the movement of the stars. These allow you to use arbitrarily long shutter speeds without blurring the stars. For instance, I took the photo below at more than 14 minutes of exposure on a tracking head, and the stars are perfect pinpoints because the tracker followed them so well:
Of course, the ground is blurry now, so I took a separate image and blended them together:
That method works well when your foreground has a sharp edge, like a mountain, but runs into issues for complex foregrounds like trees. At that point, the better option is to do “image averaging” instead. Essentially, you take a series of photos at a relatively short shutter speed like 5 or 10 seconds, combined with a high ISO. With specialized astrophotography software (Starry Landscape Stacker for Mac and Sequator for Windows), you can rotate and align the stars in the image without rotating the foreground, then average together your images to reduce noise.
I’ve written a full article about the technique here if you want more info. But the result is that you can get pinpoint stars with image quality equivalent to using a multi-minute exposure. That’s what I did here with 14 images, each taken at 10 seconds of exposure:
And you can see the level of detail (and lack of star trailing) in the crop:
For this method, it helps to use a shutter speed no longer than the strictest version of the NPF rule. Even in the over-the-top example I gave earlier of the Sony A7r IV with an f/1.4 lens, it’s better safe than sorry; if the NPF rule suggests no more than 4 seconds of exposure, that’s what you should use. (If you don’t have an NPF calculator handy, just use a shutter speed that feels excessively short, like 5-8 seconds.) Then, compensate for the individually short exposures by taking 30 or 40 images to get an equivalent exposure of several minutes long. Blend in your stacking software for great results.
Just like the others, though, this not always a perfect method. It isn’t fun to take dozens of photos to merge in a potentially time-consuming process later. But for photographers who see the “blur versus noise” dilemma and proudly yell “Neither!” – image averaging or a tracking head are your options.
Conclusion
It’s amazing how a simple topic like choosing your shutter speed for Milky Way photography can lead down all these rabbit holes. At the end of the day (literally), your decision may boil down to a simple choice between 15 seconds, 25 seconds, or somewhere in between – and you could even capture a variation of each, in less time than it takes to read this article!
But I do think it’s important to understand these fundamentals, including the simplifications that both the 500 rule and NPF rule make. You may get good photos most of the time just by choosing a formula’s recommendation, but in tricky situations, it’s critical to have more background knowledge. Even for standard astrophotography, wouldn’t you rather understand what’s going on below the surface, so you can feel more confident about your settings? I know I would.
Hopefully this article clarified everything you were wondering about. If you have any questions about the 500 rule, NPF rule, or just astrophotography in general, let me know in the comments below!
This a great article about npf rule for getting pinpoint stars. I am only very puzzled about the influence of the aperture. Why is that such a big factor. And besides that I would expect that the wider the aperture (and the smaller the F number) you would be able to take loner exposures. But seems when I narrow my apeterture to a bigger F value, the the possible shutterspeed gets bigger. So with F22 much bigger speed posibble? Why then. I would have zero effect on the length of the startrails i gues. So what is it.
This aspect puzzles me as well. That first term in the numerator increases as the f-number gets larger, meaning that with a tighter aperture one can keep the shutter open for a longer time before the stars start trailing?!? That most likely works for telescopes, where the f-number is fixed and relatively low (8 or less for deep sky photos). But for camera lenses, where the f-number can be increased quite a lot by closing the iris, I doubt this formula remains valid.
My guess is that common sense should prevail: in visual astronomy “aperture is king”, in astrophotography the f-number is the most important resource and reducing it without a crucial reason would defy the purpose. As far as I understand, that first term of the numerator is related to diffraction and it is assumed that nobody in their right mind would willingly increase the f-number unless it’s absolutely necessary.
Sorry, I made a mistake in the second paragraph: I should have written: “the lowest possible f-number is the key to good pictures and increasing it without a crucial reason would defy the purpose”.
Very informative article. Thank you for taking the time and effort to write it. I am a beginning smartphone astrophotographer and am unclear about “35 mm equivalent” and its use in the various Rules. My phone (moto g8) has an F =1.7, Focal Length 4.71mm with a 35mm equivalent = 24mm. So when using say, the 500 Rule, do I divide 500 by 4.71 or by 24? Thank you
You always divide by the full-frame equivalent focal length – 24 in your case.
Hi Spencer, I am new at astrophotography and I found this article entirely and wonderfully useful! This article is very clearly written. I have learned a great deal from it. I am doing coastal astrophotography which has its own set of challenges,. Thank you.
Very happy to hear it, thank you Jack!
Thank you for this very interesting article. I’m the author of the NPF rule and you are entirely right, the formula does not take into account the aberrations of the lens. It is in fact impossible to go in such details (each lens is different, some are very sharp, some are horribly smooth, and it also depends on the sensor’s sensitivity to UV and IR) so your approach is very good : start from a conservative value, calculated with the NPF rule and then alter the exposure duration to your needs.
Clear sky
Fred
Thank you, very education.
Hi Spencer,
I have D5500 and AF-P 10-20 dx lens which I use for nightscapes and star photography. Since this is a very slow lens, I mostly use F5.6 at 10 mm to capture stars. What I have noticed is that I can maintain my ISO at 100 at take a 13 to 15 second exposure to capture stars. At this exposure, I can retain the bluish hue of some stars. I tried using ISO 800 with 13 second exposure, but could not retain colour in stars. All of them looked like white spots in the sky. Even the exposure (highlight) alert in Capture One shows blown stars at anything above the exposure triangle of ISO 100, 13-15 sec & F5.6. And I have set the alert at 250. Am i doing something incorrect? How is that you are able to shoot at ISO 800, F2.8 & 15 sec exposure? I do not use any specialised software for aligning stars.
Looking forward to your response. Thanks in advance!!
I do end up losing a bit of color in the stars sometimes. There’s no great way to retain all the colors if you want the stars to be bright enough to see well – they usually blow out to white in the center.
Spencer, the image claiming to have longer star trails due to a longer focal length isn’t accurate, it is the magnification that makes it seem like they are longer. If you would equalize the images in size they would be the same length. Great article!
Hi Michael, it’s certainly true that the star trails are the same length relative to fixed objects in the photo, like the mountain. But they take up more of the photo as you zoom in, and that’s what ultimately matters. So, if you print the two photos at identical sizes, you’d notice star trailing in the 67mm image, but much less or not at all in the 24mm image. (Along the same lines, the crops shown are identical crops – a 1021 x 681 snippet of each image)
In other words, what you’re saying is only true if you print the 67mm image way smaller than the 24mm image. It’s not true if you match the images’ display sizes.
Thanks for the great article! As kind of a beginner, I have been messing around with astrophotography for about a year or so, mostly trial and error, with some ok to good results. I’m excited to go out and try some of your suggestions the next clear night we have. I’m sure my results will improve! Thank you again!
That’s great! Glad this article could be helpful.
You noted, ” value of 3 means you’re tripling the shutter speed (thus using 24 rather than 8 seconds in this case)”. I’ll respectfully disagree with this statement. You’re tripling your exposure time, not the shutter speed, in this case. That said, it’s a very informative article. Thanks!
Glad you enjoyed the article! I may be misunderstanding you, but I don’t think there’s anything wrong with the sentence the way it’s written.
The two terms (shutter speed and exposure time) are synonyms and completely interchangeable. As Wikipedia says, “In photography, shutter speed or exposure time is the length of time when the film or digital sensor inside the camera is exposed to light.”
Tripling the shutter speed is the same as tripling the exposure time.
speed [noun]
3.1 The duration of a photographic exposure.
www.lexico.com/definition/speed
See also
en.m.wikipedia.org/wiki/…tter_speed
Typically meaning an increased shutter speed is a shorter duration of time. The example given refers to reducing exposure by increasing speed.
Conversely, a ‘fast’ lens (large aperture) or ‘fast’, ‘hi-speed’ film (high ISO) permit the use of a fast shutter speed. Essentially, fast and speed are implied characteristics for Aperture and ISO, but they are actual physical characteristics for shutters. Hence, for long exposure work like astro it is better to use the same terminology as would be used in the darkroom where exposures are almost always longer than a second -> ‘longer exposure’, ‘tripling exposure time’ etc.
“t = Recommended shutter speed”
Tripling the shutter speed, t, is multiplying t by 3, not dividing t by 3. Made especially obvious by Spencer’s elaboration as quoted by GrayCard.
The shutter speed is the exposure duration, not its reciprocal. The Oxford dictionary is correct; if you disagree then you are incorrect, by definition.
So would you say that 1/1000th sec is a faster or slower shutter speed than 1/300th sec?
If faster, would you agree that a faster shutter speed results in a reduced exposure?
If slower, you would argue that to freeze birds in flight you need to use a slower shutter speed?
Which one is it Pete? And would the same apply when you are referring to long exposures over a second? I need your expert help on this.
Google ‘what happens when you increase shutter speed’?
A ‘When you increase the shutter speed the camera shutter opens and closes more quickly, reducing the amount of light that enters the camera. … You’ve increased the shutter speed by two stops, and so you have two stops less of light entering the camera sensor.’
The correct expression would have been ‘tripling exposure time’ or perhaps ‘shutter duration’, but never ‘shutter speed’.
So I guess the OED is incorrect, or more likely, you are incorrect by not considering the context of a dictionary entry.
Looks like you’re referring to an article from Digital Photography School, which is not a reliable source of photography information. And that particular quote from them is unambiguously wrong (in fact, completely backwards).
Shutter speed IS exposure time. They are synonyms and completely interchangeable. I know that some people would say 1/500 is an increase from 1/100, but those people do not understand fractions, and they are wrong. It’s not a matter of us not considering context. Pete, and the Oxford Dictionary, are both correct.
To answer your earlier question, 1/1000th second is inarguably faster than 1/300th second. It’s just a basic truth about numbers. 1/1000 is a smaller number than 1/300. Likewise, 8 is a smaller number than 24. 1/1000th of a second goes by faster than 1/300th of a second, while 8 seconds goes by faster than 24 seconds.
No I just referrred to the Google result whatever it thinks is best, but if you search for any article on any other website, book, chart, table etc anywhere in the world, a faster shutter speed is a shorter duration in time and hence a reduction in exposure.
Take a look at the hundreds of different charts that come up if you Google it. Fast shutter speeds are 1\1000 sec etc, slow shutter speeds are 1\8th sec etc. I don’t think everyone else could have got this wrong.
Great article though.
Thanks! I don’t mean any of this personally, just trying to make sure everyone understands things. I guess it was Google quoting from Digital Photography School in that case, but it doesn’t make them any less wrong.
Your current comment though is 100% correct. A faster shutter speed is a shorter duration in time.
Therefore if you double that duration in time, you’re using a longer shutter speed. That’s the part your other comments have backwards.
For instance, we both agree that 1/20 is faster and 1/10 is a slower shutter speed. So, if I were to say “double your 1/20 second shutter speed,” I’d be saying to use a 1/10 second shutter speed. I’m doubling the duration of the exposure from 1/20 second (50 milliseconds) to 1/10 second (100 milliseconds).
This is consistent with the definition of shutter speed as the length of time your camera sensor or film is exposed to light.
By the way, you’re not wrong that some photographers and websites refer to “increasing” shutter speed when talking about going from (say) 1/100 second to 1/500 second. It’s a somewhat common way to say things. But it’s also absolutely incorrect.
My usual preference for an accurate description is to say “use a faster shutter speed” or “use a quicker exposure.” I don’t like dealing with phrases like “decrease shutter speed” or “halve the shutter speed” for exactly this reason, even when they’re technically correct.
Yes, I think the confusion has come from the different uses of doubling/tripling etc, which is clearly about lengthening the exposure duration, and ‘increased shutter speed’, which I’m afraid is not ‘completely incorrect’ as you say. Not only does the first Google response define ‘increased shutter speed’ as a faster shutter duration to be used to freeze action, but pretty much every other source defines ‘increased shutter speeds’ that way. And that is also the case in video work, where you have to increase your shutter speeds to maintain the shutter angle if you increase your fps (Nikons do this automatically for you).
In fact, since most shutter speed dials and LCD displays have shown just the reciprocal figure for the last 50 years or so, ‘increasing shutter speed’ has generally been the appropriate thing to say for a faster exposure, because the speed of the shutter is clearly ‘faster, higher, more rapid’ and hence ‘increased’. Don’t forget that once you’re over about 1/200 second, the shutter blade’s speed across the film plane / sensor is what determines the expsoure length. There is a clear distinction with longer exposure time scenarios, where the speed of the movement of the shutter blades is irrelevant compared to the time that the film/sensor is exposed.
Put it this way, if somoene came to you with their camera at 1/60th sec and said ‘how do I freeze the motion of a fast moving subject’, most people would say ‘increase the shutter speed to 1/500th’, they would not say ‘decrease the shutter speed to 1/500th’. At least that’s my experience of 40+ years in photography.
I’m similarly not meaning to be ageist, but I was ‘increasing the exposure time’ for slow exposures like astro work, and ‘increasing the shutter speed’ for fast exposures like birds in flight, since before you were born. Despite what a single line entry in a dictionary may say, I’m afraid photography terminology is not, and has never been, black & white, you need to consider the context first!
All right, “completely incorrect” is harsh when some photographers who use these phrases do have a common understanding among themselves of what they mean. “Mathematically incorrect” is more what I’m going for.
I do recognize the context that many photographers say “increase” when going from something like 1/100 to 1/500 second. Given that most cameras only show the denominators (at least before the one second mark), it’s a given that this is how a lot of people are going to phrase things.
Of course, mathematically, it’s just as wrong as saying “increase your aperture from f/2.8 to f/5.6.” Aperture is another case where we are often shown just the denominator of the fraction, so it’s quite a comparable situation.
Regardless of how long you’ve been using this terminology, it doesn’t make it correct or incorrect – whether it’s correct or not depends on its own virtues. It’s not like there’s normally much harm in using terms that are mathematically incorrect, yet still understood by fellow photographers. But in cases like this article, where we have a mathematical formula which includes shutter speed as a term, it begins to be important to know that so-and-so action will “double” one’s shutter speed – with “double” being the mathematically correct definition of using twice as long an exposure.
Also, the physical shutter curtains are not moving faster at fast shutter speeds, at least in any camera I know of. It’s just that the gap between them is smaller.
Yes you are correct. ‘Tripling of shutter speed’ typically means reducing exposure because shutter speeds are normally reciprocal figures. So tripling would be going from 1/125 to 1/500th sec for example. In most daylight situations the expressions ‘increasing shutter speed’, ‘upping the shutter speed’ etc all refer to reducing exposure because they are referring to the denominator. You increase the shutter speed to freeze action, because it is the speed the shutter is moving you are increasing, not the time the shutter is open, referring to the physical movement of the two shutter blades (or one circular shutter).
However, in long exposures shutter speeds are not often reciprocal figures so Spencer is correct to say tripling shutter speed as it is implied that he is referring to the numerator, 2 seconds to 6 seconds etc. But in my experience the more common expression to avoid confusion in long exposure situations would be something like ‘tripling exposure’ or ‘tripling shutter duration’, as you correctly suggested.
A similar confusion exists in apertures. Many people think ‘stopping down’ is reducing the F number from say F5.6 to F4. Whereas in fact, stopping down means reducing the aperture size, so F5.6 to F8 etc. You stop down, or open up, apertures, because the aperture is ‘stopping’ light passing through the lens.
Your example is wrong – tripling 1/125th second does not get you to 1/500th second. Maybe it helps to think about it this way: 1/125 second is equal to 8 milliseconds. Tripling such a duration would be to use an exposure of 24 milliseconds (roughly 1/40 second).
Admittedly, enough people are confused by fractions that I’d be unlikely to use the word “tripling” to describe going from 1/120th second to 1/40th in an article, even though that’s what it is. But in this article, I see nothing wrong with saying that 24 seconds is triple 8 seconds.
Yes 24 is 3×8, similar to the simple maths I put in the second paragraph for long exposures.
Awesome article! I use the NPF rule, and sometime use something between the NPF and 500 rule. I also thing getting the right ISO is important too!
Thank you, Zigman! It’s all about using a process that works for you. Glad you’ve found a good one.